This chapter describes the color attributes shared by the Tk widgets. Images and bitmaps can be displayed instead of text by several widgets. This chapter describes commands that create and manipulate images. The cursor attribute controls the shape and color of the mouse cursor when it is over a particular widget. This chapter includes a figure that shows all the cursors available in Tk.
Color is one of the most fun things to play with in a user interface. However, this chapter makes no attempt to improve your taste in color choices; it just describes the attributes that affect color. The tradition of having users change application colors is stronger in UNIX than on the other platforms. This is because all the X toolkits support color tuning via the resource database. Tk carries this tradition to Windows and Macintosh. However, if native look and feel is important, you should not change the default widget colors. On the other hand, tuning colors can provide a flair to your applications, and knowledge of colors is useful for canvas applications.
This chapter describes images, too. The image facility in Tk lets you create an image and then have other Tk widgets display it. The same image can be displayed by many different widgets, multiple times on a canvas, and multiple times within the text widget. If you redefine an image, its display is updated in whatever widgets are displaying it.
The last topic of the chapter is cursors. All widgets can control what the mouse cursor looks like when it is over them. In addition, the widgets that support text input define another cursor, the insert cursor. Its appearance is controlled with a few related attributes.
Table 41-1 lists the resource names for color attributes. The table indicates what widgets use the different color attributes. Remember to use all lowercase and a leading dash when specifying attributes in a Tcl command.
Table 41-1. Color attribute resource names
The normal background color. All widgets. | |
Short for | |
The normal foreground color. Widgets: | |
Short for | |
The background when a mouse button will take an action. Widgets: | |
The foreground when the mouse is over an active widget. Widgets: | |
The background when a widget is disabled. Widgets:
| |
The foreground when a widget is disabled. Widgets:
| |
| The highlight color when widget does not have focus. All widgets. |
The highlight color when the widget has focus. All widgets. | |
The color of the insert cursor. Widgets: | |
The background when a widget is in the | |
The background of selected text. Widgets: | |
The color of the selector indicator. Widgets: | |
The foreground of selected text. Widgets: | |
The trough part of scales and scrollbars. |
The foreground color is used to draw an element, while the background color is used for the blank area behind the element. Text, for example, is painted with the foreground color. There are several variations on foreground and background that reflect different states for widgets or items they are displaying.
Each attribute also has a resource class. This is most useful for the variations on foreground and background colors. For example, Tk does not have a reverse video mode. However, with a couple of resource specifications you can convert a monochrome display into reverse video. The definitions are given in Example 41-1. The Foreground and Background resource class names are used, and the various foreground and background colors (e.g., activeBackground) have the correct resource class so these settings work. You have to set these resources before you create any widgets:
Example 41-1. Resources for reverse video
proc ReverseVideo {} {
   option add *Foreground white
   option add *Background black
}
The tk_setPalette command changes colors of existing widgets and installs resource values so new widgets have matching colors. If you give it a single argument, it treats this as the background and then computes new values for the other color resources. For example, if you do not like the standard Tk grey, you can lighten your spirits with a cool blue background:
tk_setPalette #0088cc
If you liked the light brown color scheme of Tk 3.6, you can restore that palette with the tk_bisque command:
tk_bisque
The tk_setPalette command can be used to change any of the color attributes. You can specify a set of name-value pairs, where the names are color resource names and the values are new color values:
tk_setPalette activeBackground red activeForeground white
Color values are specified in two ways: symbolically (e.g., red), or by hexadecimal numbers (e.g., #ff0000). The leading # distinguishes the hexadecimal representation from the symbolic one. The number is divided into three equal-sized fields that give the red, green, and blue values, respectively. The fields can specify 4, 8, 12, or 16 bits of a color:
#RGB          4 bits per color
#RRGGBB       8 bits per color
#RRRGGGBBB    12 bits per color
#RRRRGGGGBBBB 16 bits per color
If you specify more resolution than is supported by the display, the low-order bits of each field are discarded. The different display types supported by Tk are described in the next section. Each field ranges from 0, which means no color, to a maximum, which is all ones in binary, or all f in hex, that means full color saturation. For example, pure red can be specified four ways:
#f00 #ff0000 #fff000000 #ffff00000000
There is a large collection of symbolic color names like "red," "blue," "green," "thistle," "medium sea green," and "yellow4." These names originate from X and UNIX, and Tk supports these colors on all platforms. As of Tk 8.3.2, these color names are documented in the colors online reference page. Prior to that, you could find the list in the Tk sources in the xlib/xcolor.c file. Or, run the xcolors program that comes with the standard X distribution.
The Windows and Macintosh platforms have a small set of colors that are guaranteed to exist, and Tk defines names for these. The advantage of using these colors is that they are shared by all applications, so the system can manage colors efficiently. Table 41-2 lists the system colors on Windows. Several of these colors map to the same RGB value. Table 41-3 lists the system colors on Macintosh.
Table 41-2. Windows system colors
Dark part of button 3D-relief. | |
Light part of button 3D-relief. | |
Window border when activated. | |
Caption (i.e., title bar) when activated. | |
Background for MDI workspaces. | |
Widget background. | |
| Button background. |
Lightest part of button 3D-relief. | |
Darkest part of button 3D-relief. | |
| Button foreground. |
Caption (i.e., title bar) text. | |
Text when disabled. | |
Grey text color. | |
| Selection background. |
Selection foreground. | |
Window border when not activated. | |
Caption background when not activated. | |
Caption text when not activated. | |
Help pop-up background. | |
Help pop-up text. | |
Menu background. | |
Menu foreground. | |
Scrollbar background. | |
Text window background. | |
Text window frame. | |
Text window text color. |
Table 41-3. Macintosh system colors
The winfo rgb command maps from a color name (or value) to three numbers that are its red, green, and blue values. You can use this to compute variations on a color. The ColorDarken procedure shown below uses the winfo rgb command to get the red, green, and blue components of the input color. It reduces these amounts by 5 percent, and reconstructs the color specification using the format command.
Computer screens can display only a fixed number of different colors at one time. The best monitors can display 24 million colors, but it is common to find 256 color displays. Really old VGA displays only display 16 colors. If you run several applications at once, it is possible that more colors are requested than can be displayed. The Windows and Macintosh platforms manage this scenario automatically. X provides lower-level facilities that Tk uses on UNIX to do the management. So, for the most part you don't have to worry. However, if you need more control, especially under X, then you need to understand colormaps and the different visual types.
Each pixel on the screen is represented by one or more bits of memory. There are a number of ways to map from a value stored at a pixel to the color that appears on the screen at that pixel. The mapping is a function of the number of bits at each pixel, which is called the depth of the display, and the style of interpretation, or visual class. The six visual classes defined by X are listed in the following table. Some of the visuals use a colormap that maps from the value stored at a pixel to a value used by the hardware to generate a color. A colormap enables a compact encoding for a much richer color. For example, a 256-entry colormap can be indexed with 8 bits, but it may contain 24 bits of color information. The UNIX xdpyinfo program reports the different visual classes supported by your display. Table 41-4 lists the visual classes:
Table 41-4. Visual classes for displays
| Greyscale with a fixed colormap defined by the system. |
| Greyscale with a writable colormap. |
| Color with a fixed colormap defined by the system. |
| Color values determined by single writable colormap. |
| Color values determined by three colormaps defined by the system: one each for red, green, and blue. |
| Color values determined by three writable colormaps: one each for red, green, and blue. |
| Use the best visual for a given depth. |
The frame and toplevel widgets support a colormap and visual attribute. You can query these attributes on all platforms. On Windows and Macintosh there is only one visual type at a time, and users may be able to change it for their whole system. On UNIX, the X server typically supports more than one visual class on the same display, and you can create frames and toplevels that use a particular visual class. The value of the visual attribute has two parts, a visual type and the desired depth of the display. The following example requests a greyscale visual with a depth of 4 bits per pixel:
toplevel .grey -visual "greyscale 4"
You can start wish with a -visual command line argument:
wish -visual "truecolor 24"
A visual is associated with a colormap. Windows and Macintosh have a single colormap that is shared by all applications. UNIX allows for private colormaps, which can be useful if you absolutely must have lots of colors. However, the drawback of a private colormap is that the display flashes as the mouse enters windows with their own colormap. This is because the monitor hardware really only has one colormap, so the X server must swap colormaps. Macintosh and Windows manage their colormap more gracefully, although if you use too many colors some flashing can occur. Tk can simulate private colormaps on Windows, but it is probably better to let the system manage the colormap. Tk on the Macintosh always uses a 24-bit truecolor visual, which is basically unlimited colors, and lets the operating system dither colors if necessary.
By default a widget inherits the colormap and visual from its parent widget. The value of the colormap attribute can be the keyword new, in which case the frame or toplevel gets a new private colormap, or it can be the name of another widget, in which case the frame or toplevel shares the colormap of that widget. When sharing colormaps, the other widget must be on the same screen and using the same visual class.
The label and all the button widgets have an image attribute that specifies a graphic image to display. Using an image takes two steps. In the first step the image is created via the image create command. This command returns an identifier for the image, and it is this identifier that is passed to widgets as the value of their image attribute.
Example 41-3. Specifying an image for a widget
set im [image create bitmap
   -file glyph.bitmap -maskfile glyph.mask
   -background white -foreground blue]
button .foo -image $im
There are three things that can be displayed by labels and all the buttons: text, bitmaps, and images. If more than one of these attributes are specified, then the image has priority over the bitmap, and the bitmap has priority over the text. You can remove the image or bitmap attribute by specifying a null string for its value:
.foo config -image {}
Tk 8.4 introduced the compound attribute for labels, menu entries, and the various button widgets, which specifies whether the widgets should display both an image (or bitmap) and text, and if so, where the image should be placed relative to the text. For example, the following command would cause a label to display a bitmap on the left, and text to the right:
label .warn -text Warning -bitmap warning -compound left
Table 41-5 summarizes the image command.
Table 41-5. Summary of the image command
| Creates an image of the specified type. If |
| Deletes the named image. |
| Returns the height of the image, in pixels. |
| Returns a boolean value indicating whether or not the image given by |
Returns the list of defined images. | |
| Returns the type of the named image. |
Returns the list of possible image types. | |
| Returns the width of the image, in pixels. |
The exact set of options for image create depend on the image type. There are two built-in image types: bitmap and photo. Chapter 48 describes the C interface for defining new image types.
A bitmap image has a main image and an optional mask image. The main image is drawn in the foreground color. The mask image is drawn in the background color, unless the corresponding bit is set in the main image. The remaining bits are “clear” and the widget's normal background color shows through. Table 41-6 lists the options supported by the bitmap image type:
Table 41-6. Bitmap image options
| The background color (no |
The contents of the bitmap as a string. | |
The name of the file containing a bitmap definition. | |
| The foreground color (no |
The contents of the mask as a string. | |
The name of the file containing the mask data. |
The bitmap definition files are stylized C structure definitions that the Tk library parses. The files usually have a .xbm file name extension. These are generated by bitmap editors such as bitmap program, which comes with the standard X distribution. The -file and -maskfile options name a file that contains such a definition. The -data and -maskdata options specify a string in the same format as the contents of one of those files.
The label and all the button widgets also support a bitmap attribute, which is a special case of an image. This attribute is a little more convenient than the image attribute because the extra step of creating an image is not required. However, there are some power and flexibility with the image command, such as the ability to reconfigure a named image (e.g., for animation) that is not possible with a bitmap.
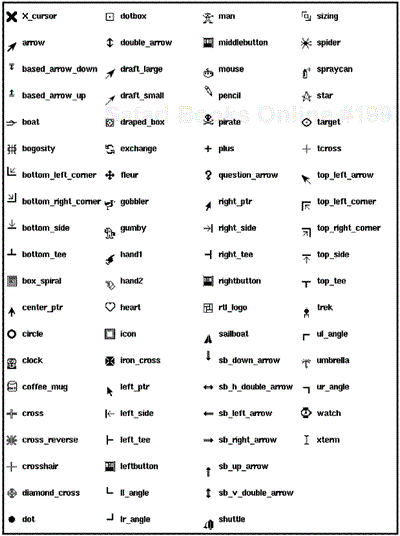
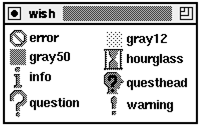
The @ syntax for the bitmap attribute signals that a file containing the bitmap is being specified. It is also possible to name built-in bitmaps. The predefined bitmaps are shown in the next figure along with their symbolic name. Chapter 48 describes the C interface for defining built in bitmaps.
Example 41-5. The built-in bitmaps
frame .f -bd 4; frame .g -bd 4 ; pack .f .g -side left
set parent .f ; set next .g
foreach name {error gray12 gray50 hourglass
             info questhead question warning} {
   frame $parent.$name
   label $parent.$name.l -text $name -width 9 -anchor w
   label $parent.$name.b -bitmap $name
   pack $parent.$name.l -side right
   pack $parent.$name.b -side top
   pack $parent.$name -side top -expand true -fill x
   set tmp $parent ; set parent $next ; set next $tmp
}
The photo image type was contributed to Tk by Paul Mackerras. It displays full color images and can do dithering and gamma correction. Table 41-7 lists the attributes for photo images. These are specified in the image create photo command.
Table 41-7. Photo image attributes
| The contents of the photo as a base64 encoded or binary string. |
| The name of the file containing a photo definition. |
| Specifies the data format for the file or data string. |
A gamma correction factor, which must be greater than zero. A value greater than one brightens an image. | |
The height, in screen units. | |
| The number of shades of gray or color for the image. |
| The width of the image, in screen units. |
The format indicates what format the data are in. The photo image supports different image formats. Tk has built-in support for the PPM, PGM, and GIF formats. There is a C interface to define new photo formats. The CD-ROM has a "plus-patch" version of Tk that supports pixmaps and JPEG files. Normally you do not need to specify the format because the photo implementation will try all format handlers until it find one that accepts the data. An explicit format limits what handlers are tried. The format name is treated as a prefix that is compared against the names of handlers. Case is not significant in the format name.
The palette setting determines how many colors or graylevels are used when rendering an image. If a single number is specified, the image is rendered in greyscale with that many shades of gray. For full color, three numbers separated by slashes specify the number of shades of red, green, and blue, respectively. The more shades you specify the more room you take up in your colormap. The photo widget will switch to a private colormap if necessary. Multiply the number of red, green, and blue shades to determine how many different colors you use. If you have an 8-bit display, there are only 256 colors available. Reasonable palette settings that do not hog the colormap include 5/5/4 and 6/6/5. You can use fewer shades of blue because the human eye is less sensitive to blue.
After you create an image you can operate on it. Table 41-8 lists the image instance operations. In the table, $p is a photo image handle returned by the image create photo command.
Table 41-8. Photo image operations
Clears the image. It becomes transparent. | |
| Returns the configuration attribute |
| Reconfigures the photo image attributes. |
Copies another image. Table 41-9 lists the | |
| Returns image data in the form of a list of rows, where each row is a list of colors in |
| Returns the pixel value at position |
| Inserts |
Loads an image from a file. Table 41-10 lists the read options. | |
Reapplies the dithering algorithm to the image. | |
| Returns a boolean indicating if the specified pixel is transparent |
| Makes the specified pixel transparent if |
Saves the image to |
Table 41-9 lists the options available when you copy data from one image to another. The regions involved in the copy are specified by the upper-left and lower-right corners. If the lower-right corner of the source is not specified, then it defaults to the lower-right corner of the image. If the lower-right corner of the destination is not specified, then the size is determined by the area of the source. Otherwise, the source image may be cropped or replicated to fill the destination.
Table 41-9. Copy options for photo images
| Specifies how transparent pixels in the source image are combined with the destination image. When |
| Specifies the location and area in the source image. If |
| Specifies the location and area in the destination. If |
| Shrinks the destination so that its bottom right corner matches the bottom right corner of the data copied in. This has no effect if the |
| Magnifies the source so each source pixel becomes a block of |
| Reduces the source by taking every |
Table 41-10 lists the read options. If not specified, the format is determined automatically. If there are multiple image types that can read the same data, you may specify a read format
Table 41-10. Read options for photo images
Specifies the format of the data. By default, the format is determined automatically. | |
| Specifies a subregion of the source data. If |
| Specifies the top-left corner of the new data. |
Shrinks the destination so that its bottom-right corner matches the bottom-right corner of the data read in. This has no effect if the width and height have been set for the image. |
Table 41-11 lists the options used for write and data. When writing to files, the -format option is important because if you don't specify it, the first format found is used. On the other hand, you shouldn't use the -format option with data operation, as data returns the image date as a list of rows, where each row is a list of colors in #rrggbb format (suitable as input to the put command).
Table 41-11. Write options for photo images
| If specified, all transparent pixels are replaced by the specified |
| Specifies the format of the data. |
| Specifies a subregion of the data to save. If |
| If specified, the data is transformed into grayscale. |
The text, entry, and canvas widgets have a second cursor to mark the text insertion point. The text insert cursor is described by a set of attributes. These attributes can make the insert cursor vary from a thin vertical line to a large rectangle with its own relief. Table 41-12 lists these attributes. The default insert cursor is a two-pixel-wide vertical line. You may not like the look of a wide insert cursor. The cursor is centered between two characters, so a wide one does not look the same as the block cursors found in many terminal emulators. Instead of occupying the space of a single character, it partially overlaps the two characters on either side:
Table 41-12. Cursor attribute resource names
The mouse cursor. See text for sample formats. All widgets. | |
Color for the text insert cursor. Widgets: | |
Width for three dimensional appearance. Widgets: | |
Milliseconds the cursor blinks off. (Zero disables blinking.) Widgets: | |
Milliseconds the cursor blinks on. Widgets: | |
Width of the text insert cursor, in screen units. Widgets: |
On Unix systems, a foreground and background color for the cursor can be specified. Here are some example cursor specifications:
$w config -cursor watch             ;# stop-watch cursor
$w config -cursor {gumby blue}      ;# blue gumby
$w config -cursor {X_cursor red white}  ;# red X on white
The other form for the cursor attribute specifies a file that contains the definition of the cursor bitmap. If two file names are specified, then the second specifies the cursor mask that determines what bits of the background get covered up. Bitmap editing programs like idraw and iconedit can be used to generate these files. Here are some example cursor specification using files. You need to specify a foreground color, and if you specify a mask file, then you also need to specify a background color:
$w config -cursor "@timer.xbm black"
$w config -cursor "@timer.xbm timer.mask black red"
The cursors shown in Example 41-6 are available on all platforms. However, on Windows and Macintosh some of the cursors are mapped to native cursors and appear differently. On Windows the following cursors are mapped to native cursors: arrow, ibeam, icon, crosshair, fleur, sb_v_double_arrow, sb_h_double_arrow, center_ptr, watch, and xterm. These additional cursors are defined on Windows: starting, size, size_ne_sw, size_ns, size_nw_se, size_we, uparrow, and wait. On Windows, use the no cursor to eliminate the cursor. On Macintosh, the following cursors are mapped to native cursors: ibeam, xterm, cross, crosshair, plus, watch, arrow. These additional cursors are defined on Macintosh: text and cross-hair.
As of Tk 8.3, when running on Windows you can also use Windows system cursors by specifying the name of the appropriate .ani or .cur file. For example:
$w config -cursor @C:/WINNT/Cursors/globe.ani