
This chapter fulfills the obligation of all self-respecting tutorials to include a Hello World program. The chapter’s tutorial shows you how to use the Project Builder application described in Chapter 4, to create a project that builds a Hello World program for Cocoa. Hello World represents the simplest possible working program that does something detectable (like printing a string to the screen). A working Hello World program verifies that your development environment is functioning properly.
The simplest type of Cocoa program is called a Foundation tool. Because this type of program uses only the Foundation framework, it has no graphical user interface (GUI). A Cocoa program that has no GUI is called a tool, to clearly distinguish it from a Cocoa program that does have a GUI, which is called an application. Unlike Cocoa applications that use the Application Kit Framework (detailed in Chapter 1), Foundation tools can be run only from within Project Builder and from the command line.
Foundation tools are a great way to quickly create very powerful command-line applications for use in the Mac OS X BSD environment. A Foundation tool is very similar to a standard C program but, because it links with the Foundation framework, it has access to all the power of the Foundation classes in addition to the standard Objective-C constructs.
In this section you’ll be led through the steps necessary to create a very simple foundation tool that prints the string “Hello World!”
Before you can start building applications with Project Builder, you need to launch the application:
Find Project Builder in
/Developer/Applications.Double-click the icon.
The first time you start Project Builder, you’ll be presented with an Assistant to set up your application preferences:
Click Next on the Assistant’s welcome page.
Choose your build products location and click Next. The first page of the Assistant asks where you’d prefer to keep the build products (an executable or library, for example) and intermediate build files (object files, for instance). The default is to keep both in the build directory of the current project, but you can choose whatever directory you wish.
Choose your editing preference and click Finish. The second and final Assistant page asks whether you prefer to open new text files in separate windows or to open them in Project Builder’s single-window code editor.
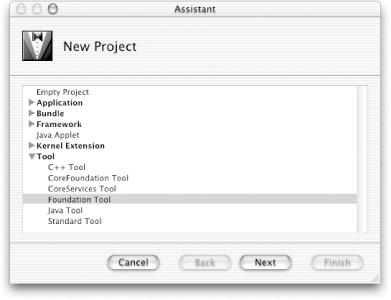
When Project Builder is first launched, only its menu bar appears. To create a project, choose New Project from the File menu. Project Builder will then display the New Project Assistant, shown in Figure 5.1), which will take you through a few simple steps to create a new project.
Though this book focuses on building Cocoa applications, Project Builder can be used for other types of projects, ranging from Carbon and Java applications to Mac OS X kernel extensions and frameworks. The Assistant lets you choose a project template so you’ll have a useful working starting point for your application:
Select Foundation Tool from the list of templates and click Next. The New Project Assistant gives you an opportunity to name your new project and choose a location in the file system in which to save it. See Figure 5.2.
Type
Hello Worldin the Name field.If you don’t want to use the default project location (your home directory), click the Set button and use the file-system browser to navigate to the directory where you want your project to be saved.
Click Finish.
When you are done, Project Builder displays the main project window. See Figure 5.3.
The main project window contains all the tools you need for application development. From this central location, you can:
View, edit, and organize your source files
Invoke the build system
Modify debugger settings, set breakpoints, and step through code
Modify project settings
Search your source files as well as the system headers
Invoke Help Viewer to access documentation


In the Groups & Files list of Project Builder’s main window, click the disclosure triangle to the left of the Source group.
Click
main.m. You will see the contents of the file in the code editor, as shown in Figure 5.4.The
main.mimplementation file contains the entry point for the application. The Foundation Tool project template provides a standardmainfunction for you that prints “Hello World” to Project Builder’s Run pane. Don’t worry about the function of the NSAutoreleasePool right now; it will be covered in the next chapter.int main (int argc, const char *argv[]) { NSAutoreleasePool * pool = [[NSAutoreleasePool alloc] init]; // insert code here NSLog(@"Hello, World!"); [pool release]; return 0; }The
NSLogfunction works very much likeprintfin the C language. The difference is thatNSLogtakes an NSString object instead of a C string. Apple’s Objective-C compiler includes the@""directive, which creates an NSString object using the characters between the quotation marks.Click the Build button in the main window.

Now the build process begins. Project Builder’s Build pane opens to reveal detailed information about the build as it progresses. When Project Builder finishes—and encounters no errors along the way—it displays Build Succeeded in the lower-left corner of the project window.
Congratulations! You’ve just created your first Cocoa application. All you have to do is click the Run button in Project Builder to launch the application.
When the application launches, the Run pane of Project Builder’s main window will enlarge to display the output of the NSLog function. You should see a string similar to this:
Nov 10 15:56:12 Hello World[256] Hello, World!
In addition to the string, NSLog prints the current date and time, the program name, and the process ID number (PID) of the program.