
Graphical interfaces are driven by user events—mouse clicks and keystrokes. However, a running application can also receive events that don’t originate from the user interface: packets arriving over a network interface, periodic timers firing, an input device being plugged into a USB port, or a CD being inserted into an attached drive. In an object-oriented world, both types of events eventually result in a message being sent to an object in your application, as depicted in Figure 8.1. This chapter focuses on events—both user- and program-generated—and how, as a programmer, you intercept, handle, and coordinate them in Cocoa.

In this section you’ll explore the structure of a Cocoa application from a user-event-handling perspective. You’ll learn about the classes in the core program framework and delve into topics such as the view hierarchy, the event cycle, and the responder chain. Later you’ll build a simple application that responds to a user’s mouse click by drawing a colored dot in the application’s window.
Four classes are at the core of a running application: NSResponder, NSWindow, NSView, and NSApplication (Figure 8.2). Each class plays a critical role in the two primary activities of an application: drawing the user interface and responding to events. The structure of their interaction is sometimes called the “core program framework.”
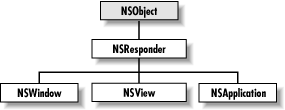
NSResponder is an abstract class, but it enables event handling in all classes that inherit from it. It defines the set of messages invoked when different mouse and keyboard events occur. It also defines the mechanics of event processing among objects in an application, especially the passing of events up the responder chain to each next responder until the event is handled. The responder chain is covered later in Section 8.1.3.
An NSWindow object manages each physical window on the screen. It draws the window’s frame area and responds to user actions that close, move, resize, and otherwise manipulate the window.
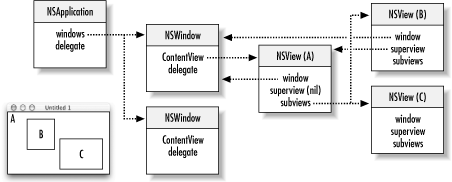
The main purpose of an NSWindow is to display an application’s user interface (or part of it) in its content area: that space below the titlebar and within the window frame. A window’s content is the view hierarchy it encloses, and at the root of this view hierarchy is the content view, which fills the content area. Based on the location of a user event, NSWindows assigns an NSView in its content area to act as first responder.
An NSWindow allows you to assign a custom object as its delegate and so participate in its activities.
Any object you see in a window’s content area is an NSView. (Actually, since NSView is an abstract class, these objects are instances of NSView subclasses.) NSView objects are responsible for drawing and for responding to mouse and keyboard events. Each NSView owns a rectangular region associated with a particular window; it produces images within this region and responds to events occurring within the rectangle.
NSViews in a window are logically arranged in a view hierarchy, with the content view at the top of the hierarchy. An NSView references its window, its superview, and its subviews. It can be the first responder for events or the next responder in the event chain. An NSView’s frame and bounds are rectangles that define its location on the screen, its dimension, and its coordinate system for drawing.
Every application must have one NSApplication object to supervise and coordinate the overall behavior of the application. This object dispatches events to the appropriate NSWindows (which, in turn, distribute them to their NSViews). The NSApplication object manages its windows and detects and handles changes in their status as well as in its own active and inactive status. The NSApplication object is represented in each application by the global variable NSApp. To coordinate your own code with NSApp, you can assign your own custom object as its delegate.
Just inside each window’s content area—the area enclosed by the titlebar and the other three sides of the frame—lies the content view. The content view is the root (or top) NSView in the window’s view hierarchy, shown in Figure 8.3. Conceptually like a tree, one or more NSViews may branch from the content view, one or more other NSViews may branch from these subordinate NSViews, and so on. Except for the content view, each NSView has one (and only one) NSView above it in the hierarchy. An NSView’s subordinate views are called its subviews; its superior view is known as the superview.
On the screen, enclosure determines the relationship between superview and subview: a superview encloses its subviews. This relationship has several implications for drawing on the screen:
It permits construction of a superview simply by arrangement of subviews. (For example, an NSBrowser is an instance of a compound NSView.)
Subviews are positioned in the coordinates of their superview, so when you move an NSView or transform its coordinate system, all subviews are moved and transformed in concert.
Because an NSView has its own coordinate system for drawing, its drawing instructions remain constant regardless of any change in position in itself or of its superview.
The core program framework provides several ways for your application to access the participating objects so you need not define outlets or instance variables for every object in the hierarchy:
The global variable NSApp identifies the NSApplication object. By sending the appropriate message to NSApp, you can obtain the application’s NSWindow objects (
windows), the key and main windows (keyWindowandmainWindow), the current event (currentEvent), the main menu (mainMenu), and the application’s delegate (delegate).Once you’ve identified an NSWindow object, you can get its content view (by sending it
contentView), and from that you can get all subviews of the window. By sending messages to the NSWindow object, you can also get the current event (currentEvent), the current first responder (firstResponder), and the delegate (delegate).You can obtain from an NSView most objects it references. You can discover its window, its superview, and its subviews.
If you make a custom subclass of NSView (or any class that inherits from NSView) and want to do custom event handling or drawing, the same basic procedure applies:
In Interface Builder, define a subclass of NSView. Then generate header and implementation files.
Drag a CustomView object from the Views palette onto a window and resize it. Then, with the CustomView object still selected, choose the Custom Class display of the Info window and select the custom class. Connect any outlets and actions.
Override the designated initializer,
initWithFrame:, to perform any custom initialization. The argument of this method is the frame rectangle of the NSView, as set in Interface Builder.
In Chapter 13, you’ll make a subclass of NSButtonCell (which does not inherit from NSView) that uniquely responds to mouse clicks. The way custom NSViews handle events is different. If you intend your custom NSView to respond to user actions, you must do a couple of things:
Override
acceptsFirstResponderto returnYESif the NSView is to handle selections. (The default NSView behavior is to returnNO.)Override the desired NSResponder event methods (
mouseDown:,mouseDragged:,keyDown:, etc.):- (void)mouseDown:(NSEvent *)event { if ([event modifierFlags] & NSControlKeyMask){ [self doSomething]; }
You can query the NSEvent argument for the location of the user action in the window, modifier keys pressed, character and key codes, and other information.
When you send display to an NSView, its
drawRect: method and each of its subviews’
drawRect: are invoked. This method is where an
NSView renders its appearance. The argument for
drawRect: is usually the bounds rectangle in which
drawing is to occur. This tells the view which part of its bounds
needs updating. To draw the NSView, you can do one or more of the
following:
Use the NSBezierPath, NSString, NSFont, or NSColor classes.
Call Application Kit functions such as
NSRectFillandNSFrameRect(NSGraphics.h).Composite an NSImage.
Call C functions that correspond to single PDF operations.
When the state changes and you need to have the object redraw itself,
invoke setNeedsDisplay: with an argument of
YES.
See Appendix A, for more information on drawing and compositing with NSView.
The NSApplication object is, in a sense, the master controller for your application. At the core of its responsibilities is the event loop. One by one it picks an event from those queued by the underlying Cocoa platform and decides which object is responsible for handling the event. Then it sends a message, passing an NSEvent object describing the particulars. The event message passes from NSApplication to the appropriate window to a view (commonly a control) within the window and eventually to your target object.
This is how a button knows that it has been clicked. Your custom object responds to the button click through target/action, through delegation (which you’ll learn more about in Section 8.2.1), or (in the case of custom views or controls) directly. When your application objects are finished responding to the message, control unwinds and returns to NSApplication, where it loops again, ready to process the next queued event.
This cycle—the event cycle—usually starts at launch time when the application (which includes all the frameworks it’s linked to) sends a stream of Quartz code to the window server to have it draw the application interface. Then the application begins its main event loop and begins accepting input from the user. When users click or drag the mouse or type on the keyboard, the window server detects these actions and processes them, passing them to the application as events.
When an application starts up, the NSApplication object (NSApp) starts the main event loop and begins receiving events from the window server. As NSEvents arrive, they’re put in the event queue in the order they’re received. On each cycle of the loop, NSApp gets the topmost event, analyzes it, and sends an event message to the appropriate object as shown in Figure 8.4. (Event messages are defined by NSResponder and correspond to particular events.) When NSApp finishes processing the event, it gets the next event and repeats the process again and again until the application terminates.
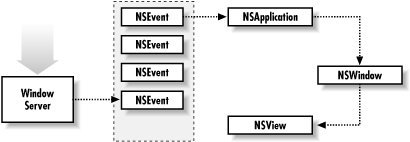
Event routing depends on the type of the event. NSApp sends most event messages to the NSWindow in which the user action occurred. A mouse event is forwarded by NSWindow to one of the objects in its view hierarchy: the NSView within which the mouse was clicked. Key events are routed to the first responder. If the NSView can respond to the event—that is, it accepts first responder status and defines an NSResponder method corresponding to the event message—it handles the event. If the NSView cannot handle an event, it forwards the message to the next responder in the responder chain (see Section 8.1.3.3 for details). It travels up the responder chain until an object handles it.
NSWindow handles some events, such as window-moved, window-resized, and window-exposed events, itself and doesn’t forward them to an NSView. (Since these events are handled by NSWindow itself, they are not defined in NSResponder.) NSApp also processes a few kinds of events itself, such as application-activate and application-deactivate events.
The window server treats each user action as an event. It associates the event with a window and reports the event to the application that created the window. Events are objects—instances of NSEvent composed from information derived from the user action.
All event methods defined in NSResponder (such as
mouseDown: and keyDown:) take an
NSEvent as their argument. You can query an NSEvent to discover its
window, the location of the event within the window, and the time the
event occurred (relative to system startup). You can also find out
which (if any) modifier keys (such as Command, Shift, Option, and
Control) were pressed, the codes that identify characters and keys, and
various other kinds of information.
An NSEvent also contains the type of event it represents. There are many event types (e.g., NSEventType); they fall into four categories:
Keyboard events. These events are generated when a key is pressed down, a pressed key is released, or a modifier key changes. Of these, key-down events are the most useful. When you handle a key-down event, you often determine the character or characters associated with the event by sending the NSEvent a
charactersmessage.Mouse events. These events are generated by changes in the state of the mouse button (that is, down and up) and during mouse dragging. Events are also generated when the mouse simply moves, without any button depressed.
Tracking-rectangle events. These events are generated by the window server, if the application has asked it to set a tracking rectangle in a window. The window server creates mouse-entered and mouse-exited events when the cursor enters the rectangle or leaves it.
Periodic events. These events are generated by timers. A periodic event notifies an application that a certain time interval elapsed. An application can request that periodic events be placed in its event queue at a certain frequency. They are usually used during a tracking loop. (These events aren’t passed to an NSWindow.)
You can view events as they are sent to an application using the
event-tracing feature of Cocoa. You enable event tracing for an
application by setting the NSTraceEvents flag.
There are several ways to do this for a given application, but they
all involve using the Mac OS X command-line interface. This interface
is available from the Terminal application located in
/Applications/Utilities. Find and launch this
application now.
To see all of the events being sent to the Project Builder application from the window server, first make sure the application is not already running, and then enter the following command into a Terminal window:
/Developer/Applications/Project Builder.app/Contents/MacOS/Project Builder
-NSTraceEvents YES
This command launches the Project Builder application and sets the
NSTraceEvents flag to the value
YES. Note the backslashes before the spaces
separating the words “Project” and “Builder.” The backslashes are
necessary to let the command-line interpreter know that the following
space is part of the pathname (as opposed to a space that separates
different parameters of a command).
As you move the mouse over the Project Builder’s user interface and interact with it by clicking buttons, you will see each event being printed out in the Terminal window. This method of enabling event tracing is “one shot,” meaning that trace information will be enabled only for this Project Builder session. The next time you launch the application, it will behave normally.
Another method for enabling event tracing is to set the
NSTraceEvents flag in the application’s
preferences. When you do this, event tracing will remain enabled until
you turn it off by modifying the application’s preferences. This
method is also slightly different from the previous one because the
event trace output is sent to the Mac OS X console instead of a
Terminal window. The console is available from the Console application
located in /Applications/Utilities. The console is
where applications (and the operating system) can print status and
debugging information. Locate and launch the Console application now.
To modify Project Builder’s preferences from the command line, use the
defaults command. This command allows you to read
and write application preferences that are not available from the
application’s graphical user interface. Type the following into a
Terminal window to enable event tracing for Project Builder:
defaults write com.apple.ProjectBuilder NSTraceEvents YES
Quit Project Builder if it is still running, and then launch it again from the Finder. You should see event trace information being printed to the Console window as you interact with Project Builder. To turn off event tracing, enter the following in the Terminal window:
defaults delete com.apple.ProjectBuilder NSTraceEvents
Though it can take time to sort through all of the event information provided by Cocoa’s event-tracing facility, it can be an invaluable debugging tool.
Each NSWindow in an application keeps track of the object in its view hierarchy that has first responder status. This is the NSView that currently receives keyboard events for the window. By default, an NSWindow is its own first responder, but any NSView within the window can become first responder when the user clicks it with the mouse.
You can also set the first responder programmatically with the
NSWindow makeFirstResponder: method. Moreover, the
first-responder object can be a target of an action message sent by an
NSControl, such as a button or a matrix. Programmatically, you do this
by sending setTarget: to the NSControl (or its
cell) with an argument of nil. You can do the same
thing in Interface Builder by making a target/action connection between the NSControl and the First Responder
icon in the Instances display of the nib file window.
Recall that all NSViews of the application, as well as all NSWindows and the application object itself, inherit from NSResponder, which defines the default message-handling behavior: events are passed up the responder chain. Many Application Kit objects, of course, override this behavior, so events are passed up the chain until they reach an object that does respond.
The series of next responders in the responder chain is determined by the interrelationships between the application’s NSView, NSWindow, and NSApplication objects. For an NSView, the next responder is usually its superview; the content view’s next responder is the NSWindow. From there, the event is passed to the NSApplication object.
For action messages sent to the first responder, the trail back through possible respondents is even more detailed. The messages are first passed up the responder chain to the NSWindow and then to NSWindow’s delegate. Then, if the previous sequence occurred in the key window, the same path is followed for the main window. Then the NSApplication object tries to respond, and failing that, it goes to NSApplicaton’s delegate.
In a multiwindowed desktop environment, there are many open windows on the screen. A user selects a window with the mouse to make it active. When this happens, the window becomes key and the window’s first responder becomes the target of any events generated by the user.
If a different window is selected, it becomes key and its first
responder becomes current. If no object has been selected, or if the
window has no controls, the window is its own first responder. You
can configure initialFirstResponder so that, when a
window appears, the first logical control capable of using keystrokes
is brought into focus as the first responder. The default object
selected by the window when initialFirstResponder
is nil is typically quite reasonable.
In this section you’ll build an application using a custom NSView subclass that responds to a mouse click by drawing a colored dot. Working through this example will give you an opportunity to see how custom event handling works, and as a bonus, you’ll learn how to render simple shapes using Cocoa’s main drawing class: NSBezierPath.
Create a new Cocoa application project called Dot View.
Open the main nib file.
Title the main window Dot View.
Create a subclass of NSView called DotView.
Create the files for DotView and add them to the project.
Drag a custom view from the More Views palette to the window, and then add a horizontal slider and a color well, as shown in Figure 8.5.
Select CustomView, bring up the Info window, and change the view’s class to DotView.
Open
DotView.hand add the declarations shown in Example 8.1. The three instance variables represent the attributes of the dot that the class will draw: its location in the view, its color, and its size, respectively. The method declarations are described by the brief comments in the code listing.Drag
DotView.hfrom Project Builder into Interface Builder’sMainMenu.nibwindow. This will give Interface Builder the opportunity to parse the file and discover the actions and outlets you added to the DotView class.In Interface Builder, Control-click the horizontal slider and drag a connection to the DotView. Make the target/action connection to the
setRadius:method in the Connections pane of the Info window.Drag a connection from the color well to the DotView, and make the target/action connection to the
setColor:method.Make the outlet connections from the DotView to the slider and the color well.
Save the nib file.

Example 8-1. DotView.h
#import <Cocoa/Cocoa.h>

@interface DotView : NSView {
    NSPoint center;
    NSColor *color;
    float radius;

    // Outlets for the color well and the slider
    IBOutlet NSColorWell *colorWell;
    IBOutlet NSSlider *sizeSlider;
}

// Standard view create/free methods
- (id)initWithFrame:(NSRect)frame;
- (void)dealloc;

// Drawing
- (void)drawRect:(NSRect)rect;
- (BOOL)isOpaque;

// Event handling
- (void)mouseUp:(NSEvent *)event;

// Custom methods for actions this view implements
- (IBAction)setRadius:(id)sender;
- (IBAction)setColor:(id)sender;

@end
Now that you have constructed the interface and defined connections between the DotView and the dot drawing controls, it’s time to implement the DotView class:
Open
DotView.mand add an implementation forinitWithFrame:shown in the following code. This method initalizes DotView’s instance variables:- (id)initWithFrame:(NSRect)frame { self = [super initWithFrame:frame]; center.x = 50.0; center.y = 50.0; radius = 10.0; color = [[NSColor redColor] retain]; return self; }Implement
deallocas shown. There’s nothing unusual here:- (void)dealloc { [color release]; [super dealloc]; }Implement the
awakeFromNibmethod so you can initialize the color well and slider to the same values that were defined in theinitWithFrame:method shown in step 1. To enable setup operations like this, theawakeFromNibmessage is sent to all objects in the nib when unarchiving concludes. It is not possible to do this until the nib file is unarchived because the act of unarchiving is what creates the color well and establishes the connection to thecolorWelloutlet. Before the nib file is unarchived, the outlet is uninitialized, so messages sent through the outlet will do nothing. This way, when the app first launches, the user interface controls will reflect the initial values that will be used to draw dots:- (void)awakeFromNib { [colorWell setColor: color]; [sizeSlider setFloatValue:radius]; }The
drawRect:method draws the dot in the view. First it clears the view by filling it with white. Next it computes a bounding rectangle for the dot. Then it sets the current color to the value stored in the view’s instance variable, and finally it uses NSBezierPath to actually draw the rectangle in the view:- (void)drawRect:(NSRect)rect { NSRect dotRect; [[NSColor whiteColor] set]; NSRectFill([self bounds]); dotRect.origin.x = center.x - radius; dotRect.origin.y = center.y - radius; dotRect.size.width = 2 * radius; dotRect.size.height = 2 * radius; [color set]; [[NSBezierPath bezierPathWithOvalInRect:dotRect] fill]; }Add an implementation for
isOpaque. Views that redraw their whole bounds without needing any of the views behind it should overrideisOpaqueto returnYES. This is a performance optimization hint for the display subsystem:- (BOOL)isOpaque { return YES; }Overriding NSResponder (the superclass of NSView) methods in the NSView subclass is the recommended way to handle events for the view. One such method is
mouseUp:, which is invoked when the user releases the mouse button. Add an implementation formouseUp:, as shown. All of the NSResponder methods receive the event as an argument. The event contains the mouse location in window coordinates; you can useconvertPoint:fromView:(withnilas the view argument) to convert this point to local view coordinates. Note that once we get the new center, we callsetNeedsDisplay:YESto mark that the view needs to be redisplayed (which is done automatically by the Application Kit).- (void)mouseUp:(NSEvent *)event { NSPoint eventLocation = [event locationInWindow]; center = [self convertPoint:eventLocation fromView:nil]; [self setNeedsDisplay:YES]; }Add an implementation for
setRadius:, an action method invoked by the slider on the user interface. This method lets you change the radius of the dot. It assumes the sender is a control capable of returning a floating-point number, so we ask for its value, set the DotView’s instance variable, and mark the view as needing to be redisplayed. A possible optimization is to check to see if the old and new value is the same and if so, not do anything.- (void)setRadius:(id)sender { radius = [sender floatValue]; [self setNeedsDisplay:YES]; }Add an implementation for
setColor:, the action method invoked by the color well that lets you change the color of the dot. This method assumes the sender is a control capable of returning a color (NSColorWell can do this).setColor:gets the value from the sender, releases the previous color, and marks the view as needing to be redisplayed. As with thesetRadius:method, a possible optimization is to check to see if the old and new value is the same and if so, not do anything.- (void)setColor:(id)sender { [color autorelease]; color = [[sender color] retain]; [self setNeedsDisplay:YES]; }Build and run the application and create some dots as shown in Figure 8.6.
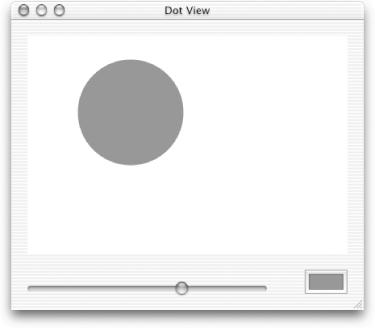
Dot View is a simple application, but is a great example of what makes Cocoa programming so much fun. In just a few easy steps you have created a view that can draw a circle in response to a mouse click. The size and color of the circle are dynamically configurable using the slider and color well. And you were able to build and test the project in a matter of minutes using off-the-shelf parts.