
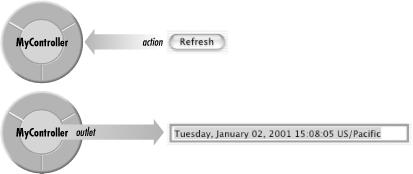
The target/action pattern is part of the mechanism by which user interface controls respond to user actions, enabling users to communicate their intentions to an application. The target/action pattern specifies a one-to-one relationship between two objects; the control (more specifically, the control’s cell) and its target. When a user clicks a user interface control, the control sends an action message to the target object as depicted in Figure 6.23.
The target/action relationship is typically defined using Interface Builder, in which you select a target object for a control, along with the specific action message that will be sent to the target. Target/action relationships can also be set (or modified) while an application is running.
The following steps take you through the process of building a simple example application that uses the target/action pattern. In this example, clicking a button in the main window causes the date and time to be updated in a text field.
Since the first example provided detailed instructions on creating projects using Project Builder, this example generally does not repeat those instructions. If you forget how to do a step, refer back to the Nib Files project in Section 6.2 to refresh your recollection.
Start Project Builder, if it is not already running.
Create a new Cocoa application project called TargetAction.
Open the main nib file.
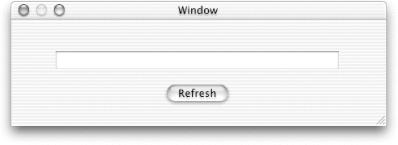
Drag a text field onto the main window and make it about four times the default width.
Drag a button onto the main window
Double-click the button and rename the button by typing
Refresh.
When you’re finished, you should have a window that looks something like Figure 6.24.
Here you’ll subclass NSObject to create a controller class for the application.
Click the Classes tab of the
MainMenu.nibwindow.Select NSObject from the list of classes.
Press Return to create a new subclass and type
MyControllerto replace the text MyObject.
The controller class needs an outlet for the text field so it can send messages to the text field.
Select MyController in the Classes pane.
Click the electrical outlet icon to the right of the class.
Press Return to create a new outlet.
Name this outlet
textFieldand press Return.
You will define one action method for MyController called
refresh:. When the user clicks the Refresh
button, a refresh: message is sent to the target
object, an instance of MyController. Action refers both to a message
sent to an object when the user manipulates a control object and to
the method that is invoked.
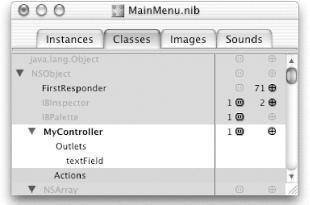
Click Actions under MyConverter in the Classes pane shown in Figure 6.25.
Press Return to create a new action, and type the name of the method,
refresh. IB adds the:for you.
Now you must create a proxy instance of the controller class so you can make connections between the controller object and UI objects.
Click MyController in the Classes list to select it.
Choose Instantiate from the Classes menu. The instance will appear in the Instances pane.
For MyController to receive an action message from the button in the
user interface, you must connect the button to MyController. The
button object keeps a reference to its target using an
outlet—not surprisingly, the outlet is named
target.
You can view (and complete) target/action connections in the Connections Info window in Interface Builder. The upper-right column of the Connections Info window lists all action methods defined by the class of the target object and known by Interface Builder.
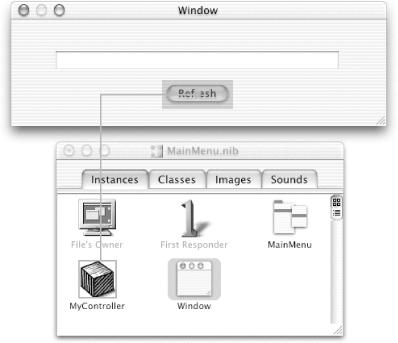
Control-drag a connection from the Refresh button to the MyController instance in the
MainMenu.nibwindow. When the instance is outlined, release the mouse button, as shown in Figure 6.26.In the Connections pane, make sure
targetin the Outlets column is selected.Select
refresh:in the column on the right, as shown in Figure 6.27.Click the Connect button.
Save the main nib file.

Developers new to Cocoa sometimes get confused when making action and outlet connections in Interface Builder. In general, you need only follow a simple rule to know which way to draw a connection line. Draw the connection in the direction that messages will flow:
To make an action connection, draw a line from a control object in the user interface, such as a button or a text field, to the custom instance that should receive the action message.
To make an outlet connection, draw a line from the custom instance to another object in the application.
The difference between target/action and outlet connections is depicted in Figure 6.28.

Another way to clarify connections is to consider who needs to find whom. With outlets, the custom object needs to find some other object, so the connection is from the custom object to the other object. With actions, the control object needs to find the custom object, so the connection is from the control object.
So that you can tell when the refresh: action
method is invoked, the application must provide some kind of feedback.
For this example, clicking the Refresh button will print the current
date and time.
Connect MyController to the text field in the main window as you did
in Section 6.2. The refresh:
method will use this outlet to send text to the text field.
In the Instances pane of the nib file window, Control-drag a connection line from the MyController instance to the text field. When the instance is outlined, release the mouse button.
Interface Builder brings up the Connections pane of the Info window. Select the outlet
textField.Click the Connect button.
At this point you’ve finished declaring MyController’s outlets, actions, and connections, so it’s time to create the source files for the class and add them to the Project Builder project.
Go to the Classes pane of the nib file window.
Select the MyController class.
Choose Create Files in the Classes menu.
Verify that the checkboxes in the Create column next to the
.hand.mfiles are selected.Verify that the checkbox next to the TargetAction target is selected.
Click the Choose button.
Save the nib file.
Now we leave Interface Builder for this application. You’ll complete the application using Project Builder.
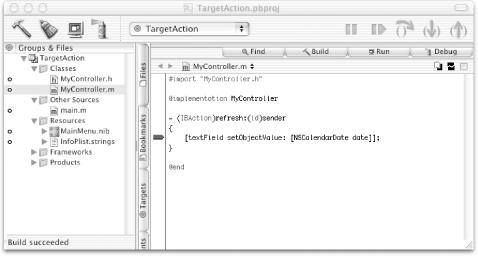
Fill in the implementation of MyController’s
refresh: method.
The method simply sends the current date and time to the text field so it is updated every time you click the Refresh button.
To smooth the task of debugging, Project Builder puts a graphical user
interface over the GNU debugger, GDB. To help familiarize you with the
debugger, use it now to set a breakpoint on the
refresh: method.
Click
MyController.min Project Builder’s Groups & Files list.Locate the
refresh:method in the Text pane.Set a breakpoint by clicking in the column to the left of the code listing. See Figure 6.29.
Click on the Build button to build the project.
Run the debugger by clicking the Debug button, or press Command-R.
When the application launches, click the Refresh button in its window.
When you click Refresh, the debugger will activate, stop at the breakpoint, and allow you to examine the call stack and the value of local variables.
To perform complex debugging tasks, you can use the GDB console.
Click the Console tab at the top righthand corner of the window to
expose the Console. When you click in the Console window and press
Return, the (gdb) prompt appears. There are many
GDB commands that you can type at this prompt that are not represented
in the user interface. For online information on these commands, enter
help at the prompt.