
This chapter uses a simple tutorial application called Expenses to introduce two of Cocoa’s data handling features that are used in many types of applications. You need to be familiar with these features to complete the advanced tutorials in Chapter 11, Chapter 12, and Chapter 13.
The first section of the chapter covers table views—user interface objects that display data as rows and columns. Implementing a table view will deepen your understanding of the interaction between controls, cells, and their enclosing objects. Your work with table views will also provide an introduction to the concept of data sources—helper objects that provide the data to a table view for display.
In the final section of this chapter, you’ll use Cocoa’s archive/unarchive mechanism to “flatten” a group of data objects (also known in object-oriented parlance as serialization) so they can be saved to persistent storage and later retrieved for use.
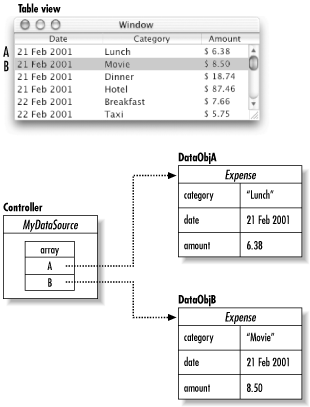
Table views are objects that display data as rows and columns. In a table view, a row typically maps to one object in your data model, while a column maps to an attribute of the object for that row. Some columns may hold derived or calculated values. Often, only a subset of an object’s attributes appear in the table view. See Figure 9.1
An NSTableView is actually several objects, bound together in a scroll view. Inside the scroll view is an instance of NSTableView, in which data is displayed and edited. At the top of the table view is an NSTableHeaderView object. Beneath the header view are one or more columns (instances of NSTableColumn). A column in a table view has several configurable attributes:
Identifier. This is an object value, most often a string, that is used to map a column to an attribute in the data model object. The identifier might be the attribute name or a number that acts as a tag.
Data cell. This is a single object value within a table view. It is possible to configure a column to use a custom cell if your application requires it. NSTextFieldCell is the default
dataCelltype.Formatter. Like a text field, a table view column can use a formatter. The formatter applies to all cells in the column.
An NSTableView owns one or more NSTableColumns that define the columns
the table shows. A table view also may own an NSTableHeaderView that
is tiled above it in its scroll view. A table view uses the
NSTableColumns inside it to figure out how to lay itself out and uses
the dataCell from each column to draw and/or edit
each individual row value for that column. (For editing, it makes a
copy of the dataCell that it throws away when
editing is over.) An NSTableHeaderView uses the NSTableColumns from
the NSTableView to figure out how to lay itself out. It uses the
headerCell from each column to actually draw the
column heading for that column.
Like most user interface elements, NSTableView is a subclass of
NSControl. As such, it supports a target/action connection. In
addition, you can set a doubleAction that will be
sent when the user double-clicks anything other than an editable
cell. This cannot be set in Interface Builder; use NSTableView’s
setDoubleAction: method.
Unlike simpler NSControls, NSTableView doesn’t store the data it displays. Instead, table views get the data they display from a custom “helper” object that you provide—its data source. A data source supplies data to a table view by implementing the NSTableDataSource informal protocol. The data source protocol for a table view consists of only two required methods:
-(int)numberOfRowsInTableView:(NSTableView *)tableView;
and:
-(id)tableView:(NSTableView *)tableView
    objectValueForTableColumn:(NSTableColumn *)tableColumn row:(int)row;
The first method provides a way for the table view to ask its data source how many rows of data are in the data model. The second method is used by the table view to retrieve an object value from the data model using row and column numbers as coordinates. If the user is allowed to enter or modify data in the table, you must implement a third method for saving changes back to the data source.
In MVC terms, a data source is a controller object that communicates with a model object (typically an array) and the view object (typically a table view or outline view). Figure 9.2 shows these relationships.
Several other Application Kit classes (such as NSOutlineView and NSComboBox) declare analogous informal protocols so that other objects can act as a data source for them.

In this section you’ll implement a very simple application with a data source that supplies data to a table view for display. Later in the chapter you’ll extend the application so that it functions as a utility for tracking daily expenses.
Begin by creating a new Project Builder project for the application.
Create a new Cocoa application project called Expenses.
Open the main nib file.
The only UI object the Expenses application requires is a table view. Add it to the window now.
Drag the table view object from the Tabulation Views palette as shown in Figure 9.3.
Resize the table view to fill the window.

If you test the interface now, you’ll see that resizing the window doesn’t affect the table view. If you want to make the table view resize along with the window, you must modify the Autosizing settings in the Size pane of the table view’s enclosing NSScrollView:
Click the table view once to bring up the NSTableView Info window.
Select the Size pane and click the lines so they match those shown in Figure 9.4.
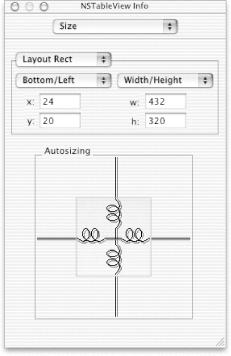
The Autosizing box represents the view enclosing the currently selected object—in this case, the window enclosing the table view. The beveled square represents the selected object, while the springs and lines indicate freedom of movement. The settings shown earlier dictate that the distance between the edges of the table view and the enclosing window are fixed (the straight lines extending from the beveled square to the Autosizing box), but the size of the table view is flexible (the springs inside the beveled square). Clicking a line changes it to a spring and vice versa. Experiment with different settings and test the interface each time to see what happens.
To completely configure the table view, you must set attributes of the NSTableView object as well as the NSTableColumn object:
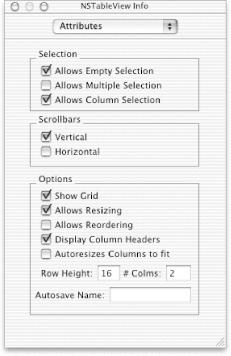
Select the NSTableView.
Set the attributes in the Attributes pane of the NSTableView Info window as shown in Figure 9.5.
In this section you’ll make the table columns equal width and give the columns titles.
Make the columns’ width equal. Select the leftmost column (you may have to double-click), hold the cursor over the right edge of the column, and wait for the cursor to change to a pair of horizontally opposed arrows. Drag the column edge so the column view is divided into two equal parts. When you are done, Command-click on the selected column to deselect it.
Double-click the column header. Type
Column 1and press Return.Repeat for the second column and name it
Column 2.One at a time, select the column headings and bring up the Table Column Info window. Select the Attributes pane and center the headings.
When you’re finished, the window should look something like Figure 9.6.

A data source can be any object in your application that supplies the NSTableView with data. Later in the chapter, you’ll build a complex data model for a table view, but for the first incarnation of this example, you’ll create a dedicated simple data source object that will supply test data to the table view.
Create a subclass of NSObject and name it
MyDataSource.Instantiate the MyDataSource class.
Draw a connection from the table view object to the data source object in the Instances window. Make sure you have selected the table view and not its surrounding scroll view before you draw the connection. The table view will turn a darker shade of gray when selected.
Select the
dataSourceoutlet in the Connections pane of the Info window and click Connect.Create the files for MyDataSource, and add them to the Project Builder project.
The MyDataSource class needs only two methods to be able to feed data to the table for display—one to tell the table view how many rows of data to display and the other to return values for the cells in the table. To be compatible with the table view, the elements of data (usually records of some sort) must be identifiable through zero-based indexing.
Open
MyDataSource.hin Project Builder and add the following declarations:- (int)numberOfRowsInTableView:(NSTableView *)tableView; - (id)tableView:(NSTableView *)tableView objectValueForTableColumn:(NSTableColumn *)tableColumn row:(int)row;Open
MyDataSource.mand add the following method implementations:- (int)numberOfRowsInTableView:(NSTableView *)tableView { return 10; } - (id)tableView:(NSTableView *)tableView objectValueForTableColumn:(NSTableColumn *)tableColumn row:(int)row { return [NSCalendarDate date]; }
The implementation for numberOfRowsInTableView: in
this very simple example always returns 10. In a fully functional
application this method would query a container object such as an
array and return the number of items in the array.
The implementation for
tableView:objectValueForTableColumn:row: simply
returns the current date and time for each cell in the
table. Similarly, in a fully functional implementation, this method
would retrieve data from the container object based on the requested
row and column and return it to the table view for display.
That’s all there is to making a very simple table. Build the project and run the application. As you’ll see, resizing the window will cause the table view to resize accordingly. You can change the column widths by dragging the divider between the column headings. Clicking an item in the view will cause it to ask the data source for an update.
Though you have built a working table view, its implementation is unrealistically minimal. The data source class doesn’t have a true data model, and there is no way for the user to modify data in the table. In this section you’ll modify the Expenses application to address these shortcomings. The new version of the table view example will function as a very simple expenses application.
The first thing you need to add to the table view application is a data model class. Since you are creating an expense-tracking application, you need a class that will represent an expense. Create a class that stores three pieces of data: the date of the expense, the category, and the amount.
In Project Builder, open the Expenses example project (if it’s not already open).
Choose New File from the File menu.
An Assistant dialog box will appear. Choose Objective-C Class from the list.
Name the new file
Expense.mand click Finish. Project Builder will create the header and implementation files, insert default templates, and add them to the project.Open
Expense.hand add the following instance variable declarations. Remember to insert these declarations between the curly braces.NSCalendarDate *date; NSString *category; NSDecimalNumber *amount;
Add the following accessor method declarations. Remember to insert these declarations between the closing curly brace and the
@enddirective.- (NSCalendarDate *)date; - (void)setDate:(NSCalendarDate *)value; - (NSString *)category; - (void)setCategory:(NSString *)value; - (NSDecimalNumber *)amount; - (void)setAmount:(NSDecimalNumber *)value;
In
Expense.m, add the next line between the#importand@implementationdirectives:static NSString *defaultCategory = @"Food";
In the implementation section, add an
initmethod:- (id)init { self = [super init]; [self setDate: [NSCalendarDate date]]; [self setCategory: defaultCategory]; [self setAmount: [NSDecimalNumber zero]]; return self; }Add a corresponding
deallocmethod:- (void)dealloc { [date release]; [category release]; [amount release]; [super dealloc]; }Finally, add the accessor method implementations:
- (NSCalendarDate *)date {
    return date;
}

- (void)setDate:(NSCalendarDate *)value {
    [date autorelease];
    date = [value copy];
}

- (NSString *)category {
    return category;
}

- (void)setCategory:(NSString *)value {
    [category autorelease];
    category = [value copy];
}

- (NSDecimalNumber *)amount {
    return amount;
}

- (void)setAmount:(NSDecimalNumber *)value {
    [amount autorelease];
    amount = [value copy];
}
Now you have a fully functional Expense class. When the modifications to the Expenses application are completed, the data source object will contain an array of Expense objects. Each row in the table view will have a corresponding Expense object in the array. Each column in the table view for a given row will correspond to an instance variable in that row’s Expense object.
Create a third column for the table view. The three columns will display the date, category, and amount of each expense.
Open the main nib file.
Select the NSTableView object, and in the Attributes pane of the Info window, change the number of columns to three.
Resize the three columns so that they are of equal width. The newly created third column will appear out of sight to the right of the second. You’ll have to select the second column and move its right edge to the left to reveal the third column.
Rename the table columns and add formatters to make the application’s UI more attractive.
Rename the three columns
Date,Category, andAmount, respectively.Use the Info window to center the third column’s label.
Select the Date column and drag a date formatter onto the Date column heading box. You’ll see the outline of the heading box highlight when the cursor enters it. In the Formatter pane of the Date column’s Info window, choose a date format that appeals to you. Also, select the Allow Natural Language box. This is a nice feature of the formatter that lets you use strings like “today,” “yesterday,” and “tomorrow” for entering dates.
Repeat step 3 for the Amount column, using a number formatter instead of a date formatter.
A column identifier is an object value, most often a string, that is used to map a column to an attribute in the data model object. When the table view sends a message to the data source asking for data, the column identifier is included so the data source can determine which column needs data—and therefore which attribute in the data model to retrieve.
In Interface Builder, select each column of the table view and use the Attributes pane of the Info window (Figure 9.7) to set a column identifier.
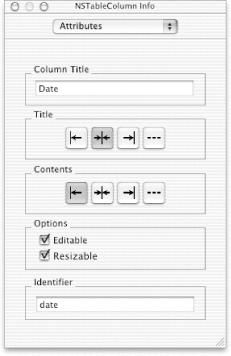
Use “date” for the Date column, “category” for the Category column, and “amount” for the Amount column. You could use any string value as an identifier, but as you’ll soon see, there is a reason for using these particular strings.
Now that your work with the user interface is complete, you must make some modifications to the data source class so it can use the Expense class you created earlier. The new implementation of the data source from earlier in the chapter will maintain an array of Expense objects as its data model.
In Project Builder, open
MyDataSource.h.Add an instance variable for the array of Expense objects:
NSMutableArray *expenses;
Add method declarations for the accessor methods:
- (NSMutableArray *)expenses;
- (void)setExpenses:(NSMutableArray *)newExpenses;
Open
MyDataSource.mand importExpense.h:#import "Expense.h"
Add implementations for the accessor methods:
- (NSArray *)expenses {
    return expenses;
}

- (void)setExpenses:(NSMutableArray *)newExpenses {
    [expenses autorelease];
    expenses = [newExpenses retain];
}
Add implementations for the
initanddeallocmethods:- (id)init { self = [super init]; [self setExpenses: [NSMutableArray array]]; return self; } - (void)dealloc { [expenses release]; [super dealloc]; }Change the implementation of
numberOfRowsInTableView:so it returns the number of items in the array of Expense objects:- (int)numberOfRowsInTableView:(NSTableView *)tableView { return [expenses count]; }Change the implementation for
tableView:objectValueForTableColumn:row:so it retrieves a value from the array of Expense objects.This method uses a column identifier to retrieve data from an Expense object. It accomplishes this in an especially clever way that bears some explanation. First, the column identifier is retrieved from the table column object that was sent as a message parameter. Next, an Expense object is retrieved from the array of expenses using a row number that was also sent as a message parameter.
Now for the tricky bit: since the table column identifier string you assigned in Interface Builder is the same as the name of an instance variable in the Expense object, you can use key-value coding to retrieve the proper attribute value from the Expense object in one step. Key-value coding is a kind of shorthand used for accessing instance variables. If an object has an instance variable, then you can use the variable name as a parameter of the message
valueForKey:and get the value of that variable from the object in one simple step:- (id)tableView:(NSTableView *)tableView objectValueForTableColumn: (NSTableColumn *)tableColumn row: (int)row { NSString *identifier = [tableColumn identifier]; Expense *expense = [expenses objectAtIndex: row]; return [expense valueForKey: identifier]; }Key-value coding substantially simplifies the implementation of the data source method. Without this convenience, you would have to test the string value of the column identifier against a list in an elaborate
if...thenstatement to decide which of the Expense object’s accessor methods to call. Instead of one line, you would have to do the following:id value = nil; if ([identifier isEqual: @"date"]) value = [expense date]; else if ([identifier isEqual: @"category"]) value = [expense category]; else value = [expense amount]; return value;
You could build and run the application now, but since you haven’t yet
implemented a way to add data to the empty array of expenses, you
wouldn’t see anything. In this section you will use the
awakeFromNib method to fill an Expense array with
data and set the data source object to use the test data.
Add a method to
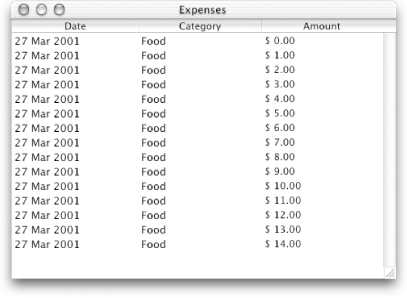
MyDataSource.mthat creates an array of Expense objects filled with test data and declare it inMyDataSource.h. Each object is created using the current date, the default expense category, and a dollar amount equal to the loop counter:- (NSMutableArray *)generateTestData { NSMutableArray *array = [NSMutableArray array]; int index; for (index = 0; index < 15; index++) { Expense *exp = [[Expense alloc] init]; [exp setAmount: (NSDecimalNumber *)[NSDecimalNumber numberWithInt:index]]; [array addObject: exp]; [exp release]; } return array; }Implement
awakeFromNibforMyDataSource.m:- (void)awakeFromNib { [self setExpenses: [self generateTestData]]; }
Build the application and try it. You should see something similar to Figure 9.8.
For users to be able to change a value in the table and have the new
value be copied back to the associated attribute in the data source’s
array of Expense objects, you need implement only one more method:
tableView:setObjectValue:forTableColumn:row:.
Here’s an implementation that uses key-value coding:
- (void)tableView:(NSTableView *)tableView
    setObjectValue:(id)object
    forTableColumn:(NSTableColumn *)tableColumn
    row:(int)row
{
    NSString *identifier = [tableColumn identifier];
    Expense *expense = [expenses objectAtIndex: row];

    [expense takeValue: object forKey: identifier];
}Some commonly used NSTableView methods that you might want to try out include:
reloadData. This method forces the table view to reload from the data source.noteNumberOfRowsChanged. This informs the table view that the size of the data source has changed.selectedRow. This method returns the index of the currently selected row.editColumn:row:withEvent:select:. This method is used with NSTextField’sselectTextmethod; it allows you to put an individual cell into edit mode programmatically.
NSTableView defines some delegate methods including
textShouldBeginEditing,
textShouldEndEditing,
tableView:willDisplayCell:forTableColumn:row:, and
tableView:shouldEditTableColumn:row:. You can make
your data source be the table view’s delegate and implement these
methods to more closely follow the user’s interaction with the table
view and modify its behavior.
NSTableView also posts some notifications like
NSTableViewSelectionDidChangeNotification and
NSTableViewColumnDidMoveNotification, which you can
also use to help your data source track changes in the table view.
A good way to explore NSTableView and how it interacts with a data source is to modify the example application so you can add and delete expenses.
Also, examine and run the example application OutlineView in
/Developer/Examples/AppKit. NSOutlineView is
slightly more complicated than NSTableView, but with what you’ve
learned here you should have no problem understanding how it works.