
This part introduces you to the various tools that accompany Mac OS X. The sections in this part are intended to provide an overview of the following:
System Preferences
Applications and Utilities
Developer Tools
Chapter 5 provides additional information about how to use and apply the System Preferences for configuring your system, as well as specific uses for some of Mac OS X’s standard Applications and Utilities.
As mentioned earlier, Mac OS X’s System Preferences perform many of the same functions as Mac OS 9’s Control Panels. To launch the System Preferences application, simply click on the light-switch icon in the Dock, and the window shown in Figure 3-1 will appear.
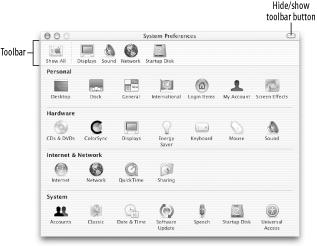
As you’ll notice, the System Preferences are broken down into four categories: Personal, Hardware, Internet & Network, and System. There is also a customizable toolbar at the top of the window, similar to the toolbar in the Finder window. If you find yourself using a particular System Preference often, drag its icon to the toolbar. Likewise, if there is one you use rarely (such as the Displays panel), drag the icon away, and the item will be removed from the toolbar.
Unlike the Finder’s toolbar, you cannot customize the System Preferences toolbar. (You can customize the Finder’s toolbar by Control-clicking on the toolbar itself and selecting Customize Toolbar from the context menu.) Thankfully, not all hope is lost, though. You can add and remove icons from the System Preferences toolbar by dragging an icon onto or off the toolbar. When you drag an icon off the toolbar, it will disappear in a puff of smoke, similar to what happens when you remove an icon from the Dock. You can also change the size of the icon and the text labels for the icons by Command-clicking on the toolbar button as follows:
The first time you Command-click reduces the size of toolbar icons and the text labels.
The second time you Command-click removes the text labels and displays the icons at the normal size.
The third time you Command-click reduces the size of the toolbar icons without the text labels.
The fourth time you Command-click removes the panel icons and replaces them with large text labels.
The fifth time you Command-click reduces the size of the text labels without the panel icons.
The sixth time you Command-click returns the icons and text labels for the panels in the toolbar to their normal, original size.
Note
This also works in applications such as Mail and the Omi applications (such as OmniWeb, OmniGraffle, and OmniOutliner). If you add the Shift key to any of these
-click combinations (i.e., Shift-
-click), you’ll go backward through the cycle to the previous setting.
You can move the icons in the toolbar around by click-dragging them to a different position. The only icon you can’t remove from the toolbar is the Show All icon, which is permanently fixed to the far left of the toolbar. Additionally, you can’t place anything to the left of the divider bar in the toolbar.
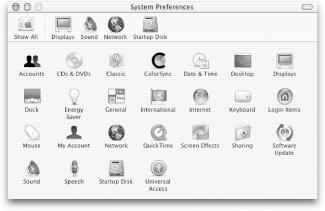
When you click on one of the icons, the window changes to reflect that particular panel’s settings, but the toolbar remains in place. To hide the toolbar, click on the transparent button in the upper-right corner of the window. To go back to the main view, click the Show All button (View → Show All In Categories, or
-L). You can also select View → Show All Alphabetically; this menu option changes the view of the System Preferences window to that shown in Figure 3-2.
When you’ve completed altering the settings of your computer, quit the System Preferences (System Preferences → Quit, or
-Q).
The next four sections provide an overview of the controls found in the System Preferences. For additional information on how to use the System Preferences panels to configure your system, see Section 5.1 later in the book.
Note
Some of the System Preferences panels require administrator privileges. If you attempt to change a setting and are asked for a password, try using the password you used to log in to the computer. If that doesn’t work, contact your system administrator for assistance.
These items control the general look and feel of the Aqua interface:
- Desktop
This lets you set the pattern, image, or color of your desktop. If you click on the checkbox next to Change picture at the bottom of the window, the desktop picture will change automatically based on the timing you select in the pull-down menu.
- Dock
This is one of the ways you can configure your Dock (another is by going to
→ Dock → Dock Preferences). See Section 2.5.1, earlier in the book, for details on the Dock.
- General
This panel specifies the colors used for buttons and menu items when selected, location of scrollbar arrows (top and bottom, or together, known as “Smart Scrolling” in Mac OS 9), and how a click in the scrollbar will be interpreted (scroll down one page or scroll to that location in the document). Here, you can specify the number of recent items to be remembered and listed in the
→ Recent Items menu for Applications and Documents, as well as determine which font smoothing style and size is best for your type of display.
- International
This is used to set the languages supported by your system. The language you specify during the installation process will be the default. Also found here are controls used to format the date, time, numbers, and currency, as well as the keyboard layout to be used for a country and its language.
If you select more than one language in the tabbed Input Menu pane, a menulet will appear in the menu bar, showing the flags for the countries whose languages will be supported on your system.
- Login Items
This panel lets you specify which items will launch or open automatically after you log in to your system. These “items” can include applications, files, folders, and remote filesystems. For Mac OS 9 users, the Login Items panel is similar to placing an alias in the
Startup Itemsfolder.- My Account
This panel includes options for changing your password, specifying a login picture (from either one of 30 default images or from another on your system), and an option for editing your card in the Address Book. You can further configure your account via the Accounts panel, described later.
- Screen Effects
This panel lets you select one of Mac OS X’s default screensaver modules. Here, you can set the amount of time your system must be inactive before the screensaver kicks in, require a password to turn off the screensaver, and specify Hot Corners for enabling/disabling the screensaver.
If you have a .Mac account, you can also choose from the .Mac Screen Effects, or subscribe to another .Mac member’s public slide show. To do this, click on the Configure button and enter the members’ name (for example, chuckdude).
These panels are used to control the settings for the devices connected to your computer.
- Bluetooth
This panel allows you to configure the settings for using Bluetooth to exchange files with other users and to synchronize data between your computer and other devices, such as cellular phones and PDAs. This item only appears if you have a Bluetooth USB dongle (such as the one Apple promotes from D-Link) inserted on your system.
- CDs & DVDs
The items in the CDs & DVDs panel all share the same basic interface: a pull-down menu that lets you choose what the Mac does when it mounts various kinds of disks. You can choose to have it simply open the new media volume as a Finder window, launch an appropriate application (such as iTunes for music CDs and Disk Copy for blank discs), run a script, or prompt you for some other action to take.
- ColorSync
This panel is used to control and ensure the quality of the colors you see on your monitor.
- Displays
This panel lets you set your monitor’s resolution and its color-depth (256, thousands, or millions of colors). There is also an option to include a monitor menulet in the menu bar, as well as a slider control to set your monitor’s brightness. If you have more than one monitor connected to your system, clicking on the Detect Displays button will allow you to specify settings for that display.
- Energy Saver
This panel is used to set the auto-sleep settings for your computer. Here, you can specify the amount of time your system must be idle before putting your monitor, hard drive, or the entire system to sleep.
PowerBook and iBook users will also see two pull-down menus at the top of this panel. The first, Optimize Energy Settings, lets you select from one of four preset options, or to specify custom settings. The second pull-down menu, Settings for, gives you options for controlling the Energy Saver settings for when you’re plugged in (Power Adapter), or when you’re operating on battery (Battery Power).
- Ink
This item appears only if you have a graphics tablet (such as a Wacom tablet) connected to your system. Ink controls how handwritten text is handled by the InkPad. The Gestures tab includes pen-strokes for invoking commands such as Undo, Cut, Copy, Paste, inserting a space or carriage return (Vertical Space), and more.
- Keyboard
This panel controls the repeat rate when you depress a key and hold it down. You can specify the speed of the repeat (from slow to fast) and the delay between the time the key is first depressed until the repeat option kicks in (from long to short). If you select the Off option for Delay Until Repeat, the repeat feature will be disabled entirely.
If you click on the Full Keyboard Access tab and opt to “Turn on full keyboard access,” you can use the Control key with either Function keys, Letter keys, or Custom keys instead of using the mouse. These key combinations and their functions are listed in Table 3-1.
Table 3-1. Keyboard Access key combinations
Function keys
Letter keys
Description
Control-F1
Control-F1
Enable/disable keyboard access
Control-F2
m
Control the menu bar
Control-F3
d
Control the Dock
Control-F4
w
Activate the window or the next window behind it
Control-F5
t
Control an application’s toolbar
Control-F6
u
Control an application’s utility window (or palette)
Control-F7
Control-F7
Used for windows and dialogs to highlight either text input fields and lists, or for any window control
Esc
Esc
Return control to the mouse, disabling the Control-F
xkey combinationSpacebar
Spacebar
Perform the function of a mouse click
Note
If you are using an iBook or PowerBook, you need to use Control plus the fn key along with the Function or Letter key for keyboard access; for example, Control-fn-F2 to access menus. The fn key is at the bottom-left corner of your keyboard, to the left of the Control key (and below the Shift key).
- Mouse
This panel lets you specify the mouse’s Tracking Speed, as well as the delay between double-clicks. If you are using an iBook or PowerBook, the Mouse preferences panel will have an added section for setting the controls for your trackpad.
- Sound
This panel offers two panes, one for configuring Alert sounds and another for sound Output (e.g., speakers). The Alerts pane has an option for including a volume control slider in the menu bar.
These panels are used to control your Mac’s settings for connecting to other computers:
- Internet
This panel has four tabbed panes. The first two, .Mac and iDisk, allow you to configure the settings for your .Mac account (formerly known as iTools), and supply you with information about your iDisk (requires a .Mac account).
The other two tabbed panes, Email and Web, allow you to enter the settings for your primary email account, specify your default email client and web browser, and choose where files you download from the Internet will be saved.
Warning
If you have a primary email account (such as the one you use at work or that is provided by your ISP), clicking on the checkbox next to “Use .Mac Email account” will replace the settings for your primary mail account. You will be warned about this by the system; just make sure this is what you really want to do before clicking on the Replace button or hitting Return to dismiss the alert.
Most email clients provide support for multiple mail accounts, including Mac OS X’s Mail application. If you have a .Mac email account that’s secondary to your primary email account, you should configure the .Mac account in your email client, rather than here in the Internet preferences panel.
- Network
This panel is used to configure your settings for dial-up, Ethernet, and AirPort networking, including enabling/disabling AppleTalk. For details on how to configure these settings, see Section 5.1 later in this book.
- QuickTime
This panel lets you configure QuickTime’s settings for playing back movies and music. If you’ve purchased a license for QuickTime Pro, click on the Registration button to enter the registration number.
- Sharing
This panel has changed a lot since Mac OS X 10.1.x. The Sharing panel is used to set the name of your computer, and your Rendezvous name. The lower portion of the Sharing panel has three tabbed panes:
- Services
This pane allows you to turn on file, web, and printer sharing, control FTP access to your machine, and allow users of other computers to log in to your machine remotely via the Secure Shell (SSH).
- Firewall
By default, the firewall is turned off. Use this panel to restrict people from the outside world from gaining access to your machine through its various ports and services. The services you turn on in the Services pane controls the enabled services in the Firewalls pane. For example, if you turn on Personal File Sharing in the Services pane, the checkbox next to Personal Fire Sharing will be checked in the Firewall pane.
- Internet
This pane allows you to share your Internet connection with other computers, either via AirPort or built-in Ethernet.
The items in the System panel allow you to configure a variety of settings for your computer:
- Accounts
As the name implies, this panel is used to add and remove users and to make changes to their identities and passwords.
If you have administrator privileges, you can also specify the Capabilities of a non-administrator’s account, for doing such things as removing items from the Dock, using the System Preferences, changing passwords, burning CDs or DVDs, and even restricting which applications and utilities are available to the user.
- Classic
Use this to start, stop, and restart the Classic environment. For additional information, see Section 2.6, earlier in this book.
- Date & Time
This panel is used to set the date and time for your system, as well as your time zone, specify a network time server, and how (or whether) the date and time will appear in the menu bar.
- Software Update
As with Mac OS 9, the Software Update panel can be used to check for updates to your Mac OS X system. You can use this panel to check for updates manually (i.e., when you want to, or when you learn of an available update) or automatically (daily, weekly, or monthly). When an update is found, you will be prompted to specify which updates will be downloaded and installed on your system.
- Speech
This panel can be used to turn on and configure speech recognition, to specify a default voice for applications that speak text, and to specify whether items in the user interface (such as alert messages or the text in menus) will be spoken as well.
- Startup Disk
This panel is used to specify whether your system will boot into Mac OS 9 or Mac OS X. With Jaguar, you can also specify a Network Startup disk if your computer is configured or set up via NetBoot from Mac OS X Server.
- Universal Access
The Universal Access panel provides support for people with disabilities. Jaguar features two panes for people who have problems Seeing or Hearing, and includes two additional panes for those who find it difficult to use a Keyboard or Mouse.
One thing you’ll quickly notice is that all the text labels for the user interface elements in the Universal Access panel are spoken using the voice you’ve specified in the Speech panel.
After you’ve completed tweaking your System Preferences, use
-Q to Quit the application.