
Troubleshoot network problems with one of the most advanced wireless monitoring tools available.
Unlike simple beacon scanners such as NetStumbler [Hack #21] and MacStumbler [Hack #22], Kismet is one of the most advanced diagnostic tools available for wireless networking. It is a completely passive network scanner, capable of detecting traffic from APs and wireless clients alike (including NetStumbler clients). It finds "closed” networks by monitoring the traffic sent from its users, and logs all raw 802.11 frames in standard pcap format for later use with specialized diagnostic and analysis tools—as you’ll see in [Hack #39]. If you have a machine with multiple wireless cards, Kismet even splits the work of network scanning across all of them, making a scanner capable of simultaneously tracking all 802.11 traffic in range. These are just a few of the incredible features of this piece of free software.
Of course, with all of this power comes a fair amount of complexity. For starters, you need an 802.11b card capable of entering RF Monitoring mode. Some of these cards are Prism-based (such as the Senao/EnGenius, Linksys, or D-Link cards), some are Lucent/Orinoco/Proxim/Avaya, and some are Cisco Aironet. Kismet also works with ar5k-based 802.11a cards. I was able to get Kismet running well on an iBook with an internal AirPort card (an Orinoco derivative) under Debian. The following explains what I had to do to make it work.
Download Kismet from http://www.kismetwireless.net/. Unpack the source tree and navigate into it. If you want to use Kismet’s dump files with Ethereal (highly recommended), you need a copy of the Ethereal source tree. Configure Kismet with a line like this:
./configure --with-ethereal=../ethereal-0.9.12/Of course, substitute the full path to your Ethereal sources. Now you should be able to build Kismet with a standard:
make; make dep; make installDepending on your platform and wireless card, you may also need to install a driver capable of setting up RF Monitor mode. For the AirPort on my iBook, I used the precompiled kernel and modules available at http://www.macunix.net:443/ibook.html.
Next, create a user that Kismet will assume when it isn’t running as root. You can also use your own UID if you wish. Kismet needs to run as root initially, but will drop its privileges to this UID as soon as it begins capturing data.
Now edit /usr/local/etc/kismet.conf to suit your
system. At the very least, set the source= line to
match your hardware. For the iBook, I set it to
source=orinoco,eth1,Airport. The format for this
line is
driver,device,description.
See the comments in the file for supported drivers.
If you want
Kismet
to be able to read the SSID of detected networks aloud, also download
and install the
Festival text to speech package. Kismet will play sound effects if
you wish; by default, it expects /usr/bin/play
to be installed (part of the Sox sound utility), but any command-line
audio player will work. All of the audio and other display parameters
are configured in /usr/local/etc/kismet_ui.conf.
Before you launch Kismet, you need to
put your wireless card into RF monitoring mode. You can do
this easily by running kismet_monitor as root.
Note that once in RF monitoring mode, your card is no longer able to
associate with a wireless network, so you should use Ethernet (or
another wireless card) if you need a network connection.
Now you can start Kismet by simply running kismet
under your normal UID. This should present you with a screen that
looks something like Figure 3-26.
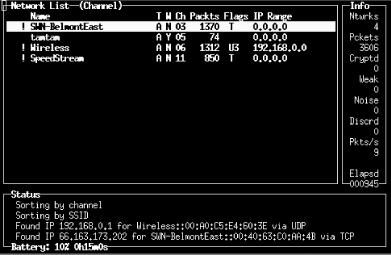
I say that it will look something like this figure, because more
likely than not you will see only one network, if any. This is
because you need to manually tell your card to start hopping between
channels. From another xterm, run
kismet_hopper
-p as root. This makes your card skip between
channels in an efficient manner. Naturally, the skip pattern is
completely configurable to your tastes. See man kismet_hopper for details.
Once kismet_hopper
is up and running, you should see the main screen spring to life with
all sorts of information. By default, Kismet initially sorts the
network list based on the last time it saw traffic from each network.
This list constantly changes, making it impossible to select one
network for more detailed operations.
Change the sort order by hitting
s at any time, followed by the desired sort order
(for example, to sort on SSID, hit ss). You can
now use the arrow keys to select a particular network for further
inspection. Hit h at any time to see the keystroke
help, and q to close any pop-up window.
Now that a couple of networks are listed, you can get more
information on any one of them by selecting it and hitting
i. Figure 3-27 shows the network
information screen.
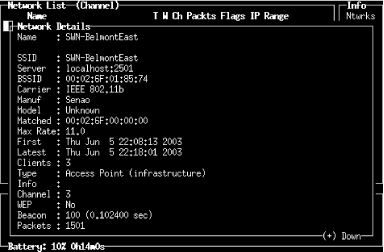
In addition to standard access points, Kismet displays
Ad-Hoc networks, as well as so-called
“closed” networks. If there are no
clients actively using a closed network, it displays the network
information with a name of <no ssid>. Once a
client associates with the closed network, this information is
updated with the proper SSID.
Kismet also tracks a great deal of
information about wireless clients. For example, to see the
associated clients of a particular AP, hit c from
the main screen. This is illustrated in Figure 3-28.

Kismet attempts to guess the IP network in use based on the traffic it sees. It also keeps statistics about how much traffic each client is generating, making it easy to discover who is hogging all of the bandwidth.
If you find that you are missing packets while monitoring a particular wireless network, this is probably because you are still scanning for networks. To focus on a specific channel, kill kismet_hopper and set your channel manually. In Linux, this is accomplished with a command such as:
# iwpriv eth1 monitor 2 6eth1 is set to monitor mode, and the last number specifies the channel. The above example would set the card to monitor channel six. When tuned to one channel, this allows Kismet to capture much more data as it doesn’t have to divide its time between multiple channels. Consult the documentation if you would like to add more radio cards to completely cover the entire available spectrum.
When you are finished using Kismet, hit
Q (that’s a capital Q) to quit,
and then run kismet_unmonitor as root. This takes
your wireless card back out of monitor mode, but does not reset its
original network parameters. Either eject the card and reinsert it,
or configure your SSID and other settings manually to start using
wireless as you normally would.
These are just a few of the insanely useful features that Kismet has to offer. On top of everything else, Kismet saves all recorded frames to standard pcap format, so you can use tools like Ethereal or AirSnort to pour over your captured data for later analysis. It can be daunting to get Kismet running at first, but it is worth the effort when serious network analysis is called for.
Tons of information on RF Monitoring drivers (http://airsnort.shmoo.com/)
AirSnort on the iBook (http://www.macunix.net:443/ibook.html)
Passive RF Monitoring on the iBook (http://www.swieskowski.net/code/wifi.php)