
Chapter 5. Networking Hacks
Introduction
You probably spend most of your time accessing servers on the Internet or on your own network. In fact, networking has become so prevalent, it’s becoming increasingly difficult to tolerate even short periods of network outages.
This chapter contains many ideas for accessing networking services when the conventional avenues seem to be unavailable. Have you ever wanted to train your system to notify you of its new network configuration when its primary link becomes unavailable? Would you like to check your email from a system that doesn’t contain a preconfigured email client? How can you maintain network connectivity when your ISP’s DHCP server no longer recognizes your DHCP client?
You’ll also gain insight into how some of the networking services
and tools we often take for granted work. Become a tcpdump guru—or at least lose the intimidation
factor. Understand your DNS messages and how to troubleshoot your DNS
servers. Tame your sendmail
daemon.
Finally, meet two excellent open source utilities that allow you to perform routine tasks simultaneously on all of your servers.
See Console Messages Over a Remote Login
View a server’s console messages remotely
As a Unix system administrator, you can do 99% of your work remotely. In fact, it is very rare indeed that you’ll need to sit down in front of a server (assuming the server even has an attached keyboard! [Hack #26] ).
However, one of the key functionalities you lose in remote administration is the ability to see the remote server’s console. All is not lost, though. First, let’s answer these questions: “What do you mean by the console, and why would you want to see it?”
The Console
If you’re physically sitting at a system, the console is the
virtual terminal you see when you press Alt-F1. If you’ve ever logged
into this particular virtual terminal, you’ve probably noticed that error
messages appear here. These messages can be rather disconcerting when
you’re working at the console, especially if you’re fighting your way
through vi and bright white error
messages occasionally overwrite your text.
If you ever find yourself in that situation, Esc-Ctrl-r will refresh your screen. Better yet, don’t log into Alt-F1 when you’re physically sitting at a system. Instead, log into a different terminal, say, the one at Alt-F2.
However, when you access a remote system, you can’t log into a virtual terminal, and the console is considered to be a virtual terminal. (You access it by pressing Alt-F1 at the local keyboard, after all). Instead, you log into a pseudoterminal (also known as a network terminal).
Here’s an example. I’m sitting at a system and have logged into
the virtual terminals at Alt-F2 and Alt-F3. From Alt-F3, I’ve used
ssh to log into the localhost. If I
run the w command, I’ll see this:
% w
12:25  up 22 mins, 3 users, load averages: 0:00, 0:00, 0:00
USER           TTY      FROM              LOGIN@  IDLE WHAT
genisis         v1      -                12:25PM     - -csh (csh)
genisis         v2      -                12:25PM     - ssh localhost
genisis         p0      localhost        12:25PM     - w
Notice that the virtual (or physical access to keyboard)
terminals begin with a v in the
TTY section. Since terminals start
numbering at 0, I’m logged into the second (v1) and third (v2) virtual terminals. I’m also connected to
the first pseudoterminal, p0, so
I’m currently the only user logged in over the network.
In my ssh session, if I press
Alt-F1, I’ll access the console on my local
system (where I am sitting), not the console on the remote
system.
Seeing Remote Console Messages
If Alt-F1 won’t do it, how can you see remote console messages? A quick hack for your current session is to run this command:
% tail -f /var/log/messages &tail shows the end of a file, much like head shows the start. In this case, the file
is /var/log/messages. This
particular log contains a copy of the messages that appear on the
system console. When run with the -f switch, tail will remain open, allowing you to see
when new entries are added to that logfile. The trailing ampersand
(&) runs the command in the
background, so you’ll get your prompt back if you press Enter or type
in another command.
As the system writes console entries to this file, tail will also display to your current
pseudoterminal. If you’re in the middle of typing something when a log
message is displayed, Ctrl-r will refresh your command prompt line so
you can see where you left off typing.
An Alternate Method
There’s always more than one way to skin a cat. Since syslog is responsible for logfiles, you can
also change its configuration file. Let’s start by seeing
why messages are sent to the console:
% grep console /etc/syslog.conf
*.err;kern.debug;auth.notice;mail.crit       /dev/console
# uncomment this to log all writes to /dev/console to /var/log/console.log
#console.info                                /var/log/console.log
See how messages are sent to /dev/console by default? This file also gives a hint on how to send
those messages elsewhere—to a file called console.log. By uncommenting that console.info line, you can send those
messages to /var/log/console.log.
If you decide to remove that #, don’t forget to create an empty logfile
with the specified name and to inform syslogd of your changes by sending it a
signal one:
#touch /var/log/console.log#killall -1 syslogd
Now you’re probably thinking, big deal. So I’ve sent console
messages to a different filename. I still have to run that tail -f command to see them.
Well, how about changing that console.info line to this instead:
console.info root,genisis
Don’t forget to killall -1
syslogd once you save your changes.
Now when I ssh into that
system as the user genisis, I don’t
have to remember to run the tail
command. As long as I’m the user genisis, even if I become the superuser, all
console messages will be sent to my terminal.
Hacking the Hack
You may have noticed that uncommenting the console.info line results in messages being
sent twice: once to /var/log/console.log and once to either the
original console or the specified users. If you prefer to only have
messages sent to either the log or the console or user, recomment the
console.info line and indicate in
the line that originally specified /dev/console where you want the information
to go.
For example, to log only to a file:
*.err;kern.debug;auth.notice;mail.crit /var/log/console
Or to log only to the specified users:
*.err;kern.debug;auth.notice;mail.crit root,genisis
Again, don’t forget to inform syslogd of any changes you make to /etc/syslog.conf.
See Also
man wman syslog.conf
Spoof a MAC Address
Even good guys can use secret identities.
Okay, I know what you’re thinking. There’s never a legitimate reason to spoof any type of address, right? Even if there were, why would you bother to spoof a MAC address, other than to prove that it can be done?
Consider the following scenario. I was administrating a small network where the ISP restricted the number of IP addresses a DHCP client was allowed to receive. Their DHCP server kept track of the leased addresses by using a combination of the client’s MAC address and an OS identifier. One day I needed to replace that network’s external NIC. It took me a while to figure out why the new NIC refused to pick up a DHCP address from the ISP. Once the restriction was explained to me, I contemplated my available courses of action. One was to spend the afternoon listening to Musak in the hopes that I’d eventually get to speak to one of the ISP’s customer service representatives. I decided my time would be better spent if I instead took 30 seconds and spoofed the old MAC address. This provided a quick solution that allowed the owner to get back online until he could make arrangements with the ISP regarding the new MAC address.
Spoofing on FreeBSD
Before I could accomplish the spoof, I needed two pieces of
information. The first was the MAC address for the old NIC.
Fortunately, I record such things in a binder. However, I initially
found out that information using ifconfig. In
this scenario, the interface in question was called rl0:
% ifconfig rl0
rl0: flags=8843<UP,BROADCAST,RUNNING,SIMPLEX,MULTICAST> mtu 1500
        inet 192.168.2.12 netmask 0xffffff00 broadcast 192.168.2.255
        ether 00:05:5d:d2:19:b7
        media: Ethernet autoselect (10baseT/UTP)
The MAC address is the hex number immediately following ether.
Second, I needed to know the identifier used by the ISP’s DHCP server. This was found in the DHCP lease:
% more /var/db/dhclient.leases | grep host
option host-name "00-05-5d-d2-19-b7-36-33"
Some ISPs use option
host-name, while others use option
dhcp-client-identifier. Choose the option in the lease that
is associated with the MAC address. In this example, my identifier was
the MAC address, followed by -36-33.
Armed with the information I needed, I could spoof the old MAC
address onto the new NIC card. In my case, the new card was an
ed0:
#ifconfig ed0 ether 00:05:5d:d2:19:b7# #ifconfig ed0 | grep etherether 00:05:5d:d2:19:b7
Note that you have to be the superuser to change these settings.
This particular change won’t survive a reboot, as the NIC will give the kernel its burnt-in MAC address during the hardware probe that occurs during bootup. If you intend to reboot before sorting out the situation with the ISP, carefully add this line to /etc/rc.conf:
ifconfig_ed0_alias0="ether 00:05:5d:d2:19:b7"
This will create an alias for ed0 that uses the desired MAC address,
rather than the MAC address burnt into the physical card. Think of an
alias as an alternate set of instructions an interface can give to the
kernel—a kind of networking nickname.
Next, I’ll edit /etc/dhclient.conf:
#vi /etc/dhclient.conf# $FreeBSD: src/etc/dhclient.conf,v 1.3 2001/10/27 03:14:37 rwatson Exp $ # # This file is required by the ISC DHCP client. # See ``man 5 dhclient.conf'' for details. # # In most cases an empty file is sufficient for most people as the # defaults are usually fine. #interface "ed0" {send host-name "00-05-5d-d2-19-b7-36-33";send dhcp-client-identifier "00-05-5d-d2-19-b7-36-33";}
By default, this file contains only comments; I added a section
for interface ed0. When editing
your own file, remember to include the opening and closing curly
braces ({}). Each statement must
also end in a semicolon (;). Here,
I’ve set both the host-name and the
dhcp-client-identifier options to
the values expected by the ISP.
Now it’s time to test that these changes did indeed work. You don’t need to reboot in order to test that alias in /etc/rc.conf. This command will do the trick:
# /etc/netstart
Doing stage one network startup:
Doing initial network setup:.
ed0: flags=8843<UP,BROADCAST,RUNNING,SIMPLEX,MULTICAST> mtu 1500
        inet 192.168.2.95 netmask 0xffffff00 broadcast 192.168.2.255
        ether 00:05:5d:d2:19:b7
lo0: flags=8049<UP,LOOPBACK,RUNNING,MULTICAST> mtu 16384
        inet 127.0.0.1 netmask 0xff000000
Additional routing options: ignore ICMP redirect=YES log ICMP redirect=YES drop SYN+FIN
packets=YESsysctl: unknown oid 'net.inet.tcp.drop_synfin'
.
Routing daemons:.
Excellent. The new NIC kept the spoofed MAC address. Now let’s see how the DHCP server responds when I release and try to renew an address:
# dhclient -r ed0
#
Using -r with dhclient forces the DHCP client to give up
its old address and request a new lease from the DHCP server. If this
succeeds, the prompt will return without any error messages. Running
ifconfig ed0 will show that the
ISP’s DHCP server did indeed give this interface a public IP
address.
Spoofing on NetBSD
The current version of ifconfig that ships with NetBSD does not support this functionality. To allow MAC
address changes, try Dheeraj Reddy’s ifconfig patch, available from http://mail-index.netbsd.org/tech-net/2003/08/08/0001.html.
You will need to apply this patch to NetBSD sources and build a
new version of ifconfig. To begin,
download the system sources, unpack them, and change the working
directory to src/sbin/ifconfig.
Download the patch and apply it with:
# patch < ifconfig.patchBuild a new binary with:
# makeRemember that this code is experimental and may not always work
as advertised, so it is crucial that you back up the original ifconfig binary in some safe place.
When you have the new binary, run it with:
# ifconfig interface-name lladdr MAC-addrSpoofing with OpenBSD
The standard ifconfig that
ships with OpenBSD does not contain an option to change the MAC
addresses of interface cards. If you need it, you will have to build
your own tool for that purpose with sea.c. Download it from http://www.devguide.net/books/openbsdfw-02-ed/
Build sea as follows:
# gcc -Wall -o sea sea.c -lkvmNext, boot OpenBSD into single-user mode:
#rebootboot>boot -s
Then, once in single-user mode, use sea to spoof the desired address on
the specified
NIC:
#seainterface-nameMAC-addr
See Also
man ifconfigman dhclient.conf
Use Multiple Wireless NIC Configurations
Take the pain out of configuring your laptop’s wireless interface.
If you use a laptop and have remote sites that you visit regularly, configuring your wireless interface can be interesting. For example, every wireless network has a unique service set identifier (SSID). Each site that uses WEP will also require a unique encryption key. Some networks may use static IP addresses, while others may use a DHCP server.
You could keep a copy of each network’s configuration in your wallet and reconfigure your NIC manually at each site, but wouldn’t you rather automate the various network configurations and choose the desired configuration after bootup?
For the purpose of this exercise, we will assume that the wireless access points have been properly configured and activated.
Initial Preparation
Before you can script the network configurations, you’ll need to
collect the information listed next. I’ve associated the necessary
information with ifconfig’s
keywords where possible. You will see these keywords in the configuration
script.
ssid, the name of the wireless networkauthmode, the network’s authorization mode (none,open, orshared)nwkey, the encryption key, in hexadecimalWhether to use a static IP address or
dhclientto obtain dynamic IP address informationinet, the static IP address, if necessarynetmask, the netmask, for static network configurationThe default gateway, for static IP configuration
Nameservers, for static IP configuration
The network device (
wi0,an0, etc.)
You can obtain all but the final item from whoever set up the wireless access points for each site.
If you don’t know the name of your network device, review the
output of dmesg for networking
protocol names (Ethernet, 802.11) and MAC addresses. Here’s the
command I use and the relevant lines from my
laptop:
# dmesg | grep address
rl0: Ethernet address: 00:08:02:9e:df:b8
wi0: 802.11 address: 00:06:25:17:74:be
rl0 is the device name for
the cabled Ethernet port, and wi0
is the device name for the wireless PCMCIA card.
Preparing the Script
Here are a few notes regarding the network device configuration script:
The script is named for the network device it controls.
The script will live in /usr/local/etc/rc.d. Since we do not want the script activated at bootup, the script name must not end in .sh.
Each network device should have its own script so that the connection can be easily dropped using the argument
stop.Each configuration will have its own section in a case construct.
Each section’s name will consist of a
d(to use DHCP) or ans(to use a static IP address) followed by a location name.The script will accept a section name as a command line argument for configuration selection.
In order to use WEP with DHCP, the device must be configured with the encrypted code prior to calling
dhclient.A
statussection will give us current network information for the device.A wildcard section will print a list of the section names when given an invalid argument.
Since my network device is wi0, I’ll save the script as /usr/local/etc/rc.d/wi0. I tend to use my
laptop in three locations: at home with DHCP and WEP, at home with a static IP address and WEP, and at my
sister’s home with DHCP and WEP. Tables Table 5-1 through Table 5-3 list the appropriate
configurations.
Option name | Value |
| |
| |
| |
| |
| Use |
The Code
#!/bin/sh
# /usr/local/etc/rc.d/wi0
# Configure wireless interface

# See the ifconfig(8), dhclient(8) and route(8) man pages for further
# assistance.

NIC=wi0

case $1 in
dhome)
       ifconfig ${NIC} ssid "myhome" authmode "shared" nwkey 0x123456789a
       dhclient ${NIC}
       echo ${NIC}
       ;;
shome)
       ifconfig ${NIC} inet 192.168.1.21 ssid "myhome" authmode "shared" ""
       nwkey 0x123456789a netmask 255.255.255.0
       route add default 192.168.1.1
       echo nameserver 24.204.0.4 > /etc/resolv.conf
       echo nameserver 24.204.0.5 >> /etc/resolv.conf
       echo ${NIC}
       ;;
dsister)
       ifconfig ${NIC} ssid "sisterhome" authmode "shared" nwkey
           0x987654321a
       dhclient ${NIC}
       echo ${NIC}
       ;;
stop)
       [ -s /var/run/dhclient.pid ] && kill `cat /var/run/dhclient.pid`
           && rm /var/run/dhclient.pid
       ifconfig ${NIC} remove
       echo " ${NIC} removed"
       ;;
status)
       ifconfig ${NIC}
       ;;
*)
       echo "usage: /usr/local/etc/${NIC} [dhome|shome|dsister|stop|status]"
       ;;
esac
Note that the stop option
kills dhclient. If you will be
using multiple network interfaces, you may wish to delete the line
that reads:
[ -s /var/run/dhclient.pid ] && kill `cat /var/run/dhclient.pid` && rm
      /var/run/dhclient.pid
The script should be owned by root and be readable by root only. If you create your script as a
normal user, you need to change its owner. Become the superuser,
and:
#chown root:wheel /usr/local/etc/rc.d/wi0#chmod 700 /usr/local/etc/wi0
Running the Hack
Using the script is fairly straightforward. To activate the
dhome configuration (DHCP at
home):
# /usr/local/etc/rc.d/wi0 dhome
wi0
To remove the wi0 interface
and kill the connection:
# /usr/local/etc/rc.d/wi0 stop
wi0 removed
If I enter an erroneous argument, I’ll get a list of valid arguments:
# /usr/local/etc/rc.d/wi0 badargument
usage: /usr/local/etc/wi0 [dhome|shome|dsister|stop|status]
Now you can choose an existing network configuration without having to remember any network details.
A similar script will work for cabled network devices. Simply
change the device name and remove the wireless keywords (ssid, authmode, and nwkey) and values.
Hacking the Hack
For all the geek points, you could put your wireless card in
promiscuous mode (if it supports it), sniff for the available ESSIDs
and their signal strengths, and choose the appropriate configuration
based on that information. If you go this route, install the net/bsd-airtools port and remember to ask
for permission before using someone else’s resources.
See Also
man dhclientman ifconfigman route
Survive Catastrophic Internet Loss
Set up your network to recover from a full Internet loss.
Someday this all too common event may happen: while you’re away
from your network, your connection dies. Whether the ISP drops it, the
cable gets unplugged or the server behind your NAT box dies, it is gone. You are now lost at sea, not
knowing what is actually going on back at home. You ping, telnet, and pray to the network gods, but
nothing seems to work.
Wouldn’t it be better if your network could recognize that it has lost that connection and find a way for you to get back in touch? The system that I set up did just that. All it took was a well-configured OpenBSD firewall with NAT and a short Ruby program that uses the Jabber protocol to get my attention.
Hardware Configuration
I use OpenBSD on a 486 to make my network resistant to total connectivity failure. The computer has two network cards, one for the DSL bridge and the other for the rest of the network. In addition, I managed to find a 56k ISA modem.
Since this computer provides little more than firewall and NAT services, it’s more than capable of serving a small home or business network. The DSL bridge provides the primary Internet connection with a static IP. The service through my provider is usually quite good, but there have been troubled times. The house has only one phone line, which is plugged into the 56k modem in the same computer as the DSL line. You could easily make the modem computer a different machine entirely, but I found that this 486 is quite compact and sufficient for my purposes.
Connectivity Software
The current OpenBSD operating system (Version 3.4 as of this writing) comes with a wonderful firewall and NAT package, named Packet Filter (PF). PF works well on a day-to-day basis moving my packets from the network to the Internet. Unfortunately, it does not handle the loss of the connection to the ISP. A full discussion for configuring PF is beyond the scope of this hack, but you can find what you need from the OpenBSD PF FAQ at http://www.openbsd.org/faq/pf/index.html.
When the unthinkable happens and your network falls off the
Internet, you may fall back to your trusty 56k modem. The idea is that
the modem will dial out automatically once your main connection goes
away. First, though, you need some way to detect that your connection
is lost. I use a slow ping
to the router on the other end of my DSL
connection.
I run this heartbeat from cron instead of using a daemon process. It
sends three pings at two-second intervals every 10 minutes—a very
conservative test, especially if you are only sending to your local
gateway. Here is the cron
entry:
*/10 * * * * /usr/local/testconnect/testconnect.sh
The testconnect.sh script resembles this:
#!/bin/sh

# First gather data about your connection
PINGS=`ping -c 1 -i 2 [your gateway] | wc -l`

# Apply test and execute on result
if [ -f /tmp/lostconnection.lock ]
then
  echo "Lockfile in place"
else
  echo "No lockfile"
  if [ $PINGS -lt 8 ]
  then
    echo "Connection lost, commencing dialup"
    touch /tmp/lostconnection.lock
    pfctl -d
    ppp -nat internet
    ruby /usr/local/testconnect/send_new_ip.rb
  else
    echo "All is well"
  fi
fi
If the gateway is unavailable, then the pings will time out and generate a short
ping result. By counting the number of letters (with wc -l) and applying a length test (if [ $PINGS -lt 8]), the script can tell if
the pings failed. In the case of
failure, the script goes through the steps to give you connectivity
through alternative means and to stop it from doing it every 10
minutes if things go really wrong.
First, it creates a lockfile to ensure future runs of this
script do not dial out over and over again. Second, it shuts down the
current NAT interface to make way for the next step. Third, it fires
up the modem and connects to my emergency ISP using a preconfigured
ppp.conf profile called internet. Here, I enabled NAT (-nat) over PPP so that computers at my house
will only notice that the service is slow. The Internet connection
will still function in the same way. Finally, I run a script to alert
me to the failure.
You may have noticed one flaw in this setup. Most cheap ISP services usually do not give you the same IP address when you dial into them. How do you know how to contact your reconnected gateway from the outside? Easy: have the computer tell you.
Jabber and Ruby to the Rescue!
There are many ways a computer can contact you with its current status. I decided to use Jabber because I spend a fair amount of time with a Jabber session running. This script will notify me quickly if something untoward happens to my connection at home, such as an incident involving the vacuum cleaner.
I figured that a message from my computer with the current network configuration would provide enough information to allow me to log in remotely. The most important information is the current IP address of the backup PPP connection. I decided to create a Ruby script using the Jabber4r module to accomplish this:
require 'jabber4r/jabber4r'

now    = `date`.chomp!
ipdata = `/sbin/ifconfig tun0`

session = Jabber::Session.bind_digest("user@jabberserver/modem", "secret")
session.new_chat_message("user@jabberserver").
   set_body("I had to dial up for internet access at #{now}.
#{ipdata}
")
      .send

sleep 5
session.close
The Ruby script grabs the current time and state of the tun0 interface, which contains the current
IP address assigned by the dial-up ISP. Armed with that IP address,
you can then ssh into your computer
and begin to diagnose the situation.
The Jabber4r module lives at http://jabber4r.rubyforge.org/. You will also need the REXML module from http://www.germane-software.com/software/rexml/. Both of these installed without issue on top of the Ruby package that shipped with OpenBSD 3.4.
The Last Piece
After your connection has been restored, you need to clean up.
You will need to stop ppp, start PF
again—hopefully with pfctl—and
remove the lockfile that prevents the /tmp/testconnect.sh script from dialing out
over and over. After that, you should be back to normal, at least
until the next mishap.
See Also
The Jabber web site (http://www.jabber.org/)
The Ruby web site (http://www.ruby-lang.org/en/)
Humanize tcpdump Output
Make friends with tcpdump .
One of the most useful utilities in a network administrator’s
tool belt is tcpdump. While you
probably agree, I bet the very thought of wading through a tcpdump sniff makes you groan. Take heart:
I’ll walk you through some concrete examples that show how to zero in on
the information you need to solve the particular network problem that
prompted you to consider doing a packet sniff in the first place.
You might be thinking, “Why bother? There are much nicer utilities
out there.” That’s true. My personal favorite happens to be ethereal. However, you don’t always have the
luxury of working on a system that allows you to install third-party
utilities or, for that matter, even has X installed. tcpdump is guaranteed to be on your BSD
system. It’s there, it’s quick, it’s dirty, and it’s darn effective if
you know how to harness its power.
The Basics
Let’s start with the basics: starting a capture. Before you can capture any packets, you need to
be the superuser. You also need to have the bpf device in your kernel. If you’re using
the GENERIC kernel, you’re set. If you’ve created your own custom
kernel [Hack #54] , double-check you still have
that device. In this example, my kernel configuration file is called
CUSTOM:
# grep bpf /usr/src/sys/i386/conf/CUSTOM
# The 'bpf' device enables the Berkeley Packet Filter.
device    bpf    #Berkeley packet filter
You also need to know the names of your interfaces and which
interface is cabled to the network you wish to sniff. You can find
this with ifconfig:
# ifconfig
rl0: flags=8802<UP,BROADCAST,RUNNING,SIMPLEX,MULTICAST> mtu 1500
        inet 192.168.3.20 netmask 0xffffff00 broadcast 192.168.3.255
        ether 00:05:5d:d2:19:b7
        media: Ethernet autoselect (10baseT/UTP)
rl1: flags=8802<BROADCAST,SIMPLEX,MULTICAST> mtu 1500
        inet 192.168.12.43 netmask 0xffffff00 broadcast 192.168.12.255
        ether 00:05:5d:d1:ff:9d
        media: Ethernet autoselect (10baseT/UTP)
ed0: flags=8843<UP,BROADCAST,RUNNING,SIMPLEX,MULTICAST> mtu 1500
        inet 192.168.2.95 netmask 0xffffff00 broadcast 192.168.2.255
        ether 00:50:ba:de:36:33
lp0: flags=8810<POINTOPOINT,SIMPLEX,MULTICAST> mtu 1500
lo0: flags=8049<UP,LOOPBACK,RUNNING,MULTICAST> mtu 16384
        inet 127.0.0.1 netmask 0xff000000
This particular system has three Ethernet (ether) cards attached to three different
networks. Since I’m interested in the traffic on the 192.168.2.0
network, I’ll use the ed0
interface.
To start a capture, simply specify the interface you’re
interested in, with the interface (-i) switch:
#tcpdump -i ed0tcpdump: listening on ed0Ctrl ttcpdump: 24 packets received by filter, 0 packets dropped by kernelCtrl c33 packets received by filter 0 packets dropped by kernel
You will lose your prompt for the duration of the dump, and
captured packets will be displayed to your terminal (these weren’t
shown in this example’s output). If you press Ctrl-t, you can see how
many packets have been captured so far and how many have been dropped,
if any. If you’re dropping packets, that means packets are arriving
faster than tcpdump can process
them. To end your sniff, press Ctrl-c and you’ll return to your
prompt.
Unless you’re a speed reader or have a very boring network,
you’ll probably prefer to send the captured packets to a file. Use the
-w (write) switch to specify the
name of the file you’d like to create:
#tcpdump -i ed0 -w dumpfiletcpdump: listening on ed0Ctrl tload: 0:00 cmd: tcpdump 1458 [bpf] 0.01u 0.00s 0% 1576kCtrl c56 packets received by filter 0 packets dropped by kernel
Note that you won’t be able to read that file with a pager or
editor, as it is written in a format that only tcpdump or another packet-sniffer utility
can understand. Instead, use the -r
(read) switch and specify the name of the file:
# tcpdump -r dumpfile | moreDisplay Filters
If you try the previous examples on a moderately busy
network, you’ll probably remind yourself why you don’t like using
tcpdump. In a minute you can
capture hundreds of seemingly unintelligible lines of numbers. You’re
wasting time and brain cells if you’re wading through hundreds of
lines and you’re interested in only two or three of them. You can save
on both of those precious resources if you spend a few minutes
creating a display filter.
There’s always a reason behind a packet sniff. tcpdump is a very intelligent utility, but
it’s not a mind reader. However, if you can convert your reason into
syntax that tcpdump understands,
you can create a filter that will display only
interesting packets.
Let’s say that you suspect broadcast packets are slowing down a network segment. This incantation will capture only broadcast packets:
# tcpdump -i ed0 broadcastWhen you end your capture, you’ll find that the number of
packets received by the filter will be greater than the number of
packets displayed to your screen. This means that tcpdump will still capture all packets, but
will display only the packets matching your filter. This can give you
a good idea of ratio. For example, if you captured 100 packets in a
minute and only 4 of those packets were broadcasts, then broadcasts
probably aren’t an issue on that network.
Next example: a particular workstation is having problems
connecting to a server. Create a filter that zeros in on the packets
between those two systems, in this case, genisis and server1:
# tcpdump -i ed0 host genisis and server1In this example, I only have to use the host keyword once, as it is assumed until I
specify a different keyword. If I really like to type (which I don’t),
it would have been just as correct to type host genisis and host server1.
You can also fine-tune that syntax to unidirectional traffic like so:
# tcpdump -i ed0 src host genisis and dst host server1That will show only the traffic that was created at genisis and is destined for server1. This time I had to repeat the word
host, as one incantation was
src host while the other was
dst host.
Suppose you’re interested in only ICMP traffic:
# tcpdump -i ed0 icmpor perhaps only ARP traffic:
# tcpdump -i ed0 arpPerhaps you’re having a problem with IKE, which uses UDP port 500:
# tcpdump -i ed0 udp port 500As you can see, tcpdump comes
with many keywords that assist you in creating a display filter suited
to your needs. These keywords are building blocks for more complex
expressions. When you do your own combinations, you might find it
easier to use the words and,
or, and not. For example, this will capture all
traffic on network 192.168.2.0 that is not ARP-based:
# tcpdump -i ed0 net 192.168.2 and not arpOf course, you can find all of the keywords, along with
examples, in man tcpdump. I’ve highlighted only the most
commonly used keywords.
More Complicated Filters
tcpdump is capable of zeroing in on any particular field in a
packet. In order to harness this power, it’s useful to have a picture
of the various types of headers in front of you. Once you have a picture of the
fields contained within the particular header you’re interested in,
the examples in man tcpdump will
make a lot more sense.
You’ll know you’re creating a very specific filter if your
tcpdump expression contains the
name of a protocol followed by square brackets ([ ]). Let’s take a look at this example from
the manpage, which is designed to capture only SYN-1s, the first
packet in the TCP three-way handshake. Remember that square brackets
may have special meaning to the shell, so quote complex expressions to
prevent weird syntax errors:
# tcpdump -i ed0 'tcp[13] = = 2'If you’re familiar with the three-way handshake, you know that it involves the flags field of a TCP header. Let’s find that particular field within the TCP header. Figure 5-1 shows the header fields of a TCP packet.
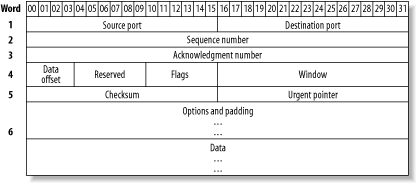
The number enclosed within the [
] represents how many octets into the header a particular
field occurs. Each line, or word, of a header is 4 octets long. The
Flags field is after the first three words (i.e., 12 octets) and
occurs one more octet in, just after the Data Offset and Reserved
fields. So, this particular TCP field occurs in octet 13 and is
represented by tcp[13].
Still with me? Okay, where’d the = =
2 come from? For that one, you need to know the names of the
flags as well as the decimal equivalents for each binary bit that
represents a flag. These are listed in Table 5-4.
Flag name | Decimal equivalent |
URG | 32 |
ACK | 16 |
PSH | 8 |
RST | 4 |
SYN | 2 |
FIN | 1 |
Finally, you need to know that the first packet in the three-way handshake is distinguished by just the SYN flag being turned on. Since all of the other flags will be turned off and will therefore contain a value of 0, a value of 2 in this field indicates that only the SYN bit is enabled.
If math isn’t your strong point, there is an alternate way to write this particular expression:
# tcpdump -i ed0 'tcp[tcpflags] = =tcp-syn'If the particular field you’re interested in happens to be the TCP flags field, the ICMP type field, or the ICMP code field, you’re in luck. Those three fields are predefined, so you don’t have to count how many octets in that field occurs in the header. So:
tcp[13]is the same expression astcp[tcpflags].icmp[1]is the same expression asicmp[icmpcode].icmp[2]is the same expression asicmp[icmptype].
Again, the manpage lists which ICMP types have predefined keywords. To specify the other types or the codes, look up the desired number from the official list at http://www.iana.org/assignments/icmp-parameters.
Deciphering tcpdump Output
Okay, you’ve managed to capture just the packets you’re interested in. Now, can you understand your results?
Let’s look at some sample lines from a dumpfile. This particular dump is the first few packets from a POP3 session:
# tcpdump -r dumpfile
17:22:36.611386 arp who-has 192.168.2.100 tell genisis.
17:22:36.611642 arp reply 192.168.2.100 is-at 0:48:54:1e:2c:76
ARP packets are fairly comprehensible. In this example,
my ARP table didn’t contain an entry for my default gateway,
192.168.2.100. My system, genisis,
sent out a request looking for that gateway. The gateway responded
with its MAC address, 0:48:54:1e:2c:76.
17:22:36.620320 genisis..49570 > nscott11.bellnexxia.net.domain:  40816+
A? pop1.sympatico.ca. (35)
17:22:36.628557 nscott11.bellnexxia.net.domain > genisis..49570:  40816
1/4/4 A 209.226.175.83 (203) (DF)
Once ARP had sorted out the MAC address, a DNS lookup had to occur. The word domain in these lines indicate a DNS lookup
request followed by a DNS reply. Let’s see if we can decipher both the
request and the reply.
Each starts with a timestamp, which is composed of the time and a random number, separated by a dot. Since many packets can be sent within the same second, the random number is used to differentiate between packets.
The two hosts are separated by a greater-than sign. If you can
visualize it as an arrow, like -->, you can see that genisis sent that first packet to nscott11.bellnexxia.net.domain. Each
hostname has an extra dot, followed by either a port number or a
resolved port name. In this case, genisis used port 49570, and nscott11.bellnexxia.net used the domain port. If you come across a port name
you’re not familiar with, look it up in /etc/services:
% grep -w domain /etc/services
domain    53/tcp    #Domain Name Server
domain    53/udp    #Domain Name Server
The next number, 40816, is an
ID number that is shared by both the DNS client (genisis) and the DNS server. The client then
asked a question (?) regarding the
A record for pop1.sympatico.ca. The entire packet itself
was 35 bytes long.
The second packet, from the DNS server, shared the same ID
number. It was also a longer packet, 203 bytes, as it contained the answer. See
the 1/4/4? This means that there is
one entry in the answer section, four entries in the authority
section, and four entries in the additional section. (See [Hack
#47] for an explanation of these sections.) The DNS
server also sent the requested A
record, which contains the requested IP address, 209.226.175.83.
Now that name resolution has succeeded, a packet can be sent to the POP3 server:
17:22:36.629268 genisis..49499 > 209.226.175.83.pop3: S
2697729992:2697729992(0) win 65535 <mss 1460,nop,wscale 1,nop,nop,timestamp
2474141 0> (DF)
17:22:36.642617 209.226.175.83.pop3 > genisis..49499: S
2225396806:2225396806(0) ack 2697729993 win 25920 <nop,nop,timestamp
3293621409 2474141,nop,wscale 0,mss 1452> (DF)
This output is much easier to read if you have a picture of a
TCP header handy, as the output details the information found in that
header. Each line starts out as before: the timestamp, source port,
>, and destination port. We then
see an S, which refers to that SYN
flag.
This is followed by the sequence number and, almost always, by the ack number. The only packet that doesn’t have an ack number is the SYN-1, the first packet in this example. This is because a SYN-1 is the first TCP packet, so there is nothing to acknowledge yet. All other TCP packets after the SYN-1 will have an ack.
Next comes the window size. If the packet has any options, they
will be enclosed within angle brackets. Finally, the IP header had the
“don’t fragment” flag, DF, set.
This is important enough to be printed at the end of any line
representing a TCP or UDP header.
See Also
man tcpdump“TCP Protocol Layers Explained,” a FreeBSD Basics column (http://www.onlamp.com/pub/a/bsd/2001/03/14/FreeBSD_Basics.html)
“Examining ICMP Packets,” a FreeBSD Basics column (http://www.onlamp.com/pub/a/bsd/2001/04/04/FreeBSD_Basics.html)
Understand DNS Records and Tools
Demystify DNS records.
DNS is one of those network services that has to be configured carefully and tested regularly. A misconfigured DNS server can prevent the world from finding your web and mail servers. Worse, a misconfigured DNS server can allow the world to find more than just your web and mail servers.
Even if you’re not a DNS administrator, you should still know some handy DNS commands. The simple truth is, if DNS isn’t working, you’re not going anywhere. That means no surfing, no downloading, and no email for you.
Exploring Your ISP’s DNS
On your home system, you most likely receive your DNS information from your ISP’s DHCP server. Do you know where to find your primary and secondary DNS server addresses? If not, try this:
% more /etc/resolv.conf
search domain.org
nameserver 204.101.251.1
nameserver 204.101.251.2
Another method is to use the dig (domain
information groper) utility. Here, I’ll ask for the nameservers (ns) for
the sympatico.ca network:
% dig ns sympatico.ca

; <<>> DiG 8.3 <<>> ns sympatico.ca
;; res options: init recurs defnam dnsrch
;; got answer:
;; ->>HEADER<<- opcode: QUERY, status: NOERROR, id: 2
;; flags: qr rd ra; QUERY: 1, ANSWER: 4, AUTHORITY: 0, ADDITIONAL: 4
;; QUERY SECTION:
;;        sympatico.ca, type = NS, class = IN

;; ANSWER SECTION:
sympatico.ca.                8h29m IN NS        ns5.bellnexxia.net.
sympatico.ca.                8h29m IN NS        ns6.bellnexxia.net.
sympatico.ca.                8h29m IN NS        dns1.sympatico.ca.
sympatico.ca.                8h29m IN NS        dns2.sympatico.ca.

;; ADDITIONAL SECTION:
ns5.bellnexxia.net.        23m45s IN A        209.226.175.236
ns6.bellnexxia.net.        32m47s IN A        209.226.175.237
dns1.sympatico.ca.         27m28s IN A        204.101.251.1
dns2.sympatico.ca.         22m26s IN A        204.101.251.2

;; Total query time: 2038 msec
;; FROM: genisis to SERVER: default -- 198.235.216.111
;; WHEN: Sun Nov 23 17:22:31 2003
;; MSG SIZE  sent: 30  rcvd: 182
Understanding DNS entries
dig results are divided into sections. Not surprisingly, the
ANSWER SECTION answers the
question asked; in this case, “What are the nameservers for
sympatico.ca?” In DNS, each entry in the DNS
database is called a record. The answer
indicates that sympatico.ca has four
nameservers. Their hostnames are:
ns5.bellnexxia.netns6.bellnexxia.netdns1.sympatico.cadns2.sympatico.ca
The next section, ADDITIONAL
SECTION, maps each hostname in the ANSWER SECTION to its corresponding IP address.
As an end user, you’re really interested in the IP addresses of your
nameservers, not their names. You need the address of least
one DNS server before you can resolve
any name to an address.
The other thing I’d like to point out is the type of records
that were returned in the output. Notice that each nameserver record
had an NS. If you ever see
NS in a DNS database, you know
you’re looking at a DNS server record. Also, all hosts, regardless
of whether they also happen to be a DNS server, web server, or mail
server, have an A record. An
A record maps a hostname to an IP
address. In other words, a DNS server has two records: the NS record indicates that it is a DNS
server, and the A record lists
its IP address.
Can you tell which of the four nameservers in this output is the primary nameserver?
You could look at the names and try to figure it out from there.
However, it is possible to find out for sure, and it’s easy once you
know that SOA, the start of
authority record, indicates the primary nameserver. Let’s ask
dig to show us the SOA record:
% dig soa sympatico.ca
<snip banner>
;; ANSWER SECTION:
sympatico.ca.                16m18s IN SOA        dns1.sympatico.ca.
dns-admin.sympatico.ca. (
<snip>
;; AUTHORITY SECTION:
sympatico.ca.                3h22m20s IN NS        dns2.sympatico.ca.
sympatico.ca.                3h22m20s IN NS        ns5.bellnexxia.net.
sympatico.ca.                3h22m20s IN NS        ns6.bellnexxia.net.
sympatico.ca.                3h22m20s IN NS        dns1.sympatico.ca.
;; ADDITIONAL SECTION:
dns2.sympatico.ca.          8m36s IN A        204.101.251.2
ns5.bellnexxia.net.         9m55s IN A        209.226.175.236
ns6.bellnexxia.net.        18m57s IN A        209.226.175.237
dns1.sympatico.ca.         13m38s IN A        204.101.251.1

;; Total query time: 239 msec
;; FROM: genisis to SERVER: default -- 198.235.216.111
;; WHEN: Sun Nov 23 17:36:22 2003
;; MSG SIZE  sent: 30  rcvd: 228
Notice the answer? Looks like dns1.sympatico.ca or 204.101.251.1 is the primary nameserver.
We also received an extra section, the AUTHORITY SECTION. Every query except
ns will show which nameservers
have the “authority” to answer your question.
You may prefer to try an any query instead of ns. This will show both the NS records and the SOA record, all in one shot.
While you’re digging through your ISP’s DNS information, you
might want to find the name of your SMTP server. Since these servers have mail exchange (MX) records, use an mx query:
% dig mx sympatico.ca
<snip banner>
;; ANSWER SECTION:
sympatico.ca.                27m48s IN MX        5 smtpip.sympatico.ca.
sympatico.ca.                27m48s IN MX        5 mta1.sympatico.ca.
sympatico.ca.                27m48s IN MX        5 mta2.sympatico.ca.
sympatico.ca.                27m48s IN MX        5 mta3.sympatico.ca.

;; AUTHORITY SECTION:
sympatico.ca.                2h34m29s IN NS        dns2.sympatico.ca.
sympatico.ca.                2h34m29s IN NS        ns5.bellnexxia.net.
sympatico.ca.                2h34m29s IN NS        ns6.bellnexxia.net.
sympatico.ca.                2h34m29s IN NS        dns1.sympatico.ca.

;; ADDITIONAL SECTION:
smtpip.sympatico.ca.        28m30s IN A        209.226.175.84
mta1.sympatico.ca.          13m56s IN A        209.226.175.80
mta2.sympatico.ca.          28m30s IN A        209.226.175.81
mta3.sympatico.ca.          13m56s IN A        209.226.175.82
<snip>
Looks like my ISP has four SMTP servers; I’d better remember which one I’m supposed to use!
MX records always include a priority number. In this example, each mail server has
a priority of 5, so they all have the same priority. Sometimes
you’ll see records where one mail server has a higher number than
another. Always try sending your email to the server with a
lower number—that server has a higher priority.
If the priority is 0, you should
always use that mail server. This bit of information is good to know
if you plan to send someone an
email without using a mail client [Hack
#48] .
Securing DNS
Put on your administrator’s hat for a moment and re-examine
these dig outputs. Did you happen
to notice that the nameservers live on different networks? Let’s take
another look at those A records for
the DNS servers:
dns2.sympatico.ca.         8m36s IN A        204.101.251.2
ns5.bellnexxia.net.        9m55s IN A        209.226.175.236
ns6.bellnexxia.net.       18m57s IN A        209.226.175.237
dns1.sympatico.ca.        13m38s IN A        204.101.251.1
Two of the four nameservers live on network 204.101.252, and the other two live on network 209.226.175. This is actually a good network design. Several attacks against high-profile companies have succeeded because their DNS servers were all on the same subnet of the same network. (See this article about DNS troubles at Microsoft for an example: http://www.findarticles.com/cf_dls/m0FOX/3_6/75645162/p1/article.jhtml.)
Realistically, to provide such protection, your company has to enter into an agreement with another company willing to host a copy of your DNS database. That other company may be your ISP, or perhaps a sister company. While adding redundancy, this also adds complexity and another element of trust. It’s one thing to keep your own DNS servers up-to-date, fully patched, and securely configured. It’s quite another to work with another administrator and assume that she has the resources to devote the same time and effort to your DNS servers.
Regardless of how the network is organized, someone has to address the issue of zone transfers. In DNS, your database is called a zone, as it really is just a portion of the globally distributed DNS database. When you need to make a change to your zone, you edit the database on the primary DNS server. However, you have to implement at least one secondary DNS server to provide redundancy. How are those changes propagated to the secondary DNS server(s)? If you guessed “via a zone transfer,” you’re right!
It’s important to make a distinction here. Resolving a hostname is one thing. As an end user, you need that functionality in order to access Internet resources. As an administrator, you want your DNS servers to provide name resolution. Otherwise, you have to listen to a lot of unhappy end users.
However, your end users do not need to know the entire contents
of your DNS database. The world at large certainly doesn’t need to
know the name and IP address of every host in your network. Think
about that one for a moment. You probably have machines right now
called finance, hr, patents, store, or admin. What tasty names those are to fire
the imaginations of a malicious user!
The two-pronged approach
You can use a two-pronged approach to prevent your DNS servers from leaking information you’d rather not have the world see. The first approach is called split DNS. Run your full DNS zone within your internal network, and run a very small subset of that zone in your DMZ. That small subset is all the world sees. If you think about it for a moment, which records does the world need to know about? Probably just the record for your DNS server (the one in the DMZ, with its secondary preferably hosted at your ISP or somewhere else), the record for your web server, and the record for your SMTP server. Those are the only records that this mini-zone should contain.
The second approach is to control zone transfers tightly. The last thing you want to happen is for the DNS server in the DMZ to ask for a copy of your full internal zone. For that matter, you also don’t want a user on the Internet to ask your internal DNS server for all of the records in your network.
There are multiple ways to control zone transfers, and you should implement all of them. First, read the documentation for your DNS server to see how to restrict the IP addresses that are allowed to ask for zone transfers. (The “Securing an Internet Name Server” link in this hack’s Section 5.7.3 section explains how to do this for BIND.)
Second, configure your firewalls to control zone transfers. DNS is an interesting protocol, as it uses port 53 with both TCP and UDP. Your firewalls must allow UDP 53; if you deny this, all name resolution will stop. That is a bad thing. However, TCP 53 is used for zone transfers. You must carefully construct a firewall rule that allows TCP 53 only for the specific IP addresses of the DNS servers that need to participate in a zone transfer. Remember, you do want to transfer changes to your secondary servers.
Third, create guidelines to test your DNS servers periodically. Notice how complex it was to secure those nameservers. How many things could go wrong? Perhaps an OS patch or a DNS server application patch will introduce a new hole. Perhaps a change in a firewall rulebase will unwittingly reallow zone transfers. You’re dealing with multiple DNS servers—probably in multiple locations—and multiple firewalls, which only increases the possibility of error. A routine testing schedule increases the chance of catching those errors before they remain for very long.
Testing DNS
You can use the axfr switch
with dig to test your DNS
servers, but I prefer the output provided by host -al. When you run this utility against your own domain name, you should see a
result similar to this one:
% host -al sympatico.ca
rcode = 0 (Success), ancount=4
Found 1 addresses for ns5.bellnexxia.net
Found 1 addresses for ns6.bellnexxia.net
Found 1 addresses for dns1.sympatico.ca
Found 1 addresses for dns2.sympatico.ca
Trying 209.226.175.236
Server failed, trying next server: Query refused
Trying 209.226.175.237
Server failed, trying next server: Query refused
Trying 204.101.251.1
Server failed, trying next server: Query refused
Trying 204.101.251.2
Server failed: Query refused
Remember, host -al asks for
a zone transfer. You want your DNS servers to
refuse this request. In this example, all four DNS servers received
the request, so I know they are up and working. The host utility then requested a zone
transfer from each server. Note the order: the first IP address is
for the first listed nameserver, and so on. This is important,
especially if one of those nameservers responds with a zone
transfer. I can’t count the number of times I’ve tested DNS servers
and two out of three will refuse the query, but one will allow the
zone transfer. You’ll know which DNS server was the culprit if you
make note of the server response order.
This test is especially important if one or more of your DNS servers is hosted elsewhere. Make sure your agreement indicates that you will be regularly testing your DNS servers for misconfigurations.
See Also
man digman hostImplementing Split DNS (http://www.relevanttechnologies.com/splitdns_081000.asp)
“Securing an Internet Name Server” (http://www.acmebw.com/resources/papers/securing.pdf)
Send and Receive Email Without a Mail Client
Learn to speak SMTP and POP3.
Contrary to popular belief, you don’t have to go to the trouble of configuring an email client just because you want to check your email or send off a quick email message.
Normally when you use the telnet application, you use a Telnet client to
attach to a Telnet server listening on port 23. Once you’re connected,
you can log in and do anything on that device as if you were physically
there, typing at its keyboard.
The Telnet client has even more powerful capabilities than this.
If you specify a port number with the telnet command, you will attach directly to
the TCP server listening on that port. If you know which commands that
server can respond to, and if the service understands plain text
commands, you can talk directly to that server. This essentially means
that you no longer require a client application specific to that
server.
Sending Email with telnet
Whenever you send an email, you connect to an SMTP server
listening on port 25. Let’s use telnet to see what really happens in the
background and which commands the client and the SMTP server exchange.
Note that in the following examples, the names and addresses have been
changed to protect the innocent.
%telnet smtp.mycompany.com 25Trying 1.2.3.4... Connected to smtp.mycompany.com. Escape character is '^]'. 220 smtp.mycompany.com ESMTP server (InterMail version x) ready Sun, 2 Nov 2003 09:54:18 -0500mail from:<[email protected]>250 Sender <[email protected]> Okrcpt to:<[email protected]>250 Recipient <[email protected]> Okdata354 Ok Send data ending with <CRLF>.<CRLF>This is a test message.Not very interesting, really..250 Message received: 20031102145448.QON15340.smtp.mycompany.com@[1.2.3.4]quit
Let’s pick apart that output. Note the 25 at the end of the telnet command. If you forget the port
number, your prompt will probably hang. This is because instead of
trying to connect to the SMTP service, you’re trying to receive a
login prompt from your ISP’s mail server. If you actually do receive a
login prompt, it is time to switch ISPs, as security is obviously not
one of their concerns!
Next, the output indicates when you successfully connect to the SMTP service. Notice that there are very few secrets in TCP/IP-land. The SMTP server readily shows its banner, which indicates the type of SMTP application running on that server, its version and patch level, as well as the time and date you connected. We’ll talk more about banners later.
After connecting to the server, I issued two SMTP commands:
MAIL FROM and RCPT TO. Some SMTP servers are pickier than
others and won’t recognize these commands unless you say hello first.
If your SMTP server complains about your lack of politeness, try
typing HELO or EHLO. I know that this SMTP server accepted
my commands because the responses start with 2xx and end with Ok. Responses that begin with 5xx indicate errors—you either made a typo
or used the wrong command. Most SMTP servers try to be helpful by
giving the syntax of the command they expect to receive.
After providing the sender and recipient email addresses, I
issued the DATA command and pressed
Enter. The SMTP server then asked me to type my message. To indicate I
was finished, I put a dot (.) on a line by itself. The server
responded with a message number, and I ended the session by typing
QUIT.
Some interesting things happen if I play a bit with the SMTP
commands. For example, the MAIL
FROM command does not verify that the given email address is
valid. This has some interesting ramifications, as I could pretend to
be [email protected],
[email protected], or any other address my
imagination could dream up. Remember this quirk when you read your
email. There is no guarantee that any given email was actually sent
from the email address it purports to be from.
Additionally, I’ll have mixed results if I start playing with
the RCPT TO address. I might start
receiving error messages like this:
550 relaying mail to nowhere.com is not allowed
This is actually a good error message to receive, as SMTP relaying is considered to be a bad thing. In this particular instance, I’ve asked the SMTP server of mycompany.com to send my message to a recipient at nowhere.com. The server rightfully complained, as it should only be responsible for the recipients at mycompany.com. If I want to send a message to a recipient at nowhere.com, I should instead attach to nowhere.com’s SMTP server.
Tip
Since you’re supposed to connect to the correct SMTP server in order to send email, how can you find out the name of a recipient’s SMTP server? This is a very easy matter, since a company’s DNS server has to maintain an MX record for just this purpose. See [Hack #47] for details.
Testing for Relaying
As mentioned before, relaying is considered harmful because it
allows spammers to use another company’s SMTP server to relay spam. If
you’re responsible for an SMTP server, be sure to read your SMTP
documentation to see whether relaying is off by default and how to
turn it off if it isn’t. You can then initiate a quick telnet session to port 25 to ensure your
SMTP server does indeed refuse to relay email. For example, I don’t
want the mycompany.com SMTP server to respond
like this:
               rcpt to:<[email protected]>
250 Recipient <[email protected]> Ok
If it does, it is willing to relay to the unix.ca SMTP server.
What else should you look for when you telnet to your own SMTP server? Take a
careful look at your banner. Does it freely advertise that you’re one
or two patch levels behind? Do you really want to tell anyone who
knows enough to ask which particular SMTP product you’re using? If
they know enough to use telnet,
they probably know how to use Google to look for known vulnerabilities
in that product. It’s always good to know exactly what the world sees.
You can then determine if you prefer to change the banner to something
a little less chatty. Read the documentation for your particular
product to see how to do so.
Testing SMTP Server Availability
Finally, telnet is an invaluable troubleshooting tool. For example, if
users complain that they can no longer access the mail server, your
first step is to check connectivity by pinging the mail server. If the mail server
responds, you can telnet to its
SMTP port to verify that the SMTP service is still running.
Reading Email with telnet
Let’s move on to POP3, so we can pick up our email messages. Here I’ll pick up that message I sent previously:
%telnet pop.mycompany.com 110Trying 1.2.3.4... Connected to pop.mycompany.com. Escape character is '^]'. +OK InterMail POP3 server ready.user you+OK please send PASS commandpass thecleartextpassword+OK you is welcome herelist+OK 1 messages 1 544 .retr 1+OK 544 octets Return-Path: <[email protected]> Received: from [1.2.3.4] by smtp.mycompany.com (InterMail version x) with SMTP id: <20031102145448.QON15340.smtp.mycompany.com@[1.2.3.4]> for <[email protected]>; Sun, 2 Nov 2003 09:54:18 -0500 Message-Id: <20031102145448.QON15340.smtp.mycompany.com@[1.2.3.4]> Date: Sun, 2 Nov 2003 09:57:34 -0500 From: <[email protected]> This is a test message. Not very interesting, really. .quit+OK you InterMail POP3 server signing off. Connection closed by foreign host.
Notice that you use port 110 to connect to a POP3 server. Also,
the commands used by POP3 are very different than those understood by
SMTP. In this session, I used the USER command to indicate my username and the
PASS command for my password.
Unlike SMTP, you do have to authenticate to use POP3.
Once I successfully authenticated, I used the LIST command to see how many email messages
were waiting for me. I had one message, which was 544 bytes long. I
then used the RETR command to
display that message, including the headers as well as its contents,
and typed the QUIT command to end
the POP3 session.
There are several things you should be aware of regarding the POP3 protocol. The first is that every single packet—including those containing your username, password, and the contents of each email message—are sent in clear text. That means that a packet sniffer running on your network would have full access to that information.
Second, anyone who knows your email password could conceivably
connect to your POP3 server and read your email. Worse, they could use
the DELE command to delete your
email before you had a chance to receive it.
Security Considerations
That doesn’t sound very good, does it? There are several things you can do as an end-user to protect your email. One is to use a third-party email encryption product, which will protect the contents of your email (but not your username and password) from packet sniffers. The other is to use different passwords for different functions. For example, don’t use the same password to pick up email, do online banking, log into your office network, etc. And always pick a password that your friends and family won’t be able to guess.
As an email administrator, you can also create a safer
environment for your users. Create a different username for each user,
something other than the names contained within their email addresses.
For example: [email protected] usually indicates
a username of moi. That means I
could connect to the POP3 server at mycompany.com
and try to guess the password for the user moi. However, if the administrator had given
that user a username such as l2tn4g
and instructed that user never to give out his username, it would be
much more difficult for someone else to access his email.
See Also
RFC 2821, the latest SMTP RFC (including valid SMTP commands), at http://www.ietf.org/rfc/rfc2821.txt
RFC 1939, the latest POP3 RFC (including valid POP3 commands), at http://www.ietf.org/rfc/rfc1939.txt
The Relaying FAQ (http://ordb.org/faq/)
How to Read Email Headers (http://www.stopspam.org/email/headers.html)
Why Do I Need sendmail?
As an end user, you’ve probably asked yourself: “If all I’m doing is
running a FreeBSD machine for personal use, why should I need to run a
heavyweight MTA daemon like sendmail?”
sendmail is the standard Mail
Transport Agent (MTA) on FreeBSD, as it is on most Unix systems. In
fact, the majority of email passing over the Internet will probably
travel through a sendmail server at
some point. However, sendmail isn’t
the easiest software package to manage, and the configuration file
syntax gives most people a headache. There are several alternative MTA
packages available, but these are also industrial-strength programs
suitable for demanding use.
Many modern graphical email clients, such as Netscape Mail or
Evolution, can send email directly to a mail server machine across the
network. So, no, you won’t need an MTA on your local machine to send
email. (However, you will need an MTA if you use one of the more
traditional Unix mail clients, such as mail, mutt,
or pine.)
Regardless of your email client, if you want to see any automatic
emails the system sends—usually from the periodic scripts—then you do require an MTA. More precisely, Unix
programs expect to be able to send email by piping its text into the
standard input of /usr/sbin/sendmail, and have the system take
care of the rest of the work for them.
Tip
The venerable sendmail is
only one of many MTAs available. Choosing another MTA does not always
mean that you need to change the habits you picked up while working
with sendmail. All three major BSD
systems have a translator file, /etc/mailer.conf, that identifies which
commands to execute when the user or another process executes sendmail, mailq, or newaliases.
For example, if you install postfix, you still use the sendmail command, even though the real job
is done by the commands from the postfix package. The existence of /etc/mailer.conf makes it easy to replace
one MTA with another without turning the whole mail subsystem upside
down.
Closing Port 25
Since most systems aren’t mail servers, you can disable the
receiving of email. In other words, there’s no
reason to have sendmail listening
on port 25 on any exposed interface.
Tip
Port 25 must be open on SMTP mail servers, but it does not have to be open in order to send an email as a client. Remember, any unnecessary open port is a potential security risk.
It is possible to close port 25 (except on the loopback
interface) and still allow sendmail
to run occasionally in order to process outgoing messages. Add the
following line to /etc/rc.conf:
sendmail_enable="NO"
With the release of sendmail-8.12.2 in 2002, sendmail has been split into two parts, each
with a separate configuration file. These are the MTA process, which
uses SMTP to copy the mail from machine to machine, and the Mail Submission Process (MSP), whose job is to read in
the complete text of any new email and reliably inject it into the
MTA. When programs run /usr/sbin/sendmail, they interact with the
MSP.
You can either run an MTA process locally or not run it at all, configuring the MSP to deliver straight to the MTA on your provider’s smart host. In order to deliver any email, it has to pass from the MSP to an MTA. The MSP talks SMTP to the MTA to do that, which requires the MTA to be listening on port 25.
Simple sendmail Configuration with a Local MTA
Setting sendmail_enable="NO" in /etc/rc.conf does not turn off sendmail—use sendmail_enable="NONE" for that—but it does
stop sendmail from receiving
incoming email. In fact, sendmail_enable="NO" will result in starting
up two sendmail processes: an MSP
queue manager and an MTA process that listens on the loopback address
only. Having the MTA listen only on the loopback interface means that
it can be accessed only from the local machine. This is an acceptably
secure compromise between having port 25 open generally and not having
access to the local MTA at all.
If you want to send emails to external recipients, edit the sendmail configuration file slightly to tell
it the name of your provider’s email smart host:
#cd /etc/mail#cp freebsd.mc `hostname`.mc
where `hostname` turns into
the system’s hostname.
Open < hostname>.mc in your favorite editor. Change the line that says:
dnl define(`SMART_HOST', `your.isp.mail.server')to read:
define(`SMART_HOST', `smtp.yourprovider.net')Replace smtp.yourprovider.net with
the correct name of your provider’s SMTP server. dnl stands for “Delete until New Line”—it’s
used to comment out text in .mc
files, so this change simply uncomments an example line in the default
.mc file. Note that in .mc files, the left tick (`) is different from the right tick
(').
Tip
By default, the submission port (587) is also open. This port is part of the SMTP standard, but there is very little application support at the moment, so you won’t miss it if you close it. Add this line to your hostname.mc:
FEATURE(no_default_msa)dnl
Now process the .mc file into a .cf file, and install and activate it:
#make#make install#make restart-mta
You don’t need to make any changes to the default sendmail MSP configuration. This setup will
send all messages for nonlocal users to the provider’s smart host for
processing. It doesn’t provide any means of receiving incoming emails
over the network.
Simple sendmail Configuration Without a Local MTA
Instead of running both a sendmail MSP queue runner and a sendmail MTA process, an alternative is to
use just an MSP queue runner. Don’t worry about the sendmail MTA, as
you’re not using it. In addition to sendmail_enable="NO“, add these lines to
/etc/rc.conf:
sendmail_submit_enable="NO"
sendmail_outbound_enable="NO"
You’ll also need to customize the sendmail configuration slightly, this time
for the MSP rather than the MTA.
#cd /etc/mail#cp freebsd.submit.mc submit.mc
Change the last line in submit.mc from:
FEATURE(`msp', `[127.0.0.1]')dnl
to:
FEATURE(`msp', `smtp.yourprovider.net')dnlwhere, as before,
smtp.yourprovider.net is your ISP’s mail
smart host.
Then, install and activate the new configuration:
#make#make install#make restart-mspq
Again, this will permit you to send email anywhere in the world,
but not to receive incoming messages. This differs from the preceding
“with MTA” configuration, in that this has to send all outgoing
messages—without exception—through the provider’s smart host. In
return, there is no longer a sendmail process listening on port 25.
Tip
A third alternative to send-only SMTP is ssmtp, which is
available in the FreeBSD ports collection or from source at the main
web site. You can find detailed instructions in Bill Moran’s “Setting up to send only” article at http://www.potentialtech.com/wmoran/outgoing-only.html.
See Also
man sendmailman mailer.confman rc.confThe
ssmtpweb site (http://packages.debian.org/testing/mail/ssmtp.html)
Hold Email for Later Delivery
Control when sendmail uses an intermittent Internet connection.
The default sendmail configuration assumes that you have a constant network
connection. What if you’re on a dial-up system and want to be able to
work on emails without causing your modem to dial up immediately? In
this scenario, you want to queue your sent messages to send later, the
next time you go online.
Configuring sendmail Queueing
Fortunately, sendmail
has a “hold expensive” function designed for this purpose. To activate
it, add the following lines to the /etc/mail/<hostname>.mc file:
define(`confCON_EXPENSIVE', `True')dnl
MODIFY_MAILER_FLAGS(`RELAY', `+e')dnl
MODIFY_MAILER_FLAGS(`SMTP', `+e')dnl
MODIFY_MAILER_FLAGS(`ESMTP', `+e')dnl
MODIFY_MAILER_FLAGS(`SMTP8', `+e')dnl
define(`confTO_QUEUEWARN', `12h')dnl
The first line enables the feature. The next four lines add the
letter e to the flags for each
named mailer, to indicate that it is “expensive” and that email should
first be queued rather than immediately delivered. The last line just
extends the length of time the system will wait before it warns you
that your message hasn’t been delivered yet (the default is four
hours).
Now just build the configuration file, install it, and restart
sendmail as usual:
#cd /etc/mail#make#make install#make restart-mta
The four mailers listed (RELAY, SMTP, ESMTP, and SMTP8) will handle the bulk of all
transmissions over the network. The configuration of both local and
remote mail systems will determine which one to use. However, if you
send out all of your mail via your provider’s smart host, the RELAY mailer is the best choice.
So far so good. However, you still need to make some more
changes to the way sendmail runs.
Queued messages will sit in the mail queue (/var/spool/mqueue) until the next sendmail queue run. These occur every 30
minutes when using the default sendmail command-line flags. The following
settings in /etc/rc.conf will
suppress that default:
sendmail_enable="NO"
sendmail_submit_flags="-L sm-mta -bd -ODaemonPortOptions=Addr=localhost"
Note the deletion of -q30m
from the default value of sendmail_submit_flags. Those lines assume
that you don’t want a sendmail
process listening on port 25 on your network interface for incoming
emails, which can be problematic on a transient link, such as dial-up.
(See [Hack
#49] for an alternate approach.)
Configuring PPP
Having effectively prevented the system from ever flushing the mail queue, you’ll now need to add a
mechanism for sending all queued email when the PPP link activates. If
you’re running the user land ppp
daemon, create /etc/ppp/ppp.linkup with these
contents:
papchap:
    !bg /usr/sbin/sendmail -q
/etc/ppp/ppp.linkup should
be owned by the root user and the
wheel group, and be writable only
by root, although it can be
readable by all.
Alternatively, add the line /usr/sbin/sendmail -q to an existing
auth-up file. (pppd uses the shell script /etc/ppp/auth-up to run commands after the
link has come up and the systems have authenticated
successfully.)
Dealing with DNS
There is a huge gotcha in this whole discussion. sendmail makes extensive use of the
DNS while it processes email. That DNS traffic will
usually trigger on-demand dialing, and bringing up the PPP
link—triggering an immediate queue flush—defeats the whole purpose of
what you’ve done so far.
There are several things you can do to ameliorate this problem:
Add DNS traffic to the
dialfilter in /etc/ppp/ppp.conf if you use user-modeppp. This is effective, but leads to annoying delays waiting for DNS lookups to time out.
Tip
0 and 1 are just the rule numbers for the dial filter set: modify these as necessary if you already have some dial filter rules.
Run your own DNS server either just as a local cache or as the authoritative host for your local networks.
Record the hostnames and IP numbers of your systems and your provider’s mail systems in /etc/hosts, and configure the system to use the flat files instead of DNS. (See
man host.conffor FreeBSD 4.x andman nsswitch.conffor 5.x.)Alternatively, use other local databases to do host lookups, such as NIS or LDAP.
Specify hostnames in the
sendmailconfiguration using square brackets around the[hostname].
This last option tells sendmail not to look up MX records, which
are available only from DNS; instead, it will only look up IP numbers.
For example, specify your ISP’s SMTP server’s hostname in this line of
/etc/mail/<hostname>.mc:
define(`SMART_HOST', `[smtp.example.com]')dnl
Then, rebuild the configuration file as before.
Note that these hacks will only mitigate the DNS problem. Unfortunately, it is all but impossible to eliminate inconvenient DNS lookups.
Get the Most Out of FTP
Get the most out of stock ftp with macros and scripts.
In this age of GUIs and feature-rich browsers, it’s easy to forget
how quick and efficient command-line ftp can be. That is, until you’re logged into
a system that doesn’t have X installed, nor a browser, nor any fancy FTP
programs. If it’s really your lucky day, it won’t even have any
manpages. And, of course, you’ll need to download something.
Perhaps you find yourself using ftp all the time, always going to the same FTP
servers and downloading from or uploading to the same directories.
Clearly, it’s time for some FTP automation.
Automating Logins
Have you ever noticed how easy it is to use FTP from a modern browser? Simply click on a hyperlink to start a download. At the command line, though, you can’t even browse the FTP directory structure until you successfully log into the FTP server. Well, guess what: you always have to log into an FTP server. It’s just that your web browser hides this little detail by doing it for you in the background.
You can achieve the same transparency for command-line ftp by creating a file called .netrc in your home directory and placing
the following line in that file:
% more ~/.netrc
default login anonymous password [email protected]
This line will work for any FTP server on the Internet that accepts anonymous logins. (Most do, unless it’s a private server.) When creating your own file, use your own email address as the password.
Test your change with this command:
% ftp ftp.freebsd.orgCompare your results to the FTP output in [Hack #71] . You should receive the same banner shown there without having to first type in a username and password.
If you’re a webmaster who uses FTP to upload your new files, you do have to log in first. After all, you don’t want just anyone uploading files, so you require a username and password. To automate that process, add a section to your ~.netrc that reflects the name of your server and your username and password:
machineftp.myserver.comloginmyusernamepasswordmypassword
Since you’ve just inserted your password into a plain text file, it’s important to change the permissions on this file so that only you can read it:
% chmod 600 ~/.netrcIf you forget to change the permissions and try to access an FTP server that requires a username and password, your login attempt should fail and result in this error message:
ftp: Error: .netrc file is readable by others.
ftp: Remove password or make file unreadable by others.
To be extra safe, exclude the password line completely. When you connect
to the FTP server, your username will be provided for you, but you
will still be prompted for the password.
Automating Transfers
Now, let’s say that you visit ftp.freebsd.org on a regular basis
and always access its pub/FreeBSD/releases/i386 directory. Rather
than cding every time, you can
automate that process by creating an FTP macro. Add these lines to
~/.netrc:
macdef fbsd
bin
cd /pub/FreeBSD/releases/i386
Macros are defined by macdef, and the name of the macro follows.
Keep the name short but useful, as a macro is supposed to be a
timesaver. Once you’ve declared the macro, add the FTP commands you
want to execute, one line at a time. This particular macro contains
the bin (or binary) command. That command is useful when
downloading because it ensures all files, including non-ASCII files
such as applications, will download correctly. I also included a
cd command to automatically take me
to my usual working directory.
There are two ways to use your macro. If you’re already
connected to the FTP server, type $
macroname at the ftp prompt:
ftp> $ fbsd
bin
200 Type set to I.
cd /pub/FreeBSD/releases/i386
250 "/pub/FreeBSD/releases/i386" is new cwd.
Note that each command in the macro will be executed, followed by its results.
The second way to run the macro is when you first invoke the
ftp command:
% echo "$ fbsd" | ftp ftp.freebsd.orgNow, if you try that one, you’ll notice that all of your
commands will succeed. Then, your FTP session will abruptly end, and
you’ll receive your regular prompt back! Rather disappointing if you
were planning on typing some more commands at the ftp prompt, but absolutely perfect if your
intention is to script an entire FTP session.
Scripting an Entire Session
If you already know what you want to do, and especially if
you need to do it more than once, why type in everything at the
ftp prompt? Suppose you want to
download the latest XFree86 distribution directly from ftp://ftp.xfree86.org/. Consider placing this macro in
~/.netrc:
macdef X
bin
bell
prompt
cd /pub/XFree86/4.3.0/source
mget *
bye
This macro assumes that this ~/.netrc file already contains the line that allows anonymous logins.
The bell command, which is optional, should produce a sound after
each successful file transfer. The prompt command is very important, though. By default, the FTP
server expects interaction from the user. That is, when you ask to
download multiple files with mget,
the FTP server will wait for you to confirm every transfer by typing
y. Obviously, we want to disable
that behavior when we’re scripting a download.
To run this macro:
% echo "$ X" | ftp ftp.xfree86.orgBy default, ftp will save the
downloaded files in your current working directory. If you prefer, you
can specify an alternate location in your macro with the lcd (local change directory) command. For
example:
lcd /usr/local/Xsource
will save the downloaded files to the /usr/local/Xsource directory. Make sure
your directory exists and put the lcd line before your mget line.
A Better FTP?
No matter how hard you try to make the default FTP client
user-friendly, it is still a very basic command, and you may find a
little too primitive, especially if you use ftp often. If you would like to try a more
convenient and user-friendly command-line tool, try ncftp, which is available as a port or
package for FreeBSD, NetBSD, and OpenBSD.
See Also
man ftpThe
ncftpweb site (http://www.ncftp.com/ncftp/)
Distributed Command Execution
Use tentakel for parallel, distributed command execution.
Often you want to execute a command not only on one computer, but on several at once. For example, you might want to report the current statistics on a group of managed servers or update all of your web servers at once.
The Obvious Approach
You could simply do this on the command line with a shell script like the following:
#for host in hostA hostB hostC>do ssh $host do_something>done
However, this has several disadvantages:
It is slow because the connections to the remote hosts do not run in parallel. Every connection must wait for the previous one to finish.
Managing many sets of hosts can become a complicated task because there is no easy way to define groups of hosts (e.g., mailservers or workstations).
The output is provided by the program that is run remotely.
The output is hard to read because there are no marks indicating when the output for a specific host begins or ends.
How tentakel Can Help
While you could write a shell script to address some of these
disadvantages, you might want to consider tentakel, which is available in the ports
collection. Its execution starts multiple threads that run
independently of each other. The maximum waiting time depends on the
longest running remote connection, not on the sum of all of them.
After the last remote command has returned, tentakel displays the results of all remote
command executions. You can also configure how the output should look,
combining or differentiating the results from individual hosts.
tentakel operates on
groups of hosts. A group can have two types of members:
hosts or references to other groups. A group can also have parameters
to control various aspects of the connection, including username and
access method (rsh or ssh, for example).
Installing and Configuring tentakel
Install tentakel from the ports collection:
#cd /usr/ports/sysutils/tentakel#make install clean
You can instead install tentakel by hand; consult the INSTALL file in the distribution. A
make install should work in most
cases, provided that you have a working Python environment
installed.
After the installation, create the configuration file tentakel.conf in the directory $HOME/.tentakel/. See the example file in /usr/local/share/doc/tentakel/tentakel.conf.example for a quick overview of the format.
Alternatively, copy the file into /usr/local/etc/ or /etc/, depending on your system’s policy, in order to have a site-wide tentakel.conf that will be used when there is no user-specific configuration. As an administrator, you may predefine groups for your users this way.
Assuming that you have a farm of three servers, mosel, aare, and spree, of which the first two are web
servers, your configuration might resemble this:
set format="%d
%o
"

group webservers(user="webmaster")
  +mosel +aare

group servers(user="root")
  @webservers +spree
With this definition, you can use the group name servers to execute a command on all your
servers as root and the group name
webservers to execute it only on
your web servers as user webmaster.
The first line defines the output format, as explained in Figure 5-1.
Character | Output |
| The hostname |
| The output of the remotely executed commands |
| A newline character |
This commands tentakel to
print the hostname, followed by the lines of the remote output for
each server sequentially. You can enrich the format string with
additional directives, such as %s
for the exit status from commands. See the manpage for more
information.
As you can see from the servers definition, there is no need to list
all servers in each group; include servers from other groups using the
@groupname notation.
On the remote machines, the only required configuration is to
ensure that you can log into them from the tentakel machine without entering a
password. Usually that will mean using ssh and public keys, which is also tentakel’s default. tentakel provides the parameter method for using different mechanisms, so
refer to the manpage for details.
Using tentakel
To update the web pages on all web servers from a CVS repository:
% tentakel -g webservers "cd /var/www/htdocs && cvs update"
### mosel(0):
cvs update: Updating .
U index.html
U main.css
### aare(1):
C main.css
cvs update: Updating .
%
Note the use of quotes around the command to be executed. This
prevents the local shell from interpreting special characters such as
& or ;.
If no command is specified, tentakel invokes interactive mode:
%tentakelinteractive mode tentakel(default)>use webserverstentakel(webservers)>exec du -sh /var/www/htdocs### mosel(0): 364k /var/www/htdocs ### aare(0): 364k /var/www/htdocs tentakel(webservers)>quit%
While in interactive mode, the command help prints further information.
See Also
man tentakelThe
tentakelweb site (http://tentakel.biskalar.de/)
Interactive Remote Administration
Managing a large network can be a daunting task. Even with the Unix utilities available for remote administration, making changes on many systems can be taxing. Scripting tools make life easier to some extent, but some tasks require hands- and eyes-on interaction.
Several system utilities allow you to execute the same command on multiple hosts. This form of loosely coupled clustering is useful for information gathering and some monitoring purposes. However, on some occasions, you not only need to run a process on multiple hosts, but you must also observe it and interact with the process to resolve host-specific issues. An administration shell script will save typing and minimize mistakes, but it’s hard to write a script that will work correctly on every machine on a diverse network.
Wouldn’t it be nice if there were a program that allowed you to interact with your remote hosts while running parallel commands? Enter ClusterIt.
Why ClusterIt?
ClusterIt is a set of tools written by Tim Rightnour, designed to place all of your network hosts
at your fingertips. ClusterIt includes utilities for running a single
command on all of the hosts in your cluster. It also allows automatic
distribution of the tasks to any available hosts in a defined group.
It uses a remote login method, such as sshd on the target hosts, so you only need
to install it on the control host.
Scripts can also synchronize between task completions on different hosts. For example, you can set two hosts to compile an application and install it on the other machine. Neither host should begin the installation until the other host has finished compiling, but it is impossible to predict which host will finish first. ClusterIt defines barrier operations that can be included in a script to prevent passing a synchronization point until all hosts have caught up.
In most clustering systems for Unix, once you issue a command, you cannot interact with the hosts in the cluster individually; you only see the final output of each command run on each of the hosts. ClusterIt does not have this limitation, making it ideal for dealing with processes that need continual monitoring.
Installation and Configuration
Install ClusterIt from the NetBSD pkgsrc collection:
#cd /usr/pkgsrc/parallel/clusterit#make install clean
It is also available in FreeBSD’s /usr/ports/parallel/clusterit.
Before using any ClusterIt utility, you must create a list of
machines in your cluster. Create the file ~/.cluster, containing a list of host
names. Be sure not to put any whitespace after GROUP:, as in this example:
GROUP:setB
Bester
Brust
GROUP:setOther
Clarke
Dick
Niven
Pohl
Zelazny
Set an environment variable to tell ClusterIt where to find the
list of hosts, and set two more to specify ssh as the tool to start remote shells and
terminals. Run this from the tcsh command line or add the commands to
your ~/.cshrc:
%setenv CLUSTER ~/.cluster%setenv RCMD_CMD ssh%setenv RLOGIN_CMD ssh
Tip
Use ssh-agent or an
equivalent method to prevent ClusterIt from prompting for a password
every time you connect to a host. If you’re unfamiliar with ssh-agent, see “What is SSH agent, and how
do I use it?” at http://security.sdsc.edu/help/ssh/agent.shtml.
Testing Noninteractive Commands
Now you’re ready to issue commands to the cluster. You can run simple commands that require no
interactivity from the command line with the dsh (distributed shell) command. Let’s start
by checking the version of the operating system on each of the hosts
in a group:
% dsh -g setB uname -a
Bester: SunOS bester 5.7 Generic_106541-11 sun4u sparc
SUNW,UltraSPARC-IIi-Engine
Brust: NetBSD brust 1.6ZC NetBSD 1.6ZC (GENERIC.MP) #1: Fri Sep 26
23:33:56 EDT 2003
david@pohl:/usr/obj/usr/src/sys/arch/i386/compile/GENERIC.MP i386
The -g
groupname option specifies which hosts in
the cluster should run this command. Every ClusterIt command allows
you to specify a list of hosts, a named group of hosts, the entire
cluster, or any of those options minus a list of excluded
hosts.
As you can see, not much can go wrong with the uname command. Interestingly, the two hosts
that I’ve chosen to use for examples are running different operating
systems.
Using dvt
Many maintenance operations require different steps on machines
running different operating systems. ClusterIt also includes a command
called dvt (distributed virtual terminal), which allows you to
interact with several hosts simultaneously or individually. This is
where dvt shines!
Suppose that I want to install a Perl module on both of these example machines. First, I’ll open the distributed terminals:
% dvt -g setBThree terminal windows have opened up to my screen: one window for each of the two hosts and one control window. Anything I type in the control window goes to all of the host windows, as if I typed the same thing in each one. (I can also type within an individual host window, which will send my input only to that particular host.)
I have windows open to the hosts in the group now, but I’ll need
to be root to install the
module.
In the control window, I’ll type su. If the root password is the same on all
the hosts, I can type it everywhere at once by typing in the command
window. If the passwords are different on different hosts, I’ll have
to activate each host window in turn, typing the appropriate password
in each one.
For simplicity, imagine I’ve already copied the module to my
home directory on each host. I now need to un-tar it, run Perl on the Makefile.PL, run make, and run make
install:
#tar xzvf Perl-Package-1.0.tgz && cd Perl-Package-1.0 && perlMakefile.PL && make && make install
If I knew that this command would work without any errors, I
could have used dsh instead.
However, any number of differences between these two machines could
cause one or both to fail to complete this process. This Perl package
may not have been tested on Solaris yet, or either machine could be
missing some prerequisite package.
Since each host has its own window that I can view and type into, I can monitor the progress of the installation. If either host encounters a problem, I can focus my mouse on that window and manually correct and continue the process, without interfering with the other host.
Hacking the Hack
This technique is useful in several other situations. You can
monitor a set of hosts by running ps, who,
or top in several windows. You can
diagnose network issues by running tcpdump on the source host, destination
host, and any machines routing the packets in between the two.
An interesting way to troubleshoot networking is to have every
host in your cluster ping or
traceroute to the problem host. The
missing route or mistyped filter rule quickly becomes obvious.
A sysadmin must troubleshoot all sorts of issues, including
diagnosing name service troubles, NFS mount permissions, sysctl values, disk space, routing tables,
backups, and logfiles. You can solve these problems more easily when
you have a consolidated view of your systems.
See Also
man dvtman dshThe ClusterIt web site (http://www.garbled.net/clusterit.html)