
Chapter 4. Using JDBC
On my first trip down the Cossatot River, the first two sections were easy and beautiful, but I couldn’t enjoy them fully. I’d never really been on a class IV rapid, and I’d read that section three would start out with vengeance: five waterfalls ranging from six to ten feet, with the coup de grace being the fourth drop, called Washing Machine. I unintentionally ran two of the five backwards. But every advanced paddler needs to start somewhere, and I became addicted.
Setting Up the Database and Schema
If you don’t already have a relational database, it’s time to set one up, define the schema for our application, and tweak our Ant build appropriately. Don’t worry. It will go quickly. We’ll use MySQL. You can then define some scripts that build the schema, and an Ant task to create the database from a script.
I’m directionally challenged, but kayakers have a tremendous advantage that most hikers don’t share. Hikers can get easily lost as they take on more advanced hikes. My rivers don’t move. They stay in the river beds, and flow one direction. I never have to worry about getting lost, as long as I can find the put-in and the take-out. Spring is like the river that lends structure and direction to your journey. It doesn’t provide the database or transactions or remoting, but makes those services more consistent and easier to use.
How do I do that?
First, you’ll get and install MySQL. You can find it at http://mysql.org. Download it and follow the installation directions. Make sure to pay special attention to the instructions for initializing and modifying the user accounts for the installation; the instructions can vary greatly from one version to the next.
Start the MySQL daemon and make sure things are working by creating a database, as in Example 4-1.
mysql> create database bikestore;
Query OK, 1 row affected (0.00 sec)

mysql> show databases;
+------------+
| Database   |
+------------+
| bikestore  |
| mysql      |
| test       |
+------------+
3 rows in set (0.00 sec)
Your application is going to talk to MySQL through a JDBC driver. You’ve got to tell the JVM how to find it. You’ll want to download the latest release version of the Mysql Connector/J library and make it available to your project’s classpath. In this case, we’ve copied it into the /lib folder underneath the main project folder.
Next, you can create the database schema. You could issue commands directly against the database. You’d be able to quickly establish a few tables, and you’d get immediate feedback if you made any syntax errors. But there are also a few downsides to that approach:
You wouldn’t be able to automate the process. If you wanted to create the database on another machine, you couldn’t.
You wouldn’t have the DDL (data definition language). The DDL can also help you communicate with others that may want to read your code, or help them set up the environment to test the code.
Later, when you use an object relational mapper, it’s safer to use a script than to point it directly to the database.
Instead, you’ll create a file with your database schema and data, and store it in the project’s /db folder, which you created earlier. For each table, you’ll use an identifier, which makes it easier to build consistent code, and a simple schema, which handles the identifiers consistently. You’ll also see a database table column for each major field. For the most part, your design will let you have one class per table, but not exclusively. Some of the relationships will require extra relationship tables (Example 4-2).
drop database bikestore;

create database bikestore;

use bikestore;

create table bikes (
   bikeId int(11) not null auto_increment,
   manufacturer char(50) not null,
   model char(50) not null,
   frame int(11) not null default '0',
   serialNo char(20) not null,
   weight double not null default '0',
   `status` char(15) not null,
   primary key (bikeId));

create table customers (
   custId int(11) not null auto_increment,
   firstname char(50) not null,
   lastname char(50) not null,
   primary key (custId));

create table reservations (
   resId int(11) not null auto_increment,
   bikeId int(11) not null,
   custId int(11) not null,
   resDate date not null,
   primary key (resId));
After creating the tables, you should assign all permissions to your account so that your code can access the data.
You should try to verify your driver with the simple test shown in Example 4-3, which opens the driver.
public void testJDBC( ) throws Exception {
   try {
      System.setProperty("jdbc.drivers", "com.mysql.jdbc.Driver");
      Connection conn =
DriverManager.getConnection("jdbc:mysql://localhost/bikestore");
   } catch (Exception ex) {
      fail("Failed to open connection:" + ex.getMessage( ));
   }
   assertTrue(true);
}
Example 4-4 creates some sample data. This approach is nice, because once you start testing, it allows you to start with a consistent set of test data for each test case.
insert into bikes values(1, "Shimano", "Roadmaster", 20, "11111", 15, "Fair");
insert into bikes values(2, "Cannondale", "F2000 XTR", 18, "22222",12, "Excellent");
insert into bikes values(3, "Trek","6000", 19, "33333", 12.4, "Fair");

insert into customers values(1, "Justin", "Gehtland");
insert into customers values(2, "Bruce", "Tate");

insert into reservations values(1, 2, 2, '2004-09-15'),
insert into reservations values(2, 3, 1, '2004-10-07'),
Finally, you’ll modify your Ant build script to use the rentabike.sql file to create your database. To do so, you’ll have to provide a couple of new properties, as well as a classpath that points to the MySQL driver in your /lib folder.
<property name="database.url" value="jdbc:mysql://localhost/bikestore"/>
<property name="database.username" value="bikestore"/>

<path id="mysql.class.path">
    <pathelement location="${war.dir}/WEB-INF/lib/
       mysql-connector-java-3.0.14-production-bin.jar"/>
</path>

<target name="create.tables">
    <sql driver="com.mysql.jdbc.Driver"
        url="${database.url}"
        userid="${database.username}"
        password="">
        <classpath>
            <path refid="mysql.class.path"/>
        </classpath>
        <fileset dir="${db.dir}">
            <include name="rentabike.sql"/>
        </fileset>
    </sql>
</target>
What just happened?
You’re now set up and ready to put Spring through its paces. You just installed MySQL, the database engine. You started the database service and then created a database, so you know it’s working. Since all Java applications will access MySQL through a JDBC driver, you installed one so that our application could find it. Then, you created a new Ant task, and ran the task to create a database and some sample data.
You need to be careful to make sure that both the database and the driver work. These verification steps may seem tedious, but they’ll save you a whole lot of time in the long run, because things are much easier to debug before you add additional layers.
What about...
...HyperSQL, Oracle, DB2, or some other database? You used MySQL because it’s one of the most widely used open source databases. Spring will make sure that much of what you’re going to do will be portable. If you’d like, you can install any database, as long as you make sure to install a working JDBC driver.
Using Spring JDBC Templates
Although persistence frameworks like EJB container-managed persistence, JDO, and Hibernate have attracted fans at various times, JDBC remains the bread-and-butter of database development with Java. You can write it all yourself, or you can use some frameworks to help manage the details. Spring lets you do JDBC development in a variety of ways. In this example, you’ll use JDBC templates.
If Spring offered nothing more than a little configuration, a smattering of user interface development, and a slightly different programming model, then this book would be done, but Spring offers much more, including tremendous advantages over roll-your-own JDBC:
- Resource management
Spring will open and close connections for you, so you won’t have to write that tedious code, and you won’t have leaks.
- Unchecked exceptions
Spring will not force you to use checked exceptions, so you won’t have to make those tedious checks for errors that you can’t recover from anyway. Instead, you can catch the right exception at the right level.
- Inversion of control
Spring will iterate your result set for you, saving effort and keeping your approach consistent.
- Configuration
Spring will let you configure and exchange out resources like data sources and connections, without changing code.
In short, you’ll write less code, and build programs that are easier to maintain and read. You’ll let Spring, instead of tedious, handwritten code do the heavy lifting.
How do I do that?
Spring uses a concept called templates. You’ll pass each template an SQL query, and a method that will process each row in a result set. Normally, that code, in an inner class, will map the results from a query onto objects. Spring will do the rest.
You’ll put the template code into an implementation
of our façade layer. Since you’ve already
got an interface, a test implementation and the object model for the
application, you’ll create the JDBC implementation,
which extends a Spring-provided class
called
JdbcDaoSupport that makes life easier (Example 4-6).
public class JDBCRentABike extends JdbcDaoSupport implements RentABike {
   private String storeName;
   private static final int MANUFACTURER = 2;
   private static final int MODEL = 3;
   private static final int FRAME = 4;
   private static final int SERIALNO = 5;
   private static final int WEIGHT = 6;
   private static final int STATUS = 7;

   public List getBikes( ) {
      final ArrayList results = new ArrayList( );
      JdbcTemplate template = getJdbcTemplate( );
      template.query("SELECT * FROM bikes",
         new RowCallbackHandler( ) {
            public void processRow(ResultSet rs)
               throws SQLException {
                  Bike bike = new Bike(rs.getString(MANUFACTURER),
                  rs.getString(MODEL), rs.getInt(FRAME),
                  rs.getString(SERIALNO), rs.getDouble(WEIGHT),
                  rs.getString(STATUS));
                  results.add(bike);
               }
         });
      return results;
   }

   public Bike getBike(String serialNo) {
      final Bike bike = new Bike( );
      JdbcTemplate template = getJdbcTemplate( );
      template.query("SELECT * FROM bikes WHERE bikes.serialNo = '"
         + serialNo + "'",
         new RowCallbackHandler( ) {
            public void processRow(ResultSet rs)
               throws SQLException {
                  bike.setManufacturer(rs.getString(MANUFACTURER));
                  bike.setModel(rs.getString(MODEL));
                  bike.setFrame(rs.getInt(FRAME));
                  bike.setSerialNo(rs.getString(SERIALNO));
                  bike.setWeight(rs.getDouble(WEIGHT));
                  bike.setStatus(rs.getString(STATUS));
            }
         });
      return bike;
   }

   //etc...
This may look a bit muddy, until you compare it to a traditional JDBC method. The inner class syntax is a little awkward, but you’ll learn it quickly.
Next, add the data source and the JDBC connection to the context. Also, we need to point the application to the new façade implementation (Example 4-7).
<bean id="dataSource"
   class="org.springframework.jdbc.datasource.DriverManagerDataSource">
   <property name="driverClassName">
      <value>com.mysql.jdbc.Driver</value>
   </property>
   <property name="url">
      <value>jdbc:mysql://localhost/bikestore</value>
   </property>
   <property name="username"><value>bikestore</value></property>
</bean>

<bean id="rentaBike" class="com.springbook.JDBCRentABike">
   <property name="storeName"><value>Bruce's Bikes</value></property>
   <property name="dataSource"><ref bean="dataSource"/></property>
</bean>
Don’t forget to wrap any calls to
the JdbcTemplate
in appropriate error handling. Any time you invoke your own or
somebody else’s code to access a database, things
can go wrong (failed connection, invalid permissions, locked data,
etc.). You should have a plan for dealing with these kinds of
exceptions and treat any call to the JdbcTemplate
as a potential for failure.
What just happened?
For the code that sits above the façade, you’re not seeing much of a difference between the test version and the database version. That’s the beauty of the test façade that you built early in Chapter 1. However, now multiple applications can share the database, and it will retain changes between invocations, just as you’d expect.
In the façade, we used a JDBC template. We provide three pieces of data to the JDBC template:
- The query
- The parameters
If the statement is a parameterized query, you can specify all of the variable parameters that the statement requires.
- A callback class
We can also specify an inner class, with one method, to match the
RowCallbackHandlerinterface. The method will fire for each line in the result set.
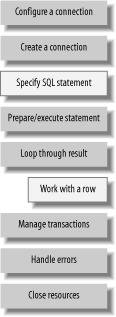
Notice that all of the code that we specify is necessary. These are the things that change from one JDBC invocation to the next. Instead of specifying the control structures (like a while loop) to iterate through the result set, we hand control to Spring. It then does the grunt work:
Spring gets a connection from a data source.
Spring specifies (and potentially prepares) the SQL statement.
Spring then iterates through the result set.
For each line in the statement, Spring calls the callback that we specify.
Spring then closes down the connection.
If there’s an exception, Spring folds it to an unchecked, common exception.
But what happened is not nearly as important as how it happened. Go back and read the code in the façade once again. Think again about all of the things that Spring does for us:
- Exception management at low levels
While there might be some JDBC errors within the façade layer, it’s probably not the best place to deal with the problem. Instead, the client of the façade is probably in a much better place to deal with the problem. I’d go as far as saying that checked exceptions in Java were a mistake. Spring helps to rectify that mistake.
- Exception folding
Databases bury a SQL code into SQLExceptions. Even though this application may run on multiple databases, we don’t see the application react in different ways to the different exceptions thrown by different databases. Spring folds exceptions onto a common set.
- Resource management
We don’t have to open or close the connection. The framework does this for us. We don’t have to worry about leaks, because the Spring developers have already released the connection appropriately, and tested the results.
- Iteration through the result set
This is the centerpiece of inversion of control. Spring iterates through the result set, and calls the template for each row in the result set.
- Transactions
We could simply set the JDBC to auto-commit, as in this example. If we were to change our minds, the application would have to change. Spring lets us specify a transaction strategy in the configuration, as you’ll see in Chapter 7.
- Other services
Spring will let you attach other services to the façade through configuration instead of code.
Figure 4-1 shows the work that nearly all JDBC programs must do. The blocks in grey show the operations that Spring handles for you. You’ve got to do the rest yourself.
What about...
...persistence frameworks? We introduce a few in the next chapter. With the advent of Hibernate and the resurgence of JDO, you might be convinced that there’s never any reason to use JDBC, but remember, you don’t need a flamethrower to swat a fly. Like that flamethrower in the living room, your persistence framework may have some unintended consequences. If you’ve got a flyweight problem, grab a flyswatter.
On the other hand, the previous code tied the object fields to
specific database datatypes. If a developer is supporting both Oracle
and MySql, and a field might grow longer than
Oracle’s VARCHAR will handle, it must be defined as
a CLOB. JDBC’s CLOB handling does
not match VARCHAR handling at all. MySQL doesn’t
present this problem. You’d either need to handle
the difference yourself, or reach for a more robust persistence
solution.
Refactoring Out Common Code
If you’re paying attention, you’ve probably noticed a little repetition. In fact, some of those inner classes may be better served by separate classes that can populate your domain model. In this example, you’ll refactor a little of that common code.
Your small objects may keep this book short, but they’re not particularly realistic. Business objects typically have many more fields. If you try to do everything in line, you can accumulate a little too much replication. I like repetition about as much as I like paddling on flat water. In fact, my worst injuries have both come on easier rapids, or easy trails, because I wasn’t not paying attention as closely as I should have been. You’re likely to find the same phenomenon with tedious, repetitive code: the monotony can keep you from paying attention, and cause an uncomfortable number of minor injuries.
How do I do that?
You’re simply going to break some of the code in those inner classes free, so they’re easier to read and easier to reuse. You’ll focus on the code that populates each object (Example 4-8).
public List getBikes( ) {
   final ArrayList results = new ArrayList( );
   JdbcTemplate template = new JdbcTemplate( );

   class BikesHandler implements RowCallbackHandler {
      public void processRow(ResultSet rs) throws SQLException {
         Bike bike = new Bike(rs.getString(MANUFACTURER),
            rs.getString(MODEL), rs.getInt(FRAME), rs.getString(SERIALNO),
            rs.getDouble(WEIGHT), rs.getString(STATUS));
         results.add(bike);
      }
   }
      template.query("SELECT * FROM bikes", new BikesHandler( ));
      return results;
   }

   public Bike getBike(String serialNo) {
      final Bike bike = new Bike( );
      JdbcTemplate template = new JdbcTemplate( );
      class BikeHandler implements RowCallbackHandler {
         public void processRow(ResultSet rs) throws SQLException {
            bike.setManufacturer(rs.getString(MANUFACTURER));
            bike.setModel(rs.getString(MODEL));
            bike.setFrame(rs.getInt(FRAME));
            bike.setSerialNo(rs.getString(SERIALNO));
            bike.setWeight(rs.getDouble(WEIGHT));
            bike.setStatus(rs.getString(STATUS));
         }
      }

      template.query("SELECT * FROM bikes WHERE bikes.serialNo = '"
         + serialNo + "'", new BikeHandler( ));

      return bike;
   }
When you run the application, you should get the same behavior, since once again, you’re only changing database logic. Notice how Spring is protecting the user interface from churn.
What just happened?
The execution path is the same. You just replaced the in-line inner classes with named inner classes. The result is practically identical execution, but with a cleaner code base.
Using Access Objects
In this example, you’re going to take a simple query object and wrap it up in a reusable form. Spring provides an API called RDBMS operational objects to help you wrap stored procedures, queries, and updates.
You may find that you’re repetitively defining a block of SQL or a stored procedure. Wrapping it up into a reusable form adds convenience and clarity to your code. Plus, you’ll create a thread-safe, reusable form.
How do I do that?
In this case, you’ll use this feature to look for
reservations. To do so, create a new
MappingSqlQuery class
for
each kind of reservation search. Specify parameters for each of the
parameters of the query, and then set the types for each of the
parameters. As before, you’ll specify a method to
map each row, with an inner class. Example 4-9 shows
the code we have so far.
abstract class FindReservations extends MappingSqlQuery {
   protected List reservations = new ArrayList( );
   protected FindReservations(DataSource dataSource, String query) {
      super(dataSource, query);
   }

   protected Object mapRow(ResultSet rs, int rownum)
      throws SQLException {
      int resId = rs.getInt(1);
      int bikeId = rs.getInt(2);
      int custId = rs.getInt(3);
      Date resDate = rs.getDate(4);

      Bike bike = getBike(bikeId);
      Customer customer = getCustomer(custId);
      Reservation reservation = new Reservation(resId, bike,
         customer, resDate);
      reservations.add(reservation);
      return reservation;
   }

   abstract List findReservations(int param);
}

class FindReservationsByCustomer extends FindReservations {
   public FindReservationsByCustomer(DataSource dataSource) {
      super(dataSource,
         "SELECT * FROM reservations WHERE custId = ?");
      declareParameter(new SqlParameter(Types.INTEGER));
      compile( );
   }

   public List findReservations(int param) {
      execute(param);
      return this.reservations;
   }
}

class FindReservationsByBike extends FindReservations {
   public FindReservationsByBike(DataSource dataSource) {
      super(dataSource,
         "SELECT * FROM reservations WHERE bikeId = ?");
      declareParameter(new SqlParameter(Types.INTEGER));
      compile( );
   }

   public List findReservations(int param) {
      execute(param);
      return reservations;
   }
}
You can use the new query whenever you need to query for appointments, as in Example 4-10.
public List getReservations(Customer customer) {
       return new FindReservationsByCustomer(dataSource).
          findReservations(customer.getCustId( ));
    }

    public List getReservations(Bike bike) {
       return new FindReservationsByBike(dataSource).
          findReservations(bike.getBikeId( ));
    }
You’ll run the code as before.
At this point, you will also add two new domain classes that represent customers and reservations.
package com.springbook;
import java.util.Set;

public class Customer {
    private int custId;
    private String firstName;
    private String lastName;
    private Set reservations;

    public Set getReservations( ) { return reservations; }

    public void setReservations(Set reservations)
        { this.reservations = reservations; }

    public int getCustId( ) { return custId; }

    public void setCustId(int custId) { this.custId = custId; }

    public String getFirstName( ) { return firstName; }

    public void setFirstName(String firstName) { this.firstName = firstName; }

    public String getLastName( ) { return lastName; }

    public void setLastName(String lastName) { this.lastName = lastName;}

    public Customer(int custId, String firstName, String lastName) {
        this.CustId = custId;
        this.firstName = firstName;
        this.lastName = lastName;
    }

    public Customer( ) {}

    public String toString( ) {
        return "Customer : " +
            "custId -- " + custId +
            "
: firstName --" + firstName +
            "
: lastName --" + lastName +
            ".
";
    }
}package com.springbook;
import java.util.Date;
public class Reservation {
private int reservationId;
private Date reservationDate;
private Bike bike;
private Customer customer;
public Reservation( ) {}
public int getReservationId( ) { return reservationId; }
public void setReservationId(int reservationId)
{ this.reservationId = reservationId; }
public Date getReservationDate( ) { return reservationDate; }
public void setReservationDate(Date reservationDate)
{ this.reservationDate = reservationDate; }
public Bike getBike( ) { return bike; }
public void setBike(Bike bike) { this.bike = bike; }
public Customer getCustomer( ) { return customer;}
public void setCustomer(Customer customer) { this.customer = customer; }
public Reservation(int id, Bike bike, Customer customer, Date date) {
this.reservationId = id;
this.bike = bike;
this.customer = customer;
this.reservationDate = date;
}
public String toString( ) {
return "Reservation : " +
"reservationId -- " + reservationId +
"
: reservationDate -- " + reservationDate +
"
: bike -- " + bike +
"
: customer -- " + customer +
".
";
}
}What just happened?
You created a reusable, parameterized package. It’s
clean and simple. The MapRow method converts each
row of the data set into an object. The query then returns a list of
bikes in the store that will fit criteria we specify. You created an
object hierarchy to allow for two different kinds of reservation
queries; to add more (search by date, by customer and date, etc.),
you just need to make more subclasses of
FindReservations.
What about...
...stored procedures? Most object-heads despise stored procedures, but they’re part of the landscape in many places. You can’t just hide your head in the sand. Placing a stored procedure in a cleaner object oriented package that maps the results into objects certainly can make them more palatable.
I’ll go a step farther. While stored procedures do not provide the cleanest or most elegant code, you can and should use them for spot performance optimizations. A stored procedure can often reduce round trips to the database by more than an order of magnitude. I can recall a performance benchmark that compared DB2 with a set of other databases. My team noticed that DB2 was slower by a factor of eight behind one of our rivals. After several late nights and a few rolls of Tums, we noticed that the benchmarking testing company had used stored procedures for the competition, but not DB2. When the testing laboratory reran the tests, DB2 was once again on top. You don’t have to go crazy with them, but never underestimate stored procedures when you’re spot-tuning and none of the quicker optimizations are working.
Running a Test with EasyMock
It’s time to run a test case. Since you’re testing a JDBC application, it makes sense for us to verify that it’s been used correctly.
Let’s say that you wanted to test a single turn signal, one time. One way would be to stand behind the car, and then have someone inside activate the signal. If it didn’t blink, then you’d say so. But say that you wanted to test the device before you put it into a car. One strategy would be to plug in a volt meter, a device that measures electricity, instead of a light bulb. Then, if the signal did not generate the right amount of electricity at the right time, the test would fail.
That’s how a mock object works. Sometimes, instead of simulating the real world (like our stub in Chapter 1 that simulated a database), you want to know how your object under test is using its interfaces. You might use a mock object instead of a JDBC interface to make sure that the application opens the connection and closes it, just as you expect.
How do I do that?
You’ll first need to install EasyMock. Download the latest version from http://www.easymock.org and place the easymock.jar file in your project’s classpath. We’ve added it to our /lib folder.
Next, you can establish the collection of mock objects you’ll need (Example 4-13). You are effectively drilling down through the JDBC interfaces, and it turns out you will use four of them.
public void testGetBikesWithMocks( ) throws Exception {
   DataSource mockDataSource;
   Connection mockConnection;
   Statement mockStatement;
   ResultSet mockRS;

   MockControl controlDataSource =
      MockControl.createControl(DataSource.class);
   MockControl controlConnection =
      MockControl.createNiceControl(Connection.class);
   MockControl controlStatement =
      MockControl.createControl(Statement.class);
   MockControl controlRS =
      MockControl.createControl(ResultSet.class);
         mockDataSource = (DataSource)controlDataSource.getMock( );
         mockConnection = (Connection)controlConnection.getMock( );
         mockStatement = (Statement)controlStatement.getMock( );
         mockRS = (ResultSet)controlRS.getMock( );
Next, you will set the expectations. Using EasyMock, you do this by recording a working version of your intended test case. When you do the record, you’re telling EasyMock how the application should behave (Example 4-14).
      mockDataSource.getConnection( );
      controlDataSource.setReturnValue(mockConnection);

      mockConnection.createStatement( );
      controlConnection.setReturnValue(mockStatement);

      mockStatement.executeQuery("SELECT * FROM bikes");
      controlStatement.setReturnValue(mockRS);

      controlRS.expectAndReturn(mockRS.next( ), false);

      controlStatement.expectAndReturn(mockStatement.getWarnings( ),
         null);

      mockRS.close( );
      mockStatement.close( );
      mockConnection.close( );
Next, you’ll play the test case back, as in Example 4-15.
      controlConnection.replay( );
      controlDataSource.replay( );
      controlStatement.replay( );
      controlRS.replay( );
Finally, you will kick off the actual test and verify the test case (Example 4-16). If the verification step fails, then the test case will fail, just as if an assertion failed in basic JUnit.
      JDBCRentABike jstore = (JDBCRentABike)store;
      jstore.setDataSource(mockDataSource);
      List bikes = store.getBikes( );

      controlConnection.verify( );
      controlDataSource.verify( );
      controlStatement.verify( );
      controlRS.verify( );
Let’s say that you forgot to record the
ResultSet being closed (by leaving out the call
mockRS.close( )). Example 4-17
shows the results of running the unit test.
junit.framework.AssertionFailedError:
  Unexpected method call close( ):
    close( ): expected: 0, actual: 1
    at org.easymock.internal.ObjectMethodsFilter.invoke(ObjectMethodsFilter.java:44)
    at $Proxy3.close(Unknown Source)
    at org.springframework.jdbc.support.JdbcUtils.closeResultSet(JdbcUtils.java:69)
    at org.springframework.jdbc.core.JdbcTemplate$1QueryStatementCallback.doInStatement
(JdbcTemplate.java:259)
    at org.springframework.jdbc.core.JdbcTemplate.execute(JdbcTemplate.java:204)
    at org.springframework.jdbc.core.JdbcTemplate.query(JdbcTemplate.java:266)
    at org.springframework.jdbc.core.JdbcTemplate.query(JdbcTemplate.java:270)
    at com.springbook.JDBCRentABike.getBikes(JDBCRentABike.java:56)
    at JDBCFacadeTest.testGetBikesWithMocks(JDBCFacadeTest.java:75)
    at sun.reflect.NativeMethodAccessorImpl.invoke0(Native Method)
    at sun.reflect.NativeMethodAccessorImpl.invoke(NativeMethodAccessorImpl.java:39)
    at sun.reflect.DelegatingMethodAccessorImpl.invoke(DelegatingMethodAccessorImpl.java:25)
at com.intellij.rt.execution.junit2.JUnitStarter.main(Unknown Source)What just happened?
You’ve seen dynamic mock objects in action. The nice thing about dynamic mock objects is that you can test sophisticated user interfaces, like JDBC, without having to simulate all of its behavior.
What about...
...other mock object frameworks? You don’t have to use EasyMock. Other mock object frameworks work as well. The overall flow is the same. For any framework, we’ll see the following steps (similar to the ones described in the sidebar above):
- Set the expectations for success
A mock object will replace one or more interfaces in an application. It doesn’t need to act like the real thing, but it does need to simulate the input and output.
- Exercise the mock object
You’ll make the object under test do something.
- Verify the mock object
You’ll then ask the mock object if it was used in the way that you expected.
For some, mock objects might seem to be awkward. Stay with them, and you’ll learn to appreciate how they ease your testing burden. Just don’t throw away everything else in your toolbox to make room for this, or any other, golden hammer.
You have just seen how to use simple JDBC with Spring. In the next chapter, you’ll see how Spring can do many of the same things for other persistence solutions, including full object relational frameworks.