
Chapter 9. Making Money with Google
You’ve mastered searching with Google, you’ve gotten your site in Google’s index, and you have a healthy PageRank. So how do you pay the bills? Unless your site makes a profit on donations from visitors who just love your wacky sense of humor, consider trying Google’s advertising programs: AdWords and AdSense.
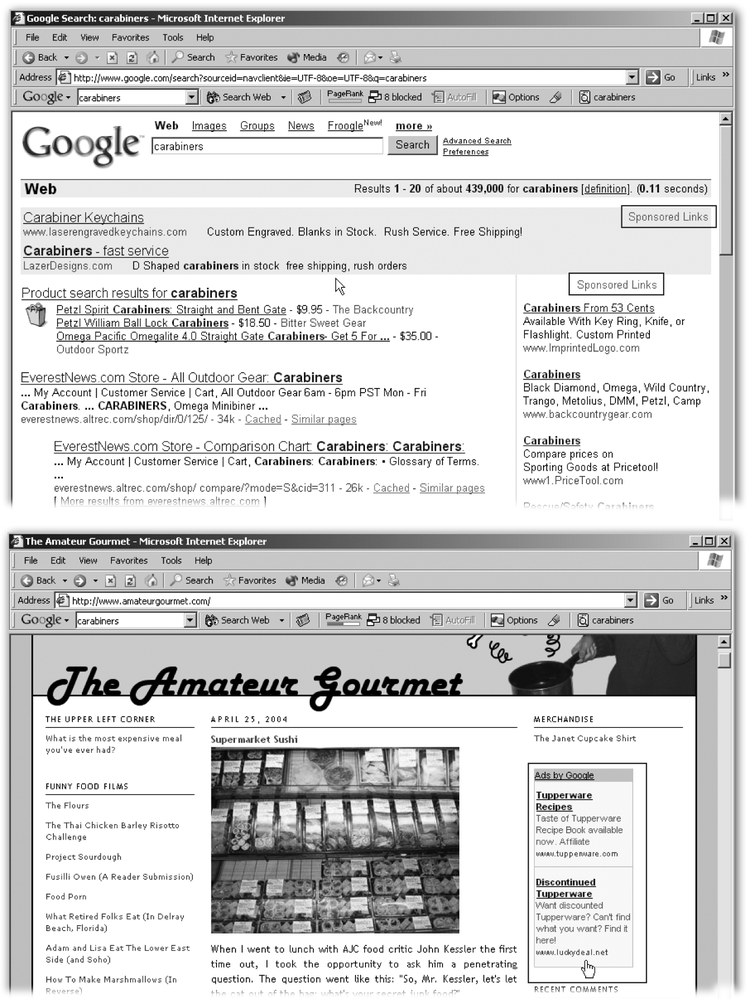
AdWords lets you buy spots among the sponsored links—the ads you see on many Google results pages. AdSense lets you sell advertising space on your own site for other people’s ads. Both programs, shown in Figure 9-1, draw from the same pool of about 150,000 advertisers—everyone from 16-year-old babysitters selling hand-knit cellphone pouches to Fortune 500 companies selling cellphone service.
AdWords and AdSense are both easy to get started with, but neither is intuitive. This chapter provides an introduction to the programs, explaining how they work, when to use them, and how to get the most out of them.
Note
If this chapter doesn’t answer a question you have about Google’s ad programs, check the Google help pages for AdSense (https://google.com/adsense/online-help) and AdWords (https://adwords.google.com/select/index.html), which are pretty thorough and generally good. This chapter points out some of the more useful help pages.
Google AdSense
AdSense is a great program, though Google has given it a confusing name. If they’d called it AdSpace, you’d know right away what it’s about: selling advertising space on your Web site. Despite the nomenclature issue, AdSense (www.google.com/adsense) has become popular with bloggers and other people who run noncommercial sites.
You sign up, carve out some space on your pages for the ads (Figure 9-2), paste a few lines of code from Google into the HTML for your site, and let Google fill in your pages with color-coordinated ads. When somebody clicks one of the ads, Google pays you a fee (the amount varies, and the company doesn’t disclose its payments).
Note
AdSense can be tricky for e-commerce sites because you can’t fully control which ads appear on your site, and you wouldn’t want to run ads for your competitors’ merchandise right next to your own displays. You can, however, filter out some ads. Section 9.1.8 tells you more.
Though you can’t decide which ads appear on your site, Google does a very nice job of assessing your pages and supplying ads that might interest your visitors. For example, if you run a site about the history of window treatments, Google is likely to dish up ads for vintage blinds and specialty curtain rods. That kind of relevance is important, because Google doesn’t pay you when somebody sees an ad on your site—it pays you when somebody clicks an ad, so you want Google to fill your space with blurbs likely to interest your readers.
The $64,000 question is, of course, how much can you make? The exact answer is: it depends. If your site gets tons of visitors, and you focus on a narrow topic, there’s a good chance Google will serve up ads that appeal to a lot of people hitting your site. For example, if you run a popular site devoted to mobile gadgetry, you might make enough to buy a new device every few months. If your site gets sporadic traffic or, more important, if it’s not clearly about something, it may be hard for Google to supply highly relevant ads, and you might make enough to cover a box of paper clips every so often.
Tip
If you fall into the second category, consider Amazon’s Associates program, which lets you place ads on your site for specific items sold at Amazon. When somebody clicks and buys the item in the ad, Amazon pays you a referral fee. From any page on Amazon, look for a link to Sell Your Stuff, and then look for links to the Associates program.
The beauty of AdSense, however, is that it’s free—absolutely gratis—to join and run, so you may as well give it a whirl. And the program automatically tailors itself to your site over time, supplying more relevant ads as it gets to know you better or as you change your content. It can take a few months before Google hits the sweet spot with ads that your readers love, but the only thing you have to do is set it up and watch it go to work.
Warning
Don’t try to game AdSense. It probably won’t surprise you a whit to learn that people have set up sites primarily to showcase ads and draw lots of clicks (and make buckets of money). When Google finds out about these sites—and it often does—it blocks the ads immediately. But dirty play makes the whole system weaker, and it harms not only Google but the people who pay for clicks, too. Don’t be part of that damage.
How does Google know what ads will interest my audience?
Google’s AdSense engine—as with everything Google—is rather sophisticated. Rather than simply serving up random ads from its advertiser base, Google works hard to make sure the ads your visitors see are likely to pique their interest.
From the day you start offering ads, the AdSense robot visits on a regular basis, reading through your pages with ads (for more on robots, see Section 8.5.3). The robot takes a look at the words you use, the frequency with which you use them, even some of your page structure and formatting (for example, bigger fonts usually signify something important). Then Google uses all this info to figure out which ads your readers will warm to.
Even better, Google takes the language of your site and the location of your visitors into account, serving up language-specific, location-targeted ads for maximum impact. So a visitor from France—or a person browsing the Internet from her Frenchified computer—may see AdWords in French (shown here) or from French companies, while your U.S. visitors see theirs in English, Germans in German, and so forth. (The box in Section 9.2.5 explains how Google knows where your visitors are from.)
Bottom line: Google may know more about your audience than you do. Use AdSense to work that knowledge to your advantage.
Signing Up for Google AdSense
Setting up an account takes two minutes, plus two or three days: You fill out an application, and then you wait to get accepted. Google does not allow just any online riffraff into the program. Personal sites, for example, are usually a no-go. So if your blog is about you and your cat, Google may reject your application. On the other hand, if you run a popular feline couture blog, you’ve got a good shot at getting in—and winding up with ads for kitty clothing. In addition, Google places some technical restrictions on the sites it accepts. For instance, it’s not fond of pages that require passwords or those with text and pictures that rarely change. And your site must be primarily in English, French, German, Italian, Dutch, Portuguese, Japanese, or Spanish. Before you try to sign up, take a look at the AdSense policies and make sure your site qualifies: https://www.google.com/adsense/policies.
Note
When you sign up for AdSense, you have to give Google a U.S. tax ID, like a Social Security number or taxpayer identification number. For more information about tax IDs and why Google needs them, see https://google.com/adsense/faq#tax.
Head over to www.google.com/adsense .
Press Click Here to Apply. Google takes you to a page that lets you log in if you already have an account or sign up if you don’t.
Create an account.
Even if you want to put AdSense ads on 285 different sites, you need only one account, because you can paste your AdSense HTML code on any page of yours that meets the Google guidelines.
If you’re new to Google advertising, use the form on the right side of the page to create a Google AdSense account. Simply enter your email address and make up a password you’ll use for subsequent visits.
If you already have a Google AdWords account, use the form on the left part of the page to add AdSense.
Click Continue.
Provide contact information.
Fill in the Account Information form with your contact information, Web site address, and language. Even if you plan to run ads on more than one site, you need to fill in only one site for now.
Choose the type of AdSense that you want to use.
Google gives you the option of ordinary AdSense (called “AdSense for content”) and a search-based feature called “AdSense for search.” So far, this chapter has focused on the most popular choice, which is AdSense for content. With AdSense for search, you provide a Google search box on your page that visitors can use to search the rest of the Web using Google’s famous search engine. The neat part is that when Google shows promotional links alongside the search results, they’re treated like ads on your Web site. That means you get paid if a visitor clicks any of the sponsored links. You may as well choose both AdSense programs since you can decide later what you actually want to add to your Web site.
Warning
If you want to post ads on a site that doesn’t fit under Google’s policies, it may seem like you can slide in a legit site here and then later post ads to your noncompliant site. But if Google finds you’ve added ads to an inappropriate site—and, remember, in order to supply relevant ads, it will crawl your sites regularly—the company may block ads from all your sites.
Click Submit. The final page shows a summary of all the information you supplied.
Click Continue to finish the process.
Wait.
While Google reviews your application, you can dream about upgrading your daily coffee to a large mocha latte with all your AdSense loot. A day or two after signing up, you should receive an email confirmation that your account is ready.
Note
If you don’t hear from Google in a timely manner—say five days or so to be on the safe side—let them know using the Contact Us form at https://www.google.com/adsense/contact. Even if they reject your application, you might not hear from them, so it’s best to be proactive.
You might also take a second look at the Google AdSense Policies page (https://google.com/adsense/policies) in case there’s something about your site that might disqualify you.
Log in.
When you get the confirmation email, head back to www.google.com/adsense and log in using your email address and the password you created in step 2. (The next section gives you the skinny on logging in.)
That’s all there is to signing up for a Google AdSense account.
Logging in to Your AdSense Account
Before you can do anything with AdSense, you need to head back to www.google.com/adsense and log in. Once you do, you’ll see the central Google AdSense page (see Figure 9-3).
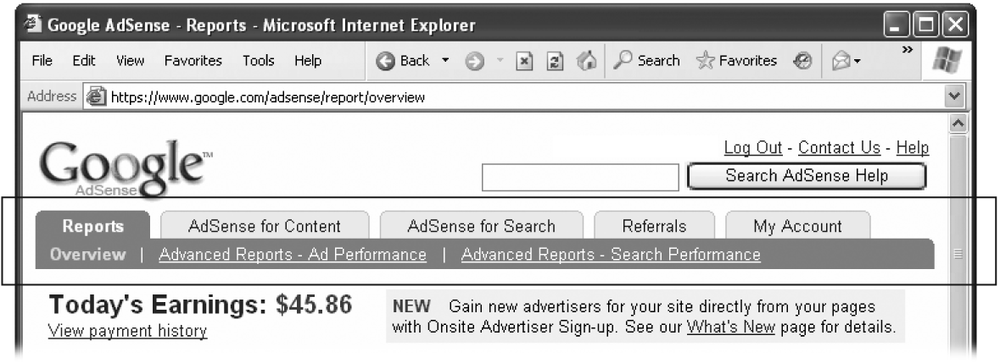
The AdSense page has five central sections, which are represented by tabs at the top of the page. These sections include:
Reports. This tab helps you assess the performance of your AdSense ads. You’ll see a summary of the money you’ve made today and over the last week. For more information, jump ahead to Section 9.1.5.
AdSense for Content. This is your starting point for generating AdSense ads—it’s where you specify the type of ad you want and get the HTML code you need to insert into your Web pages. You also have access to some advanced features here, such as filtering out ads from specific Web sites (Section 9.1.9).
AdSense for Search. Using this tab, you can generate the HTML for a Google search box that you can place on your Web pages. When a visitor performs a search through this Google box, they may see some relevant ads, and if they click one, you’ll get the usual commission.
Referrals. Looking for another way to net some cash? Google pays you up to $100 for referring new customers their way. See Section 9.1.8 for the full scoop.
My Account. This tab lets you update most of the information you supplied when you registered. This includes details like your mailing address and tax information.
Now on to the fun part—building your ads.
Building Your AdSense Ads and Adding Them to Your Pages
Building your AdSense ads is easier than you might imagine: select an ad layout, choose a color palette, optionally choose an alternate ad, and then paste some JavaScript code from Google into your Web pages’ HTML. That’s it.
Note
These steps supply the basic process for creating ads. If you want to place different ads on different pages—perhaps using various color schemes or shapes, depending on your pages’ layout, or using different channels (Section 9.1.3)—you need to go back through to rebuild the ads and then place them on the appropriate pages.
Log in and click the “AdSense for Content” tab.
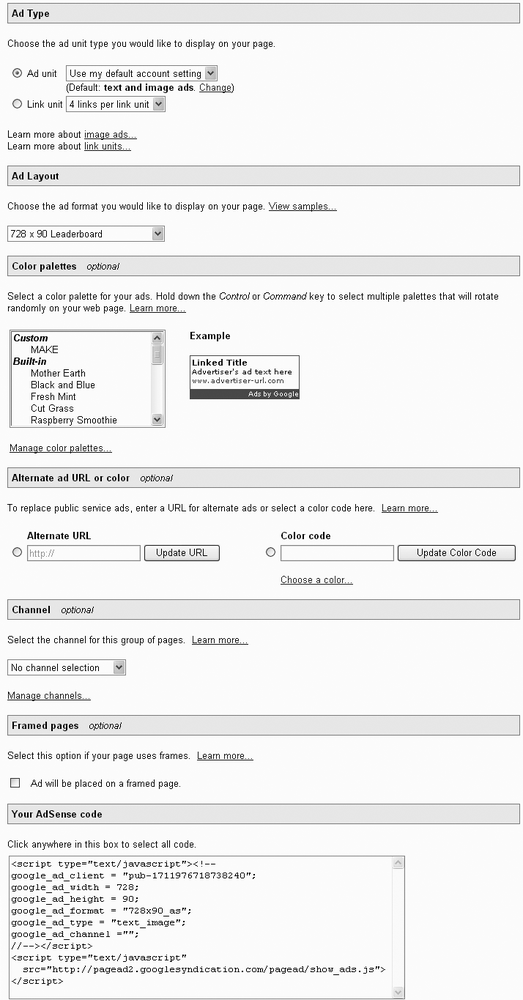
This tab includes four separate pages, whose links are shown just under the row of tabs. These sections are: “Ad layout code,” “Ad colors,” “Channels,” and “Competitive Ad Filter.” Right now you’re in the “Ad layout code” section (shown in Figure 9-4), but you can use the other links to define custom colors and custom channels, or to block out URLs you don’t want to use in your ads, as you’ll see.
Choose the type of ad you want to create—either an ad unit or a link unit.
An ad unit is a group of one or more ads, complete with descriptive text or (optionally) images. When a visitor clicks an ad, he winds up at the advertiser’s Web site (and you get paid). If you’re used to seeing AdSense ads on Web pages, ad units are what you’ve probably seen most of in the past.
A link unit is a slim box of links with no descriptive text. The title of the box is “Ads by Google” and the links are one or two word entries, like Digital Cameras or Consumer Electronics. If a visitor clicks one of these links, Google serves up a new page that’s filled with ads for that topic. If the visitor then clicks one of these ads, you get paid.
Choose the exact type of ad (from the list box next to the “Ad unit” or “Link unit” option).
If you’re creating an ad unit, you can choose whether you want to use text or image ads. Generally, image ads stand out more than text ads. However, you need to balance two conflicting goals: the desire to make money by attracting clicks with eye-catching ads, and the desire to minimize the distraction on your Web page by choosing ad types that are less obtrusive.
If you’re creating a link unit, you’re limited to choosing how many links appear in the box.
Select the ad layout.
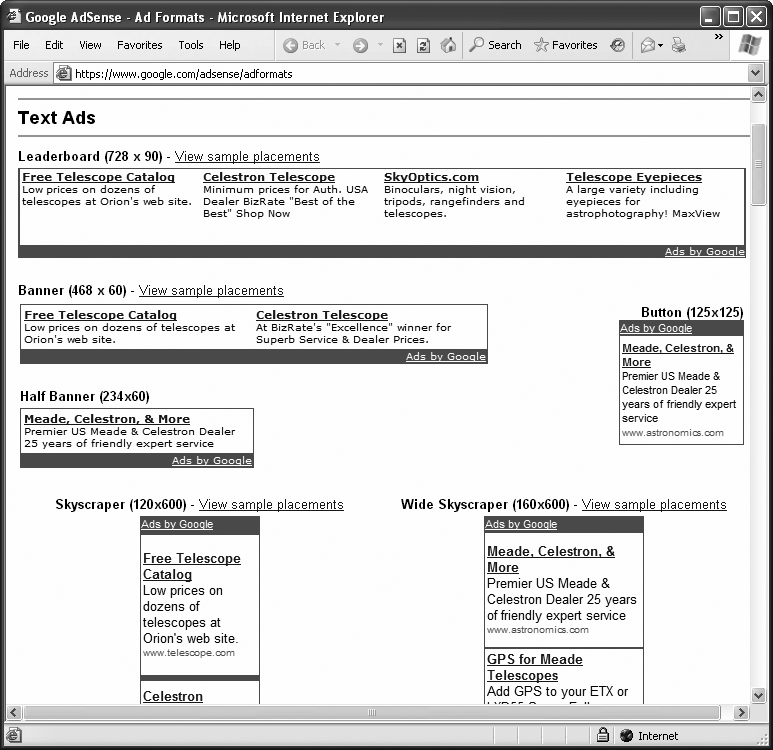
AdSense provides a nice selection of ad styles, from single-ad buttons at 125 x 125 pixels, to five-ad skyscrapers measuring 160 x 600 pixels (a pixel is the smallest dot you can place on a computer screen, and it’s a common measurement in Web pages). To see the examples in Figure 9-5, click “View samples” or head to https://google.com/adsense/adformats.
Figure 9-5. Google provides a bunch of sample ad formats. How to choose? On your site, is there anywhere an ad might fill in some empty space or even draw the page together—especially above the fold (the first screen your visitors see without scrolling down). Where might your readers’ eyes end up? Use these observations to guide your decisions.When you choose an ad layout, start small. Don’t crowd your page with a skyscraper or rectangle just to get the most ads possible on your site. The ads should never dominate your pages, or you’ll risk turning off your visitors.
Once you’ve decided on a shape and size, head back to the layout page, open the layout menu, and select your preference.
Choose a color palette.
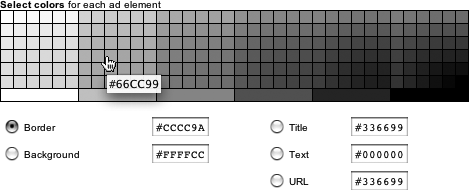
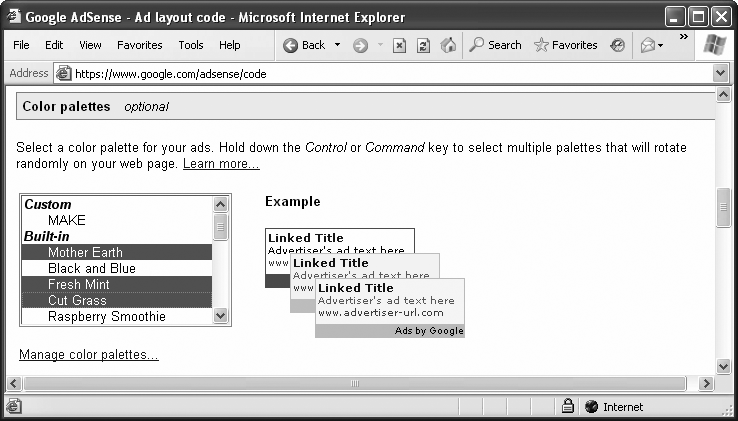
The ads on your site can incorporate up to five colors: one each for the background, border, title, text, and URL. To take the guesswork out of color coordination, AdSense provides a nice selection of color palettes, everything from Peach Melba to Swamp Green. Figure 9-6 explains how to choose them.
Figure 9-6. Use the pop-up menu to find existing color palettes and select the ones that sound intriguing. The sample ad just to the right of the palette list changes to reflect your selection, giving you a live preview of what your ads could look like. If you can’t settle on one, you can choose up to four palettes, and Google will rotate them on your site. To select multiple palettes, Ctrl+click (⌘-click) them. (In this example, three color palettes are selected.)If none of the built-in color palettes work with your exquisite site design, you can create your own. Under the built-in palettes, click the “Manage color palettes” link. Google takes you to a page that lets you control the color of every aspect of your ad: the border, background, title, ad text, and URL.
Google provides a chart of Web safe colors, the 216 colors that look the same on nearly every browser, no matter the operating system. Each color has a six-character code, known as a hex code; if you mouse over the grid, Google displays the codes, as shown here, at bottom right.
Above the grid, Google provides a menu of the existing palettes and suggests that you choose one as a starting point. Click Reset or choose another palette at any time to wipe out your changes and start from scratch.
To start picking your own colors, select one of the ad elements below the color grid. For example, choose Title, and then click any color from the rainbow of available choices. Google incorporates the change immediately, both in the sample ad on the left and in the numerical color code to the right of the word “Title.” Do the same for each ad element you want to change.
When you’re satisfied with your ad, type a name for your custom color palette in the “Palette name” box at the bottom of the screen and then click Save. Your newly minted palette appears both in the “Custom palettes” list to the right and in the “Choose a palette” menu above.
You’re allowed up to a hundred custom color palettes, so you have lots of room to fiddle. Should you wish to delete a particularly abominable creation, select it in the Custom palettes list and click Delete.
Once you’re done, click “Save and get code,” which takes you back to the Ad layout screen. When you return to the layout process, be sure to choose your custom palette from the “Color palette” list; Google doesn’t do it for you automatically.
Provide an alternate ad if you want to.
If Google can’t provide targeted ads for your page—either because they haven’t indexed your page yet and so don’t know what’s appropriate, they have nothing suitable on hand, or AdSense has simply hiccupped—it serves up a public service advertisement instead, as shown in Figure 9-7.
Figure 9-7. Google’s alternate ads are usually from organizations like the Red Cross, ASPCA, or some other nonprofit.If you’d rather not waste good page real estate on nontargeted advertising, you can provide an alternate ad or picture of your own to replace the public service announcement. You have a few choices for the substitute:
Static image. You can supply a GIF or JPG. Click Alternate URL, and then enter the link to your picture. The URL might look something like this:
http://www.yoursite.com/images/alternate.gif
Ads from another company. If you’re part of another advertising network, like DoubleClick, you can drop in an ad from that service. Check with the other company for the code or the URL that points to their ads. Then click Alternate URL and enter it.
Block of color. If you want just a block of color, click “Color code.” If you know the hex code of the color that matches your page background, type it in. To pick it out of a color lineup, click the “Choose a color” link, pick a color out of the choices you’re offered, and click the “Save and get code” button to copy it back to your ad page.
Add channels, if you wish.
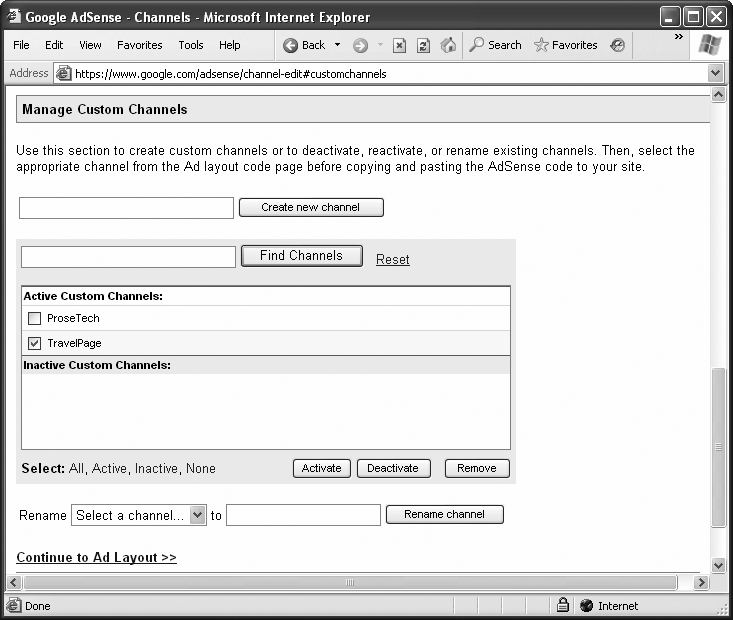
Channels are Google’s name for tags that you can add to any of your Web pages, letting you track pages separately and compare their performance in your AdSense reports. Channels are useful when, for example, you want to find out whether your index pages or your archive pages draw more click-throughs over time. Channels are also good for determining whether your tower ads work better than your leaderboards (horizontal ad panels), or whether a contrasting color palette gets more attention than one that blends in.
To create a couple of channels, click the “Manage channels” link, which takes you to the page shown in Figure 9-8.
Tell Google if your page has frames.
If you use frames to lay out your pages, you have to let Google’s crawlers know which frame to look at when they come by seeking clues about your pages so that AdSense can serve up relevant ads. To alert them, simply turn on the"Ad will be placed on a framed page” checkbox.
Copy the code from the box labeled “Your AdSense code.”
When you’re done choosing all the settings, the box at the bottom of the page reflects your choices of color palette, ad layout, and so forth. Highlight all of the code in the box and copy it by typing Ctrl+C (⌘-C).
Edit your Web pages.
With ad code in hand, it’s time to head on over to your Web site for a quick paste. Use whatever editing tools you usually do; the only stipulation is that you need to get to the HTML source view because the code from Google uses HTML to connect to your site’s code.
Tip
Google prefers pages with lots of text rather than lots of pictures, because it can better assess what kind of ads will be interesting to your visitors.
Open the Web page or pages on which you’d like to display the ads you just set up. Paste in the code you copied during the last step—Google asks that you don’t make any changes to it—then save your pages as you usually do.
Take a look.
View your Web pages in a browser, which automatically sends a message to Google, telling its robot to come on by at its earliest convenience. While you’re there, assess your ads. If they don’t seem to fit in with the rest of your décor, play around with ad placement and, if necessary, go back and rebuild the ad, choosing a different color palette and/or layout.
Tip
If you want to see how your ads look before they go live, you can check them on a test server that’s online. But keep in mind that if the server is connected to the Internet, Google can see your pages, so it can—and will—index them.
Don’t worry if the initial rounds are public service ads—that should change in anywhere from a few minutes to 48 hours or so as the AdSense bot visits and figures out what your Web page is all about. If, after a few days, the ads still haven’t become more targeted to your site, chances are you’re either not giving AdSense enough material to work with (your page is rather spare of text) or their robot is barred at the gates (you’ve got some robot exclusion rules forbidding it entry; see Section 8.5.3). Be sure you’re letting the AdSense robot in and providing it enough to chew on.
Tip
For more help, including instructions on blocking robots other than the Googlebot, check the Troubleshooting Tips section of the “Google AdSense Technical Implementation Guide” at https://www.google.com/adsense/faq-tech.
If you ever want to alter your contact information, visit the My Account tab (or https://google.com/adsense/account), which has links across the top that let you change your mailing address, login information (email address, display language, and email preferences), and tax information (if you need help with this one, Google provides a wizard on the right side of the screen).
Note
The display language is the language in which Google speaks to you on your account pages. The way ads appear on your site is a different matter. To decide which ads to show and what language they should be in, AdSense checks where your visitors are from—based on information it can glean from their computers’ Internet connections—before it serves up ads. Thus, it may serve different, regionally targeted ads to people from Iran and from Mexico, and it might show ads in different languages. Most of the time, this system (called geotargeting) is very cool. The only hitch is that you can’t always see the ads other people see on your site, because your location determines the ads Google shows you, too.
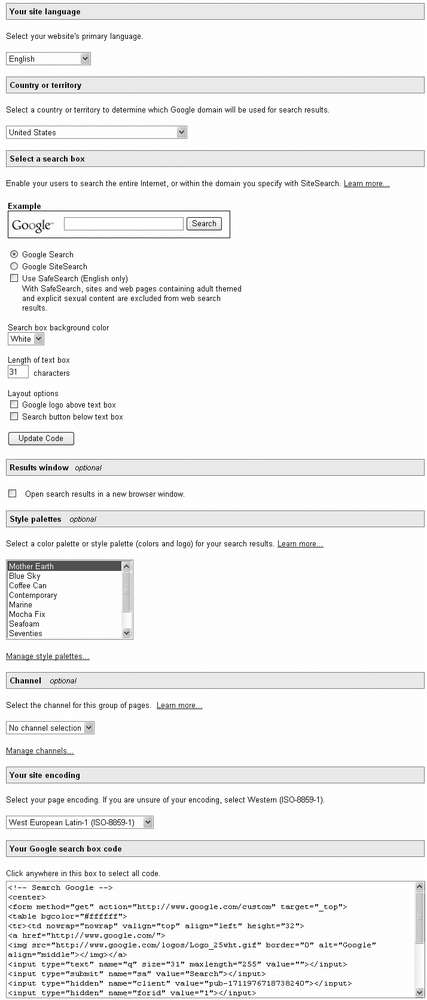
Adding a Google Search Box to Your Pages
Nothing beats Web page ads for making quick money on a popular site. But if you’re restless (and looking for another way to scrape in the Web revenue), you can use Google’s "AdSense for search” promotional program. Here’s how it works: you add a Google search box to a Web page, which lets visitors launch their Google queries right from your site. However, if these visitors click any ads in the search results, you pocket the earnings, just as though you placed the ad directly on your site.
Here’s how to set it up:
Log in to your AdSense account, and click the “AdSense for Search” tab.
This shows the “AdSense for Search” page (Figure 9-9).
Select the language and country of your Web site.
The standard options are English and United States. As you probably know, Google has country-specific pages that can tweak search results, providing them in different languages or giving priority to local sites.
Choose Google Search (if you want visitors to be able to explore the whole Web, including your site) or Google SiteSearch (if you want them to be confined to just searching the pages on your site).
Google SiteSearch is an innovative idea—it’s a search box for searching just your site. For example, if you have dozens of pages of travel stories, a visitor could home in on the page she wants by typing "funny story about rubber chicken in Peru" into a SiteSearch box. However, there’s one catch. SiteSearch still uses Google’s standard, centralized catalog of Web pages; it just limits the search to the pages from your site. But if Google doesn’t have the page in its catalog (either because you just created it or because Google doesn’t know your site exists), SiteSearch won’t find it.
If you want to provide both options (Google Search and Google SiteSearch), just follow these instructions twice to create two different text boxes. But be careful you don’t wind up confusing your visitors.
If you want to filter out profanity and sexual content from search results, choose the SafeSearch option.
SafeSearch is useful in two situations. First, it’s de rigueur for sites that provide children’s content. Second, it’s handy if your Web site deals in a topic that shares some keywords with adult-only sites. For example, if you’re creating a breast-cancer awareness page, you don’t want searches for "breast exam" to dig up the wrong goods.
Tailor the appearance of the Google search box.
You can tweak the background color, width, and placement of the logo and search button.
Choose any optional features you want.
Turn on the “Open search results in a new browser window” checkbox if you want a new page to pop up with the results of the visitor’s search. This is usually annoying to Web surfers, but handy if you want to make sure your Web site sticks around on the visitor’s desktop.
Choose a style palette for the search results page. This way, the search results can blend in with the color scheme used for the rest of your Web site. Style palettes are almost the same as the color palettes discussed with ad creation (Section 9.1.3), except they also allow you to add a custom logo.
Choose a channel if you want to track the ad dollars you make from this search box. See Section 9.1.3 for more information about channels.
The text box at the bottom of the page now has your complete, customized search engine box.
You can copy this with a quick Ctrl+C (⌘-C) and paste it into any Web page.
Getting Paid
Thirty days or so after the end of each month, you’ll receive a check in the mail for your Google AdSense revenue. But Google pays only when you’ve reached $100 in revenue or more; anything under gets carried through from month to month until it reaches the $100 mark. The only exception to this rule is a new year, upon which AdSense clears its books and sends you a check for all outstanding earnings.
Note
AdSense offers payment by check or electronic funds transfer (EFT), which deposits the money directly to your bank. At the time of this writing, EFT is available in 16 countries and is ready to go once you supply some information about your bank (see https://www.google.com/support/adsense/bin/answer.py?answer=15918 for more details).
Monitoring Your Performance
It’s easy to get obsessed and spend all your time wondering how your AdSense ads are faring. Did all your hard work buy you a cup of coffee this morning? Perhaps a bagel, too?
To help your find out, AdSense offers three reports. To see them, start by clicking the Reports tab or surfing directly to https://google.com/adsense/reports. Under the Reports tab, you’ll see three links: Overview, Advanced Reports - Ad Performance, and Advanced Reports - Search Performance. The Overview section (Figure 9-10) provides an at-a-glance look at your ad performance, and it’s a perfect place to start.

Advanced performance report
The Performance reports let you dig into the details of how your ads have performed over the course of time. To view the Performance report, choose either the Advanced Reports - Ad Performance or Advanced Reports -Search Performance link, depending on whether you want to track the progress of your ordinary ad units or sponsored Google searches (Section 9.1.3).
To fine-tune your report, simply pick a date range to see your progress over time (it shows you today’s info if you don’t specify another range), decide if you want to see info about your channels, and then click Display Report. Google fills in the chart at the bottom of the page (Figure 9-11).
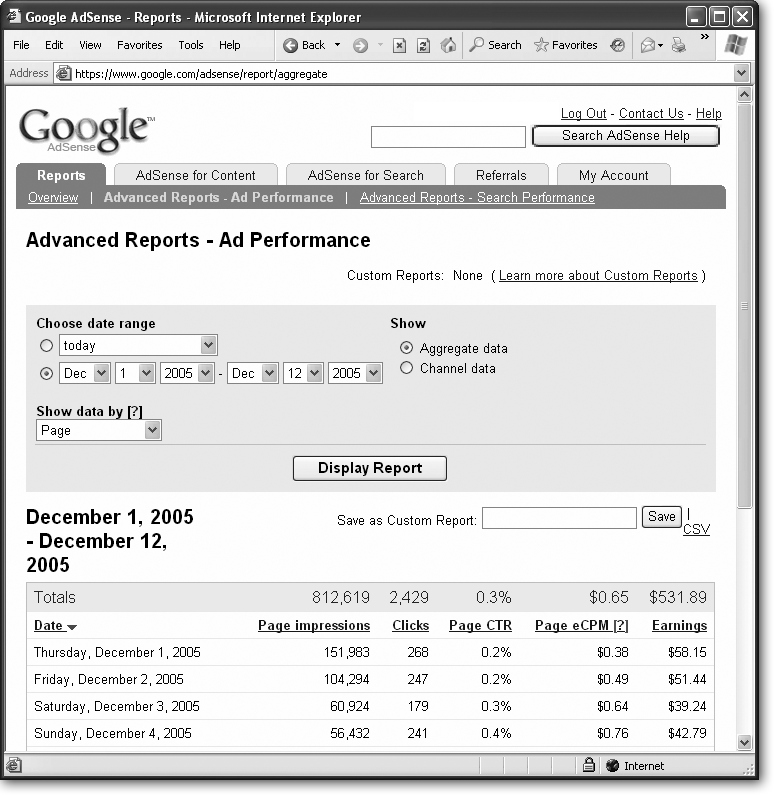
In the marketplace of clicks that Google has created, some clicks are worth more than others, based on the price advertisers are willing to pay for them. So while your number of clicks might be exactly the same from day to day, and the click-through rate (Section 9.2.2) might be similar, your earnings will typically fluctuate depending on which ads your visitors clicked and what they were worth at the time—things that Google doesn’t tell you. On your report, it simply says that, for example, one day six clicks are worth $2.31 while another day they net you a mere $0.69. To learn more about the value of clicks, see Section 9.2.3.
Despite this mushiness in your earnings information, you can still use the report to see what you’ve earned and whether you’re making more money over time (which you should be, as Google gets to know your pages better and serves more relevant ads, and as more people flock to your site). And if you’ve set up channels, you can also see whether one page of ads is earning you more money than another.
Note
There’s one other option on the Performance report page—the “Show data by” list. When you use the standard value (Page), the chart indicates how many times a surfer visits one of your ad-adorned pages. But if you use Individual Ad Unit, the chart instead calculates each ad unit served out as a distinct impression. That means if you have one page with four ad units on it, Google counts four impressions for every one visit.
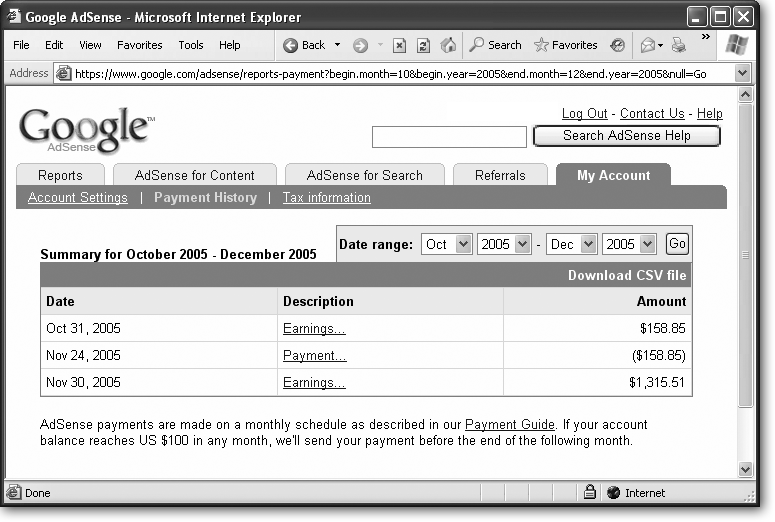
Payment History
The payment report is the poster child for simplicity. To see it, click the “Payment history” link in the Reports tab. Google shows you how much it sent you and when (Figure 9-12).
Honing Your Ads
The sheer simplicity of AdSense’s copy-and-paste ad code means you can change the ads’ look at will. And shaking things up a little can make a huge difference in the number of people noticing and clicking your ads. It’s therefore worth playing with your ads every so often. Change their color scheme (for example, if you have complementary colors, try contrasting colors). Or fiddle with the layout or placement on your Web page. Then leave things alone for a few days. You may find a nice change in your click-through rate—and earnings.
Tip
Use channels (Section 9.1.3) to keep track of how your changes are affecting individual pages or sections of your site.
If you find that AdSense is using your site to advertise products or services from a competing company, or you just don’t like a particular advertiser’s wares, you can block ads from up to 200 URLs. Under the AdSense for Content tab, click Competitive Ad Filter (or head to https://google.com/adsense/filter), and then click Edit to open a box where you can type in any URLs you want to nix. Add just one URL per line, and when you’re done, click “Save changes.”
The tricky thing here is that you can block URLs on a domain-wide basis (if you block www.example.com, Google won’t show anything from that site, including www.example.com/rubber_duckies and www.example.com/rubber_duckies/ornamental, for example), but when you do so, you really reduce the number of potential ad matches for your pages and thus your potential earnings. In fact, it’s easy to do more harm than good by blocking ads, and you should filter URLs with great care—even those from your direct competitors. For tips on blocking pages rather than whole sites, see the box on the next page.
Referrals
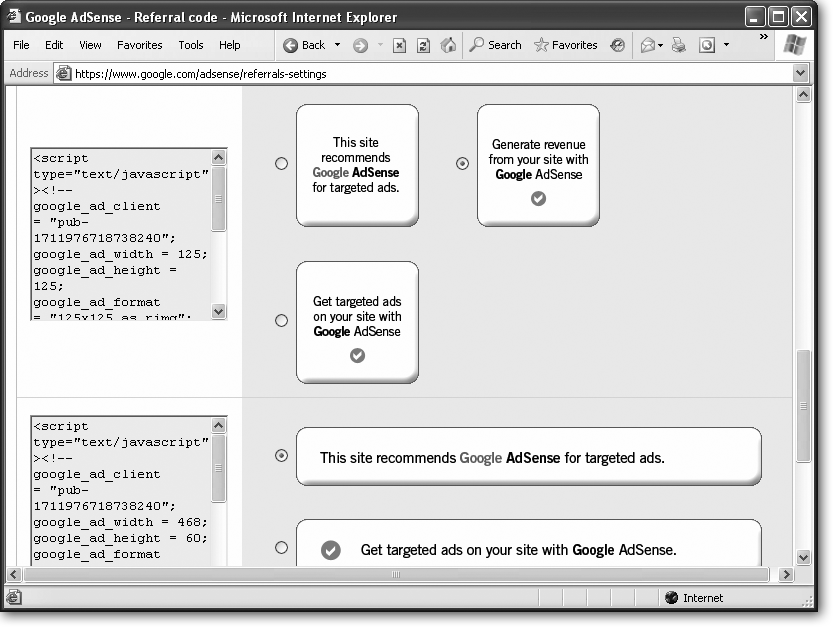
Still looking for ways to fish out a few extra dollars? Google provides a referral feature that promises to net you $100 for every person you convince to sign up for AdSense. The only catch is that you don’t get your $100 payout until the person you refer earns her first $100.
Google referrals work through a special referral button that you must add to your Web site. When someone clicks this link, he’s prompted to sign up for AdSense. (Obviously, if he clicks the link and then back out, you get nothing for your trouble.) Figure 9-13 shows how to create a referral.
Note
Google may also offer other referral opportunities through the referral tab. Currently, there’s an offer that nets you $1.00 for every copy of the Firefox browser that’s downloaded through a link on your site.
Getting Help
Google’s online help pages for AdSense (https://www.google.com/adsense/online-help) are chock-full of useful information on setting up shop, getting the most out of the program, maintaining your account, troubleshooting, and so on. Visit every so often, and especially before you write in for help. If you do have a question that isn’t answered by the help pages or is specific to your account, drop the AdSense crew a line using the form at https://google.com/adsense/contact.
Google AdWords
The AdWords concept is simple: You create ads that Google shows alongside regular search results. Your ads appear when somebody searches for keywords you’ve told Google you want to be associated with. For example, if you have a site that sells SpongeBob SquarePants scissors, you might want your ad to appear alongside Google results when people search for SpongeBob or children’s office supplies.
As with any advertising, you can create ads for your whole site (kiddie office supplies), for particular products you sell (Barney tape dispensers), or even for ideas (a comparison of political candidates’ education policies). But unlike traditional advertising, you don’t pay Google when it displays your ad (which is called an impression); instead you pay only when somebody clicks your ad (more on that later).
The true beauty of AdWords is that the sponsored links are every bit as relevant as the regular results. If somebody searches Google for Volvo safety, Google displays—alongside the Volvo safety reports and crash tests—Car Safety ads from Carfax.com and Volvo Auctions from CheapCarFinder.com. If somebody searches Google for your keywords, you know they’re looking for whatever you’re advertising. AdWords can thus be a great choice when you want to direct your ads to a narrow audience. (In fact, advertising gurus think of AdWords as a form of direct marketing, which means your message is delivered individually to each potential customer.)
AdWords may also be a good choice when you have just a few dollars for reaching your audience. You can advertise on Google for as little as $1.50 a month. Google charges just $5 to sign up for AdWords, and after that, you can set a budget as low as five cents per day. It costs more to send five snail-mail letters a month.
The confusing part about AdWords is that Google doesn’t charge a set price for ads. Instead, the company lets you bid on the keywords that you want to trigger your ads. If you bid higher than everyone else who’s bid on the same keyword, your ad is likely to appear near the top of the sponsored links.
For example, if you set a maximum bid of 35 cents for the word stapler, and the next highest bid is 23 cents, Google gives your ad priority among the sponsored links it serves up when somebody searches for stapler. Even better, Google charges you only a penny more than the second-highest bidder, so you may never even have to pay the full 35 cents you bid. If you bid less than the highest bid, Google still lets you play; it just doesn’t show your ad as often as other people’s. “Understanding the Costs” in Section 9.2.2 tells you more about how pricing and payment work.
Note
When deciding who gets top billing among the sponsored links, Google factors in bids and how many people click through each ad, giving preference to the more effective ads. You can’t, therefore, buy the top spot outright. But you might be able to sneak up on a competitor with deeper pockets. Section 9.2.2 tells you more.
If that all sounds appealing, it should: Google has designed a seductively smart system, and joining takes just a few minutes. But make no mistake: AdWords is a demanding way to advertise on the Web. This chapter explains the challenges, but first you need to get your head around Google’s advertising terminology.
Note
AdWords changes pretty regularly, which makes writing a book about the program like trying to nail Jell-O to a tree. This chapter covers all the features that exist at the time of this writing.
Understanding AdWords Terminology
Google tries hard to make AdWords perfectly understandable, even to the advertising neophyte. Yet for all the PDF guides and multimedia tutorials Google offers (https://adwords.google.com/select/library), the concepts can get rather confusing, rather fast.
It’s useful to remember that the AdWords universe is a hierarchy. It begins with keywords, which are connected to ads, which are connected to Ad Groups, which are connected to campaigns, which are connected to accounts, which are connected to the anklebone:
Keywords are the magic words that trigger Google to show your ads when people (read: potential customers) search for the terms. If, for instance, you’re selling a new line of floral shirts and you choose Hawaiian shirts as keywords, Google displays your ads when people search for—what else?—Hawaiian shirts.
Google lets you decide whether you also want people searching for leisurewear or Hawaiian cruises or other inexact matches to see your ad. To give you flexibility, Google offers four types of keywords: broad match, phrase match, exact match, and negative keyword. The box in Section 9.2.5 explains the differences and how to set them.
Tip
AdWords provides a helpful Keyword Suggestion Tool (https://adwords.google.com/select/main?cmd=KeywordSandbox) to guide you beyond the obvious choices for your products and services. Section 9.2.5 tells you all about it.
Once you pick your keywords, you associate them with an ad, described next.
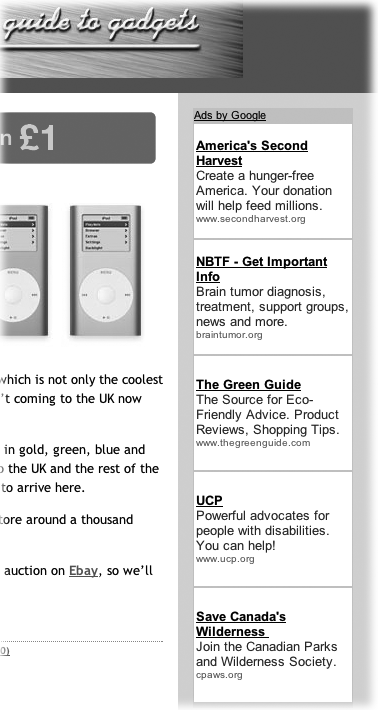
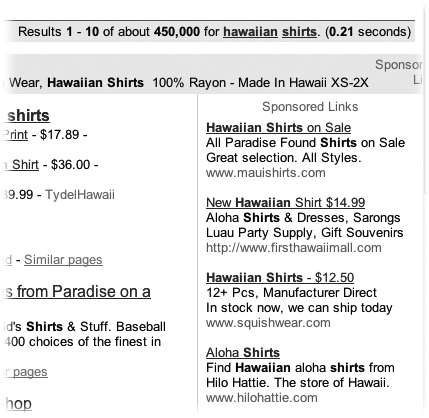
An ad appears on a Google search results page as a sponsored link (Section 1.4.2.1) or on an associated Web site, via AdSense (Section 9.1), under the legend “Ads by Google.” Figure 9-14 has an example.
Figure 9-14. As the top ad shows, a single ad consists of a headline (“Hawaiian Shirts on Sale”), two short lines of description (“All Paradise Found Shirts on Sale,” “Great selection. All styles.”), and a URL (”www.mauishirts.com“).One or more ads make up an Ad Group.
An Ad Group is a collection of ads taken out by one advertiser that all target the same keywords. For example, you might have three or four variations on the “Hip Hip Hawaii” ad or separate yet similar ads (“Boffo Bermudas,” for example) that you’ve associated with the same Hawaiian shirts keywords. You may think of this as your Clothing Ad Group.
An Ad Group is part of a campaign.
A campaign is a collection of Ad Groups. How you slice a campaign is really up to you. For Hiphawaiian.com, it might be spring vs. summer, men’s vs. women’s, clothing made of cotton vs. clothing made of shells.
AdWords accounts are unlike any other advertising account you may have come across, because Google has gone out of its way to make this program flexible. Your minimum cost is $1.50 per month. You can run ads for as short or as long a time as you like. And you can run as many or as few campaigns, Ad Groups, and ads as you wish, targeting any keywords that are in some way related to your line of products or services. The Fruit of the Month Club is a bigger commitment.
Understanding the Costs
Upon signing up for AdWords, you owe Google a whopping $5 activation fee. That’s it. You don’t owe anything else for another 30 days, and you get to tell Google in advance how much you’re willing to spend for the month. Even more amazing: No matter how many times Google shows your ads to prospective clickers, you don’t spend a penny unless people actually click through to your site.
Here’s how it works. You choose the cost-per-click that you’re willing to pay for your keywords. Then you choose an average daily amount you’re willing to pay for all your keywords. Google cleverly displays your ads often enough so that your click-throughs (the number of people who see your ad and then actually click it) multiplied by your costs-per-click equals your daily budget.
Note
Some days, your click-through rate might produce costs lower than your daily budget, and some days it might generate higher costs, but over the course of 30 days, it usually evens out. If it doesn’t, and your costs run higher than the monthly budget you set, Google gives you a credit for the overcharge. For example, if your daily budget is $10, your actual costs might fluctuate between $9 and $11 per day. But if the actual cost exceeds your monthly budget, you still pay Google no more than $300 for 30 days.
Fortunately, you don’t have to bid for keywords in the dark. After you’ve chosen your keywords, Google suggests a maximum cost-per-click based on what other advertisers have agreed to pay for those terms. Other people’s bids are important, because the price you’re willing to pay helps determine whether your ad appears above or below your competitors’ ads and how often it shows up. For example, you could tell Google you’re willing to pay 50 cents for the keyword Hawaiian. If your nearest competitor is willing to pay only 40 cents, Google actually lowers your price to 41 cents and gives your ad some priority when it displays them.
So why not pay just enough to keep your ad in the top spot? Because you can’t. When it ranks sponsored links, Google also looks at ads’ click-through rates, bumping up the ads with the highest rates. As a result, you can’t simply bid higher than everyone else to ensure the top spot. In fact, if your click-through rate is higher than your competitors', you could wind up in the top spot with a lower bid. (This scheme sounds counterintuitive, but it’s actually very much in keeping with Google’s philosophy of delivering results based on popularity.)
See “Signing Up” in Section 9.2.4 for some tips for balancing your costs with your ads’ exposure.
AdWords charges your credit or debit card every 30 days after your first click comes through. For acceptable cards by country, see https://adwords.google.com/select/pay_options.html.
Note
If you think you’ll be spending at least $7,500 a month for three months or more, Google may provide you with a line of credit and bill you monthly. For more info, see https://adwords.google.com/select/pricing.html#billing5.
Before You Sign Up
Before you even consider shelling out valuable advertising dollars, you should consider two things: Is AdWords even necessary for your business, and is it worthwhile? If you decide to go for it, you need to do some market research to figure out the keywords that might work for you.
Is it necessary?
You might just have all the free, targeted advertising you need in regular Google search results. And as good as AdWords are, nothing beats a great ranking when it comes to click-throughs. (For proof, ask your friends if they ever read or click the sponsored links—you’ll be amazed to find that most people ignore them completely.)
Run a few Google searches using keywords or phrases you’d hope (not expect) would turn up your site in results. Make note of those in which you appear above the fold—typically the first five results or so. If you’re consistently showing up near the top, consider putting that ad cash elsewhere (toward other keywords, for example, or other marketing outlets entirely).
If you’re making it into the top ten results, but not the top five, think about whether pumping those advertising dollars into a bigger and better site might net you some more attention and links—perhaps enough to raise you a result or two in the regular rankings. $5,000 or $10,000 can buy a lot more in the way of site improvements than AdWords ads.
Is it worthwhile?
The biggest mistake people make before joining AdWords is not figuring out how much clicks are worth to them. That’s like wandering into a car dealership knowing you need a new auto but having no idea how much you can afford. Before you know it, you’re driving out in a nice convertible that costs more per month than your salary.
Fortunately, there are a few fairly simple calculations you can use to figure out how much you can sanely spend on AdWords, or whether the costs are even worthwhile for your business.
The first step is to figure out how much you’re willing to spend for every sale. For example, if you sell fur-covered, roof-mounted ski racks for $3,000 a pop, and your gross margin (the amount you make after factoring in your costs) is $1,500, you might be willing to pay $200 or more to make a sale. If you sell fur-covered mountain bike seats for $250, you may be willing to spend only about $30 for a sale. (Unfortunately, there’s no general rule of thumb for determining your maximum cost-per-sale; it’s a business decision you have to make independent of AdWords.)
Once you’ve determined a maximum cost-per-sale, you need to get your head around a conversion rate, the percentage of people who click your ad and then actually buy a furry item. Conversion rates can vary from campaign to campaign, but industry experts say that a rate of one percent is fairly common. You read that right: Only one out of every hundred people who click through to your site is likely to actually spend money.
With your maximum cost-per-sale and an estimated conversion rate, you’re ready to do some math.
Note
Weirdly, you do this math before you have a clue as to how many people will see your ad or what your click-through rate will be. That stuff comes later.
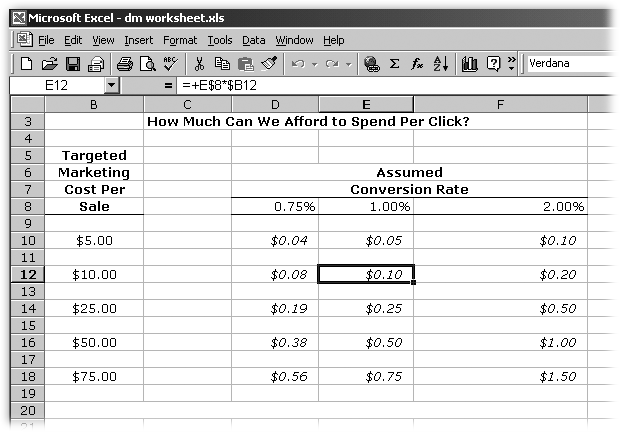
Here’s the magic equation: Simply multiply your max cost-per-sale by the conversion rate. The answer equals the most you should pay for a single click. For example, if you decide that the most you can afford to pay for a sale is $10, and you assume that one percent of people who click your ad will wind up buying your product, then the most you can afford to pay for a click is a dime ($10 x 1% = $0.10). If your conversion rate is a stellar two percent, you can afford 20 cents.
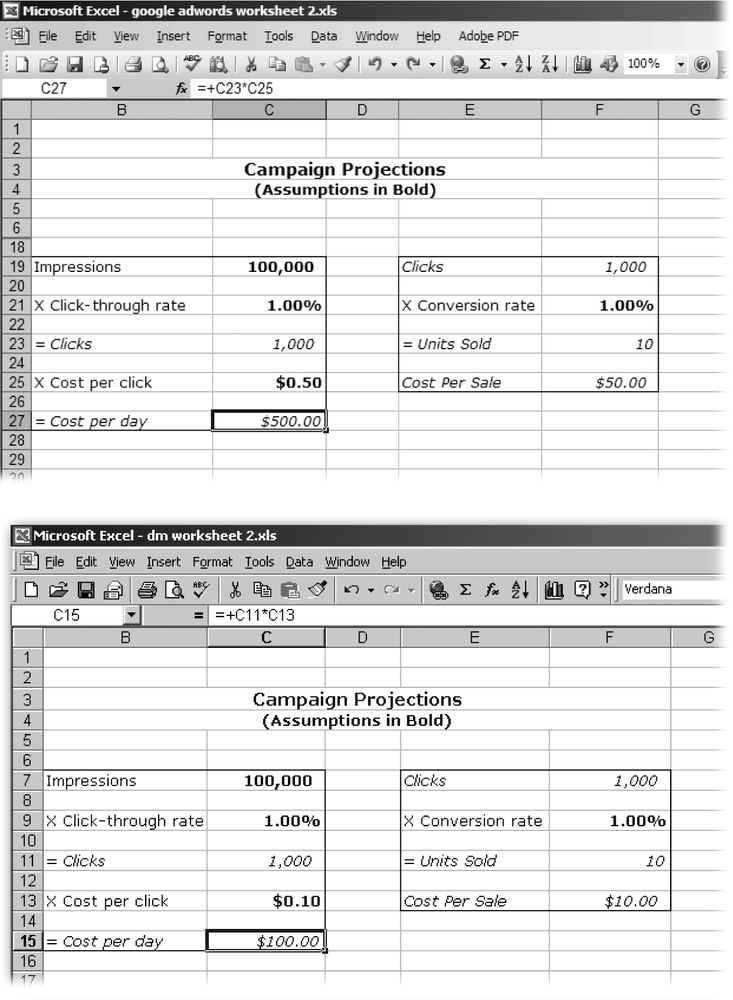
If you’re advertising a bunch of products with a range of prices, or if you want to find out how different conversion rates affect your cost-per-click (or if you hate math), you can create a spreadsheet like the one in Figure 9-15 to let you see at a glance the most you can afford to bid per keyword for any particular campaign.
Note
To make it easier for those of you keeping score at home, the spreadsheets shown in Figures 9-15 and 9-16 are available on the “Missing CD” page at www.missingmanuals.com. Simply download them and plug in your own numbers.
Once you’ve determined your max cost-per-click, you can start figuring out how much AdWords might cost you every day, and how many sales you can expect to get for your daily budget. The charts in Figure 9-16 guide you through the process.
If you estimate a one-percent click-through rate, a one-percent conversion rate, and 35 cents per keyword, you’ll probably get a ballpark guess on what AdWords might cost—and earn—you. And all of this math may very well lead you to the point of deciding AdWords is simply too expensive or will likely yield too few sales to work for your site. But if you’re still intrigued, you can find out whether Google is actually selling keywords at a price you can afford and how many impressions you can expect to get for those keywords. Simply sign up for AdWords and play with the Traffic Estimator—a tool for guesstimating just those factors (Section 9.2.5)—without spending a dime.
The market research
If you decide to increase your visibility with AdWords, take the time now to do some market research:
Mix and match your keywords and phrases to learn which searches your competitors are associated with. Bear in mind that you’ll have to pay more for popular keywords, and in many cases, you’ll do better if you differentiate yourself with very specific keywords and effective, targeted ads. For example, if you have a small bookstore in Boise, Idaho, you can associate yourself with your locale (Section 9.2.4) and a specialty, like first-edition Jane Austen books. If all you have to say is “We also have books,” no ad will help you compete against giants like BarnesandNoble.com or BooksAMillion.com.
Figure 9-16. Top left: This chart shows you how much AdWords will cost you per day if you get 100,000 impressions at a click-through rate of one percent and a cost-per-click of 50 cents. Top right: This chart shows you how many sales you can expect to make based on the clicks you’ll get multiplied by the conversion rate. The cost-per-sale is the total cost from the chart on the left divided by the units sold. Bottom left and right: The same formulas, but with a different cost-per-click. You can also play with the impressions, the click-through rate, and the conversion rate to find different winning scenarios.Tip
Your keywords might bring up ads unrelated to your products and services. For example, if you sell video camera parts, your keywords might pull up ads for video-rental services. Even if those advertisers aren’t your competitors, you’ll still be competing with them for people’s attention. Accordingly, plan ads that will help distinguish your offerings from the rest of the crowd. Think, too, about finding less obvious keywords that might have fewer advertisers—and lower costs.
Put yourself in the shoes of your potential customers when you think about what your ad might look like. What are they looking for? What enticing words might draw their attention from the search results and direct their eyeballs (and mice) to your ad? What would differentiate your ad from those above and below it? You certainly don’t want to be just one of many advertisers sporting a “Hawaiian Shirts” title. Should you mention price (is your $39.95 pricing competitive)? Discount? Hard-to-find designs? Other matching merchandise? Keep these things in mind, and be prepared to tweak your ads to come up with the most effective copy.
The Web is littered with sites that failed to plan ahead and lost scads of time and money to AdWords. Don’t let it happen to you.
A Few Final Words of Warning
To run an AdWords campaign that makes you more money than it costs (or draws enough readers to justify the costs, if that’s your goal), you must be prepared to spend a good deal of time, maybe hundreds of hours, honing your ads. And you must be incredibly organized and methodical as you try out hundreds or thousands of different combinations of ad copy, keywords, keyword details (Hello Kitty vs. "Hello Kitty“), landing pages (the place on your site where somebody goes when they click your ad), and daily budgets. And that’s just for a small campaign.
Although Google automates a number of processes in AdWords (like lowering high bids for clicks to a penny above your competitors'), you have to manually juggle a lot of variables, each of which has many possibilities. Furthermore, you have to try perhaps dozens of strategies to figure out what combinations of variables leads to clicks and cost-effective ads. Moreover, some of the factors (like a keyword’s cost-per-click) can change over the course of a single day. It’s not for the faint of time or patience.
In addition, while you can spend as little as five cents a day in theory, and you can definitely set your own daily budget, in practice you may find it difficult to spend within your limits and still reach potential customers. Small-scale spending was easier when Google first introduced its cost-per-click system in early 2002. But as more and more advertisers join the program, the keyword bidding gets more competitive, and costs go up incrementally. As a result, today many potential advertisers are nearly priced out of the market (Section 9.2.3 offers tips on how to figure out whether AdWords is worth it for you).
All that said, AdWords is a great Web marketing tool for a lot of advertisers, and it may be for you, too.
Signing Up
You join AdWords by creating an Ad Group to hold your first ad, writing the ad itself, and choosing your keywords.
Tip
As you go through the process of signing up, don’t use your browser’s Back button to return to previous pages. Doing so can cancel your session. Instead, use the links Google provides to navigate between the pages.
Go to the Google AdWords home page: http://adwords.google.com .
To get things rolling, click “Sign Up Now: Click to begin.”
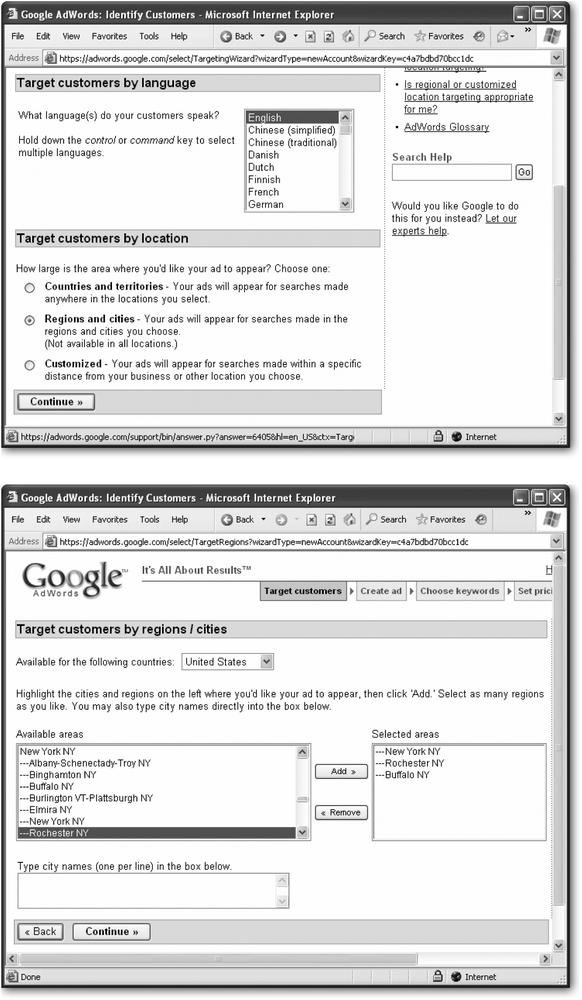
Pick target languages, countries, and particular regions.
Not only are your ads specific to the keywords folks are searching for, but you can also decide who sees them based on the language people search Google in, and their country or region (Figure 9-17).
Figure 9-17. Top: First, you choose a combination of languages; Ctrl+click (⌘-click) to select more than one in a list. You should also decide what level of location-specific targeting you want to use. When you’ve picked your settings, click Continue. Bottom: If you choose regional targeting, Google takes you to this page. Choose the country you want to target, and then choose as many specific areas as you want. After you select an area, click the add button. (You can remove a region from your list by highlighting it and then clicking Remove.) If you want to focus in even closer, you can type in a list of city names (one per line) in the text box at the bottom.Google provides regions for many countries, and these regions may correspond to states and metropolitan areas (in the U.S.), provinces (in Canada), and so on. If you want to reach people in a limited geographic area, regional targeting can bring down your cost-per-click substantially, because many fewer sites tend to compete for keywords in smaller physical areas.
Tip
The language and countries you choose don’t have to be native matches. For example, you can allow French speakers from Canada but not from France. For that matter, you can target the French speakers from Australia or anywhere else you know they’re wild about Hawaiian shirts.
When you’re ready to move on, click the Continue button.
Fill in the ad form.
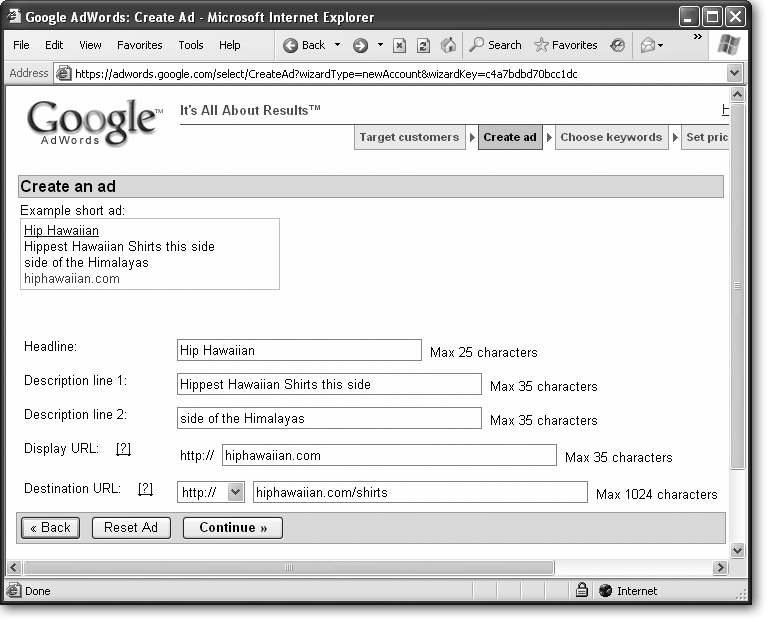
It’s time to inject those creative juices into your ad. (Hopefully you’ve been giving it some thought, as suggested in Section 9.2.1.) Create your first ad by filling in the form shown in Figure 9-18.
Figure 9-18. As you fill in each line, Google changes the sample ad at the top of the page to reflect your choices. When you’ve filled in everything up through the line for the display URL, you can see what your ad will look like when it appears in Google results.The first thing your audience sees (or summarily ignores) is your ad’s headline, so make it stand out with a phrase that’s enticing and novel, yet explanatory. And do it all in 25 or fewer characters. Similarly, Google gives you only 2 lines of 35 characters apiece for your description, so every letter counts. If you can, focus on products or services you offer that distinguish you from your competitors.
Tip
Consider keeping your character count below rather than right at the maximum for each line of your ad. Your ad may appear on associate sites as part of the AdSense program (Section 9.1), and sometimes Webmasters for associate sites scale their ad space improperly, or their sites may behave oddly on some browsers, both of which can cut off wider ads.
Google recommends making your ads available to their AdSense network for widest exposure. In fact, when you sign up for AdWords, Google automatically puts your ads in the pool for its whole distribution network. But you can choose to have your ads show up in Google results only. For directions on setting your distribution preferences, see Section 9.2.6.1.
Google gives you two slots for URLs. First is your display URL, which is the one that appears in your ad. It should be short and sweet—again, no more than 35 characters—and for advertising purposes, it ought to represent your whole site, so your home page URL is probably best.
Tip
If people can reach your site without typing in www, leave that part out to help keep your ad trim.
The destination URL is the page people actually go to when they click your ad (no matter where in your ad people click, they go to the same page), so you can bring customers to just the right page for the product or service you’re advertising. Here you’ve got 1,024 characters, and the URL doesn’t appear in the ad itself, so link to as wide or deep a page on your site as you’d like.
Click Continue to move to the keywords page. At this point, Google checks your ad for inappropriate language. For example, if you inadvertently leave out the “r” in Shirts, Google rejects your ad.
On the “Choose keywords” page, type your keywords.
You should already have thought of these, tried them out earlier, and honed ‘em (Section 9.2.1). Once you’ve got your list, type each keyword or phrase on its own line. Start with some obvious choices for your products or services (Hawaiian shirts). Then widen the circle to include synonyms (Hawaiian clothing), misspellings (Hawaiin shirts, Hawaiian shorts, Hawaiin shorts), singular or plural forms (Hawaiian shirt), associated phrases (leisurewear), and so on. You can always add keywords, so consider starting with just a few to test the waters. Later on, you can play with the mix as you learn what’s working and what’s not.
Note
You can have as many keywords as you’d like for each ad. Each line (that is, each query), however, has a ten-word maximum, just as Google limits all searches to ten words (Section 1.3.2).
As you go, you also need to tell Google how you want it to deal with your ads when somebody searches for your keywords. You have four match choices, described in the box in Section 9.2.5, each of which has punctuation you can use to indicate your choice:
For broad matches, use no punctuation.
For phrase matches, put your phrase in quotes.
For exact matches, put your phrase in brackets.
For negative keywords, put a minus sign or dash before the word or phrase you want to ignore.
Tip
Google has a pretty good multimedia tutorial on AdWords keywords at https://services.google.com/marketing/stats/tutorial_redirect.
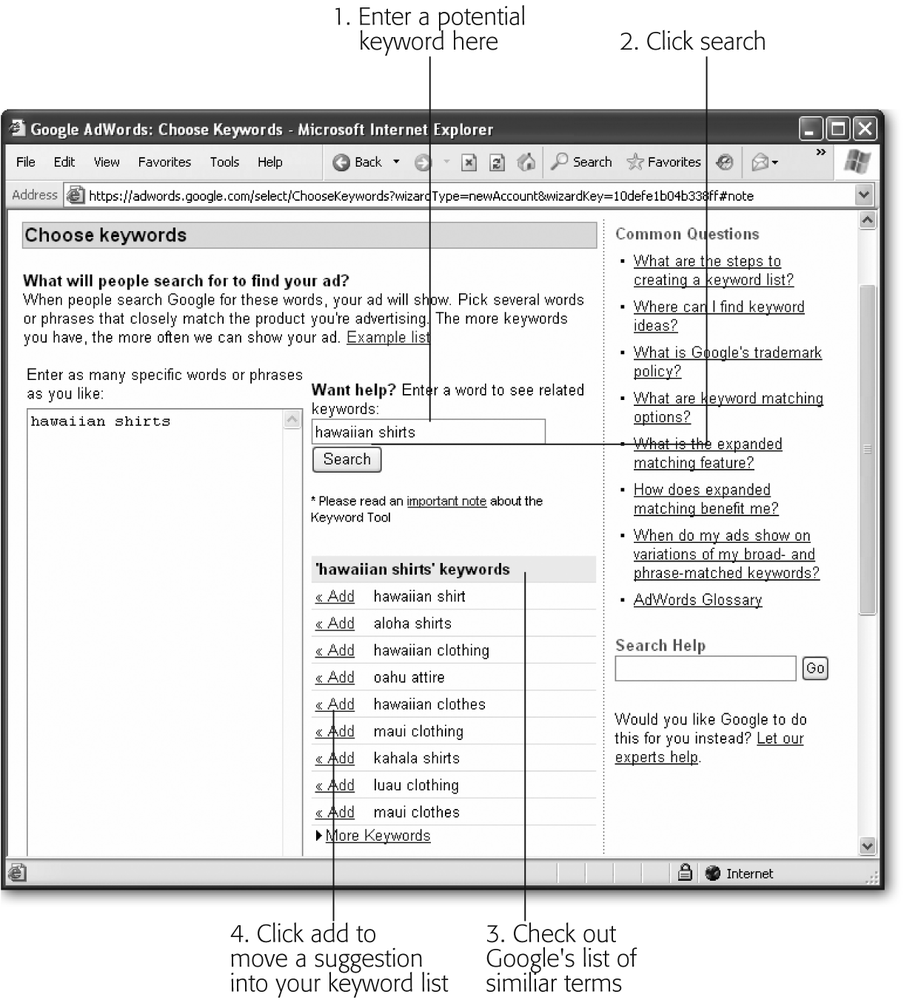
It can be tedious coming up with all the keyword combinations you want to use. For help thinking of similar keywords and phrases, give the Keyword Tool a whirl (Figure 9-19). A similar version of the tool is available for you to use at any time at https://adwords.google.com/select/KeywordSandbox.
When you’ve finished setting your keywords, click Continue.
Set your currency and your daily budget.
AdWords suggests a daily budget, but if it’s more than you can afford, you can change the “Daily budget” number. (Remember that your monthly expenditure equals no more than 30 days times your daily budget.)
No matter your daily budget, Google tries to show your ad evenly throughout each day. The lower your daily budget, however, the less often Google shows your ads. Unfortunately, Google doesn’t provide an estimate of how a lower daily budget might affect your exposure, so you have to simply try out an amount you can afford and keep an eye on your reports (Section 9.2.7) to see what happens.
Figure 9-19. The Keyword Tool uses Google’s powerful understanding of relevance to help you choose related, effective keywords. If you want to test new terms, head to the box that’s just to the right of the keyword list, type in a keyword, phrase, exact match, or negative keyword, and then click the Search button. A list of similar keywords appears under the text box. If you see a keyword you like in this list, click Add, which removes it from the search list and pops it into your list of chosen keywords.Choose your maximum cost-per-click.
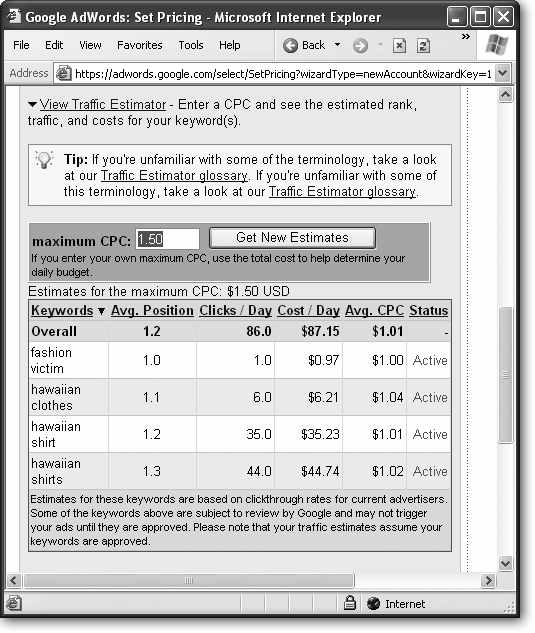
Remember, when you bid on keywords, you’re actually agreeing to pay Google anywhere from five cents to $50 for each person who clicks through your ads. But you don’t have to guess at the marketplace for your keywords, because Google automatically suggests a maximum cost-per-click, based on what existing advertisers are already paying for your keywords. To find out how that suggestion will play out, click View Traffic Estimator, and check out Figure 9-20.
The Traffic Estimator is a terrifically handy predictor of the number of clicks you can expect for each of your keywords, your average cost-per-click and cost per day, and what position your ad is likely to reach (1.0 is the highest, 2.0 is second, and so on). At the top is your total cost per day. If it’s more than you’re prepared to pay, you can delete keywords, reduce the maximum cost-per-click you’re willing to pay, or limit your target languages and countries. Conversely, if you want more exposure and you have a bigger budget, you can add keywords, increase your maximum cost-per-click, or expand your target language and countries. After you’ve changed any of those factors, click Get New Estimates (above the Traffic Estimator) to find out how your new scenario will work.
Figure 9-20. The Traffic Estimator suggests a maximum cost-per-click for all the keywords in your Ad Group. (If your local currency is not U.S. dollars, choose another from the currency list.) If you want to set the cost-per-click for each keyword individually, you can do so after your account is established (Section 9.2.5).As you work with the Traffic Estimator, use its numbers to refine the projections spreadsheet you created before you signed up (Section 9.2.3). The reality check of the Traffic Estimator, combined with your own calculations on cost-per-sale, units sold, and daily budget, may lead you to reconsider whether AdWords is worth your precious time and money. If the numbers don’t look good but you’re still itching to try it, you can always run a campaign for a few hours or a few days to see how things really play out.
Tip
If the Traffic Estimator is giving you bad news about your keywords—either they cost too much, or the exposure is too skimpy, or both—and you want to tweak your terms to see how that affects your bottom line, click “Edit your keyword list” under the Traffic Estimator, which takes you back to the “Choose keywords” page (step 4 above).
When you’re satisfied you’ve set your costs properly, click the Continue button.
Confirm your choices.
Google gives you a final look at your ad, daily budget, and keywords. To back up and take another whack or three at any of these numbers, click the Back button (at the bottom of the page).
When you’re comfortable with your ad (and its cost), click the Continue to Sign Up button. Finally: It’s time to sign up for an AdWords account.
Use an existing account or create a new AdWords account.
If you have an existing Google account (one that you use for Gmail, for example), you can use that as your AdWords account as well. Click the “Sign in to AdWords with your Google Account” option, and supply your email and password.
If you don’t have a Google account or if you want to keep it separate from your AdWords account, click “Create a new Google Account to be your login to AdWords” instead. Fill in the AdWords sign-up form, providing an email address and making up a password. Be sure you choose an email address that is actually up and running, as Google sends a confirmation email to that address, and you need to retrieve it to finalize your account.
Either way, you click the Create AdWords Account button to seal the deal.
Check your email, verify it, and log in.
An email message from Google AdWords soon lands in your inbox. Click the hyperlink in it to go to the page where you complete the AdWords sign-up process. Log in using your email address and password.
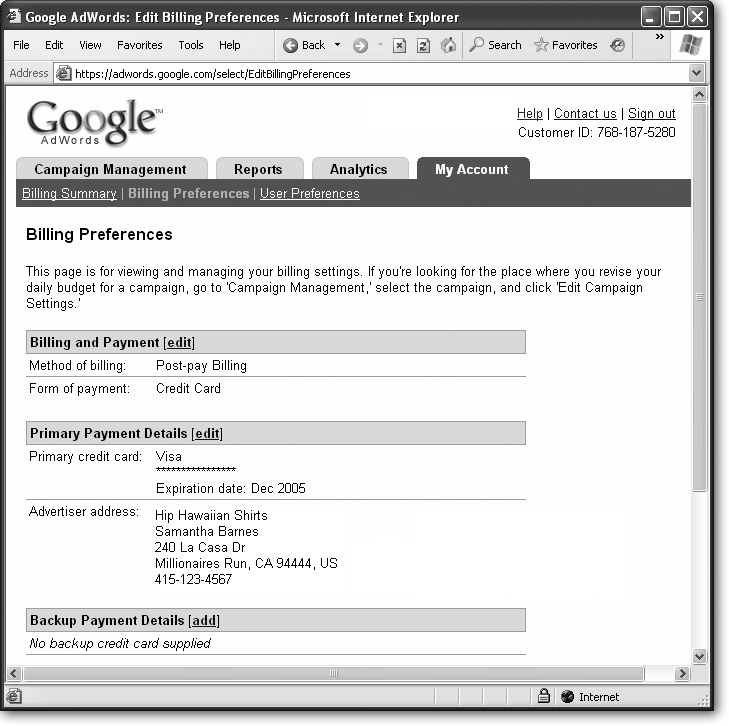
Set up billing.
After you’ve logged in, click the My Account tab and then Billing Preferences to get to the page where you can set up your billing options (Figure 9-21). Google deploys your first Ad Group and the associated ads the moment you provide your billing details.
That’s it. Now you can start wondering how your ads are faring. The next section tells you how to find out.
Managing AdWords
After you’ve set up an account, the name of the game is tweaking. And lots of it. To reach your sales goals, you’ll have to try many combinations of keywords, keyword matches, ad copy, landing pages, costs-per-click, and daily budget. And to be successful, you have to treat it like science. When you do an experiment, you can’t change everything at once. In fact, you can only learn what’s working if you change one factor at a time. There’s no way around it: AdWords is high maintenance. Fortunately, Google offers a slew of tools to help you assess the performance of every detail in your campaigns.
Note
Google offers some useful optimization and adjustment tips at https://adwords.google.com/select/tips.html.
When you’re logged in to your AdWords account, the Campaign Management tab is your command center. The tab has three pages: Campaign Summary, a nifty way to view your account; Tools, which lets you adjust the keywords across all your campaigns (described in Section 9.2.6.2); and Conversion Tracking, an optional system for determining the effectiveness of your ads (see the box “Tracking Conversions” in Section 9.2.6.2).
Tip
You can search through all your campaigns, Ad Groups, ad text, and keywords by using the Search box at the top right of every Campaign Management tool screen. It’s handy when you have a lot of ads, and you can’t remember which one has an outdated link to, say, your “Shirt of the Month” page. It’s also useful if you’ve suddenly run out of flowery shirts and you want to find all your ads that mention floral patterns and change them to advertise stripes.
The Campaign Summary page, Figure 9-22, is where you’ll do most of your clicking around.
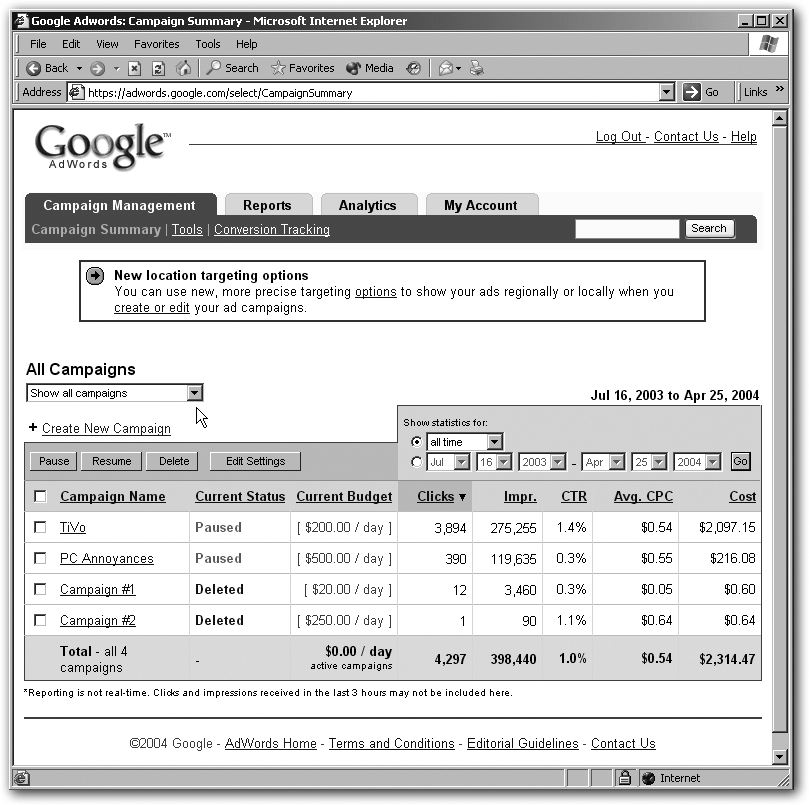
As you know, a campaign contains one or more Ad Groups. For each campaign, Google gives you a summary of its status, letting you take various actions.
Note
To apply an action to a particular campaign, turn on its associated checkbox and then click the appropriate action button. For example, to pause the first campaign on your list, click its checkbox and then click Pause. Select multiple campaigns by turning on multiple checkboxes. Select them all by turning on the checkbox to the left of the Campaign Name heading.
Create New Campaign. Use this link to create a campaign for your nifty new line of Hawaiian footwear. Google takes you back to step 2 in Section 9.2.4.
Pause. Perhaps your campaign has been too successful and you’re plumb out of Hawaiian shirts, or you’ve decided to take a different tack for June, focusing on an overstock of Bermuda shorts instead. Pause a campaign at any time to suspend the appearance of its ads alongside Google results.
Resume. Your supplier has managed to come up with a few more gross of shirts; you can safely resume your campaign now that you’ve got merchandise to sell.
Delete. Campaign just not working at all? Time to try something different. While you can just Pause a campaign, if you’re sure you won’t ever want it again, simply delete it.
Edit Settings. You can alter any of the options you set when you created your account or the current campaign, including campaign name, daily budget, a time period for displaying the ads, language and country, and which Web sites Google displays your ads on. If you don’t want your ads to appear on sites in the AdSense network (Section 9.1), here’s the place to change that setting.
Visit the Ad Groups in a campaign. Click the blue name of an ad campaign to zoom in on it and work with the Ad Groups within it, discussed next.
Managing your Ad Groups
An Ad Group consists of one or more ads. When you’re on the Campaign Summary page, clicking a campaign name shows the Ad Groups within that campaign (Figure 9-23) and lets you take action on the groups. You can do most of the same things you could do at the campaign level (create new groups, pause, resume, and delete them), but you can also do a few extra things.
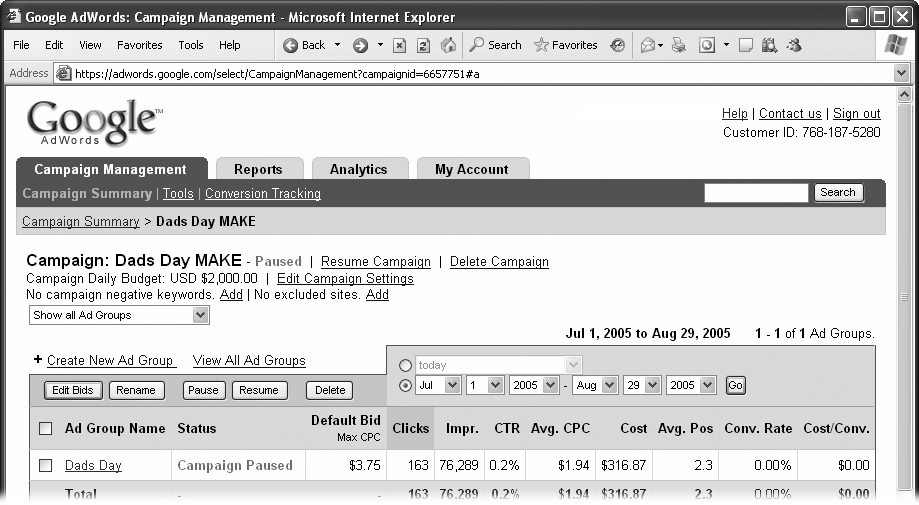
Edit Bids. Change your mind about how much you’re prepared to pay for each click for all the ads in a group? Raise or lower your maximum cost-per-click at any time.
Rename. Perhaps you’re combining your Bermuda shorts with your entire line of pants; rename the “Bermudas” Ad Group to “Pants.”
Visit the ads in an Ad Group. Click the blue name of an Ad Group to zoom in and fiddle about with the ads themselves, discussed below.
Managing your ads and keywords
Click an Ad Group for an overview of its keywords and the ads triggered by these keywords, shown at the bottom of the Web page (Figure 9-24).
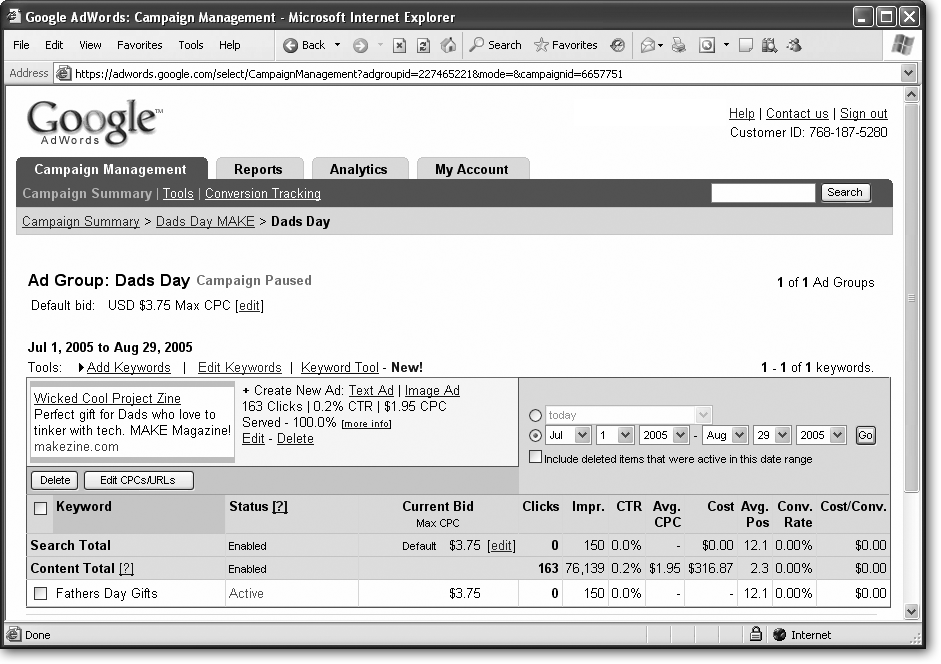
Here you can create a new ad or delete a keyword that just isn’t coming up enough or seems to be attracting the wrong crowd. You can also jump to Edit CPCs/URLs page, where you can also edit your cost-per-clicks for each individual keyword, a level of specificity you couldn’t reach during setup. For example, if you’re willing to pay more for "vintage Hawaiian shirts" because that’s your specialty and you really want to draw people looking for them, you can bump up your cost-per-click when people search for that phrase. If people searching for "newfangled Hawaiian shirts" are potential customers but not as likely to buy, you can pay less per click for them.
On the Edit CPCs/URLs page you can also tailor the URLs associated with individual keywords so that your landing pages are different depending on what people are searching for. For example, perhaps you want people searching for Hawaiian to click through to your general store (www.hiphawaiian.com), but you want people looking for "Hawaiian shirts" to go straight to the right section of your site (www.hiphawaiian/clothing/shirts). Again, associating individual keywords with specific links to your site is a level of detail you couldn’t achieve when you set up the ads.
You can take your keyword management to yet another level. From the Campaign Management tab, click Tools to get a page that’s packed full of AdWords goodness. You’ll see three groups of links. The first group is Optimize Your Ads, which brings the following features together:
Keyword Tool. Here you can build a master list of keywords for use in various campaigns with the familiar Keyword Tool (which you first used in Section 9.2.5). As its name implies, the tool suggests keywords related to the ones you’ve already picked, helping you refine your targeting.
Edit Campaign Negative Keywords. Use this option to define negative keywords (Section 9.2.5) that will apply to an entire campaign, rather than just one Ad Group.
Site Exclusion. Use this option to define sites on which your ads should never appear.
Traffic Estimator. This brings you back to the familiar Traffic Estimator (Section 9.2.5), which is useful for budgeting out keywords and campaigns.
The second group is named Analyze Your Ad Performance. Here, you can explore and analyze how your ads are working. Your options include:
Ads Diagnostic Tool. This is a nifty tool that lets you try out a sample Google search and see if it pulls up any of your ads. You can choose to try your virtual search for different Google-controlled sites (like www.google.com, www.google.ca, froogle.google.com, and so on) and you can choose the language and region settings that you want to use for the search. Once you’ve configured these details, just supply the keywords and click Continue. Google tells you if any of your ads fit the bill.
Disapproved Ads. If one or more of your ads were rejected by Google, click here to find out what they were and why Google didn’t like them.
Conversion Tracking. Brings you to the handy Conversion Tracking tool (Section 9.2.6.2), where you can see how many visitor ad clicks lead to the ultimate goal you have in mind (for example, a sale).
My Change history. Review the changes that you’ve made to your account over the last three months.
Finally, the Modify Your Campaigns section of links has a few tools that are useful when you have several campaigns going. You can search for ads throughout all your campaigns and then choose to tweak their Max CPC value (click “Find and Edit Max CPCs”), text (“Find and Edit Ad Text”), or keywords (“Find and Edit Ad Keywords”). Finally, use “Copy or Move Keywords and Ad Text” to shuffle ads and keywords from one campaign to another, which is useful when you need to create new campaigns that have some similarities to old ones.
Reporting
AdWords reports are basically the spreadsheets in the Campaign Management tab, but you can’t take any actions from the reports (read: muck something up). Reports are thus good for people like coworkers who need “look but don’t touch” access to your campaigns, and they let you create crowd-pleasing graphs. Reports are also good for letting you get a bird’s-eye view of your campaigns without losing detail. For example, you can see how a keyword is performing across several campaigns, including the number of impressions it’s drawing, the clicks, conversion rate, and more. Perhaps the best feature of the reporting tools is that you can have Google email you any report daily, weekly, or monthly, which lets you keep an eye on things without having to remember to go look.
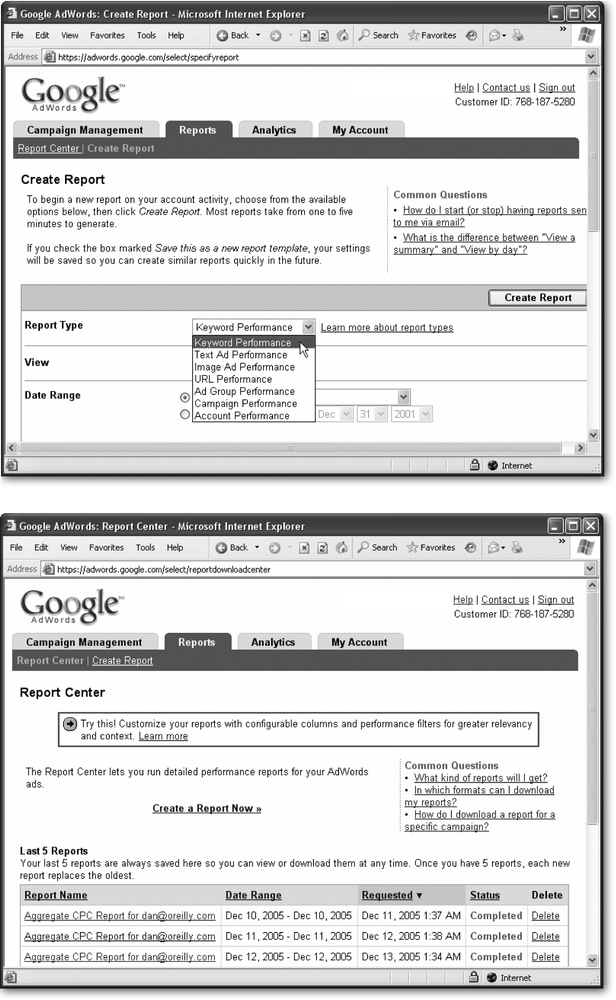
The Reports tab has two links: Report Center, which shows all the reports you’ve created so far (and lets you review them with a single click), and Create Report, which lets you build a new report. Here’s how you can create a report:
In the Reports tab, click Create Report.
The Create Report page appears (Figure 9-25).
Select the Report Type.
In the Report Type box, Google provides a number of handy prefab report options. They include:
Keyword Report. See how your individual keywords and phrases are faring.
Ad Text Report. Check how slight alterations to the titles and descriptions of your ads change your click-through rates. For example, find out if the headline “Hawaii Five-Whoa” garners a higher rate than the headline “Hawaiian Punch.”
URL Report. Keep track of the landing pages you’ve embedded in your ads.
Account Report. Get an overview of how your AdWords account is doing.
Campaign Report. Compare your various campaigns against one another.
Ad Group Report. Compare your Ad Groups and their associated keywords against one another.
Choose a view.
The view determines how detailed the chart is. You can choose Summary, Daily, Monthly, Quarterly, or Yearly, depending on whether you want to look at the big picture or hone in on daily fluctuations.
Change the date range (optional).
Reports cover the last seven days if you don’t change the date range.
Choose a specific campaign or ad group (optional).
If you don’t make a selection here, the report includes data from all your campaigns.
Add or remove columns (optional).
Google provides a lengthy list of columns for every report type. Based on the type you choose, Google selects certain columns. However, you can add or remove individual columns—just add a checkmark next to the ones you want.
Add a filter (optional).
If you don’t want to see everything, you can limit your report with a filter. For example, if you’re performing a keyword report, you could show only keywords that resulted in a minimum 10 clicks, cost more than a certain amount, or were served a minimum number of times.
Choose a name for your report.
This is the name that the report will have on the Report Center page. By default, this name matches the report type (as in Account Report or Keyword Report). If you’ve applied more settings, you should customize it to be something more meaningful.
If you want to reuse your report, choose “Save this as a new report template.”
This choice lets you create a new report based on this report in this future. You can also use the scheduling options (described in step 10).
Set scheduling options (optional).
Complex reports can take some time to generate, so you might want to schedule them so the information is ready when you want it. You can configure a report to run automatically on a daily, weekly, or monthly basis. Even better, if you switch on this option (by selecting “Schedule this report to run automatically”), you can also have the report emailed to you (select “Whenever the report runs, send email to” and fill in an email address) so you get the results without needing to log in to AdWords.
Click Create Report.
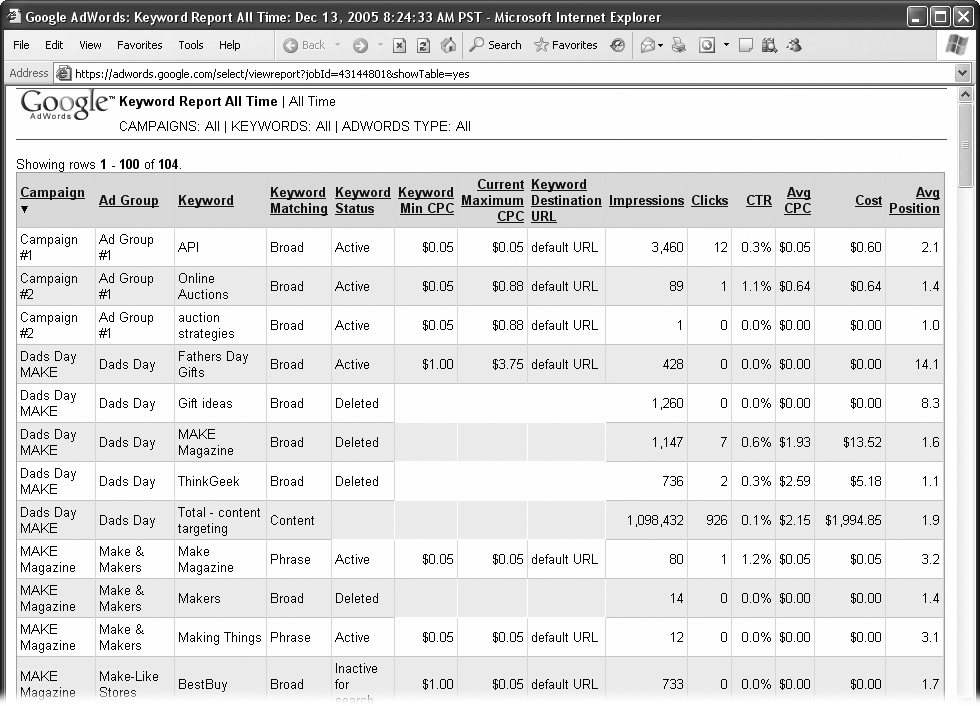
There’s a short delay while Google generates the report. Once it’s finished, the page refreshes. Click the “View data” link to continue on to your report. (Figure 9-26 shows you the Keyword Report, which is one of the handiest.)
Tip
You can view reports right there in your browser by choosing “View data” once the report is generated. But if you want to view them in your favorite spreadsheet or database application—so you can create your own charts or compare data with another marketing campaign—you can download the data in a format that other programs can read, known as comma-separated values, or .csv (in this format, you get just the columns of data, separated by commas, which most database and spreadsheet programs can easily import). Text and XML downloads are also available—just click the appropriate link in the Download Report section.
Billing
Under the My Account tab, you can get a billing summary, or alter your billing preferences (such as which credit card Google charges) or user preferences (such as your contact information). Mostly, you’ll ignore the preference pages and check out the billing summary, shown in Figure 9-27, which lets you track pending charges and payments you’ve made on your AdWords account.
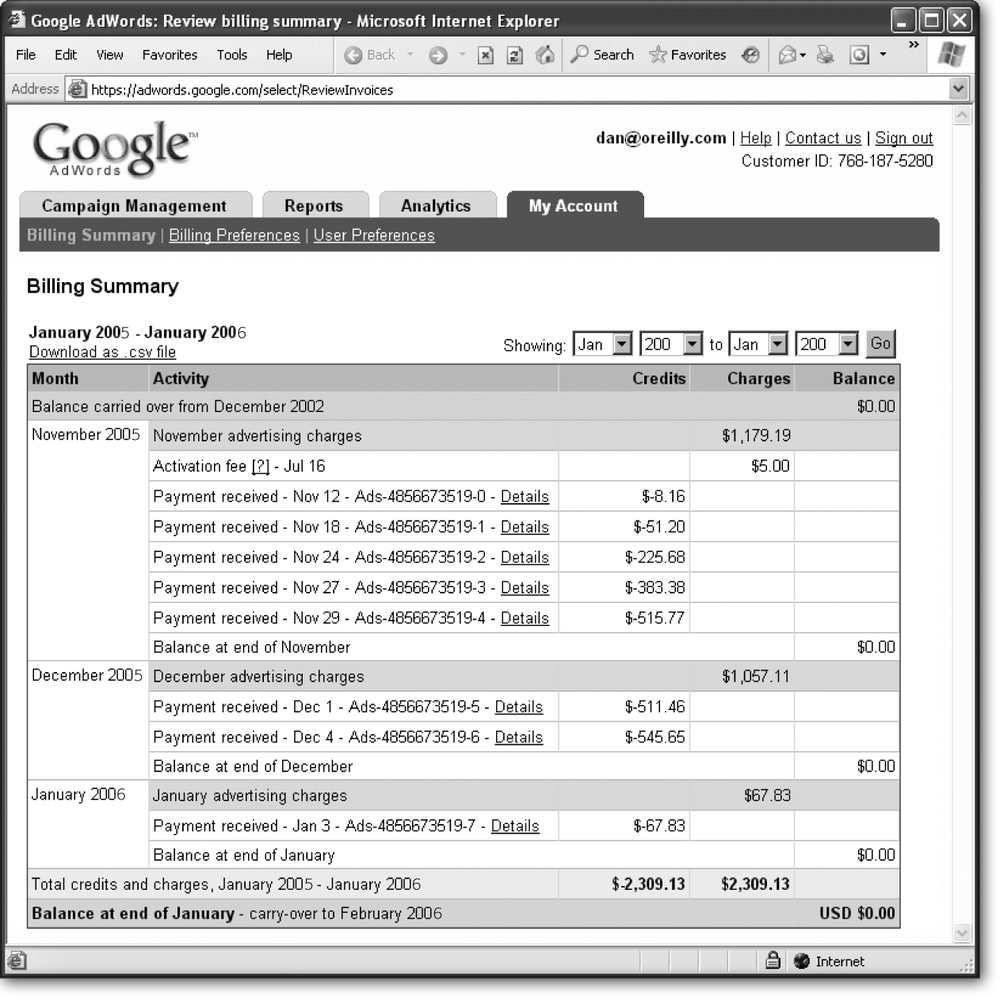
Tip
If you want to view the billing information in your own spreadsheet or accounting program, click “Download as .csv file” to have Google convert the data into a format that other programs can read.
The billing summary is a handy way to check your charges and credits, but most of the time, you can use the campaign summary pages and your reports to keep track of what’s happening in your AdWords world.
Getting Help
You can view AdWords online help two ways: at https://adwords.google.com/select/index.html, which includes links to pages about what an AdWords campaign can do for you, and at https://adwords.google.com/support, which focuses on FAQs and running a campaign. From this page, you can also search for specific terms or look them up in a glossary.
If you can’t find what you need, use the contact form at https://adwords.google.com/support/bin/request.py to ask a question.