
Chapter 11. Gmail
When Google unveiled Gmail, its free Web-based email service, on April 1, 2004, and announced that each user could have an entire gigabyte of space for mail and attachments, many people assumed it was a nerdy April Fool’s joke. (A gigabyte is so large, it needs its own box to explain how big it is; see Section 11.1.) Most free Webmail services at the time parceled out only 2, 4, or maybe 10 megabytes of mailspace (a megabyte is about a thousand times smaller than a gigabyte). With those services, when your inbox filled up with spam, your incoming messages started bouncing back like toddlers on a trampoline.
Google wasn’t joking about the gigabyte. As with the other Webmail services, it lets you check your mail and send messages from just about any computer, anywhere on the planet, that has a Web browser and an Internet connection. But with Gmail, you have room to receive and save all your messages, too—two and a half times over, now that Google has upgraded its accounts to store two gigabytes instead of one.
Note
Several other Webmail services have scrambled to improve their own offerings since Gmail got up and running. Hotmail accounts now offer 250 megabytes of room for mail, and Yahoo upped its free mailbox capacity to one gigabyte per person in an attempt to match Gmail—but it tries to wheedle $20 a year from you for the two-gigabyte account. Gmailers now get 2.5 gigs free.
In addition to giving you two and a half gigabytes of server space to pile up your electronic epistles, Google has included some other features with Gmail that make it stand out from your average Webmail service. For one, your new Gmail account can handle file attachments up to 10 megabytes in size, which means if your spouse goes nuts with the digital camera and emails you a half-dozen high-resolution photos of the new beagle puppy attached to a single message, they should land in your Gmail Inbox just fine. Most other email services have smaller attachment limits, which means those pics are likely to bounce back.
Size is not the only thing that matters in Gmail. The service has a number of other cool features, including:
Rich text. Instead of boring, plain text, you can use different fonts and colors—not to mention bullet points and highlighting—in messages. Learn how to art up your mail in Section 11.2.1.
Multiple languages. Display the Gmail interface in any of 13 different languages, including French, German, Italian, Dutch, Spanish, Portuguese, Russian, Korean, Japanese, simplified or traditional Chinese, and two flavors of English: U.S. or U.K. There are instructions for changing your Gmail language in Section 11.5.1.
Google your Gmail. If you think any email service created by the world’s largest search engine would be super-speedy, you’d be right. The Gmail search (Section 11.3.5) pops up matching messages quickly and accurately, and does the same when you’re looking for someone within your Gmail Contacts address book.
Contacts importing. Speaking of contacts, you know that huge list of email addresses in your Yahoo or Outlook Express address book? You can bring the gang along when you make the jump to Gmail with just a couple of clicks (Section 11.4.2).
Gmail everywhere. People read email in all kinds of ways, including on portable devices like BlackBerry handhelds, downloaded with software like Outlook Express, and forwarded from other email programs. Gmail is flexible enough to follow you anywhere and into nearly any email program you want to use (Section 11.5.2).
So how does Google expect to make money from offering all of these features and services with Gmail? The same way ABC can afford to bring you new episodes of Alias every Wednesday night: advertising. Gmail displays ads alongside your email messages.
Despite the fact that Gmail is free, noncompulsory, and useful, it drew a lot of criticism early on for displaying advertising. “But ads show up everywhere on the Web these days,” you say. “Why would anyone care about these ads in particular?” The thing that freaked people out was that Gmail ads were related to your email messages, making it seem as if Google employees were sifting through your Inbox, matching ads to your personal life.
For example, if you received an email from your mother about your great-uncle’s funeral, the ads along the side might be for hearse services. While some people found those ads useful or simply ignorable, others thought they were a breach of privacy.
In fact, Google uses a sophisticated software system to look for keywords and slot in potentially relevant ads; no humans at Google read your Gmail to make sure you’re getting the right ads. Once the world got used to that idea, the controversy over Gmail died down, and people got on with the project of creating and storing a massive amount of email.
Note
Gmail is a free service: You can’t pay a fee in order to prevent those ads from appearing. If ad intrusion, however robotic, still squicks you out, perhaps Gmail is not the service for you.
(Incidentally, the ads in Gmail come from the same pool as those in AdSense and AdWords, as described in Chapter 9.)
This chapter takes a look at the ins and outs of Gmail, from setting up your account and composing messages to keeping track of that 528-message round-robin mail chat you have going with your buddies about the Philadelphia Eagles. As you’ll see on the following pages, Webmail—especially two and a half gigabytes of it—can be incredibly liberating.
Note
Gmail works on most, but not all, Web browsers and operating systems. Although you can still read mail on, say, Internet Explorer creaking along on an arthritic Mac OS 9 system, you’ll need a Gmail-approved browser to fully use all of the service’s features.
Minimum versions of Windows Web browsers that fully support the Gmail service include Microsoft Internet Explorer 5.5, Netscape 7.1, Mozilla 1.4 and Firefox 0.8. Mac OS X and Linux fans can get by with Firefox 0.8, Netscape 7.1 and Mozilla 1.4, and the Mac folks also have the option of using Apple’s Safari 1.2.1 browser for their Gmailing.
Welcome to Gmail
You can find Gmail at http://gmail.google.com. Like Google’s own practical-yet-minimalist approach to Web-page design, the Gmail home page (Figure 11-1) is stark compared to its Webmail competitors, with no loudly colored boxes or strobing banner ads. The Gmail page is just a discreet logo on a white background with a few lines of text and an account sign-in box off to the right.
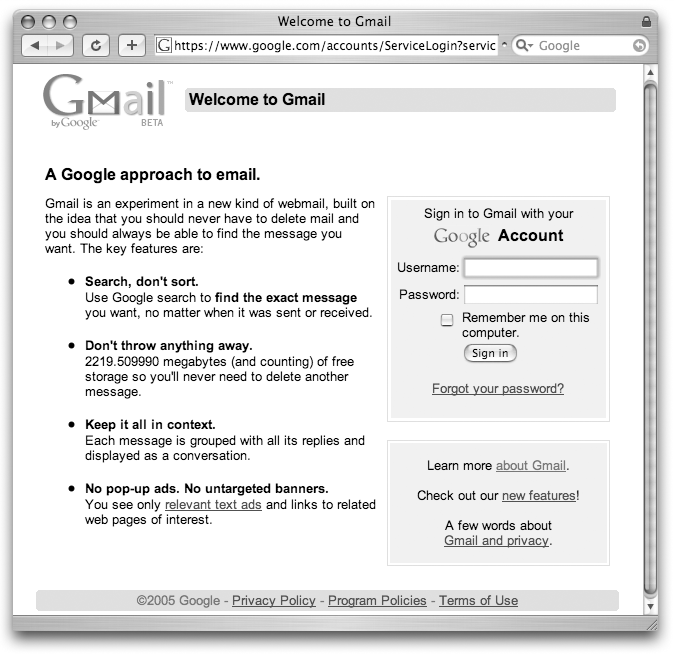
One thing other Webmail services have that Gmail currently doesn’t have is a Sign Up button. When the company first rolled Gmail out of the Google Garage, they made it invitation-only for a few select people. Then Google gave those people a few invitations that they could pass along to friends to create new Gmail accounts. You couldn’t just go to the Gmail page and sign yourself up—someone you know had to personally extend an invitation to you.
When they first appeared, Gmail invitations were a hot commodity because they were so rare. Holders of extra invites were hawking the coveted accounts for $60 to $125 on eBay. Google eventually became much more generous and gave five or six sharable invitations to everyone with an account. Over time, the company upped the allotment to 100 invites—and the allotment replenishes all the time.
Google claims all of this exclusive invitation business was because Gmail was still in beta, the software testing stage when the program mostly works and is available for the public to try, even though there are still a few glitches. By controlling the number of people who had accounts, the company could test, monitor, and maintain the Gmail service without worrying about a mad crush of new email fanatics stampeding its Gmail servers all at once and crashing them all to pieces.
A year after its introduction, Gmail remains invitation-only. If you don’t have an account, however, read on.
Getting a Gmail Account
Before you try anything else, check the Gmail home page (http://gmail.google.com). As of this writing, the service was still invitation-only, but by the time you’re reading, Google might have made it free for all.
If you find yourself stuck behind the virtual velvet rope of Club Gmail, fear not. Gmail invitations are easy to come by these days. First, ask anyone you know, or anyone who has sent you email from a Gmail account, if she can spare an invite. With a steady 100 invitations at their disposal, most Gmailers have extras to dispense.
Note
You can tell if somebody has emailed you from a Gmail account because the part of his e-address after the @ symbol will be gmail.com, like this: [email protected].
If you don’t personally know a Gmailer who’ll invite you onboard, fire up Google itself and search for Gmail invitations, which should generate results with plenty of sites that dispense spare Gmail accounts, like the Gmail Invite Spooler (http://isnoop.net/gmail).
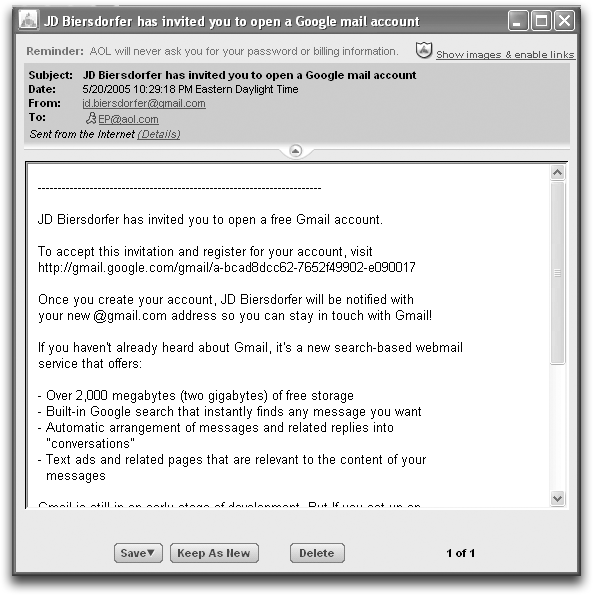
No matter where your Gmail invitation comes from, you’ll need an existing email address to receive the invite. Once you’ve persuaded someone to send the Gmail invite to you, you’ll get a message like the one in Figure 11-2.
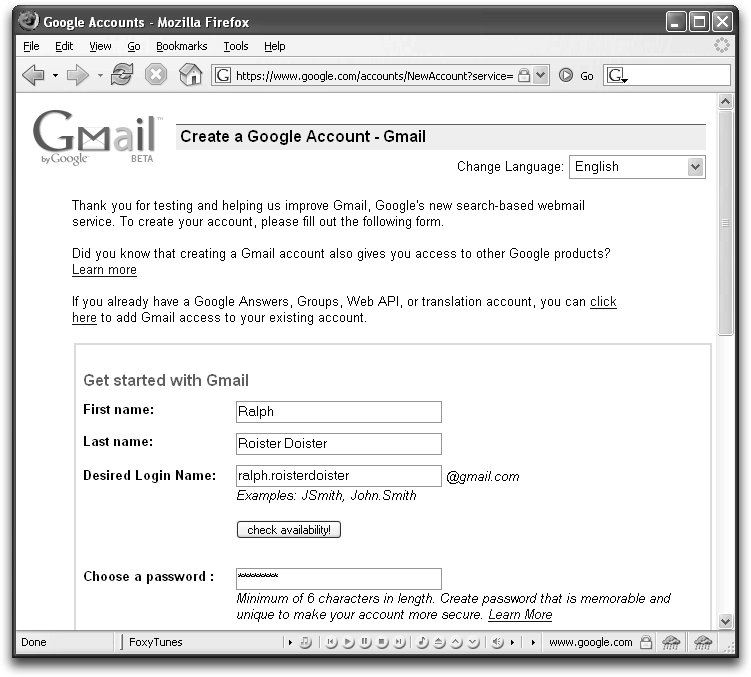
When you use the Web link from the Gmail invite, you land on an account setup page that looks pretty much like any other. The page has a form where you type in the email address, name, language, and password you’d like to use for your Gmail account. Click the “check availability!” button (as shown in Figure 11-3) to see if your desired account name is available.
If it’s not, you’ll have to type in something else until you come up with a unique Gmail address. Be sure to pick an address you like, because you can’t change it without getting another invite and making yourself a whole new account. Luckily, the one thing you don’t have to type in on the account-creation page is a credit card number.
Tip
If you’re the giving sort of person, check along the left side of the Gmail window for the “Invite a friend to Gmail” box, which you can use to bequeath a mail account to up to 100 of your closest friends. To send the invitation, type in your buddy’s current email address and then click the Send Invite button to send out an invitation message just like the one you got when you signed up for Gmail. What comes around can indeed go around, courtesy of the Internet. (You can even use this trick to send an invite to your own alternate email address, thereby creating a new Gmail account.)
Once you’ve invited someone onboard the good ship Gmail, you won’t have to work too hard to keep in touch. If the person accepts your Gmail invitation and creates an account, Gmail sends you a message letting you know your friend has joined up and displays the email address that she chose. Gmail even puts this new address in your own Contacts list so you have no excuse not to write.
As soon as you’ve created your new Gmail account, Google whisks you away to a Welcome screen highlighting all the latest and greatest features of the service. If you want to get right to the part where you actually get to send email to people, look for a link that says “I’m ready—show me my account.” Click that link and you’re off to your brand new Gmail Inbox.
Tip
The greeting message that lands in your Inbox as soon as you sign up has a couple of worthwhile links, especially if you’re new to the concept of Web-based email. The Gmail Tour link offers up an animated demo of Gmail in action, for example, and the Getting Started link quickly points out the unique and helpful features the service offers.
A Peek in the Gmail Window
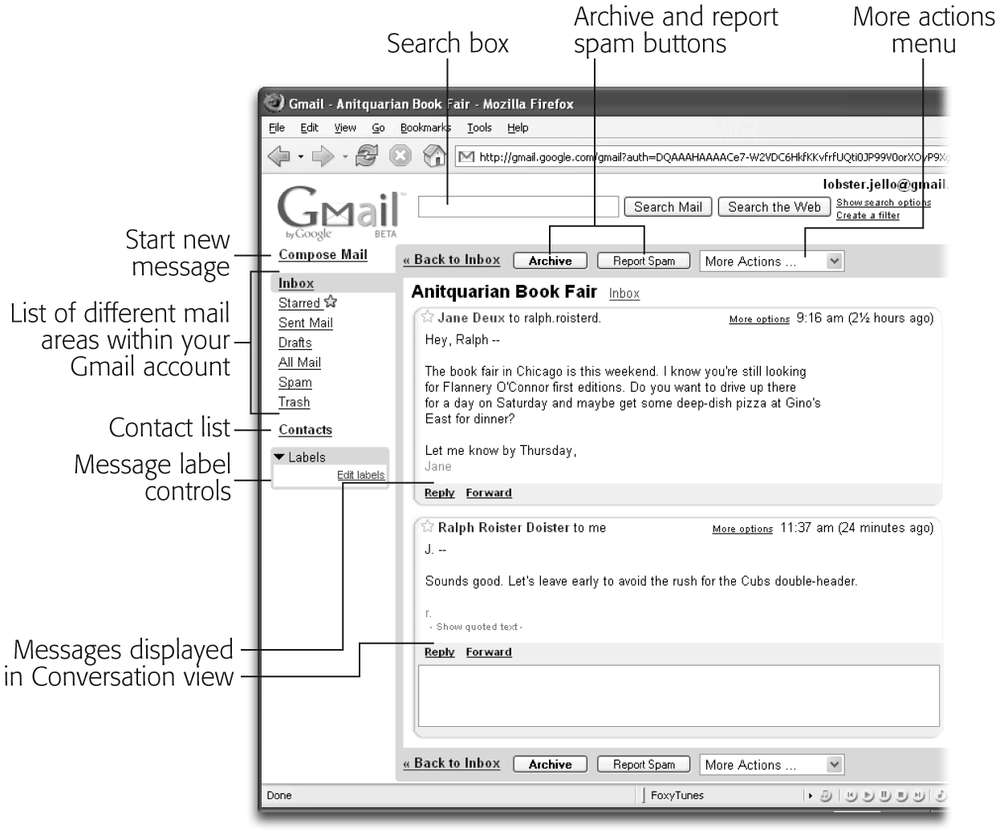
When you first open Gmail, you may notice that it looks slightly different from other Web-based email services, as you can see in Figure 11-4. For one thing, there’s a Search box right on top of the window that lets you type in keywords and track down a particular message in your vast, two-and-a-half-gigabyte mailbox.
After that, the top of the Gmail window has a series of buttons and links for various features and aspects of the service, including the Settings for your account (Section 11.5.2), a Help area, a place to create a mail filter (Section 11.3.4), and buttons to archive mail (Section 11.3) and report spam (Section 11.2.8).
The controls for creating new messages, as well as those for the other sections of your Gmailbox (like your Inbox, Sent Mail, Spam, and Trash areas), appear along the left side of the window. Just click the link to bop to another part of your mailbox. For example, if you want to see messages you’ve sent, click the Sent Mail link, and you’ll find yourself wading around in copies of messages you’ve already fired off to people. To get back to your Inbox, just click the Inbox link.
The left side of the main window also contains a link to your Gmail contacts—the address book for all your correspondents, described in detail in Section 11.3.7—as well as the controls for making labels for your messages (Section 11.3.3), a simple system that lets you group them under headings.
If you have messages in your Inbox (and there should be at least one: the welcome note from Google), Gmail shows you 50 of them at a time, with the most recently received at the top. To see older messages, click the links in the upper-right or bottom-right corner of the window to jump to the previous 50 messages or the very oldest 50. Unlike most conventional mail programs, you can’t sort your Inbox by sender or oldest-message-first, but Gmail does let you search for messages with specific criteria (Section 11.3.5), which gives you a similar way of viewing things.
From your Inbox, you can click any message to open not only that individual message, but also any messages you sent or received that are part of that particular exchange. When an email program clumps together all the messages in one discussion, it’s often called threading, though Gmail calls these clumps conversations (Section 11.2.7). Once you get used to them, conversations are a great way to keep on top of your email because you don’t have to hop all over your Inbox to remember who said what to whom and when.
Note
It’s a good thing that threading is a cool feature, because Gmail gives you no way to turn it off.
When you’ve opened a message (Figure 11-5), the edges of the Gmail window look pretty much the same as in the Inbox view, but the right side of the window now contains the controls for printing your messages and expanding or collapsing conversations (Section 11.2.7). The aforementioned ad links also show up on this side of the window. (The ad links are very subdued, with no flash-dancing windows or colored boxes popping up at you as you try to read your mail.) As advertising goes, it’s almost tasteful, and if you’re deep in electronic conversation, you might forget that the ad links are even there.
Now that you’ve had a little time to get used to the look of Gmail, it’s time to start sending out mail like a power user. The next section tells you how.
Tip
If one of the ads Google has sprinkled in your message happens to catch your eye, all you have to do is click its link to get whisked into a new browser window that opens over your Inbox. Once you’ve satisfied your curiosity or helped the gross national product by buying something from the sponsor, you can switch back and continue your mail chores.
Composing and Sending Messages
Webmail programs are simple affairs: You sign onto your account, type in the address of the person you want to contact, compose your message, and hit the Send button to fling the note out to its Internet destination. Gmail lets you go with that basic process, but you can also call on its free-styling and spell-checking tools to make sure your message is spiffy and spelled properly.
To create and send a Gmail message, first sign into your account (Section 11.1.1), and then:
In the upper-left corner of the screen, just under the Gmail logo, click the Compose Mail link.
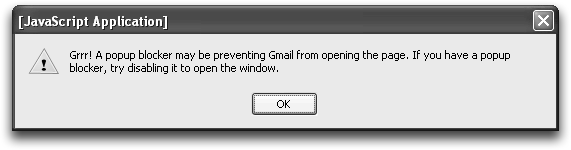
This link takes you to a new blank message form in the middle of the screen, complete with address field and message body ready for you to fill in. If you want to isolate a message from the browser window, either for aesthetic reasons or so you can start a message and come back to it later, you can also start a new message in its own window by holding down the Shift key when you click Compose Mail. If you get a warning like the one in Figure 11-6, check your Web browser’s settings for pop-up blocking (on a PC, try looking under Tools → Options or Tools → Pop-up Blocker; on a Mac, try Browser Name → Preferences).
Figure 11-6. Gmail gets cranky if it tries to open a new message window for you but window-squasher software smacks it down. You can usually allow pop-up windows from a specific site by adding its URL to a list of exceptions; in this case, when you find the list, type in http://gmail.google.com.If you already have a full-screen message form open, you can isolate it from the rest of the browser and pop it open in its own window, as shown in Figure 11-7, by clicking the “New window” link next to the little blue-arrow icon on the right side of the browser window.
Figure 11-7. If you don’t want to be distracted by the other links and elements on the Gmail screen, click the “New window” link next to the saucy blue-arrow icon to open a message in its own private little window.(This same blue-arrow icon appears by itself at the top of the screen when you click Compose Message and start a fresh message, giving you the option to finish the note in its own private window should you need to return to your Inbox for more pressing matters.) This trick helps you isolate the different features of Gmail in different windows (composing and reading email, for example), much like an email program on your hard drive would.
In the To field, type in the email addresses of your intended recipients. In the Subject field, type in your message intentions.
If you’re sending the message to multiple addresses, type a comma after each address. Once you’ve used Gmail for a while and have some frequently used addresses in your Contacts list (Section 11.3.7), the program will pop up a list of similar addresses as you type, in an attempt to auto-complete your friends’ email addresses. If you see the person you’re trying to reach, scroll down to that address and then press Enter. (If you don’t see the person you’re trying to reach, just ignore the pop-up menu.)
Tip
Gmail includes address lines for people you want to Carbon Copy (Cc) as well as people you want to Blind Carbon Copy (Bcc) on your message. Everyone can see who’s been carbon-copied on a message, but sticking an address in the Bcc: field hides it from the rest of the recipients.
If you’re sending out a large group email, (you can send a Gmail message to 100 people at a time) and don’t want to reveal who is on the list, address the message to your own account and put everyone else in the Bcc field. None of your recipients will be able to see who else got the message—an arrangement that both protects their privacy and keeps them from having to scroll through a list of 100 email addresses at the top of their message.
Write your message.
If you’re just dashing off a quick note, plain text will do. But Gmail gives you the option of dressing up your message with rich-text formatting, too (Section 11.2.1).
If you don’t have time to finish your message, click the Save Draft button to store a copy of the unfinished work in the Drafts area until you can pick it up again. If you decide to call the whole thing off, click Discard.
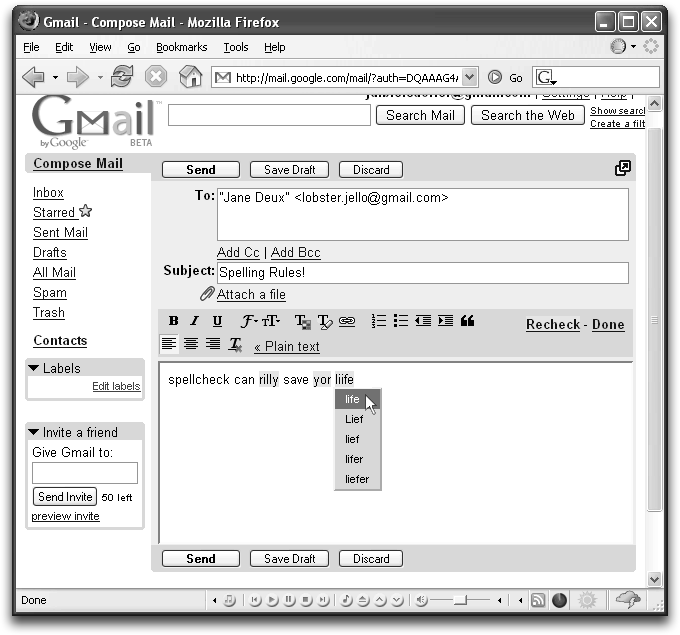
Weed out unfortunate typos and keyboard slips in your message by clicking the Check Spelling link that appears in the upper-right corner just above the message window. Gmail highlights in yellow any suspect words (Figure 11-8). Click the highlighted words to see a list of suggestions for what you meant to type. Select a correction for each flagged word, and then click the Recheck link until Gmail tells you it doesn’t see any misspellings. Click Done.
Click Send.
When you’re satisfied with your message, click Send to release it to the wilds of the Internet. Gmail flashes a small yellow box on the screen informing you that your message has been sent.
Of course, sending a simple message in plain text is easy enough, but if you want to add pizzazz to your e-postal efforts, you can do that, too. Read on for the skinny.
Formatting a Message with Rich Text
As you may have noticed, not everybody on Earth uses the same word-processing software or email program. Choice is good, but when you and a correspondent use different software, formatting in the same document or email message can vary wildly or looked completely scrambled on one of your machines. Plain text is pretty much a universal format because it includes no formatting at all, but it’s dull.
Fortunately, the world has rich text, too. The term has nothing to do with the economic status or dairy quotient of your message; instead, it refers to a format that lets you add type styles like bold and italic to your otherwise plain text.
Rich text is the next most common format after plain text, which means lots of computers can read it readily. Even better, it gives you juicy options for text styling. You can make certain words in your message bold or italic, underline them for even more emphasis (“Honey, don’t forget to bring home MiLk tonight”), change the size of your fonts for dramatic effect, change your fonts to a prettier typeface, create bulleted lists, and much more.
Note
Rich-text formatting isn’t available if you’re using Gmail in HTML view (Section 11.2).
To create a message with rich-text formatting, click Compose Mail and then click the “Rich formatting” link above the message window. A toolbar like the one in Figure 11-9 immediately pops up with a variety of text-enhancing options.
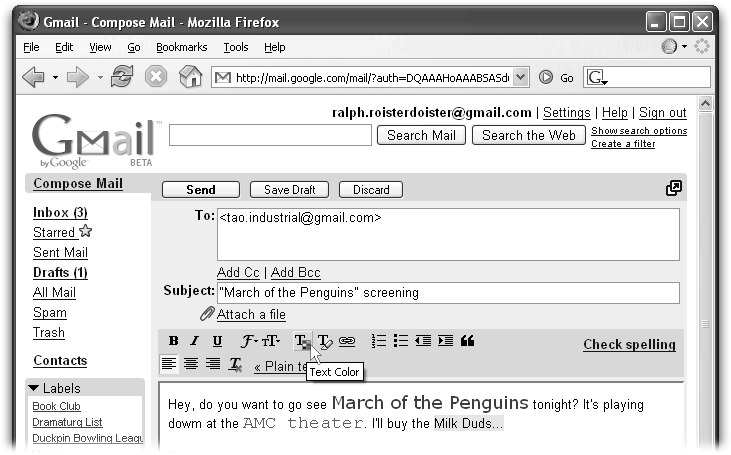
To apply text styling to a message you’ve just whipped up, select the words you’d like to style by highlighting them with the cursor, and then click the icon for the type of style you want to use: B for bold, I for italic, and so on. You can use the text-alignment controls toward the other end of the toolbar to center your text lines on screen.
Tip
When the toolbar is open, you can use many familiar keyboard shortcuts for formatting, like Ctrl+B for bold and Ctrl+I for italic.
You can start a message in plain text and switch to rich formatting in the middle of typing. If you start the message in rich formatting and decide to go back to plain text for the whole thing (when you realize your recipient has an ancient email program that can’t display rich text properly), you can switch back to plain text (on the Rich Text toolbar, click the “Plain text” link). Gmail gives you a warning that you’ll lose all your rich-text formatting, but you probably knew that was going to happen.
Adding File Attachments to Messages
If a picture is worth a thousand words, just think of all the typing you’d save by attaching photos and other image files to your Gmessages. You can add several kinds of file attachments to your mail, including JPEG photos, Word and Excel documents, MP3 songs, and other popular file types. Each Gmail message and attachment can be up to 10 megabytes in size, which is quite a generous amount compared to what other mail services allow you to send. You can fit about three average pop-song MP3 files or six average-size digital photos in 10 megabytes of space; Word documents can range in size from a few kilobytes to The File That Ate Cleveland, depending on what you’ve got inside, so check the file’s size before attaching it to your message.
To attach a file to your Gmail message-in-progress, look below the message’s Subject line for the “Attach a file” link next to the little paper clip icon. Click it to open up a new box on the message form with a handy Browse button right next to it, as shown in Figure 11-10.
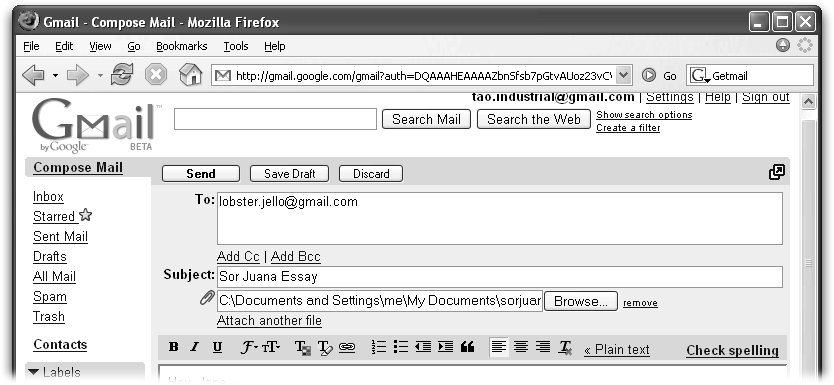
Click the Browse button and navigate through your hard drive until you find the file you want to attach. Once you locate the file, select it and then click Open. Gmail jumps back to the message window, where a file path (a cryptic string of names and slashes in Computerese that points to the file’s location on your system) appears next to the paper clip icon, signifying that your file is attached to the message. If you need to attach another file to the same message, click the “Attach another file” link and repeat the process.
If you change your mind about sending a file, click the “remove” link on the other side of the Browse button to knock the attachment off the message.
When you’ve got your message written and your attachments lined up, click Send.
Using Picasa to Send Photos by Gmail
Picasa is an intuitive and powerful photo-management program, and there are two really great things about it. First, it’s free to download at www.picasa.com. Second, Google owns it, so it works seamlessly with Gmail.
“Why,” you wonder, “do I need a whole ‘nother photo program when I just read that whole section about attaching files directly in Gmail?” The truth is, you don’t need Picasa to send picture attachments in Gmail, but it makes managing your whole digital photo collection and sharing pics via email a lot easier. (And it does some other really cool stuff, too.)
Note
Picasa works only with Windows 2000 and XP, so Mac OS X enthusiasts may want to bop over to Section 11.7.1, where’s there’s a discussion of using your Gmail account with standard email programs like Apple Mail, Eudora, and Entourage. Once you can send and receive your Gmail messages through your regular mail program, you can use Apple’s iPhoto software to manage and manipulate the photos you want to email.
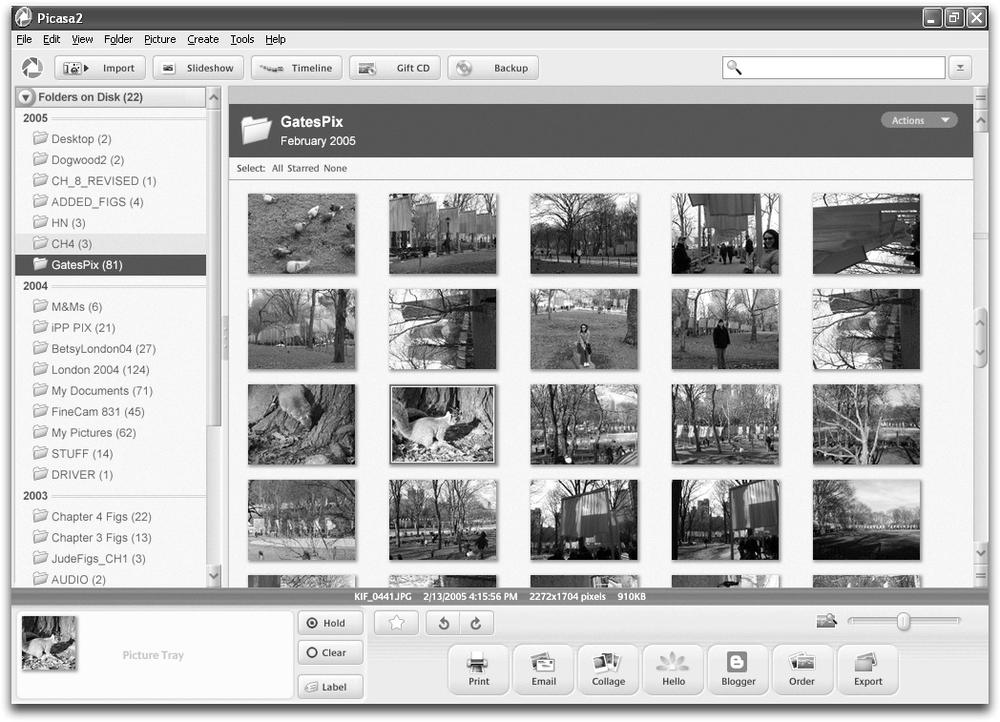
When you first install Picasa, the program scans your system and displays a thumbnail image of every single photo lurking in the deepest, darkest corners of your computer, as shown in Figure 11-11.
One of the things that makes Picasa worth its wait in download time is the program’s ability to instantly resize and attach photos to messages. This is a huge boon, because digital cameras usually take photos at higher resolutions than you’d want for sending and viewing them in email (that is, the pictures have a ton of information per square inch, making them really hefty). All that extra digital data becomes a burden when you attach a wad—or even just one full-size photo—to an email, creating a monster message that might choke your recipient’s email server or clog up his system if he’s on a dial-up connection. And even if the message doesn’t die in transit, the time it takes to download could make your correspondents want to kill you.
Picasa comes to the rescue by quickly downsizing a copy of each photo you want to send before attaching it to an outgoing message for you.
Once you’ve downloaded and installed Picasa—and let it round up all your photos—attaching a picture to a Gmail message is easy. In Picasa, find the photo you want to send, click it once to select it (Ctrl-click to select multiple pics), and then click the Email button at the bottom of the Picasa window.
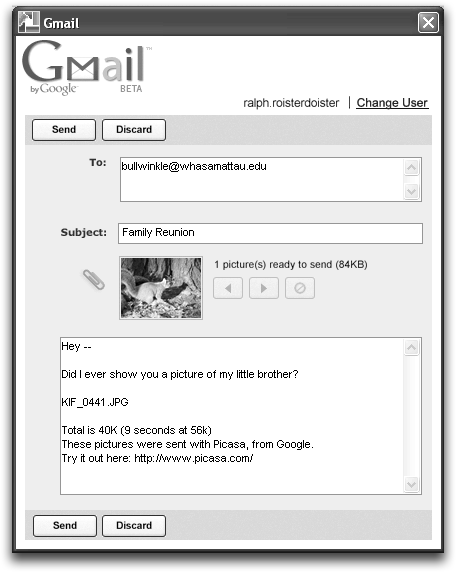
Picasa presents a box asking you to pick the email program you’d like to use to send the photos. You have your choice of your PC’s default email program (Outlook Express, Outlook, Mozilla Thunderbird, Eudora, whatever), your Gmail account, or Picasa’a own mail program. Select your Gmail account if that’s the one you want to use. If this is your initial voyage into emailing with Picasa, you’ll be asked to type in your account name and password.
After you supply the information, Picasa pops up a message window in which you can address and type in a note to your recipient. As shown in Figure 11-12, the window also displays a small thumbnail version of the photo(s) you’re sending and lists the file size of the attachment Picasa has created. When you’re done with the message, just click the Send button to blast off your picture mail.
Creating a Signature File
You can have Gmail add a signature file to the bottom of each and every message you send. A signature file is usually your full name and contact information—like an electronic business card pasted to the tail end of your message—but some people prefer to put stirring historical quotes, classic lines from The Simpsons, King of the Hill jokes, or other bits of text-based whimsy at the end of a message. It’s all up to you.
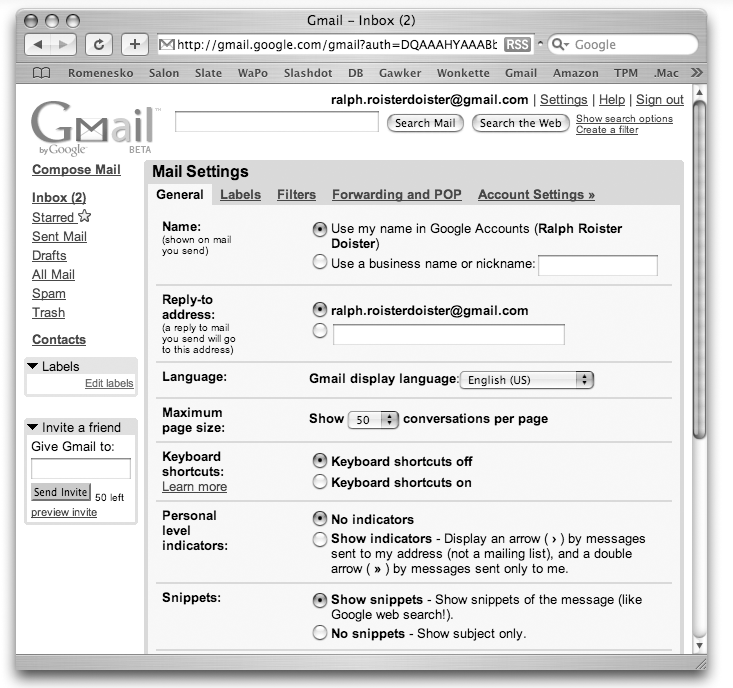
To create a signature file in your Gmail account, click the Settings link at the top of the Gmail window. In the Mail Settings area, you can change all sorts of things about how Gmail looks and feels, but for now, click the General tab and then scroll down to the Signature area, which is at the bottom of the General tab. Click the button next to the empty text box (Figure 11-13), and then type in the information you’d like to include in all your messages.
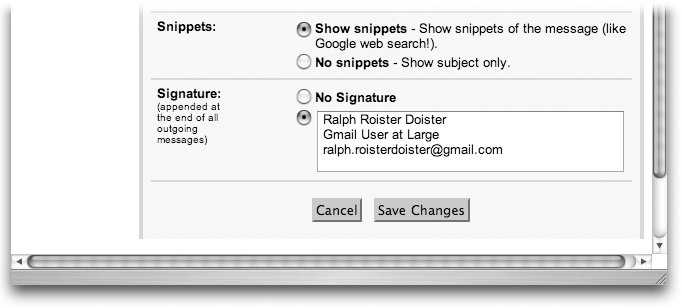
When you’ve got it just the way you want it, click the Save Changes button at the bottom of the window. The next time you click Compose Mail, your blank message form will pop up with your signature file attached, complete with a little separator line between where the message text ends and the signature file begins. Just type your message above it.
If you decide you don’t want to use the signature file for that particular message, simply delete it from the bottom before you click the Send button. If you tire of having a signature file altogether, return to Settings → General, and then click the button next to No Signature before clicking the Save Changes button.
Receiving and Reading Gmail
Once you’ve sent off a few messages from your new Gmail account, you won’t have to wait long for people to start writing you back. And when the messages start flooding your Inbox, Gmail includes plenty of tools to help you organize and keep track of them—even those lengthy back-and-forth electronic conversations you have over the course of days or weeks.
Checking Your Gmail
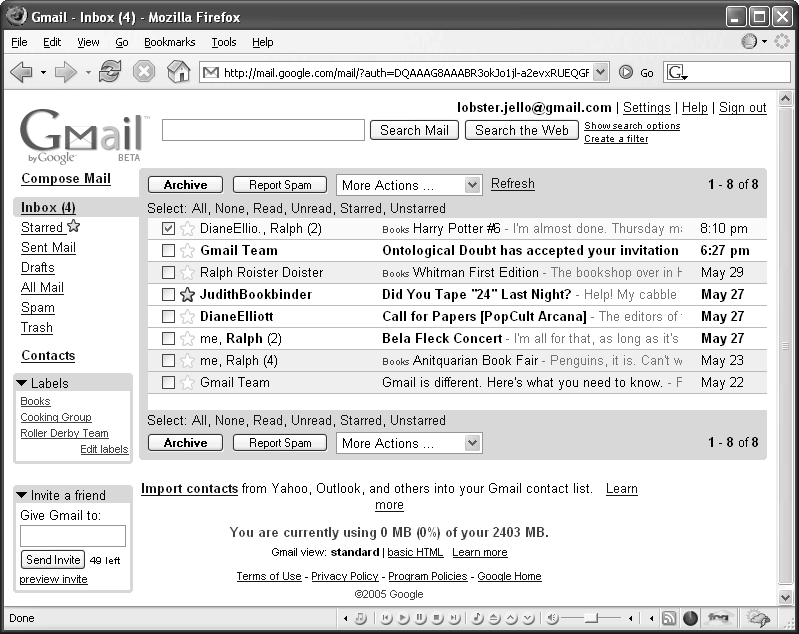
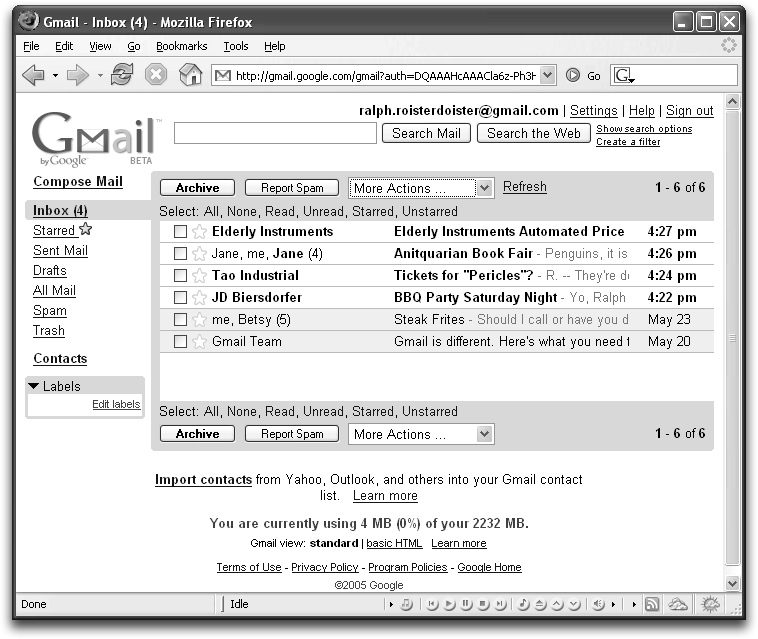
As soon as you sign in to your Gmail account, all your new messages appear in bold at the top of your Inbox. You can tell how many new ones have arrived by looking at the number in parentheses next to the Inbox link on the left side of the screen (Figure 11-14).
If you’re in the middle of message ping-pong with someone and want to see if they’ve written you back while you’ve been writing messages to other people, head to the top of the Inbox window, and then click the Refresh link to the right of the More Actions menu; this link tells Gmail to check for and display any fresh messages.
Reading Your Gmail Messages
At first glance, the Gmail Inbox looks like any other emailbox: stacks of messages with the sender’s name, the message subject and the date it was sent all piled on top of each other. After you use Gmail for a few days, though, you may notice a few unique things about the service.
Conversation View
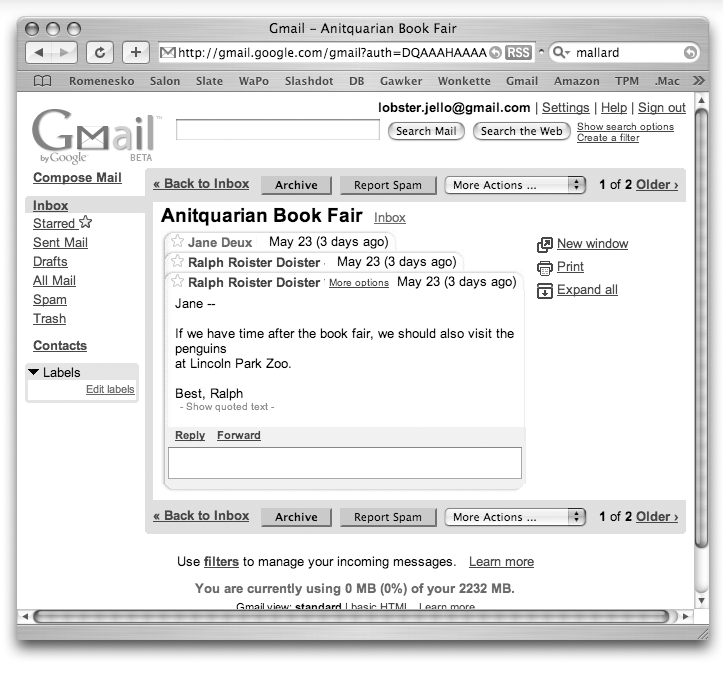
When it’s not spam, email can be a form of dialogue between you and a friend or group of friends. Google has taken this idea to heart and makes it an integral part of the Gmail system, which it calls Conversation View. People familiar with electronic mailing lists, message-board posts, Slashdot article responses, and other digital discussions call these ongoing messages on the same topic threads. Gmail calls them conversations. Once you get used to it, this feature is handy—which is a good thing, because you can’t turn it off.
With conversations, Gmail clusters together all messages with the same Subject line. The clusters appear anytime you see a message that has related messages attached to it, most commonly in your Inbox and when you open a message.
When you’re on your Inbox page, you can tell you have a conversation going because a message line has a number after it in parentheses, which you can see in Figure 11-14. This number indicates how many messages have been passed in the conversation and who was in on it for easy reference. When you click a conversation, Gmail opens it as a clump, shown in Figure 11-15.
Tip
If you have extremely chatty pals, you may notice that Gmail doesn’t show the entire text of long messages. If you find any of these truncated notes, click the “More options” link next to the sender’s name, and then click the link for Show Original to get the full story on your screen.
To see what you or a correspondent said in a prior message in the conversation, click one of the previous emails to expand the view and read it right there without having to burrow back though your Inbox looking for it. You can also click the Expand/Collapse All link on the right side of the window to open or close all the previous messages in one fell swoop. If you want to read the conversation in a new window, click the “New window” link (also on the right side of the Gmail screen).
To continue the conversation, you can hit Reply right there as you read the most recent message in the exchange and have all the previous messages right in front of you as you make plans, argue a point, or wheedle a raise. Once you’re done reviewing prior messages, click the Expand/Collapse All link to collapse them back.
Note
Most people get tons of email a day, but you can tell Gmail to let you know which messages in the Inbox were addressed just to you personally, and which ones were addressed to a group that happens to include you. The Gmail Personal Level Indicator arrows point the way: A single > arrow means the message was sent to a group, and a double arrow (>>) means the message was sent only to you.
To turn on the arrows, click the Settings link at the top of the Inbox page and click the radio button to turn on Personal Level Indicators. Messages from Internet mailing lists won’t get the arrow treatment, but the rest of your mail will soon be divided between the We and the Me.
Replying to messages, forwarding messages, and more options
Just like mail in other programs, Gmail messages can be replied to, forwarded on to another recipient, or pried open to reveal all sorts of information (like what email program your sender happens to be using). The first two commands, Reply and Forward, are conveniently located right at the bottom of your open message window.
Want to write your buddy right back and say you do want those extra jazz festival tickets he’s got? Just click the Reply link and dash off your note; his address will already be in the To field. If a message slides into your Inbox that you want to pass along, click the Forward link and fill in the addresses of the people you want to share the message with.
If you get a message that was sent to a whole bunch of folks, and you want to reply to the whole team at once, click the “More options” link next to the sender’s name and then click the Reply All link that magically appears underneath the message header.
This “More options” box lives up to its billing and provides you with additional actions to take with the open message on your screen. You can trash the message directly, report a suspected phishing scam (Section 11.3), print the message for posterity, or add the sender to your Contacts list. If you’re an inquisitive soul (or just bored) and like to look at message headers to see all the servers that this piece of mail visited on its way to you, or what email program was used to send the message, click the Show Original link. This action springs open a plain text version of the message, complete with full header information and other geeky goodness.
Downloading file attachments
In Gmail, you can receive file attachments up to 10 megabytes in size. In your Inbox, you can tell a message has an attachment, because on the right end of the message line, Gmail displays a paper clip. If you open a message with a JPEG picture attachment, you see a small thumbnail of the image, along with links to view the picture at full size right there on the screen, or to download it to your hard drive (Figure 11-16). (Some picture-file types like TIFF aren’t as forthcoming as Internet-friendly JPEG files, though, so you may just see a file icon next to the View and Download links.) If you get a word processing document or other non-picture file, you just get the option to download the attachment to your hard drive. (The exception to receiving attachments is executable files, discussed in the box in Section 11.2.2.)

Note
If you use Google’s Picasa photo-management software (Section 11.2.3), you can easily keep track of all the digital images people send you after you download the pictures to your hard drive, because Picasa automatically displays any new photo files it finds on your hard drive.
Once you see a photo in Picasa, you just need to click its thumbnail image once to see what its name is and what folder it lives in on your computer. Double-click the thumbnail image to call up a toolbox of photo-editing options like cropping and contrast controls.
Spam, Spam, Spam, Spam
Cheap Rolexes! Quality software at a fraction of the retail price! Enhancements for body parts you may not even have! Spam is a fact of life for anyone who has had an email account for more than 20 minutes. Fortunately, email software and service providers, including Gmail, are fighting back with filters that help block junk mail—or at least reroute it away from your Inbox and into its own festering holding pen (or the Trash).
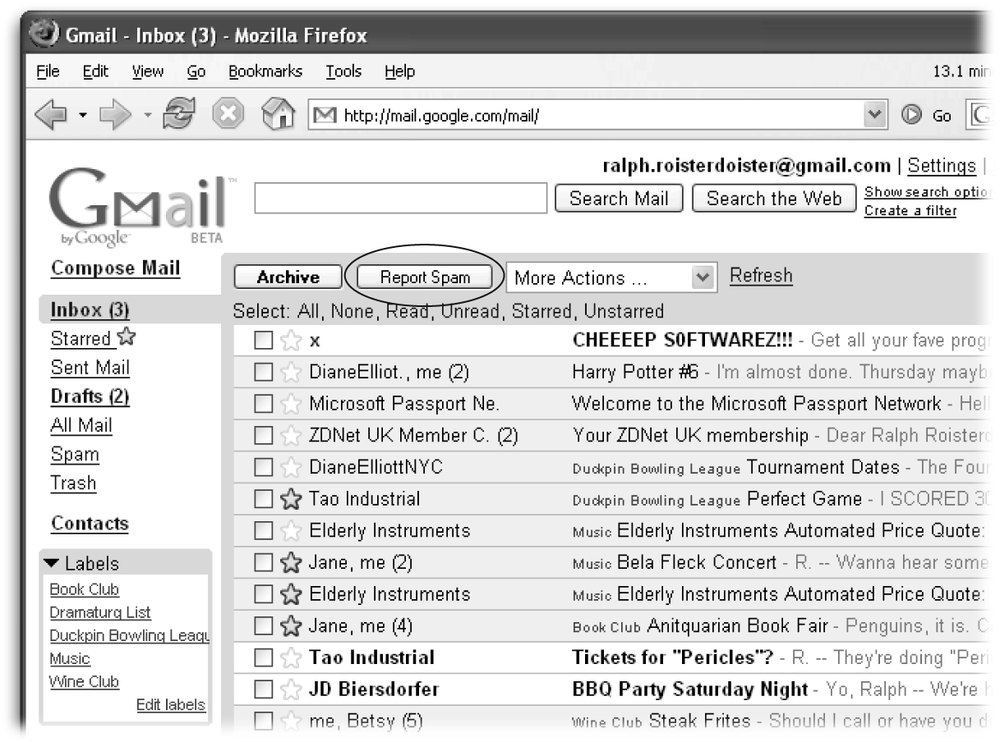
Gmail automatically bounces as much spam as it can into your Spam box. But it needs your help in identifying incoming junk mail that slips through to your Inbox. When you see a message that’s obviously unwanted garbage mail, select it by turning on the checkbox next to the sender’s name, and then click the Report Spam button at the top of the mailbox window (Figure 11-17). That feature lets you smack the spam right out of your Inbox and into your Spam bin—while also giving the Gmail system the information it needs to block similar messages from slithering into your Inbox the next time around.
Note
If you get fooled into opening a junk message that has a camouflaged subject line, the Report Spam button is still conveniently available at the top of the open message window.
If you suspect a message you actually want landed in your Spam box, click the Spam link on the left side of the mailbox window to see which messages wound up in there. If Gmail has gotten too aggressive and tagged a legitimate message as spam, you can rectify the situation by turning on the checkbox next to its header and clicking the Not Spam button at the top of the window. Doing so moves the message back into your Inbox and puts the sender back in your Gmail good graces by adding him or her to your Contacts list to ensure express delivery into your Inbox.
Of course, if you peek in your Gmail Spam box and see that all of it’s total dreck, there’s something deeply satisfying about clicking Select: All and then whamming the mouse button down on the glorious Delete Forever button.
Gmail Mailbox Management
After you use Gmail for a while and things begin to pile up in your Inbox, you might get sick of thrashing around in all the messages trying to find a specific piece of email or a collected conversation. Lucky for you, Gmail gives you plenty of ways to organize, sort, and store your mail so you can find what you want, when you want it. In addition to making your Inbox less of a jungle, the things you can do—like tagging messages with different labels, creating filters to perform specific actions on incoming mail, and archiving old conversations—help the search tool within Gmail find the messages you want with greater precision.
Archiving Messages
Let’s face it—you can store a heckuva lotta messages in two and a half gigabytes of space. That’s good because you rarely have to think about throwing out old messages to keep your mailbox from bulging into overflow. On the other hand, letting all your mail hang around can clutter up your Inbox fast.
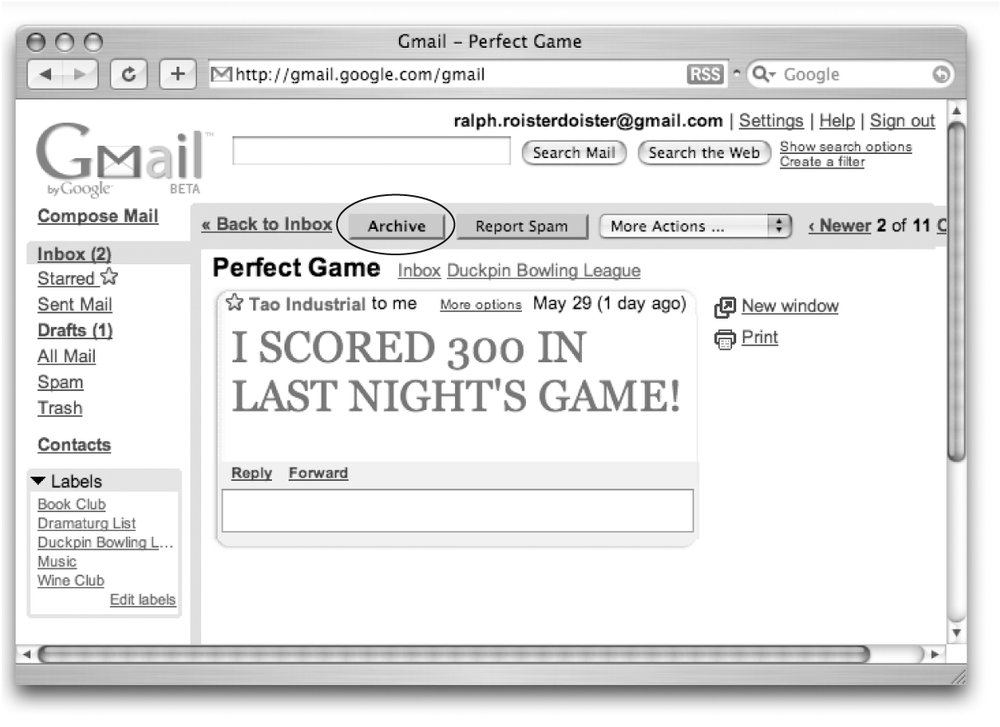
To help keep things under control, Gmail lets you archive older messages, which means that you can keep them around for historical reference, but you don’t have to see them in your Inbox. If you archive a message or conversation, it moves from your Inbox to the mailbox called All Mail.
To archive a message, from your Inbox, turn on the checkbox next to the sender’s name, and then, at the top of the column, click Archive. You can also archive an open message or an entire conversation, as shown in Figure 11-18. (When you archive a message that’s part of a conversation, the whole conversation gets filed away in All Mail.)
Note
To archive more than one Inbox message at a time, simply turn on all the corresponding checkboxes before clicking Archive.
If you want to see the archived messages, click the All Mail link on the left side of the Gmail window. You can send a message back to your Inbox by selecting it in the All Mail list and then, at the top of the screen, clicking “Move to Inbox.”
Note
If someone sends a reply to a message you’ve archived already, the whole conversation containing that message thread shows up in your Inbox again. This can be a good thing, as it shows you the whole exchange and saves you the trouble of remembering what you were writing about with this person in the first place. (If you don’t like the behavior, however, you can’t turn it off.)
Taking Actions with Messages
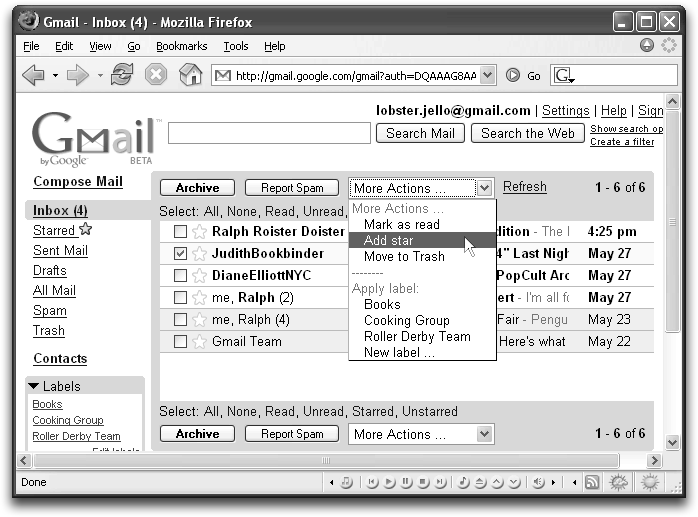
Clicking the box next to the sender’s name in your Gmail Inbox selects that message for a specific action. For example, if you’re in the middle of a hot email session with a friend and you get called away before you can reply to the last note, you can “star” the message by clicking the More Actions pop-up menu and then choosing Add Star. This action applies a little yellow five-point star to the message’s entry in your Inbox (Figure 11-19), so you remember you have to go back and send a reply.
You can apply stars to a bunch of messages at once by turning on the checkbox next to each message and then choosing More Actions → Add Star from the menu at the top of the Inbox.
Tip
If you have a bunch of starred messages, you can separate them from the rest of the stuff in your Inbox by clicking the Starred link on the left side of the Gmail window.
In general, once you turn on the checkbox next to the sender’s name in the Gmail Inbox, you’ve selected that message or messages for an action. You can archive all the selected messages, move them out of your life and into your Trash area, or even give them all the same label, a trick described in the next section.
If you want to get fancy with your selections, the Select line near the top and bottom of your Gmail Inbox gives you a lot of power. With just one click, you can select:
All. This choice turns on the checkbox next to every message in the Gmail window.
None. Here you can deselect any currently selected messages.
Read. This command selects the messages you’ve already opened and read.
Unread. Likewise, you can also select all the messages you haven’t read yet.
Starred. This command selects all the messages you’ve starred for future reference.
Unstarred. You can also mass-select all your common, unstarred mail.
Creating and Applying Message Labels
Instead of folders for separating your mail into categories, Gmail gives you labels. You create a label and attach it to any relevant messages, and then Gmail lets you sift out all the messages with that label.
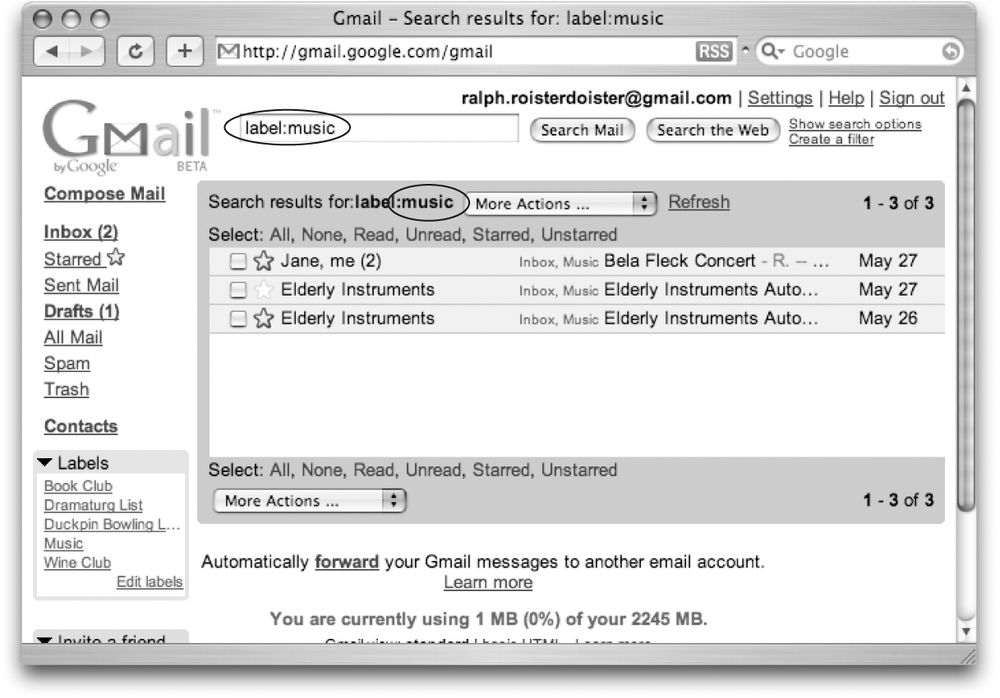
In your Inbox, the label shows up in small green type to the left of the messages’ Subject line. But that’s not the best way to find labeled messages. Instead, you can use Gmail’s search (Section 11.3.5), or you can use the label link. Here’s how it works: Every time you create a new label, Gmail adds to the left side of the screen a link for that label. When you click the label link, Gmail automatically shows you all the messages with that label.
For example, if you want to keep all the messages from members of your book club separate from the messages from people in your duckpin bowling league, you can create a message label called Book Club to apply to all the messages from people in the group. Gmail then gives you a link for Book Club, and when you click it, you see a list of only those messages with the Book Club label. It’s similar to having a folder for your Book Club messages, but more flexible because you can leave a message in your Inbox or All Mail box and label it Book Club at the same time and label it From Sister, too. That means you don’t have to decide the best place for a message—you can tag it in all the ways that you deem relevant.
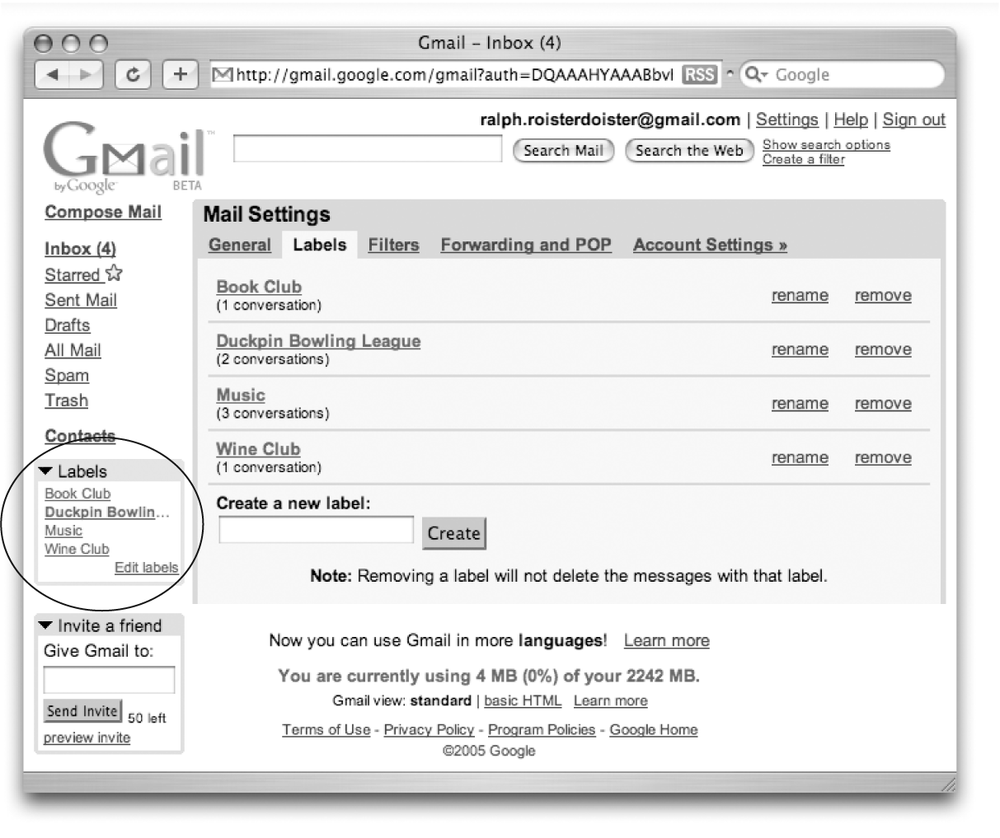
You can quickly create a label by heading to the left side of the Gmail window, and then clicking the green “Edit labels” link (if you have any existing labels, they’re already listed here). That link takes you to the Labels screen, shown in Figure 11-20, where you can not only create a new label by typing it into the “Create a new label” box and then clicking the Create button, but you can also see any existing labels, plus how many mail conversations you’ve tagged with each label.
Tip
You can also create a new label from any mailbox by opening the More Actions pull-down menu at the top of screen and then choosing “New label…” to get a dialog box where you can type in your new label name.
Once you’ve created a label, Gmail adds it to the More Actions menu, which you can see back in Figure 11-19. To add the label to new messages, you have two choices:
From the Inbox (or any mailbox), turn on the checkbox next to the message or conversation you want to label, open the More Actions pull-down menu at the top of the screen, and then choose the label you want.
When you’re looking at an open message, head directly to the More Actions menu and then apply the label you want.
You can rename older labels if they’ve become outdated (if your book club morphs into a Harley club, this is the feature for you), or remove a label entirely (who needs that NCAA Final Four Pool label after the tournament’s over, anyway?). On the Labels screen (Figure 11-20), just click the links on the right side of the screen to get a dialog box letting you type in a new name or confirm your deletion.
Want to see all the messages with a particular label? From the Labels screen or from the Labels list on the left side of the Gmail window, click the label name to get a list of all the messages with that tag. If you want to remove the label from a single message or from a few messages in the list, turn on the checkbox next to the ones you want to un-label, and then, at the top of window, click “Remove label <label_name>“.
Tip
Section 11.3.5.1 tells you how to search for messages with a particular label or labels.
Mail Filters
Mail filters are like air-traffic control for your Gmail: They check and direct incoming messages and route them to the right place.
Say you subscribe to a mailing list of people all discussing a certain topic, like 19th century American literature or pet chinchillas, over email. Depending on how many people are on the mailing list and how chatty they are, you could be in for a lot of messages bombarding your mailbox along with all the mail from friends, family, your book club, and other correspondents.
With a mail filter, however, you can instruct Gmail to look out for all messages coming from the mailing list, and then have it automatically slap a label on them, add a star to them, or even forward a copy to another email address. They’re a great way to help you maintain control of a busy Inbox.
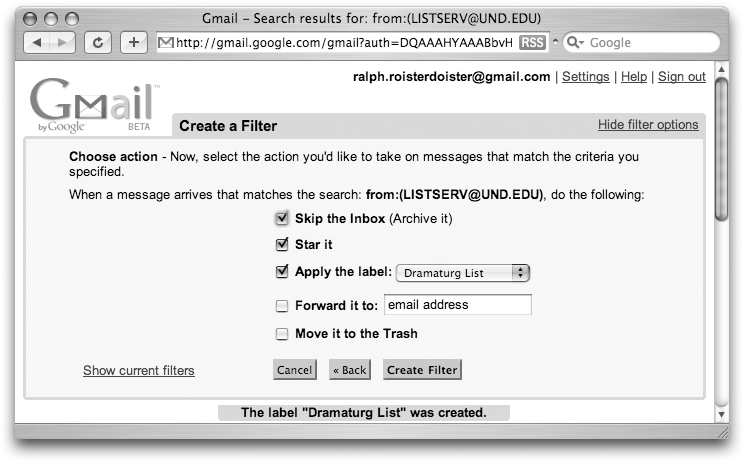
To create a filter for incoming messages, click the Settings link at the top of the page, and then click Filters to get to the screen shown in Figure 11-21. You can also click the “Create a filter” link at the top of the Gmail window, right next to the “Search the Web” button.
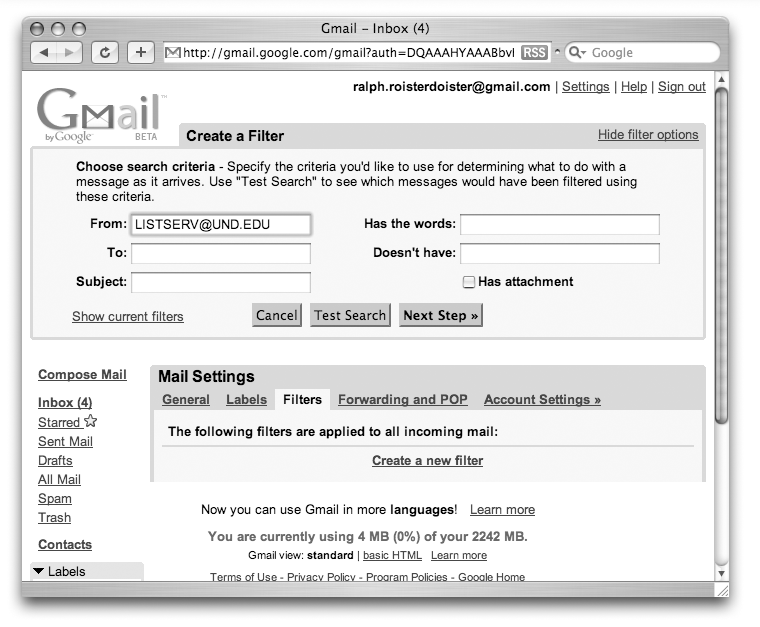
The first step in making a filter is telling Gmail what to watch out for in an incoming message. You can specify that it look for messages from a certain correspondent or email list, or that it look for messages to a particular group, with a specific subject line, or including certain body text. You can also turn on the checkbox that flags messages with attachments. Just type in the criteria you want, filling in one or more of the fields.
Tip
To test whether your filter is working, click Test Search to see which of your existing messages would have made the cut with the criteria you’ve set.
Once you’ve told Gmail how to recognize a certain type of message, you need to click the Next Step button and tell it what to do with the message.
As shown in Figure 11-22, you have several actions to choose from. You can have Gmail automatically star the message, archive it, label it, forward it to a different address, or dump it directly in the Trash (a popular option for the still-bitter and unexpectedly single). Once you’ve decided on all the actions you want to take with messages that match your criteria, click the Create Filter button to set the whole thing up. From here on out, Gmail performs these actions without any further work on your part.
Googling Your Gmail
If Google is known for anything, it’s for being a top-notch search engine. And it can search your Gmail just as deftly and accurately as it can dig up results on the Web for “cute pictures of baby ducks”. You can use many of the same search techniques and operators (Section 2.6) you use for regular Google Web searches on your own Gmail, too.
If you’re just doing a quick search for words or phrases you know are in a message or subject line but can’t remember anything else about it, just type the keywords into the blank box at the top of the Gmail window and then click the Search Mail button. Gmail will scour the contents of your mail account and give you a list of any messages containing those keywords. The list contains up to 20 messages per page, sorted by most recently received first; to see older messages, click the Older link in the upper- or lower-right corners of the window.
Note
The search function doesn’t search text within file attachments—just the contents of the messages themselves.
Gmail won’t automatically check your Spam and Trash bins for matching messages. If your results don’t include the message you’re looking for, click the “Show search options” link at the top of the Gmail page, and then on the next screen, choose Search → All & Spam & Trash, as illustrated in Figure 11-23, to search all your mailboxes.
Alternatively, if your list of results is too big to be useful, adding criteria is a good way to narrow it down. Click “Show search options” to get the screen in Figure 11-23, where you can home in on a message. In fact, you can use this form to start a search, a handy trick when you want guidance in defining a lot of criteria for your hunt. Just click “Show search options” from any screen.
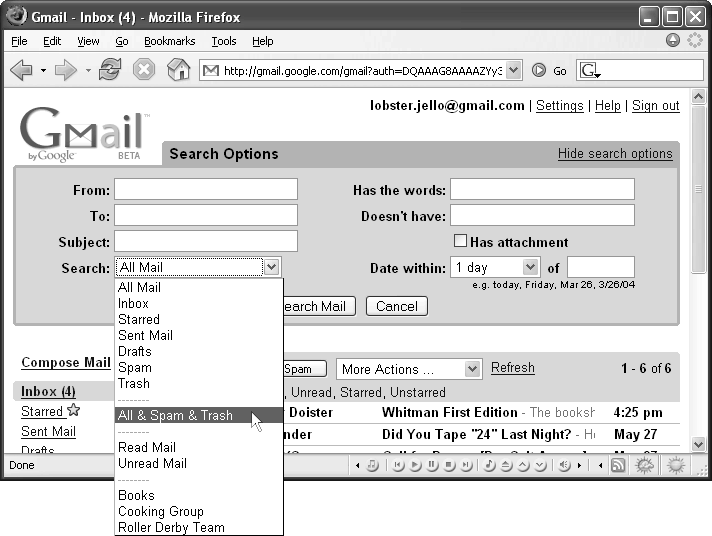
To close the Search Options box, in the upper-right corner of the box, click “Hide search options.”
Note
If you type keywords into the search box at the top of the Gmail window and then click the “Search the Web” button instead of the Search Mail button, Gmail pops open a fresh Google window with the familiar Web search results.
Power searching
Just as you can get Google to rustle up definitions for you by typing define: before a word in the search box (Section 1.6.1), Gmail can respond to a series of simple commands (called operators by database divas) designed for finding messages that contain certain elements, like a specific sender. For instance, if you want to find all the mail your pal Kermit has sent you, type from:kermit in the Search Mail box to have Gmail show you a list of messages just from him. Likewise, you can search for message you’ve sent to Kermit by typing to:kermit in the box. While you can similarly limit searches by using the Search Options box described previously, operators save you some clicking around and give you more choices. (Figure 11-24 shows you how it works.)
Here are additional operators you can use with Gmail (in each case, you’d swap in your own keyword or phrase instead of the word “something”):
subject:something. Searches for words in a message’s Subject line. For example, if you search for subject:online, Gmail gives you any message that includes the word online in the subject—even if the subjects have other words, too.
label:something. Searches for messages tagged with one of your custom labels.
has:attachment. Searches for messages with attachments.
filename:something. Searches for attachments by their file names.
cc:something. Searches for messages by names in the Cc: field.
bcc:something. Searches for messages by names in the Bcc: field.
For real power, you can combine operators. If you want to search for messages from either Kermit or Teddy, string it together as from:kermit OR from:teddy. If you have a ton of messages from Kermit but want to find the one where he sent you a photo of his pet chinchilla, type from:kermit has:attachment to narrow things down.
Punctuation marks can get pressed into duty as search operators as well. Think of the hyphen (-) as a minus sign and put it in front of any words you don’t want to appear in your search results. For example, searching for games -doom looks for messages where you discussed games, but not Doom.
Typing words between parentheses lets you search for messages that contain all of those words. If you want to find all the messages where you discussed both baseball and football with Kermit, type from:kermit (baseball football) to dig up results.
To find messages containing an exact phrase, put the words between quotation marks in your Search box, as in “live long and prosper” or subject:"Star Trek”.
You can also track down messages with a handful of self-explanatory time-and-place operators by typing in a location or time after the colon:
	in:inbox
	in:spam
	in:trash
	in:anywhere
	after:2005/05/17
	before:2005/07/13
Note
The before and after keywords search for when a message was sent, not when it was received. Email is so fast these days, though, that it’s not likely to make a difference.
Tacking in more information, like if the message was starred or unread, can help produce precise search results as well:
	is:starred
	is:unread
	is:read
When you get a bunch of these operators working all at once, you have searches that look like your keyboard’s colon key is out of control, like from:kermit is:starred subject:(death OR taxes) before:2005/04/14.
Deleting Messages Forever
When you’re done with a message and never want to think about it again, you can dump it out of your Inbox in two ways:
Move one or more messages from your Inbox to the digital dumpster by ticking the checkbox next to each message and then choosing Actions → Move to Trash.
Note
If the message you selected is part of a conversation, Gmal now trashes the entire conversation. If you want to delete only the message itself (and none of the others in the conversation), open the conversation, click the subject snippet you want to toss out, click the “More options” link next to the sender’s name, and finally click “Trash this message.”
When a message is open, choose More Actions → Move to Trash.
Tip
Click the “More options” link at the top of an open message and then click “Trash this message” for more instant gratification.
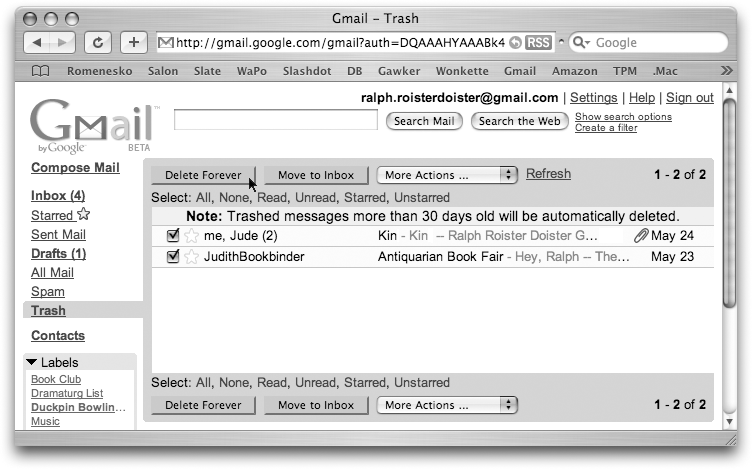
While either of these actions moves the unwanted email into the Trash box, it doesn’t permanently erase it immediately. Instead, Gmail waits for 30 days before automatically clearing out the Trash box. (Until then, you can still see the old messages by clicking the Trash link in the Gmail window.) To permanently dispose of all the old mail right away, click the Trash link and select all the messages by clicking the Select: All link at the top of the column. Click the Delete Forever button (Figure 11-25) to permanently zap the selected messages.
Printing Messages
When you want to convert a digital note into a paper copy, Gmail is on your side. This feature is useful when, say, you buy movie tickets online and want to print out your bar-coded proof of purchase so you can skip the line at the ticket printer in the theater’s crowded lobby. To print a solo message, just open it and click the Print icon on the right side of the window.
Printing can get confusing, however, when you have a 20-message conversation onscreen but just want to print out the one message in the bunch. To print out a single message buried in a Gmail conversation, open the conversation, click the Expand All link on the right, and then find the message you want to print. Since each message in the conversation has its own “More options” link, click just the “More options” link in the desired message, and then, from the list of choices below the Subject line, click Print.
The Contacts List
Contacts are nothing more than a stored list of email addresses. The cool thing about them is that they let you fill in the To field of a message with just a click or two—and without having to remember whether your brother’s e-address is [email protected] or [email protected].
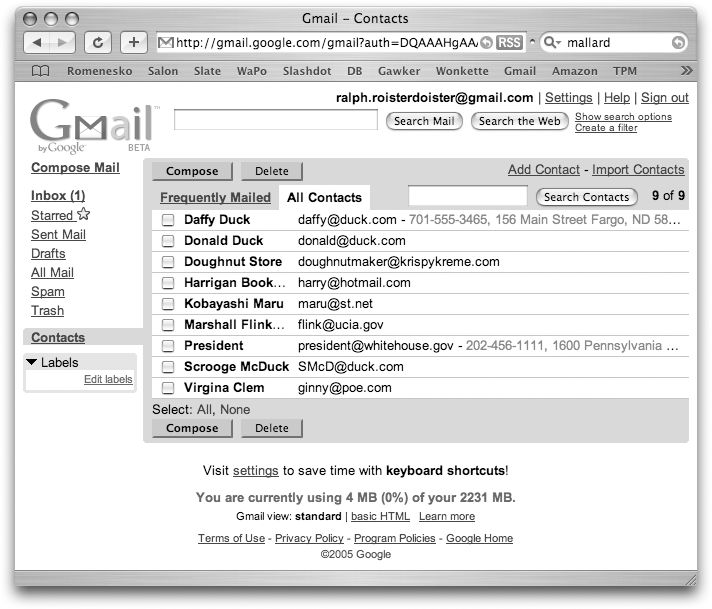
For example, instead of typing out [email protected] every time you get the urge to tell the President how you feel, you can call up your Contacts list by heading to the left side of the Gmail window and then clicking the Contacts link. When you do so, Gmail presents a list of names and e-addresses of people you frequently send messages to (click All Contacts to see the entire list of people you’ve added to your email address book, as shown in Figure 11-26). Turn on the checkbox next to the entry for “President,” and then click Compose to open a pre-addressed message form all ready for you to fill in with your latest thoughts.
Tip
You can send the same message to multiple Contacts all at once. Just turn on the checkbox next to each name on the list that you want to use (or, to include everyone, at the bottom of the Window, click Select: All) and then click the Compose button. It’s a quick way to tell everybody about your new Gmail address, for example.
A great benefit of having addresses in your Gmail Contacts is that whenever you’re working on a new message and you start typing a few letters of the recipient’s address in the To field, Gmail’s auto-complete function kicks in and shows you a list of contacts that match the letters you’ve already typed. So when you type pre, Gmail shows you [email protected], [email protected], [email protected], and so on. Just select the one you want and then press Enter to have Gmail finish filling in the field for you.
There are three ways to add people to your Gmail Contacts. The first is to send a message to somebody; Gmail automatically stores the recipient’s address in your Contacts. The other two ways—doing it manually and importing a batch from another program—are described next.
Tip
Want to import old mail as well as contacts into your Gmail account? Check out Mark Lyon’s GMail Loader program at www.marklyon.org/gmail/, a free bit of software that harvests old messages from other accounts and plants them in your new Gmail Inbox.
Manually Adding Contacts to Gmail
You can add individual email addresses to Gmail when you’re in the Contacts window (from the main window, just click the Contacts link). On the Contacts page, click the Add Contact link, and then fill in the form.
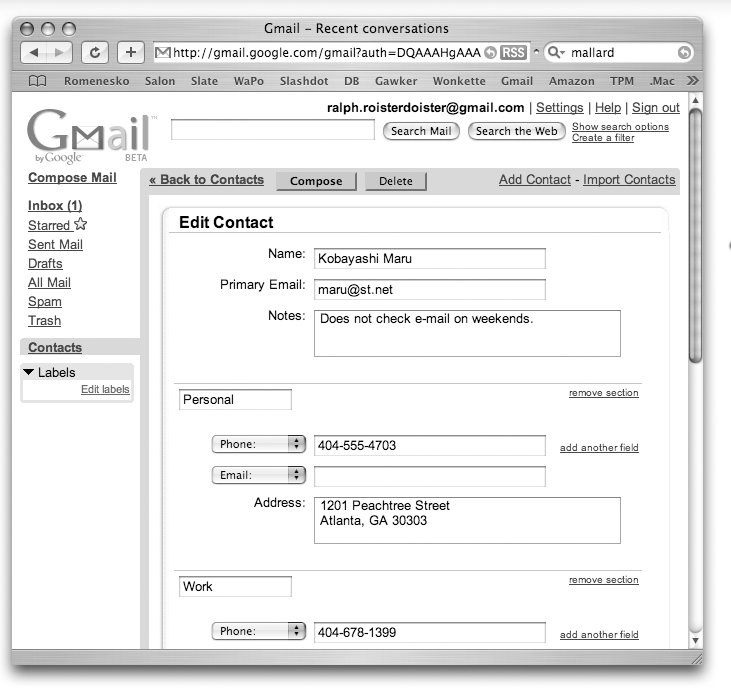
The basic screen allows for just a name, primary email address, and some random notes. If you’re a completist and want detailed information on your pals, click the “add more contact info” link to add names, email addresses, mailing addresses, phone numbers, and more to the Contact file, as shown in Figure 11-27. When you’re done, click Save to confirm and store all the new information you just added.
Importing Contacts from Other Mail Programs
Manually adding address information into your Gmail Contacts is all well and good, but what if you have a nice full address book you’ve been working with for years—and it happens to be in another email program like Eudora or Outlook Express?
If your other mail program lets you export your address list to what’s called a CSV file, you can import it right into your Gmail Contacts. (CSV is spreadsheet-nerd shorthand for Comma Separated Values, which means that each nugget of information is separated from every other info-nugget by a mighty comma.)
Converting contacts for use with Gmail varies depending on what email program you’re using. With some, it’s a simple export operation, while other mail programs make you jump through a few hoops. You may even have to muscle the file around in Microsoft Excel, Corel’s Quattro Pro, or another spreadsheet program to get it to play nice with Gmail.
Keep in mind, however, that no matter what program you use, if you import a contact that has the same email address as an existing entry in your Gmail Contacts list, the newly imported contact will replace the older one.
Note
You can import up to 3,000 contacts at a time, but address-book entries formatted in mail-distribution lists or groups won’t transfer. This means if you once made a Eudora nickname or Outlook group contact name to store the email addresses of all 67 members of the Film Society, Gmail won’t accept it.
Some people get around this by manually adding each person’s address to a message, sending the message, and then keeping that message around to cut and paste all the names into any future messages. It’s a hassle, but it’s the best you can do until Google adds group contacts.
Adding contacts from Eudora, Outlook, and Outlook Express
If you use a standalone email programs like Eudora, Outlook, or Outlook Express, you’re in luck. They make it easier to wrestle out address-book information than do Web-based mail services like Hotmail.
To import contacts into Gmail, you must first export them as a CSV file from your existing mail program. Here’s how to get started:
Note
These steps should work in older versions of each of these programs. If you’re using a different version and you get hung up, however, search the program’s help system for “Export” or “Exporting” to find the right steps.
Eudora 6. With the address book open on screen, choose File → Export. In the dialog box, give the file a name, and then choose CSV format and export the file to your desktop or other easy-to-reach location on your computer.
Outlook 2003. From the main menu bar, chose File → Import and Export to call up the Import/Export wizard. On the first screen, choose “Export a file,” and on the next screen, select Comma Separated Values (Windows). From the list presented on the next screen, choose the Contacts file. Type in name to call the exported file, and then click Export. Finally, save the file to your desktop or other accessible hard disk location.
Outlook Express 6. From the main menu bar, choose File → Export → Address Book. Select Text File (Comma Separated Values), and then click Export. Save the file to your desktop or some other place where you can easily find it.
Once you have your CSV file safely exported, you’re ready to move the contacts to Gmail:
Sign in to your Gmail account and then, on the left side of the window, click the Contacts link.
The Contacts page opens.
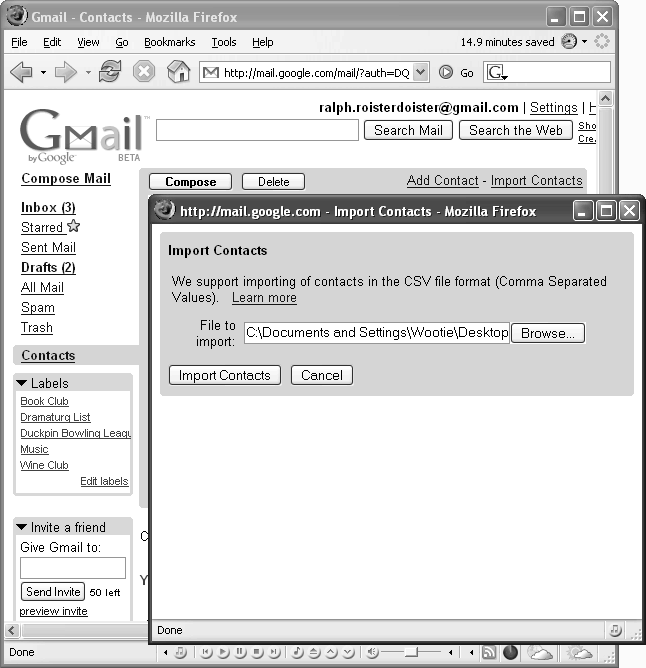
Click “Import Contacts.”
A dialog box like the one in Figure 11-28 pops up.
Click the Browse button, mosey to the desktop or wherever you parked the CSV file, and then select it.
Click Open to return to the importing dialog box.
In the importing dialog box, click Import Contacts.
Gmail imports your list and tells you how many contacts you’ve just added.
Adding contacts from Yahoo Mail
Yanking a .CSV file out of Yahoo’s address book is fairly straightforward:
Sign in to your Yahoo Mail account, and then open your address book.
If you were sticking with Yahoo, this is where you’d add new contacts.
On the right side of the Address Book page, click the Import/Export link.
If you ever decide to switch back to Yahoo, you can import any contacts you’ve accumulated in the meantime using the Import feature here.
Go to the Export area, and then click the Export Now button next to “Microsoft Outlook.”
Yahoo automatically creates a .CSV file called Yahoo_ab.csv, which you’ll be able to then import into your Gmail address book.
Save the CSV file to your desktop, or some other convenient location.
Follow the steps in Section 11.4.2 for importing contacts into Gmail.
Adding contacts from Hotmail
Harvesting addresses out of Hotmail is possible, but it’s a bit more complicated than in other programs. Here’s one way to do it, but note that you’ll need a spreadsheet program to crack open the exported file and fiddle with it:
Sign in to your Hotmail account.
Click the Contacts tab.
In the Contacts tab, click “Print view” and then select all of the contacts in the list.
You can select all the contacts by dragging the cursor over the list from the top of the Name column on down.
Press Ctrl+C (⌘-C) to copy the selected text.
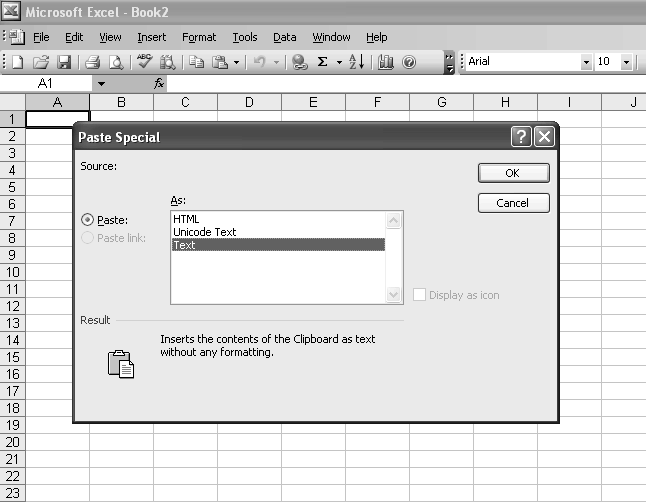
Open your spreadsheet program, and then click the top-left square.
In Excel, for example, this square would be cell A1.
If you used Internet Explorer to log in to Hotmail, press Ctrl+V (⌘-V) to paste the text into the spreadsheet. If you used either the Mozilla or Firefox browsers, right-click the top-left cell, and from the menu that appears, choose Paste Special. A dialog box opens; choose Text (Figure 11-29) and then click OK.
Your contacts appear in the grid.
Figure 11-29. The Paste Special command in Excel lets you choose the format to use for pasted text. If your browser was Firefox or Mozilla, when you copied your contacts, however, the browser added some gunk you don’t want now. Choosing the Text option in this dialog box gets rid of the extra stuff.Save the spreadsheet as a .CSV file, and store it on your desktop or some other place you can easily find it.
In Excel, for example, choose File → Save As → CSV (Comma delimited).
Follow the steps in Section 11.4.2 for importing the contacts to Gmail.
Adding contacts from AOL
Getting addresses, old mail, or anything else out of America Online’s mail program can be tricky, and the variations are many. Luckily, there are links to plenty of address-extraction tools and other helpful programs on the eMailman site at www.emailmain.com/aol/.
Troubleshooting Importing Errors with Contacts
In most cases, Gmail will cheerfully import your addresses into its Contacts list without complaining. But certain things—like bad formatting in the CSV file—will trip it up, causing it to flash an error message at you.
In many cases, opening up the CSV file in a spreadsheet program and fussing with the formatting can take care of import problems. When you open the file in Excel or whatever spreadsheet program you use, make sure the file is formatted as a table. The table needs to include a header at the top of each column, describing what’s in that column: name, email address, and so on (Figure 11-30). If the file doesn’t have those headers, Gmail won’t know what to do with the list.

Once you’ve adjusted the table in the spreadsheet program, save it as a CSV file—in Excel, choose File → Save As → CSV (Comma delimited)—and then try the Import Contacts process again.
Editing and Deleting Gmail Contacts
People are always on the move, and their email addresses may change in the process. If you need to edit somebody’s address information, just open your Contacts page, click the name you want to work on to get a screen with just that person’s name, and then click the “edit contact information” link to open an editable form for that contact. You can add data fields to include phone numbers, mailing addresses, pager numbers, instant-message screen names, and other useful coordinates as described in Section 11.4.1—or you can just edit the information that’s already there. When you’re done, click Save.
Note
When you import information like birthdays or phone numbers into Gmail, they wind up in the Notes field of a contact. If you want to move the information out of the Notes field, just add an Other field and paste in the information. You may also find the Other field useful if you need room to store some serious intel on your pal, like dining preferences, parents’ address, or whatever you want to remember.
If you decide to cross somebody off your list, you can delete the entire contact by clicking the checkbox next to her name and then clicking the Delete button at the top of the list.
Adjusting Your Account Settings
Gmail gives you the power to adjust many of the settings that affect how you see and get your mail. To get to these controls, click the Settings link at the top of the Gmail window, and you’ll see a screen similar to the one shown in Figure 11-31.
There are five different Settings categories to fiddle with, as described next.
Mail Settings
The Mail Settings area holds many of the controls for what your messages look like, including:
Name. If you want to change the name on mail you send to people, adjust it here.
Reply-to Address. Have your message replies come back to your Gmail account or choose another email address to collect the responses.
Language. Select the language you want to use for the buttons, links, and other screen elements in your Gmail window. There are 13 of them to choose from.
Maximum page size. You can opt to see a list of 25, 50, or 100 conversations at once on your screen.
Keyboard shortcuts. Quick keystrokes can save time if you remember them (see Section 11.6 for a list), but if they bother you, you can toggle the shortcut function on or off here.
Personal level indicators. Gmail will automatically place single and double arrows next to messages in your Inbox, depending on whether they were sent to a group or just to you. You can turn on this feature here.
Snippets. With Snippets activated, you have the option of seeing the first few words of a message in your Inbox alongside the Subject line. If you turn off Snippets, you just see the subject words alone.
Signature. You can add or turn off a signature file (Section 11.2.4) for all your outgoing messages here.
Labels
The Labels settings give you one place to create, rename, or remove the personalized tags that help you sort and organize your messages (Section 11.3.3). Clicking a message name shows you all the conversations that Gmail has grouped under each label.
Filters
You can review all of your current mail filters (Section 11.3.4) for rerouting or labeling incoming messages, and also create new ones within the Filters settings area. If you need to change a filter’s action or delete one altogether, you can do so here as well.
Forwarding and POP
If you have multiple email accounts and want to automatically send incoming Gmail to another one of your accounts (Section 11.7.2), turn on the forwarding option here and supply the email address you want to use to collect the rerouted Gmessages.
If you’d prefer to use a POP mail program like Outlook Express or Apple Mail to read your email messages, turn on the POP Download function. (You get to pick whether Gmail keeps copies of downloaded messages, archives them, or trashes them from your Gmail Web window.) Once you turn on POP downloads here, you’ll need to open your POP mail program and add the Gmail account information, as described in Section 11.7.1.
Account Settings
Gmail keeps all the settings concerning your account name, password, and security question here. Although you can’t change your Gmail address after you set it up, you can change the password and the secret question that proves your identity if you forget your password.
You can delete your Gmail account here if you decide you don’t want it after all, or add other Google gravy like having Froogle Shopping Lists (Section 3.2.4) and Google Alerts (Section 5.2.3) sent to your Gmail address.
Note
If you like Gmail but don’t use it as your primary email address, be sure to sign in to it every few weeks to keep it active. If you don’t use the account for an extended period of time, the folks at Gmail consider it dormant. After nine months of waiting around for you to come back, Gmail deletes all the messages in your account, closes it up, and tosses your address back into the pool of available names for somebody else to pick up and use.
Other Cool Gmail Tricks
As you get used to Gmail and want to earn your Power User merit badge, here are a couple of ways to make the service more fun and efficient.
Tip
Since Gmail launched, fans have complied Web sites full of tips, tricks, and tweaks. You can find a lot of information and discussion at sites like www.gmailusers.com and www.gmailwiki.com. Also worth a visit is Jim Barr’s GmailTips site, http://g04.com/misc/GmailTipsComplete.html, and the GmailForums discussion board at www.gmailforums.com.
Gmail Keyboard Shortcuts
If you’re tired of dragging your mouse around the Gmail window, try some of these keyboard shortcuts to perform many common commands with the tap of a button. The keyboard shortcuts are optional, though, and you have to tell Gmail that you want to use them in your Settings area. (To do so, click the Settings link at the top of the Inbox page, and then on the General tab, click the button next to “Keyboard shortcuts on.”) Most shortcuts work for navigating around your Inbox window, unless otherwise noted, and all are lowercase letters. (If you don’t have this book handy, you can also find the list of keyboard shortcuts in the Gmail Help area when you’re logged in to your account.)
|
Shortcut Key |
What It Means |
What It Does |
|
c |
Compose. |
Starts a new message for you to fill in. Pressing Shift+c starts the message in a new window. |
|
/ |
Search. |
Plants your mouse cursor in the search box. |
|
k |
Move to newer conversation. |
Opens or moves the black cursor arrow to a more recent conversation in your Inbox list. Press Enter to expand a Gmail conversation. |
|
j |
Move to older conversation. |
Opens or moves the black cursor arrow to the next oldest conversation in the Inbox’s list. Hit Enter to expand a conversation. |
|
n |
Next message. |
Moves your cursor to the next message. Press Enter to expand or collapse a message. (Works only in Conversation View.) |
|
p |
Previous message. |
Moves the cursor to the previous message. Press Enter to expand or collapse a message. (Works only in Conversation View.) |
|
o or Enter |
Open. |
Opens a mail conversation, and expands or collapses a message if you’re already in Conversation View. |
|
u |
Return to conversation list. |
Refreshes your current page and sends you back to the Inbox, or to a list of conversations. |
|
y |
Archive/Remove from current view. |
Removes the message or conversation from your current view and sends the message elsewhere, depending where you’re currently parked:
If you’re in Spam, Sent, or All Mail, pressing the y key does nothing. |
|
x |
Select conversation. |
Automatically turns on a conversation’s checkbox and selects a conversation so that you can archive it, label it, or choose an action from the menu for that conversation. |
|
s |
Star a message or conversation. |
Adds or removes a star to a message or conversation. |
|
! |
Report spam. |
Marks the message as vile spam and boots it out of your conversation list. |
|
r |
Reply. |
Sets up a reply to the message sender. Pressing Shift+r opens the reply message in a new window (only in Conversation View.) |
|
a |
Reply all. |
Sets up a reply to all message recipients. Pressing Shift+a opens the mass reply in a new window. (Works only in Conversation View.) |
|
f |
Forward. |
Sets up the message to be forwarded to another person. Pressing Shift+f does the same thing in a new window. (Works only in Conversation View.) |
|
Esc |
Escape from input field. |
Removes the cursor from your current field. |
Once you’ve mastered the simple key shortcuts, you’re ready for the one-two punch of combination keystrokes to jump around your messages and mailboxes:
|
Shortcut Keys |
What They Mean |
What They Do |
|
Tab then Enter |
Send message. |
After writing your message, press this key combination to automatically send it. (Works only in Internet Explorer.) |
|
y then o |
Archive and next. |
Archives the conversation and moves you to the next one |
|
g then a |
Go to All Mail. |
Takes you to the All Mail area, which is an online garage for all the mail you’ve ever sent or received (but haven’t deleted). |
|
g then s |
Go to Starred. |
Takes you to all the mail conversations you’ve marked with a star. |
|
g then c |
Go to Contacts. |
Takes you to your Contacts list. |
|
g then d |
Go to Drafts. |
Takes you to all drafts of messages-in-progress you’ve saved. |
|
g then i |
Go to Inbox. |
Turning Gmail into a Web-Based File Server
Considering all that space you get with your Gmail account, wouldn’t it be great if you could use some of it for backing up big files that you could then snag from any Web browser? For example, if you had an 8-megabyte PowerPoint presentation you’d been working on at home and at the office all week, it would be cool to use Gmail as your Web-based file server, rather than toting the file back and forth on a CD?
Emailing yourself a copy of the file every time you make changes can get tedious, but a free little program for Windows machines running Internet Explorer 5 or later called GMail Drive (www.viksoe.dk/code/gmail.htm) turns some of that spare Gmail space into a virtual hard drive. The program adds Gmail to the list of drives that you can see in My Computer and lets you transfer files by dragging them onto it—just like any other hard drive or USB flash drive.
After you download and install the program, go to My Computer and then double-click the GMail Drive icon. In the dialog box that opens, type in your Gmail name and password (Figure 11-32). Now, when you drop files on your Gmail Drive icon, they copy over to your Gmail Inbox, just like you were dropping them on a file server or external hard drive.
When you want to grab a copy of a file you’ve backed up to Gmail, just log in to your Gmail account and you’ll see the file in your Inbox with the prefix GMAILFS in the window. If you’re running Windows XP on the retrieving computer, you can also install a copy of GMail Drive there to grab files using the GMail Drive icon in My Computer.
Three Other Ways of Reading Gmail
A lot of people love the storage space and freedom of Gmail but aren’t fans of the interface. If you’re part of that club, this section gives three ways to get your messages other than the standard Gmail window.
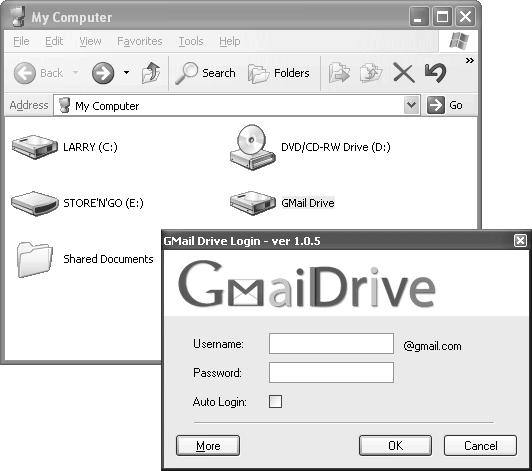
Using Gmail with a Different Mail Program
Describing Gmail as “Web-based” email doesn’t give the service full credit, because you can also send and receive your Gmail in a standalone mail program that handles POP mail. POP stands for Post Office Protocol, and it works with mail software like Outlook Express, Mozilla Thunderbird, Apple Mail, and Eudora.
Routing your Gmail through your existing mail program—especially if you have multiple mail accounts that you’d like to check all at once—saves you the trouble of remembering to fire up your Web browser to scope out your Inbox. It’s also a good choice if you happen to prefer your email software to Gmail’s Web interface.
Of course, if you ditch the Web browser window and download your Gmail with any ol’ email program, you lose the neatly stacked Conversation view that’s a big part of the Gmail experience. That’s about the only big thing you lose, though; even if you’re on the road and check your Gmail the old-fashioned browser way, all your messages will still download to your mail program (like Outlook Express) when you return home.
You need to do two basic things to run Gmail in the mail program of your choice:
Adjust your Gmail account settings to allow POP downloading.
Add the Gmail server information to your mail program’s settings.
To adjust your Gmail so that it sends copies of your messages on to your POP mail program, sign in to your Gmail account from your Web browser, and then click the Settings link in the upper-right corner of the page. In the Settings area, click the tab for “Forwarding and POP” (shown in Figure 11-33), and in the POP Download section, set the following:
Whether you want to download all your existing Gmail or just Gmail that arrives from now on. (Click the button next to the choice you want.)
Whether to keep a copy of each message in your Web Inbox, archive them (Section 11.3), or dump them in the trash (since you’ll already have read the message in your mail program). Choose from the pull-down menu.
The Gmail account settings for your e-mail software of choice. This step requires leaving the Gmail POP Download area and bopping over to your email program.
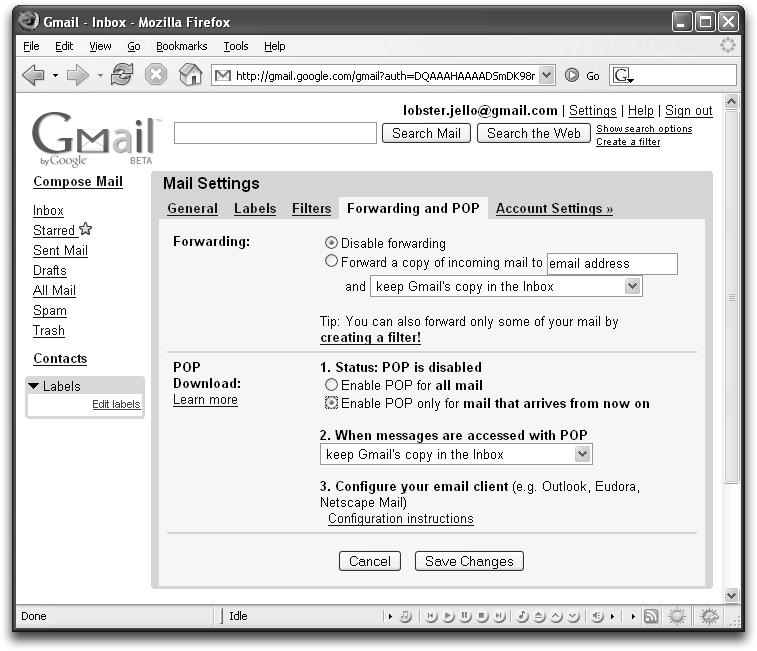
When you’re done telling Gmail what you want, click Save Changes.
Next, you have to set up Gmail as an account in your other mail program. The exact configuration steps vary slightly depending on which program you use, but the basics are the same: you need to create a new account in your mail software’s Preferences or Settings area, and then type in information to help the program find your Gmail.
The things you need to tell the mail program about your Gmail account include:
The Gmail server (the computer that’s in charge of Gmail) uses a secure Internet connection and requires authentication to send messages, which means you need to tell it your user name and password every time you want to send a message. Web-based Gmail authenticates automatically. You can have your POP program authenticate automatically, too, by supplying the information in the Outgoing Mail server settings. Figure 11-34 shows some examples of account settings with a couple of different mail programs. You can find specific instructions for just about any current mail program—as well as BlackBerry wireless email devices—in the POP section at http://gmail.google.com/support.
Auto-Forwarding Gmail Messages
If you don’t want to add your Gmail account to your existing POP mail program, but you would like see your incoming messages without having to log into Gmail, you can auto-forward your Gmessages. Auto-forwarding simply means that the Gmail server always forwards a copy of all your incoming messages to another email address. Auto-forwarding can be helpful if, say, you don’t have access to a computer and are reading your mail on an Internet-enabled wireless phone for the day.
To turn on the auto-forwarding feature, sign in to your Gmail account, and then click the Settings link at the top of the screen. Click the “Forwarding and POP” tab. In the Forwarding section at the top of the screen, click the button next to “Forward a copy of incoming mail to,” and then type in the email address you want to use for collecting your Gmail. Underneath that setting, use the pull-down menu to choose whether to save a copy of the original message, archive it (Section 11.3), or trash it completely. Click the Save Changes button when you’ve adjusted the Forwarding settings to your liking.
Note
If you just want to forward incoming mail from a certain person, domain, or containing specific keywords, you can create a filter (Section 11.3.4) to forward just those messages to your other account, and leave the rest waiting for you when you get back to your computer.
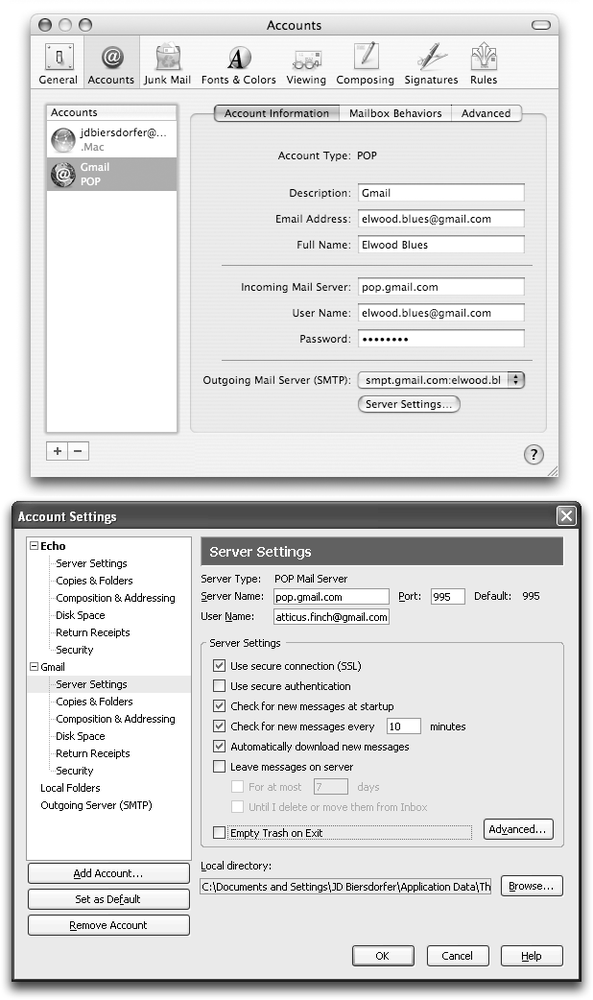
Using Gmail with a News Reader
With people hoping to keep on top of all the 21st century information, it’s no wonder programs known as news readers (or the more wonkish news aggregators) have caught on so quickly. With news-reader software, you can view freshly updated headlines and capsule summaries from hundreds of Web sites all in one window, without having to plod through site after site looking for new content.
These updates are called feeds. Many Web sites—from the New York Times to your favorite rant-a-day blog—have news feeds available to anybody who wants to sign up or subscribe to them. The summary text in the feed includes a link to the full version of the article or post in its original location, which makes it a breeze to scan the headlines and follow though to the full story of the articles that interest you.
There are two popular standards for serving up news feeds: Atom and RSS (which either stands for Rich Site Summary or Really Simple Syndication, depending on whom you ask). Some news-reader programs work with both systems. Moreover, some browsers, like Safari and Firefox, have Atom-ready newsreaders built right in.
You may think all of this news-reader stuff has nothing to do with Gmail, but in fact, you can browse summaries of your fresh, unread Gmail messages right alongside your news updates from the BBC and the Washington Post. Then, when you want to read a message, you can just click through to see the whole thing. All you need is a news reader that supports Atom feeds.
Note
Getting feeds of your Gmail doesn’t alter the messages in your Inbox in any way. They’re still there when you log into Gmail.
Modern Web browsers that work with Atom feeds, like Safari 2.0 and Firefox, can display your new Gmail messages in summary form (Figure 11-35). To find out if your browser can handle Atom feeds, check the Client Software list in the Atom Enabled directory at www.atomenabled.org/everyone/atomenabled to see if your program is on the list.
Adding a feed for your Gmail with Atom-ready browsers is simple. In Safari, log in to Gmail, look at the top of the page for the RSS button and then click it to open a dialog box like the one in Figure 11-36, where you provide your Gmail account name and password so the browser has permission to download and display summaries of your unread messages.
In the Firefox browser, you can see the subject lines of all your unread Gmail messages by making a Live Bookmark to round up the Atom feed. To do so, choose Bookmarks → Manage Bookmarks. In the Manage Bookmarks box, choose File → New Live Bookmark and get ready to do some typing in the URL box. When you’ve warmed up your hands, type in:
https://yourUserName:yourPassword@gmail.google.com/gmail/feed/atom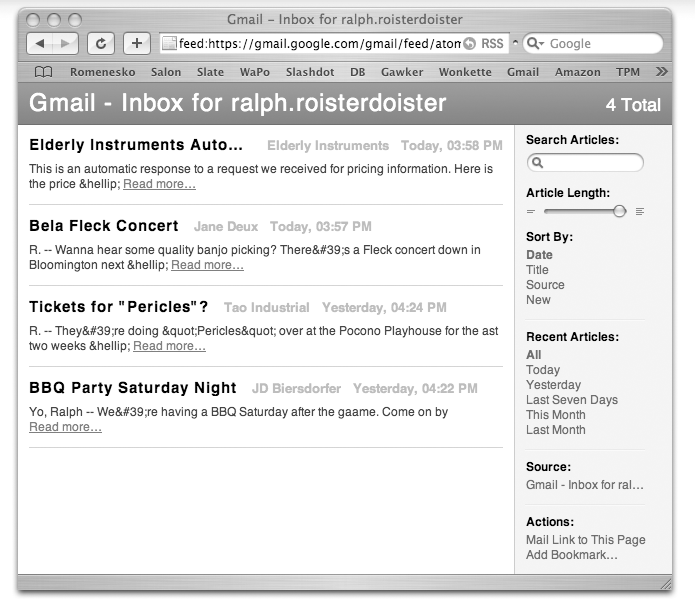
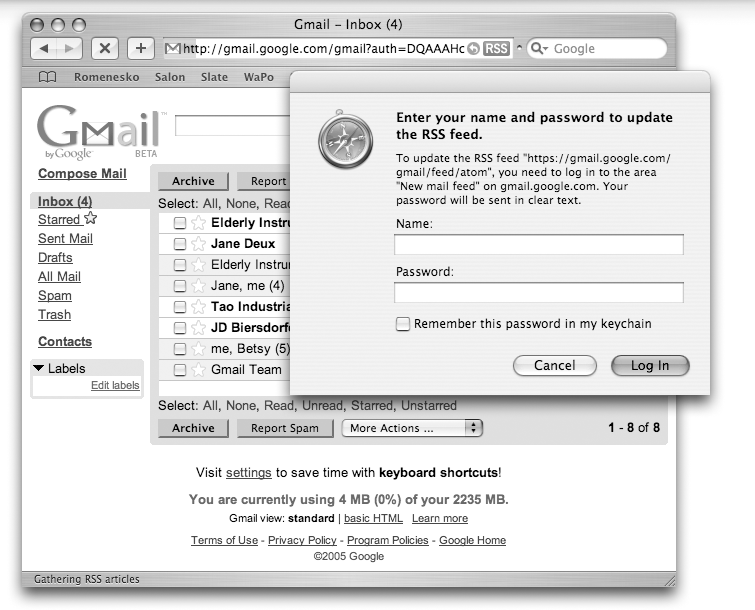
The subject lines of any unread messages now show up in the submenu of Gmail Live Bookmark so you can keep an eye on your Inbox. If you don’t have any new messages, the Live Bookmark fails to load—and sometimes even when you do have new mail, the Live Bookmark is a few messages behind. If you suspect that might be happening, right-click the Live Bookmark and choose Refresh Live Bookmark to update the list.
Note
The security-savvy will note that this URL puts your Gmail password in plain, unscrambled text. If that makes you nervous, perhaps it’s best to stick to the Old Ways and the Web browser.
If your browser doesn’t have an integrated newsreader, there are dozens of dedicated programs that can do the job. Newsreader programs that work with Gmail’s Atom feed include the open source BottomFeeder program (www.cincomsmalltalk.com/BottomFeeder), which works on most Windows, Macintosh, and Linux systems out there; FeedDemon (www.feeddemon.com) and NewsGator (www.newsgator.com) for Windows; and Shrook for Mac OS X (www.fondantfancies.com/apps/shrook).
Once you’ve decided which newsreader to use, you need to tell it where to look for your Gmail. While most reader programs come with a stock set of feeds, you can add new ones of your own (look for an “Add new feed” command or button within the program). When the software asks for a URL to use for the new feed, type in https://gmail.google.com/gmail/feed/atom to point it toward the Gmail server. (The program also asks for your Gmail account name and password in order to snag your new message summaries.) Figure 11-37 shows an example of a Gmail Atom feed displayed in the FeedDemon program for Windows.
Tip
Google keeps an extensive, updated Gmail Help section online at http://mail.google.com/support. If you want an alternate route to Helpville, click the Help link at the top of the page when you’re logged in to your Gmail account. In either case, the section covers pretty much anything you can do with Gmail, from configuring different email programs for downloading Gmail messages to creating filters to bounce bozos out of your Inbox and into the Trash.