
Chapter 2. Desktop Telephony
Hacks 8–27: Introduction
To take advantage of computerized telephony, you don’t need a VoIP gateway, a fancy Internet Protocol (IP) phone, or an open source PBX (though those are certainly fun, hackworthy telephony goodies). Your desktop PC can be the nerve center of all your voice communications, replacing your telephone, your caller ID display, your answering machine or voicemail, and possibly even your phone bill (some VoIP services will bill you electronically).
Some pretty amazing software goodies are available to make your voice communication life a real joy. Programs like Gizmo Project and Skype let you make voice calls to buddies around the globe—for free. Some of these programs have built-in voicemail and call recording, and most are cross-platform, offering support for Mac, Windows, and Linux.
Hardware contraptions and telephony automation software bring even more exciting capabilities to the table. With a telephone-line interface for the Mac or a voice modem in a Windows PC, all you need is the right software to tie your phone completely to your desktop—but don’t forget your wireless headset. VoIPing is much cooler when you aren’t physically bound to your PC.
So don’t delay; dig in to this grab bag of desktop telephony ideas. They’re just the tip of the iceberg.
Access Next-Gen Voice Features
Broadband VoIP providers like Vonage don’t just provide phone service. If you know where to find the features, they integrate with other applications on your desktop—and with your digital life.
When you subscribed to your amazing new VoIP telephone service, you might have missed the fact that, along with your new Internet calling, money-saving VoIP service, you also picked up some nifty desktop telephony enhancements. Most of the broadband VoIP phone service providers give you some cool extras that you’d never get with a traditional phone company—stuff like web-based account management, voicemail-to-email integration, and even softphone calling from your desktop. Did you know…?
Vonage Users Can Call Any Outlook Contact with One Click?
Vonage lets you place calls to your Outlook contacts with a special piece of software, an add-in called Click-2-Call, which comes on the Vonage software CD. Install it and launch Outlook. You’ll notice that your Outlook contacts now have a Click-2-Call option in their Actions menu. Clicking this option dials the contact’s phone number via your Vonage analog telephone adapter (ATA) and then connects the call with your phone. Pick it up; you should hear your call ringing in the handset, waiting for your contact to answer.
BroadVoice Users Can Use a Web-Based Tool to Place and Manipulate Calls?
If you’re a BroadVoice subscriber, you’ve got some really cool web-based call-management tools at your disposal. Thanks to BroadVoice Call Manager, a web-based tool that BroadVoice gives you access to when you sign up, you can use a web page to control your voicemail, enable and disable call forwarding, and even tell BroadVoice how to handle your incoming calls based on their caller IDs—maybe you want to forward certain callers to one number, while allowing your BroadVoice voicemail to handle other callers. Nifty, eh?
You Can Automatically Dump Unwanted Girlfriends and Boyfriends Using a VoIP-Based Service?
Sad, but true. Hey, if you can get a date using the Web, why not dump people the Internet way, too? VoicePulse, a broadband VoIP carrier, provides the VoIP network framework for a service that will help you handle unwanted advances like a dating champ. You don’t have to be a VoicePulse subscriber to use the service, though. Any phone user—VoIP, traditional, or cell—can dump somebody the high-tech way.
Let’s say you’re at a party and some doofus asks you for your phone number. Give the doofus the local number you find at RejectionHotline.com (http://www.rejectionhotline.com/numbers_and_cities.php), rather than your real number. When the dork calls for a date, he or she will instead get a professional rejection courtesy of the Rejection Hotline.
Aside from being cruelly entertaining, the Rejection Hotline provides a great demonstration of a large-scale soft-based voice system. By the time you’re done with this book, you’ll probably have enough VoIP chops to start your own version of the Rejection Hotline.
Broadvox Direct Users Can Use Find-Me-Follow-Me so that They Can Be Reached Wherever There’s a Phone?
You bet! When you subscribe to the Broadvox Direct VoIP service, you get a web-based toolset that lets you configure a find-me-follow-me call list. That way, when folks call your home phone, the service can attempt to track you down on your cell phone, at Mom’s house—wherever you might be.
Track Vonage Account Info on Your Desktop
This tiny desktop tool helps keep track of your minutes and voicemails, too.
If you’ve never used Konfabulator (now known as Yahoo! Widgets) or Apple’s Dashboard widget system, you should try it out. Widgets are very simple, specialized desktop apps that provide short, useful information in real time. They can be floating windows, or they can be embedded into your desktop. Remember Active Desktop from 1997, which let you dock an informational web page into your Windows desktop? Well, widgets are about nine times better.
The widget experience is best with Yahoo! Widgets, a widget framework that seamlessly integrates with Mac OS X and Windows—specifically, Mac OS X 10.2 and higher, or Windows 2000 and XP. Literally thousands of different widgets are available that run on both Mac and Windows—everything from weather reports and stock tickers to cute little iPod remote controls and telephony-related goodies. One such goody is the must-have vonageGauge widget by Martin Koistinen, which gives you a one-glance update of your remaining Vonage minutes, as well as a count of voicemails waiting to be listened to (Figure 2-1).
Installing Yahoo! Widgets
It’s quite worth your while to install Yahoo! Widgets, even if you can’t benefit from vonageGauge. Throughout this book, I reference a number of other cool Yahoo! Widgets that will aide you in your telephony travails. The place to start is http://widgets.yahoo.com/. Here, you can download a version of the Y! Widgets system for either platform.
To install on Windows, just run the installer that you downloaded. To install on Mac OS X, drag the Konfabulator icon (which might eventually become the Y! Widgets icons) from the downloaded DMG volume folder into your system’s Applications folder. Then, launch it by double-clicking it.

You’ll be stepped through a wizard that helps you decide where you want to store downloaded widgets as your inevitable widget addiction grows. When the wizard is complete, Konfabulator/Yahoo! Widgets will automatically launch its default set of widgets. Now, to try out vonageGauge.
Installing the Vonage Widget
Download the vonageGauge widget from http://www.widgetgallery.com/view.php?widget=36334 and save it in a temporary folder or in the standard spot where you put downloaded files. Unzip the download (or mount it by double-clicking it, if on a Mac) and copy the enclosed widget file to the widget folder you selected during installation.
Mac users can launch the widget with no further issues. Windows users, however, must do some manual configuration due to lack of SSL support for the curl web utility in the Windows version of Konfabulator. Don’t worry, though. This is hardly a painful thing to fix. You need this because Vonage’s web site requires (as it should) SSL encryption to be employed when accessing account information.
To rectify the matter, download the most recent version of curl from its web site, http://curl.haxx.se/latest.cgi?curl=win32-ssl. From the downloaded zip file, note the files curl.exe and curl-ca-bundle.crt, as you’ll need them in a moment.
Then grab the needed SSL libraries, ssleay32.dll and libeay32.cll, from http://www2.psy.uq.edu.au/~ftp/Crypto/. The libraries will be located in a binaries directory on one of the FTP mirrors listed here. The specific file you need to download will have a name like SSLeay-X.X.X-DSA.msw32.zip. From inside this zip file, copy the two SSL dll files to the Konfabulator wbin folder located at Program FilesPixoriaKonfabulatorUnixUtilsusrlocalwbin.
Copy the two files from the curl download here, too. In total, you should have copied four files into this folder.
Gauging Your Vonage Utilization
Launch the widget by double-clicking its icon in your widgets folder. The thermometer-like display shows you how many minutes are remaining on your monthly plan. The more minutes you use, the lower the height of the “mercury” in the thermometer. This can help you conserve your utilization and spread your usage out to control your Vonage burn rate. Note that if you have an unlimited plan, this isn’t really doing much for you, aside from showing you how many voicemails you have waiting.
To listen to unheard voicemails, double-click the text at the bottom of the thermometer, and your web browser will launch Vonage’s services page, where you can hear them.
Pick a Desktop VoIP Client
There’s no shortage of fantastic VoIP software for Windows, Mac, and Linux. But which one (or two) do you need?
VoIP applications tend, like email, to have a few servers facilitating interaction on behalf of many clients. In the case of email, those clients are applications like Microsoft Outlook, Eudora, and Apple Mail. But in Voice over IP, clients can be standalone devices, like IP phones and interface boxes (ATAs like those described in Chapter 1), or desktop applications like softphones or instant-messaging apps. The information in this hack will help you decide which VoIP client is right for you.
Some VoIP clients use well-known standards such as the Session Initiation Protocol (SIP) and are designed for use with your choice of VoIP service providers. Others are designed specifically to attach only to a certain service— such as AOL Instant Messenger (AIM). Still others are built using open standards but are hard-wired to work with only certain services; Yahoo! Messenger uses SIP but works only with the Yahoo! service. That is, you can’t use the VoIP features of Yahoo! Messenger with your own choice of VoIP service providers.
Some VoIP clients are quite functional “out of the box,” such as Skype, which provides a user-friendly wizard to sign you up for Skype service and get you logged in. With others, such as X-Lite and GnoPhone—which are designed for use with your choice of service providers, or even with your own VoIP server—you really need to know what you’re doing to get much use out of them. Since X-Lite and GnoPhone aren’t officially sanctioned for use with a particular provider, you’ve got to know how to configure them yourself.
Meet H.323, SIP, and IAX
VoIP clients and servers use three common standards for signaling call events. (These events might be the beginning and end of a call, an attempt to join a voice conference, or looking up a phone number to discover the best way to reach a particular user on a VoIP network.) These three communication protocols are H.323, SIP, and IAX. Very rarely does a single client support more than one of these protocols (Firefly is an exception, and provides support for both SIP and IAX). Having a basic grasp of the different protocols will help you choose a VoIP client.
H.323: the earliest VoIP standard.
An H.323 client, such as Microsoft’s Net-Meeting, really is good only in a corporate telephone system environment. It was once fashionable to use H.323 to have voice conversations with buddies over the Internet, but the rise of broadband firewall routers—which break the H.323 signaling protocol—and the growth of better protocols such as SIP led to a backslide in NetMeeting’s popularity as a personal VoIP tool. Microsoft has since replaced much of the functionality of NetMeeting in its Windows Messenger IM software. So unless you need a softphone that works with your H.323-based PBX system (like an early-model Nortel PBX or Cisco media gateway), you’re probably best served by foregoing H.323-based software.
SIP: the dominant VoIP standard.
SIP has become the dominant multimedia communication protocol, used by an overwhelming majority of VoIP service providers and professional phone system vendors. Aside from voice, you can use SIP components to signal video and instant-messaging conversations, too. I’ll concentrate on SIP as it applies to voice, though.
There are two kinds of SIP VoIP clients: those that allow you to connect to a VoIP system of your choice and those that are programmed for use only with a certain provider. SIP-supporting VoIP client software includes products such as Yahoo! Messenger, Apple iChat, sipXphone, Firefly, GnoPhone, Gizmo Project, and lots of others.
IAX: a really cool VoIP protocol.
Inter-Asterisk Exchange protocol (or IAX, pronounced eex) is used by a growing number of VoIP client programs and service providers. The coolest thing about IAX is that it’s firewall-proof. In situations where SIP and H.323 are rendered inoperable by NAT firewalls like your home broadband router, IAX shines. The only problem is finding a service provider with which to use IAX (visit http://www.teliax.com/ to learn about one that offers an IAX-based VoIP telephone service). IAXPhone and Firefly use IAX.
Understand VoIP Client Features
You ultimately will decide on a VoIP client based on features and compatibility. While one VoIP client might support the protocol you need—say, SIP—it might not support the features you need. iChat and X-Lite are both SIP software, but you can’t use iChat with your own VoIP server; you need X-Lite for that. (If you’re reading this book from front to back, you might be wondering if I’m planning to show you how to build a VoIP server. For the record, I am, but not until Chapter 4.)
Then again, the protocol or innards of the software might make absolutely no difference to you (plenty of folks use Skype, which doesn’t use a standard protocol at all). Table 2-1 is a matrix of VoIP client software and their features and compatibility.
|
Software |
Mac |
Windows |
Linux |
Uses SIP |
Uses H.323 |
Uses IAX |
Uses with your own server |
License type |
|
Gno-Phone |
No |
No |
Yes |
Yes |
No |
No |
Yes |
Open source |
|
IAX-Phone |
Yes |
Yes |
Yes |
No |
No |
Yes |
Yes |
Open source |
|
Skype |
Yes |
Yes |
Yes |
No |
No |
No |
No |
Free-ware |
|
sip-Xphone |
No |
Yes |
No |
Yes |
No |
No |
Yes |
Open source |
|
AIM |
Yes (no VoIP features) |
Yes |
No |
No |
No |
No |
No |
Free-ware |
|
iChat |
Yes |
No |
No |
Yes |
No |
No |
No |
Free |
|
X-Lite/X-PRO |
Yes |
Yes |
No |
Yes |
No |
No |
Yes |
Free/Comm |
|
Firefly |
No |
Yes |
No |
Yes |
No |
Yes |
Yes |
Free |
|
Gizmo Project |
Yes |
Yes |
Yes |
Yes |
No |
No |
No |
Free |
|
Net-meeting |
No |
Yes |
No |
No |
Yes |
No |
Yes |
Free |
|
Gnome-Meeting |
No |
No |
Yes |
No |
Yes |
No |
Yes |
Open source |
As you work through the hacks in this and the following chapters, you’ll become very comfortable with the differences and similarities of these programs—and you’ll have an even better feel for their strengths and weaknesses. A quick Google on any of these program names will get you to a place where you can download and install the program. And, speaking of Google, to get the most out of Google when using telephony, read “Google for Telephony Info” [Hack #21] .
Sound Like Darth Vader While You VoIP
Using Audio Voice Cloak, you can sound like Darth Vader—or like Alvin and the Chipmunks—while you talk online.
Star Wars Episode III: Revenge of the Sith hit the screens right around the time I first tried this hack. When I filed into the very first midnight screening of the movie at my local cineplex, I was particularly excited by the prospect of again hearing the voice of the galaxy’s most dysfunctional father. There’s just something about James Earl Jones and the flange effect.
After all, who hasn’t looked into a mirror in a private moment and said, "I am your father!” a few times? OK, maybe you’re not as big a Star Wars geek as I am, but if you are a closet Wookiee lover, I’ve got the perfect hack for you to use the next time you chat with fellow fans.
Tip
If you think spy movies are cooler than Star Wars movies, you can also use this hack to make yourself sound like one of those disguised-voice phone informants that sound a lot like, well, Darth Vader.
Gold Software’s nifty voice-changing tool, Audio Voice Cloak, lets you tweak your speaking voice, adding pitch shifting, EQ, echo, and other sound effects in real time (Figure 2-2). If you have Windows, you’re in luck (Mac folks, see the sidebar). Download and install AVC from http://www.goldsoftware.com/downloads5903.html. Launch it and, after the shareware commercial, you’ll be able to click the All Controls button to reveal all of the sound-altering controls available to you. The program uses the default microphone input, so if you’re using a nonstandard microphone channel for your telephony or online chat, you’ll need to click the Recording Source button and select the right input.
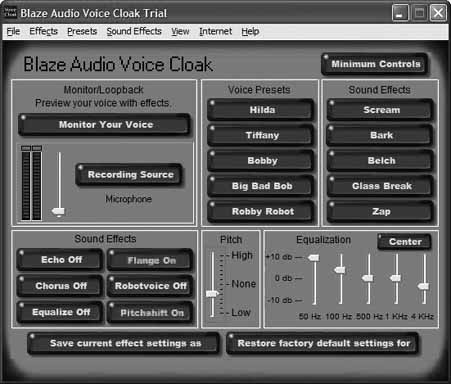
While you tinker with AVC’s settings, you can monitor yourself with the aptly titled Monitor Your Voice button. Beware: you’d better put on a pair of headphones, or you’ll get feedback.
To get the most authentic Vader imitation (short of hiring Ben Burtt, the famed sound effects guru from Lucasfilm), you’ll want a slightly southerly pitch shift (drag the pitch slider down a notch or two) and a flange effect (click the Flange Off button to toggle it on). Finally, click the Center button on the Equalization panel to flatten (or “reset”) the equalizer. Then, monitor your speech to hear how you sound. You should have the familiar, convincing tone of a half-machine Sith lord.
Now, fire up your Yahoo! chat client or AIM and surf on over to the closest chat room. Since AVC passes the modified audio through in real time, you can chat live as Darth, ot you can raise the pitch shift to sound like a chipmunk. And don’t discount the immaturity factor: if you have kids who chat with their buddies online, this could be a lot of fun!
Grow Your Social Network with Gizmo
If you love Skype but hate the fact that it isn’t open and standards-based, you’ll be right at home with Gizmo.
Gizmo Project, sponsored by SIPphone Inc. (http://www.sipphone.com/), seeks to create a free, peer-to-peer softphone with instant messaging à la Skype, but without the proprietary hindrances of Skype. In this regard, Gizmo does an excellent job. Its features are the same on Mac, Windows, and Linux, too—which means no more waiting two months for Windows only features to show up in the Mac and Linux clients, something Skype users are accustomed to. Another cool plus that Gizmo brings to the table is free voicemail, something Skype has yet to offer.
To get started with Gizmo, hook up your headset and microphone, and download and install the client for your platform from http://www.gizmoproject.com/. Launch the Gizmo app, and register for your Gizmo name from the login screen. This name is both your login ID and the name that other Gizmo callers will use to call you. Once you’re logged in, set up your user profile, as in Figure 2-3.
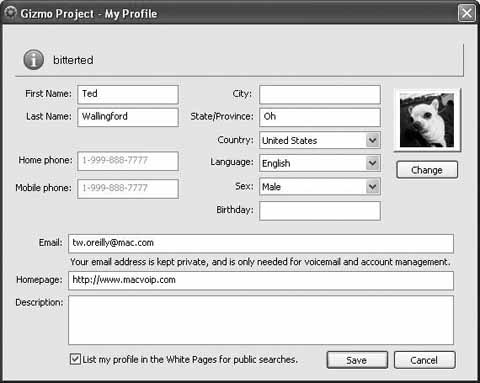
Don’t forget to check the “List my profile in the White Pages for public searches” checkbox if you’d like to hear from other Gizmo users. Otherwise, they won’t be able to find you when searching Gizmo Project’s central user database. If you’d like to search for some buddies to add to your contact list, start by clicking the Search button in Gizmo’s main window. Its search function, which is similar to but less elaborate than that of Skype, shows you the city, state, and country of each user, if they’ve entered that information in their profile. Gizmo also has a big selection of rather cool built-in avatars (buddy icons), or you can select your own image file to use.
Placing a voice call with Gizmo is as easy as entering the Gizmo name of the person you want to talk to and clicking the round phone icon in the upper right of the main interface window. If you don’t yet have any buddies in your contact list, a great place to start is the Gizmo Project Party Line, which you can call by typing partyline in place of a normal Gizmo name. Calling the Party Line connects you to other folks in a voice chat room who might be able to help you start your social network with Gizmo. If there’s nobody in the Party Line chat room at the outset of your call, you’ll literally hear crickets chirping (how appropriate).
Extra Gizmo Features
Gizmo comes with a few extra features not available with a default install of Skype.
Map It.
Have you ever wanted to know where the person you’re talking to is located? When you’re in a call, click the Map It icon, and you’ll see a very nice satellite photo with lines drawn between the estimated locations of the call’s participants, as in Figure 2-4.

Record It.
Podcasters rejoice! Folks who’ve been looking for an easy way to record their VoIP calls from Skype and other softphone apps need look no further than Gizmo Project, which has the built-in ability to record all calls without the need for any other software. As a call is in progress, if you want to record it, just click the circular record button at the top of the conversation pop-out window that appears at the outset of each call. Recorded calls are saved in a WAV audio file on the desktop by default (you can change this location in Gizmo’s preferences).
Gauge It.
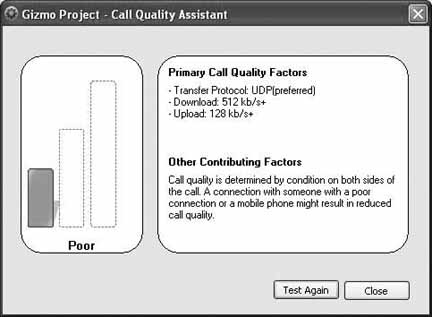
At the bottom of Gizmo’s main window is an icon that looks like the signal-strength icon you might be familiar with from your cell phone—a row of vertical bars that indicate the quality of the connection to the phone network. In Gizmo’s case, the bars represent the quality of the voice pathway your Internet connection provides. If you double-click the icon, you’ll get a pop-up dialog that gives you more details about your available bandwidth, and you’ll find out Gizmo’s opinion of your Internet connection (apparently Gizmo doesn’t particularly care for mine; see Figure 2-5).
Share the Love
If you’ve come this far with Gizmo and still haven’t placed an actual call, why not use that 25-cent call-out credit that SIPphone Inc. provides and call a buddy to tell him about it. Do this by typing your friend’s phone number into the top drop-down list and clicking the round phone button. After a few seconds, your friend’s phone will ring and you’ll be able to talk for as long as a quarter will allow—which isn’t long, so you might want to purchase more call-out credits by clicking the Out icon on Gizmo’s Home tab.
Also Worth Checking Out
If you’re really into desktop VoIP and you’d like to experiment with other standards-based messaging apps, I recommend JAJAH in addition to Gizmo. It’s a Windows-based SIP softphone application that lets you call traditional phone numbers, like Gizmo, but also supports the IAX protocol and Skype, giving it the ability to communicate with several VoIP networks simultaneously.
I’ve always had to maintain several instant-messaging accounts to keep in touch with all of my online buddies on Yahoo!, AIM, and ICQ. To avoid running several instant-messaging clients, I have adopted Trillian, a Windows-based instant-messaging client that can talk to all of these networks, letting me manage all my IM activity from a single interface. (A similar Mac multinetwork IM tool is Adium.)
As Skype, Gizmo, and other VoIP networks grow, you’ll probably need to attach to them simultaneously, as you would in the realm of IM. JAJAH lets you connect to VoIP networks using several major standards—SIP, IAX, and Skype—simultaneously, saving you from having to run several VoIP clients at the same time.
Record VoIP Calls on Your Windows PC
Unless you’re using Gizmo, you probably can’t record your VoIP calls without a little outside software assistance.
If you constantly forget things (which I do), or you’re a private investigator (which I’m not), you might have wondered how to record calls so that you can listen to them later. Recording calls on traditional phones and IP phones is a simple matter of analog electronics (see Chapter 5), but recording softphone and instant-messenger voice calls is another matter entirely. Of course, you can set an old-fashioned tape recorder on your desk and press the Record button, but come on! In our digital world, there’s got to be a better way, right?
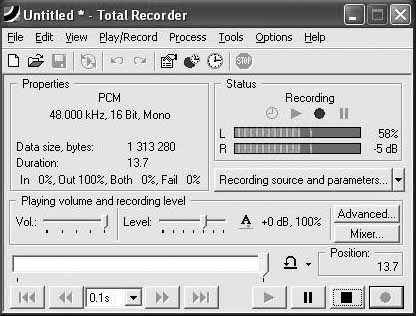
Of course there is. You can find a handful of useful recorder apps at http://www.download.com/ and http://www.downloadsquad.com/ that can record WAV files and MP3s from any sound input or output on your Windows PC. One such application is Total Recorder, developed by High Criteria (Figure 2-6). In its default configuration, Total Recorder will record only the output (the person on the other end of the call), but not your voice.
To alleviate this, click Total Recorder’s Recording Source and Parameters button and then check the “Record also input stream” checkbox. This way, your recording will be sure to contain both sides of the call. The “Remove silence” checkbox will enable a feature that doesn’t save moments of silence into the recording. This might be useful if you record a ton of calls and review them regularly, as waiting through unneeded silence would certainly slow this process and use up more hard-disk space.
A real time-saver is found by checking “Convert using Recording Parameters specified below” and then clicking the Change button. In the dialog window that appears, you can adjust the sound resolution and the output format. Just about every sound codec you’d want is supported, from Windows Media to MP3. For even more sound-conversion goodness, be sure to check out “Create Telephony Sounds with SoX” [Hack #24] .
Handle Calls with Windows Software
Have your PC screen your calls and take your messages with handy Windows tools.
If you’ve got a Windows PC with a standard modem (it doesn’t have to be a voice modem), you can use some really cool software applications that can identify incoming calls, with their caller ID information shown on your Windows desktop. (Mac users can use Phlink for this purpose [Hack #15] .) Some of these apps can even respond to incoming calls so that you don’t have to.
This kind of application is a lot of fun, because while it technically doesn’t use any VoIP components (it’s still strictly legacy phone technology), it will give you an idea of how much power you as a phone user have when you use software to enhance telephony applications. After all, your phone service is merely an application, and you’ll be using a PC application to enhance it.
Tip
You’ll need caller ID service enabled on your phone line if you want your PC to handle your calls in this way.
PhoneTray Free and PhoneTray Dialup
A cool freeware app that provides a caller ID pop-up window in the Windows system tray is appropriately named PhoneTray Free. In addition to the pop-up display, PhoneTray will log all incoming calls—handy when you’ve been out, and you want to know whom to call back—and it has a feature called Privacy Manager that lets you block calls from certain callers (Figure 2-7). PhoneTray also has a handy scheduler to establish your “quiet time,” so you aren’t receiving annoying calls in the middle of the night. While these features might be available from your local phone company, you can certainly save a few bucks by implementing them yourself with a PC tool like PhoneTray. The only hardware requirement is a modem connected to your phone line.

For a small premium, PhoneTray’s developer will sell you a version of the package, called PhoneTray Dialup, which works with caller ID–enabled modems. Using this feature, if you’re a dial-up Internet user, you can receive caller ID signals on your PC desktop while remaining online. You can obtain PhoneTray from http://www.traysoft.com/.
Call411
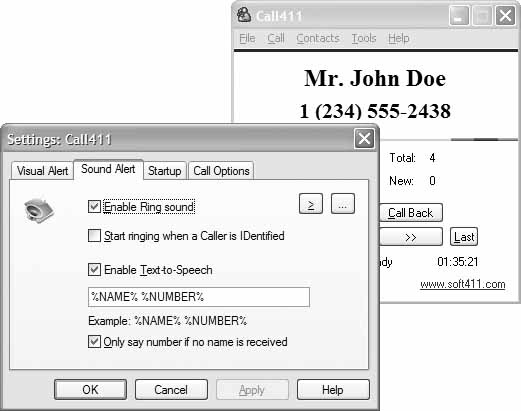
Another nifty free application that handles caller IDs in your Windows workspace is Call411. While this app doesn’t have the elaborate interface or the extensive call-handling options of PhoneTray, it’s an effective, no-frills tool for displaying caller IDs, as shown in Figure 2-8. You can associate a custom ringtone with each caller ID if you like, and Call411 will even audibly announce incoming callers’ phone numbers if you wish. You can obtain Call411 from http://www.soft411.com/company/Soft411/Call411.htm.
Call Soft and Call Soft Pro
If and when you outgrow Call411 and PhoneTray’s features, and you find yourself wanting a complex voicemail and auto-attendant to handle your calls, you can graduate to a more capable commercial application such as Call Soft Pro, available from TOSC (http://www.toscintl.com/) and shown in Figure 2-9. This full-featured telephony system lets you tap into many of the standard calling features on your phone line. Even things like distinctive ring are supported. Call Soft Pro is a message recorder and interactive voice-response tool, so your callers can be prompted to select which voicemail box they’d like to record their message in. If you’ve got a large household, this can be a godsend. Mom and Dad can have the generic family voicemail greeting, and teenagers Todd and Susie can feel cool because they have their own individual voicemail greetings. With distinctive ring enabled on your phone line, the kids can even have their own separate phone number, and Call Soft Pro will recognize their ring pattern and play their special greeting.
Tip
TOSC makes a scaled-down version of Call Soft Pro called Call Soft, which is geared more toward home users and lacks many of the automation features of the Pro version.
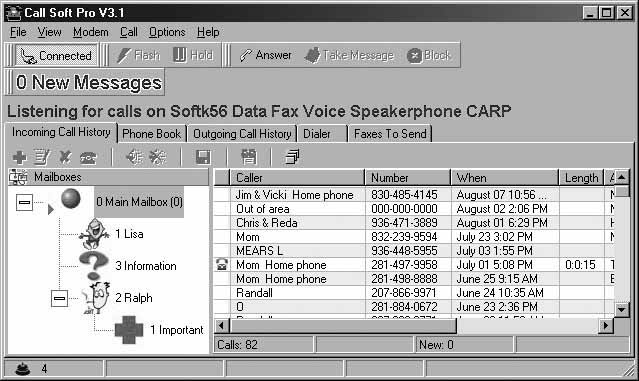
The program also offers a searchable call log, can receive faxes (which are saved as bitmapped files so that you can view or print them), and turns your PC into a speakerphone so that you can listen to calls through your PC’s audio output and speak into your PC’s microphone input. This allows you to use your PC as a phone and to record your conversations, instead of merely using it for automated call processing. Of course, there’s a good bit of that in Call Soft Pro, too. Automatic forwarding of recorded messages via email is supported, and Call Soft Pro can provide music-on-hold for your callers, too.
Let Your Mac Answer and Log Your Calls
Ovolab’s amazingly simple Phlink telephony package lets you do some really cool stuff on your Mac—like answer calls and remotely control your Mac with a telephone call.
Watching Steve Jobs pitching the digital lifestyle at Macworld Expo is a favorite pastime of Mac enthusiasts. In fact, there’s little that Mac users love more than watching the leader of the Mac world tout new developments and cool little tweaks in Apple’s flagship iLife applications: iTunes, iPhoto, iDVD, iMovie, and GarageBand. But for all the pomp and circumstance surrounding these ravishing rollouts, Apple seems to have missed a critical component of the digital lifestyle, one that was around long before DVDs or MP3s—telephony.
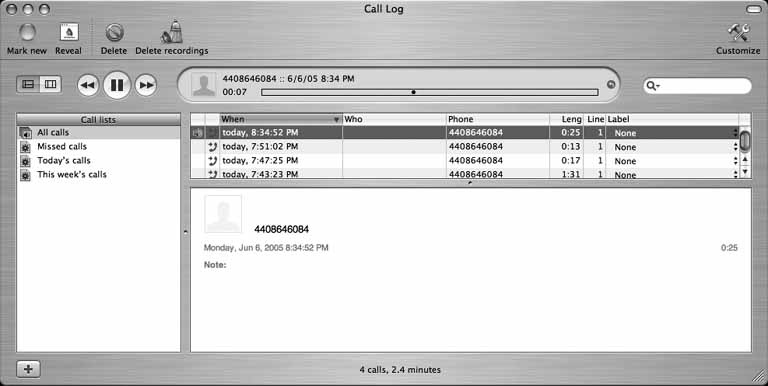
Fortunately, an Italian company called Ovolab has created a really cool application that serves as the missing telephony link for iLife. Phlink is a hardware-software combination that answers calls with a voicemail greeting, logs them, and even allows you to set up AppleScripts that you can control remotely from a touch-tone phone. The hardware piece of the Phlink setup is a USB device with two RJ11-type ports, one for your standard phone line and another for your analog legacy telephone. The software component (available at http://www.ovolab.com/phlink/) consists of an application that looks like iTunes (see Figure 2-10). You get all of this for less than the cost of dinner (at a really nice restaurant).
Installing Phlink is a snap. Just plug the USB interface into an available spot on your Mac or its keyboard. There’s no power adapter to worry about, thankfully. Plug your phone line into the “line” port on the USB interface, and plug your analog phone into the “aux” port. Then, drag the Phlink icon from the included CD-ROM to your Mac’s Applications folder.
Pop-Up Caller ID Notifications
In Phlink’s Preferences window (available by clicking Preferences from the Phlink menu), you can enable an option that shows you a pop-up window with the caller IDs of incoming calls on your screen, so you can decide whether you want to answer them without having to even take your eyes off the screen, let alone leave your desk.
What’s cooler than that? Well, how about telling your Mac to answer the call so that you can get on with what you’re doing and not be bothered with answering the phone. To do so, just click on the round phone button in the Phlink action window, as shown in Figure 2-11. This starts the greeting to the caller and records the caller’s message.

Custom Greetings
When Phlink answers each incoming call, it looks in the Phlink Items folder in the Library/Application support folder of your user profile for a file called greeting.txt. If it finds the file, it uses the Mac’s built-in speech synthesis to speak the words in the file to the incoming caller. To modify this greeting, simply refill the contents of this file with whatever you like.
If Phlink can’t find the greeting.txt file, it looks in the same directory for greeting.aif or greeting.mp3. Whichever of these files is present is played back to the caller. To create your own audio greeting, use a recording program (such as Cacophony [Hack #22] ) to record and mix this greeting as you see fit.
Tip
To get files into the right format for a greeting—i.e., AIF or MP3—use SoX. Refer to “Create Telephony Sounds with SoX” [Hack #24] for tips.
Answer Fax Calls
Phlink can answer fax calls. In the Preferences window on the Fax tab is a checkbox to enable automatic answering of incoming fax calls. You can have the Mac OS X fax viewer handle the faxes, or use the script option to handle them yourself. And speaking of scripting, now that you’ve covered the basics of Phlink, let’s begin customizing!
Run Phlink Even When Logged Off
Phlink is a great application, but it’s a desktop program, not a server app that’s made to run in the background. So, when you log off, it shuts down and can’t answer calls—unless you customize it to do so.
To get Phlink to launch upon login is really easy—just make it a login item for your user account in OS X Preferences. But getting Phlink to stay running even after you’ve logged out is a challenge. Of course, Phlink is most useful when it’s running at all times, so you need to be able to do this.
Thankfully, for every unique need there’s an equally unique hack. In this case, we’re going to launch Phlink under a different user account. This user account will be automatically logged in at boot time, allowing the Phlink application to launch in that user account. Then, we’ll create an Apple-Script login item to switch to the user-selection screen automatically, giving you the option of logging in as any user you want.
To get started, open up System Preferences and click the Accounts preference pane. Click the + icon to create a new account, and call it Phlink. Make sure it is set to log in automatically upon startup. Now, log in as this user. Be sure to enable Phlink as one of its login items. To enable login items for the Phlink user, return to System Preferences and select the Login Items tab. Now you can add Phlink to and remove it from this list, causing it to launch whenever the user phlink logs in.
Now, launch the AppleScript editor, and create a script with this single line:
	do shell script "/System/Library/CoreServices/Menu \ Extras/User.menu/
	Contents/Resources/CGSession – suspend"
The purpose of this one-line AppleScript is to present the user-switching dialog on the screen. We’ll use this AppleScript to get back to the traditional login screen once the Phlink user has logged in and the Phlink app has launched. Save this AppleScript and then make it a login item for the user phlink. (Be sure it’s listed after the Phlink login item.) Then, save and exit Preferences.
Now you’re ready to try it. Reboot your Mac. If all goes well, your Mac will log in as the Phlink user automatically, launch Phlink, and return you to the screen where you can choose which user to log in as (or the username and password prompt, if that’s how your Mac is configured).
Now, Phlink will handle your calls even while you’re logged in as another user, or logged off altogether, because it’s running as its own user in the background.
Greet Callers Differently Each Day
Many voicemail systems let you use a different greeting depending on the day of the week or the time of day, but not Phlink—that is, unless you know how to use cron.
As you know from “Let Your Mac Answer and Log Your Calls” [Hack #15] , a file in the /Library/Application Support/Phlink Items directory contains your outbound greeting. Either it’s greeting.txt (for a synthesized voice greeting), or it’s an audio file in the form of greeting.aif or greeting.mp3. But suppose you want to use a different greeting depending on the day of the week.
Thank goodness for cron—the trusty Unix relic is a workhorse. Assuming you have all of your daily greetings stored in the same place, you can create a script that cron can use to update the greeting based on the day of the week. Here’s the directory listing on my machine:
	Mac-Mini:/Library/Application Support/Phlink Items kelly$ ls -al
	total 328
	drwxr-xr-x	 10 tedwalli   admin	340		 Jun		9 22:39 .
	drwxrwxr-x   16 root	   admin	544		 Jun		6 19:50 ..
	-rw-r--r--	 1 tedwalli	   admin    6148     Jun     6 19:50 .DS_Store
	-rw-r--r--   1 tedwalli    admin      94     Jun     6 19:50 greeting.txt
	-rw-r--r--    1 tedwalli    admin   755002   Jun     9 22:39 greeting_friday.aif
	-rw-r--r--    1 tedwalli    admin   740222   Jun     9 22:39 greeting_monday.aif
	-rw-r--r--    1 tedwalli    admin   700101  Jun     9 22:39 greeting_thursday.aif
	-rw-r--r--     1 tedwalli    admin   694450  Jun     9 22:39 greeting_tuesday.aif
	-rw-r--r--     1 tedwalli    admin   801006 Jun     9 22:39 greeting_wednesday.aif
	-rw-r--r--     1 tedwalli    admin   154102  Jun     6 19:41 ring.aif
Now, create a quick shell script like this one, for each day of the week:
	#!/bin/sh
	## This script is for Monday.
	cd "/Library/Application Support/Phlink Items"
	cp –f greeting_monday.aif greeting.aif
Save each daily shell script in a convenient place, perhaps in a cronjobs folder in the user profile of that phlink user we made in “Run Phlink Even When Logged Off”
[Hack #16]
. Don’t forget to make them executable (run chmod 755 * in the directory where you’ve put them). Then, add each file to the last column of the /etc/crontab file, which defines scheduled Unix activities that should run in the background on Mac OS X. In this example, the daily file rotation occurs at 6:30 a.m. from Monday through Friday (the Friday greeting remains in place until Monday morning):
	#   cron  jobs  to   rotate   the   phlink  greeting
	30     6         *       *           fri    ~phlink/cronjobs/Friday.sh
	30     6         *       *           mon    ~phlink/cronjobs/Monday.sh
    30     6         *       *           tue    ~phlink/cronjobs/Tuesday.sh
	30     6         *       *           wed    ~phlink/cronjobs/Wednesday.sh
    30     6         *       *           thu   ~phlink/cronjobs/Thursday.sh
Now, your Phlink setup will have a different greeting depending upon the day of the week.
Use Caller IDs in AppleScripts
One of Phlink’s AppleScript hooks occurs when incoming calls arrive, which means you can create actions to handle how those calls are handled.
If Phlink didn’t have AppleScript support, it wouldn’t be nearly as cool as it is. In fact, when I first fired up the Phlink application, I looked at the minimal interface and thought to myself, “Is that it?”
The fact is that Phlink’s most awesome functionality is in its AppleScript object model. By using Phlink’s functions in tandem with other AppleScript aware applications, you can do some very cool telephony automation, from music-on-hold to greeting callers with the Mac’s speech synthesis in interactive stages. Anything you can retrieve into an AppleScript variable from other Mac apps, you can pass into Phlink functions for interaction with callers. The only limit, then, is your imagination.[1]
Tip
As I got into setting up these voice AppleScripts, I was reminded of the interprocess communication goodness of the vintage Arexx scripting language on my old Amiga 4000 computer. I got to thinking—wouldn’t it be cool to do some voice hacks on that 25 MHz classic? Then I realized that the Amiga’s pokey 680x0-vintage processors don’t even have enough processing power to encode and decode modern audio codecs! My hopes of splashing the cover of O’Reilly’s Make magazine with a really tasty Amiga VoIP hack were dashed, and I returned to the 21st century realm of VoIP Hacks.
A great place to start building Phlink AppleScript hacks is with caller ID. When Phlink receives an incoming call, the first script Phlink calls is ring, which you’ll create in the /Library/Application Support/Phlink Items directory. The call doesn’t have to be answered to execute this script; the line just needs to ring.
Now, while I’m not going to give you a full-blown explanation of AppleScript (O’Reilly’s AppleScript: The Definitive Guide does a far better job than I could hope to, anyway), these examples should suffice to let you hack Phlink. Since we’re starting out with the ring script, take a look at this example, which announces the caller ID of the call while it’s ringing:
	on incoming_call given callername:theName
			if the Name is ""
				return true
			else
				say ("You are receiving a call from " & theName) as string
				return false
			end if
		return callAgain
	end incoming_call
It will probably take two rings before caller ID information is transmitted from the phone company (it tends to come between rings), but Phlink calls the ring script until it returns false, as in the previous example. An even cooler use of the ring script is to retrieve the caller’s Address Book entry based on the caller ID signals received:
	on incoming_call given callername:theName
			if the Name is ""
				return true
			else
				tell application "Address Book"
				set selectedPerson to (the name of the person
				whose name contains theName)
				end tell
			end if
		return callAgain
	end incoming_call
Control iTunes from Phlink
If you have a ton of iTunes tracks just sitting there on your hard drive, why not put them to work in Phlink.
One of the coolest things about Phlink is its AppleScript abilities. Much like PhoneValet and other desktop telephony packages, custom scripting is where all the fun lies. Sure, letting folks record their voicemail onto your computer is fun, but integrating the other stuff on your computer with the phone—that’s even better. You’ve seen how to do some basic database interaction between Phlink and the Address Book [Hack #18] . That’s a great starting point for this hack, because it introduces the events that can trigger scripts within Phlink. If you haven’t been there already, check it out, come back, and I’ll be waiting here with this iTunes hack.
Your iTunes music library makes the perfect source for on-hold music, or just for a cool telephone gimmick like a "remote phone jukebox.” The following AppleScript will actually search through your iTunes music library and find non-copy-protected songs (i.e., songs imported from CDs or MP3 files, and not purchased online) to play for the caller:
	on do_action given call:my_call
		tell application "iTunes"
		set track_found to false
		set num_retries to 0
		repeat until track_found
			set my_track to some file track	of library playlist 1
			if (kind of my_track contains "Protected") is false then
				 set track_found to true
			else
				set num_retries to (num_retries + 1)
				if num_retries > 100 then
				exit repeat
				end if
			end if
		end repeat
		set my_song_file to the location of my_track
		end tell
		tell application "Ovolab Phlink"
			tell the_call to play (my_song_file as alias)
		end tell
	 end do_action
my_song_file is a variable that stores the location of a song to play for the caller, which is triggered to play in the fourth-from-last line in the script. You can trigger this bit of AppleScript from any of Phlink’s event-handling scripts (ring, greeting, hangup, etc.). The Ovolab Phlink user manual, written by fellow O’Reilly author Matt Neuberg, provides a scholarly introduction to all of Phlink’s event-handling scripts.
Automatically Pause iTunes, Resume iTunes
Ovolab provides the following script to pause iTunes music playback when the phone rings. (This script is really cool. As Forrest Gump would say, that’s about all I have to say about that.) Save it as ring.scpt (or modify your existing ring) and put it in the Phlink Items directory:
	on incoming_call given call:the_call
		set my_paused to false
			tell application "Finder"
			if (exists of (every application process whose creator type
			is "hook")) is true	then
			tell application "iTunes"
			if player state is playing then
				set my_paused to true
				pause
			else
				set my_paused to false
			end if
			end tell
		end if
		end tell
	tell application "Ovolab Phlink"
		tell the_call
			make new bag with properties
			{name:"pauseitunes", waspaused:my_paused}
		end tell
	 end tell
   return false
   end incoming_call
Now, to resume iTunes automatically when the phone call is hung up, add this to your hangup script:
	on do_action given call:the_call
		tell application "Ovolab Phlink"
		tell the_call
		try
		if waspaused of bag "pauseitunes" is true then
			tell application "Finder"
			if (exists of (every application process whose
			creator type is "hook")) is true then
				tell application "iTunes" to play
			end if
			end tell
		end if
		end try
		end tell
		end tell
	end do_action
For more fantastic Phlink scripting magic, be sure to visit the message board at http://www.ovolab.com/, and for some more cool ideas for iTunes/Phlink scripting, visit the source of several of these scripts, http://www.gunsmoke.com/scot/home_automation/phlink.html.
VoIP While Fragging
This sure beats typing “OWNED!” in an in-game chat window.
If you’re like most übergeeks (and I say this as an admitted übergeek), there might be no pastime more satisfying to you than online gaming. Indeed, it’s hard to beat the pure excitement of fragging your best friend with a rocket launcher in Quake or laying down the Horde smack onto a World of Warcraft n00b. Of course, if you’re a Ventrilo or Teamspeak user, you can use Voice over IP to rub it in your opponent’s face verbally when you crush him.
Ventrilo and Teamspeak provide hands-free conference calling designed for online gaming. This way, teammates can coordinate their strategies verbally, communicating by mouth without interrupting their in-game action, rather than by typed messages, which can be a real distraction. Nothing’s a greater mood killer than having to stop to type a chat message to call for a rescue, only to get hit from behind by a stray rocket while typing your plea.
One great feature of both Ventrilo and Teamspeak is their “push-to-talk” capability. This allows you to treat them like a walkie-talkie—cutting out the background noise that would otherwise be transmitted if the chat were always live. With this feature, you can even forego headphones if you keep your transmissions brief so as to discourage echo.
Ventrilo
Ventrilo, from Flagship Industries (http://www.ventrilo.com/), is a team voice chat system that uses the Global System for Mobile (GSM) codec—a very bandwidth-conservative codec that’s excellent for use with games (you don’t want your voice traffic to create in-game lag, so a codec like GSM is perfect). Ventrilo has client and server components. The client runs on Windows and Mac OS X, and the server runs on Mac OS X, Windows, and Linux. A version of the client for Linux is said to be in development.
To run the Windows client, you’ll need DirectX 8.1 or later (available from Microsoft and standard with Windows XP and above). The Mac client requires OS X Version 10.3.2 or higher. You’ll also need a microphone and a pair of headphones (the headphones are superior to using freestanding speakers, because ambient noise from the speakers will “spill” into the microphone, creating really annoying echo for your game-playing buddies).
Teamspeak
Teamspeak (http://www.goteamspeak.com/) is similar in purpose to Ventrilo, though its web-based chat room administration tools are more advanced, and its bent toward gaming is a lot more obvious (Ventrilo professes to be useful for other things in addition to gaming). Teamspeak uses the Speex codec, which, like GSM, is very lean on bandwidth, making it a good choice for lag-sensitive gamers.
Teamspeak offers clients and servers for Windows and Linux. They’re fully interoperable with each other. Like Ventrilo, Teamspeak requires DirectX 8.1 (or later), and its designers insist on a pair of headphones to reduce echo. Also offered is a hosted, pay-for-play service based on the software.
Though not officially sanctioned by the designers of Teamspeak, a great Mac client called Teamspeex has been developed. You can download it from http://www.savvy.nl/blog/download.
Skype
Perhaps the easiest way to VoIP while fragging is with Skype. This desktop voice chat package supports conference calls with five participants—perfect for maintaining open communications for a marauding patrol of Halo warriors behind enemy lines. Skype has several things going for it: it has handsfree operation, making it ideal for gaming; it’s fully cross-platform (even Linux has a client); and it’s stable.
But since only five conference participants at a time are permitted in Skype (four plus the person hosting the conference), you aren’t going to accomplish your entire 500-person EverQuest guild meetings using Skype. That kind of scalability is something you’d need Teamspeak for. For small conferences, Skype is adequate. Perhaps it’s no coincidence that the maximum size of a quest group in World of Warcraft is five members—ideal for a Skype conference. Just be sure the host PC has plenty of horsepower and a solid broadband Internet connection.
Skype for Windows runs on Windows 98 and up, while Skype for Mac runs on Mac OS X 10.2 and up. For more Skype details, sift through the delicious goodies in Chapter 3.
The Skype Alternatives
Gizmo Project, which is a lot like Skype but uses industry-standard SIP for call signaling, is (as of Version 1.0) very limited in terms of conferencing. In fact, it doesn’t have any VoIP-based conferencing built in at all. Conference calling using SIP requires a centralized conference-mixing server, a complexity that makes Skype preferable to Gizmo for in-game conferencing.
Google Talk (http://talk.google.com/) is another Skype alternative. Like Gizmo Project, Google Talk, which has two-party voice calling features, supports a well-known standard for call signaling, called Jabber. And like Gizmo Project, Google Talk is free. iChat can be configured for use with the Google Talk Jabber network, as can various other IM clients such as Trillian and Adium. So you aren’t confined to using Google’s Windows-only client if you want into the network. But that’s where the pros end and the cons begin. Like Gizmo, there’s no way to do conference calls. And worse still, voice chat between official Google Talk clients and non-Google clients such as iChat doesn’t work at all. So Google Talk’s usefulness as an in-game voice conferencing tool is, well, nonexistent.
The Hardware
To have voice communication while blasting the competition to bits, you’re going to need headphones and a microphone. The mic can be built into the headset, or it can be freestanding. But, definitely use headphones. They’ll cancel the acoustic feedback you would get if you were using regular speakers, and they’ll substantially reduce annoying echo. Your gamer buddies will thank you. There’s nothing quite as unnerving as a VoIP-enabled four-player round of Warcraft III when one of the players is echoing like crazy. Friends don’t let friends frag without headphones.
Google for Telephony Info
Harness the world’s most knowledgeable search database for your own voice purposes.
Near the end of the dotcom boom, a little search engine startup called Google was born. Today Google dominates search on the Internet. Though Google has moved into the realm of VoIP with Google Talk, its new IM client, the company’s best offering to telephony is still its famously useful search engine, Google.com.
Mine for Phone Numbers
If you’re looking for a particular phone number, or for a group of phone numbers to be used in telemarketing or fundraising applications, a great place to start is with Google. (And a really smart next step is the National Do Not Call Registry [http://www.donotcall.gov/] if you plan to solicit the folks you’re calling. Once a call recipient informs you that his number is on the list, it’s illegal for your organization to call him again.) Here are some Google search queries that you can use to turn up phone numbers.
Suppose you want to turn up numbers in a given area code and prefix. You can form your Google query like so:
"(440) 328" OR "440-328"The quotation marks surrounding the two expressions tell Google to treat them each literally—that is, to return only instances of the entire expression (”(440) 328“) and not mere instances of the elements within the expression ((440) or 328).
Google will return web page hits that contain occurrences of the area code 440 and the prefix 328 (you might get some non-telephone-related stuff, too) in its two most common forms: with parentheses, and with a hyphen. Of course, the results you get from that query might require a lot of interpretation and massaging before you can really use the phone numbers that you’ve turned up in an automated dialing app or something similar.
Complete That Phone Number
Sometimes the results from a Google phone number search can be fast, useful, and simple to interpret. Let’s say you need to call somebody in your neighborhood, like the local pizza parlor. Let’s also say that you know the pizza shop’s phone number begins with the area code that’s common in your neighborhood. Bang a query like this into Google and you’ll have the whole phone number—and your pizza—in no time:
Hungry Howie's Lakewood 216By giving Google the name of the pizza place, the city it’s in, and the area code you expect its phone number to have, the first Google result is (almost) always the right one—and the entire phone number you’re looking for usually shows up in the short synopsis on Google’s results page, so you don’t even need another click. Hey, when you’re craving pizza, time is of the essence, right?
Telephone Privacy Check
While you’re perusing Google’s phone number department, you might want to see if your phone number is in the Google search index. If it is, your privacy could be in question. Try Googling your phone number, with and without punctuation, and see what results come back. You might even turn up somebody who has published your phone number without your authorization. This isn’t entirely likely, but I remember a couple of years ago when a list of thousands of valid credit card numbers made it into the Google index, so it’s not out of the question.
Research VoIP History on Google Groups
Probably the best historical newsgroup search tool on the Web, Google Groups lets you go back in time to search for public correspondence about all kinds of topics, including Voice over IP. By surfing to Google Groups (http://groups.google.com/), I was able to find that the first mention of VoIP on record occurred in early 1996 and that the first mention of Voice over IP dates back to early 1995. A good deal of early IP telephony research is probably quoted in the Google Groups archives, so if you’re interested in the history of VoIP, this is a fantastic source. After all, as Gavin DeGraw sings, “Part of knowing where I’m going is knowing where I came from.”
Telephonize a Sound File
This trick is useful for taking on-hold music for a test drive, or just for making recordings sound like they’re coming through a telephone.
Whenever you work with telephony, be it desktop telephony apps or full-fledged IP phone systems, you’re bound to encounter prerecorded sounds; things like on-hold messages, voicemail greetings, and even elevator music are often generated by computerized telephony applications. You might even need to create sounds that can be used with these apps. Generating your own telephony-ready sounds is a snap using desktop recording software. You can even resample your recordings so that you’ll know exactly how they’ll sound in a VoIP environment. This way, you can “preview” them.
Sound-effects producers who need to make somebody’s voice sound as though it’s being heard through a telephone employ a technique called downsampling. This gives recordings that tinny telephone flavor. For a perfect phone-sound simulation, you’d also need to chop the high and low frequencies of the sound using an equalizer tool, but downsampling alone produces a pretty convincing “phone sound.” Here’s how it’s done.
The easiest way to downsample a sound is by using a simple sound editing tool such as Richard Bannister’s Cacophony for Mac OS X, or Windows Sound Recorder, which comes with Windows. In essence, you open the sound file, change its sampling resolution to 8 bits per sample and 8,000 samples per second, and then save the file. (On a standard telephone call, there are 8 bits per sample and 8,000 samples per second in the media stream.) This matches your prerecorded sound to the sampling resolution of a typical phone call.
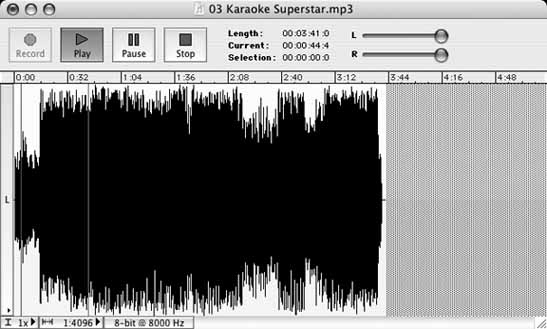
In Figure 2-12, an MP3 sound file has been opened in Cacophony. Its left and right waveforms are displayed, since it’s a stereo sound.
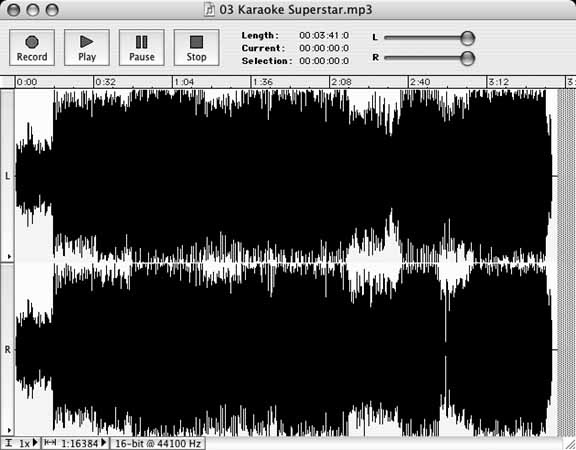
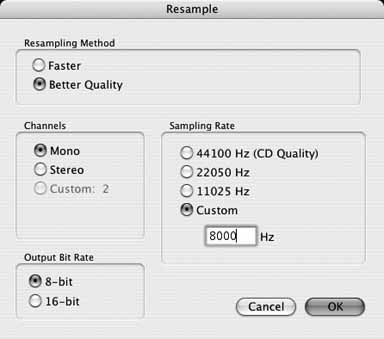
Clicking Cacophony’s Resample function displays the Resample dialog, which lets you specify the exact factors you’ll use to downsample the sound. All telephony applications are mono, not stereo. All legacy telephone equipment (and most VoIP equipment, too) uses a sampling resolution of 8 bits and 8,000 Hz, as shown in Figure 2-13. Once these settings are made, clicking OK dismisses the Resample dialog and performs the downsampling on the sound file.
In Figure 2-14, the resulting sound waveform is telephonized. Listen to it now and hear the difference. It sounds much flatter, less crisp, and possibly more robotic. It sounds like you’re hearing it through a telephone, which is the idea here.
Record an Audio Chat on Your Mac
Have you ever wished you had a recording of a past conversation?
Recording incoming audio from any application is a snap on Mac OS X, as long as you have Ambrosia Software’s free trial version of WireTap Pro or Rogue Amoeba’s Audio Hijack—two applications that permit you to siphon audio produced by desktop applications into sound files in real time. In this case, we’ll use the X-Lite softphone [Hack #4] and Wiretap 1.0 to make an AIFF sound file that contains an incoming caller’s side of the conversation. With this hack, you can record an audio chat on your Mac.
Warning
To make a recording that mixes both ends of the conversation—your voice and the caller’s voice—you’ll need more elaborate sound-recording software, like the pay-for version of Ambrosia’s WireTap (WireTap Pro), or Rogue Amoeba’s Audio Hijack Pro. Both applications allow you to record from the Mac’s audio output (for grabbing the caller’s voice) and its audio input (for grabbing your voice).
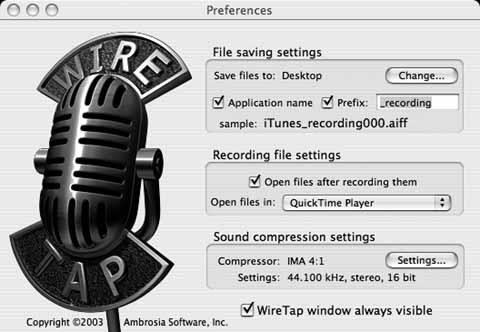
First, we’ll need to get WireTap (http://www.ambrosiasw.com/utilities/wiretap/) set up to make the recording. Since the audio fidelity of a phone call on the X-Lite softphone isn’t likely to be higher than 8-bit/8 kHz, we’ll configure WireTap to save using the same fidelity. Once you’ve launched WireTap, go to Preferences from its application menu and note the soundcompression settings. By default, the fidelity will be 44.1 kHz stereo and 16 bit sampling depth, as shown in Figure 2-15. Click the Settings button to change that.
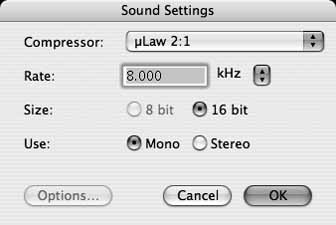
As shown in Figure 2-16, you can drop the sample rate and depth to match an appropriate level for a telephone call (and consequently make your AIFF recording smaller). There’s no point in saving 16-bit recordings if the audio coming from the recorded call is only 8 bits deep, and there’s no point in creating a stereo recording of a phone call. Once you’ve made the changes, click OK to dismiss the Sound Settings window, and close the Preferences window, too, if you wish.
Next, fire up your X-Lite softphone (this will also work with Skype and iChat), and make sure it is registered to send and receive calls with your VoIP provider, as described in “Use a Softphone with a VoIP TSP” [Hack #4] . Then, call somebody or have somebody call you. As the call begins, click the red circle (record) button in WireTap’s floating window, shown in Figure 2-17. This will start an AIFF recording of the current audio output, including the audio coming from the softphone. When the call concludes, click the square (stop) button.

If you didn’t disable the option to launch the recording automatically upon completion, it should immediately appear in a QuickTime window for you to listen to.
Create Telephony Sounds with SoX
Use the Swiss Army knife of sound-conversion utilities for your VoIP setup.
Though dozens of utilities are available for converting and tweaking audio files, the cross-platform open source audio tool called SoX really stands out. If you’ve got a Linux or BSD PC, chances are pretty good that you’ve got SoX installed. Windows and Mac users will have to download a compatible version of SoX from http://sox.sourceforge.net/. And since SoX is a command-line utility, you’ll need to be at least a mediocre typist to get through this hack and the next two hacks. You’ll also need to know how to get to a command line on your particular platform. On Windows, this means running the MS-DOS prompt. On the Mac, it’s the Terminal. Linux and BSD users need only to fire up xterm. This hack will show you the ins and outs of using SoX to convert audio files from one format to another, add audio effects, and telephonize your audio through downsampling.
File Format Conversion
File format conversion is perhaps SoX’s biggest strength. You can use SoX to convert from one format to another (WAV, AIFF, etc.) and from one encoding to another (uLaw, MP3, etc.). It even supports some fossilized sound formats like 8SVX and .voc. All of this format support is helpful if you want to use a file that you have only in some oddball format that your telephony software can’t use.
In most telephony applications, like voicemail and interactive voice response (IVR), where recorded voice prompts are the user interface, you’ll encounter sounds in one of a few encoding formats:
- GSM
An encoding commonly used on cell networks and in Voice over IP calls. This is the de facto encoding used by Asterisk voicemail greetings and other announcements.
- uLaw or aLaw
The two most common 8-bit pulse code modulation formats; they are most frequently used in legacy telephony, such as T1 voice connections and digital PBX telephone systems. uLaw is common in North America, and aLaw is common in Europe.
To convert a sound file from one format to another, there are two ways to go. SoX can recognize the input and desired output formats merely by parsing the filename extensions you provide, as in the following example:
$ sox basic_instructions.ulaw basic_instructions.gsm
This syntax takes basic_instructions.ulaw and creates a GSM-encoded file called basic_instructions.gsm. Of course, if the file you’re converting doesn’t have a file extension in its name, you can express your intentions more explicitly:
$ sox –t gsmanother_brick –t aif another_brick_in_aiff_format
By specifying the encoding type with the -t option, you can tell SoX specifically how to convert the file, regardless of filenames and extensions. But that’s not all you’ll find SoX useful for.
Adding Sound Effects
Aside from converting files between formats, SoX can add some cool effects, too. Equalization, reversal, chorus, reverb, time shifting, and vibrato are some of the most commonly used effects options. Some of these effects are probably more useful in a pro audio environment than in VoIP, but there are uses for audio effects even in telephony—like an on-hold message that hypes a particular product or event. Such an announcement might benefit from a little reverb or delay. Just think about some of the sound effects used in monster-truck advertisements beckoning your attendance on SundaySunday-Sunday! Consider the following syntax, which adds reverb to a sound:
$ soxbigFootSunday.aif bigFootSundayVerb.aifreverb 1 1000 15
This example takes bigFootSunday.aif and adds 1,000 milliseconds of reverb with a 15-millisecond delay before saving the file as bigFootSundayVerb.aif. You can combine sound effects, too. So, for instance, you can place a reverb and an EQ effect together:
$ soxgilmour.aif gilmour.aifreverb 1 1200 30 highpass 1000
The reverb effect is followed by a high-pass filter, which is an EQ technique that trims (reduces) samples below a certain frequency—in this case, 1 kHz. You can experiment with the high-pass and low-pass features to trim frequencies, letting you obtain a number of cool effects. Make your music sound like it’s coming through a megaphone or, with a little reverb, make it sound like you’re singing in the shower. Now, it’s up to you to find an appropriate venue for all this aural awesomeness in your VoIP setup—per-haps in your Skype answering machine [Hack #37] .
Resample and Re-Level Sounds
The SoX bag of tricks has many compartments. Aside from EQ, effects, and format conversion, you can use SoX to downsample sounds, as in the Cacophony example earlier in this chapter [Hack #22] . SoX can also alter a sound’s volume level (amplitude level).
To alter the sample rate, use the -r option and specify the desired sample rate in kilohertz. Of course, you can decrease (downsample) or increase the sample rate, but increasing the sample rate won’t result in a higher-fidelity sound. This example takes a file called bytor.wav and downsamples it to 8 kHz:
$ soxbytor.wav–r 8000bytor_8khz.wav
To alter a sound’s amplitude, or volume level, use the -v option. This example increases the volume of the sound by 25% (using a negative value will decrease the volume):
$ sox –v 0.25bytor.wav bytor_loud.wav
Mix the Perfect Announcement
Put SoX to work mixing different sound files—music, spoken words—to make the ultimate announcement message.
Are you looking for an easy way to make a seriously cool announcement for your Skype answering machine or outgoing voicemail greeting on your Asterisk VoIP server? You could buy a copy of a high-end audio package like Logic Express for all its cool sound-mixing and effects abilities. Even some of the simpler sound editing tools let you merge files, but (if you have Unix) chances are good that you’ve already got SoX! If you’re on a Mac or Windows box, you’re only a download away from having it, so take the MacGyver approach and save some cash. (Mac, Windows, and Linux users can get SoX from http://sox.sourceforge.net/.)
In this little project, we’ll mix an announcement message with some background music, and then trim the resulting file to just the right length, all using the SoX toolset. Finally, we’ll save it in the appropriate sound format.
To get started, find a piece of music that you think will make good background music—preferably something that has no lyrics to interfere with the spoken message you’ll be mixing in. The music can be in any format SoX can handle—.wav, .mp3, whatever. If you can, note the length (in minutes and seconds) of the music file, as this could come in handy later. To figure out the length, just launch the file in your favorite sound player. It should show you the length.
Warning
If you use copyrighted music for commercial or nonprivate use, you’ll need permission from the artist who created the music, or you’ll have to pay royalties for using the music!
Next, record your announcement using Windows Sound Recorder, Cacophony, or your favorite sound recorder. Drop the resulting file in the same folder with your music file. Oh—and you might want to note its length, too. Use these two commands to perform some conversions on your raw audio files:
$ soxbg_music.mp3–r 14400 –c 1bg_music.wav$ soxannounce.wav–r 14400 –c 1announce.wav
These two commands grab the files, resample them both to 14,400 kHz, and make them mono (-c 1), not stereo sounds, ready to be mixed together. The following command mixes the two resultant files into a single file:
$ soxmixbg_music.wav announce.wav mixed.wav
If you find that the background music is too loud or soft, you can adjust it and remix the files:
$ soxbg_music.wav–v -0.25bg_music_quiet.wav$ soxmixbg_music_quiet.wav announce.wav mixed.wav
Then, all that’s left is to get the file into the format you need for your telephony application. If it’s for an Asterisk announcement, you’ll probably want it in GSM format at 8,000 kHz:
$ soxmixed.wav–r 8000mixed_for_asterisk.gsm
Converting to other formats as opposed to GSM is as simple as changing the extension on your final filename.
Sound Like a Pro Announcer
Do you want to have a deep, commercial-sounding voice on your greeting messages? Here’s how.
You might think it takes a ton of natural talent to sound like one of those professional, deep-voiced commercial announcers that you hear in the on-hold messages of big companies. But all it really takes is adherence to a few simple guidelines for clear speech…and maybe a little hacking talent.
First, the speech guidelines. Commercial announcers usually speak much more slowly and concisely than would be appropriate for normal conversation. As a result, they are very easy to understand and follow. Radio announcers often place almost lopsided stress on the words they want to emphasize, too. So, if your recorded announcements are sales pitches, you’ll want to speak concisely, slightly more slowly than normal, and with great stress on the words you’d like to emphasize. You’ll also want to smile while you record yourself. It seems odd at first, but a smiling announcer conveys a different attitude than a blank-faced one. A high school or college speech textbook might be a good source if you really want to hack your speaking ability!
Now, on to the hack. By now, you’ve probably used SoX to convert files from one format to another, but did you know SoX can deepen your voice like a pro announcer? To do this, you’ll need to use SoX’s shift (pitch) effect, which takes a positive or negative integer as an argument. If positive, the integer will increase the pitch of the sound by the number of steps specified. The higher the number, the higher the pitch will be. The lower the number, the lower the pitch will be. In this case, we’re going for pro announcer, not chipmunk, so start with a value of -2 and work your way down until it’s deep, but not artificial-sounding:
$ soxannounce.gsm announce_lower.gsmpitch -2
Record a Videoconference
Snapz Pro X lets you record video and audio together—the perfect way to record a video conference.
The term VoIP usually refers to Voice over IP, but it could easily mean Video over IP, too, since video conferencing is such a popular use for the Internet today. Tools such as Yahoo! Messenger and Apple iChat allow you to do face-to-face video conferences across the Internet, but one thing neither of these tools allows is recording your conferences. Fortunately, Ambrosia Software’s Snapz Pro X lets you create a QuickTime file of any onscreen activities, including a video conference. Unfortunately, it runs only on Mac OS X, so Windows and Linux users are out of luck.
You can download a copy of Snapz Pro X from http://www.ambrosiasw.com/. It will install as a background application that you can summon with a special key combination that you’ll assign right after it installs, the first time it runs. When Snapz’s main window appears, click the Movie button. Here, you can configure the size and aspect of the capture, as well as the frame rate that will be used in the saved video file and whether to include sound from the audio output (the conference participants’ voices) or microphone input (your voice).
You can crop, resize, and drag Snapz’s viewfinder so that it wraps tightly around the area of the screen you want to record. Just don’t drag the window you’re recording from out of the area of this viewfinder, as it remains in a fixed size, shape, and location throughout the recording (unless you’ve configured it to follow your mouse movements, which is probably not a good idea when recording from a video chat window). Once you’ve got everything positioned just right, press the Return (Enter) key, and Snapz will prompt you for a filename. Enter this and click OK, and recording will begin and will continue until you summon Snapz again using the key combination you established during installation.
Unless you change Snapz’s default settings, the saved QuickTime file will appear in the Preview immediately after the recording is complete. If you want to view it later, just call it up from the Finder.
[1] For an unrelated affirmation of the limitlessness of the human spirit, visit http://www.zombo.com.