Day 7. More on Program Flow
Programs accomplish most of their work by branching and looping. On Day 4, “Creating Expressions and Statements,” you learned how to branch your program using the if statement.
Today, you will learn
• What loops are and how they are used
• How to build various loops
• An alternative to deeply nested if...else statements
Looping
Many programming problems are solved by repeatedly acting on the same data. Two ways to do this are recursion (discussed on Day 5, “Organizing into Functions”) and iteration. Iteration means doing the same thing again and again. The principal method of iteration is the loop.
The Roots of Looping: goto
In the primitive days of early computer science, programs were nasty, brutish, and short. Loops consisted of a label, some statements, and a jump that went to the label.
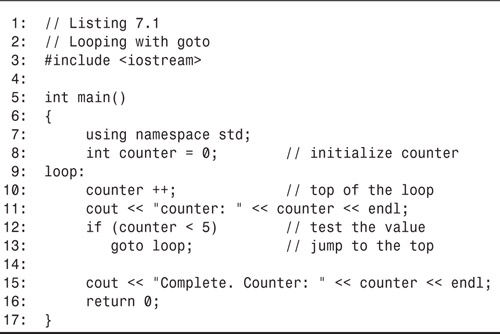
In C++, a label is just a name followed by a colon (:). The label is placed to the left of a legal C++ statement. A jump is accomplished by writing goto followed by the name of a label. Listing 7.1 illustrates this primitive way of looping.
Listing 7.1. Looping with the Keyword goto
![]()
counter: 1
counter: 2
counter: 3
counter: 4
counter: 5
Complete. Counter: 5.
![]()
On line 8, counter is initialized to zero. A label called loop is on line 9, marking the top of the loop. counter is incremented and its new value is printed on line 11. The value of counter is tested on line 12. If the value is less than 5, the if statement is true and the goto statement is executed. This causes program execution to jump back to the loop label on line 9. The program continues looping until counter is equal to 5, at which time it “falls through” the loop and the final output is printed.
Why goto Is Shunned
As a rule, programmers avoid goto, and with good reason. goto statements can cause a jump to any location in your source code, backward or forward. The indiscriminate use of goto statements has caused tangled, miserable, impossible-to-read programs known as “spaghetti code.”
if (value > 10)
goto end;
if (value < 10)
goto end;
cout << "value is 10!";
end:
cout << "done";
To avoid the use of goto, more sophisticated, tightly controlled looping commands have been introduced: for, while, and do...while.
Using while Loops
A while loop causes your program to repeat a sequence of statements as long as the starting condition remains true. In the goto example in Listing 7.1, the counter was incremented until it was equal to 5. Listing 7.2 shows the same program rewritten to take advantage of a while loop.
Listing 7.2. while Loops

![]()
counter: 1
counter: 2
counter: 3
counter: 4
counter: 5
Complete. Counter: 5.
![]()
This simple program demonstrates the fundamentals of the while loop. On line 8, an integer variable called counter is created and initialized to zero. This is then used as a part of a condition. The condition is tested, and if it is true, the body of the while loop is executed. In this case, the condition tested on line 10 is whether counter is less than 5. If the condition is true, the body of the loop is executed; on line 12, the counter is incremented, and on line 13, the value is printed. When the conditional statement on line 10 fails (when counter is no longer less than 5), the entire body of the while loop (lines 11–14) is skipped. Program execution falls through to line 15.
It is worth noting here that it is a good idea to always use braces around the block executed by a loop, even when it is just a single line of code. This avoids the common error of inadvertently putting a semicolon at the end of a loop and causing it to endlessly repeat—for instance,
int counter = 0;
while ( counter < 5 );
counter++;
In this example, the counter++ is never executed.
while ( condition )
statement;
// count to 10
int x = 0;
while (x < 10)
cout << "X: " << x++;
Exploring More Complicated while Statements
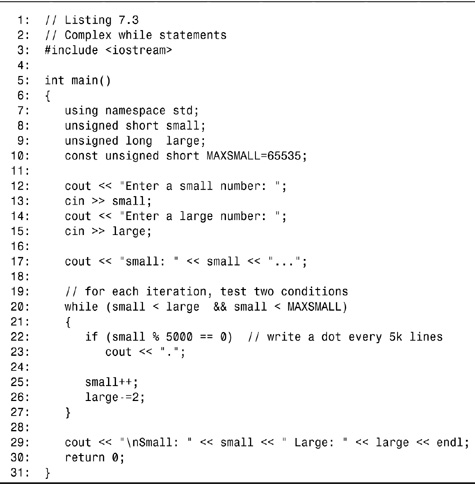
The condition tested by a while loop can be as complex as any legal C++ expression. This can include expressions produced using the logical && (AND), || (OR), and ! (NOT) operators. Listing 7.3 is a somewhat more complicated while statement.
Listing 7.3. Complex while Loops
![]()
Enter a small number: 2
Enter a large number: 100000
small: 2.........
Small: 33335 Large: 33334
![]()
This program is a game. Enter two numbers, one small and one large. The smaller number will count up by ones, and the larger number will count down by twos. The goal of the game is to guess when they’ll meet.
On lines 12–15, the numbers are entered. Line 20 sets up a while loop, which will continue only as long as two conditions are met:
1. Small is not bigger than large.
2. Small doesn’t overrun the size of a small integer (MAXSMALL).
On line 22, the value in small is calculated modulo 5,000. This does not change the value in small; however, it only returns the value 0 when small is an exact multiple of 5,000. Each time it is, a dot (.) is printed to the screen to show progress. On line 25, small is incremented, and on line 26, large is decremented by 2.
When either of the two conditions in the while loop fails, the loop ends and execution of the program continues after the while loop’s closing brace on line 27.
Note
The modulus operator (%) and compound conditions were covered on Day 3, “Working with Variables and Constants.”
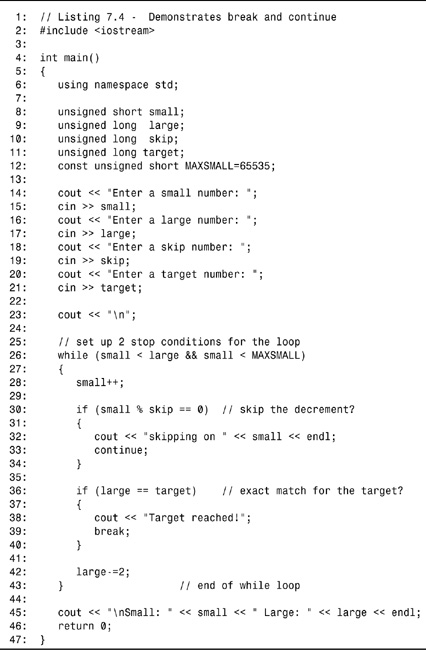
Introducing continue and break
At times, you’ll want to return to the top of a while loop before the entire set of statements in the while loop is executed. The continue statement jumps back to the top of the loop.
At other times, you might want to exit the loop before the exit conditions are met. The break statement immediately exits the while loop, and program execution resumes after the closing brace.
Listing 7.4 demonstrates the use of these statements. This time, the game has become more complicated. The user is invited to enter a small number and a large number, a skip number, and a target number. The small number will be incremented by one, and the large number will be decremented by 2. The decrement will be skipped each time the small number is a multiple of the skip. The game ends if small becomes larger than large. If the large number reaches the target exactly, a statement is printed and the game stops.
The user’s goal is to put in a target number for the large number that will stop the game.
Listing 7.4. break and continue
![]()
Enter a small number: 2
Enter a large number: 20
Enter a skip number: 4
Enter a target number: 6
skipping on 4
skipping on 8
Small: 10 Large: 8
![]()
In this play, the user lost; small became larger than large before the target number of 6 was reached.
On line 26, the while conditions are tested. If small continues to be smaller than large and if small hasn’t overrun the maximum value for a small int, the body of the while loop is entered.
On line 30, the small value is taken modulo the skip value. If small is a multiple of skip, the continue statement is reached and program execution jumps to the top of the loop back at line 26. This effectively skips over the test for the target and the decrement of large.
On line 36, target is tested against the value for large. If they are the same, the user has won. A message is printed and the break statement is reached and executed. This causes an immediate break out of the while loop, and program execution resumes on line 44.
Note
Both continue and break should be used with caution. They are the next most dangerous commands after goto, for much the same reason. Programs that suddenly change direction are harder to understand, and liberal use of continue and break can render even a small while loop unreadable.
A need for breaking within a loop often indicates that the terminating condition of the loop has not been set up with the appropriate Boolean expression. It is often better to use an if statement within a loop to skip some lines than to use a breaking statement.
while (condition)
{
if (condition2)
break;
// statements;
}
Examining while (true) Loops
The condition tested in a while loop can be any valid C++ expression. As long as that condition remains true, the while loop continues. You can create a loop that never ends by using the value true for the condition to be tested. Listing 7.5 demonstrates counting to 10 using this construct.
Listing 7.5. while Loops
1: // Listing 7.5
2: // Demonstrates a while true loop
3: #include <iostream>
4:
5: int main()
6: {
7: int counter = 0;
8:
9: while (true)
10: {
11: counter ++;
12: if (counter > 10)
13: break;
14: }
15: std::cout << "Counter: " << counter << std::endl;
16: return 0;
17: }
![]()
Counter: 11
![]()
On line 9, a while loop is set up with a condition that can never be false. The loop increments the counter variable on line 11, and then on line 12 it tests to see whether counter has gone past 10. If it hasn’t, the while loop iterates. If counter is greater than 10, the break on line 13 ends the while loop, and program execution falls through to line 15, where the results are printed.
This program works, but it isn’t pretty. This is a good example of using the wrong tool for the job. The same thing can be accomplished by putting the test of counter’s value where it belongs—in the while condition.
Caution
Eternal loops such as while (true) can cause your computer to hang if the exit condition is never reached. Use these with caution and test them thoroughly.
C++ gives you many ways to accomplish the same task. The real trick is picking the right tool for the particular job.
Implementing do...while Loops
It is possible that the body of a while loop will never execute. The while statement checks its condition before executing any of its statements, and if the condition evaluates false, the entire body of the while loop is skipped. Listing 7.6 illustrates this.
Listing 7.6. Skipping the Body of the while Loop
1: // Listing 7.6
2: // Demonstrates skipping the body of
3: // the while loop when the condition is false.
4:
5: #include <iostream>
6:
7: int main()
8: {
9: int counter;
10: std::cout << "How many hellos?: ";
11: std::cin >> counter;
12: while (counter > 0)
13: {
14: std::cout << "Hello!
";
15: counter--;
16: }
17: std::cout << "Counter is OutPut: " << counter;
18: return 0;
19: }
![]()
How many hellos?: 2
Hello!
Hello!
Counter is OutPut: 0
How many hellos?: 0
Counter is OutPut: 0
![]()
The user is prompted for a starting value on line 10. This starting value is stored in the integer variable counter. The value of counter is tested on line 12 and decremented in the body of the while loop. In the output, you can see that the first time through, counter was set to 2, and so the body of the while loop ran twice. The second time through, however, the 0 was entered. The value of counter was tested on line 12 and the condition was false; counter was not greater than 0. The entire body of the while loop was skipped, and Hello was never printed.
What if you want to ensure that Hello is always printed at least once? The while loop can’t accomplish this because the if condition is tested before any printing is done. You can force the issue with an if statement just before entering the while loop
if (counter < 1) // force a minimum value
counter = 1;
but that is what programmers call a “kludge” (pronounced klooj to rhyme with stooge), an ugly and inelegant solution.
Using do...while
The do...while loop executes the body of the loop before its condition is tested, thus ensuring that the body always executes at least one time. Listing 7.7 rewrites Listing 7.6, this time using a do...while loop.
Listing 7.7. Demonstrates do...while Loop
1: // Listing 7.7
2: // Demonstrates do while
3:
4: #include <iostream>
5:
6: int main()
7: {
8: using namespace std;
9: int counter;
10: cout << "How many hellos? ";
11: cin >> counter;
12: do
13: {
14: cout << "Hello
";
15: counter--;
16: } while (counter >0 );
17: cout << "Counter is: " << counter << endl;
18: return 0;
19: }
![]()
How many hellos? 2
Hello
Hello
Counter is: 0
![]()
Like the previous program, Listing 7.7 prints the word “Hello” to the console a specified , number of times. Unlike the preceding program, however, this program will always print at least once.
The user is prompted for a starting value on line 10, which is stored in the integer variable counter. In the do...while loop, the body of the loop is entered before the condition is tested, and, therefore, the body of the loop is guaranteed to run at least once. On line 14, the hello message is printed, on line 15 the counter is decremented, and then finally, on line 16 the condition is tested. If the condition evaluates true, execution jumps to the top of the loop on line 13; otherwise, it falls through to line 17.
The continue and break statements work in the do...while loop exactly as they do in the while loop. The only difference between a while loop and a do...while loop is when the condition is tested.
do
statement
while (condition);
// count to 10
int x = 0;
do
cout << "X: " << x++;
while (x < 10)
// print lowercase alphabet.
char ch = ’a’;
do
{
cout << ch << ’ ’;
ch++;
} while ( ch <= ’z’ );
Looping with the for Statement
When programming while loops, you’ll often find yourself going through three steps: setting up a starting condition, testing to see whether the condition is true, and incrementing or otherwise changing a variable each time through the loop. Listing 7.8 demonstrates this.
Listing 7.8. while Reexamined
1: // Listing 7.8
2: // Looping with while
3:
4: #include <iostream>
5:
6: int main()
7: {
8: int counter = 0;
9:
10: while(counter < 5)
11: {
12: counter++;
13: std::cout << "Looping! ";
14: }
15:
16: std::cout << "
Counter: " << counter << std::endl;
17: return 0;
18: }
![]()
Looping! Looping! Looping! Looping! Looping!
Counter: 5.
![]()
In this listing, you can see that three steps are occurring. First, the starting condition is set on line 8: counter is initialized to 0. On line 10, the test of the condition occurs when counter is tested to see if it is less than 5. Finally, the counter variable is incremented on line 12. This loop prints a simple message at line 13. As you can imagine, more important work could be done for each increment of the counter.
A for loop combines the three steps into one statement. The three steps are initializing, testing, and incrementing. A for statement consists of the keyword for followed by a pair of parentheses. Within the parentheses are three statements separated by semicolons:
for( initialization; test ; action )
{
...
}
The first expression, initialization, is the starting conditions or initialization. Any legal C++ statement can be put here, but typically this is used to create and initialize a counting variable. The second expression, test, is the test, and any legal C++ expression can be used here. This test serves the same role as the condition in the while loop. The third expression, action, is the action that will take place. This action is typically the increment or decrement of a value, though any legal C++ statement can be put here. Listing 7.9 demonstrates a for loop by rewriting Listing 7.8.
Listing 7.9. Demonstrating the for Loop
1: // Listing 7.9
2: // Looping with for
3:
4: #include <iostream>
5:
6: int main()
7: {
8: int counter;
9: for (counter = 0; counter < 5; counter++)
10: std::cout << "Looping! ";
11:
12: std::cout << "
Counter: " << counter << std::endl;
13: return 0;
14: }
![]()
Looping! Looping! Looping! Looping! Looping!
Counter: 5.
![]()
The for statement on line 9 combines the initialization of counter, the test that counter is less than 5, and the increment of counter all into one line. The body of the for statement is on line 10. Of course, a block could be used here as well.
for (initialization; test; action )
statement;
// print Hello ten times
for (int i = 0; i<10; i++)
cout << "Hello! ";
for (int i = 0; i < 10; i++)
{
cout << "Hello!" << endl;
cout << "the value of i is: " << i << endl;
}
Advanced for Loops
for statements are powerful and flexible. The three independent statements (initialization, test, and action) lend themselves to a number of variations.
Multiple Initialization and Increments
It is not uncommon to initialize more than one variable, to test a compound logical expression, and to execute more than one statement. The initialization and the action can be replaced by multiple C++ statements, each separated by a comma. Listing 7.10 demonstrates the initialization and increment of two variables.
Listing 7.10. Demonstrating Multiple Statements in for Loops
1: //Listing 7.10
2: // Demonstrates multiple statements in
3: // for loops
4: #include <iostream>
5:
6: int main()
7: {
8:
9: for (int i=0, j=0; i<3; i++, j++)
10: std::cout << "i: " << i << " j: " << j << std::endl;
11: return 0;
12: }
![]()
i: 0 j: 0
i: 1 j: 1
i: 2 j: 2
![]()
On line 9, two variables, i and j, are each initialized with the value 0. A comma is used to separate the two separate expressions. You can also see that these initializations are separated from the test condition by the expected semicolon.
When this program executes, the test (i<3) is evaluated, and because it is true, the body of the for statement is executed, where the values are printed. Finally, the third clause in the for statement is executed. As you can see, two expressions are here as well. In this case, both i and j are incremented.
After line 10 completes, the condition is evaluated again, and if it remains true, the actions are repeated (i and j are again incremented), and the body of the loop is executed again. This continues until the test fails, in which case the action statement is not executed, and control falls out of the loop.
Null Statements in for Loops
Any or all the statements in a for loop can be left out. To accomplish this, you use a null statement. A null statement is simply the use of a semicolon (;) to mark where the statement would have been. Using a null statement, you can create a for loop that acts exactly like a while loop by leaving out the first and third statements. Listing 7.11 illustrates this idea.
Listing 7.11. Null Statements in for Loops
1: // Listing 7.11
2: // For loops with null statements
3:
4: #include <iostream>
5:
6: int main()
7: {
8: int counter = 0;
9:
10: for( ; counter < 5; )
11: {
12: counter++;
13: std::cout << "Looping! ";
14: }
15:
16: std::cout << "
Counter: " << counter << std::endl;
17: return 0;
18: }
![]()
Looping! Looping! Looping! Looping! Looping!
Counter: 5.
![]()
You might recognize this as exactly like the while loop illustrated in Listing 7.8. On line 8, the counter variable is initialized. The for statement on line 10 does not initialize any values, but it does include a test for counter < 5. No increment statement exists, so this loop behaves exactly as if it had been written:
while (counter < 5)
You can once again see that C++ gives you several ways to accomplish the same thing. No experienced C++ programmer would use a for loop in this way shown in Listing 7.11, but it does illustrate the flexibility of the for statement. In fact, it is possible, using break and continue, to create a for loop with none of the three statements. Listing 7.12 illustrates how.
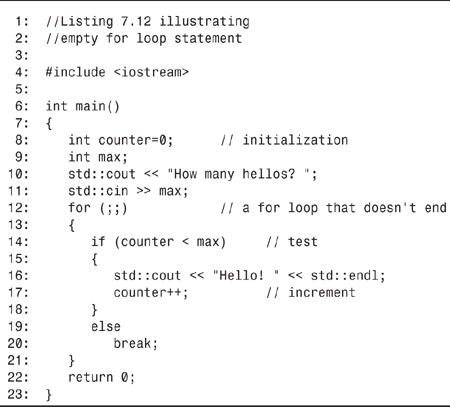
Listing 7.12. Illustrating an Empty for Loop Statement
![]()
How many hellos? 3
Hello!
Hello!
Hello!
![]()
The for loop has now been pushed to its absolute limit. Initialization, test, and action have all been taken out of the for statement on line 12. The initialization is done on line 8, before the for loop begins. The test is done in a separate if statement on line 14, and if the test succeeds, the action, an increment to counter, is performed on line 17. If the test fails, breaking out of the loop occurs on line 20.
Although this particular program is somewhat absurd, sometimes a for(;;) loop or a while (true) loop is just what you’ll want. You’ll see an example of a more reasonable use of such loops when switch statements are discussed later today.
Empty for Loops
Because so much can be done in the header of a for statement, at times you won’t need the body to do anything at all. In that case, be certain to put a null statement (;) as the body of the loop. The semicolon can be on the same line as the header, but this is easy to overlook. Listing 7.13 illustrates an appropriate way to use a null body in a for loop.
Listing 7.13. Illustrates the Null Statement in a for Loop
1: //Listing 7.13
2: //Demonstrates null statement
3: // as body of for loop
4:
5: #include <iostream>
6: int main()
7: {
8: for (int i = 0; i<5; std::cout << "i: " << i++ << std::endl)
9: ;
10: return 0;
11: }
![]()
i: 0
i: 1
i: 2
i: 3
i: 4
![]()
The for loop on line 8 includes three statements: The initialization statement establishes the counter i and initializes it to 0. The condition statement tests for i<5, and the action statement prints the value in i and increments it.
Nothing is left to do in the body of the for loop, so the null statement (;) is used. Note that this is not a well-designed for loop: The action statement is doing far too much. This would be better rewritten as
8: for (int i = 0; i<5; i++)
9: cout << "i: " << i << endl;
Although both do the same thing, this example is easier to understand.
Nesting Loops
Any of the loop can be nested within the body of another. The inner loop will be executed in full for every execution of the outer loop. Listing 7.14 illustrates writing marks into a matrix using nested for loops.
Listing 7.14. Illustrates Nested for Loops
1: //Listing 7.14
2: //Illustrates nested for loops
3: #include <iostream>
4:
5: int main()
6: {
7: using namespace std;
8: int rows, columns;
9: char theChar;
10: cout << "How many rows? ";
11: cin >> rows;
12: cout << "How many columns? ";
13: cin >> columns;
14: cout << "What character? ";
15: cin >> theChar;
16: for (int i = 0; i<rows; i++)
17: {
18: for (int j = 0; j<columns; j++)
19: cout << theChar;
20: cout << endl;
21: }
22: return 0;
23: }
![]()
How many rows? 4
How many columns? 12
What character? X
XXXXXXXXXXXX
XXXXXXXXXXXX
XXXXXXXXXXXX
XXXXXXXXXXXX
![]()
In this listing, the user is prompted for the number of rows and columns and for a character to print. The first for loop, on line 16, initializes a counter (i) to 0, and then the body of the outer for loop is run.
On line 18, the first line of the body of the outer for loop, another for loop is established. A second counter (j) is initialized to 0, and the body of the inner for loop is executed. On line 19, the chosen character is printed, and control returns to the header of the inner for loop. Note that the inner for loop is only one statement (the printing of the character). The condition is tested (j < columns) and if it evaluates true, j is incremented and the next character is printed. This continues until j equals the number of columns.
When the inner for loop fails its test, in this case after 12 Xs are printed, execution falls through to line 20, and a new line is printed. The outer for loop now returns to its header, where its condition (i < rows) is tested. If this evaluates true, i is incremented and the body of the loop is executed.
In the second iteration of the outer for loop, the inner for loop is started over. Thus, j is reinitialized to 0 and the entire inner loop is run again.
The important idea here is that by using a nested loop, the inner loop is executed for each iteration of the outer loop. Thus, the character is printed columns times for each row.
Note
As an aside, many C++ programmers use the letters i and j as counting variables. This tradition goes all the way back to FORTRAN, in which the letters i, j, k, l, m, and n were the only counting variables.
Although this might seem innocuous, readers of your program can become confused by the purpose of the counter, and might use it improperly. You can even become confused in a complex program with nested loops. It is better to indicate the use of the index variable in its name—for instance, CustomerIndex or InputCounter.
Scoping in for Loops
In the past, variables declared in the for loop were scoped to the outer block. The American National Standards Institute (ANSI) standard changes this to scope these variables only to the block of the for loop itself; however, not every compiler supports this change. You can test your compiler with the following code:
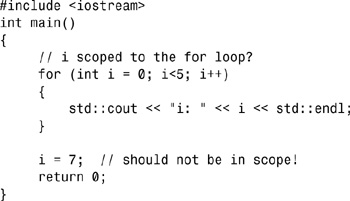
If this compiles without complaint, your compiler does not yet support this aspect of the ANSI standard.
If your compiler complains that i is not yet defined (in the line i=7), your compiler does support the new standard. You can write code that will compile on either compiler by declaring i outside of the loop, as shown here:
#include <iostream>
int main()
{
int i; //declare outside the for loop
for (i = 0; i<5; i++)
{
std::cout << "i: " << i << std::endl;
}
i = 7; // now this is in scope for all compilers
return 0;
}
Summing Up Loops
On Day 5, you learned how to solve the Fibonacci series problem using recursion. To review briefly, a Fibonacci series starts with 1, 1, 2, 3, and all subsequent numbers are the sum of the previous two:
1,1,2,3,5,8,13,21,34…
The nth Fibonacci number is the sum of the n-1 and the n-2 Fibonacci numbers. The problem solved on Day 5 was finding the value of the nth Fibonacci number. This was done with recursion. Listing 7.15 offers a solution using iteration.
Listing 7.15. Solving the nth Fibonacci Number Using Iteration
1: // Listing 7.15 - Demonstrates solving the nth
2: // Fibonacci number using iteration
3:
4: #include <iostream>
5:
6: unsigned int fib(unsigned int position );
7: int main()
8: {
9: using namespace std;
10: unsigned int answer, position;
11: cout << "Which position? ";
12: cin >> position;
13: cout << endl;
14:
15: answer = fib(position);
16: cout << answer << " is the ";
17: cout << position << "th Fibonacci number. " << endl;
18: return 0;
19: }
20:
21: unsigned int fib(unsigned int n)
22: {
23: unsigned int minusTwo=1, minusOne=1, answer=2;
24:
25: if (n < 3)
26: return 1;
27:
28: for (n -= 3; n != 0; n--)
29: {
30: minusTwo = minusOne;
31: minusOne = answer;
32: answer = minusOne + minusTwo;
33: }
34:
35: return answer;
36: }
![]()
Which position? 4
3 is the 4th Fibonacci number.
Which position? 5
5 is the 5th Fibonacci number.
Which position? 20
6765 is the 20th Fibonacci number.
Which position? 100
3314859971 is the 100th Fibonacci number.
![]()
Listing 7.15 solves the Fibonacci series using iteration rather than recursion. This approach is faster and uses less memory than the recursive solution.
On line 11, the user is asked for the position to check. The function fib() is called, which evaluates the position. If the position is less than 3, the function returns the value 1. Starting with position 3, the function iterates using the following algorithm:
1. Establish the starting position: Fill variable answer with 2, minusTwo with 1, and minusOne with 1. Decrement the position by 3 because the first two numbers are handled by the starting position.
2. For every number, count up the Fibonacci series. This is done by
a. Putting the value currently in minusOne into minusTwo
b. Putting the value currently in answer into minusOne
c. Adding minusOne and minusTwo and putting the sum in answer
d. Decrementing n
3. When n reaches 0, return the answer.
This is exactly how you would solve this problem with pencil and paper. If you were asked for the fifth Fibonacci number, you would write
1, 1, 2,
and think, “two more to do.” You would then add 2+1 and write 3, and think, “one more to find.” Finally, you would write 3+2 and the answer would be 5. In effect, you are shifting your attention right one number each time through and decrementing the number remaining to be found.
Note the condition tested on line 28 (n != 0). Many C++ programmers use the following for line 28:
for ( n-=3; n; n-- )
You can see that instead of using a relational condition, just the value of n is used for the condition in the for statement. This is a C++ idiom, and n is considered equivalent to n != 0. Using just n relies on the fact that when n reaches 0, it will evaluate false, because 0 has been considered as false in C++. In keeping with the current C++ standards, it is better to rely on a condition to evaluate to the value of false than to use a numeric value.
Compile, link, and run this program, along with the recursive solution offered on Day 5. Try finding position 25 and compare the time it takes each program. Recursion is elegant, but because the function call brings a performance overhead, and because it is called so many times, its performance is noticeably slower than iteration. Microcomputers tend to be optimized for the arithmetic operations, so the iterative solution should be blazingly fast.
Be careful how large a number you enter. fib grows quickly, and even unsigned long integers will overflow after a while.
Controlling Flow with switch Statements
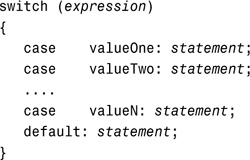
On Day 4, you saw how to write if and if...else statements. These can become quite confusing when nested too deeply, and C++ offers an alternative. Unlike if, which evaluates one value, switch statements enable you to branch on any of several values. The general form of the switch statement is
switch (expression)
{
case valueOne: statement;
break;
case valueTwo: statement;
break;
....
case valueN: statement;
break;
default: statement;
}
expression is any legal C++ expression, and the statements are any legal C++ statements or block of statements that evaluate (or can be unambiguously converted to) an integer value. Note, however, that the evaluation is for equality only; relational operators cannot be used here, nor can Boolean operations.
If one of the case values matches the expression, program execution jumps to those statements and continues to the end of the switch block unless a break statement is encountered. If nothing matches, execution branches to the optional default statement. If no default and no matching case value exist, execution falls through the switch statement and the statement ends.
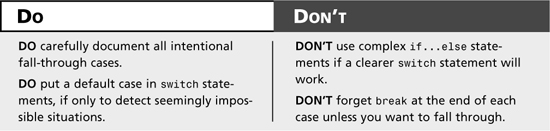
Tip
It is almost always a good idea to have a default case in switch statements. If you have no other need for the default, use it to test for the supposedly impossible case, and print out an error message; this can be a tremendous aid in debugging.
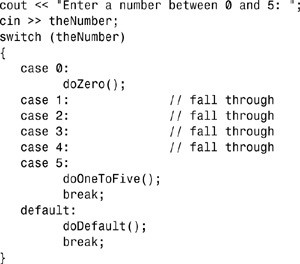
It is important to note that if no break statement is at the end of a case statement, execution falls through to the next case statement. This is sometimes necessary, but usually is an error. If you decide to let execution fall through, be certain to put a comment indicating that you didn’t just forget the break.
Listing 7.16 illustrates use of the switch statement.
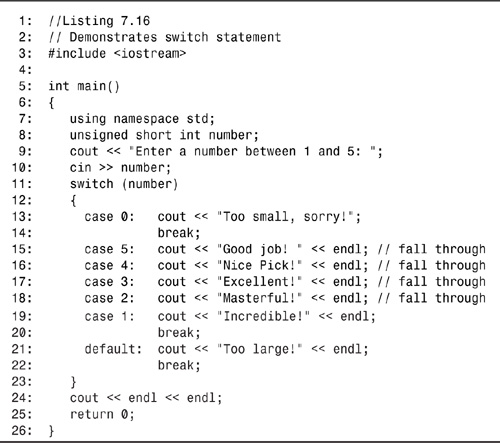
Listing 7.16. Demonstrating the switch Statement
Enter a number between 1 and 5: 3
Excellent!
Masterful!
Incredible!
Enter a number between 1 and 5: 8
Too large!
![]()
The user is prompted for a number on lines 9 and 10. That number is given to the switch statement on line 11. If the number is 0, the case statement on line 13 matches, the message Too small, sorry! is printed, and the break statement on line 14 ends the switch. If the value is 5, execution switches to line 15 where a message is printed, and then falls through to line 16, another message is printed, and so forth until hitting the break on line 20, at which time the switch ends.
The net effect of these statements is that for a number between 1 and 5, that many messages are printed. If the value of number is not 0 to 5, it is assumed to be too large, and the default statement is invoked on line 21.
switch (choice)
{
case 0:
cout << "Zero!" << endl;
break;
case 1:
cout << "One!" << endl;
break;
case 2:
cout << "Two!" << endl;
default:
cout << "Default!" << endl;
}
switch (choice)
{
case 0:
case 1:
case 2:
cout << "Less than 3!";
break;
case 3:
cout << "Equals 3!";
break;
default:
cout << "greater than 3!";
}
Using a switch Statement with a Menu
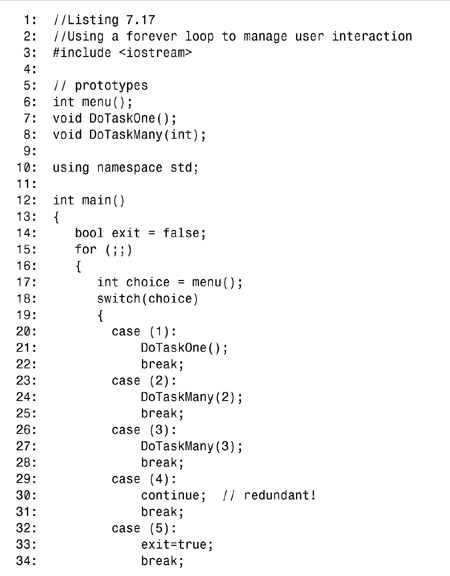
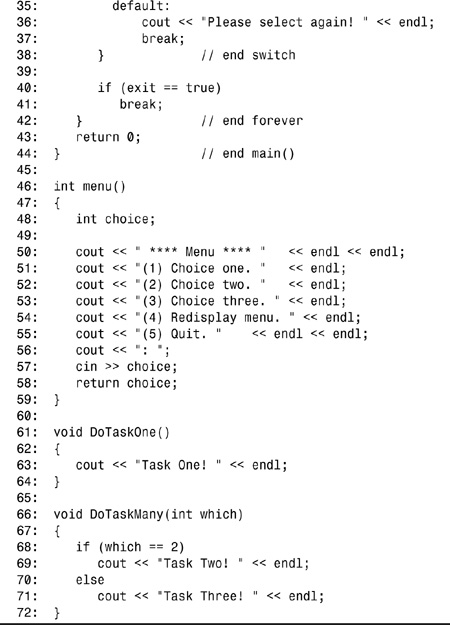
Listing 7.17 returns to the for(;;) loop discussed earlier. These loops are also called forever loops, as they will loop forever if a break is not encountered. In Listing 7.17, the forever loop is used to put up a menu, solicit a choice from the user, act on the choice, and then return to the menu. This continues until the user chooses to exit.
Some programmers like to write:
#define EVER ;;
for (EVER)
{
// statements...
}
A forever loop is a loop that does not have an exit condition. To exit the loop, a break statement must be used. Forever loops are also known as eternal or infinite loops.
Listing 7.17. Demonstrating a Forever Loop
![]()
**** Menu ****
(1) Choice one.
(2) Choice two.
(3) Choice three.
(4) Redisplay menu.
(5) Quit.
: 1
Task One!
**** Menu ****
(1) Choice one.
(2) Choice two.
(3) Choice three.
(4) Redisplay menu.
(5) Quit.
: 3
Task Three!
**** Menu ****
(1) Choice one.
(2) Choice two.
(3) Choice three.
(4) Redisplay menu.
(5) Quit.
: 5
![]()
This program brings together a number of concepts from today and previous days. It also shows a common use of the switch statement.
The forever loop begins on line 15. The menu() function is called, which prints the menu to the screen and returns the user’s selection. The switch statement, which begins on line 18 and ends on line 38, switches on the user’s choice.
If the user enters 1, execution jumps to the case (1): statement on line 20. Line 21 switches execution to the DoTaskOne() function, which prints a message and returns. On its return, execution resumes on line 22, where the break ends the switch statement, and execution falls through to line 39. On line 40, the variable exit is evaluated to see whether it is true. If it evaluates true, the break on line 41 is executed and the for(;;) loop ends; but if it evaluates false, execution resumes at the top of the loop on line 15.
Note that the continue statement on line 30 is redundant. If it were left out and the break statement were encountered, the switch would end, exit would evaluate false, the loop would reiterate, and the menu would be reprinted. The continue does, however, bypass the test of exit.
Summary
Today’s lesson started with a look at the goto command that you were told to avoid using. You were then shown different methods to cause a C++ program to loop that don’t require a goto.
The while statement loops check a condition, and if it is true, execute the statements in the body of the loop. do...while loops execute the body of the loop and then test the condition. for loops initialize a value, then test an expression. If the expression is true, the body of the loop is executed. The final expression in the for header is then executed and the condition is then checked again. This process of checking the condition, executing the statements in the body, and executing the final expression in the for statement continues until the conditional expression evaluates to false.
You also learned about continue, which causes while, do...while, and for loops to start over, and break, which causes while, do...while, for, and switch statements to end.
Q&A
Q How do I choose between if...else and switch?
A If more than just one or two else clauses are used, and all are testing the same value, consider using a switch statement.
Q How do I choose between while and do...while?
A If the body of the loop should always execute at least once, consider a do...while loop; otherwise, try to use the while loop.
Q How do I choose between while and for?
A If you are initializing a counting variable, testing that variable, and incrementing it each time through the loop, consider the for loop. If your variable is already initialized and is not incremented on each loop, a while loop might be the better choice. Experienced programmers look for this usage and will find your program harder to understand if you violate this expectation.
Q Is it better to use while (true) or for (;;)?
A No significant difference exists; however, it is best to avoid both.
Q Why shouldn’t a variable be used as a condition, such as while(n)?
A In the current C++ standard, an expression is evaluated to a Boolean value of true or false. Although you can equate false to 0 and true to any other value, it is better—and more in line with the current standards—to use an expression that evaluates to a Boolean value of true or false. However, a variable of type bool can be used in a condition without any potential problems.
Workshop
The Workshop provides quiz questions to help you solidify your understanding of the material covered as well as exercises to provide you with experience in using what you’ve learned. Try to answer the quiz and exercise questions before checking the answers in Appendix D, and be certain you understand the answers before continuing to tomorrow’s lesson.
Quiz
1. How do you initialize more than one variable in a for loop?
2. Why is goto avoided?
3. Is it possible to write a for loop with a body that is never executed?
4. What is the value of x when the for loop completes?
5. Is it possible to nest while loops within for loops?
6. Is it possible to create a loop that never ends? Give an example.
7. What happens if you create a loop that never ends?
Exercises
1. Write a nested for loop that prints a 10×10 pattern of 0s.
2. Write a for statement to count from 100 to 200 by twos.
3. Write a while loop to count from 100 to 200 by twos.
4. Write a do...while loop to count from 100 to 200 by twos.
5. BUG BUSTERS: What is wrong with this code?
int counter = 0;
while (counter < 10)
{
cout << "counter: " << counter;
}
6. BUG BUSTERS: What is wrong with this code?
for (int counter = 0; counter < 10; counter++);
cout << counter << " ";
7. BUG BUSTERS: What is wrong with this code?
int counter = 100;
while (counter < 10)
{
cout << "counter now: " << counter;
counter--;
}
8. BUG BUSTERS: What is wrong with this code?