
If you are providing hosting for other users, you need an efficient way for them to upload and maintain their websites. This chapter covers the mod_dav module and how to use it to provide users with a way to manage their content. It includes explanations on how to limit write access to particular resources, how to configure different clients (including Windows web folders), and some of the most common issues. It also provides information on how to enable per-user directories so each user can have their own separate web space.
WebDAV stands for Web-based Distributed Authoring and Versioning. It is a protocol that extends HTTP and allows users to remotely upload and modify their content. To appreciate the tremendous usefulness of WebDAV, it is necessary to understand the limitations of pre-existing publishing methods. In the early days of the web, webmasters and system administrators edited the server’s content directly from the shell using text editors such as vi or emacs. As the Web grew, different roles emerged: administrators maintaining the server and users and programmers providing the content. It was necessary to have mechanisms in place to allow users to upload and modify their content. This separation of tasks required access restriction policies and easy-to-use methods for updating the website content by non-technical individuals. The tools for generating web content evolved from simple text editors to sophisticated publishing tools, closer to word processors in features and ease of use.
Unfortunately, there was no standard way for those tools and individuals to upload the content. Solutions ranged from allowing users shell access to the system, to using the File Transfer Protocol (FTP) or other proprietary protocols. Shell access requires your users to be familiar with the basics of the Unix command line and comes with all the associated complexity and security issues of allowing direct access to the server. Using an FTP client requires end users to download and install a different tool, and also requires an FTP server. Finally, custom made scripts, file uploads via HTML forms, and proprietary protocols (such as those used by Microsoft FrontPage) raise a number of interoperability and security issues of their own.
WebDAV provides a way around these issues by providing a standard protocol that can be implemented as part of the web server. WebDAV extends the HTTP protocol with new methods for tasks such as creating, deleting, and locking resources for editing. WebDAV is implemented in Apache with mod_dav, which is distributed as a third-party module for Apache 1.3 and as a built-in module for Apache 2.0
As explained in the previous section, mod_dav is implemented as an Apache module that extends the HTTP protocol. It can take advantage of a number of built-in Apache features, such as SSL for encryption and certificate-based authentication, HTTP basic authentication, proxy servers, and so on. Integration with Apache allows many other possibilities, such as sharing access control mechanisms and interaction with scripting engines such as mod_perl and PHP.
The DAV protocol itself is extensible. Although the resources accessed via DAV usually live in the file system, DAV can act as a standards-based front end to a variety of back-end repositories such as databases, version control systems, and proprietary document management frameworks.
For example, DAV has the concept of collections, which are groups of files. This usually translates to a directory in the server, but it might have a completely different meaning for other back ends.
Finally, WebDAV has been implemented by most modern web publishing frameworks, office suites, and desktop environments.
DAV is implemented on top of the standard HTTP protocol that allows browsers and web servers to communicate. It extends existing HTTP methods and includes new ones, as described here. You will need this knowledge to implement access control for writing to DAV-enabled resources.
COPY: Copy files or collections (equivalent to file system directories). Additional headers enable you to specify the recursive copy of nested collections.MOVE: Move files and collections.MKCOL: Creates a new collection. If parent collections do not exist, an error is raised. Parent collections must be explicitly created using thePUTmethod.PROPFIND: You learned earlier that DAV resources could have metadata information associated with them. ThePROPFINDmethod enables you to query this information.PROPPATCH: This method enables you to delete, create, and modify resource metadata.LOCKandUNLOCK: These methods allow you to lock a resource. This is useful, for example, for preventing modification to a resource while you are editing it.
The DAV protocol extends existing HTTP methods such as GET and PUT, mainly to make them aware of the new locking features. The OPTIONS method is extended to report DAV capabilities.
./configure --enable-davApache 2.0 bundles mod_dav, although it is not enabled by default. You can enable it as you would do with any other of the included modules. By default, it will also compile the file system back end (--enable-dav-fs). It is also possible to have alternate back ends for DAV, such as the Subversion source management system and databases, as described in Chapter 12.
If you are using the Apache 2 Windows distribution, mod_dav is already present as a DLL, so you will just need to enable the LoadModule directives in the httpd.conf configuration file:
LoadModule dav_module modules/mod_dav.so
LoadModule dav_fs_module modules/mod_dav_fs.so
tar xvfz mod_dav-1.0.3-1.3.6.tar.gz
cd mod_dav-1.0.3-1.3.6
./configure --with-apxs=/usr/local/apache/bin/apxs
make
make install
Apache 1.3 does not have built-in DAV support. You will need to download and install mod_dav as you would do with any other third-party module, as shown. You can find more information on how to compile third-party modules in Chapter 12. You can download the Unix source code and Windows binaries from http://www.webdav.org/mod_dav/ and http://www.webdav.org/mod_dav/win32/.
Configuring DAV is very simple. All you need to do is include DAV on inside the location or directory container you want to make accessible through DAV. The example shows how to DAV-enable your entire website. DAV has its own locking mechanism, and does not rely on the functionality of the underlying file system. You can specify the location of the DAV lock file with the DAVLockDB directive.
There are, however, a few more aspects of DAV configuration that need to be addressed in a production DAV environment: security and interoperability with buggy third-party clients. These are explained in the following sections.
<LimitExcept GET HEAD OPTIONS>
    require user davuser
  </LimitExcept>
By default, enabling DAV presents a serious security risk. Users will be able to read and modify your web content. This potentially includes the source code for CGI or PHP scripts that may contain sensitive usernames and passwords. It is thus necessary to protect access to DAV-enabled resources. Since DAV is built on top of HTTP, this can be accomplished using standard Apache access-control modules. The example shows how to require a valid username and password for write access to a DAV resource such as MKCOL. This is done using mod_auth, as covered in Chapter 6, and the <LimitExcept> directive.
<Limit> and <LimitExcept> are two container directives that allow you to apply certain configuration parameters only to specific request methods. While this is not very useful for regular HTTP, it can be very useful for DAV setups. The example allows everyone to access the web content using pure HTTP methods, but restricts DAV access to only authorized users.
There are additional measures you can take, such as running DAV on a separate, single-purpose instance of Apache. This Apache server can run in a separate port and be easily trimmed down and secured. You can also configure it to require SSL or IP-based access control for additional protection.
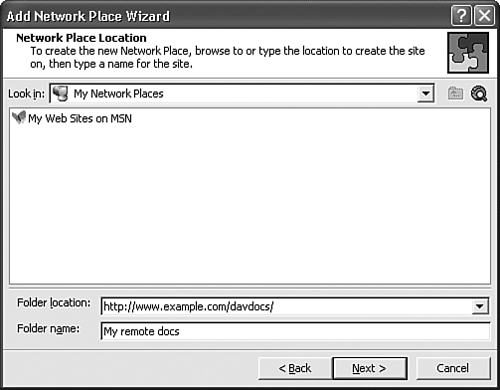
Recent versions of Microsoft Office, such as Office 2000 and Office XP, enable you to open and edit documents directly from DAV-enabled servers, including recent versions of Exchange. You can simply specify a URL for a DAV-enabled location in the Open dialog of the application or use the add a new network place dialog, as shown in Figure 8.1. Once that is done, this will allow you to easily create, edit, and share documents in the remote server.
Recent versions of Microsoft operating systems, such as Windows 2000 and Windows XP, provide support for DAV via web folders. Web folders allow transparent access to DAV-enabled servers by presenting them as Windows desktop folders. Windows users can then drag and drop files into these folders, double-click to edit them, and so on. You can access a DAV resource as a web folder on a Windows 2000 machine directly from Explorer or by using a wizard.
The rest of this section assumes an Apache server serving the www.example.com domain with DAV-support enabled under the /davdocs section of the website. Make sure the appropriate RedirectCarefully directive is in place, as explained later in the “Dealing with Buggy Clients” section.
Open an Internet Explorer window. Click on the File menu entry and select Open. A pop-up window will appear, as shown in Figure 8.2.
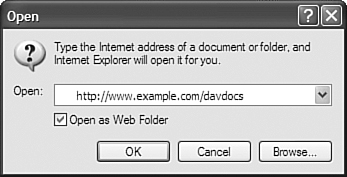
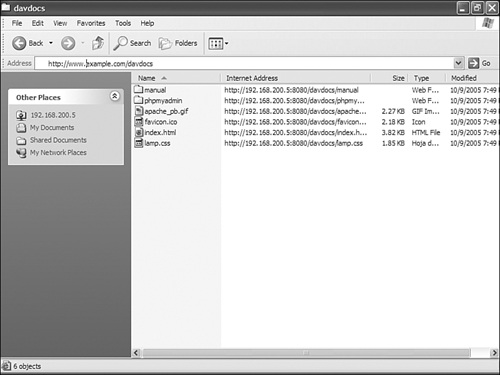
Type the following URL: http://www.example.com/davdocs/. Check the Open as Web Folder option and click OK. Explorer will connect to the resource, and you should now be able to create directories, drag and drop files, and edit them as shown in Figure 8.3.
The location will be added automatically to the My Network Places folder. You can access this folder by clicking the desktop icon with the same name.
You can also add a web folder using a wizard by first going to the My Network Places folder mentioned in the previous section and then clicking on the Add Network Place icon and following the onscreen instructions.
At the time of the writing of this book, Firefox does not include native support for accessing DAV resources. However, the Windows-only openwebfolder extension allows you to hook into the Microsoft Windows WebDAV component, allowing you to access DAV resources from within Firefox. It is available from http://openwebfolder.mozdev.org/.
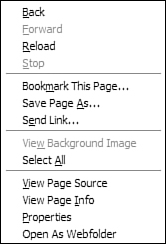
To install it, just click on the XPI link at http://openwebfolder.mozdev.org/installation.html from within Firefox and follow the instructions. Once you have restarted Firefox, you can right-click any page and select Open as Web Folder from the pop-up to access it through WebDAV (see Figure 8.4).
There are a number of command-line clients available to access DAV-enabled resources, allowing both for interactivity and easy integration within administrative scripts. They can be convenient replacements for their FTP and scp counterparts. Two of the most popular open source command-line clients are cadaver and sitecopy. cadaver is an interactive shell that provides FTP-style commands such as ls, put, get, and so on. The example shows how to use cadaver to access a DAV-enabled web server, list the available resources, and edit a remote file.
./cadaver
dav:!> open http://example.com
dav:/> ls
Listing collection `/': succeeded.
Coll: images 0
Dec 7 2004
Coll: styles 0
Dec 12 2004
Home.html 4816
Aug 14 14:19
company.html 5352
Dec 7 2004
partners.html 6087
Dec 7 2004
solutions.html 3037
Dec 7 2004
dav:/> edit solutions.html
Locking `solutions.html': succeeded.
Downloading `/solutions.html' to /tmp/cadaver-edit-
zEzdL9.html
Progress: [=============================>] 100.0% of
6230 bytes succeeded.
Running editor: `vi /tmp/cadaver-edit-
zEzdL9.html'...
Changes were made.
Uploading changes to `/solutions.html'
Progress: [=============================>] 100.0% of
6232 bytes succeeded.
Unlocking `solutions.html': succeeded.
dav:/>cadaver can be downloaded from http://www.webdav.org/cadaver. sitecopy allows you to maintain a local document tree and a remote server synchronized using a variety of protocols, including DAV. It can be downloaded from http://www.lyra.org/sitecopy.
BrowserMatch "Microsoft Data Access Internet
Publishing Provider" redirect-carefully
BrowserMatch "^gnome-vfs" redirect-carefully
If you can’t connect to your DAV server using Microsoft web folders or older versions of Gnome virtual folders and you find something similar to
"OPTIONS /davdocs HTTP/1.1" 301
in your access log, you have hit a bug with certain client implementations of WebDAV. Apache is sending a redirect (HTTP code 301) to the client, but the client is getting confused and does not follow the redirect. Apache provides a workaround against this buggy behavior, skipping the redirect when the redirect-carefully environment variable is set. This example, included in the default Apache configuration file, sets the redirect-carefully environment variable for two WebDAV clients known to have the problems mentioned.
If you are using DAV, you will need to disable mod_speling. This is required, as mod_speling will interfere with a number of DAV-related operations, such as creating new resources, by erroneously matching them to existing files if the names are similar. mod_speling is used to correct user spelling mistakes and is described in Chapter 4.
Alias /php /usr/local/apache/php_files
Alias /php-source /usr/local/apache/php_files
<Location /php-source>
    DAV On
    ForceType text/plain
</Location>
When accessing resources that are dynamically generated, such as PHP pages or CGI scripts, you may run into a problem where Apache returns the dynamically generated content and not the source code for the file. In other words, you get the contents of the file after it has been processed by the web server and not the source code. To get around this, you can run a separate web server or virtual host that does not have PHP support enabled, as described in an earlier section.
Another method is to map the same file system path to different URLs and selectively enable or disable modules. The example, taken from the DAV documentation, shows how to do just that. It forces all content served through the /php-source URL to be of type text/plain, thus bypassing execution by the PHP engine.
Have you ever accessed an URL similar to http://www.example.com/~joe?
That is what is called a per-user web page. Each user in the system is assigned a URL that starts with ~ and the name of the user. When Apache finds such a request, it maps it to a special path inside the user’s home directory. This functionality allows each one of your users to publish their own content. This functionality is provided by mod_userdir. You can enable and disable this functionality with the UserDir enabled and UserDir disabled configuration directives. You can also specify an additional list of usernames to selectively enable or disable, as in UserDir disabled mysql root.
If the first argument is not enabled or disabled, it is used to specify where per-user websites are stored. For example, UserDir public_html will map a request for http://www.example.com/~user/ to /home/user/public_html/. The path itself can also contain a pattern, such as
UserDir /home/*/web
which will map http://www.example.com/~user/index.thml to
/home/user/web/index.html
The per-user directories need to be readable by the user Apache runs as. Finally, you can choose to redirect the client to a certain URL. For example
UserDir http://www.example.com
will map http://www.example.com/~user/index.thml to http://www.example/user/index.html.
RewriteEngine On
RewriteCond %{HTTP_HOST} !^(www.)
RewriteCond %{HTTP_HOST} ^([^.]+).example.com
RewriteRule ^(.*)$ /home/%1/public_html$1
If you do not want to enable mod_dir, or you need a slightly different functionality than it offers, you may want to consider using mod_vhost_alias or mod_rewrite. The example shows how to use mod_rewrite to map requests for user.example.com to the appropriate per-user html directory.
No such file or directory: A lock database was not
specified with the DAVLockDB directive. One must be
specified to use the locking functionality. [500,
#401]
If you find a message similar to this, it means that you need to provide a DavLockDB directive in the configuration file, as shown:
DAVLockDB /usr/local/apache/var/DAVLock
If the directive is specified, but the directory containing the lock file cannot be written to, you will get a message similar to the following:
The lock database could not be opened, preventing
access to the various lock properties for the
PROPFIND. [500, #0]
Fix the permissions so the path of the DavLockDB directive has write permission for the user Apache runs as.