1 Installation
Before you try to install a cluster, it is important that you know how a cluster in MySQL Cluster spreads out over multiple computers. It does so by creating three different types of nodes, which do three different jobs:
![]() Storage nodes—These nodes hold the data in the cluster and do most of the actual work processing queries.
Storage nodes—These nodes hold the data in the cluster and do most of the actual work processing queries.
![]() Management nodes—These nodes keep the configuration of the cluster and provide a central point from which to manage the cluster.
Management nodes—These nodes keep the configuration of the cluster and provide a central point from which to manage the cluster.
![]() SQL nodes—These nodes are typically MySQL daemons that accept, parse, and optimize queries and do some of the processing work before returning the results. Some binaries that you will meet later on (such as
SQL nodes—These nodes are typically MySQL daemons that accept, parse, and optimize queries and do some of the processing work before returning the results. Some binaries that you will meet later on (such as ndb_restore for restoring backups) are also SQL nodes because they connect to the cluster; however, they have little to do with SQL queries.
You can run SQL nodes on the same physical machine as storage and management nodes—and you can run more than one storage node on each physical machine. However, if you want a highly available, fault-tolerant cluster with no single point of failure, you must have at least three physical machines and a management node that does not share a physical machine with a storage node.
The following section discusses a standard installation with the cluster communicating over TCP/IP. Later chapters cover some slightly more complex setups involving high-speed interconnects.
Before you install or use MySQL Cluster, you should read the section “Limitations of NDB” in this book’s introduction, which explains several limitations of current versions of MySQL Cluster that you cannot avoid. Here is a short list of things you should check before you attempt to install or use MySQL Cluster for a project (if you are just setting up a test database as a proof of concept, you can skip this part):
![]() Ethernet—Make sure you have operable networking between all the nodes in the cluster and make sure that any firewalls you have are disabled while you are installing and testing. (Chapter 4, “Security and Management,” covers the rules you need to add to your firewall.)
Ethernet—Make sure you have operable networking between all the nodes in the cluster and make sure that any firewalls you have are disabled while you are installing and testing. (Chapter 4, “Security and Management,” covers the rules you need to add to your firewall.)
![]() RAM—Make sure you have plenty of RAM free on the servers you plan to use as storage nodes. The Linux command
RAM—Make sure you have plenty of RAM free on the servers you plan to use as storage nodes. The Linux command free -m tells you how much RAM you have free. As in the following example, you can add the free and cached columns to get a (very) rough (and high) estimate of available RAM, in megabytes:
[root@host] free -m

This server has 2638MB + 484MB free, which is just over 3GB.
![]() Table structure—If you are attempting to move an existing database from MyISAM or InnoDB (or any other storage engine), you might find that it requires some changes. The main limitations are that enormous tables (that is, enormous in the width of each row) will not work; there is a hard-coded limit of 8KB per row (not including data stores in BLOB fields; as you will see later on, these are stored differently). Tables can have as many rows as your RAM will allow. You should also remember that variable-width columns become fixed-width columns with an additional overhead, which means that a
Table structure—If you are attempting to move an existing database from MyISAM or InnoDB (or any other storage engine), you might find that it requires some changes. The main limitations are that enormous tables (that is, enormous in the width of each row) will not work; there is a hard-coded limit of 8KB per row (not including data stores in BLOB fields; as you will see later on, these are stored differently). Tables can have as many rows as your RAM will allow. You should also remember that variable-width columns become fixed-width columns with an additional overhead, which means that a VARCHAR(200) field uses more than 200 bytes per row—even if it has only 2 bytes of information in it. Depending on the character set, it may take up significantly more space; using utf8, for example, this field will take up at least 600 bytes per row. This explains why most tables end up much larger when they are converted to NDB (Network Database, the storage engine that MySQL Cluster uses).
Before you install MySQL Cluster, you should clearly understand the different processes that you have to undertake to set up the three different type of nodes:
![]() To set up a SQL node, all you need to do is install the
To set up a SQL node, all you need to do is install the MySQL-Max package and add a few lines to my.cnf.
![]() To set up management and storage nodes, you need to install the MySQL Cluster binaries, the names of which all start with
To set up management and storage nodes, you need to install the MySQL Cluster binaries, the names of which all start with ndb.
MySQL-Max is needed on all nodes. As described shortly, you should install MySQL-Max on all the nodes that you plan to take part in the cluster before you do anything else.
It is important that you give some thought to the number of physical servers your cluster will require. Shortly, you will see the sample cluster that we use through this book. It is as simple as you can get if you want a highly available setup, and it requires three physical machines.
You will learn later in this chapter how to calculate the RAM usage for your cluster, but this section explains the important decisions you need to make regarding the layout of your new cluster.
First, you have to decide how many copies of each piece of data you would like the cluster to hold. This determines the number of nodes that will be in each node group. (A node group is a group of storage nodes that hold the same data.)
Second, you need to decide how many storage nodes should be part of your cluster. This depends on two things:
![]() Performance—The number of storage nodes, all other things remaining equal, is (very nearly) proportional to performance. However, you should bear in mind that the total number of nodes should be the product of the number of copies of each piece of data you just decided on and a power of 2. For example, if you decide to have two copies of each piece of data—as many clusters do—you should have 2, 4, 8, and so on storage nodes.
Performance—The number of storage nodes, all other things remaining equal, is (very nearly) proportional to performance. However, you should bear in mind that the total number of nodes should be the product of the number of copies of each piece of data you just decided on and a power of 2. For example, if you decide to have two copies of each piece of data—as many clusters do—you should have 2, 4, 8, and so on storage nodes.
![]() Memory usage—If you have a database that takes up 45GB in the cluster format (NDB), you are unlikely to want to use two nodes with 45GB RAM plus operating system overhead! You are more likely to use 8 servers with 12GB of RAM per server (assuming that the cluster is set to hold two copies of each piece of data).
Memory usage—If you have a database that takes up 45GB in the cluster format (NDB), you are unlikely to want to use two nodes with 45GB RAM plus operating system overhead! You are more likely to use 8 servers with 12GB of RAM per server (assuming that the cluster is set to hold two copies of each piece of data).
The number of replicas determines the total memory usage required; however, you can spread this out over any number of nodes (and therefore servers) from 1 to 62 to keep the amount of memory required per server to an acceptable level. Note that 64 nodes is the maximum total of all nodes—including SQL, management, and storage nodes—so the realistic maximum number of storage nodes is 62 to allow for 1 management and 1 SQL node.
At this stage, you can estimate your total memory usage based on your current database size (which you can easily determine) if you use the following formula:
Total size of database in NDB format x Number of replicas x 1.1
You then divide this figure by the number of nodes to estimate the memory requirement per node. For initial rough calculations, you can treat the size of the database in NDB as being equal to the current size in whatever storage engine the database is held, subject to the caveat that if you use variable-width columns, you should covert your variable-width columns to fixed-width and calculate the new size and then plug the new size in to the preceding formula to get a more accurate estimate. Of course, you can just make a guestimate or use the ndb_size.pl script that is discussed shortly.
Later in this chapter, you will learn how to calculate your memory usage far more accurately. The purpose of mentioning this basic formula here is to give you some idea of how much RAM you are likely to need. Bear in mind that this estimate could be off by a long way in some circumstances; many new users are surprised by the amount of RAM that a MySQL cluster can and does consume!
There are several different methods of obtaining MySQL:
![]() Install a binary package, either using some sort of formal package or just a tar file.
Install a binary package, either using some sort of formal package or just a tar file.
![]() Compile from source, using a package of source code.
Compile from source, using a package of source code.
![]() Download the latest nightly build and compile from that, using BitKeeper.
Download the latest nightly build and compile from that, using BitKeeper.
The easiest method is to install a binary package with precompiled executables and libraries and that does not require any configuration to work. All the files will be placed in whatever the maker of the package considers the “standard” location. The binaries can come in RPM or other package such as a Mac OS X package (either directly from MySQL.com or from your Linux/UNIX distributor, such as Red Hat) or as a tarball that you can download from MySQL.com. There is a significant distinction between these two methods: The tarball puts all the files in one folder (if you follow the guide in the manual, it is /usr/local/mysql). The RPM package, however, does not put all the files in one folder, but spreads them out according to where you get the binary from. This can lead to confusion, so if you install binaries from someone other than MySQL.com, you should make sure to spend some time familiarizing yourself with any different locations for files.
Note
You should ensure that you get the MySQL-Max release and not the regular distribution. The -Max designation means that the compilation has extra features compared to the regular distribution. One such feature is enabling support for MySQL Cluster, which you definitely need if you want to set up such a cluster!
The second, and far less common and more complex, method of installing MySQL-Max is to compile from source. There are many valid reasons to do this, but for the sake of performance and sanity, we recommend that you do not compile from source if possible but instead use a precompiled binary package. Furthermore, we suggest that if possible, you use a binary package provided by MySQL rather than your Linux distributor. If you ever want support—either paid-for support from MySQL or just helpful people on the mailing lists—you will find it much easier to get help if you have all your files in the place that MySQL decided to put them rather than wherever your distribution provider decided to put them. For example, in this book we assume that my.cnf is in the /etc/ folder. On Debian binary installations, it is actually in /etc/mysql/, which may well cause confusion, particularly for users fairly new to Linux or a particular distribution. Another reason to avoid third-party binaries is that most of their distributions do not include support for MySQL Cluster. A final reason to use the packages provided by MySQL is that you know that you can always access the latest version; you also do not rely on someone else to produce a package, which may take time.
Although we recommend that you install MySQL using the binary tarball available from MySQL.com, this chapter briefly covers installing MySQL using all common methods. In this book, we use CentOS 4.0, which is identical (except for branding) to Red Hat Enterprise Linux 4 and is a good choice if you want a solid Linux distribution without any formal support; however, you should find that these steps work correctly on all common Linux distributions.
This chapter also covers installing the latest nightly release from BitKeeper. You should not do this unless you hit a bug that is not fixed in a regular release but that has been fixed by a developer and will be in the nightly build. (BitKeeper is really just the “cutting edge” source code and includes lots of code that is new or has changed since the last formal release.) We include this information here simply because there are few clear guides available on this topic, yet installing BitKeeper is not particularly difficult to do. We strongly recommend that you never use code from BitKeeper in a production environment because it has not been tested as much (or at all, in some cases) as a full release.
Note that if you are running SELinux (Security Enhanced Linux), you should either create a new policy or disable it. Creating policies is beyond the scope of this book, but basically, to disable it, you edit the file /etc/sysconfig/selinux, change/add the SELINUX=disabled line, and reboot the system. If you want to leave SELinux enabled, visit the website for this book to download a rule that will allow you to run a MySQL cluster with SELinux.
All the examples in this book are for MySQL Cluster version 5.0, which we expect will be the generally available release by the time that this book is published. However, the steps are virtually identical for versions 4.1 and 5.1.
To install MySQL Cluster from a binary tarball, you need to locate the correct tarball for your platform at the MySQL download page (for version 5.0, this is http://dev.mysql.com/downloads/mysql/5.0.html) and then obtain the relevant file. You then need to extract it, move it to the correct folder, add the mysql user, set up the initial tables, and start the server:
[user@host] su -
[root@host] cd /usr/local/
[root@host] wget <url-of-mirror>/mysql-max-5.0.11-beta-linux-i686.tar.gz
[root@host] tar -zxvf mysql-max-5.0.11-beta-linux-i686.tar.gz
[root@host] rm -f mysql-max-5.0.11-beta-linux-i686.tar.gz
[root@host] ls
bin games lib mysql-max-5.0.12-beta-linux-i686 share
etc include libexec sbin src
Note that a folder is created, with the “full” name of the distribution (mysql-max-5.0.12-beta-linux-i686, in the preceding example). For the sake of neatness and upgradeability, you should create a soft link (that is, a symlink) to this folder mysql. This also helps with upgrading because you can install both the older and new versions and then just stop MySQL, change the link, and start the upgraded version very easily. You can create this link easily:
[root@host] ln -s mysql-max-5.0.11-beta-linux-i686 mysql
[root@host] cd mysql
The MySQL database server can run as either root or any other user on the system. From a security point of view, it’s a bad idea (and the developers have made it quite difficult) to run the MySQL database server as root; therefore, you should create a special mysql user and group for this purpose:
[root@host] groupadd mysql
[root@host] useradd -g mysql mysql
Now you need to tell MySQL where you want it to store its data. Unless you want it to store the databases in the same folder as the actual programs (/usr/local/mysql/data/), you should create a file called /etc/my.cnf that has the following contents:
Note
Storing the databases in the same folder as the actual programs is probably a bad idea. It is almost always a good idea to keep your data (databases) far away from your applications (binaries). This makes upgrading much easier, and it reduces the chance of a botched upgrade or installation destroying your data. If you choose not to follow this advice, you should change the second chown command to change the permissions on the folder /usr/local/mysql/data.
[mysqld]
datadir=/var/lib/mysql
socket=/var/lib/mysql/mysql.sock
[mysqld_safe]
err-log=/var/log/mysqld.log
pid-file=/var/run/mysqld/mysqld.pid
Next, you need to initialize the system database and tables. This means creating the mysql and test databases as well as the system tables that MySQL needs in order to run. You must also make sure that these new tables are owned by the mysql user:
[root@host] mkdir /var/lib/mysql
[root@host] /usr/local/mysql/scripts/mysql_install_db
[root@host] chown -R root:mysql /usr/local/mysql
[root@host] chown -R mysql:mysql /var/lib/mysql
On distributions of Linux that support the service servicename start command and syntax, you should copy the helpful mysql.server script into the /etc/rc.d/init.d/ folder (where the service command can find it):
[root@host] cp /usr/local/mysql/support-files/mysql.server /etc/rc.d/init.d/mysql
[root@host] service mysql start
Otherwise, you should copy the mysql server to wherever your distribution keeps init scripts and execute it.
You now need to add the MySQL bin directory to the PATH variable so you do not need to append /usr/local/mysql/bin/ before each binary name every time you want to use it. If you use the BASH shell, as most distributions do, you need to edit your .bash_profile file in your home directory. You need to make sure to change this file for each user on the system. Essentially, this involves opening up $HOME/.bash_profile with a text editor (such as vi/vim, pico, or emacs) and adding /usr/local/mysql/bin to the line that defines the variable $PATH, which may look something like this:
PATH=$PATH:$HOME/bin
You change it to this:
PATH=$PATH:$HOME/bin:/usr/local/mysql/bin
Then you log out and log back in again. The quickest way to test whether it is all working is to try to run the MySQL client:
[root@host] mysql -V
mysql Ver 14.12 Distrib 5.0.11-beta, for pc-linux-gnu (i686) using readline 5.
If you get an error such as -bash: mysql: command not found, you have not correctly changed the path. If you get the correct version, you have MySQL-Max installed.
There are many other things you would need to do if you were installing a server in a production environment (for example, set a root password, optimize my.cnf), but we do not cover these steps here. If you are not entirely confident with any of these things, you should consult the MySQL manual.
To upgrade a binary tarball setup, you follow this process:
1. Download the new .tar.gz file in /usr/local/ and then extract it.
2. Make a full backup.
3. Remove the symlink mysql.
4. Create a new symlink that points to the new full folder name.
5. Change the permissions on the new folder.
6. Restart MySQL.
You can see that this is very easy, and you can also see how easy it is to switch back: All you need to do is replace the mysql symlink with the old one and restart MySQL.
You should also be able to see why we recommend that you not have your data directory in the same place as your binaries. If you do, you need to copy the original data directory over to the new data directory and reset the permissions on it.
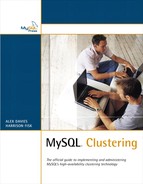
Installing from a binary RPM is the easiest method of installing MySQL-Max. Essentially, all you need to do is download and install the RPMs you need. Table 1.1 lists the RPMs you need for each node.
1. You don’t strictly need this or the MySQL-ndb-extra package to run a storage node, but we strongly recommend that you install it because this book often uses packages that appear in all three storage node packages.
Running multiple nodes on one machine is absolutely fine: You just need to install all the packages you might need. For example, to run a storage and SQL node on a server (but not a management node), you should install MySQL-server, MySQL-ndb-storage, MySQL-ndb-tools, MySQL-ndb-extra, and MySQL-Max.
The actual installation process is as simple as obtaining the RPMs you need and installing them. To install all the packages (for SQL, storage, and management nodes as well as benchmarking tools), you use the following commands. Note that this is the process for RPM packages; however, you can easily change this to suit other forms of package, such as those found on OS X. First of all, you obtain the packages:
[user@host] su -
[root@host] cd /tmp/
[root@host] rm -f MySQL-*-5.0.11-0.i386.rpm
[root@host] wget <url-of-mirror>/MySQL-Max-5.0.11-0.i386.rpm
[root@host] wget <url-of-mirror>/MySQL-bench-5.0.11-0.i386.rpm
[root@host] wget <url-of-mirror>/MySQL-client-5.0.11-0.i386.rpm
[root@host] wget <url-of-mirror>/MySQL-devel-5.0.11-0.i386.rpm
[root@host] wget <url-of-mirror>/MySQL-ndb-storage-5.0.11-0.i386.rpm
[root@host] wget <url-of-mirror>/MySQL-ndb-management-5.0.11-0.i386.rpm
[root@host] wget <url-of-mirror>/MySQL-ndb-tools-5.0.11-0.i386.rpm
[root@host] wget <url-of-mirror>/MySQL-ndb-extra-5.0.11-0.i386.rpm
Then you install them. For RPMs, this should be as simple as using the following command:
[root@host] rpm -i MySQL-*-5.0.11-0.i386.rpm
This installs MySQL with every optional extra package. You should be aware that the benchmarking tools require perl-DBI, which you may have to obtain before you can install the RPM.
To upgrade an RPM setup, you simply download the new RPMs, stop MySQL, and run the following command on each RPM:
rpm -U MySQL-whatever-version.i386.rpm
An issue you may have if you completely remove and reinstall MySQL (that is, if you run rpm -e before installing the new RPM) is that if you have the “cluster lines” that are discussed shortly in the [mysqld] section of /etc/my.cnf file (for example, ndb-connectstring), the commands shown here will fail because the package manager will attempt to restart MySQL after installing the standard MySQL server before it installs MySQL-Max. Without MySQL-Max, you cannot have cluster commands in my.cnf (it throws an error because it has no idea what to do with the parameters), so MySQL will fail to start. The solution is to comment out the offending lines in my.cnf or move my.cnf somewhere else during the upgrade. As soon as all the packages are installed, you can go back to your existing my.cnf.
Remember that unless you have a really good reason to install MySQL Cluster by compiling from source, it is probably a bad idea. However, if for some reason you want to compile your own copy, this section provides the steps you should follow. You need GNU bison 1.75 (or newer), make, autoconf 2.58 (or newer), automake 1.8, libtool 1.5, and m4 to run the next set of commands. Even though many operating systems come with their own implementations of make, chances are good that the compilation will fail with strange error messages if you use their versions; therefore, it is highly recommended that you use GNU make (sometimes called gmake) instead.
First, you need to download the source tarball from MySQL.com:
[user@host] su -
[root@host] cd /tmp/
[root@host] wget <url-of-mirror>/mysql-5.0.11-beta.tar.gz
[root@host] tar -zxvf mysql-5.0.11-beta.tar.gz
[root@host] cd mysql-5.0.11-beta
When you have obtained the source code, it is time to compile it. At this stage, you can issue whatever flags you want to the compiler in addition to the basic ones listed here:
[root@host] ./configure --prefix=/usr/local/mysql -with-ndbcluster
[root@host] make
[root@host] make test
[root@host] make install
[root@host] groupadd mysql
[root@host] useradd -g mysql mysql
You then install MySQL and add the mysql user and group.
Now you need to tell MySQL where you want it to store its data. Unless you want it to store the databases in a subdirectory in the same folder as the actual programs (/usr/local/mysql/var), you should create the file /etc/my.cnf, with the following contents:
[mysqld]
datadir=/var/lib/mysql
socket=/var/lib/mysql/mysql.sock
[mysqld_safe]
err-log=/var/log/mysqld.log
pid-file=/var/run/mysqld/mysqld.pid
Next, you need to initialize the tables. This means you need to create the system databases that MySQL needs to run. You should then make sure that these new tables are owned by the mysql user:
[root@host] /usr/local/mysql/bin/mysql_install_db
[root@host] chown -R root:mysql /usr/local/mysql
[root@host] chown -R mysql:mysql /var/lib/mysql
You should now have a working MySQL installation, which you can start like this:
[root@host] /usr/local/mysql/bin/mysqld_safe --user=mysql &
Note
As described earlier in this chapter in the section “Installing MySQL Cluster from a Binary Tarball,” you should install the mysql.server script and add the MySQL bin directory to the $PATH variable, but in this case, you find the mysql.server script in the /usr/local/mysql/share/mysql/ folder (not in the support.files folder).
BitKeeper is a commercial revision control system that MySQL uses to manage its massive amount of code and control updates. There may be situations in which you want the latest version of the code, and this is how to get it.
First, you need to install the BitKeeper client. You need to have zlib installed before you attempt to install BitKeeper (which may involve installing both the zlib and zlib-devel packages). When you have zlib, you need to download and install the BitKeeper client. This can be achieved with the following commands:
[alex@host]$ su -
Password:
[root@host]# cd /tmp/
[root@host]# wget http://www.bitmover.com/bk-client.shar
--00:31:15-- http://www.bitmover.com/bk-client.shar
=> ‘bk-client.shar’
Resolving www.bitmover.com... 192.132.92.2
Connecting to www.bitmover.com[192.132.92.2]:80... connected.
HTTP request sent, awaiting response... 200 OK
Length: 28,867 [application/x-shar]
100%[====================================>] 28,867 123.59K/s
00:31:16 (123.15 KB/s) - ‘bk-client.shar’ saved [28,867/28,867]
[root@host]# sh bk-client.shar
x - creating lock directory
x - creating directory bk_client-1.1
x - extracting bk_client-1.1/demo.sh (text)
x - extracting bk_client-1.1/Makefile (text)
x - extracting bk_client-1.1/update.c (text)
x - extracting bk_client-1.1/sfioball.c (text)
x - extracting bk_client-1.1/sfio.c (text)
x - extracting bk_client-1.1/system.h (text)
[root@host]# cd bk_client-1.1/
[root@host]# make all
cc -O2 -o sfio -lz sfio.c
cc -O2 sfioball.c -o sfioball
cc -O2 update.c -o update
[root@host]# PATH=$PWD:$PATH
Now you need to download the latest copy of the source:
[root@host bk_client-1.1]# mkdir /usr/src/mysql
[root@host bk_client-1.1]# cd /usr/src/mysql
[root@host mysql]# sfioball bk://mysql.bkbits.net/mysql-5.0 5.0
OK-root OK
(More output appears as the latest source is retrieved.)
Next, you need to compile and install the code. You need GNU bison 1.75 (or newer), make, autoconf 2.58 (or newer), automake 1.8, libtool 1.5, and m4 to run the next set of commands. Even though many operating systems come with their own implementations of make, chances are good that the compilation will fail with strange error messages if you use their versions; therefore, it is highly recommended that you use GNU make (sometimes called gmake) instead.
The commands for compiling and installing the source code follow:
[root@host] cd 5.0
[root@host] bk -r edit
[root@host] aclocal; autoheader
[root@host] libtoolize --automake --force
[root@host] automake --force --add-missing; autoconf
[root@host] (cd innobase; aclocal; autoheader; autoconf; automake)
[root@host] (cd bdb/dist; sh s_all)
[root@host] ./configure --prefix=/usr/local/mysql -with-ndbcluster
[root@host] make
[root@host] BUILD/autorun.sh
If you get some strange errors at this stage, you should verify that you really have libtool installed. Otherwise, when the build is done, you should run make install. You need to be careful with this on a production machine because the command may overwrite your live release installation. If you have another installation of MySQL, you should run ./configure with different values for the --prefix, --with-tcp-port, and --unix-socket-path options than those used for your production server so your new source install runs in parallel and does not interfere with your production version. Of course, if you have the resources, it is highly recommended that you do your testing on non-production machines.
Note
Another way you can get a recent version of the source code, without needing BitKeeper or the automake toolchain, is to visit http://downloads.mysql.com. MySQL AB publishes nightly source code snapshots that are available for download at that location. These snapshots do the preceding steps for you and give you a version of the code that you can install exactly the same way you do the regular source code.
If you want to update the BitKeeper code any time after you first install it, you simply run these commands:
[alex@host]$ su -
Password:
[root@host]# cd /usr/src/mysql/
[root@host]# update bk://mysql.bkbits.net/mysql-5.0 5.0
Then you continue with the following commands:
[root@host] cd 5.0
[root@host] bk -r edit
[root@host] aclocal; autoheader
[root@host] libtoolize --automake --force
[root@host] automake --force --add-missing; autoconf
[root@host] (cd innobase; aclocal; autoheader; autoconf; automake)
[root@host] (cd bdb/dist; sh s_all)
[root@host] ./configure --prefix=/usr/local/mysql -with-ndbcluster
[root@host] make
[root@host] BUILD/autorun.sh
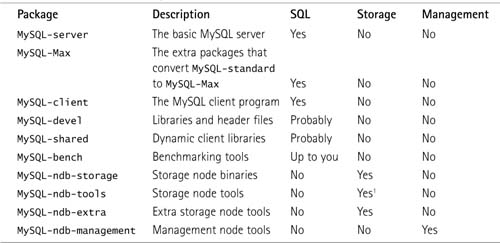
On all your nodes, you should now check that you have indeed installed support for MySQL Cluster, whether you have installed from a binary or compiled from source. To do this, you issue a SHOW TABLE TYPES command in the MySQL client:
[root@host]# mysql
mysql> show storage engines;
18 rows in set, 1 warning (0.00 sec)
If you have the words NDBCLUSTER and YES or DISABLED on the same line, you are done, and you can continue with the process described in the next section. Otherwise, you need to go back and try to determine what you did wrong: Either you failed to install the MySQL-Max binary, or you failed to add support for ndbcluster in your compile string.
After you have installed the relevant packages on each node in your cluster, you need to log in to the server on which you are going to run your management node and start to define your cluster.
First, you need to check whether the directory /var/lib/mysql-cluster exists, and if it does not, you need to create it. Within it, using your favorite text editor, you create a file called config.ini in which you define the nodes in your cluster (this is where all settings go for all nodes). All the other nodes need is a one-line configuration line called a connect string, which goes in my.cnf and tells the nodes where they can find the management node.
You should be aware that you can put config.ini wherever you like. What matters is that when you start the management daemon, you must be in the folder that contains config.ini. Some people therefore put it in /etc/. You still need to create the directory /var/lib/mysql-cluster, which your nodes will use to store data that they need to store to disk.
You can also define your settings within config.ini in my.cnf; however, this is not recommended if you want to keep your cluster configuration away from your database configuration, which in most cases is a good idea.
Let’s start with the basics. A config.ini file is made up of different sections and looks exactly like a traditional Windows .ini file, with sections separated by titles in square brackets.
There are two separate parts to a config.ini file. First, you define defaults and settings across the cluster in the following sections:
![]()
[NDBD DEFAULT] contains defaults for all storage nodes.
![]()
[TCP DEFAULT] contains networking settings for all nodes (ports and so on).
![]()
[MYSQLD DEFAULT] contains defaults for all SQL nodes.
![]()
[NDB_MGMD DEFAULT] contains defaults for all management nodes (typically, you only have one management node, so this is rather pointless).
Then you specify the settings for each particular node, with one section per node:
[NDB_MGMD] Management node
[NDBD] Storage node
[MYSQLD] SQL node
You’ll learn all the different options that you can put in each section in Chapter 2, “Configuration”. At this point, we look at the settings you must define to get your cluster working. Next, we cover each section of the config.ini file.
[NDBD_DEFAULT]
NoOfReplicas defines the number of copies of each piece of data the cluster will hold. Clearly, if you want redundancy, NoOfReplicas must be greater than or equal to 2. If you have a fixed number of storage nodes, it is worth remembering that your total number of storage nodes should be a power of 2 and a multiple of NoOfReplicas—so if you set NoOfReplicas to 2, you should have 2, 4, or 8 (and so on) storage nodes. This is a not mandatory (your cluster will still work if you don’t) but will gain you significant increases in performance due to the method of partitioning that the current versions of MySQL Cluster (4.1 and 5.0) use. It is expected that this will become less important in MySQL Cluster 5.1. Note that there is an exception: If NumberOfReplicas is equal to the total number of storage nodes, that is fine (even if the total number of storage nodes is not a power of 2).
NoOfReplicas also specifies the size of node groups. A node group is a set of nodes that all store the same information. Node groups are formed implicitly. The first node group is formed by the set of data nodes with the lowest node IDs, the next node group by the set of the next-lowest node identities, and so on. It is important to configure the cluster in such a manner that nodes in the same node groups are not placed on the same computer. (You will see how to do this in the next section.) In this situation, a single hardware failure would cause the entire cluster to crash. (This book’s introduction provides a graphical illustration and further description of this concept.)
DataDir defines the folder that the node will use when it flushes its data to disk. This data on disk is used to recover from a cluster crash where no node in one or more node groups is left alive. We strongly suggest that you set this to /var/lib/mysql-cluster.
[NDB_MGMD](Management), [NDBD](Storage), and [MYSQLD](SQL)
You must define at least one management node, one SQL node, and two storage nodes in order for your cluster to work. All three of the sections [NDB_MGMD], [NDBD], and [MYSQLD]require the parameter Hostname, which defines either the hostname or the IP address of the node. We strongly suggest that you use IP addresses, and when troubleshooting, you should certainly use IP addresses. Many problems are caused by using hostnames unless both the forward and reverse DNS are in perfect order, which on many hosts they are not. If you use hostnames, you should try to define them in /etc/hosts to reduce your reliance on DNS lookups.
If you have three separate servers and want to run storage nodes on two of them, SQL nodes on all three, and the management node on the server that does not have a storage node, you produce a configuration like this, where 10.0.0.1, 10.0.0.2, and 10.0.0.3 are the IP addresses of the servers:
[NDBD DEFAULT]
NoOfReplicas=2
DataDir= /var/lib/mysql-cluster
# Management Node
[NDB_MGMD]
HostName=10.0.0.1
DataDir= /var/lib/mysql-cluster
# Storage Nodes
# One entry for each node
[NDBD]
HostName=10.0.0.2
[NDBD]
HostName=10.0.0.3
# SQL Nodes
# One entry for each node
[MYSQLD]
HostName=10.0.0.1
[MYSQLD]
HostName=10.0.0.2
[MYSQLD]
HostName=10.0.0.3
We use this sample configuration for the rest of this chapter, and if you are able to get your hands on three servers, we strongly recommend that you start out using this configuration.
Note
We use the same three IP addresses for the rest of this chapter, so if you have different ones on your servers, we recommend that you now write down a list of the IP addresses in the book (10.0.0.1, 10.0.0.2, and 10.0.0.3) and the IP addresses of your servers. You can then just substitute the former for the latter each time that you want to try something.
Of course, if you do have three completely spare servers, you can actually set their IP addresses to 10.0.0.1, 10.0.0.2, and 10.0.0.3, and then you will avoid any chance of confusion when following the examples in this book.
You should now be able to produce a simple cluster with a slightly different format than shown in the preceding example—perhaps with three replicas and three storage nodes2 or two replicas and four storage nodes. However you want to set up your first cluster, write out your config.ini file and check it before advancing to the next step.
You only need to define ID if you are planning on running multiple storage nodes on the same physical machines. If you do not define this parameter, the management daemon will assign IDs in the order in which they connect.
If you define IDs for storage nodes, it is good practice to also define an ID for the management node, typically 1. You do this by including an ID line in the [NDB_MGMD] section.
You can choose a number between 1 and 64 for this parameter; node groups are formed from consecutive IDs, so if you have four storage nodes and NumberOfReplicas is equal to 2 (that is, each node group contains two nodes), the first two IDs will form Node Group 1, and the second two will form Node Group 2.
If you have two physical servers, you need to make sure that you define the IDs such that storage nodes on the same physical machine are in different node groups, as in this example:
Server 1, First Storage node: ID # 2 (nodegroup 1)
Server 1, Second Storage node: ID # 4 (nodegroup 2)
Server 2, First Storage node: ID # 3 (nodegroup 1)
Server 2, Second Storage node: ID # 5 (nodegroup 2)
This means that Server 1 has a node in both node groups on it, which is good because each node group holds only 50% of the data, so you need members of both node groups to actually have a complete set of data in the cluster. This means that a failure of either server does not remove all nodes in one node group, so your cluster can survive.
You now need to start the management daemon. This is the program that runs in the background and controls your cluster.
To start the management daemon, you log in as root to the server you want to run your management node, change directory to /var/lib/mysql-cluster, and start the ndb_mgmd daemon:
[user@mgm] su -
[root@mgm] cd /var/lib/mysql-cluster
[root@mgm] ndb_mgmd
Alternatively, you can start the ndb_mgmd daemon from any folder and pass the location of the configuration file to the daemon:
[root@mgm] ndb_mgmd -f /var/lib/mysql-cluster/config.ini
Note that this example assumes that you have the MySQL bin directory in your path; if you do not, you need to add /usr/local/mysql/bin/ (or wherever you installed your binaries) in front of ndb_mgmd and in front of every other MySQL binary in this book. Refer to the end of section “Installing MySQL Cluster from a Binary Tarball,” earlier in this chapter, for instructions on how to add to your path.
If the output from the ndb_mgmd daemon is nothing at all, you are okay. If you get an error, you almost certainly made a mistake in your config.ini file, so you need to go back and compare it with the preceding example, and if you are still stuck, refer to Chapter 2, which explains exactly what to put where in a config.ini file.
The next step is to enter the management console, which is the client to the management node—rather like the mysql binary is a client to the MySQL server. The management console is called ndb_mgm. You log in to the management node and issue the command SHOW, which asks the management daemon to send it details about the current status of the cluster:
[user@mgm] ndb_mgm
-- NDB Cluster -- Management Client --
ndb_mgm> SHOW
Connected to Management Server at: 10.0.0.1:1186
Cluster Configuration
---------------------
[ndbd(NDB)] 2 node(s)
id=2 (not connected, accepting connect from 10.0.0.2)
id=3 (not connected, accepting connect from 10.0.0.3)
[ndb_mgmd(MGM)] 1 node(s)
id=1 @10.0.0.1 (Version: 5.0.11)
[mysqld(API)] 3 node(s)
id=4 (not connected, accepting connect from 10.0.0.1)
id=5 (not connected, accepting connect from 10.0.0.2)
id=6 (not connected, accepting connect from 10.0.0.3)
If, on the other hand, you get an error like this when you attempt to use SHOW, your management daemon has failed to start properly:
ndb_mgm> SHOW
Unable to connect with connect string: nodeid=0,127.0.0.1:1186
If this is what you get, you should turn to Chapter 6, “Troubleshooting,” for ideas on solving this sort of issue.
In order to get your cluster to work, you need to connect your storage nodes. The process is identical on all storage nodes, so you can complete it with one and then repeat the same process for all your other storage nodes. Essentially, all you need to do is tell the daemon where to find the management server and then start the ndbd daemon (which is the storage daemon).
To tell the daemon where to find the management server, you can either put some lines in /etc/my.cnf or you can pass it as a command-line parameter. We suggest that you use my.cnf, but we illustrate both methods here. Note that it is not a bad idea to add these lines to /etc/my.cnf on the management server as well, even if it is not acting as a storage node. If you do not, it will just connect to the local machine (127.0.0.1), which normally works (we relied on it working earlier), but when it becomes possible to bind the management daemon to one IP address, you may no longer be able to rely on it working without an IP address (even if it is just the primary IP of the local machine) in my.cnf.
To use my.cnf, you create the file /etc/my.cnf, if it does not already exist, and add the following:
[mysql_cluster]
ndb-connectstring=10.0.0.1
Then you need to start the storage node daemon, ndbd:
[root@storage] ndbd --initial
This should return no output if it works.
The other way to do it does not involve a my.cnf file. When you start ndbd, you just pass the connect string to it, like this:
[root@storage] ndbd --connect-string=10.0.0.1 --initial
The only way to tell if this method works is to return to the management console (by using ndb_mgm on the management server) and see if the status has changed. If you do this after starting one storage node, you get output like this:
ndb_mgm> SHOW
Cluster Configuration
---------------------
[ndbd(NDB)] 2 node(s)
id=2 (not connected, accepting connect from 10.0.0.2)
id=3 @10.0.0.3 (Version: 5.0.10, starting, Nodegroup: 0, Master)
If it has not changed and you still get all lines reporting “not connected,” then something has gone wrong. Refer to Chapter 6 for further help.
When you have all your storage nodes started, you should see that the output from SHOW in ndb_mgm changes to Started:
ndb_mgm> SHOW
Cluster Configuration
---------------------
[ndbd(NDB)] 2 node(s)
id=2 @10.0.0.2 (Version: 5.0.11, Nodegroup: 0, Master)
id=3 @10.0.0.3 (Version: 5.0.11, Nodegroup: 0)
[ndb_mgmd(MGM)] 1 node(s)
id=1 @10.0.0.1 (Version: 5.0.11)
This means that your cluster is working. However, you need to connect at least one SQL node before you can start using it.
The requirement for a SQL node is that it must have MySQL-Max rather than just MySQL. Apart from that, you can use any recent version of MySQL to connect to your new cluster. All you need to do is add two lines to the [mysqld] section of my.cnf:
[mysqld]
ndbcluster
ndb-connectstring=10.0.0.1
In this example, 10.0.0.1 is the IP address or hostname (not recommended) of your management node.
You then simply have to restart MySQL, with a command such as service mysql restart.
If MySQL fails to come up, you should check the error log—typically /var/lib/mysql/hostname.err. If you have an error such as the following:
[ERROR] /usr/sbin/mysqld: unknown variable 'ndb-connectstring=10.0.0.1'
you do not have the MySQL-Max package installed or you did not include support for NDB during your compilation process if you compiled from source. Refer to the earlier section in this chapter “Installing MySQL-Max” for further advice.
If you have created the config.ini file described in this chapter, with three servers and two storage nodes, one management node, and three SQL nodes, you should get the following output from a SHOW command:
[user@mgm]# ndb_mgm
-- NDB Cluster -- Management Client --
ndb_mgm> SHOW
Connected to Management Server at: 10.0.0.1:1186
Cluster Configuration
---------------------
[ndbd(NDB)] 2 node(s)
id=2 @10.0.0.2 (Version: 5.0.11, Nodegroup: 0, Master)
id=3 @10.0.0.3 (Version: 5.0.11, Nodegroup: 0)
[ndb_mgmd(MGM)] 1 node(s)
id=1 @10.0.0.1 (Version: 5.0.11)
[mysqld(API)] 3 node(s)
id=4 @10.0.0.1 (Version: 5.0.11)
id=5 @10.0.0.2 (Version: 5.0.11)
id=6 @10.0.0.3 (Version: 5.0.11)
Notice how the storage nodes (called “NDB nodes” in the management client) have a Nodegroup parameter. Both storage nodes are in Node Group 0; you should have been expecting this because you have NumberOfReplicas defined as two, and you have two storage nodes; therefore, you have one node group. If you added another two storage nodes, you would have two node groups.
Now that you have MySQL Cluster working, you can start to create some tables. To do so, you log in to the MySQL client on any one of the SQL nodes (using your mysql root user and password if you have created one), and then you create a database and table and insert and select a row:
[user@any]# mysql
mysql> create database clustertest;
Query OK, 1 row affected (0.03 sec)
mysql> use clustertest;
Database changed
mysql> create table ctest (i INT) ENGINE = NDBCLUSTER;
Query OK, 0 rows affected (4.27 sec)
mysql> INSERT into ctest () VALUES (1);
Query OK, 1 row affected (0.63 sec)
mysql> SELECT i from ctest;
+------+
| i |
+------+
| 1 |
+------+
1 row in set (0.05 sec)
You can see that this has all worked. If the cluster is not actually working properly, you may get an error such as ERROR 1015 (HY000): Can’t lock file (errno: 4009) or ERROR 1050 (42S01): Table ‘ctest’ already exists while attempting to create the table or while selecting or inserting the row. In this case, you need to go back to ndb_mgm and ensure that all nodes in the cluster are correctly started, referring to Chapter 6 for help, if needed.
The final thing you are likely to want to check is that all your SQL nodes are actually working, so if you insert one row on one node, it does appear on all the others. You can do this by logging in to each storage node and inserting another row before selecting all rows. However, before you try to do this, you should read the next section on auto-discovery of databases.
MySQL Cluster does not currently feature auto-discovery of databases on SQL nodes, so you have to manually create each database on each SQL node before MySQL Cluster will start to show the tables. You can create the database on some SQL nodes after you have actually created the database on another SQL node and created the table; you can consider using the create database command as a way of saying “go look for my cluster tables in this database.” You should also run FLUSH TABLES after you have completed the database to make sure the SQL node picks up the tables. You do not need to create tables on each SQL node. MySQL features auto-discovery of tables, so you simply need to create each database on each SQL node.
If you drop a database, you will delete the tables within it from all the storage nodes. So be careful; you can’t just drop the database and expect it to remain on other nodes!
While your storage nodes are starting up, you can get slightly more detailed information about what they are doing via the management client.
If you enter <id> STATUS, the management client will tell you what phase of the startup process you are in, as in this example:
ndb_mgm> 2 STATUS
Node 2: starting (Phase 2) (Version 5.0.11)
ndb_mgm> 2 STATUS
Node 2: started (Version 5.0.11)
You can also use the ALL STATUS command to list the status for all nodes at the same time.
A quick description of what the cluster is doing during each phase follows; this is often useful when you are debugging problems as it gives you a hint as to exactly what problems you are experiencing:
Note
Note that some concepts here have not been explained in detail yet; they are intended to help you troubleshoot your problems, but if you do not have any problems yet or do not follow any of the points, feel free to skip this.
![]() Phase 1 is when the node first connects to all the other nodes in the cluster and heartbeats between nodes are initiated.
Phase 1 is when the node first connects to all the other nodes in the cluster and heartbeats between nodes are initiated.
![]() Phase 2 is when an arbitrator is elected, if none exists.
Phase 2 is when an arbitrator is elected, if none exists.
![]() Phase 3 initializes the internal variables.
Phase 3 initializes the internal variables.
![]() Phase 4 finds the end of the logs and prepares for the node to start.
Phase 4 finds the end of the logs and prepares for the node to start.
![]() Phase 5 copies the data from the alive nodes in the node group (if available) or starts the recovery from local checkpoints and the
Phase 5 copies the data from the alive nodes in the node group (if available) or starts the recovery from local checkpoints and the REDO log.
![]() Phase 6 and onward do various small other tidbits such as re-creating all ordered indexes, so you can expect high CPU usage.
Phase 6 and onward do various small other tidbits such as re-creating all ordered indexes, so you can expect high CPU usage.
To shut down a cluster cleanly, you issue the command SHUTDOWN in the management client and wait for all nodes to cleanly shut down. This will not shut down your SQL nodes—only your storage and management nodes. However, all tables you have converted to the NDB engine will not be available anymore because you have shut down all the storage nodes.
When you restart the storage nodes in your cluster (for example, by using the ndbd daemon), you should not use the --initial flag when you start ndbd. --initial simply means “I am running for the first time; please take DataDirectory, delete everything in it, and format it for my use.” You use it in three situations:
![]() When starting the cluster for the first time
When starting the cluster for the first time
![]() When starting the cluster after making certain changes to
When starting the cluster after making certain changes to config.ini (changes that affect the disk storage of the nodes—as discussed in Chapter 2)
![]() When upgrading the cluster to a new version
When upgrading the cluster to a new version
When you run ndbd with --initial, MySQL Cluster will clear the cluster file system. (This can be considered Stage 0 in the startup process.)
Note that starting all nodes in any one node group with the --initial flag at the same time after a shutdown will completely destroy all your data. The only time you should start all nodes with --initial is when you are installing it for the first time or when you are upgrading major versions and have very good backups.
You will inevitably have to restart your cluster from time to time. We cover upgrading a cluster later on (see the section “Upgrading MySQL Cluster,” later in this chapter), but here we describe how nodes resynchronize their data and cover the procedure to recover from the process of shutting down the complete cluster or just a single node.
When a transaction (that is, a query) is committed, it is committed to the RAM in all nodes on which the data is mirrored. Transaction log records are not flushed to disk as part of the commit. This means that as long as one of the nodes remains working, the data is safe. It also means that there is no reading or writing to the disks during one transaction, which naturally removes that bottleneck.
However, of course this means that if all nodes suffer simultaneous failure that clears their RAM, you lose your data. Therefore, MySQL Cluster is designed to handle a complete cluster crash—that is, all nodes in any one node group (or all nodes) being killed (for example, if the power is cut to all servers and then any UPS system fails to work). It does this in several ways, all of which involve storing the data on the hard drives of the individual storage nodes in a process known as check pointing.
The first type of checkpoint, a global checkpoint, stores all the recent transactions in a log file format. The data node flushes the most recent REDO log (which contain all the recent transactions) to disk, which allows the cluster to reapply recent transactions in the event of total failure of all nodes in a node group. The frequency with which it updates this copy is controlled by the parameter TimeBetweenGlobalCheckpoints in config.ini and defaults to 2 seconds. Any less time, and you lose performance and increase durability; any greater time, and you lose durability and increase performance.
The second type of checkpoint, a local checkpoint (LCP), takes place on each storage node more or less concurrently. During an LCP, all the cluster’s data is stored on the disk. In most clusters with high update rates, it is likely that a new LCP is started immediately after the previous one is completed; the default frequency is to start a new checkpoint after 4MB of write operations have built up since the last checkpoint was started. The LCP mechanism uses an UNDO log in order to allow it to create a completely consistent copy of the data without locking anything while doing so. An LCP is essentially the same process that occurs when you take an online backup with MySQL Cluster. The purpose of the LCP is to allow the data node to remove old REDO logs to prevent disk usage from always growing.
The cluster will store on disk the three most recent LCPs and the REDO logs for in between.
If one node in each node group remains working, to start the other node(s) in the node group, you simply run ndbd on the servers where the dead node(s) reside, which should connect and start working.
In some situations, the data on the disk of a node can become corrupted, and if this is the case and the node fails to start properly, you simply start it with the --initial flag.
If your entire cluster fails for some reason, the recovery can be more complicated than the recovery for a single node.
You should try to bring up your management node and then start to connect storage nodes. Each cluster node copies the last complete LCP it has on its disk back into RAM, and it then applies the latest complete global checkpoint (from the REDO log).
If none of these files are corrupted on any nodes, you should find that the startup is fairly quick and everything continues from where it was when it died.
However, if some nodes do not come up, you are still okay as long as one node in each node group has come up. You can start other nodes with ndbd --initial as long as there is another node in that node group that has started and has a complete set of data stored on it.
Note that normally a cluster doesn’t want to start if not all the data nodes are connected. Therefore, the cluster waits longer during the restart if the nodes aren’t all connected so that the other data nodes can connect. This period of time is specified in the setting StartPartialTimeout, which defaults to 30 seconds. If at the end of 30 seconds, a cluster is possible (that is, it has one node from each node group) and it can’t be in a network partitioned situation (that is, it has all of one node group), the cluster will perform a partial cluster restart, in which it starts up even though data nodes are missing. If the cluster is in a potential network partitioned setup, where it doesn’t have all of a single node group, then it will wait even longer, with a setting called StartPartitionedTimeout, which defaults to 60 seconds. Starting in this situation would be potentially dangerous because network partitioning can lead to data integrity issues. The reason for the extra wait is that a system restart is normally much faster than node restarts as it does not involve as much network traffic.
When your cluster is working and you understand how to restart nodes, it is time to ensure that it is indeed highly available. What you are now going to do is kill some nodes to make sure that the cluster remains working.
First of all, you open the MySQL client on one of the storage nodes and issue the SELECT query. Next, you go to the management node and either issue kill -9 to the ndb_mgmd process or, if the management node is alone on the server (in other words, if there is not a SQL or storage node also on the same server), unplug the network or power cable. Then you return to the SQL node (that is, the MySQL client) and issue the SELECT query, and you should find that it still works. If it does, you have just verified that your cluster can survive a failure of the management node. If you have more than one SQL node, you can try the query on all of them.
Next, you need to restart your management node. The procedure differs depending on how you killed the node:
![]() If you unplugged the power cable, you plug it back in and boot the machine and then follow the process for issuing
If you unplugged the power cable, you plug it back in and boot the machine and then follow the process for issuing kill -9.
![]() If you issued
If you issued kill -9, all you need to do is repeat the previously described process above: change directory to /var/lib/mysql-cluster and start ndb_mgmd or use one of the other methods mentioned earlier.
![]() If you unplugged the network cable, all you need to do is plug it back in. Management nodes do not kill themselves after a certain period of time without communication (heartbeats) from other nodes as storage nodes do.
If you unplugged the network cable, all you need to do is plug it back in. Management nodes do not kill themselves after a certain period of time without communication (heartbeats) from other nodes as storage nodes do.
After you have restarted the management daemon by whatever means, you should run the management client, ndb_mgm, and issue a SHOW command to check that all the storage and SQL nodes have reconnected to the management server and that your cluster is back up and running. When you have established that all is well, you are ready to continue the testing.
You now want to establish whether your cluster is able to survive a failure of one of the storage nodes. In theory, your cluster can survive as long as one storage node in each node group remains alive. In the example we have been using so far in this chapter, there only is one node group, with two nodes in it, so you can only survive the failure of one storage node. If you had, for example, NumberOfReplicas set to 3 and had six storage nodes, you would be able to survive four nodes failing—two in each node group, although the cluster could potentially fail if three nodes failed (if they were all three nodes in one node group).
To check that your cluster is indeed highly available, you log in to a SQL node and run the MySQL client. You should then issue the SELECT query as before and verify that it works. Then you move over to the other storage node and either issue a kill -9 command for the ndbd process (there are actually two ndbd processes per node, so you need to kill both at the same time; otherwise, one can restart the other) or remove the power or network cable from the back of the server. (Again, this works only if the server is only running a storage node; if it is running a management node or the only SQL node, you should not do this!) You then repeat the SQL query on the surviving storage node, and you should find that it continues to work. If you issued a kill -9 command to kill the storage node on a server that also has a SQL node on it, the SQL node on that server should also continue to work, so you should test that as well.
Now you need to restart the storage node that you killed. If you reset the machine or killed the power and then powered the machine back on, you log in, su to root, and run ndbd. If you simply killed the ndbd process, you should be able just to start the ndbd process again.
If you removed the network cable, you should plug it back in and watch to see if the storage node attempts to connect to the management node (by looking at the output of SHOW in the ndb_mgm client). It will almost certainly not because ndbd will have exited previously. This is because the storage node will not have been able to contact the arbitrator (the management daemon) and will have killed itself. You should be aware that it is possible to cause the storage node not to shut down completely in the event of a network outage or similar situation, but instead to cause the node to attempt to reconnect periodically. For more information, you should read about the option StopOnError, which is covered in Chapter 2. In summary, if the ndbd (storage) node process has exited, you just start it again; if you were very quick, it might not have exited, and you might be able to just plug the cable back in again.
MySQL Cluster supports online upgrades within major releases. This means that you can upgrade from 5.0.10 to 5.0.11 without any downtime at all; however, you cannot upgrade from 4.1.x to 5.0.x without downtime.
Upgrading MySQL Cluster is very simple. The first thing you have to do is stop your current management node, upgrade it, and restart it. You then stop one storage node at a time, upgrade each, and start it up with the ndbd -initial command, waiting for it to completely start before moving on to the next storage node.
For example, if you were to try to upgrade the sample cluster we have used so far (with one management node, two storage nodes, and a SQL node on three physical servers), the process would be as follows:
1. Stop the management node by issuing <id> STOP in the management client, where <id> is the ID of the management node (ID 1 in the sample output from the SHOW command within the management client example earlier in this chapter).
2. Exit the management client.
3. Upgrade the MySQL-ndb-management package or copy the new ndb_mgmd and ndb_mgm binaries to overwrite the old ones in your binary directory.
4. Start the new ndb_mgmd binary from /var/lib/mysql-cluster.
5. Enter the management console, where you should see something like this:
ndb_mgm> SHOW
Cluster Configuration
---------------------
[ndbd(NDB)] 2 node(s)
id=2 @10.0.0.2 (Version: 5.0.10, Nodegroup: 0, Master)
id=3 @10.0.0.3 (Version: 5.0.10, Nodegroup: 0)
[ndb_mgmd(MGM)] 1 node(s)
id=1 @10.0.0.1 (Version: 5.0.11)
[mysqld(API)] 3 node(s)
id=4 @10.0.0.1 (Version: 5.0.10)
id=5 @10.0.0.2 (Version: 5.0.10)
id=6 @10.0.0.3 (Version: 5.0.10)
Notice how the MGM node is now version 5.0.11, while all other nodes remain 5.0.10.
6. Start upgrading storage nodes. Repeat the following process for each storage node in turn:
![]() Stop the first storage node by issuing
Stop the first storage node by issuing <id> STOP in the management console.
![]() Upgrade the
Upgrade the MySQL-ndb-storage, MySQL-ndb-tools, and MySQL-ndb-extra RPM packages or overwrite all the old ndb* binaries with the new ones.
![]() Start
Start ndbd again, by using the ndbd -initial command.
![]() Return to the management console and wait for the status of the node to change from this:
Return to the management console and wait for the status of the node to change from this:
id=x @10.0.0.x (Version: 5.0.11, starting, Nodegroup: 0)
to this:
id=x @10.0.0.x (Version: 5.0.11, Nodegroup: 0)
Move on to the next storage node in the cluster.
When you have completed this process for all storage nodes, you have successfully upgraded your cluster. There is no need to do anything to the SQL nodes that are connected to your cluster, although normally you would want to upgrade them. (The upgrade process is not any different as a result of the cluster subject to the one gotcha covered earlier in this chapter: If you completely remove all the RPMs before reinstalling them, you should comment out the cluster lines in my.cnf, or the installation of the new RPMs will fail.)
The procedure for upgrading across major versions—for example, from 4.1 to 5.0 or 5.0 to 5.1—is simple but requires a short period of downtime:
1. Enter single-user mode to prevent any changes from being made to your database while you are restoring your backup (see Chapter 3, “Backup and Recovery”).
2. Make a backup of your cluster (see Chapter 3).
3. Do a full SQL dump of all databases. (There are bugs in some older versions of MySQL that prevent later versions from reading backup files produced by these versions. You don’t want to find that this affects you after you have shut down your cluster and upgraded all the binaries.)
4. Back up config.ini (in case you have to change it, for whatever reason, and forget what the original is during the upgrade process).
5. Shut down your cluster (that is, all storage and management nodes).
6. Copy DataDir on all storage nodes to a backup folder (this aids quick rollback if you need to go back to the previous version quickly), such as to /var/lib/mysql-cluster2.
7. Copy all binaries that start with ndb in your MySQL bin directory to a backup folder.
8. Upgrade all the MySQL packages on all nodes to the latest versions.
9. Start the management daemon.
10. Start the storage nodes by using --initial.
11. Attempt to restore the cluster backup (see Chapter 3).
12. If step 11 fails, drop all tables and databases and restore from your SQL dump.
13. Exit single-user mode.
We suggest that whenever possible, you set up a test cluster on the new version to make sure your data can work nicely. There is a possibility that things might change between major versions, and this might mean, for example, that you would need to increase some parameters in config.ini to get things to work. You probably don’t want to find this out for the first time when you have to revert to the older version after attempting to upgrade or have to start searching mailing lists for the solution to your problem with your database down.
You might find that it is extremely inconvenient to have to log in to each machine to start ndbd, particularly if you have a very large number of nodes in your cluster and/or exotic authentication methods on the servers that make up your cluster which make logging in to lots of servers a time-consuming and tedious process. Several tricks are worth mentioning; the first is to use SSH to start all your data nodes (using the ssh -t command to issue a command and then log straight out). You issue the following commands on the management server to completely start your sample cluster (which you should make sure is shut down first):
[root@s1 mysql-cluster]# ndb_mgmd
[root@s1 mysql-cluster]# ssh -t 10.0.0.2 ndbd
[email protected]'s password:
Connection to 10.0.0.2 closed.
[root@s1 mysql-cluster]# ssh -t 10.0.3 ndbd
[email protected]'s password:
Connection to 10.0.0.3 closed.
[root@s1 mysql-cluster]# ndb_mgm
-- NDB Cluster -- Management Client --
ndb_mgm> SHOW
Connected to Management Server at: 10.0.0.1:1186
Cluster Configuration
---------------------
[ndbd(NDB)] 2 node(s)
id=2 @10.0.0.2 (Version: 5.0.11, starting, Nodegroup: 0, Master)
id=3 @10.0.0.3 (Version: 5.0.11, starting, Nodegroup: 0, Master)
[ndb_mgmd(MGM)] 1 node(s)
id=1 @10.0.0.1 (Version: 5.0.11)
[mysqld(API)] 3 node(s)
id=4 (not connected, accepting connect from any host)
id=5 (not connected, accepting connect from any host)
id=6 (not connected, accepting connect from any host)
Then, after a few minutes, your cluster should start as usual:
ndb_mgm> SHOW
Connected to Management Server at: 10.0.0.1:1186
Cluster Configuration
---------------------
[ndbd(NDB)] 2 node(s)
id=2 @10.0.0.2 (Version: 5.0.11, Nodegroup: 0)
id=3 @10.0.0.3 (Version: 5.0.11, Nodegroup: 0, Master)
[ndb_mgmd(MGM)] 1 node(s)
id=1 @10.0.0.1 (Version: 5.0.11)
[mysqld(API)] 3 node(s)
id=4 (Version: 5.0.11)
id=5 (Version: 5.0.11)
id=6 (Version: 5.0.11)
If you set up SSH authentication using private/public keys, you can complete this process without using passwords, which means you can script it very easily.
Another trick you can use is to start the ndbd daemon on a node but not actually get it to join the cluster; in this case, it just connects and waits for the management server to instruct it to start. You do this by passing the -n command as an argument to ndbd when you start it (that is, -n = nostart). If you were to start both storage nodes in the sample cluster by using -n, you would get this:
ndb_mgm> SHOW
Cluster Configuration
---------------------
[ndbd(NDB)] 2 node(s)
id=2 @10.0.0.2 (Version: 5.0.11, not started)
id=3 @10.0.0.3 (Version: 5.0.11, not started)
[ndb_mgmd(MGM)] 1 node(s)
id=1 @10.0.0.1 (Version: 5.0.11)
[mysqld(API)] 3 node(s)
id=4 (not connected, accepting connect from any host)
id=5 (not connected, accepting connect from any host)
id=6 (not connected, accepting connect from any host)
You can start these storage nodes by issuing the <id> START command in the management client:
ndb_mgm> 2 START
Database node 2 is being started.
ndb_mgm> 3 START
Database node 3 is being started.
You can extend this trick further by writing a simple shell script to detect whether ndbd is not running on a node and then get it to “half start” like this so that you can always restart nodes that die from within the management client. This can make dealing with a large cluster much easier because it means you do not have to log in to each server to start the cluster, and as soon as nodes crash or reboot, they will automatically half start, allowing you to completely start them from the management client—eliminating the need for you to actually log in to your storage nodes. A very simple script such as this should do the trick:
#!/bin/bash
#
# ndbd_keepalive.sh
#
# Checks that ndbd, the storage daemon for MySQL Cluster,
# is running. If it is not, start it with -n (nostart)
# to allow administrator to start it from within the
# management client
#
# Usage: /path/to/ndbd_keepalive.sh
#
# This script can be run from crontab every few minutes
#
# (C) Alex Davies 2005.
# You are free to do whatever you like with this script
ps -efl | grep ndbd | grep -v grep &> /dev/null
if [ "$?" != 0 ]
then
# NDBD is dead
# So, restart it
# And, log it
ndbd
wall "ndbd_keepalive.sh restarted ndbd"
echo -n "ndbd_keepalive.sh restarted ndbd:" >> /root/ndbd-restart-log
date >> /root/ndbd-restart-log
fi
Note that you should make sure that the ndbd line contains the full path to the ndbd binary (that is, /usr/local/mysql/bin/ndbd or /usr/sbin/ndbd) if the script does not work without it (which it might not do, particularly if you run it from cron).
You should test the script by starting up your cluster. After the cluster is started, you add the crontab line (crontab -e on most Linux distributions) to the storage nodes, like this:
*/2 * * * * /root/ndbd_keepalive.sh
This runs the script every 2 minutes.
When the cluster is up and running, you should stop a storage node, and within 3 minutes, it should reconnect so you can start it properly from within the management client:
ndb_mgm> SHOW
Connected to Management Server at: 10.0.0.1:1186
Cluster Configuration
---------------------
[ndbd(NDB)] 2 node(s)
id=2 @10.0.0.2 (Version: 5.0.11, Nodegroup: 0)
id=3 @10.0.0.3 (Version: 5.0.11, Nodegroup: 0, Master)
[ndb_mgmd(MGM)] 1 node(s)
id=1 @10.0.0.1 (Version: 5.0.11)
[mysqld(API)] 3 node(s)
id=4 @10.0.0.1 (Version: 5.0.11)
id=5 @10.0.0.2 (Version: 5.0.11)
id=6 @10.0.0.3 (Version: 5.0.11)
ndb_mgm> 2 STOP
Node 2 has shutdown.
At this stage, you should wait 3 minutes for the script to kick in on Storage Node 2 and then restart it. Then, you issue a SHOW command, like this:
ndb_mgm> SHOW
Connected to Management Server at: 10.0.0.1:1186
Cluster Configuration
---------------------
[ndbd(NDB)] 2 node(s)
id=2 @10.0.0.2 (Version: 5.0.11, not started)
id=3 @10.0.0.3 (Version: 5.0.11, Nodegroup: 0, Master)
[ndb_mgmd(MGM)] 1 node(s)
id=1 @10.0.0.1 (Version: 5.0.11)
[mysqld(API)] 3 node(s)
id=4 @10.0.0.1 (Version: 5.0.11)
id=5 @10.0.0.2 (Version: 5.0.11)
id=6 @10.0.0.3 (Version: 5.0.11)
Notice how Storage Node 2 has now gone to the status “not started.” You can now start it by using 2 START:
ndb_mgm> 2 START
Database node 2 is being started.
If the script restarts a node, it will add a log entry with the date and time in /root/ndbd-restart-log. You could also have it email an administrator so that that person knows to come investigate the cause of the cluster crash and complete the startup process.
You might wonder why the preceding script uses ndbd -n rather than just ndbd (which would start the node completely and not require an <id> START command to be entered into the management client by an administrator). The answer is that you should never have a script automatically restart cluster nodes. If cluster nodes die, you should always investigate what the problem is. Of course, it would be perfectly possible to remove the nostart flag from the script and to also write a similar version for ndb_mgmd on the management node; this would allow you to reboot all your machines, and they would then restart the cluster when they started back up. We strongly recommend that you not do this; there are many situations in which you may not actually want both nodes to attempt to start (for example, if you suspect that one node has gotten a corrupt copy of the database, you might want to start the other node(s) in the same node group and then start the dodgy node by using --initial). We believe it is important for an administrator to be around to investigate the cause of node failure.
Note
If you use a script like this, and if you change config.ini, you must manually stop each storage node and restart it by using --initial. If you just stop it and leave it to the script to restart it, the script will simply try to start it every 3 minutes but continue to fail, resulting in downtime for you.
There is one overriding thought that should be in your mind if you are reading this section: MySQL Cluster is not supported in any way on anything other than the following operating systems:
![]() Linux (Red Hat, Novell/SUSE)
Linux (Red Hat, Novell/SUSE)
![]() Sun Solaris
Sun Solaris
![]() IBM AIX
IBM AIX
![]() HP-UX
HP-UX
![]() Mac OS X
Mac OS X
Future versions of MySQL Cluster may add more officially supported platforms as more people use MySQL Cluster in production.
Notice that Windows is not included in the list. You should not even consider running it in a production environment on anything other than one of the listed operating systems. The only reason to install it on any other platform should be academic interest and to have a version to play with on whatever machine you use as your desktop.
If you are looking to run a version of MySQL Cluster on your Windows desktop, do yourself a favor and install an emulator such as VirtualPC or VMWare, both of which do a very good job of running any Linux distribution you choose. (CentOS is a good bet if you are fairly new to Linux.) If you have enough RAM, you can run many different virtual machines at the same time and try out things without having to have access to an actual cluster. There has been some work done running MySQL Cluster on Windows, but it is very buggy and incomplete, and we can’t understand why you would want to use it.
We should also point out that in a production environment we recommend that you use Linux. This is not because Linux is superior to other operating systems on which MySQL Cluster is supported but simply that the vast majority of users use Linux, and it is the operating system on which MySQL Cluster is best tested and best supported. Solaris is the next most used platform, and in many ways it is similar to Linux. Other platforms are used by a fairly small number of users at the moment, so documentation and the user support available for them is not as good.
If you want to mix platforms, you should be fine, as long as all platforms within the cluster have the same endianness. There are four types, and you should keep to architectures in the same type:
![]() Pure big-endian—Sun SPARC, Motorola 68000, PowerPC 970, IBM System/360
Pure big-endian—Sun SPARC, Motorola 68000, PowerPC 970, IBM System/360
![]() Bi-endian, running in big-endian mode by default—MIPS running IRIX, PA-RISC, most POWER and PowerPC systems
Bi-endian, running in big-endian mode by default—MIPS running IRIX, PA-RISC, most POWER and PowerPC systems
![]() Bi-endian, running in little-endian mode by default—MIPS running Ultrix, most DEC Alpha, IA-64 running Linux
Bi-endian, running in little-endian mode by default—MIPS running Ultrix, most DEC Alpha, IA-64 running Linux
![]() Pure little-endian—Intel x86, AMD64
Pure little-endian—Intel x86, AMD64
You can mix the two most common architectures (Intel x86 and AMD64) with no problems, but you cannot mix a Sun SPARC system with an Intel x86 system.
You can install MySQL on Solaris and Mac OS X by downloading the pkg format binaries from the MySQL website. You can find more detailed installation instructions in the MySQL manual.
There are also binaries available for HP-UX and IBM AIX. To install on these platforms, you need the MySQL-max packages as well as the standard packages.
MySQL Cluster is an in-memory database in version 5.0, and at the time of this writing, disk-based tables in version 5.1 are in the fairly early stages of testing and are unlikely to be in a generally available version, and therefore available for production use, for quite some time. This means that RAM usage is an important consideration when you are deciding whether MySQL Cluster is the software package for you. If you have an 80GB database, unless you have an extremely large budget, you are not going to be able to use a cluster in MySQL Cluster.
There are several important things to bear in mind about MySQL Cluster. The first is a general rule that your table will occupy significantly more space in NDB than in MyISAM, for the following reasons:
![]() NDB is fixed width in versions 4.1 and 5.0, so if you have variable-width fields, such as
NDB is fixed width in versions 4.1 and 5.0, so if you have variable-width fields, such as VARCHARs, you will find that the size of the table increases dramatically. Version 5.1 will have true VARCHARs, however.
![]() NDB stores more indexes than MyISAM. To start with, there is always a primary key in an NDB table; if you don’t define one, NDB will create one for you (and hide it from view).
NDB stores more indexes than MyISAM. To start with, there is always a primary key in an NDB table; if you don’t define one, NDB will create one for you (and hide it from view).
If you are considering deploying a cluster in MySQL Cluster, in order to determine how many nodes you need and how much RAM you will need installed in each, you need to be able to calculate the memory usage per table.
The first step is calculating the amount of RAM that each row uses in each table. You then multiply the size of each row by the number of rows to get the size of each table. Then you add all the tables together to get the size of the database. Finally, you work out the exact memory usage on each storage node. To finish off, you can test your prediction and see how much RAM the cluster in MySQL Cluster is actually using.
If you have never actually thought about how much space each table occupies, as many administrators do not, this process can be quite daunting. Something that confuses many new administrators and that you should always bear in mind is the difference between bits and bytes: There are 8 bits in 1 byte. In almost all cases, you will be dealing with bytes.
It is important to remember that MySQL Cluster does not support variable-width fields, which means all rows occupy the same space. This means that VARCHAR fields are actually stored as CHAR fields internally (note that this should change in version 5.1). Many poorly designed tables have massive VARCHAR fields (for example, VARCHAR(200) for email addresses). This is because when using storage engines that support variable-width columns, such as MyISAM, it is easier to make the field far too large than to risk making it too small. However, in MySQL Cluster, such tables take up a colossal quantity of RAM. It is always worth attempting to reduce the size of variable-width fields if at all possible.
The calculation of the memory requirement for NDB tables follows the same principles as for the other table engines, with some differences. We now list the memory requirements for different types of fields.
In the following tables, M refers to the defined size of the string field (for example, in a VARCHAR(200) field, M = 200.) Note that character sets are 1 to 3 bytes in size. If you are unsure of how big your character set is, you can find the information by using the SQL command SHOW CHARACTER SET and viewing the Maxlen field.
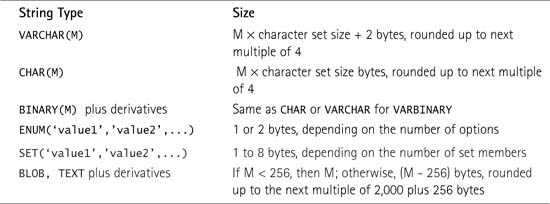
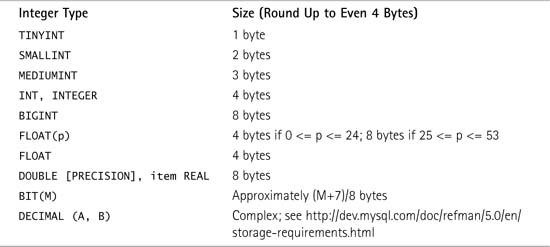

To calculate DataMemory, you first need to work out how many bytes the fields are going to use. Then you add a fixed row overhead, which is 16 bytes, or 12 bytes if you declare all your columns as NOT NULL. Then, for each ordered index, 10 bytes of storage are used. You get an ordered index for each INDEX you define. In addition, you automatically get one ordered index for each primary key and each unique key you specify, unless you tell it not to create one in the CREATE TABLE syntax. Remember that you can change tables at a later time by using ALTER TABLE or CREATE/DROP INDEX commands within MySQL; this, of course, will change your memory allocation.
However, this is not the complete story if you are trying to work out how much RAM you are going to use; you must take into account the storage space used by primary keys. Each primary key (if you have defined it) or hash index (which NDB automatically creates if you have not defined a primary key) occupies 25 bytes of storage (25 bytes + the size of the key in MySQL 4.1). You add this number to the number you calculated earlier and write this number down as the size of each row.
In addition, for each unique constraint in your schema, other than primary keys, an additional hidden table is created to enforce the constraint. In this hidden table, there are at least two columns. The first columns are the ones that you declared as unique. These columns are treated as the primary key in the hidden table. The other columns in this table make up the primary key from the base table. This hidden table has all the normal space requirements as a regular table (that is, 12 bytes overhead per row). You can see that this causes unique constraints to be quite a bit of extra size overhead. However, this setup does allow for additional speed in accessing constraints, which is discussed further in Chapter 5, “Performance.”
You then have to consider the way that NDB stores information: in pages. All data is stored in pages (a page is a certain part of RAM), and each page holds 32,768 bytes of data. Each page of data can store data from only one table (or hidden table). You therefore have to work out how many rows you get per page, which tells you how many pages you need. You divide 32,768 by the number you produced earlier and round the number down. This tells you how many rows you will get per page of 128 bytes.
You next divide the number of rows by the number of rows per page to get the number of pages you need. This is important because you will need to add a fixed overhead per page.
You can now calculate the total memory requirement, in bytes, for one copy (replica) of your table:
(Size of each row x Number of Rows) + (Number of pages x 128)
You repeat this calculation for all tables in your cluster to get a figure for the total memory requirement for one copy of your tables.
Of course, you also want to know how much RAM you need on each storage node. You use the following calculation for this:
(Total memory requirement for one copy of your tables x Number of replicas3 / Number of storage nodes
You divide this figure by 1,024 to get kilobytes and finally by another 1,024 to get megabytes.
Remember that this calculation gives you an estimate for the RAM required for data storage. More RAM is required for buffers, temporary storage, and so on; exactly how much depends entirely on the environment, so you need to experiment.
Because calculating the RAM usage of a table is so complex, this section gives a sample calculation for the following table, which contains both integer and string types, as well as variable- and fixed-width fields:
mysql> desc testtable;
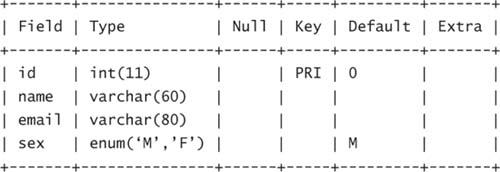
4 rows in set (0.00 sec)
This example assumes that the table uses latin1 (so the size of the character set is 1 byte). It also assumes that this table has 500 rows.
The first step is to calculate the size of each row:
![]() Each
Each INT field occupies 4 bytes.
![]() Each
Each VARCHAR(60) field occupies 64 bytes (60 + 2, rounded to next multiple of 4).
![]() Each
Each VARCHAR(80) field occupies 84 bytes (80 + 2, rounded to next multiple of 4).
![]() Each small
Each small ENUM field is 1 byte, rounded to next multiple of 4.
![]() There are two indexes, so there is a 20-byte overhead per row.
There are two indexes, so there is a 20-byte overhead per row.
This makes the total size of each row 176 bytes.
You can now divide 32,768 (the maximum size of a page) by 176 to get 186.2, so you know that each page will hold 186 rows. You can therefore work out that for 500 rows, you will need 3 pages. You can now work out the extra overhead of 128 bytes per page: 384 bytes.
Therefore, the RAM required for data storage will be (176 × 500) [Size of row × Number of rows] + (16 × 500) [Number of rows × Fixed overhead per row of 16 bytes] + 384 [Page overhead]. This comes out to 96,000 bytes, or 94KB.
You now have to work out the RAM requirement for indexes, which is easy: 25 bytes per row, so in this case, 12,500 bytes, or 12.2KB.
This gives you the quantity, in data and index RAM requirement, of this one very small, very simple, table. Of course, you need to take account of your total number of nodes and number of replicas; if you have four nodes and two replicas, you divide these figures in half to work out the storage requirement per node (because each node has half of each table).
Of course, there are significant overheads, and it is always a good idea to allow at least an extra 10% for temporary storage and so on—and for a small table, you should add a lot more.
At the time of this writing, MySQL has just released a script written by Steward Smith, ndb_size, that aims to calculate memory usage for a table automatically. We anticipate that by the time this book is published, this script will be included with MySQL. However, if it is not, you will be able to download if from this book’s website, www.mysql-cluster.com.
The idea is that you run the ndb_size script on a table before you convert it to NDB so that you can tell if you have enough RAM and get a good idea about what values to set for several configuration options.
To use this script, you need to download the script ndb_size.pl as well as the HTML template ndb_size.tmpl. You need the following Perl modules installed: DBD::mysql and HTML::Template. After you download the script, you should execute it with the following parameters:
[root@host] perl ndb_size.pl db-name host user password
It will create an HTML file that you can view in any web browser.
For example, to calculate the size of the test database on the localhost where the password for the root account is mypass, you would use this command:
[root@host] perl ndb_size.pl test localhost root mypass > /path/to/file.htm
We do not repeat the output here, but the output is split into sections, all of which are useful. The first section, “Parameter Settings,” gives estimates of what you should set the parameters in config.ini to. These will tend to be low but give a pretty good estimation. If you want to calculate your RAM usage, you add up the first two lines in the table (DataMemory (kb) and IndexMemory (kn)) and ignore the rest.
The rest of the report gives a breakdown of memory usage by attributes (tables, indexes, and so on) and then a further breakdown by table.
It is worth noting that the MySQL Cluster version 5.1 figures may change by the time that version is released.
So far we have concentrated on standard systems. Over the past 18 months, the hype surrounding 64-bit processors has increased massively, and many new servers are now able to run in either 64-bit or 32-bit modes.
From the point of view of MySQL Cluster, 64-bit processors have a massive advantage: They can address more RAM. If you have a 32-bit system, you have two problems: First, there is no possibility of the system addressing (that is, using) more than about 4GB of RAM, and second, the system will generally fail to start if the operating system attempts to allocate more than a few gigabytes of RAM in one chunk (for example, to a storage node), with an error such as this:
Message: Memory allocation failure
Fault ID: 2327
Problem data: DBTUP could not allocate memory for Page
The obvious solution to this is to upgrade to 64-bit hardware and a 64-bit operating system. However, if you want to address the full 4GB of RAM and keep your 32-bit hardware, you can simply run multiple NDBD nodes on the same machines, with DataMemory plus IndexMemory for each ndbd process set to the maximum that you can safely address (say, 2GB). If you do this, you must specify which node group each storage node is a members of, as explained earlier in this chapter, in the section “An Example of a config.ini File.” You must ensure that you do not have all the nodes in any node group running on the same physical machine; otherwise, failure of that machine will take the whole cluster down.
You will see in Chapter 2 that there are actually two separately configurable options that control RAM usage: DataMemory and IndexMemory. DataMemory controls everything except the primary key or hash index that every single row has. (If you do not create a primary key, NDB will create a hash index for you and hide it.) So DataMemory includes other regular indexes. IndexMemory can be calculated as 25 bytes per row for the primary key and 25 additional bytes for each unique key (due to the hidden table). Additional hidden tables created by secondary hash indexes use DataMemory, not IndexMemory.
If you discover that your current table structure is too large to fit viably into RAM, you have several options. The first, and often most viable, is to normalize the data to eliminate duplicate data. For example, say you have a table like this:
PEOPLE
ID INT(2)
Name VARCHAR (200)
Favorite_color VARCHAR (100)
You might find that you have perhaps five colors, which make up 95% of the colors that people select. If you have, say 1,000,000 rows, you could save yourself a vast amount of RAM by changing the structure to two tables:
PEOPLE
ID INT(2)
Name VARCHAR (200)
COLOR_ID TINYINT (1)
COLORS
COLOR_ID TINYINT(1)
Favorite_color VARCHAR (100)
You can then make queries with a simple join.
The second commonly used trick is to reduce the size of variable-width fields that are often set too large. For example, tables often have a very large number of VARCHAR(225) fields defined because whoever produced the table wanted to err on the side of caution, and it worked at the time. However, often the largest field is actually much smaller than that—perhaps 50 bytes. In table engines that support variable-width fields, this is not a problem, but as we have seen, NDB not only does not support variable-width fields (so each VARCHAR(225) field is stored as a CHAR(225) with an additional overhead) but it also stores at least two copies of each piece of data.
To illustrate this point, if we have VARCHAR(225) fields that have 100,000 rows with an average field length of 50 bytes, the following gives an idea of the size the field will use:
![]() MyISAM—0.6MB
MyISAM—0.6MB
![]() NDB—2.7MB
NDB—2.7MB x NumberOfReplicas (+ Overheads)
This represents a 350% increase from MyISAM to NDB before you account for the fact that NDB requires at least two copies of each piece of data. If you started off with a very large MyISAM table with lots of these VARCHAR fields, you could require such a ridiculous amount of RAM that the cluster in MySQL Cluster would cease to be a viable and cost-effective solution.
The best solution to this problem is to go back through the applications that use the database and establish what the actual maximum acceptable size is (if they have any validation before inserts or updates) and either reduce it to something sensible or add validation at a sensible level. You can then change the table structure to this new lower size, which makes an enormous difference.
Now that you have your cluster up and running and understand the principles behind memory usage, you can start to import your existing tables into the cluster.
There are two methods for doing this: You can use a SQL CREATE TABLE statement with ENGINE=NDBCLUSTER or you can use a SQL ALTER TABLE statement, also with ENGINE=NDBCLUSTER.
The easiest way to move your table across is simply to alter an existing table. The syntax for this is very simple, and you can carry out this process from any SQL node. You can use the command SHOW TABLE STATUS to check what engine a table has:
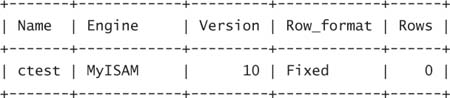
1 row in set (0.01 sec)
You also get a lot more statistics, but the interesting one is Engine. To change from any other engine to NDBCLUSTER, you issue the following commands:
mysql> USE test;
mysql> ALTER TABLE tablename ENGINE=NDBCLUSTER;
Query OK, 0 rows affected (3.54 sec)
Records: 0 Duplicates: 0 Warnings: 0
This does not tell you very much, so it is worth checking that it has worked:
mysql> SHOW TABLE STATUS FROM dbname LIKE 'tablename';
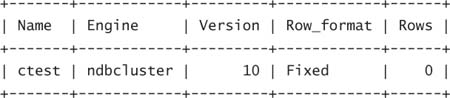
1 row in set (0.01 sec)
Notice how the engine has changed from MyISAM to ndbcluster. This means that it has worked.
If you want to be 100% sure that this has worked, you should move over to a SQL node on a different physical machine and see if the table has appeared on it. (Remember that you must create the database that the table is in first of all on all SQL nodes.) If it has appeared, you know for certain that your cluster is working and that this table is clustered.
You used the second method, the CREATE TABLE command, when you created the ctest table during the MySQL Cluster installation process. To convert a database to NDBCLUSTER, you get a SQL statement of the table structure, as in this example:
CREATE TABLE `test`.`ctest` (
`field1` int( 11 ) NOT NULL default '0',
`field2` char( 11 ) NOT NULL default '0',
`whattodo` enum( 'Y', 'N' ) NOT NULL default 'Y'
) ENGINE = MYISAM DEFAULT CHARSET = latin1;
Now, you simply replace the last line with this:
) ENGINE = NDBCLUSTER DEFAULT CHARSET = latin1;
Then you execute the query at a SQL node. You should get an empty table created in the new format. If you are trying to move a table into NDB, we recommend the following course of action:
1. For each table in the original database, dump the structure so you have a SQL query that will create the table.
2. Change ENGINE = whatever to ENGINE = NDBCLUSTER for all tables within the SQL file.
3. Move the database to dbname-old and create a new database dbname on all SQL nodes.
4. Import your newly modified SQL code so you create the same (empty) tables within the database with ENGINE=NDBCLUSTER.
5. Move the data across by running the following query for each table:
INSERT INTO `dbname`.`tablename` SELECT * FROM `dbname-old`.`tablename` ;
This copies all your data from the old table to the new table.
You are most likely to experience an error when importing data into a table. The following sections cover some of the common errors you may experience while carrying out the procedures covered earlier in this chapter.
This error means that you do not have enough DataMemory or IndexMemory. You will learn how to change these values in Chapter 2, but for now you just need to know how to find out what values you should set them to. In theory, you should either work it out manually or use a script such as ndb_size.pl, as discussed earlier in this chapter. However, if you want to find out your actual usage, you can use the command ALL DUMP 1000. In the management client, you issue ALL DUMP 1000 like this:
ndb_mgm> ALL DUMP 1000
Sending dump signal with data:
0x000003e8 Sending dump signal with data:
0x000003e8
You should now see the recorded memory usage of each node in the cluster log on the management daemon. You exit the management client and tail this log file:
ndb_mgm> exit
[root@s1 mysql-cluster]# ls
config.ini config.ini.threenode ndb_1_cluster.log ndb_1_out.log ndb_1.pid
[root@s1 mysql-cluster]# tail -4 ndb_1_cluster.log
date time [MgmSrvr] INFO -- Node 3: Data usage is 0%(19 32K pages of total 2560)
date time [MgmSrvr] INFO -- Node 3: Index usage is 1%(34 8K pages of total 2336)
date time [MgmSrvr] INFO -- Node 2: Data usage is 0%(19 32K pages of total 2560)
date time [MgmSrvr] INFO -- Node 2: Index usage is 1%(34 8K pages of total 2336)
Note
The number after the tail command should be double the number of storage nodes because you are telling tail how many lines to display (starting at the bottom of the file), and each storage node will produce two lines of log after you issue this command.
Now all you need is some simple math to work out how much DataMemory and IndexMemory are currently being used. To work this out, you choose the highest value for the data usage and index usage if there is a difference between the results for the different storage nodes (which there should not be).
19 32K pages of total 2560 means that the actual usage is 19 × 32KB, which is 2560KB (which is 2.5MB). Similarly, 34 8K pages of total 2336 means 2336KB of space.
You should make sure that your values in config.ini are significantly larger than the minimum values you have just calculated because there will be times when storage nodes will need more space for temporary tables, and you don’t want to run the risk of a table suddenly filling up and hitting its size limit, causing downtime.
This error means “too many indexes.” As you’ll learn in Chapter 2, you need to increase MaxNoOfUniqueIndexes and/or MaxNoOfOrderedIndexes.
This error indicates a problem with too many auto-increment fields. Only one auto-increment column is allowed per table. Having a table without a primary key uses an auto-incremented hidden key. That is, a table without a primary key cannot have an auto-incremented column, and a table with a primary key cannot have two auto-incremented columns.
This error means “increase MaxNoOfConcurrentTransactions.” When the MySQL server needs to start a transaction, it looks for a transaction object in a pool. Each object in this pool is connected to a certain data node. When starting a scan of a table, a transaction object is also used. Thus, in the worst case, a connection could potentially allocate the following at the same time on one data node:
Max number of tables in query + 1 (transaction) + 1 (short term usage)
This means if say you use a maximum of 20 table joins, you would get a maximum of 22 transaction objects per connection, so you can work out what value to set MaxNoOfConcurrentTransactions to. Of course, 22 would be a worst-case scenario. Most transactions use 1 or 2 transaction objects, but you should be aware that this is an error that you may encounter.
Chapter 2 provides more information on changing config.ini parameters.
This error may be generated by a query such as this:
mysql> create table ctest (i int) engine=ndbcluster;
It means the cluster is not working. As a preventive measure, if the cluster is not working, you will not be able to create tables simply because the SQL node does not know what tables actually exist in NDB format and so would run the risk of overwriting the tables that are already stored in the cluster.
In this case, you should go back to ndb_mgm and make sure all nodes are connected; if they are not, you should get them to connect. If all the storage nodes are connected, you should make sure that the /etc/my.cnf configuration on each storage node is correct and points to the correct management daemon.