4 Security and Management
The first section of this chapter, which discusses security, does not strictly relate to MySQL Cluster. That is, there is very little here that users experienced with Linux security will find new, and such users can either skim or skip this section and go straight to the “Managing MySQL Cluster” section, later in this chapter. However, many database administrators will suddenly find that they need to learn how to secure a cluster in MySQL Cluster, and this chapter will help them. It covers what you have to do to secure a cluster, and it does not expect any significant previous knowledge of Linux security.
This chapter covers Linux security in step-by-step detail; you should be able to transfer this information onto other platforms, if needed.
MySQL Cluster is an inherently insecure system: It has no security whatsoever built into it. If you have followed along with the examples so far in this book, anyone with even the most basic knowledge could connect to your cluster and steal or sabotage your data.
The first important thing to do in implementing security with MySQL Cluster is to separate any traffic within your cluster from any traffic coming in from outside. You can do this by using firewalls, which control what packets can pass through them on the basis of some simple rules or you can separate MySQL Cluster traffic onto a different network that is physically separate from your public network and therefore secure.
MySQL Cluster requires significant numbers of ports to be open for communication internode, which is why we suggest that you use a totally separate network for cluster traffic. It is then easy to prevent the forwarding of traffic from one network to the other, and you have then achieved the first goal.
You should be aware that currently there is no checking of the source IP address for ndb_mgm clients, so anyone who has access to port 1186 on the management daemon can download a copy of ndb_mgm, connect to your management daemon, and do just about anything (for example, shut down the cluster). Clearly, this is not acceptable. Three different network designs eliminate this risk: The most preferable is also most expensive, although one solution is inexpensive and relies purely on software protection, with a third option available which is a mix of the other two.
Figure 4.1 shows the best possible scenario for your cluster, with separate public and private networks.
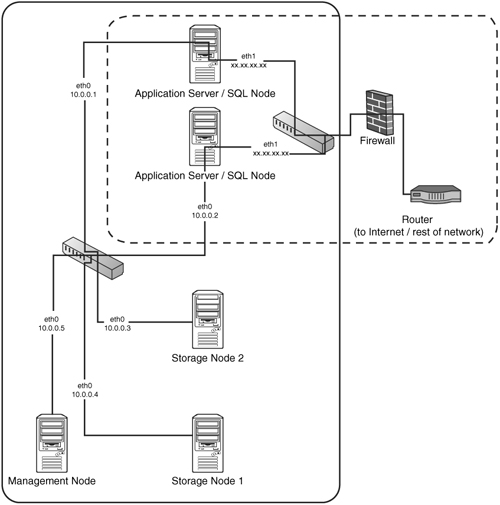
The network in Figure 4.1 has two completely separate networks: the private network (solid box) and the public network (dashed box). For performance reasons, we suggest that you use a gigabit switch for the private network because cluster nodes can transfer enormous amounts of data between each other during the normal course of operations. You can see that there is now no way for someone sitting on the public network to access the data that is traveling between cluster nodes on the private network without going through either of the application servers. In other words, internal cluster traffic (for example, from Storage Node 1 to Storage Node 2 or from App Server 1 to Storage Node 2) is completely segregated, which is excellent.
Notice in Figure 4.1 how the local network is using local addresses. We suggest that you use local addresses for your cluster nodes if they are on a separate network (we have done so in this book). This is primarily for clarity rather than security. You can choose from one of the following three sets of reserved IP addresses:
10.0.0.0–10.255.255.255
172.16.0.0–172.31.255.255
192.168.0.0–192.168.255.255
If the application servers are set so that they do not allow any forwarding (which they will be by default), and if they are themselves not hacked, your cluster data is safe from sniffing and interference. Of course, sniffing and interference are not the only threats to your cluster by any stretch of the imagination, but they are the major threats that you are much more vulnerable to if you run a cluster in MySQL Cluster when compared to a standard MySQL server due to the volumes of plain-text information moved around between nodes and the complete lack of any form of authentication or security.
This means you still need to secure your application servers against hackers, as you normally would. (Such securing is beyond the scope of this book. However, we do cover setting up software firewalls, in the context of what you have to allow for the cluster to continue to work, in the section “Software Firewalls,” later in this chapter.) You can be more restrictive with your firewall rules. For example, if your application servers are only running a web service, you can block all traffic coming in on eth0 except to 80 (and 443, if you are running SSL, and 22 if you need SSH).
If you are unable to set up two separate networks, you should make sure your network is partitioned as far as possible, ideally with all your cluster nodes plugged in to a switch, which is then plugged in to a router to keep all internal traffic in your network away from any other computers in the network. If you can get a hardware firewall, you can implement the second-best setup (in terms of both security and performance), as shown in Figure 4.2. (It is recommended even more strongly in this case that your switch be a gigabit switch.)
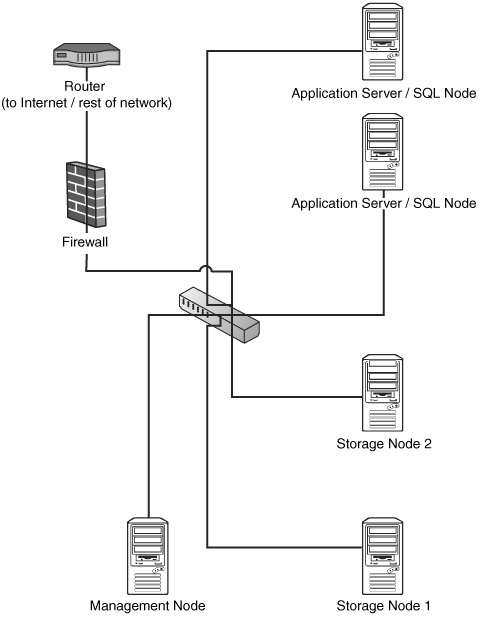
The setup shown in Figure 4.2 requires the hardware firewall to follow a simple rule that says something like this: “Deny all traffic except to the two application servers on the ports that whatever application requires for clients to connect to it.”
This may seem unclear, so let’s consider an example: “Ports that whatever application requires” would be 80 for HTTP, 443 for SSL, 3306 for MySQL client access, and so on. In other words, you could only allow ports that are actually required for your end users to connect to the servers, and this depends on what application your end users are connecting to.
Such a firewall should also filter egress traffic, again denying all traffic except traffic that is specifically required for the application to run.
If you do not have access to a hardware firewall, then security can become very difficult, and you will have to be very careful with your software firewalls. To start with, you should be very careful with your network partitioning to make sure that malicious elements can’t either sniff data traveling between nodes in your cluster or, worse, modify it with spoofed packets. Many routers incorporate features that can block both of these forms of attack; it is certainly worth making sure that yours are configured to do so and that ideally your cluster is on a dedicated network segment.
In a typical cluster, you will be left with two “zones” of nodes, as shown in Figure 4.3.
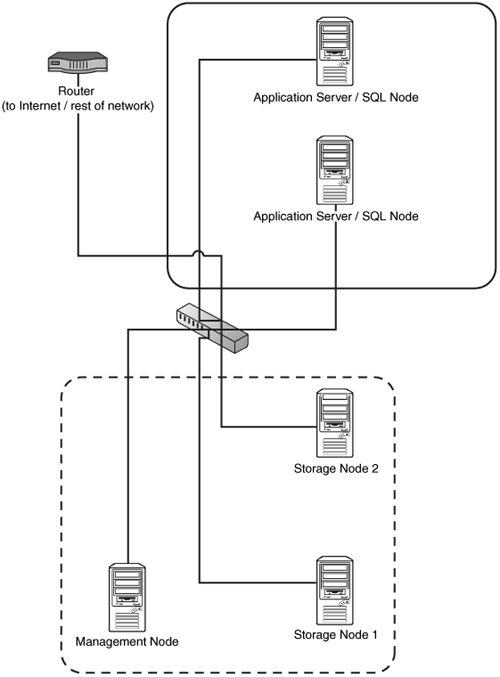
Figure 4.3 shows the storage and management nodes in one zone (dotted box). These nodes need to be able to communicate with each other and communicate with the SQL nodes. The figure also shows a zone that contains the application servers (solid box). These nodes need to be able to communicate with the users of your application and communicate with the storage nodes.
It is essential that the users of the application are not able to communicate with the storage and management nodes directly. Otherwise, malicious traffic could bring down your cluster. You therefore need to be very careful with your software firewalls, and you need to block everything that is not necessary as discussed in the next section.
This section covers the most restrictive firewall ruleset possible for the sample cluster shown in Figure 4.3. It explains what rules you want, and then it shows the exact configuration required for an APF firewall.
For the application nodes, you want rules that operate like this:
![]()
DENY all traffic unless
![]() It comes from a management or storage node (any port; TCP or UDP)
It comes from a management or storage node (any port; TCP or UDP)
Note
It is possible to define exactly what ports each node will actually use, but there seems little point.
![]() It comes from the rest of the network and it is on port 80 (TCP, assuming that your application is running HTTP; change this to whatever your application is running)
It comes from the rest of the network and it is on port 80 (TCP, assuming that your application is running HTTP; change this to whatever your application is running)
Note
We assume at this stage that you are actually running your application on the application servers in Figure 4.3 (that is, that they are running SQL nodes and the application is connecting to localhost). This is the most standard way of doing it, but you can of course put your application on a separate set of servers and have them connect to a MySQL server on 3306 running on the application servers in Figure 4.3.
For the storage nodes, you want rules that work like this:
![]()
DENY all traffic unless
![]() It comes from another management or storage node (any port; TCP or UDP)
It comes from another management or storage node (any port; TCP or UDP)
![]() It comes from an application server and is on port 1186 (TCP or UDP)
It comes from an application server and is on port 1186 (TCP or UDP)
Linux is blessed with many excellent software firewalls. The ones most commonly used are based on a package called iptables. iptables is itself a development of an older and in its own time very popular system called ipchains (which itself was based on a package called ipfw for BSD).
However, iptables is rather complex to configure directly, and we suggest that you use a program called APF to configure your firewall, particularly if you are new to Linux software firewalls, because APF produces the correct iptables rules for you based on a simple-to-understand configuration file. APF also has several modules that make it an excellent choice as a firewall, including brute force detection (which is essential for any Internet-facing server with SSH or any other interface enabled) as well as advanced denial of service mitigation. APF is released under the General Public License and is completely free.
IPTables is installed by default on almost all Linux distributions. It operates as a set of rules, and every time the Linux kernel receives or wants to send a packet, it runs through the rules until it finds one that matches the packet and defines what to do with it. If it does not find a rule that matches the packet, the fate of the packet is determined by the default action, which is typically DROP.
APF has a very simple configuration file that sets the global options and then there are two extra files—one that specifies traffic that you certainly want to get rid of (drop) and one that specifies traffic that you certainly want to allow.
The following sections show how to set up servers to disallow all traffic except SSH on all nodes from a certain IP address and web traffic on port 80 to the application nodes.
APF is released as a tar package that you must untar and install. However, it does not require compiling, and the installation process is very simple, as shown here:
[user@host] su -
Enter Password:
[root@host] cd /usr/src/
[root@host] wget http://www.rfxnetworks.com/downloads/apf-current.tar.gz
--12:49:19-- http://www.rfxnetworks.com/downloads/apf-current.tar.gz
=> 'apf-current.tar.gz'
Resolving www.rfxnetworks.com... 67.15.39.216
Connecting to www.rfxnetworks.com[67.15.39.216]:80... connected.
HTTP request sent, awaiting response... 200 OK
Length: 82,187 [application/x-gzip]
100%[====================================>] 82,187 57.39K/s
12:49:22 (57.30 KB/s) - 'apf-current.tar.gz' saved [82,187/82,187]
[root@host] tar -xvzf apf-current.tar.gz
apf-0.9.5-1/
(output from tar command here)
[root@host] cd apf*
[root@host] ./install.sh
Installing APF 0.9.5-1: Completed.
Installation Details:
Install path: /etc/apf/
Config path: /etc/apf/conf.apf
Executable path: /usr/local/sbin/apf
AntiDos install path: /etc/apf/ad/
AntiDos config path: /etc/apf/ad/conf.antidos
DShield Client Parser: /etc/apf/extras/dshield/
Other Details:
Listening TCP ports: 111,631,1024,1186,3306
Listening UDP ports: 68,111,631,804,1024
Note: These ports are not auto-configured; they are simply presented
for information purposes. You must manually configure all port options.
[root@host]
Congratulations! You have installed APF. However, by default, APF will disable itself every 5 minutes (this is in case you deny access to SSH from your IP address by mistake and lock yourself out). You also need to configure it in a bit more detail, as described in the following section.
You now need to configure the main configuration APF file: /etc/apf/conf.apf. This file contains settings such as what ports are open to all source IP addresses and whether to filter egress (outgoing) traffic.
The following lines are the ones you are likely to be interested in:
![]()
IG_TCP_CPORTS=“22”—You want to make this IG_TCP_CPORTS=“22,80” on your application servers to allow web traffic in. (You should leave it alone for all servers not running your application; clearly, if your application is not running on port 80 (HTTP), you should put in the correct port.) Also, if you are going to only allow SSH traffic in from one IP address or a class of IP addresses, you want to remove 22 here and add it later to the allow_hosts.rules file.
![]()
EGF=“0”—This is where you set whether you filter outgoing traffic (1=yes). This is not a bad idea and makes life a little bit harder for any malicious users who may attempt to take control of your server.
![]()
EG_TCP_CPORTS=“21,25,80,443,43”—If you filter outgoing traffic, this is where you set what ports you want to allow out. Note that you should not put any cluster ports in here; you should allow only those ports for individual IP addresses for extra security, which we do later in this chapter, in the allow_hosts.rules file.
Finally, you should change the line right at the top of the file that by default is DEVM=“1” and set it to DEVM=“0”. Otherwise, your firewall will disable itself every 5 minutes.
You should now configure the allow_hosts.rules file that sets out exceptions to the global rules listed in the main file for some IP addresses.
You have two choices with this file:
![]() You can allow all traffic, incoming and outgoing, for all IP addresses involved in your cluster.
You can allow all traffic, incoming and outgoing, for all IP addresses involved in your cluster.
![]() You can restrict access to only certain ports, even when the traffic originated and ended up in your cluster nodes.
You can restrict access to only certain ports, even when the traffic originated and ended up in your cluster nodes.
This chapter covers how to do only the first option because it is perfectly secure and a lot easier and less likely to cause confusion. However, there is very good documentation for APF included with APF as well as excellent commenting of the allow_hosts.rules file, and if you want to lock everything down that little bit further, you can work out how to do it very quickly.
To allow all traffic from and to cluster nodes, in the file /etc/apf/allow_hosts.rules on all nodes, you simply put a list of the IP addresses of the nodes that make up your cluster, one per line. You then need to restart APF (by using service apf restart).
On any clean installation of MySQL, you should always ensure that MySQL is running as the unique and clearly defined underprivileged user mysql. This is the default behavior in most cases (in fact, it is quite difficult to run MySQL as root, but sometimes it can run as other users). To check your installation, you run the following command when MySQL is running:
[root@host]# ps aux | grep mysql
root 3749 0.0 0.4 5280 1060 ? S 00:02 0:00 /bin/sh
/usr/bin/mysqld_safe --pid-file=/var/run/mysqld/mysqld.pid
mysql 3778 0.0 1.1 124868 2820 ? Sl 00:02 0:00 /usr/libexec/mysqld
--defaults-file=/etc/my.cnf --basedir=/usr --datadir=/var/lib/mysql --user=mysql
--pid-file=/var/run/mysqld/mysqld.pid --skip-locking
--socket=/var/lib/mysql/mysql.sock
Notice that the /usr/libexec/mysqld daemon is running as the mysql user. If it is not (that is, if it is running as root), you need to follow these steps to make it run as a nonprivileged user:
1. Create the user mysql by using useradd mysql.
2. Stop the MySQL server by using service mysqld stop.
3. Change the ownership of DataDir (for both MySQL and MySQL Cluster), by using something like this:
chown –R mysql:mysql /var/lib/mysql
chown –R mysql:mysql /var/lib/mysql-cluster
4. Edit /etc/my.cnf to add user=mysql in the [mysqld] section.
5. Start MySQL server again by using service mysql start.
The other thing you should always do is to set a root password. This is so simple, yet many people fail to do it. After the installation process completes, you have a root user with no password. To change it, you run these commands:
[user@host]# mysql -u root
mysql> UPDATE mysql.user SET Password=PASSWORD('NEWPASSWORD')
->WHERE User='root';
mysql> FLUSH PRIVILEGES;
If MySQL processes on your application servers are listening only on localhost, you can further increase security without using firewalls by adding skip-networking to the [mysqld] section of /etc/my.cnf to stop MySQL from responding to TCP/IP requests.
Note
You must ensure that all local scripts connect using a UNIX socket and not via a TCP/IP connection to 127.0.0.1. This can sometimes cause problems, although most of the time, anything that tries to connect to localhost will do so via a socket if possible because that is much more efficient.
An Important Note on Permissions Tables
All the tables in the mysql table (which contain all the information that MySQL requires, including the list of users and permissions) must not be converted to NDB format and must therefore not be clustered. MyISAM is an excellent format for these tables because they are likely to be read a lot and hardly ever written to. Converting them to any other storage engine is likely to result in instability, and converting them to NDB guarantees instability.
If you have a large cluster and need to simplify management of it, you can use replication to maintain the mysql database (although you should make sure you set up replication only to replicate the mysql database—not the clustered databases, or you will get a mess). There are plans to allow the system tables to be switched into the NDB type in a future release of MySQL Cluster.
Managing a cluster in MySQL Cluster is likely to seem strange to you if you are used to installing a database server, configuring my.cnf, and forgetting about it (which many database administrators are). With MySQL Cluster, you need to proactively monitor your cluster to make sure that it remains healthy and well configured.
The following sections cover some tricks for managing a successful cluster.
Appendix B, “Management Commands,”Provides provides a complete list of the commands you can use in the management console, and it is well worth experimenting with some of the less commonly used ones if you have the time.
To issue commands to the management console, you can either enter the console first and then issue the commands, as you have been doing so far, or you can issue them all on the command line with the -e flag, as in the following example:
[root@localhost mysql-cluster]# ndb_mgm -e SHOW
Connected to Management Server at: localhost:1186
Cluster Configuration
---------------------
[ndbd(NDB)] 2 node(s)
id=2 @192.168.254.21 (Version: 5.0.13, Nodegroup: 0, Master)
id=3 @192.168.254.22 (Version: 5.0.13, Nodegroup: 0)
[ndb_mgmd(MGM)] 1 node(s)
id=1 @192.168.254.20 (Version: 5.0.13)
[mysqld(API)] 2 node(s)
id=4 @192.168.254.21 (Version: 5.0.13)
id=5 @192.168.254.22 (Version: 5.0.13)
If you wanted to, you could put the following line in your crontab to email you the status of your cluster every day at 1 a.m.:
00 1 * * * /usr/bin/ndb_mgm -e show |
mail -s "cluster status" [email protected]
However, the trick of passing commands to ndb_mgm on the command line is more useful when it comes to running things regularly. For example, to run a backup every hour at half past the hour, you could enter the following line in your crontab:
30 * * * * /usr/bin/ndb_mgm –e "START BACKUP"
| mail -s "backup results" [email protected]
You could also write a simple script such as the following that emails you if any node disconnects for some reason:
Note
If you have spare SQL nodes (that is, nodes that are often not connected) for backup restorations and other uses, you will have to modify this script to exclude them.
#! /bin/bash
# check.sh – checks all cluster nodes connected
/usr/bin/ndb_mgm –e SHOW | grep -v grep | grep "not connected" > /dev/null
if [ $? = 0 ]; then
/usr/bin/ndb_mgm –e SHOW | mail –s "CLUSTER ERROR: node down"
[email protected]
fi ;
You will then get an email containing the following output if a node fails:
From: root <root@hostname>
To: [email protected]
Subject: CLUSTER ERROR: node down
Connected to Management Server at: localhost:1186
Cluster Configuration
---------------------
[ndbd(NDB)] 2 node(s)
id=2 (not connected, accepting connect from 192.168.254.21)
id=3 @192.168.254.22 (Version: 5.0.13, Nodegroup: 0, Master)
[ndb_mgmd(MGM)] 1 node(s)
id=1 @192.168.254.20 (Version: 5.0.13)
[mysqld(API)] 2 node(s)
id=4 @192.168.254.21 (Version: 5.0.13)
id=5 @192.168.254.22 (Version: 5.0.13)
You can see that Node 2 has indeed died. You can run this script from cron every 5 minutes by putting the following line in crontab:
*/5 * * * * /root/scripts/check.sh >> /dev/null
As mentioned previously, however, this will fail if you have extra SQL nodes that are always not connected. The way to exclude these is to define their IDs and add a grep -v command to exclude them. For example, you might want to do this if you have the following cluster output when everything is working:
Cluster Configuration
---------------------
[ndbd(NDB)] 2 node(s)
id=2 @192.168.254.21 (Version: 5.0.13, Nodegroup: 0, Master)
id=3 @192.168.254.22 (Version: 5.0.13, Nodegroup: 0)
[ndb_mgmd(MGM)] 1 node(s)
id=1 @192.168.254.20 (Version: 5.0.13)
[mysqld(API)] 3 node(s)
id=4 @192.168.254.21 (Version: 5.0.13)
id=5 @192.168.254.22 (Version: 5.0.13)
id=6 (not connected, accepting connect from any host)
In other words, you want to exclude SQL node ID 6 from the alert system if it happens to be down. You can do this by using the following command:
/usr/bin/ndb_mgm –e SHOW | grep -v grep
| grep –v id=6 | grep "not connected" > /dev/null
You will often find it useful to complete a rolling cluster restart—for example, after you have changed DataMemory or after you have upgraded your cluster nodes. The manual method for doing restarts is covered in Chapter 2, “Configuration”. You have probably noticed that this is a time-consuming process that requires you to log in to each node. (Imagine how long this would take for clusters with more than 10 servers!) This section shows how to create a script that does this for you. This script needs to run on the management daemon, and it uses SSH between nodes; we strongly suggest that you set up authentication with keys to allow the management daemon to log in to the storage nodes as root without passwords. (Otherwise, you will have to enter the root password many times during the execution of the script.) You can find a guide to do this at this book’s website, www.mysql-cluster.com.
Rather than just give the script to you in one piece, we have split it into sections and now explain what each does so you can modify it for your needs. Even if you are new to bash scripting, you should be able to make minor modifications to suit your particular needs.
To start with, you define some variables for the whole script:
#! /bin/sh
#
# Restart all nodes with the --initial parameter
# Check each node comes back up before restarting next node
# Restart management daemon first.
#
# **NOTE**
# This script will only work if all storage nodes are
# currently "up" and working.
# Define variables
export CLUSTER_PATH="/var/lib/mysql-cluster"
#DataDir on the storage nodes
export NDB_MGMD="/usr/sbin/ndb_mgmd"
#Path to management daemon on management node (the node you run the script off)
export NDB_MGM="/usr/bin/ndb_mgm"
#Path to management client on management node
export NDBD="/usr/sbin/ndbd"
#Path to storage daemon on storage nodes
export RESTART_MYSQL="/etc/rc.d/init.d/mysql restart"
#Path to the mysql init script on the SQL nodes – on some distros this is
# different, e.g. /etc/init.d/mysqld restart
export STORAGE_NODES="192.168.254.21 192.168.254.22"
List of storage nodes (list of IP addresses separated by a space)
export SQL_NODES="192.168.254.21 192.168.254.22"
List of SQL nodes, as per list of storage nodes.
Now you have defined your variables, so this script must restart the management daemon. First, you check whether it is active, and if it is, you kill it. Then you start it, wait a few seconds, and check that it is still alive:
#
# PART 1: Restart Management Daemon
#
# Stop ndb_mgmd
ps -ef|grep ndb_mgmd|grep -v grep > /dev/null
if [ $? -eq 0 ]; then
echo "stopping ndb_mgmd on management node"
pkill -9 ndb_mgmd
echo "ndb_mgmd stopped"
sleep 2;
fi ;
# Start ndb_mgmd
echo "starting ndb_mgmd from directory $CLUSTER_PATH";
cd $CLUSTER_PATH
$NDB_MGMD
echo -e "
ndb_mgmd started; checking that it is still alive in 2 seconds";
sleep 2;
# Check ndb_mgm is running
ps -ef | grep -v grep | grep ndb_mgmd > /dev/null
if [ $? = 1 ]; then
# Means that ndb_mgmd was not found in process list
echo "ndb_mgm is not running; aborting restart.";
exit;
fi ;
echo "ndb_mgmd is still running; stage 1 success!";
Now the script needs to start restarting the storage nodes. It is critical that at any one time, it kills only one storage node so that the script will wait until each node hits the “started” state before moving on to the next node in the list. You must make sure that all storage nodes are started before you run this script; otherwise, you could potentially cause a cluster crash. Here is the next part of this script:
#
# PART 2: Restart Each storage node
#
for each in $STORAGE_NODES; do
# Check if ndbd is running; stop it nicely if it is
# and if it fails to stop kill it
echo -e "
Checking if ndbd is running on storage node $each"
ssh -t $each 'ps -ef | grep -v grep | grep ndbd' > /dev/null
if [ $? -eq 0 ]; then
echo "ndbd is already running on host $each; stopping process nicely"
ndb_mgm -e "show" | grep -m 1 $each | awk '/id=/ {
print $1 }' | awk 'BEGIN { FS = "=" } ; { print $2 }';
export NUM=`ndb_mgm -e "show" | grep -m 1 $each |
awk '/id=/ { print $1 }' | awk 'BEGIN { FS = "=" } ; { print $2 }'`
ndb_mgm –e $NUM STOP
sleep 10;
echo “node given 10 seconds to die nicely,
now killing process just in case it is still alive"
ssh -t $each pkill -9 ndbd
echo "ndbd stopped on host $each"
sleep 1;
fi ;
echo "Now starting ndbd on host $each"
ssh -t $each $NDBD --initial
echo "ndbd started on host $each"
# Now, check that the node comes back up -
# otherwise we risk a cluster crash if we repeat this loop
# because we kill another node)
echo -e "
checking that ndbd on host $each has completely started"
echo "waiting for node on host $each to completely start"
while true; do
$NDB_MGM -e show | grep
"@$each (Version: [[:digit:]][.][[:digit:]][.][[:digit:]][[:digit:]],
Nodegroup:" > /dev/null
if [ $? = 1 ];
then
echo "Waiting...."; sleep 3;
else
echo "Node started OK"; sleep 5; break;
fi
done
done
As a final action, the script logs in to each SQL node to restart it. This is optional but often a good idea after a complete cluster restart:
#
# PART 3: Restart Each SQL node
#
for each in $SQL_NODES; do
echo -e "
Restarting SQL node $each"
ssh -t $each $RESTART_MYSQL
done
To complete the process and for information only, the script now prints the new and completed status of the cluster:
You will find that you often need to issue a SQL command to all your SQL nodes—for example, when adding a user (assuming that you have not set up replication for the mysql database) or when creating a database (which must be done on each SQL node before the node will “see” the database).
The following script will help you here. It logs you in from the local machine rather than logging in remotely, which allows it to log you in to nodes that only allow SQL access to the localhost. The only requirement is that the MySQL root password must be the same on each SQL node:
#! /bin/sh
#
# Issue SQL command to each SQL node in cluster
#
# Define variables
export ROOT_PASSWORD="mypass"
export DATABASE="mydb"
export SQL_QUERY="SELECT 1"
export SQL_NODES="192.168.254.21 192.168.254.22"
for each in $SQL_NODES; do
echo -e "
Issuing command to SQL node $each"
ssh -t $each echo "$SQL_COMMAND" | /usr/bin/mysql
-uroot –p $ROOT_PASSWORD $DATABASE
done
Chrooting is a verb created from the chroot(2) system call, which is a call made by processes that want to change the root of the file system they will see from then on.
When a process requests to chroot to a given directory, any future system calls issued by the process will see that directory as the file system root. It therefore becomes impossible for that process to access files and binaries outside the tree rooted on the new root directory. This environment is known as a chroot jail.
Running MySQL in a chrooted environment is another layer of security that starts with running your MySQL Cluster process as a different user (mysql). If you have MySQL running in a chrooted environment, you make it exceptionally difficult for a hacker to take the system down or take control of the system, even if the hacker manages to take control of the process via a vulnerability such as a buffer overflow.
It is not currently possible (as far as we can tell) to run the MySQL Cluster daemons in a chrooted environment, but you should run your SQL nodes in such an environment if at all possible. If you are trying to do this, it helps if you compile MySQL by using --with-mysqld-ldflags=-all-static to avoid having to put every library that MySQL Cluster requires in the chroot directory.
Getting MySQL to run in a chrooted enviroment is a very similar process to the process of compiling from source described in Chapter 1, “Installation,” although there are subtle differences, and if you have already compiled from source, we recommend that you recompile. If you have already installed a MySQL binary, we recommend that you remove it by either deleting the folder if you downloaded a binary tarball or removing the RPMs.
To obtain the MySQL Cluster source, you use the following commands:
[root@host] cd /tmp/
[root@host] wget <url-of-mirror>/mysql-5.0.12-beta.tar.gz
[root@host] tar -zxvf mysql-5.0.12-beta.tar.gz
[root@host] cd mysql-5.0.12-beta
Next, you compile and install it:
[root@host] ./configure --prefix=/usr/local/mysql --with-ndbcluster
>--with-mysqld-ldflags=-all-static --with-mysqld-user=mysql
>--with-unix-socket-path=/tmp/mysql.sock
[root@host] make
[user@host] su -
[root@host] make test
[root@host] make install
[root@host] strip /usr/local/mysql/libexec/mysqld
[root@host] scripts/mysql_install_db
[root@host] cp support-files/my-medium.cnf /etc/my.cnf
Then you create the relevant directories in the chroot folder from which you want mysql to run:
[root@host] mkdir -p /chroot/mysql/dev /chroot/mysql/etc /chroot/mysql/tmp
[root@host] mkdir –p /chroot/mysql/var/tmp /chroot/mysql/usr/local/mysql/libexec
[root@host] mkdir –p /chroot/mysql/usr/local/mysql/share/mysql/english
Next, you set the correct directory permissions:
[root@host] chown -R root:sys /chroot/mysql
[root@host] chmod -R 755 /chroot/mysql
[root@host] chmod 1777 /chroot/mysql/tmp
When the directories are set up, you copy the server’s files:
[root@host] cp /usr/local/mysql/libexec/mysqld
>/chroot/mysql/usr/local/mysql/libexec/
[root@host] cp /usr/local/mysql/share/mysql/english/errmsg.sys
>/chroot/mysql/usr/local/mysql/share/mysql/english/
[root@host] cp -r /usr/local/mysql/share/mysql/charsets
>/chroot/mysql/usr/local/mysql/share/mysql/
[root@host] cp /etc/hosts /chroot/mysql/etc/
[root@host] cp /etc/host.conf /chroot/mysql/etc/
[root@host] cp /etc/resolv.conf /chroot/mysql/etc/
[root@host] cp /etc/group /chroot/mysql/etc/
[root@host] cp /etc/my.cnf /chroot/mysql/etc/
Then you copy the mysql databases that contain the grant tables (created by mysql_install_db) that store the MySQL access privileges:
[root@host] cp -R /usr/local/mysql/var/ /chroot/mysql/usr/local/mysql/var
[root@host] chown -R mysql:mysql /chroot/mysql/usr/local/mysql/var
Next, you create a null device within the chroot:
[root@host] mknod /chroot/mysql/dev/null c 2 2
[root@host] chown root:sys /chroot/mysql/dev/null
[root@host] chmod 666 /chroot/mysql/dev/null
You then need to edit a few files to remove all users and groups apart from mysql in the chroot environment (this prevents any other user from running inside the chroot jail and is critical for the security of the jail).
In the file /chroot/mysql/etc/group, you delete all lines except the following:
root:x:0:
mysql:x:500:
In file /chroot/mysql/etc/passwords, delete all lines apart from
root:x:0:0:MySQL Cluster:/dev/null:/bin/false
mysql:x:500:501:MySQL Server:/dev/null:/bin/false
In order to run MySQL as a nonprivileged user, you need to install the chrootuid package:
[root@host] cd /usr/src/
[root@host] wget ftp://ftp.porcupine.org/pub/security/chrootuid1.3.tar.gz
[root@host] tar -zxvf chrootuid1.3.tar.gz
[root@host] cd chrootuid1.3
[root@host] make
[root@host] make install
Now, if you have done all this correctly, you can start mysql by using the following command:
[root@host] chrootuid /chroot/mysql mysql /usr/local/mysql/libexec/mysqld &
Finally, you need to create a symlink from /tmp/mysql.sock to the chroot /tmp/mysql.sock so you can connect to your server locally:
[root@host] ln -s /chroot/mysql/tmp/mysql.sock /tmp/mysql.sock
You should now be able to start the mysql client:
[root@host] mysql
Welcome to the MySQL monitor. Commands end with ; or g.
Your MySQL connection id is 2 to server version: 5.0.12-beta-log
Type 'help;' or 'h' for help. Type 'c' to clear the buffer.
mysql> show databases;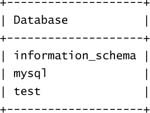
3 rows in set (0.03 sec)
mysql>
Your application should now be able to connect to the chrooted MySQL process, which should still work fine when it comes to connecting to the other nodes in the cluster.
If you consider security as a process of putting up walls for attackers, you should continue to put up walls until such a time as the cost to you (either in terms of time, money, or hassle for your users) becomes greater than the return that the extra wall gives you in terms of extra security. Few users actually run MySQL in a chrooted environment unless they are in a high-risk environment (for example, shared hosting), but it is an option worth considering.