

✓ | How to approach HTML forms processing in a powerful new way. |
✓ | How to replace traditional HTML form elements with new server controls. |
✓ | How to make events on the browser execute code on the Web server. |
✓ | How to preserve form data from one submission to the next. |
✓ | How to use validation server controls to check the syntax of visitor input. |
Web pages have included HTML forms since the early days of the Web. A form, in this sense, is an area on a Web page that contains interactive elements such as text boxes, drop-down lists, check boxes, option buttons, and push buttons. The HTML code for a form appears between <form> and </form> tags.
In another sense, forms are the most common way that Web visitors interact with programs on a Web server. Server-based programs simply require more information than clicking an ordinary hyperlink can provide. Forms are so important that ASP.NET gives them special attention and extensive new support. This chapter will introduce these features.
The traditional approach to processing HTML forms—and the approach used in classic ASP—was that sending the form to the Web visitor and receiving the completed input were two separate operations. In fact, many applications used two different Web pages. The first page displayed the form. Clicking the form’s Submit button sent the visitor’s input to the second page.
The second page received the visitor’s input and took one of two actions. Either it rejected the input and sent the visitor an error message, or it accepted the input, took action (such as updating a database or sending mail), and then sent the visitor a success message.
This approach can be awkward, especially when the second Web page rejects the visitor’s input. In that case, the visitor must read the error message, memorize it, click the browser’s Back button, and then fix the incorrect field. If the original submission contained several errors, the chances of remembering and fixing all of them are remote.
It’s quite possible—using classic ASP or other methods—to combine these two Web pages, but this introduces further complexities. One problem is that the combined page needs to behave differently when it’s first displaying the form than after the visitor supplies information and clicks Submit. Another issue is that on all but the first execution, the combined page needs to modify the HTML for each form element so that it preserves the visitor’s most recent input. These modifications require lots of extra programming.
Another difficult problem with traditional HTML forms is that interaction between the form and the Web server is limited. It’s very difficult, for example, to arrange a series of list boxes so that a selection in the first list box affects the choices in the second. When the visitor makes a choice from the first list—choosing a country, for example—some script code on the browser must set an indicator and then submit the form. The receiving page or program on the server must then sense the indicator and decide that
It’s not displaying the form initially.
It’s not actually processing a submission.
It needs to redisplay the same form with every field but one modified to reflect the visitor’s most recent input. The one field that doesn’t repeat the visitor’s last input is, of course, the second list box. The server needs to fill this list box with a list of cities in the selected country.
The more ways a form on the browser needs to interact with code on the server, the more complicated the server code must be. As a practical matter, very few Web developers support much interaction with their forms. A Submit button is usually as good as it gets.
ASP.NET includes a broad array of new features that make HTML forms easier than ever for the programmer and richer than ever for the Web visitor. Collectively, these features comprise a technology called Web Forms. Here are its major components.
The <form> tag. The first step in creating a Web Form, as with all HTML forms, is to code a pair of <form> and </form> tags. In the case of Web forms, however, it’s critical that the <form> tag contain a runat="server" attribute. This attribute tells ASP.NET to load the form into the server’s memory for processing.
HTML server controls. Web Forms support the same elements as ordinary HTML forms: <input> tags, <select> tags, and all the rest. Each such element must, however, contain the runat="server" attribute. If you forget to code this attribute, the tag won’t be available to your server-side code.
Web server controls. ASP.NET also provides a selection of new and upgraded form elements called Web server controls. To add these new elements to a form, you code new HTML tags that include the ubiquitous runat="server" attribute.
Web server controls provide all the same functionality as HTML server controls, plus new and enhanced features, and some entirely new kinds of tags.
Although you code them as if they were HTML, Web server controls are objects that run on the server and send ordinary HTML to the browser. Therefore, they have all the power and convenience of new HTML tags without the problems of dealing with older browsers.
User controls. If you can’t find an HTML server control or Web server control that does what you want, you can write your own! ASP.NET makes this very easy to do. For more information about writing user controls, refer to Chapter 9.
Web Form events. ASP.NET handles all the details of connecting (Microsoft likes to say wiring) clicks and changes on the browser to code on the Web server, making it easy to update all or part of a Web page as the visitor fills it out.
ViewState. This facility remembers the state of the your Web Form from one execution to the next. This means, for example, that when a visitor fills in a form and sends it to the server, the server will automatically send the visitor’s entries back to the browser when it redisplays the form. You can use the same facility to save any values you want from one execution to the next.
The ViewState effectively solves the problem of preserving visitor input through several interactions, and it does so with no effort whatsoever from the programmer.
Validation server controls. This is another type of control that you code with a special tag and which does a special job. In this case, the job is checking form entries for errors and displaying messages if criteria aren’t met.
Basically, in a validation server control you specify the name of a form element to check, a condition, and an error message. If the condition is False, the error message appears wherever you coded the validation server control tag. If the condition is True, the validation server control displays nothing.
A handy switch called Page.IsValid is True if all validation server control conditions are True, and False if any are False.
To take advantage of ASP.NET’s advanced control over form elements, its ViewState services, and its event structure, you must enclose all form controls on the page within an HtmlForm control. That is, you must put the form controls between <form runat="server"> and </form> tags. These tags mark the boundaries of an ASP.NET Web Form. The general format of the Web Forms <form> tag is as follows:
<form
   runat="server"
   id="programmaticID"
   method=POST | GET
   action="srcPageURL"
>
<!-- Form controls and other page elements go here . -->
</form>
Here’s how to code each attribute on the HtmlForm control:
runat Must always be server.
id Assigns a name to the form. It’s best to assign names that begin with a letter and continue with only letters, numbers, and underscores.
method Specifies POST or GET. The Web form default—and usually the best choice—is POST. This method safely transmits all the form field values, the ViewState information, and any event information in the body of the HTTP request.
The GET method transmits all the form field, ViewState, and event information in a query string appended to the page’s URL. This action exposes these values to display and tampering in the browser’s Address box, to storage and later submission from a Favorites shortcut, and to truncation.
action Specifies the URL of the page that will process the form. This attribute defaults to the URL of the page that displayed the form, which is almost always the correct choice.
Because the defaults for the method and action attributes are so often correct, it’s very common to omit these attributes entirely.
You can code only one <form runat="server"> tag on each Web page. If you try to put two or more of these tags on the same page, ASP.NET will reject the page and display an error message.
Tip
To create the effect of two or more forms on the same page, group each set of form controls visually and wire each Submit button to is own subroutine on the server.
Web Forms almost always use the same page for initial display, for error checking, and for eventual processing. The ASP.NET term that describes this is PostBack, because the browser submits (or posts, if you prefer) the form data back to the same page that initially displayed the form. Within server-side code, the expression Page.IsPostBack is True whenever a form submits itself to the same page that displayed it (that is, whenever the form is talking to itself). If Page.IsPostBack is False, the request to run the page came from somewhere else: a hyperlink on another page or an address typed into the browser’s Address box, for example.
By default, ASP.NET treats HTML elements as plain text. In this mode, the elements aren’t accessible to any server-side program code. To load ordinary HTML tags as objects on the server, you must add a runat="server" attribute to each one. Only then can you manipulate such tags with ASP.NET code.
When an HTML tag contains a runat="server" attribute, ASP.NET calls it an HTML server control. The table in Using Assignment Operators lists the available types. Note that some types don’t correspond to a specific tag, but instead provide methods and properties that other types inherit.
HTML server controls must be well formed. This means that all the attribute names and values must have correct syntax and that the tag itself must have a proper ending tag or trailing slash. In addition, HTML server controls you wish to use as form elements must reside between <form runat="server"> and </form> tags.
ASP.NET doesn’t require that tags lacking the runat="server" attribute be completely well formed. It does, however, need to inspect each tag to locate those with runat="server" attributes. This inspection requires that all HTML elements—runat="server" or not—be properly closed and nested. Overlapping tags such as <a><p></a></p> aren’t allowed.
If you add the runat="server" attribute to any tag not listed in the table in Using Assignment Operators, ASP.NET makes it an HtmlGenericControl. This is how ASP.NET works with tags such as <span>, <div>, <body>, and <font>.
HTML Server Controls | ||
|---|---|---|
Name | HTML Tag | Form Field Value |
HtmlAnchor | <a> | |
HtmlButton | <button> | |
HtmlContainerControl | All controls that require a closing tag. | |
HtmlControl | All controls in the Web Forms page framework. | |
HtmlForm | <form> | |
HtmlGenericControl | All HTML tags that lack a specific .NET Framework class. | |
HtmlImage | <img> | |
HtmlInputButton | <input type=button> | |
<input type=submit> | ||
<input type=reset> | ||
HtmlInputCheckBox | <input type=checkbox> | Checked |
HtmlInputControl | All HTML input controls, such as <input type=text>, <input type=submit>, and <input type=file> | |
HtmlInputFile | <input type=file> The PostedFile.SaveAs PostedFile.ContentType method saves the upPostedFile.ContentLength loaded file to the server’s file system. | PostedFile.FileName |
HtmlInputHidden | <input type=hidden> | Value |
HtmlInputImage | <input type=image> | |
HtmlInputRadioButton | <input type=radio> | Checked |
HtmlInputText | <input type=text> <input type=password> | Value |
HtmlSelect | <select> | Value SelectedIndex |
HtmlTable | <table> | |
HtmlTableCell | <td> and <th> | |
HtmlTableCellCollection | All <td> and <th> elements within an HtmlTable control. | |
HtmlTableRow | <tr> | |
HtmlTableRowCollection | All <tr> elements within an HtmlTable control. | |
HtmlTextArea | <textarea> | Value |
For the most part, HTML server controls use the same attributes as their ordinary HTML counterparts. The exceptions are:
runat="server". Marks the tag as an HTML server control.
id. Assigns a name to the control. It’s best to assign names that begin with a letter and continue with only letters, numbers, and underscores. ASP.NET always identifies tags by means of id attributes, even if ordinary HTML identifies them by means of name attributes.
OnServerClick. Assigns a server-side event handler to any tag that responds to an onClick event on the browser.
OnServerChange. Assigns a server-side event handler to any tag that responds to an onChange event on the browser.
There are several ways your code can inspect and modify other, more ordinary attributes of HTML server controls:
The Attributes collection. This collection contains one entry for each attribute currently assigned to a tag. Suppose, for example, that you coded the <body> tag like this:
<body id="genBody" runat="server" />
To change the page background color to blue, you could code (within a code block, of course):
genBody.Attributes("bgcolor") = "#0000FF"When ASP.NET wrote out the <body> tag, it would include the bgcolor="#0000FF" attribute.
When you assign attributes this way, ASP.NET checks neither the name nor the value. The following assignment, for example, doesn’t generate an error:
genBody.Attributes("flavor") = "chocolate"Your <body> tag will, of course, contain a flavor="chocolate" attribute. There’s no accounting for taste.
The Styles collection. This collection provides access to cascading style sheet (CSS) properties in much the same way that the Attributes collection provides access to HTML attributes. Using the same <body runat="server"> tag, the following statements would set the default font to sans-serif and the default foreground color to yellow.
genBody.style("font-family") = "sans-serif"
genBody.style("color") = "yellow"
The InnerHTML property. A generic tag’s InnerHTML contains all the text between the tag’s opening and closing tags, including HTML code. If you coded the following tag
<p id="parMsg" runat="server">Everything is <b>OK</b>.</p>
then parMsg.InnerHTML would initially contain Everything is <b>OK</b>. To change this, you could code
parMsg.InnerHTML = "This is <i>very</i> bad."
and the word very would appear in italics.
The InnerText property. This property works very much like the InnerHTML property except that it doesn’t include any HTML tags. If you coded the following HTML
<p id="parMsg" runat="server">No news is <b>good</b>news.</p>
then parMsg.InnerText would contain No news is good news. If you tried to change this by coding
parMsg.InnerText = "Not <i>that</i> again!"
the browser would receive Not <i>that<i> again! Note that < and > have replaced < and > so that the browser displays the angle brackets as text.
Using <span> tags as generic controls is a handy way of displaying variable text on a Web page without resorting to code render blocks. To display an error message, for example, you could put the following tag where you want the message to appear:
<span id="spnErrMsg" runat"server" />
Then, in the Page_Load subroutine or some other event handler, you could code statements like the following:
spnErrMsg.InnerText = "Sorry, can't deal with quantity of -1."
Some HTML server controls implement selected attributes as full-blown object properties. The HtmlImage control, for example, supports the src and alt attributes as properties. If your page contained the following HtmlImage control:
<img src="mypetmoose.jpg" id="imgPetPic" runat="server" />
and you wanted to write code that made this tag display the picture yourturtle.jpg, you could code
imgPetPic.src = "yourturtle.jpg"
If you wanted your code to specify alternate text of Pets are great, you could code
imgPetPic.alt = "Pets are great"
even if you didn’t code an alt attribute in the original tag.
If an HTML server control supports an attribute as a fully implemented property, it’s generally better to use the property than to use the Attributes collection, the Styles collection, or the InnerHTML or InnerText properties. In case of doubt, you can either
Try using the fully implemented property notation first, and fall back to one of the other approaches if you get a <name> is not a member of <object> message.
Look up the control’s properties in the MSDN Library documentation.
The ability to modify page elements this way from code is a powerful facility and, unlike classic ASP, you don’t have to garbage up your HTML by putting <% and %> tags in odd places.
To look up the syntax of a specific HTML server control, search the MSDN Web site (msdn.microsoft.com/library) for the terms ASP.NET Syntax and HTML Server Controls.
ASP.NET pages can still receive form field values the way classic ASP pages have always done. The following statement retrieves the value of a form field named txtEntry and submitted with the POST method:
strEntry = Request.Form("txtEntry")Likewise, the following expression retrieves the value of a similar field submitted with the GET method:
strEntry = Request.ServerVariables("txtEntry")Despite the fact that expressions like these still work, it’s not common to find them in ASP.NET pages because you can only receive values this way—you can’t send them. ASP.NET form fields have properties that can both receive and send form field values, and it’s these properties that ASP.NET programmers most often use. The property names for each type of form field appear in the Form Field Value column of the HTML Server Controls table in Using Assignment Operators.
The following statement, for example, retrieves the value of a hypothetical text box named txtEntry:
strEntry = txtEntry.Value
The following statement sets the value of the same form field:
txtEntry.Value = "Please enter some data here."
When ASP.NET renders a Web page, it automatically sets the value of each form element to the corresponding server control’s property value, which means that in the text box the Web visitor would see the words "Please enter some data here."
Keep in mind that server controls identify form fields differently than the Request.Form and Request.QueryString collections:
Server controls identify form elements based on id= attributes.
The Request.Form and Request.QueryString collections identify form elements based on name= attributes.
You can make both of these names the same in your code, but doing so is seldom necessary. In most cases, you can skip coding a name= attribute completely. ASP.NET will generate its own browser-side name for the field.
There is, however, one case where you must code both name= and id= attributes. For radio buttons, you must assign the same name= identity—but a different id= identity—to each button in the same group. (A group, in this sense, means a group of radio buttons where selecting one button deselects all others.) Here’s an example:
<input type="radio" runat="server"
       name="radSize" id="radSmall" value="Small" />
<input type="radio" runat="server"
       name="radSize" id="radMedium" value="Medium" />
<input type="radio" runat="server"
       name="radSize" id="radLarge" value="Large" />
Because all three buttons have the same name= attribute—radSize—selecting one—whether in the browser or in code—will deselect the others. The following statement, for example, will select the Large button and deselect the others:
radLarge.checked = True
From an ASP.NET standpoint, the name= attribute is for grouping and the id= attribute is for testing or changing the state of an individual button.
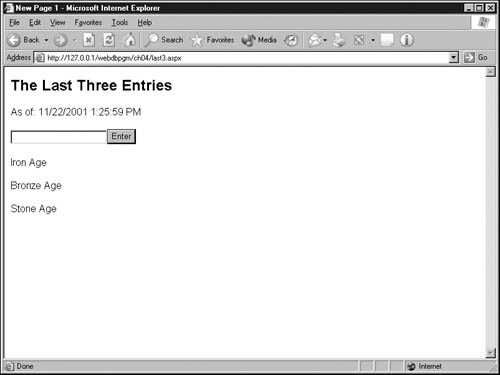
The following procedure will create a simple Web Form consisting of one text box and one Submit button. At any given time, the form will display the last three strings of text submitted, as shown in the following graphic. If you’d rather look at the finished code than enter it yourself, open the last3.aspx page in the ch04 folder you installed from the companion CD.
Open a new empty Web page containing the usual structural tags. Apply any page-level formatting you want. For example, the sample results include the following statement, which links to a shared Cascading Style Sheet file named normal.css:
<link rel="stylesheet" type="text/css" href="../normal.css">
Add the following declaration above the <html> tag:
<%@ Page Language="VB" Explicit="True" Debug="True"%>
After the <body> tag, add a heading and then a paragraph that will display the current date and time. Your code should resemble the following:
<h2>The Last Three Entries</h2>
<p>As of: <span id="spnDate" runat="server"></span></p>
The <span> tag has id and runat="server" attributes so that code elsewhere in the page can modify the text it displays.
After the declaration you created in step 2—and before the <html> tag—add a code declaration block as shown here:
<%@ Page Language="VB" Explicit="True" Debug="True"%>
<script runat="server">
</script>
<html>
Inside the code declaration block, define a subroutine that runs whenever ASP.NET loads the page. This requires the code shown here:
<script runat="server">
Sub Page_Load (sender As Object, e As EventArgs)
End Sub
</script>
Inside the Page_Load subroutine, add a statement that loads the spnDate control from step 2 with the current date and time. Here is the new statement:
Sub Page_Load (sender As Object, e As EventArgs)
  spnDate.InnerHTML = Now()
End Sub
Add a Web Form to the body of the Web page. To do this, add the following tags after the code you entered in step 2 (and just before the </body> tag):
<form runat="server">
</form>
Add a text box to the form you defined in the previous step. Put this text box inside a paragraph so that line breaks occur before and after it. This requires the code shown here:
<form runat="server">
<p><input type="text" id="txtEntry" size="20" runat="server"
/></p>
</form>
Add a Submit button to the end of the paragraph you just created. In other words, put the code that appears in blue just before the closing </p> tag:
<form runat="server">
<p><input type="text" id="txtEntry" size="20" runat="server"
/>
<input type="submit" value="Enter" runat="server" /></p>
</form>
Add three more paragraphs to the form, placing all three below the paragraph that’s already present. Within each paragraph, code a <span> tag that’s ready to receive a value from code:
<p><span id="spnEntry1" runat="server"></span></p>
<p><span id="spnEntry2" runat="server"></span></p>
<p><span id="spnEntry3" runat="server"></span></p>
Return to the code declaration block near the top of the page. Immediately after the statement you added in step 5, add an If statement that checks to see whether a PostBack has occurred. That is, add the code shown here:
Sub Page_Load (sender As Object, e As EventArgs)
  spnDate.InnerHTML = Now()
  If Page.IsPostBack Then
  End If
End Sub
Every time the visitor clicks the Submit button, some code needs to perform these steps in this order:
Copy the second previous value to the third previous value.
Copy the first previous value to the second previous value.
Copy the text box value to the first previous value.
Therefore, within the If statement you just created, add the code shown here:
If Page.IsPostBack Then
  spnEntry3.InnerHTML = spnEntry2.InnerHTML
  spnEntry2.InnerHTML = spnEntry1.InnerHTML
  spnEntry1.InnerHTML = txtEntry.Value
End If
Save the Web page in a folder that’s accessible through your Web server, giving it a file name of last3.aspx.
Load the last3.aspx page into your browser, taking care to specify an HTTP URL and not an ordinary file location.
Type a word into the text box and click Enter. The word should appear below the text box. Repeating this operation with a different word should display both words in order, and so forth. In addition, the time and possibly the date should change each time you click Enter.
The code for the complete Web page appears here:
<%@ Page Language="VB" Explicit = "True" Debug="True" %>
<script runat="server">
Sub Page_Load(sender As Object, e As EventArgs)
  spnDate.InnerHTML = Now()
  If Page.IsPostBack Then
    spnEntry3.InnerHTML = spnEntry2.InnerHTML
    spnEntry2.InnerHTML = spnEntry1.InnerHTML
    spnEntry1.InnerHTML = txtEntry.Value
  End If
End Sub
</script>
<html>
<head>
<title>New Page 1</title>
<link rel="stylesheet" type="text/css" href="../normal.css">
</head>
<body>
<h2>The Last Three Entries</h2>
<p>As of: <span id="spnDate" runat="server"></span></p>
<form runat="server">
  <p><input type="text" id="txtEntry" size="20" runat="server" />
  <input type="submit" value="Enter" runat="server" /></p>
  <p><span id="spnEntry1" runat="server"></span></p>
  <p><span id="spnEntry2" runat="server"></span></p>
  <p><span id="spnEntry3" runat="server"></span></p>
</form>
</body>
</html>The HTML server controls in the previous section are, for the most part, obvious and easy to learn. If you understand the HTML tag, you probably understand the corresponding HTML server control.
In all but a few cases, Web server controls provide much more capability than HTML server controls. Some other things Web server controls can do include
The following table lists all the Web server controls that ASP.NET provides. In each case, the basic syntax is
<asp:controlname id="programmaticID" runat="server">
</asp:controlname>
or, if the tag has no need to enclose other content,
<asp:controlname id="programmaticID" runat="server" />
In addition, each Web server control has attributes suited to its unique function.
ASP.NET Web Server Controls | ||
|---|---|---|
Name | Description | HTML Equivalent |
AdRotator | Displays an advertisement banner. | |
Button | Creates a push button. | <button> |
Calendar | Displays a calendar visitors can use to select dates. The calendar displays one month at a time and has links that move to the next and previous months. | |
CheckBox | Creates a check box that the visitor can switch between True and False states. | <input type="checkbox"> |
CheckBoxList | Create a multi-selection check box group you can populate by binding it to a data source. | <input type="checkbox"> |
DataGrid | Displays the items from a data source in a table. You can control which fields the DataGrid displays, and provide buttons to select, edit, and sort the items in the control. | |
DataList | Uses a template to display items from a data source. You can customize the results by manipulating the templates. | <table> |
DropDownList | Displays a drop-down list a visitor can use to select one or more items. | <select> |
HyperLink | Displays a link that directs the visitor to another Web page. | <a> |
Image | Displays a Web-compatible picture. | <img> |
ImageButton | Displays a Web-compatible picture the visitor can click to submit a form. | <input type="image"> |
Label | Displays static text on the page. This is useful if you want to control the text programmatically. Note that the Label control can apply style properties to the text while the Literal control, described below, cannot. | <span> |
LinkButton | Creates hyperlink-style buttons. | |
ListBox | Displays a single-selection or multi-selection list box. | <select> |
Literal | Displays static text on the page. This is useful if you want to control the text programmatically. Note that the Literal control can’t apply style properties to the text. To apply styles, use the Label control described above. | |
Panel | Provides a container for other controls. | |
PlaceHolder | Reserves a location in the page control hierarchy for controls you may add programmatically. | |
Name | Description | HTML Equivalent |
|---|---|---|
RadioButton | Creates a single radio button. | <input type="radio"> |
RadioButtonList | Displays a group of radio buttons you can populate by binding the control to a data source. If the data source has five records, you get five radio buttons. | <input type="radio"> |
Repeater | Displays the items from a data source by repeating a template. The Repeater has no appearance of its own; you must define the template to get the appearance you want. | |
Table | Displays a table that you can manipulate programmatically. | <table> |
TableCell | Displays a cell within a Table control. You can manipulate the cell programmatically. | <td> |
TableRow | Displays a row within a Table control. You can manipulate the row programmatically. | <tr> |
TextBox | Displays a single-line or multi-line text box. | <input type="text"> |
Xml | Displays an XML document or the results of an XSL Transform. | |
The Literal and Label controls are the simplest and also the most-used Web server controls. Both controls provide a named place where ASP.NET code can display text on a Web page.
Suppose, for example, that you’re writing some code that handles the Page_Load or some other event. Suppose also that the code needs to display a result, an error message, or some other kind of text on the Web page. You could try writing out the text as classic ASP programmers did—that is, by using the Response.Write method—but this probably wouldn’t produce the result you want. ASP.NET runs all event handlers (including Page_Load) before it starts rendering the page. As a result, any output from Response.Write statements located in those routines will appear before the page’s opening <html> tag.
The Literal and Label Web server controls provide an excellent solution to this dilemma. Simply put a Literal or Label control where you want the text to appear, and then in your code set the control’s Text property equal to the text you want.
Here’s the code for a typical Literal control. It goes in the body of the Web page, wherever you want the text to appear:
<asp:Literal id="litMsg" runat="server" />
The following statement, which can be in any code block you like, supplies the text to display:
litMsg.Text = "Your messages goes here."
The difference between the Literal and Label controls is that the Label control displays its text inside a pair of <span> and </span> tags. The presence of these tags means that code can change the appearance as well as the contents of a Label control. Like HTML server controls, the Label control has a Style collection, and you can manipulate it in just the same way. In addition, Label controls have BackColor, ForeColor, BorderColor, BorderStyle, BorderWidth, CssClass, Font, Height, ToolTip, Visible, and Width properties you can modify.
Tip
Most ASP.NET controls, including the Label control, require that you specify colors using a special color structure. To obtain such a structure, code Color.FromArgb(a,r,g,b) where a, r, g, and b, are values that range from 0 to 255 and indicate the transparency, red, green, and blue values of a color. Here’s an example:
lblMsg.ForeColor = Color.FromArgb(255,255,0,0)
To use the Color.FromArgb method, you must import the System.Drawing namespace.
The Literal control doesn’t surround its output within any tags at all. Therefore, in all cases, the output receives its formatting from other HTML that surrounds the <asp:literal> tag. None of the formatting features that work with the Label control will work with the Literal control.
Most other Web server controls relate directly to standard HTML tags, but have enhancements that make them more functional and easier to use. The procedure at the end of this section provides some examples, and the rest of the book will provide many more.
The DataGrid, DataList, and Repeater controls are exceptionally powerful. You may recall using the DataGrid control in the exercise at the end of Chapter 1. You added the following tag to the body of the Web page:
<asp:DataGrid id="gridMbrs" runat="server" />
Then you added these two program statements to the Page_Load event handler:
gridMbrs.DataSource = rdrMbrs
gridMbrs.DataBind
The resulting grid automatically displayed, in an HTML table, all the records from a database query. The DataGrid is quite a nice little package of functionality, and the code shown above only scratches the surface of its capabilities. Examples later in the book will illustrate more of these.
If a DataGrid doesn’t meet your needs for displaying multiple data records, you might want to consider the DataList and Repeater controls. Like the DataGrid, the DataList and Repeater controls automatically create repetitive HTML for each record in a query result. The difference is that with these other controls, you have direct control over the HTML that displays each item.
To look these up and generally find more information about a specific Web server control, search the MSDN Web site (msdn.microsoft.com/library) for the terms Web Server Controls, System.Web.UI.WebControls, Web Forms Server Controls, and Controls you can use on Web Forms.
Only the browser can detect events that a Web visitor triggers while using a Web Form. This limitation creates an apparent problem when you specify that the event handler (that is, the code that responds to the event) is supposed to run on the server. ASP.NET resolves this by using a three-step procedure:
When it renders the Web Form, ASP.NET adds code that runs on the browser and detects the specified event.
If and when the event occurs, the code that ASP.NET added detects it, sets a flag to indicate what occurred, and submits the entire form to the server.
When the server runs the Web page, information from the browser tells ASP.NET that the reason for the submission was to run the server-side event handler. ASP.NET dutifully loads the page, restores the ViewState information, runs the event handler, saves the ViewState information, renders the page, and, of course, sends it back to the visitor.
Consider, for example, the following Web Form. It’s part of the formtest.aspx page from Chapter 3.
<form runat="server">
  <p><asp:DropDownList id="ddlCountry" runat="server"
          AutoPostBack="True"
          OnSelectedIndexChanged="ddlCountry_Change">
      <asp:ListItem>England</asp:ListItem>
      <asp:ListItem>Japan</asp:ListItem>
      <asp:ListItem>United States</asp:ListItem>
    </asp:DropDownList></p>
  <p><asp:label id="lblMsg" runat="server" /></p>
</form>
The <asp:DropDownList> tag is comparable to (and in fact sends the browser) an ordinary <select> tag. The <asp:ListItem> tags are comparable to ordinary <option> tags. Together, these tags define a drop-down list.
Notice that the <asp:DropDownList> tag contains the attribute OnSelectedIndexChanged. (Hint: It’s in blue.) This specifies that a subroutine named ddlCountry_Change should run on the server whenever the Web visitor selects a different item on the browser. Coding this subroutine is simply a matter of putting some code like the following in the ASP.NET Web page that contains the form:
<script runat="server">
Sub ddlCountry_Change(sender As Object, e As EventArgs)
  lblMsg.Text = "You selected " & ddlCountry.SelectedItem.Text
End Sub
</script>
Here’s how this subroutine works:
The Sub statement defines the start of a subroutine.
The argument sender As Object points to the control that triggered the event and the e As EventArgs argument provides information about the event. The ddlCountry_Change subroutine makes no use of these arguments, but ASP.NET requires them.
The expression ddlCountry.SelectedItem.Text returns the value currently selected in the list box. (The identifier ddlCountry comes from the id attribute in the <asp:DropDownList> tag.)
lblMsg is the name of a Label Web server control. This type of control simply displays text, and it can appear anywhere on a Web page. Any text your code puts in the lblMsg.Text property will appear in place of the lblMsg control itself.
If a second list box were named ddlCity, the same subroutine could query a database, get a list of cities in the selected country, and reload the ddlCity list box with those results. This code produces the cascading list box effect, which is so difficult to create in classic ASP. For step-by-step instructions that construct a working example of cascading list boxes, refer to Chapter 9.
This next procedure will create a simple Web Form that uses the DropDownList, TextBox, Calendar, and Literal Web server controls. It also illustrates a number of server-side subroutines that respond to events on the browser. The graphic shows the finished page:
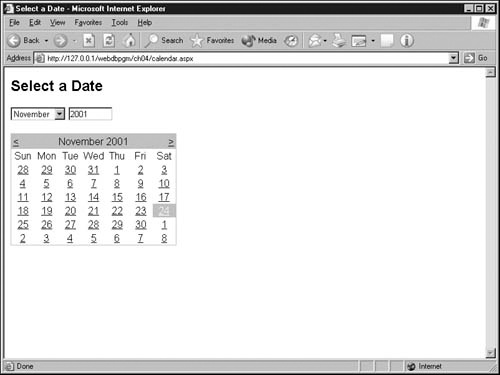
Clicking any date on the Calendar control selects that date and displays it in a message that begins, "You selected."
Choosing a different month in the drop-down list or typing a different year in the text box will update the calendar to display the given month and year.
Clicking the month navigation controls (the < and > hyperlinks) on the Calendar control not only moves the Calendar control one month back or forward—which is built-in behavior—but also updates the drop-down list and text box.
If you’d rather look at the finished code than enter it yourself, open the calendar.aspx page in the ch04 folder you installed from the companion CD. Otherwise, proceed as follows:
Open a new empty Web page containing the usual structural tags. Apply any page-level formatting you want. For example, the sample results include the following statement, which links to a shared Cascading Style Sheet file named normal.css:
<link rel="stylesheet" type="text/css" href="../normal.css">
Add the following declaration above the <html> tag:
<%@ Page Language="VB" Explicit="True" Debug="True"%>
After the <body> tag, add a heading and then a Web Form area by adding the code shown in blue:
<body>
<h2>Select a Date</h2>
<form runat="server">
</form>
</body>
Add three empty paragraphs inside the Web Form area. The form area should now look like this:
<form runat="server">
<p></p>
<p></p>
<p></p>
</form>
Create a DropDownList Web server control inside the first paragraph. This is a three-part process:
Begin the DropDownList control with the following tag:
<asp:DropDownList id="ddlMonth" runat="server"
        AutoPostBack="True"
        OnSelectedIndexChanged="ddlMonth_Change">
The AutoPostBack attribute specifies that the browser should submit the form immediately whenever a handled event occurs on the browser. If this is False (the default) the browser will capture the event but the server won’t process it until the visitor clicks a Submit button.
The OnSelectedIndexChanged attribute specifies the handled event—in this case, a change in the selected item.
Together, these two attributes tell ASP.NET that whenever the visitor chooses a different item in the list box, ASP.NET should immediately submit the form and run the ddlMonth_Change subroutine on the server.
Code 12 selections for the drop-down list, using the following code as a pattern:
<asp:ListItem value="1">January</asp:ListItem>
The remaining 11 items should have values of 2 through 12 and month names of February through December.
Terminate the DropDownList control by appending this closing tag:
</asp:DropDownList>
Immediately after the code you created in step 5 (and just before the closing tag for the first paragraph), add a TextBox Web server control to the form. This requires the following code:
<asp:TextBox id="txtYear" runat="server"
     Columns="6"
     MaxLength="4"
     AutoPostBack="True"
     OnTextChanged="txtYear_Changed"/>
The Columns attribute sets the physical width of the text box, and the MaxLength attribute specifies the maximum number of characters the visitor can type. As it did for the DropDownList control, the AutoPostBack attribute causes an immediate submission whenever a handled event occurs on the browser.
The OnTextChanged attribute tells ASP.NET that whenever the visitor changes the value of the text box, ASP.NET should run the txtYear_Changed subroutine on the server. As you’ll discover when you test the page, this event occurs only when the visitor shifts the browser’s focus to another field or presses Enter, avoiding a round trip to the server whenever the visitor types or erases a single character within the text box.
Add a code declaration block to the Web page.
<%@ Page Language="VB" Explicit="True" Debug="True"%>
<script runat="server">
</script>
<html>
Within this code declaration block, define the event handlers you specified in steps 5 and 6. The code declaration block should then look like the following one:
<script runat="server">
Sub ddlMonth_Change(sender as Object, e As EventArgs)
End Sub

Sub txtYear_Changed(sender as Object, e As EventArgs)
End Sub
</script>
Add a Calendar control to the second paragraph you created in step 4, specifying event handlers for the OnVisibleMonthChanged and OnSelectionChanged events.
<p><asp:calendar id="calDate" runat="server"
        OnVisibleMonthChanged="calDate_MonthChanged"
        OnSelectionChanged="calDate_Changed" /></p>

<p></p>
<form>
The OnVisibleMonthChanged attribute specifies a subroutine that will run whenever the visitor navigates the calendar to a different month (by clicking either the < or > hyperlink.)
The OnSelectionChanged attribute specifies a subroutine that will run on the server whenever the visitor clicks a different date.
At the bottom of the code declaration block, create two more event handlers with the names you specified in step 9:
Sub calDate_MonthChanged(sender as Object, _
                         e As MonthChangedEventArgs)
End Sub

Sub calDate_Changed(sender as Object, e As EventArgs)
End Sub
</script>
Notice that the calDate_MonthChanged subroutine requires a special object as its second argument. If you code the generic EventArgs class instead of MonthChangedEventArgs, you’ll receive an error message when you run the page. Fortunately, the error message tells you that MonthChangedEventArgs is the required type.
Add a Literal control to the last paragraph you originally created in the Web form. This will display the message that begins, "You selected."..
<p><asp:literal id="litDate" runat="server" /></p>
</form>
Add a Page_Load event handler at the end of the code declaration block, just before the </script> tag you created in step 7:
Sub Page_Load(sender as Object, e As EventArgs)
End Sub
</script>
Save the Web page in a folder that’s accessible via your Web server, giving it a file name of calendar.aspx.
Load the calendar.aspx page into your browser, taking care to specify an HTTP URL and not an ordinary file location. The browser should display all the controls properly, but there will be no interaction among them. Selecting a new month from the drop-down list, for example, will have no effect.
Although you might admire the calendar.aspx page simply because of its good looks, the page would be even more impressive if the controls interacted properly. To make this happen, you must supply correct code in each of the event handler subroutines. To begin, open the calendar.aspx page and proceed as follows:
Add code that, when the page first loads, initializes the calendar control, the text box, and the drop down list to the current date.
Sub Page_Load(sender as Object, e As EventArgs)
  If Page.IsPostBack Then
  Else
    calDate.SelectedDate = now()
    txtYear.text = calDate.SelectedDate.Year
    ddlMonth.SelectedIndex = calDate.SelectedDate.Month – 1
  End If
End Sub
By testing the Page.IsPostBack property, the If statement differentiates between initial display of the form and subsequent requests for processing. If the property is True, meaning a subsequent request for processing, the If statement does nothing. If Page.IsPostBack is False, the code is performing an initial display of the form. The three statements following the Else, then
Initialize the date selected in the Calendar control to the current date. This is the default but explicitly setting the date adds clarity to the example.
Get the Year portion of the Calendar control’s selected date and display it in the TextBox control.
Get the Month portion of the Calendar control’s selected date, subtract one, and select this entry in the DropDownList control. (The array of items in a DropDownList is zero-based. Therefore, months 1–12 correspond to list items 0–11.)
When you put initializing code like this in the Page_Load subroutine, it’s very important to execute it only when Page.IsPostBack is False—that is, only when the Web visitor has requested initial display of a page. If you also run your initializing code when Page.IsPostBack is True, it will overlay any form field values that other event handlers (or the Web visitor) have modified because Page_Load runs every time the page loads, and before any other event handlers.
Save the Web page and then load a fresh copy into your browser. This step is tougher than it sounds because clicking the Refresh button requests a postback, not a fresh copy, and clicking the browser’s Back and Next buttons displays an old copy of the Web page from the browser’s memory. The following procedure, however, always loads a fresh copy:
If the browser is currently displaying an old version of the page, select its URL in the browser’s Address box and press Ctrl+C to copy it.
Display a different Web page in your browser. This could be your Home page, for example.
Clear the browser’s Address box, and then type or paste the calendar.aspx page’s full URL (starting with http://). If the Web Form uses method=GET, erase any query string information that appears as part of a pasted URL.
Press Enter.
The Calendar control should have the current date selected. In addition, the drop-down list and text box should display the same month and year as the Calendar control.
The code that runs when the visitor selects a new month from the drop-down list is much simpler. It need only update the Calendar control’s VisibleDate property with a date built from the current text box year, the new dropdown month, and the digit 1 for the first day of the month. To accomplish this, add the statements shown here in blue to the ddlMonth_Change event handler (which, in the previous procedure, you associated with the drop-down list).
Sub ddlMonth_Change(sender as Object, e As EventArgs)
  calDate.VisibleDate = New DateTime(txtYear.text, _
                            ddlMonth.SelectedIndex + 1, 1)
End Sub
The expression New DateTime(year, month, day) creates a new DateTime object with a value equal to the given year, month, and day. The DropDownList control is zero-based, so SelectedIndex 0 means January, 1 means February, and so forth.
If you save and redisplay the Web page, you should find that selecting a new month from the drop-down list now makes the Calendar control display that month.
The code that updates the Calendar control when the visitor changes the year is the same as the code that runs following a change of month. Therefore, copy the code you added in step 3 and paste it into the txtYear_Changed subroutine like this:
Sub txtYear_Changed(sender as Object, e As EventArgs)
  calDate.VisibleDate = New DateTime(txtYear.text, _
                            ddlMonth.SelectedIndex + 1, 1)
End Sub
You should now find that entering a new year in the text box and then pressing Tab or Enter updates the Calendar control.
The Web page should also update the Month drop-down list and the Year text box when the visitor moves to a new month by clicking the Calendar control’s < or > hyperlinks. This automatic update requires completing the heretofore empty calDate_MonthChanged subroutine.
As you might recall from the earlier procedure, this event receives a special EventArgs object. One of that object’s properties is NewDate, which identifies the month and year that clicking the < or > hyperlink displayed. The first blue statement in the following code block copies the NewDate’s Year value into the year text box, and the second blue statement points the Drop Down List control to the NewDate’s Month value:
Sub calDate_MonthChanged(sender as Object, _
                         e As MonthChangedEventArgs)
  txtYear.text = e.NewDate.Year
  ddlMonth.SelectedIndex = e.NewDate.Month – 1
End Sub
Now, when you display the Web page, using the < and > links on the Calendar control should update the drop-down list and text box controls.
To provide feedback when the visitor clicks a date, add the blue statement in the following code to the existing calDate_Changed subroutine. This code simply gets the currently selected date from the calendar control and displays it as part of a message in the litDate control.
Sub calDate_Changed(sender as Object, e As EventArgs)
  litDate.Text = "You selected: " & calDate.SelectedDate
End Sub
The example is now complete.
Although this example doesn’t do any useful work (such as updating a database or sending mail), it does illustrate the power of Web server controls and the way that Web Form events can add interactivity to your pages. As for updating databases and sending mail, that’s what the rest of the book (after a few more preliminary topics) is all about.
The code for the complete Web page is as follows. As you review it, notice the complete absence of program code within the HTML. Moving all the program code out of the HTML and into a single code declaration block leads to a clean, optimal layout for HTML code and program code alike. A few extra comment lines separate the subroutines for readability.
<%@ Page Language="VB" Explicit="True" Debug="True"%>
<script runat="server">
Sub ddlMonth_Change(sender as Object, e As EventArgs)
  calDate.VisibleDate = New DateTime(txtYear.text, _
                            ddlMonth.SelectedIndex + 1, 1)

End Sub
' ----------------------------------------
Sub txtYear_Changed(sender as Object, e As EventArgs)
  calDate.VisibleDate = New DateTime(txtYear.text, _
                            ddlMonth.SelectedIndex + 1, 1)
End Sub
' ----------------------------------------
Sub calDate_MonthChanged(sender as Object, _
                         e As MonthChangedEventArgs)
  txtYear.text = e.NewDate.Year
  ddlMonth.SelectedIndex = e.NewDate.Month – 1
End Sub
' ----------------------------------------
Sub calDate_Changed(sender as Object, e As EventArgs)
  litDate.Text = "You selected: " & calDate.SelectedDate
End Sub
' ----------------------------------------
Sub Page_Load(sender as Object, e As EventArgs)
  If Page.IsPostBack Then
  Else
    calDate.SelectedDate = now()
    txtYear.text = calDate.SelectedDate.Year
    ddlMonth.SelectedIndex = calDate.SelectedDate.Month – 1
  End If
End Sub
</script>

<html>
<head>
<title>Select a Date</title>
<link rel="stylesheet" type="text/css" href="../normal.css">
</head>
<body>
<h2>Select a Date</h2>
<form runat="server">
<p><asp:DropDownList id="ddlMonth" runat="server"
        AutoPostBack="True"
        OnSelectedIndexChanged="ddlMonth_Change">
    <asp:ListItem value="1">January</asp:ListItem>
    <asp:ListItem value="2">February</asp:ListItem>
    <asp:ListItem value="3">March</asp:ListItem>
    <asp:ListItem value="4">April</asp:ListItem>
    <asp:ListItem value="5">May</asp:ListItem>
    <asp:ListItem value="6">June</asp:ListItem>
    <asp:ListItem value="7">July</asp:ListItem>
    <asp:ListItem value="8">August</asp:ListItem>
    <asp:ListItem value="9">September</asp:ListItem>
    <asp:ListItem value="10">October</asp:ListItem>
    <asp:ListItem value="11">November</asp:ListItem>
    <asp:ListItem value="12">December</asp:ListItem>
  </asp:DropDownList>
  <asp:TextBox id="txtYear" runat="server"
       AutoPostBack="True"
       Columns="6"
       MaxLength="4"
       OnTextChanged="txtYear_Changed"/></p>
<p><asp:calendar id="calDate" runat="server"
        OnVisibleMonthChanged="calDate_MonthChanged"
        OnSelectionChanged="calDate_Changed" /></p>
<p><asp:literal id="litDate" runat="server" /></p>
</form>
</body>
</html>By virtue of conforming to the HTTP specification, Web servers are inherently stateless. This means that every time a visitor requests a page, the server delivers it and then forgets completely about that visitor. This process works fine for ordinary Web pages, but it’s a continuing source of frustration for Web programmers. Any time Web pages need to retain information about the same visitor from one request to another, some sort of fancy programming needs to overcome the stateless nature of HTTP.
Web Forms address this issue in a limited but very useful way. When you send a Web Form to a visitor, ASP.NET automatically sends a packet of information called the ViewState along with the form.
The ViewState is essentially a list of name=value pairs that ASP.NET saves every time it sends a Web Form to a visitor. The data shows up highly compressed (and optionally encrypted) in a hidden form field named __VIEWSTATE. Whenever the visitor sends the form back to the server, ASP.NET receives, decompresses, and restores the ViewState information.
ASP.NET itself makes extensive use of the ViewState to remember the current settings of each server control and the state of the form overall. Your own code can make use of the ViewState as well. Suppose, for example, you wanted to save the first name "Ezekiel" from one execution of a Web Forms page to the next. The statement
ViewState("firstname") = "Ezekiel"would save the information during one execution of the page, and the statement
strFirstName = ViewState("firstname")would retrieve it during the next execution that the same visitor initiated.
The Session and Application objects provide additional ways to save information between interactions with the visitor. For more information about Application and Session objects, refer to Chapter 11.
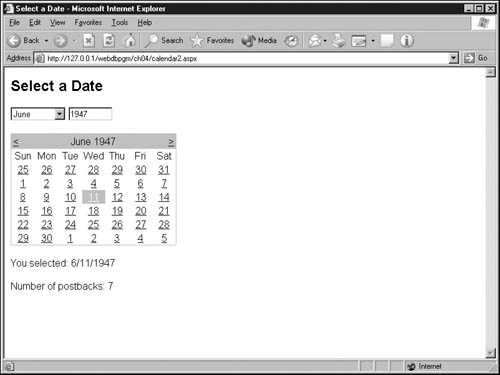
The following procedure will modify the calendar.aspx page from the previous examples to display how many times a postback to the same page has occurred. This new information appears as the last line in the Web page that appears in the following graphic:
To add this feature to the calendar.aspx page, proceed as follows. If you’d rather look at the finished code, open the calendar2.aspx page in the ch04 folder that you installed from the companion CD.
Open the calendar.aspx page you created in the previous example.
Add a Literal Web server control to the bottom of the page. To do this, just before the page’s </body> tag, add the code shown here in blue.
<p><asp:literal id="litPostBacks" runat="server" /></p>
</body>
In the Page_Load subroutine, define a variable to hold the number of postbacks that have occurred. In other words, add the statement shown here in blue:
Sub Page_Load(sender as Object, e As EventArgs)
  Dim intPostBackCnt As Integer
To increment and display the count, add the statements shown here in blue between the existing If and Else statements in the Page_Load subroutine.
If Page.IsPostBack Then
  intPostBackCnt = intPostBackCnt + 1
  litPostBacks.Text = "Number of postbacks: " & _
                       intPostBackCnt
Else
Save the Web page as calendar2.aspx and load it into your browser using an HTTP URL. You should find that the message Number of postbacks: 1 appears for the second and all subsequent executions of the same page.
The code in step 4 doesn’t increment the count because ASP.NET loads a new copy of the intPostBackCnt variable every time it loads the page. To preserve a variable from one page execution to the next, you must copy it to the ViewState object. To restore it, during the next execution of the Web page, you must retrieve it from the ViewState object. To make this work in the current example, add the two statements show here in blue:
If Page.IsPostBack Then
  intPostBackCnt = ViewState("PostBackCnt")
  intPostBackCnt = intPostBackCnt + 1
  litPostBacks.Text = "Number of postbacks: " & _
                       intPostBackCnt
  ViewState("PostBackCnt") = intPostBackCnt
Else
Save the page and display it again in your browser. The Web page should now increment the counter whenever you select a date, whenever you use the Calendar control’s < or > links to change the displayed month, and whenever you use the drop-down list or text box to change the displayed month.
Note that the Web page doesn’t increment the count when you click the browser’s Refresh button, even though ASP.NET executes the page again. ASP.NET saves all ViewState information in a hidden form field, and when you click the Refresh button, the browser transmits the previous form field values instead of the current ones.
A validation server control checks the validity of a Web visitor’s entry in one element of a Web form:
To understand more about the way validation server controls work, consider the following HTML fragment:
<asp:textbox id="txtQty" runat="server" columns="5" />

<asp:CompareValidator id="cmpQty" runat="server"
     ControlToValidate="txtQty"
     Operator="DataTypeCheck"
     Type="integer"
     Display="Dynamic"
     ErrorMessage="Quantity must be an integer value." />
Here are the important elements of this code:
Line 1 displays a text box five characters wide. Because this is a Web server control, its value will be available when the page that contains it runs on the Web server.
The tag that begins on line 3 defines a CompareValidator server control.
The ControlToValidate attribute specifies the text box from line 1 by referencing its id.
The Operator attribute tells the control to verify that ASP.NET can convert the control’s value to a specified data type. The Type attribute on the next line specifies which data type.
The Display attribute has a value of Dynamic, which tells the control that if no error condition exists, the control should take up no space on the Web page. This is the default. (A value of Static means the control should always take up space, even if it’s blank. None means the message will never take up space.) If the error message appears at all, it will appear in place of the Validation server tag.
The ErrorMessage attribute supplies the text of the error message.
Validation server controls are specification oriented; that is, you use them by specifying attributes and not by writing program code. A single Web page can contain as many validation server controls as you want, and you can test them all at once by checking the Page.IsValid property. If Page.IsValid is False, you should skip updating your database or doing whatever else the page normally does.
The following table lists the six available types of validation server controls. The first five work very much like the CompareValidator control in the example. (In fact, the first one is the CompareValidator.)
ASP.NET Validation Server Controls | |
|---|---|
Control | Description |
CompareValidator | Compares a visitor’s entry against a constant value, against the value of another control, or against a database value. |
CustomValidator | Validates a visitor’s entry using custom code you create. |
RangeValidator | Verifies that a visitor’s entry is between specified lower and upper boundaries. You can check ranges within pairs of numbers, alphabetic characters, and dates. Boundaries are expressed as constants. |
RegularExpressionValidator | Verifies that a form entry matches a pattern defined by a regular expression. This type of validation can check for required character patterns such as those in Social Security numbers, e-mail addresses, telephone numbers, and postal codes. |
RequiredFieldValidator | Ensures that the visitor doesn’t skip an entry. |
ValidationSummary | Displays a summary of error messages from all validation controls on a page. |
The last control, however, is different. Instead of checking an individual form field, the ValidationSummary control displays in one location all the error messages from all the validation controls on a Web page. This arrangement is helpful if you want all your error messages to appear together rather than scattered willy-nilly over the page. When using the ValidationSummary control, you would probably code all the other validation server controls with Display="None".
When a visitor clicks any of the server controls listed in the following table and the control’s CausesValidation property is True (the default), validation occurs automatically. Validation doesn’t occur automatically in any other case. Therefore, when any other sort of postback occurs, such as an onClick or onChange event from another type of control, your code must explicitly trigger the validation process. There are two ways of doing this:
Server Controls That Trigger Validation | |
|---|---|
Web Server Controls | HTML Server Controls |
Button | HtmlInputButton |
ImageButton | HtmlInputImage |
LinkButton | HtmlButton |
To look up the exact capabilities and attributes for each validation server control, search the MSDN Web site (msdn.microsoft.com/library) for the term Validation Server Controls.
In your testing of the calendar.aspx page and its descendants, you may have noticed that entering an invalid year causes the page to terminate with an error. In fact, ASP.NET years must be integers between 1 and 9999. This exercise will modify the calendar2.aspx page so that if the visitor enters an invalid year, the page will display an informative message like the one in the figure rather than a system-generated error page.

Proceed as follows if you wish to add this feature to the calendar2.aspx page. If you’d rather look at the finished code, open the calendar3.aspx page in the ch04 folder you installed from the companion CD.
Open the calendar2.aspx page you created in the previous example.
Locate the tag for the txtYear text box control, which looks like this:
<asp:TextBox id="txtYear" runat="server"
     AutoPostBack="True"
     Columns="6"
     MaxLength="4"
     OnTextChanged="txtYear_Changed"/>
Add a blank line after this tag and then create a range validator control to verify that the value in the txtYear control is an integer between 1 and 9999. Here’s the required code:
<asp:RangeValidator id="valYear" runat="server"
     ControlToValidate="txtYear"
     Type="integer"
     MinimumValue="1"
     MaximumValue="9999"
     Display="Dynamic"
     ErrorMessage="Year is invalid." />
The intent behind this code, if not the exact syntax, is fairly obvious:
ControlToValidate specifies which control the range validator is checking: namely, the txtYear control.
Type specifies that the value in the txtYear control must be an integer.
MinimumValue specifies that the value in the txtYear control must be at least 1.
MaximumValue specifies that the value in the txtYear control must be 9999 or less.
Display specifies that the error message will be visible if the tests fail, but take up no space if the tests succeed.
ErrorMessage specifies the text that will appear if the tests fail.
The validation checks need to occur even during postbacks not caused by a button click. One reason for this is fairly obvious: Because the Web page contains no buttons, no button click postbacks will ever occur!
The real reason, however, is that validation needs to occur when the txtYear control’s OnTextChanged event fires and the txtYear_Changed subroutine runs on the server. This event wouldn’t trigger validation no matter how many buttons the Web Form contained.
To force validation to occur on every postback, add the statement shown in blue to the Page_Load subroutine:
Sub Page_Load(sender as Object, e As EventArgs)
  Page.Validate
  If Page.IsPostBack Then
Add If... Then... End If logic to the ddlMonth_Change and txtYear_Changed subroutines so that no processing occurs unless Page.IsValid is True.
For example, add the following lines shown in blue to the txtYear_Changed subroutine:
Sub txtYear_Changed(sender as Object, e As EventArgs)
  If Page.IsValid Then
    calDate.VisibleDate = New DateTime(txtYear.text, _
                              ddlMonth.SelectedIndex + 1, 1)
  End If
End Sub
The changes to the ddlMonth_Change subroutine are exactly the same.
Save the Web page as calendar3.aspx and load it into your browser by means of an HTTP URL. You should find that entering an invalid year and then pressing Enter or Tab displays an error message like the one in the graphic on the page 142.
If you play with the resulting Web page long enough, you’ll discover one nagging little bug. Specifically, if you enter an invalid year, get the error message, and then click the calendar control’s < or > link, you’ll notice that the new, valid year appears in the text box but the error message doesn’t go away. The error message remains because the validation controls runs first, detects the invalid year, and reports the error, then the calDate_MonthChanged subroutine runs later and replaces the invalid year with a valid one.
To clear up this problem, you need to run the validation control again, after the calDate_MonthChanged subroutine changes the value of the txtYear control. To do this, add the line shown here in blue to the calDate_MonthChanged subroutine. The line in normal text should already be present.
txtYear.text = e.NewDate.Year
valYear.Validate
A complete code listing for the calendar3.aspx page follows. The lines added in this procedure appear in blue.
<%@ Page Language="VB" Explicit="True" Debug="True"%>
<script runat="server">
Sub ddlMonth_Change(sender as Object, e As EventArgs)
  If Page.IsValid Then
    calDate.VisibleDate = New DateTime(txtYear.text, _
                              ddlMonth.SelectedIndex + 1, 1)
  End If
End Sub
' ----------------------------------------
Sub txtYear_Changed(sender as Object, e As EventArgs)
  If Page.IsValid Then
    calDate.VisibleDate = New DateTime(txtYear.text, _
                              ddlMonth.SelectedIndex + 1, 1)
  End If
End Sub
' ----------------------------------------
Sub calDate_MonthChanged(sender as Object, _
                         e As MonthChangedEventArgs)
  txtYear.text = e.NewDate.Year
  valYear.Validate
  ddlMonth.SelectedIndex = e.NewDate.Month – 1
End Sub
' ----------------------------------------
Sub calDate_Changed(sender as Object, e As EventArgs)
  litDate.Text = "You selected: " & calDate.SelectedDate
End Sub
' ----------------------------------------
Sub Page_Load(sender as Object, e As EventArgs)
  Dim intPostBackCnt As Integer
  Page.Validate
  If Page.IsPostBack Then
    intPostBackCnt = ViewState("PostBackCnt")
    intPostBackCnt = intPostBackCnt + 1
    litPostBacks.Text = "Number of postbacks: " & _
                          intPostBackCnt
    ViewState("PostBackCnt") = intPostBackCnt
  Else
    calDate.SelectedDate = now()
    txtYear.text = calDate.SelectedDate.Year
    ddlMonth.SelectedIndex = calDate.SelectedDate.Month – 1
  End If
End Sub
</script>
<html>
<head>
<title>Select a Date</title>
<link rel="stylesheet" type="text/css" href="../normal.css">
</head>
<body>
<h2>Select a Date</h2>
<form runat="server">
<p><asp:DropDownList id="ddlMonth" runat="server"
        AutoPostBack="True"
        OnSelectedIndexChanged="ddlMonth_Change">
    <asp:ListItem value="1">January</asp:ListItem>
    <asp:ListItem value="2">February</asp:ListItem>
    <asp:ListItem value="3">March</asp:ListItem>
    <asp:ListItem value="4">April</asp:ListItem>
    <asp:ListItem value="5">May</asp:ListItem>
    <asp:ListItem value="6">June</asp:ListItem>
    <asp:ListItem value="7">July</asp:ListItem>
    <asp:ListItem value="8">August</asp:ListItem>
    <asp:ListItem value="9">September</asp:ListItem>
    <asp:ListItem value="10">October</asp:ListItem>
    <asp:ListItem value="11">November</asp:ListItem>
    <asp:ListItem value="12">December</asp:ListItem>
  </asp:DropDownList>
  <asp:TextBox id="txtYear" runat="server"
       AutoPostBack="True"
       Columns="6"
       MaxLength="4"
       OnTextChanged="txtYear_Changed"/>
  <asp:RangeValidator id="valYear" runat="server"
       ControlToValidate="txtYear"
       Type="integer"
       MinimumValue="1"
       MaximumValue="9999"
       Display="Dynamic"
       ErrorMessage="Year is invalid." /></p>
<p><asp:calendar id="calDate" runat="server"
        OnVisibleMonthChanged="calDate_MonthChanged"
        OnSelectionChanged="calDate_Changed" /></p>
<p><asp:literal id="litDate" runat="server" /></p>
<p><asp:literal id="litPostBacks" runat="server" /></p>
</form>
</body>
</html>
Web Forms, the ViewState, and postbacks are generally very cool and easy to use. Even so, there are a few cautions and complexities you should take into account.
Events that require a round trip to the server for processing can noticeably slow down the performance of a form. This performance hit is especially obvious, of course, if communication links are slow or the Web server is heavily loaded. Therefore, server controls react to a limited number of events:
Almost all server controls support clicking events.
Some server controls support a special version of the onChange event, which occurs when the visitor changes the control’s value. For example, the drop-down list Web server control raises an OnSelectedIndexChanged event when the Web visitor changes the current selection.
Some server controls also support higher-level events. For example, the Web calendar Web server control raises a SelectionChanged event that’s more encompassing than a simple Click event.
ASP.NET doesn’t support events like onMouseOver that occur often and generally without the user knowing it. If you want to use these events, do so outside the scope of ASP.NET; that is, with traditional browser-side code.
Event handlers for both Web server controls and HTML server controls should always expect to receive two arguments:
A pointer to the object that raised the event.
A pointer to an event object that contains any information specific to the event. This second argument is usually of type EventArgs, but some controls use a more specific object. The image button Web server control, for example, supplies an ImageClickEventArgs object that includes information about the coordinates where the visitor clicked.
If you specify the wrong type of object as an event handler’s second argument, you’ll generally get an error message. Fortunately, these messages usually include the name of the correct object. Fixing the problem is therefore as easy as copying the correct object name out of the error message and pasting it into your code.
In the case of Web server controls, by default, only button click events cause a postback to the server. If change events occur, browser-side code detects them, saves them up, and transmits them all to the server the next time a click event occurs.
On the server, ASP.NET will invoke the change event handlers in random order. All change event handlers must finish, however, before ASP.NET runs the click event handler. If you want change events for a Web server control to cause an immediate postback, code the AutoPostBack="True" attribute.
Never create application logic that relies on the change event handlers running in a specific order.
Web server controls such as the Repeater, DataList, and DataGrid create variable amounts of repetitive content. This content can contain "child" controls that raise events. For example, each row in a DataGrid can contain one or more buttons, each of which can raise events. Without knowing how many rows the DataGrid contains, it simply isn’t practical to code separate event handlers for each button.
To deal with this problem, ASP.NET "bubbles" any events from the child controls—that is, it sends them all to the Repeater, DataList, or DataGrid control that contains them. ASP.NET calls these controls containers. The container then raises a generic event called ItemCommand with parameters that point to the child control that actually raised the event. By responding to this single event, you can avoid writing event handlers for each child control.
The ItemCommand event supplies the same two arguments as any other event:
Sub datGrid1_ItemCommand (sender As Object, e As EventArgs)
The sender argument points to the child object that originally raised the event. The e argument points to an object that contains specific information about the event.
The DataGrid and DataList controls support additional events, such as EditCommand and DeleteCommand, which are special cases of bubbled events. For a working example that uses event bubbling with a Repeater control, refer to Chapter 8.
Web server controls support only server-side events. However, the core set of HTML server controls (buttons and text boxes) permit creating event handlers for both client events and server events. As with events for Web server controls, the server-side events for HTML controls are usually limited to a single event, such as Click or Change. The remaining events are available for use in client scripts.
Consider, for example, an ImageButton HTML server control. This is a picture configured so that clicking it submits a Web Form. In all likelihood, you would handle this control’s Click event with server-side code. (Otherwise, why make it a server control in the first place?)
Suppose, however, that you want to write some client-side code that changes the control’s picture whenever the mouse passes over it. To do this, you would add a perfectly ordinary onMouseOver attribute to the image button’s HTML, specifying the name of a JavaScript function that changes the picture. No conflict occurs because ASP.NET makes no use of the onMouseOver event.
Problems arise, however, if you try to create client-side and server-side event handlers for the same event. If, for example, you specify both an onServerClick (server-side) event handler and an onClick (client-side) event-handler for the same HTML button, ASP.NET will discard the onClick event handler. You can have only one event handler per event, and ASP.NET obviously favors the ASP.NET one.
This chapter introduced the concept of Web Forms, which integrate traditional HTML forms with powerful ASP.NET processing. It explained HTML server controls, which are directly analogous to traditional HTML form elements but enhanced so that you can process them with ASP.NET code, and Web server controls, which offer the same advantages as well as additional features and completely new kinds of tags.
The chapter also explained how ASP.NET can make events on the browser execute code on the Web server, how to preserve Form Data from one submission to the next, and how to use validation server controls for checking the legitimacy of data that visitors enter.
Chapter 5 will provide an overview of the Visual Basic .NET programming language. You must have at least some proficiency in Visual Basic to code the remaining examples in the book.