

In this chapter, you’ll learn: | |
✓ | What phases occur during the life cycle of an ASP.NET Web page. |
✓ | How to enhance an ordinary Web page with code that ASP.NET runs before the page leaves the Web server. |
✓ | How to use the properties and methods that ASP.NET provides for every Web page it runs. |
✓ | How to add comments to your code. |
✓ | How to include statements from another file in an ASP.NET Web page. |
✓ | How to code directives that affect the way ASP.NET processes your Web page. |
This chapter describes the basic concepts that ASP.NET applies whenever it processes a Web page and what requirements this places on the way you code your pages. These are very large topics, and consequently this is a long chapter.
This is also primarily a reading chapter. You need to learn quite a few concepts before you can understand how an ASP.NET Web page fits together, and you need this information before you start creating pages. The concepts themselves aren’t particularly difficult, and they reward you with great power. They aren’t, however, intuitively obvious.
The chapter also contains a certain amount of reference material, which goes hand in hand with an attempt to keep related pieces of information close together and therefore easy to correlate. Keep this in mind, however, if you find yourself getting lost in details. ASP.NET has many components that integrate in marvelous ways, but the old analogy of peeling back onion layers still applies. Don’t be afraid to skim this chapter (or this book) several times in increasing levels of detail.
When a visitor asks a Web server to deliver an ordinary Web page, the server reads the page from its file system, prefixes a few header lines, and then sends the file unmodified through the network port. This is the very essence of Hypertext Transfer Protocol (HTTP).
Classic ASP pages extend this concept by inserting blocks of program code wherever the page needs some sort of variable output. The following ASP page, for example, displays the current time on the Web server:
<html>
<head>
<title>Web Server Date and Time</title>
</head>
<body>
<p>The current time is <%=Now()%></p>
</body>
</html>
The <% and %> tags delimit a block of program code that will run on the Web server. The equal sign means response.write (which writes characters into the output HTML stream). Now() is a Visual Basic expression that returns the current date and time.
When the Web server delivers an ASP page, it notices the .asp filename extension and sends the page through a program named asp.dll. This program watches for and executes blocks of code enclosed in <% and %> tags. Instead of sending the program code to the Web visitor, asp.dll sends any output the program code created.
This approach works well and has achieved great popularity among developers, but it has drawbacks as well.
As ASP pages become more complex, putting program code where its output should appear becomes awkward. The resulting arrangement of the code modules doesn’t conform to any standard programming practice.
Intermixing code and HTML makes it difficult for Web programmers and Web designers to work on the same page.
ASP pages use interpreted programming languages such as VBScript or Jscript. These run slowly and don’t have access to the full Windows Application Program Interface (API).
Manipulating HTML form elements is awkward and tedious. Simple tasks such as setting drop-down lists, check boxes, and option buttons to display values from a database or from a previous input screen require relatively large amounts of code.
ASP.NET avoids these problems in a number of ways, but one of the most important is a much richer way of organizing and executing code in Web pages. The following material will examine this more fully.
ASP.NET pages have a filename extension of .aspx. The Web server notices this extension and sends the requested page into a program named aspnet_isapi.dll. The aspnet_isapi.dll program examines each HTML or XML tag in the page and looks for the attribute runat="server".
If the tag contains runat="server", ASP.NET loads the tag into memory as an object with a full set of properties and methods.
If a <script> tag contains the runat="server" attribute, ASP.NET compiles whatever code it contains and holds it ready for execution. The same is true of code between <% and %> tags.
When ASP.NET compiles code, it uses the full-blown Visual Basic .NET, Visual C# .NET, or other .NET compiler. There’s no difference between the compilers available in VisualStudio.NET and the compilers an ASP.NET page uses; no more scaled-back versions like VBScript. As additional .NET programming languages become available, they’ll be available for ASP.NET pages as well.
If the tag doesn’t contain runat="server", ASP.NET loads it into memory as ordinary text. Later, ASP.NET will send this text to the Web visitor without modification.
After the entire page is loaded into memory, ASP.NET runs any program code that corresponds to events the Web page received. Suppose, for example, that whenever the Web visitor clicks a certain button in the browser, you want to run a subroutine on the Web server. To do this, you would code the subroutine as follows:
<script runat="server">
Sub btnOne_Click(sender as Object, e as EventArgs)
'   Your code goes here.
End Sub
</script>
The name of the subroutine is btnOne_Click, and the code that defines it appears between <script runat="server"> and </script> tags. You can locate this code block anywhere you want within the page because ASP.NET won’t execute it immediately, or in line, or in any other way until an event triggers it. The following code, for example, defines a button that generates such an event:
<input type="button" value="Click Me"
       runat="server"
       id="btnOne"
       onServerClick="btnOne_Click" />
Here are the important features of this code:
The tag name input, the attribute type="button", and the attribute value="Click Me" are ordinary HTML elements that tell the browser to display a button titled Click Me.
The runat="server" attribute makes the button accessible to ASP.NET code that runs on the server. Without this attribute, ASP.NET would treat the entire tag as mere text.
The id="btnOne" attribute gives the button a name that ASP.NET code anywhere in the Web page can use.
The onServerClick attribute specifies the name of a subroutine that ASP.NET will run on the server whenever a Web visitor clicks the button on the browser. In this case, of course, it’s the btnOne_Click subroutine.
In ASP.NET parlance, the onServerClick attribute wires the button to the btnOne_Click subroutine.
Note
The ch03 folder you installed from companion CD contains a page named formtest.aspx that illustrates server-side event handling. Every time the Web visitor chooses a different selection from a drop-down list, a subroutine on the Web server provides visual feedback. If you decide to browse this file, do so using an HTTP URL.
As the server-side code runs, it can modify the properties and execute the methods of any tag coded with the all-important runat="server" attribute. For example, you could change the text on a button face, specify a different picture in an <img> tag, or replace the target location in a hyperlink. The program code could also read and update any files and databases on the server, interact with other objects and services that might be available, and then modify the in-memory version of the page accordingly.
Finally, ASP.NET converts the in-memory version of the Web page back to HTML. The ASP.NET documentation calls this process rendering.
When an HTML or XML tag contains the runat="server" attribute, the rendered version of a tag will always be different from the version in the original .aspx file. There are several reasons for this:
ASP.NET will remove the runat="server" attribute and any other specifications that are meaningless to the browser.
The very process of reading a tag into a server-side object and then converting the object back to HTML will generally result in slight coding differences. In essence, ASP.NET’s coding style is likely to be different from yours.
ASP.NET will very likely add code to make the tag interact with any server-side code you’ve specified. Notice, for example, that ASP.NET handled the entire task of hooking up (Microsoft likes to say wiring) the btnOne button on the browser with the btnOne_Click subroutine on the server. If this requires adding HTML code to your page, ASP.NET will add it.
This brief explanation skipped a number of important details. The process you must remember, though, is this:
The Web server detects the filename extension .aspx and sends the page to ASP.NET.
ASP.NET loads all tags containing runat="server" attributes as objects. This includes both tags that make up the Web page and code declaration blocks.
ASP.NET runs any program code that corresponds to events that the Web page received:
ASP.NET generates some events itself on the server.
ASP.NET also handles the details necessary to wire events that occur on the browser to subroutines that run on the server.
The server-side code modifies the properties and executes the methods of tags coded with the all-important runat="server" attribute.
ASP.NET renders the collected objects as a stream of HTML code.
The next few topics explain more about the various kinds of objects that can appear in an ASP.NET Web page and how to code them. Be forewarned, however, that each of these topics has far more options than a book this size could ever hope to describe or you, as a beginning ASP.NET developer, could ever hope to assimilate. Therefore, each topic will provide only the highlights. For more information, consult the Microsoft Developer Network Web site (msdn.microsoft.com) or a more advanced reference book. To locate the information on MSDN, search for the terms .NET Framework SDK, ASP.NET Syntax, .NET Framework General Reference, and Web Forms Syntax.
By default, ASP.NET assumes that everything in a Web page is ordinary HTML. When you want to add programming statements to the page, you must specially mark the beginning and end of your program code. ASP.NET recognizes two different ways of doing this:
Code Declaration Blocks include everything between a <script runat="server"> tag and a </script> tag. The remainder of this section discusses this type of block.
Code Render Blocks include everything between an opening <% tag and a closing %> tag. The next section will discuss code render blocks.
A Code Declaration Block defines variables, subroutines, functions, and user classes that are available to all code in the current page. The tags that define such a block have the following syntax:
<script runat="server" language="codelanguage"src=" pathname">
'
' Your code goes here.
'
</script>
The attribute runat="server" is required. If you forget to code it, ASP.NET will ignore the block entirely. The block, in that case, looks like code you want the browser to execute.
The language attribute specifies the programming language you used within the current block. This can be the name of any .NET-compatible language, such as Visual Basic .NET (VB), Visual C# .NET, or JScript. If you don’t specify a language here, the attribute defaults to whatever you specified in the @ Page directive. If the @ Page directive doesn’t specify a language, the default is VB. For more information about the @ Page directive, refer to "Coding the @ Page Directive" later in this chapter.
If the src attribute is present, it specifies the path and file name of a file you want ASP.NET to load and treat as source code. This is one of the many ways that ASP.NET makes it easy to write and debug code once and then use it in many different Web pages.
When you code the src attribute, ASP.NET ignores all content between the opening <script runat="server"> tag and the closing </script> tag. You can therefore save a bit of typing by leaving out the closing tag and instead putting a closing slash at the end of the opening tag, as shown:
<script runat="server" src="myFile.vb" />.
Any code you put in a code declaration block must be—guess what—a declaration! You can declare variables, constants, enums, types, classes, functions, and subroutines in a code declaration block, but you can’t include any executable statements unless they’re within classes, functions, or subroutines. Consider, for example, the following code:
<script runat="server">

Dim intCount as Integer
intCount = 0

Function AddOne(aintCnt As Integer) As Integer
  Return aintCnt + 1
End Function

</script>
ASP.NET will object to the statement intCount = 0 by displaying the following message:
Expected either a variable, constant, Enum, Type, or procedural
declaration
When this happens, you need to delete the offending statement or move it inside some subroutine or function that will run at the correct time. In the example shown, you could delete the offending statement and in its place, initialize the intCount variable at the time you define it:
Dim intCount as Integer = 0
As to the location of code declaration blocks, it doesn’t matter. You can code one large code declaration block or many small ones, and you can put code declaration blocks at the beginning, middle, or end of your Web page with reckless abandon. No matter where you put the code, ASP.NET will read the entire file, compile the code, and then stand ready to run any classes, functions, or subroutines you defined. It’s customary, however, and very good practice to put all your code in one <script runat="server"> block at the top of the Web page. Specifically, it should go after any directives and before the <html> tag.
For an explanation of directives and when to use them, refer to "Coding Common ASP.NET Directives" later in this chapter.
If you ever coded classic ASP pages, you probably made extensive use of <% and %> tags. In fact, you probably located all your program code within these kinds of tags.
ASP.NET still supports <% and %> tags and calls them Code Render Blocks. As with classic ASP, the Web server executes any statements inside <% and %> tags as the Web page is sending HTML to the Web visitor who requested the page. That is, ASP.NET executes code between <% and %> tags while it’s rendering the page.
At this point, it’s worthwhile to recall the steps involved in processing every ASP.NET page:
The Web server detects the filename extension .aspx and sends the page to ASP.NET.
ASP.NET loads all tags containing runat="server" attributes as objects. This includes both code declaration blocks and tags that make up the Web page.
ASP.NET runs any program code that corresponds to events that the Web page received.
The server-side code modifies the properties and executes the methods in any tag coded with the all-important runat="server" attribute.
ASP.NET renders the modified, in-memory version of the Web page as HTML.
As you might suspect, code within code render blocks (that is, within <% and %> tags) doesn’t run until step 5. This is quite a limitation, and for that reason, most code in ASP.NET pages appears within Code Declaration Blocks (the <script runat="server"></script> notation).
Code within <% and %> tags suffers a further limitation in ASP.NET: It can’t contain any Class, Function, or Sub statements. If you try coding any of these statements, you’ll get the error message:
This statement cannot appear within a method body. The compiler
will assume an intent to terminate the method body.
The answer in this case is to define the class, function, or subroutine within <script runat="server"> and </script> tags rather than between <% and %> tags.
Among the many objects that ASP.NET uses, the Page object is arguably the most important. This object represents the current Web page for the duration of one execution on the server.
Whenever a visitor requests a Web page having the .aspx filename extension from a server hosting the .NET Framework, ASP.NET compiles the file as a Page object and caches it in the server’s memory. This occurs whether the page contains .NET code or only HTML text. The Page object then serves as a container for all other controls on the page.
The first topic in this chapter explained that when ASP.NET processes a Web page, it does so in several phases. By raising events, ASP.NET makes it easy to integrate your own code with these phases. The table on the next page shows the most common Page events that occur during a normal life cycle. If you want ASP.NET to run some code when any of these events occur, simply define a subroutine with the name Page followed by an underscore and the name of the event. Here’s an example:
Sub Page_Load(Sender As Object, E As EventArgs)
'    Your code goes here.
End Sub
As with all subroutine definitions, this one must appear within <script runat="server"> and </script> tags. Only the subroutine name is important, not its location within the page.
Event | Description |
|---|---|
Init | Occurs when ASP.NET initializes the page. This is the first step in the page’s life cycle. |
Load | Occurs when ASP.NET has loaded the entire page into the Page object. |
PreRender | Occurs when ASP.NET is about to render the page as HTML. |
Unload | Occurs when ASP.NET unloads the page from memory. |
Error | Occurs when an unhandled exception occurs. |
Page_Init occurs before ASP.NET loads all the runat="server" tags into memory. Since most code you write will deal with these objects, the Page_Init event might not be terribly useful.
This event does have the advantage of running before any subroutines that respond to events on the browser. If you need to open a database connection or some other resource before those event handlers run, a Page_Init subroutine might be the place to put them.
Page_Load is generally the most useful and most often used event. This event occurs after the page is fully loaded, but before ASP.NET starts creating HTML.
Page_PreRender occurs after Page_Load and before ASP.NET starts creating HTML. In most cases it’s easier to put code at the end of the Page_Load routine than to set up a Page_PreRender subroutine, but the choice is yours.
Page_Unload occurs after ASP.NET has finished creating HTML. This event is usually too late to do anything useful, except possibly to close resources. Because most programmers close resources after the last statement that uses them, this event doesn’t see much use.
Page_Error provides a final opportunity to execute code before ASP.NET sends the visitor its standard error page. Here you can put any special error-handling code you want, such as putting messages in the system Event log or sending yourself an e-mail.
In addition to its other talents, the Page object also provides a number of useful methods. Many of these are useful only at a very low, obscure level, but two deserve special mention: MapPath and ResolveUrl.
Methods | Description |
|---|---|
MapPath | Assigns a virtual path, either absolute or relative, to a physical path. |
ResolveUrl | Resolves a relative URL to the absolute URL where the page or user control associated with this request resides. |
MapPath translates a virtual path, either absolute or relative, to a physical path. That is, it converts a URL on the local server to a physical file path. Consider the following statement:
strPhysPath = MapPath("/")After executing this statement, the strPhysPath variable would typically return C:InetPubwwwroot. Here’s another example:
strPhysPath = MapPath("/webdbpgm/ch03/default.htm")This code would typically return C:InetPubwwwrootch03default.htm. This sort of information is quite useful when you know only the URL of a file or folder, but some method or API requires a physical file name.
ResolveUrl converts a relative URL to a fully qualified URL on the local server, based on the location of the current Web page. If, for example, the URL path to the current Web page is /webdbpgm/ch03/resolve.aspx, you could execute this statement:
strURL = ResolveURL("../images/classad-l.gif")This statement would store the value /webdbpgm/images/classad-l.gif in the variable strURL.
In addition to providing essential built-in events, the Page object provides a wealth of useful properties. The tables in Demonstrate ASP.NET page events and Demonstrate ASP.NET page events list the properties ASP.NET developers are most likely to use.
Tip
ASP.NET automatically checks the Page object when it searches for any other objects you require. Therefore, it isn’t necessary to code the Page. prefix when you want to reference a Page object property.
Property | Description |
|---|---|
Controls | Gets a ControlCollection object that represents each child control on the page. |
Cookies | Gets a collection of cookies that the visitor sent. |
IsPostBack | If False, indicates that the Web visitor requested an initial display of the current page. If True, indicates that the Web visitor submitted a Web form that the current page previously displayed. |
IsValid | If True, indicates that no validation controls detected unacceptable data. |
Trace | Gets the TraceContext object for the current Web request. Tracing tracks and presents execution details about a Web request. For trace data to be visible in a rendered page, you must turn on tracing at the page or application level. |
User | Gets information about the visitor making the page request. |
ViewState | Gets a dictionary of state information that saves and restores the view state of server controls across multiple requests for the same page. |
To contradict an earlier statement, most developers aren’t likely to make direct use of the Controls property very often. However, existence of this property is relevant to the @ Reference directive described later in this chapter.
The Cookies collection contains name=value pairs for any cookie values that the Web page sends. To send the visitor a cookie as part of an out-going Web page, code
Response.Cookies("myName") = strMyValuewhere myName is any name you choose and strMyValue is an arbitrary variable or literal. The browser will then return the cookie the next time it requests the page. To retrieve the cookie value, code
strMyValue = Request.Cookies("myName")Notice that you send the cookie through the Response object and retrieve it through the Request object. This action makes complete sense given the usual role these objects play.
Use of the IsPostBack property pertains to Web Forms, a facility which the next chapter describes. The property is False for the first display of a form, and True for the second and all successive submissions of the same form.
The IsValid property pertains to Validation Server Controls. These are ASP.NET page elements that check fields on a Web Form for correct syntax. If no Validation Server Controls detect an error, the IsValid property is True. If one or more such controls detect an error, IsValid is False.
The Trace property points to an object that displays debugging data. More information about this facility will appear later in the chapter, but for now, adding the attribute Trace="True" to the @ Page directive shown below displays a variety of information about the execution of the current Web page.
<%@ Page Language="VB" Debug="True" Trace="True" %>
The User property provides the identity of the current Web visitor, but only if you require that your visitors go through a logon procedure. For more information about requiring and validating user identities, refer to Chapter 11.
Like the IsPostBack and IsValid properties, the ViewState property applies only to Web Forms. Basically, it provides a list of name=value pairs that you can send out with a form and then receive back with the next submission. ASP.NET uses this same facility to store the value of text boxes, drop-down lists, and other form elements.
As shown in the table below, the Page object also provides ASP.NET versions of the five major objects that classic ASP used for communicating with the Web server.
The next three sections will describe the Request, Response, and Server objects. A later chapter (Chapter 11) discusses the Application and Session objects.
Page Objects Comparable to Classic ASP Objects | |
|---|---|
Object | Description |
Application | Provides a common storage area for all ASP.NET pages in the same application. |
Request | Contains information received from or about the Web visitor’s request. |
Response | Receives the output from processing an ASP.NET page and sends it to the Web visitor. |
Server | Provides utility functions for creating objects, encoding strings, and translating URLs to physical locations. |
Session | Provides persistent storage for a series of interactions with the same Web visitor. |
The Page.Request object contains information about the request that triggered the Web page. In a sense, it answers the questions "Why am I here?" and "What am I supposed to do?" The next table lists the properties that the Request object provides.
Request Object Properties | |
|---|---|
Property | Description |
AcceptTypes | Gets a string array of MIME types the visitor will accept. |
ApplicationPath | Gets the URL of the current ASP.NET application. |
Browser | Gets information about the visitor’s browser capabilities. |
ClientCertificate | Gets the current visitor’s security certificate, provided the visitor supplied one. |
ContentEncoding | Identifies the character set of the request. |
ContentLength | Specifies the length, in bytes, of the content from the browser. |
ContentType | Gets the MIME content type of the incoming request. |
Cookies | Gets a collection of cookies sent by the visitor. |
FilePath | Gets the URL of the current request. |
Files | Gets the collection of files, if any, that the visitor uploaded with an HTML form in multipart MIME format. |
Filter | Gets or sets the filter to use when reading the current input stream. |
Form | Gets a collection of form variables. |
Headers | Gets a collection of HTTP headers. |
HttpMethod | Gets the HTTP data transfer method (such as GET, POST, or HEAD) from the current request. |
InputStream | Gets the contents of the incoming HTTP request body. |
IsAuthenticated | Indicates whether or not ASP.NET has authenticated the current visitor. |
IsSecureConnection | Indicates whether or not the HTTP connection uses secure sockets (that is, HTTPS). |
Params | Gets a combined collection of items from the QueryString, Form, ServerVariables, and Cookies properties. |
Path | Gets the virtual path (URL) of the current request. |
Gets additional path information for a resource with a URL extension. | |
PhysicalApplicationPath | Gets the physical file system path that corresponds to the ApplicationPath property. |
PhysicalPath | Gets the physical file system path that corresponds to the Path property. |
QueryString | Gets the collection of HTTP query string variables. |
RawUrl | Gets the raw URL of the current request. |
RequestType | Gets or sets the HTTP data transfer method (GET or POST) used by the visitor. |
ServerVariables | Gets a collection of Web server variables. |
TotalBytes | Gets the number of bytes in the current input stream. |
Url | Gets information about the URL of the current request. |
UrlReferrer | If the visitor requested the current page by clicking a link on some other page, this property contains the URL of that page. |
UserAgent | Gets the raw user agent string of the visitor browser. This is a string of characters that identifies the type of browser. |
UserHostAddress | Gets the visitor’s IP address. |
UserHostName | Gets the DNS name that corresponds to the visitor’s IP address. |
UserLanguages | Gets a sorted string array of visitor language preferences. |
Note
The Page.Request object is actually an object of type HttpRequest. However, it’s customary to call it by its simple instance name (Request) rather than the fully qualified name Page.Request or the class name HttpRequest.
Several Request object properties warrant additional mention. Two of these are Request.Form and Request.QueryString.
The Request.Form property contains a collection of values the browser transmitted from an HTML form that uses the POST method. Likewise, the Request.QueryString property contains a collection of values the browser transmitted from an HTML form that uses the GET method.
Assuming that only one value exists for a given name, the syntax for retrieving a value is unchanged from classic ASP. The following example obtains the value of the form field identified in the HTML as quantity and stores it in a variable named strQty:
strQty = Request.Form("quantity")In this example, quantity is the form field’s name as coded in the HTML.
If two or more values with the same name exist in the same collection, the expression just shown returns all the values in a comma-delimited list. This works the same way in ASP.NET as it did in classic ASP.
A discrepancy exists if the collection contains two or more items with the same name and you wish to retrieve them individually. In classic ASP, you would access the first two values using statements like these:
strQty1 = Request.Form("quantity")(1)
strQty2 = Request.Form("quantity")(2)
In ASP.NET, retrieving the same two values requires this code:
strQty1 = Request.Form.GetValues("quantity")(0)
strQty1 = Request.Form.GetValues("quantity")(1)
Similar considerations apply to the QueryString, Cookies, ClientCertificate, and ServerVariables collections.
Another difference between classic ASP and ASP.NET affects the syntax for searching several collections at once. In classic ASP, you could code
strQty = Request("quantity")and ASP would search the QueryString, Form, Cookies, ClientCertificate, and ServerVariables collections—in that order—until it found a value named quantity. This still works, but the following expression is preferable:
strQty = Request.Params("quantity")Params is a single collection that incorporates all items in the QueryString, Form, ServerVariables, and Cookies collections. Using the Params collection is more efficient than searching the five individual collections. In addition, because Params is a real collection, you can process it with constructs like For Each...Next loops.
As Chapter 4 will explain in much greater detail, the Web Forms feature of ASP.NET provides a newer and much more powerful way for forms on the browser and code on the server to interact. Although the Request.Forms and Request.QueryString collections are still a part of ASP.NET, Web Forms will largely eliminate their presence in most forms-processing Web pages.
Both classic ASP and ASP.NET provide information about the Web visitor, the visitor’s browser, the Web server, and other details of a particular transaction in the Request.ServerVariables collection. The following expression, for example, copies the exact URL that the visitor requested into a variable named strUrl:
strURL = Request.ServerVariables("url")Although ASP.NET still supports such expressions, it now provides direct property support for the same variables. The following statement, for example, is much more direct and uses fewer resources than the previous one:
strURL = Request.Url
The easiest way to view the contents of the QueryString, Cookies, ClientCertificate, and ServerVariables collections is to request a trace of the Web page. To do this, add the following statement at the beginning of your .aspx file:
<%@ Page Trace="True" %>
If the page already contains an @ Page directive, simply add the directive Trace="True". For more information about the @ Page directive, refer to "Coding the @ Page Directive" later in this chapter.
Requesting a trace tells ASP.NET to collect a variety of useful information and display it at the bottom of the output Web page. Unless the QueryString, Cookies, ClientCertificate, and ServerVariables collections are empty, you’ll find them clearly listed under prominent headings. This graphic shows some typical trace output.
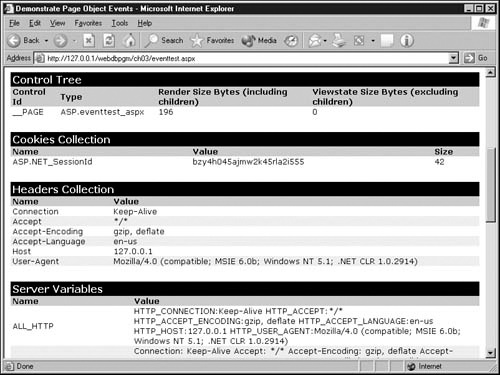
Curiously, the ASP.NET trace display doesn’t show the contents of the Request.Form collection. If you’re using Web Forms, however, the value of each form field appears in the Control Tree section of the trace. For more information about using the Trace facility for debugging, refer to Chapter 15.
As alter ego to the Request object, the Response object transmits the output Web page to the visitor who submitted a request. Most of its many features are seldom used and deserve only minimal coverage in this section. Nevertheless, listings of the Response object’s properties and methods appear in the tables in Working with HTML Server Control Attributes and Retrieving HTML Server Control Form Field Values.
For more information on how to send and receive cookies, refer to "Using the Cookies collection" earlier in this chapter.
The Response.Buffer property is a True/False switch that tells the Web server whether to delay transmitting the outgoing Web page until rendering is complete. This decision requires certain resources from the Web server, but if code that runs during rendering modifies headers or other information at the beginning of the Web page, buffering is the only option.
The Response.Clear method erases the buffer. Use of this method is rare.
The Response.Flush method immediately transmits any rendered HTML that currently resides in the output buffer—a step that’s sometimes useful when the Web page takes a long time to run and you want to release the page banner or other fast-running content without waiting for output from the long-running process. However, this works only if you put the long-running code inside code render blocks located after the Response.Flush statement. Code invoked by custom or built-in events—such as the Page_Load event—always runs to completion before page rendering starts.
Note
Experience has shown that buffering outgoing Web pages actually consumes fewer server resources than not buffering them. The Web server can transmit buffered pages in larger, more efficient TCP/IP packets than unbuffered pages. Buffering is therefore the default in Windows 2000 but not in Windows NT 4.0.
Response Object Properties | |
|---|---|
Property | Description |
Buffer | Indicates whether to buffer output and send it after the entire response is finished processing. |
BufferOutput | Indicates whether to buffer output and send it after the entire page is finished processing. |
Cache | Gets the caching policy (i.e. the expiration time, privacy, and vary clauses) of a Web page. |
CacheControl | Sets the Cache-Control HTTP header to Public or Private. |
Charset | Gets or sets the output stream’s HTTP character set. |
ContentEncoding | Gets or sets the output stream’s HTTP character set. |
ContentType | Gets or sets the output stream’s HTTP MIME type. |
Cookies | Gets the response cookie collection. |
Expires | Gets or sets the number of minutes before a page cached on a browser expires. If the visitor returns to the same page before it expires, the browser displays the cached version. This property exists for compatibility with previous versions of ASP. |
ExpiresAbsolute | Gets or sets the absolute date and time for discarding the current page from the cache. This property exists for compatibility with previous versions of ASP. |
Filter | Gets or sets a filter object that modifies the HTTP output before transmission. |
IsClientConnected | Indicates whether the visitor is still connected to the server. |
Output | Enables output of text to the outgoing HTTP response stream. |
OutputStream | Enables binary output to the outgoing HTTP content body. |
Status | Sets the Status line that the visitor will receive. |
StatusCode | Gets or sets the HTTP status code of the output returned to the visitor. |
StatusDescription | Gets or sets the HTTP status string of the output returned to the visitor. |
SuppressContent | Gets or sets a value indicating whether to send HTTP content to the visitor. |
The ContentType property controls a header field that tells the browser what kind of output you’re sending. The default, of course, is text/html. If your code is generating something other than HTML—plain text, Extensible Markup Language (XML), or pictures, for example—you’ll need to modify this property to text/plain, text/xml, image/gif, image/jpeg, or whatever is appropriate. For examples of ASP.NET pages that create GIF and JPEG pictures, refer to Chapter 8.
Because the ContentType property modifies a header field, you must change it either before rendering the opening <html> tag or, as just described, with buffering in effect.
To control how long a Web visitor’s browser can cache a page, modify the page’s Response.Expires or Response.ExpiresAbsolute property. Response.Expires specifies a number of minutes, while Response.ExpiresAbsolute specifies a date and time. Setting Response.Expires to zero tells the browser it should request a fresh copy of the page every time the Web visitor views it. This is another HTTP header field and requires the same precautions as the ContentType property.
This, however, is an outdated technique preserved for compatibility with classic ASP. The @ OutputCache directive described later in this chapter is far more powerful and fully up to date.
Response.Status specifies a three-digit status code followed by one space and then a brief text message. The default value is "200 OK" but you can modify this to values such as "401 Unauthorized" or "301 Moved Permanently." A 401 status code tells the browser to prompt the Web visitor for a user name and password and then resubmit the request. Combined with a Response.Redirect value (described below), a 301 status code tells the browser to automatically redirect all future requests. This is another header field and requires the usual precautions (that is, buffering or placement before the first HTML or Response.Write statement).
Note
For a list of HTTP status codes, either browse msdn.microsoft.com/workshop/networking/wininet/reference/constants/statuscodes.asp, or browse msdn.microsoft.com/search and search for the words "HTTP status codes."
The following table describes the methods that the Response object provides:
Response Object Methods | |
|---|---|
Method | Description |
AddFileDependencies | Adds a group of file names to the collection of file names on which the current response depends. |
AddFileDependency | Adds a single file name to the collection of file names on which the current response depends. |
AddHeader | Adds an HTTP header to the output stream. This method exists for compatibility with previous versions of ASP. |
AppendHeader | Adds an HTTP header to the output stream. |
AppendToLog | Adds custom log information to the IIS log file. |
BinaryWrite | Writes a string of binary characters to the HTTP output stream. |
Clear | Clears all content output from the buffer stream. |
ClearContent | Clears all content output from the buffer stream. |
ClearHeaders | Clears all headers from the buffer stream. |
Close | Closes the socket connection to a visitor. |
End | Sends all currently buffered output to the visitor, stops execution of the page, and fires the Application_EndRequest event. |
Equals | Determines whether two Object instances are equal. |
Flush | Sends all currently buffered output to the visitor. |
GetHashCode | Serves as a hash function for a particular type, suitable for use in hashing algorithms and data structures, such as hash tables. |
GetType | Gets the Type of the current instance. |
Pics | Appends a PICS-Label HTTP header to the output stream. |
Redirect | Sends the visitor’s browser a command to display a different Web page. |
ToString | Returns a String that represents the current Object. |
Write | Writes information to an HTTP output content stream. |
WriteFile | Writes the specified file directly to an HTTP content output stream. |
The Response.AddHeader method adds any header information you want to the outgoing Web page. Headers consist of a text identification string, a colon, a space, and then a value. Obviously, the browser must understand any header you send; otherwise the browser ignores it. And, of course, the usual precautions regarding the timing of headers apply.
The Response.End method tells the Web server to stop processing the ASP page immediately. The Web server will send the Web visitor any output you created prior to invoking the Response.End method.
The Response.Redirect method sends the Web visitor to another URL that you specify as an argument. For example, coding
Response.Redirect "/default.htm"
sends the Web visitor to the server’s home page. If you specify a URL on the same Web server as the ASP page, the server simply abandons the current request and delivers the redirect page instead. If you specify a URL on a different server, the current server sends the browser a message that tells it to contact the other server. The usual precautions for modifying header fields apply.
Last but not least, the Response.Write statement sends the Web visitor any string you specify as an argument. The characters sent can be HTML, data, JavaScript, or anything else the browser understands. This book has already shown you many examples of the Response.Write statement and will show you many more.
Unlike the Request and Response objects, which receive data from and send information to the Web visitor, the Server object doesn’t involve communicating over the network. Instead, it provides an interface between your code and the Web server that runs it. The Server object contains two properties: MachineName and ScriptTimeout.
Server Object Properties | |
|---|---|
Property | Description |
MachineName | Gets the server machine name. |
ScriptTimeout | Gets and sets the request time-out in seconds. |
The MachineName property gets and displays the name of the computer where the Web server is running. To display this name on the Web server’s console:
Right-click the My Computer icon.
Choose Properties from the shortcut menu.
When the System Properties dialog box appears:
On Windows 2000, click the Network Identification tab.
On Windows XP, click the Computer Name tab.
The ScriptTimeout property specifies how many seconds the Web page can run before the server terminates it. An administrator configures the default ScriptTimeout value at the server level, but it’s usually 90 seconds. ASP.NET code can lengthen (but not shorten) this interval.
The following table summarizes the methods that the Server object provides:
Server Object Methods | |
|---|---|
Method | Description |
ClearError | Clears the previous exception. |
CreateObject | Creates a server instance of a COM object identified by a Program ID. |
CreateObjectFromClsid | Creates a server instance of a COM object identified by the object’s class identifier (CLSID). |
Equals | Determines whether two Object instances are equal. |
Execute | Executes a request to another page. |
GetHashCode | Serves as a hash function for a particular type, suitable for use in hashing algorithms and data structures, such as hash tables. |
GetLastError | Returns the previous exception. |
GetType | Gets the Type of the current instance. |
HtmlDecode | Decodes a string that has been encoded to eliminate illegal HTML characters. |
HtmlEncode | Encodes a string to be displayed in a browser. |
MapPath | Returns the physical file path that corresponds to the specified virtual path on the Web server. |
ToString | Returns a String that represents the current Object. |
Transfer | Terminates execution of the current page and begins execution of a new page. |
UrlDecode | Overloaded. Decodes a string encoded for HTTP transmission and sent to the server in a URL. |
UrlEncode | Overloaded. Encodes a string for reliable HTTP transmission from the Web server to a visitor via the URL. |
UrlPathEncode | URL-encodes the path portion of a URL string and returns the encoded string. |
The CreateObject method creates any COM objects your ASP page requires. Code this method as follows:
variable = Server.CreateObject("ADODB.Recordset")The Server.CreateObjectFromClsid method performs the same function, except that its argument is a Class ID. Here’s an example:
variable = _
Server.CreateObjectFromClsid("00000514-0000-0010-8000-00AA006D2EA4")
These two methods apply only to COM objects. To instantiate a .NET object, use a Dim statement or the New keyword as shown in the two following examples:
Dim cnAds As OleDbConnection
cnAds2 = New OleDbConnection
The HTMLEncode method examines a string argument, replaces any special characters with their HTML mnemonic equivalents, and returns the result. For example, any ampersands in the argument appear as & any quotation marks as " and so on. The HTMLDecode method reverses this translation.
The URLEncode method performs a different kind of conversion: it converts any argument you give it to a string suitable within a URL. Here are the rules:
Letters, numbers, and hyphens remain unchanged.
Spaces change to plus signs.
All other characters change to a percent sign followed by the character’s two-digit hex code.
The URLDecode method does the reverse.
The Execute method runs another Web page and receives the results through a StringWriter object. Consider the following example:
Dim writer As New StringWriter
Server.Execute("otherpage.aspx", writer)
Response.Write("<p>The other page contains:</p>" & _
    writer.ToString())
Line 1 creates a StringWriter. Line 2 runs the otherpage.aspx file, directing its output into the StringWriter object. Line 3 writes a header line followed by the contents of the StringWriter object (expressed as a string) into the Response object for transmission to the Web visitor.
The Transfer method stops execution of the current page and starts executing another page in its place. The Web visitor receives the output of the second page. If you code
Server.Transfer("surrogate.aspx")the visitor will receive the output of the surrogate.aspx page as if he or she typed that URL into the browser’s Address field. If you want the specified page to receive the current page’s Form and QueryString collections, code
Server.Transfer("surrogate.aspx", True)Like virtually all programming environments, ASP.NET supports the use of comments. You can use comments for adding documentation to your source files; for recording notes, ideas, explanations, or excuses; for explaining obscure techniques; or for temporarily removing code from execution. The syntax for coding a comment depends on where the comment occurs.
Within <script runat="server"> </script> and <% %> blocks, you should use the comment syntax for the current programming language. Visual Basic, for example, interprets everything between an apostrophe and the end of a line as comments.
Elsewhere in the page, you can code server comments with an opening <%-- tag and a closing --%> tag. Here’s an example:
<%-- commented out code or content --%>
The opening and closing comment tags can appear on the same line of code or many lines apart. ASP.NET won’t compile or run any code between the opening and closing tags of such a comment, nor will it send any such comments to the browser.
The following example demonstrates an HtmlButton server control that’s "commented out" (surrounded by comment tags):
<%-- <button runat="server" id="btnSesame"
             onServerClick=" btnSesame _Click">
      Open garage door.
     </button>
--%>
Attempting to use a server-side comment block within either a <script runat="server"></script> block or a <% %> block will cause a compilation error.
Just as it supports every other feature of ordinary HTML, ASP.NET supports ordinary HTML comments. Use an opening tag of <!-- and a closing tag of -->. Remember, though, that the server will send ordinary HTML comments to the Web visitor’s browser. This lengthens transmission time and can give away secrets.
The server-side includes (SSI) feature is hardly new; developers have used it since the early days of the Web. An SSI directive tells the Web server to replace the directive with the contents of a specified file. There are two forms of this directive. The first is
<!-- #include file = "filename" -->The file name is a physical path on the server’s file system. If the path is relative, it starts from the directory that contains the document with the #include directive. When using this form, be sure to separate folder names with "" characters.
The second form is
<!-- #include virtual = "filename" -->
The file name is a virtual path within your Web site. If the path is relative, it starts from the URL folder where the Web page containing the #include directive resides. You must separate folder names with "/" characters when using this form.
When using SSI directives, you should be aware of the following rules and restrictions:
For both file and virtual includes, you must enclose the name of the included file in quotation marks ("").
For security reasons, ASP.NET will only include files located in the same directory as the page that contains the #include statement, or in a subdirectory of that location. It won’t include files from any directory above the page that contains the #include directive.
ASP.NET processes #include directives as it loads your Web page into the server’s memory, and before it compiles or executes any program code.
You must enclose the #include tag within the HTML/XML comment delimiters <!-- and -->.
The following example uses server-side includes to add a header and a footer to an ASP.NET page. Both SSI statements use relative paths:
<html>
    <body>
       <!-- #Include virtual="include/header.inc" -->
       Here is the main body of the .aspx file.
       <!-- #Include file="includefooter.inc" -->
    </body>
</html>
Over time, server side includes have become quite popular among programmers who create classic ASP pages. In that environment, SSIs are the only practical way to reuse the same subroutine, function, or other block of code in several Web pages. Unfortunately, the use of SSIs doesn’t scale well. Large sites end up with highly cryptic Web pages that include dozens of other files. Those files include others, which include even more files, and so forth. Tracing code to fix problems or add new features becomes a nightmare. ASP.NET therefore provides user controls, assemblies, and other features that promote reusable code while avoiding the disadvantages of SSIs.
Directives control options for compiling and running a specific ASP.NET page or user control. You can put directives anywhere in an .aspx or .ascx file, but it’s customary to put them at the very beginning. No matter where you put them, they apply to the whole file. The following table lists the eight kinds of ASP.NET directives. Use of the first two directives (@Page and @Import) is very common. The remaining directives control more advanced situations where the code in an ASP.NET page is spread across several different files.
ASP.NET Directives | |
|---|---|
Directive | Type of Options |
@ Page | Defines page-specific attributes used by the ASP.NET page parser and compiler. This directive is valid only in .aspx files. |
@ Import | Makes all classes in a given namespace available to a page or custom server control. (ASP.NET stores classes in a hierarchical naming structure that it calls a namespace.) |
@ Control | Defines attributes specific to a user control. (A user control is an ASP.NET tag that you write yourself.) |
@ Implements | Indicates that a page or user control implements a specified .NET Framework interface. |
@ Register | Associates the prefix and name of a user control with the name of the file that implements it. |
@ Assembly | Links an assembly to the current page or user control. An assembly is a precompiled file that contains one or more classes. |
Controls the output caching policies of a page or user control. If a Web visitor requests a page containing this directive twice within a given number of seconds, rules in the directive determine whether the visitor gets a new copy of the page or a copy left over from a previous execution. | |
@ Reference | Links a page or user control to the current page or user control. |
The general format for coding directives is as follows:
<%@ directive name="value" [name2="value2"...] %>
Each directive must appear within its own set of <% and %> tags. Line breaks can appear anywhere. The following code, for example, is correct:
<%@ Page Language="VB"
         Explicit="True"
         Debug="True" %>
<%@ Import Namespace="System" %>
<%@ Import Namespace="System.Data" %>
However, the following would produce a compile error:
<%@ Page Language="VB" Explicit="true" Debug="true"
  @ Import Namespace="System"
  @ Import Namespace="System.Data" %>
The @ Page directive appears in more ASP.NET pages than any other. Here are its most frequently used attributes:
AspCompat. When this attribute is set to True, ASP.NET will execute the page on a single-threaded apartment (STA) thread. This setting is required if the page calls any components developed with Microsoft Visual Basic 6.0 or any other components that use STA threading. The default is False.
AutoEventWireup. This attribute indicates whether the page’s events are autowired. If this attribute is True, a subroutine named with the name of a control, an underscore, and the name of an event will automatically run whenever that control experiences that event. The default is True.
Debug. If this attribute is True, the compiler will create debug symbols so that if the page fails, the error message can identify the offending variable or line of source code. If False, the page will run faster, but will be more difficult to debug.
Explicit. This attribute indicates, if True, that Visual Basic Option Explicit mode should be in effect. Option Explicit means that if you misspell or forget to declare a variable name, the compiler will halt. This setting is the default, and it’s also the option most experienced developers prefer. If you set Explicit="False", misspelling a variable name will automatically create a variable with the misspelled name.
Inherits. This attribute identifies a so-called code-behind class the page should inherit. This is a class that you compiled ahead of time and that contains all the default code for running the page. Storing the program source code and the HTML code in separate files makes it easier for programmers and page designers to work on the same page. It also makes it easier to develop and maintain multiple versions of the same page for different platforms or different spoken languages. (Presumably, the program code would be the same for all versions, and only the HTML would be different.)
Language. This attribute specifies which compiler to use for source code that appears within the page. The most common values for this attribute are VB (for Visual Basic .NET), C# (for Visual C# .NET), and JScript (for JScript).
Src. This attribute specifies the name of a separate file that contains the source code for the page.
Strict. A value of True indicates that Visual Basic Strict mode should be in effect. Strict means that if copying the value of one variable to another might result in loss of data, the compiler will display an error message and halt. Here’s an example:
Dim lngCount as Long = 1
Dim intCnt as Integer = 0
intCnt = lngCount
If Strict is in effect, this code would generate a compile error, because it’s trying to copy a 64-bit (Long) variable into a 32-bit (Integer) variable. This move could accidentally discard 32 bits of data. To code this statement with Strict in effect, you must code
intCnt = Cint(lngCount)
The Strict option also prohibits late binding, which means changing a variable’s type at run time. The following, for example, would produce a compile error:
dim objThing As Object
objThing = 5
So would the following statements from classic ASP:
dim objConn objConn = Server.CreateObject("ADODB.Connection")Trace. If this option is True, ASP.NET will append diagnostic information to the Web page. This includes details about the request, timings for each source of messages, a list of controls and the size of their outputs, a list of cookie values, a list of HTTP headers received, and a list of the ServerVariables collection. The default is False.
This switch also displays or suppresses any output you create using Trace.Warn or Trace.Write statements. Such output appears only if you code Trace="True".
For more information about tracing, refer to Chapter 15.
The @ Import directive approaches or exceeds the @ Page directive in popularity, depending on how you count. It makes all the classes and interfaces of a given namespace available to the page that contains the directive. The given namespace can be part of the .NET Framework class library or a user-defined namespace. To code this directive, enter
<%@ Import namespace=" value" %>where value is the name of the namespace you want to import. A given @ Import directive can specify only one namespace. To import several namespaces, code a separate @ Import directive for each one.
The need to import a namespace usually becomes apparent when you try to use a certain object and receive a "Type is not defined" message. Suppose, for example, that you coded
Dim fviFileVers As FileVersionInfo
Now suppose that you tried to run the page, and got the following compiler message:
BC30002: Type is not defined: 'FileVersionInfo'
To solve this, you would look up the documentation for the FileVersionInfo object (perhaps by searching MSDN for the keywords FileVersionInfo and Framework) and discover that it’s part of the System.Diagnostics namespace. Voil ! Adding the following directive at the top of the page will get rid of the error message:
<%@ Import Namespace="System.Diagnostics" %>
After a while, you’ll no doubt start remembering which namespaces your favorite classes (that is, your favorite object types) require and coding the necessary import directives as a matter of habit. You’ll also start paying attention to and importing the namespaces of other objects you locate to perform specific tasks. In this regard, it’s helpful to know that every ASP.NET page automatically imports the namespaces listed here with no code or effort from you.
Namespaces Automatically Imported to Every ASP.NET Page | |
|---|---|
Namespace | Functions |
System | Fundamental and base classes that define commonly used objects. |
System.Collections | Interfaces and classes for objects such as lists, queues, arrays, hash tables, and dictionaries. |
System.Collections.Specialized | Specialized and strongly typed collections such as a linked list dictionary, a bit vector, and collections that contain only strings. |
System.Configuration | Classes that access configuration settings and handle errors in configuration files. |
System.IO | Classes that read and write data streams and files. |
System.Text | Classes that represent, convert, and manipulate character strings. |
System.Text.RegularExpressions | Classes that provide access to the regular expression engine. |
System.Web | Classes that support browser/server communication. This includes the classes that implement the Request and Response objects and an HTTPServerUtility object that provides access to server-side utilities and processes. This namespace also includes classes for cookie manipulation, file transfer, exception information, and output cache control. |
System.Web.Caching | Classes that cache frequently used resources on the server. |
System.Web.Security | Classes that implement ASP.NET security features. |
System.Web.SessionState | Classes that support retention of information from one interaction to another for the same Web visitor. |
System.Web.UI | Controls and pages that appear in Web applications (that is, on Web pages). |
System.Web.UI.HtmlControls | HTML server controls. These controls run on the server and map directly to standard HTML tags. |
System.Web.UI.WebControls | Web server controls such as <asp.AdRotator> and <asp:TextBox>. These controls run on the server and create standard HTML, but their syntax doesn’t necessarily reflect HTML syntax. |
The directives in this section involve more advanced techniques than the @ Page and @ Import directives, and therefore you’ll need to code them less frequently. As a result, you may decide to only skim or to skip their descriptions on your first pass through this material. However, don’t forget that these directives exist; sooner or later, one or more of them will almost certainly be the perfect solution to some pesky problem.
The first directive, @ OutputCache, controls when, if ever, ASP.NET skips running a Web page and substitutes the results of a previous execution. The remaining five all address situations in which you want to distribute the code for a Web page among several files.
This directive controls the output caching policies of an ASP.NET page or a user control contained in a page. Here’s the required syntax:
<%@ OutputCache
    Duration="#ofseconds"
    Location="Any | Client | Downstream | Server | None"
    VaryByCustom="browser | customstring"
    VaryByHeader="headers"
    VaryByParam="parametername" %>
The following list describes the acceptable values for each @ OutputCache attribute.
Duration. The time in seconds that ASP.NET will cache a page or user control. Setting this attribute on a page or custom server control establishes a cache expiration policy for responses from that object, and automatically starts caching its output.
If you code an @ OutputCache directive at all, this attribute is required. If you omit it, a parser error occurs.
Location. The location of the output cache. This attribute is required whenever you code an @ OutputCache directive. A parser error occurs if you fail to include it. Here are the possible values:
Any. The output cache can be located on the browser client where the request originated, on a downstream server, or on the server where the request was processed.
Client. The output cache is located on the browser that originated the request.
Downstream. The output cache is located on a server downstream from the Web server that processed the request.
None. Output caching will not occur for the requested page.
Server. The output cache is located on the Web server that processed the request.
VaryByCustom. Any text that represents custom output caching requirements.
If you assign a value of browser, ASP.NET separately caches output for each browser name and major version. If you enter a custom string, you must override the HttpApplication.GetVaryByCustomString method in your application’s Global.asax file.
VaryByHeader. A list of HTTP header values, separated by semicolons.
If present, these values activate caching. When you specify more than one header value, the cache retains a different version of the output for each specified header. Setting the VaryByHeader attribute affects all HTTP/1.1 caches, not just the ASP.NET cache. This attribute isn’t valid within @ OutputCache directives for user controls.
VaryByParam. A list of strings that, if present, cause separate caching of output based on parameter values in the HTTP request.
By default, these strings correspond to query string values sent with the HTTP GET method or parameters sent with the POST method. When you specify more than one parameter, the output cache contains a different version of the requested document for each specified parameter. Possible values include none, *, and any valid query string or POST parameter name.
This attribute is required when you cache ASP.NET pages and user controls. A parser error occurs if you fail to include it. If you don’t want to specify a parameter to vary cached content, set the value to none. If you want to vary the output cache by all parameter values, set the attribute to *.
The following example caches the page on the server for 10 seconds. If any visitor causes this page to run, and then another request arrives within 10 seconds, the server will send a cached copy of the first results rather than running the page again.
<%@ OutputCache Duration="10"
                Location="Server"
                VaryByParam="none" %>
The next example caches a different version of the output for each combination of values in the location and count form fields. If two or more requests that specify the same location and count values arrive within 10 seconds, the second and all subsequent visitors will received a cached copy of what the first visitor received.
<%@ OutputCache Duration="10"
                Location="Server"
VaryByParam="location;count" %>The @Control directive serves the same function for user controls (.ascx files) that the @ Page directive serves for pages (.aspx files). It supports all the same attributes as the @ Page directive, except for AspCompat and Trace. These two attributes apply to an entire page and not just to one control.
The @ Implements directive is another directive that’s valid only within an .ascx file—that is, a file that defines a user control. It tells ASP.NET that the control has, and is willing to accept, the properties, methods, and events of a specified .NET Framework interface.
Suppose, for example, that you want to create a user control that captures form information submitted from the browser. ASP.NET provides this information to a user control by calling an interface named System.Web.UI.IPostBackEventHandler. The .ascx file that contains the user control’s code must therefore contain the following directive:
<%@ Implements Interface="System.Web.UI.IPostBackEventHandler" %>
Of course, the .ascx file must also support all the properties, methods, and events that the System.Web.UI.IPostBackEventHandler expects. Whoever develops the user control code must understand what these are and provide the necessary code.
When coding is complete, other pages can use the user control by coding an @ Register directive (described shortly) in the usual way. The @ Register directive tells ASP.NET to load the .ascx file, and in so doing ASP.NET notices the @ Implements directive. Thereafter, when a System.Web.UI.IPostBackEvent occurs for the given user control, ASP.NET will invoke the interface code that the developer provided.
Use of the @ Implements directive is a fairly advanced technique. Most use of form input and custom controls is drastically simpler.
The @ Register directive identifies the source file or assembly that contains the code for a user control. If the code resides in a source file, the @ Register directive must look like this:
<%@ Register tagprefix=" tagprefix"
             Tagname=" tagname"
             Src=" pathname" %>
To visualize how this works, imagine that you have a user control in a file named cscsrules.ascx and that it consists entirely of this line of code:
<p>User controls rule.</p>
Now suppose that you coded the following @ Register directive in a page:
<%@ Register tagprefix="myTags" Tagname="rule"
             Src="cscsrules.ascx" %>
Within that page, <p>User controls rule.</p> appears wherever you coded the following tag:
<myTags:rule id="ruleTag" runat="server" />
Note
You can find a copy of the cscsrules.ascx in the ch03 folder of the sample files on the companion CD. The file custctl.aspx, located in the same folder, invokes the cscsrules.ascx file five times. If you decide to browse the custctl.aspx file, do so using an HTTP URL.
Most user controls, of course, do much more work than just displaying static HTML. They have properties you can read and write in all the usual ways—including attributes you code within the tag—and they have code that customizes the output HTML based on property values, the type of browser, database values, or anything else you can imagine. For more information about user controls, refer to Chapter 9.
Here’s the second form of the @ Register directive:
<%@ Register TagPrefix=" tagprefix"
             Namespace=" namespace"
             Assembly=" assembly" %>
This form assigns a tag prefix and a namespace identifier to all controls in a given assembly. An assembly is a .dll or .exe file that contains one or more controls. You can create assemblies directly in Visual Studio .NET, or you can compile the source files and combine them into assemblies using command line utilities that come with the .NET Framework. To learn more about this process, search the MSDN Web site (msdn.microsoft.com/library) for the terms Building a SingleFile Assembly and Building a Multifile Assembly.
In the following example, the @ Register directive declares myTag as a tag prefix and myCompany:myNameSpace as a namespace for all controls residing in the assembly named myAssembly:
<%@ Register Tagprefix="myTag"
             Namespace="myCompany:myNameSpace"
             Assembly="myAssembly" %>
If this assembly contained a control named myControl, the following tag would display an instance of it:
<myTag:myControl id="Control1" runat="server" />
The issue of where to physically locate the assembly files is a surprisingly complex topic. The most direct approach is to simply put them in a bin folder located at the application root. However, in the application’s web.config file you can specify additional paths to search, even including locations on the Web. Finally, you can put assemblies anywhere you want and then assign them to a global cache that makes them available to every application on the local machine.
This book makes very little use of assemblies.
The @ Assembly directive links an assembly to the current page during compilation, which makes all the assembly’s classes and interfaces available for use. There are two forms to this directive, the first of which is
<%@ Assembly Src="pathname" %>This form specifies the path and file name of a source file that ASP.NET will compile along with the rest of the page. The following statement, for example, makes any classes and interfaces defined in the Visual Basic .NET source file mySource.vb available to the current page:
<%@ Assembly Src="mySource.vb" %>
The second form specifies the name of a compiled assembly:
<%@ Assembly Name=" assemblyname" %>Note that this form specifies no path and no filename extension. Instead, it searches for the application in the same way as the assembly= form of the @ Register directive. The following example links to a precompiled assembly named myAssembly:
<%@ Assembly Name="myAssembly" %>
Precompiled assemblies that reside in your Web application’s bin directory are automatically linked to pages within that application and don’t require an @ Assembly directive.
You can’t specify both the Name attributes and the Src attributes in the same @ Assembly directive. To use both, you must code two directives.
If the difference between the @ Register directive and the @ Assembly directive seems obscure, consider this:
Use the @ Register directive to make a user control available to a Web page. User controls reside in .ascx files, and you invoke them by adding a custom tag to your HTML.
Use the @ Assembly directive to make a library of class modules (that is, an assembly) available to a Web page. Assemblies reside in .dll, .exe, .vb, or .cs files. You invoke them by creating objects, manipulating properties, and calling methods.
The classtest.aspx page in the ch03 folder of the sample files on the companion CD uses an @ Assembly directive to make a class named Biology available to the Web page. The Biology class itself resides in a file named biology.vb.
The @Reference directive indicates that ASP.NET should dynamically compile and link the source file for another user control or page against the page that contains the directive. There are two forms:
Any page or user control you compile through this directive becomes a member of the ControlCollection object—which you can access through the Controls property—for the page or server control. After calling the LoadControl method (which the page inherits from the TemplateControl class), you can cast the returned type.
The following example links a page to a user control, myControl.ascx. Using the LoadControl method, it then loads the control to a containing page. Next, the example sets the control’s myProperty value and adds it, through the Controls property, to a PlaceHolder control’s ControlCollection object.
<%@ Reference Control="myControl.ascx" %>
<script language="VB" runat=server>
Sub Page_Load(sender As Object, e As EventArgs)

  Dim myControl As myControl = _
    CType(Page.LoadControl("myControl.ascx"), myControl)
  myControl.myProperty = "Color"

  PlaceHolder.Controls.Add(myControl)
End Sub
</script>

<html>
<body>
    <asp:placeholder id="PlaceHolder" runat=server/>
</body>
</html>The procedure that follows will construct a simple Web page that illustrates the key concepts of this chapter: code declaration blocks, code render blocks, the Page object, Page object events, and declarations. This isn’t the sort of Web page you’d show off to clients or relatives, but it does illustrate the key concepts and doesn’t use much Visual Basic. (Visual Basic is the subject of a later chapter.)
Start a new, blank file in your favorite text or HTML editor. If you use an HTML editor, make sure it’s displaying the HTML code.
Add any of the following HTML statements that don’t already appear. These are completely ordinary HTML tags.
<html>
<head>
<title>Demonstrate Page Object Events</title>
</head>
<body>
</body>
</html>
Insert the following declaration before the <html> tag you created in step 2:
<%@ Page Language="vb" Explicit="True" Debug="True"
         Trace="True" %>
The four attributes in this declaration have the following effects:
Language informs ASP.NET that the default programming language is Visual Basic.NET.
Explicit tells the Visual Basic compiler that if you misspell or forget to declare a variable name, you want Visual Basic to display an error message.
Debug tells the compiler that if a serious error occurs, you want the offending source statements and variable names displayed.
Trace tells ASP.NET to display diagnostic information at the end of the Web page.
Add a code declaration block between the declaration you created in step 3 and the <html> tag you created in step 2. The first four lines in the file should now contain this code.
<%@ Page Language="vb" Explicit="True" Debug="True"
         Trace="True" %>
<script runat="server">
</script>
<html>
Define a Page_Load event handler inside the code declaration block you created in step 4. The code declaration block should now look like this:
<script runat="server">
Sub Page_Load(sender As Object, e As EventArgs)
End Sub
</script>
Inside the Page_Load subroutine, add a statement that displays a message in the trace log. The subroutine will then contain these statements:
Sub Page_Load(sender As Object, e As EventArgs)
  Trace.Write("Page Load event has occurred.")
End Sub
Select all three lines in the Page_Load subroutine, copy them to the Clipboard, and then paste them immediately before the Page_Load subroutine. Finally, on lines 1 and 2 of the pasted subroutine, change the word Load to Init. The new code should look like this:
Sub Page_Init(sender As Object, e As EventArgs)
  Trace.Write("Page Init event has occurred.")
End Sub
Sub Page_Load(sender As Object, e As EventArgs) Trace.Write("Page Load event has occurred.") End SubPaste two more copies of the Page_Load subroutine after the last End Sub statement. Make these new copies into Page_PreRender and Page_Unload event handlers. As a group, the four subroutines should look like this:
Sub Page_Init(sender As Object, e As EventArgs)
  Trace.Write("Page Init event has occurred.")
End Sub

Sub Page_Load(sender As Object, e As EventArgs)
  Trace.Write("Page Load event has occurred.")
End Sub

Sub Page_PreRender(sender As Object, e As EventArgs)
  Trace.Write("Page PreRender event has occurred.")
End Sub

Sub Page_UnLoad(sender As Object, e As EventArgs)
  Trace.Write("Page UnLoad event has occurred.")
End Sub
Between the <body> and </body> tags you created in step 1, add the HTML to display a paragraph that states, "The server’s name is: " . The <body> section should now look like this:
<body>
<p>The server's name is: </p>
</body>
Just before the closing tag in the paragraph you added in step 9, insert a code render block to display the Web server’s computer name. This requires the code shown here:
<body>
<p>The server's name is: <%=Server.MachineName%></p>
</body>
Just after the paragraph you created in steps 9 and 10, add another paragraph and another code render block that displays the date and time when rendering takes place. This requires the code shown below in blue.
<body>
<p>The server's name is: <%=Server.MachineName%></p>
<p>Page Rendering occurred at <%=now()%></p>
</body>
Following the two paragraphs you just added, insert a statement that displays a message in the trace log. To make this statement execute while page rendering is in progress, enclose it within a code render block.
<body>
<p>The server's name is: <%=Server.MachineName%></p>
<p>Page Rendering occurred at <%=now()%></p>
<% Trace.Write("Page Rendering has occurred.") %>
</body>
Verify that the completed Web page contains the following code:
<%@ Page Language="vb" Explicit="True" Debug="True"
         Trace="True" %>
<script runat="server">
Sub Page_Init(sender As Object, e As EventArgs)
  Trace.Write("Page Init event has occurred.")
End Sub

Sub Page_Load(sender As Object, e As EventArgs)
  Trace.Write("Page Load event has occurred.")
End Sub

Sub Page_PreRender(sender As Object, e As EventArgs)
  Trace.Write("Page PreRender event has occurred.")
End Sub

Sub Page_UnLoad(sender As Object, e As EventArgs)
  Trace.Write("Page UnLoad event has occurred.")
End Sub
</script>

<html>
<head>
<title>Demonstrate Page Object Events</title>
</head>
<body>
<p>The server's name is: <%=Server.MachineName%></p>
<p>Page Rendering occurred at <%=now()%></p>
<% Trace.Write("Page Rendering has occurred.") %>
</body>
</html>
Save the page in an executable folder on a Web server that has the Microsoft .NET Framework installed. For consistency with this book, name the page eventtest.aspx.
Start your browser, and request the Web page you saved in step 14. Be sure to enter an HTTP URL, such as 127.0.0.1/webdbpgm/ch03/eventtest.aspx, and not a disk location, such as C:InetPubwwwrootwebdbpgmch03eventtest.aspx.
If you receive a compilation error like the one shown below, correct the offending statement, and then reload the page. Continue this process until you stop getting compilation errors.
If you get a less informative error page, make sure that you’ve specified Debug="True" correctly on the @ Page directive. If you still get a less informative display, you might need to update the web.config file.
For step-by-step instructions on creating a web.config file that displays full diagnostics, refer to the procedure "Create a simple web.config file" in Using Page Object Methods.
When the page runs successfully, you should receive output similar to the following graphic:
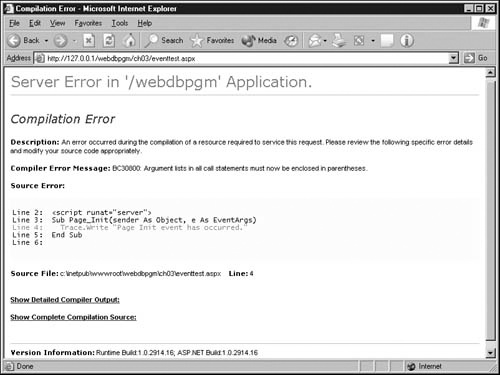
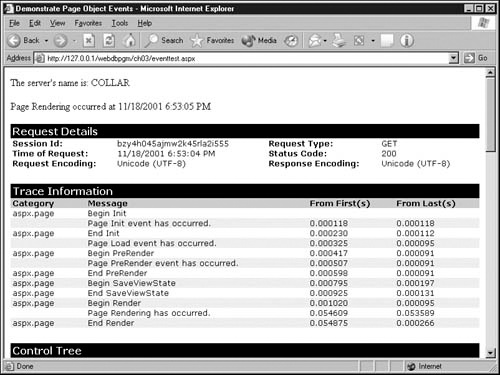
Notice the following details about the Web page you’ve created:
The body of the Web page displays the server’s machine name and the date and time when ASP.NET rendered the page. The code render blocks in the .aspx file are gone and variable information appears in their place.
The messages under the Trace Information heading appear in chronological sequence. ASP.NET inserts its own messages when each processing phase begins and ends.
The trace message from the Page_Init subroutine appears between the system-generated begin and end messages for the Init phase. This is exactly correct.
The trace messages from the Page_Load and Page_PreRender subroutines also appear as expected.
No trace messages appear during the SaveViewState phase. The next chapter will explain ViewState processing.
The trace message from step 13, which runs inside a code render block, appears between the system-generated Begin Render and End Render messages. Again, this is exactly correct.
Note that you can’t write a Page_Render subroutine and have it run during page rendering. ASP.NET wouldn’t know where in the page you wanted the generated HTML to appear. If you want to write output or do some other processing while page rendering is in progress, use code render blocks.
The trace message from the Page_Unload event doesn’t appear. Of course, you knew all along that this was going to happen. Because Page_Unload occurs after page rendering is complete, it isn’t possible to send messages from that subroutine to the browser.
You might find it instructive to rearrange the four subroutines in the code declaration block so that they appear in a different order. This change will have no effect on the Web page that appears in the browser. ASP.NET raises these events in its own order of processing, and not in the order they appear within the Web page.
You might also want to try displaying other properties of the Page, Request, Response, or Server objects. Be aware, however, that some of these properties are too complex to display as simple text.
This chapter explained the basic life cycle of an ASP.NET Web page and how this relates to the way you code your Web pages. It also described the important objects, properties, and methods you’ll most often use when taking advantage of ASP.NET’s many powerful features.
Chapter 4 will explain Web Forms, the primary way that ASP.NET interacts with the browser and therefore the Web visitor.