The expressed goal of the Tablet PC team was getting people to use their computers in places and situations they never used them before. How you will adapt your tablet to your work style is strictly personal. The first part of this chapter describes how you can use your tablet offline and how you can connect to different networks. The latter part of this chapter relates some of my experiences using my tablet on a coast-to-coast work trip and describes some of the benefits and challenges. Whether you plan to travel around the office or around the globe, all tablet users should understand the ins and outs of connecting to local networks and the Internet. If the Tablet PC team meets its goal of enabling you to take your tablet places you never took your computer before, connecting and disconnecting to networks will be a daily activity.
"Mobility is a personal thing. For some people it just means going down the hall. For others it’s going halfway around the world."
—Jim Cox, Windows XP Tablet PC Edition team.
Having a computer as portable as the tablet doesn’t do you any good if your files don’t come with you. Because much of the information that you work with yourself or share with others is stored on a network, easily working on, off, and between networks is central to having a satisfying experience with your tablet. In the following sections, I’ll briefly cover how to work with network files and folders on your computer when you’re offlineoffline and still keep the information in sync, how to maintain Web pages for offline reference, and how to set up your e-mail client so that you can read and respond to messages when you’re not connected to your e-mail server. I’ll also provide some background on working with a virtual private network and wireless networks. Although the information presented here isn’t unique to working with a tablet, setting up your tablet for optimal mobility lets you use it most effectively.
To work with your files when you’re traveling or otherwise unable to connect to a network, you need a copy of them physically stored on your tablet. Using Windows XP, you can designate a folder or a file that’s stored on a network server to be available offline. Windows then creates a folder on your local hard drive in which it stores copies of the files. When you connect to the network again, Windows synchronizes the local copy with the version on the network, providing you the means to resolve conflicts should they arise.
Glossary
Synchronization is the process of making the files in two different locations identical.
Before you assign a particular folder or file to be available offline, you need to configure your computer to work with offline files. If your computer is part of a workgroup rather than part of a domain, you can’t set up a file or folder for offline use until you have turned off Fast User Switching, the feature in Windows XP that permits more than one person to be logged on to a single computer at the same time. To be sure that Fast User Switching isn’t enabled, open User Accounts in Control Panel and then tap Change The Way Users Log On Or Off. Uncheck the Use Fast User Switching option, and then tap Apply Options.
Glossary
In Windows, a workgroup is a group of networked computers with no central administration services. Small office or home networks are usually workgroups.
Glossary
In Windows, a domain is a group of networked computers that are centrally administered. Domains are more powerful and secure but are also more complicated and require some expertise to manage. Large office networks are usually domains. When you log into a computer that is part of a domain, the login dialog box includes a list to select the domain.
To set up offline files, open Folder Options in Control Panel (Folder Options is under Appearance And Themes if you display Control Panel in Category View) and then tap the Offline Files tab, shown in Figure 7-1.
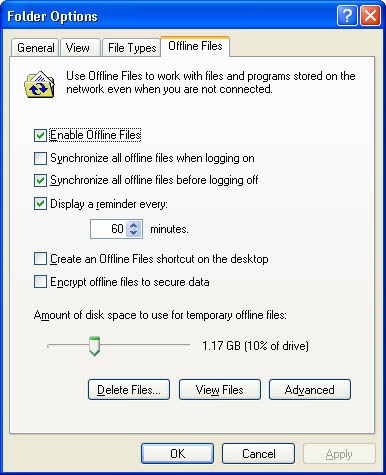
Before setting any other option, check Enable Offline Files. With offline files enabled, you can decide when you want to synchronize. The default option will synchronize your files before logging off. You can also synchronize when logging on or be reminded that you need to synchronize your offline files before logging back on. The important thing to remember is that those files need to be synchronized on a regular basis.
Other options on this tab include creating a shortcut on your desktop to your offline files and encrypting the data in offline folders for additional security. If you feel the need for such security, get more information about the ins and outs of encryption before proceeding.
To designate a file or a folder to be available offline, you must first connect to the network from your tablet. Using My Computer or My Network Places, open the network share that contains the files you want to work with offline. Right-tap on either the folder icon or a particular file you want, and then choose Make Available Offline from the shortcut menu.
Choosing this command starts the Offline Files Wizard, which, as you tap through its screens, presents many of the options included on the Offline Files tab of the Folder Options control panel. If a folder you’ve marked for offline use includes subfolders, you’ll see the dialog box shown in Figure 7-2 when you tap Finish. Select whichever option best fits your needs.
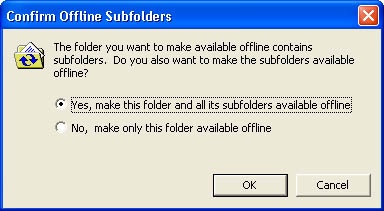
Figure 7-2. When you make a folder that contains subfolders available offline, you can decide whether to include the subfolders.
Tip
The file server doesn’t need to be anything fancy. I keep all my work on my old desktop machine running Windows XP Professional and keep synchronized copies on my tablet. Whichever computer I use, I always have my files available and up-to-date.
Tip
A great way to back up the work on your tablet is to set your My Documents folder on the tablet to point to a folder on the network and then make it available offline. To change the target of your My Documents folder, right-tap on My Documents in the Start menu and select Properties from the shortcut menu. On the Target tab, enter the path to the folder on the server.
In most cases, synchronization is straightforward. For example, if you modify an offline document on your computer and the copy on the network was not changed, the network copy is updated with the copy from your local offline folder. Similarly, if the copy on the network has changed and your local copy has not, the local copy is updated during synchronization. If both copies have been changed, you’ll see the Resolve File Conflicts dialog box, shown in Figure 7-3. As you can see, you can elect to keep one version or the other or both.
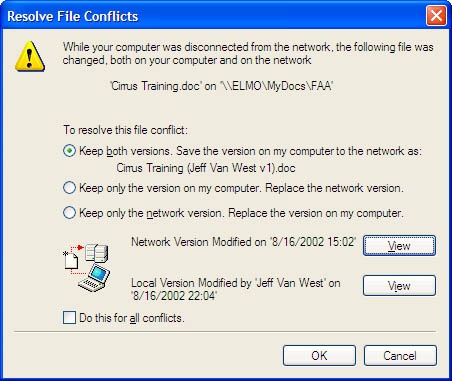
Figure 7-3. Use the Resolve File Conflicts dialog box to determine which version of a file to keep when file conflicts occur during synchronization.
Other synchronization logic is followed if you delete a file from your local offline files folder or a file has been deleted from the network. As long as a file hasn’t changed, if you delete the file from your computer, it’s deleted from the network when the two locations are synchronized. The same pattern is followed if the file was first deleted from the network. If a file is deleted in one location but has been changed in the other, Windows displays a dialog box that lets you sort through whether to retain the version that’s still stored or delete it.
You can synchronize your offline files any time you’re connected to the network by right-tapping the folder or file you want synchronized and selecting Synchronize from the shortcut menu. You can synchronize all your offline folders at once in Windows Explorer by tapping Synchronize on the Tools menu. Tapping this command displays the Items To Synchronize dialog box shown in Figure 7-4.
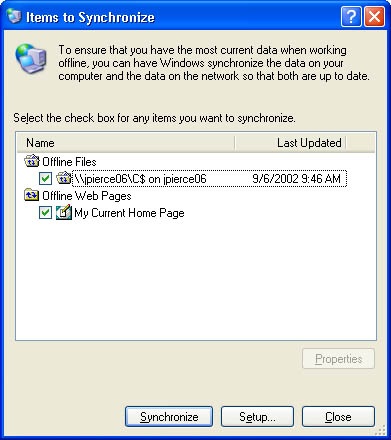
The Items To Synchronize dialog box allows you to select the items to synchronize and to specify synchronization settings. If you tap the Setup button, you can specify when synchronization should occur and other settings. The Properties button displays the files that will be synchronized.
In the Items To Synchronize dialog box, uncheck any of the items that you don’t want synchronized and then tap the Synchronize button. With the details pane shown, you’ll see a progress dialog box such as that shown in Figure 7-5.
Caution
When you’re connected to the network and working with your offline files, the files on your tablet will be synchronized when you save your work. If you leave the network without saving or synchronizing, either manually or automatically, your work might not be saved on the tablet.

Tip
If you work on a large office network, another option for offline file access is a roaming user profile. This will not only keep a copy of files and settings on your tablet but also make your files, and your entire desktop, available from virtually any computer in your office. For more information about roaming profiles, search Help And Support on the Start menu and ask your network administrator.
The Web pages or sites that you often refer to can also be made available for use offline. You can visit the site and obtain information from it without being connected to the Internet. Think of the advantages of reading through your favorite online periodical on a long coast-to-coast flight.
A Web page that you want to view offline must be included in your list of favorites in Internet Explorer. For sites already among your favorites, right-tap the favorite entry on the Favorites menu and then tap Make Available Offline on the shortcut menu. The Add Favorite dialog box, shown in Figure 7-6, includes the Make Available Offline check box for a Web page you’re adding as a new favorite.
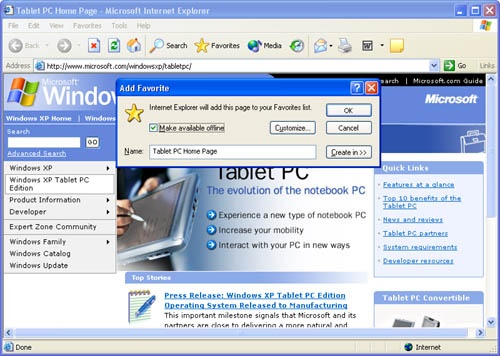
Figure 7-6. You can select the Make Available Offline option when you add a Web page to your list of favorites.
You can tailor the offline behavior of a favorite Web page by tapping the Customize button in the Add Favorite dialog box, which starts the Offline Favorite Wizard. In the first page of the Offline Favorite Wizard, shown in Figure 7-7, you establish the level to which material linked to the offline page will also be available offline. You can download only the page you’ve marked as a favorite or as many as three levels beyond that page. In other words, you can download the page marked as a favorite (zero levels), the pages that page is linked to (one level), the pages those pages are linked to (two levels), and the pages linked to those (three levels). The number of links and amount of data at three levels will be significant, and the time required to download all those pages is considerable. Downloading even two levels deep captures more content than you might expect. Be cautious about turning this setting up beyond the first level.
For further control of how an offline Web page is downloaded, right-tap the favorite entry on the Favorites menu and then tap Properties on the shortcut menu. The Download tab provides much of the information captured by the Offline Favorite Wizard, as shown in Figure 7-8.
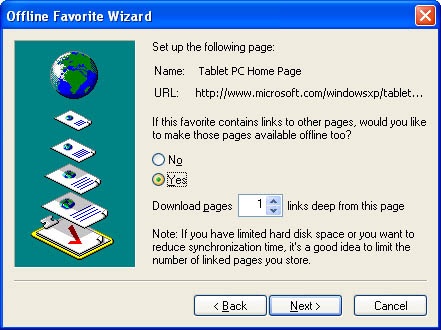
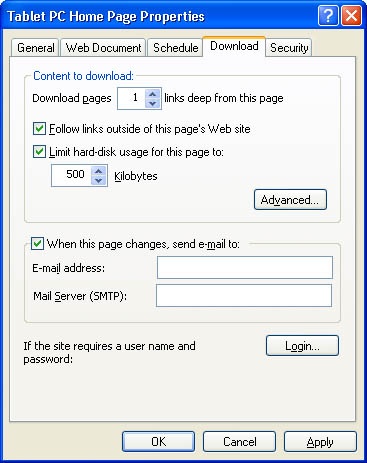
Figure 7-8. Settings for downloading offline Web pages can be specified on the Download tab of the Properties dialog box.
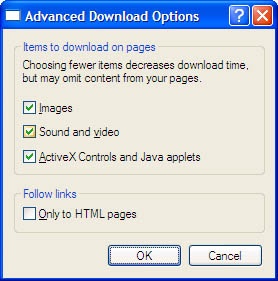
Tapping the Advanced button on the Download tab lets you select whether to download images, sound and video, and ActiveX controls and Java applets, as shown in Figure 7-9. You can also select whether you want to download links to only HTML pages. I usually check all the options in the Items To Download On Pages area and uncheck the Only To HTML Pages check box to download all links because it is a pain to discover some key item is missing as your airplane is leveling off at 32,000 feet.
As you can with files and Web pages, you can set up your e-mail accounts so that you have access to messages you want to read or respond to offline. There are two ways to work with e-mail offline: offline folders and remote mail.
Note
Most of the steps discussed here assume that your e-mail client is Microsoft Outlook 2002 and your e-mail server is Microsoft Exchange. Other e-mail clients have similar capabilities. Check the product documentation for detailed information.
Note
This discussion of offline e-mail is just an introduction to get you started. For additional information on using offline e-mail in Outlook, consult the Outlook Help or the book Microsoft Outlook Version 2002 Inside Out (Microsoft Press, 2001).
Offline folders allow you to have access to Outlook folders and Outlook items (such as calendar, contacts, tasks, and notes) offline and then synchronize your offline and online item stores when you connect to your e-mail server again. To use offline folders, you first need to have an offline folder file, and then you can perform the synchronization process.
To create an offline folder file for offline e-mail, follow these steps:
Open Outlook 2002.
On the Tools menu, tap E-Mail Accounts.
Under the E-Mail label, select View Or Change Existing E-Mail Accounts and then tap Next to see the list of existing e-mail accounts.
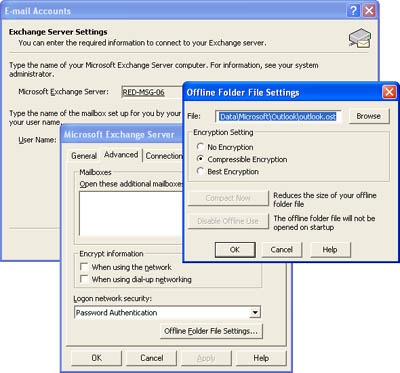
Tap the Change button, tap More Settings, tap the Advanced tab, and then tap Offline Folder Settings to see the Offline Folder File Settings dialog box.
In this dialog box, Outlook displays the path to a default offline folder file (Documents and Settings<username>Local SettingsApplication DataMicrosoftOutlookOutlook.ost). The offline folder file (.ost) stores a copy of the Outlook folders and items in your mailbox that have been identified as available offline, although you will not see a duplicate set of folders and items displayed in Outlook. Tap OK, and if a dialog box appears asking whether you want to create the file, tap Yes. This file will be associated with your e-mail account.

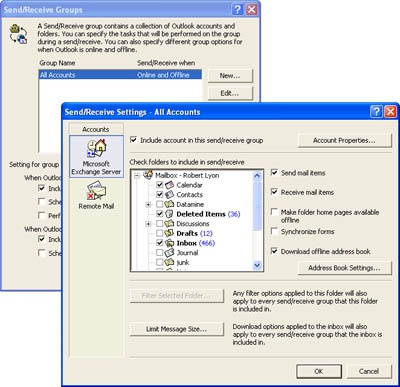
Once you have created an offline folder file, you can specify which items you want to be available offline. In Outlook, this is accomplished with send/receive groups. To edit the default All Accounts group, tap Tools, Send/Receive Settings, Define Send/Receive Groups to display the Send/Receive Groups dialog box. Select the All Accounts group, and tap Edit. In the Send/Receive Settings dialog box shown in Figure 7-10, you can specify which items to include in the group.
Before you can work offline in Outlook, you need to synchronize the offline folder file with your mailbox on the e-mail server. To manually synchronize your offline folders, choose Tools, Send/Receive, and then tap Send And Receive All to synchronize all folders or tap the send/receive group name (such as All Accounts) to synchronize the items in that group. Figure 7-11 shows a sample of the Outlook Send/Receive Progress dialog box that is displayed.

After you’ve performed this synchronization, you can work with your e-mail offline and then synchronize your offline work with your mailbox on the server the next time you connect to the network. Messages you’ve composed offline will be sent to their recipients, and changes to your Outlook items (calendar, contacts, tasks, and notes) are updated.
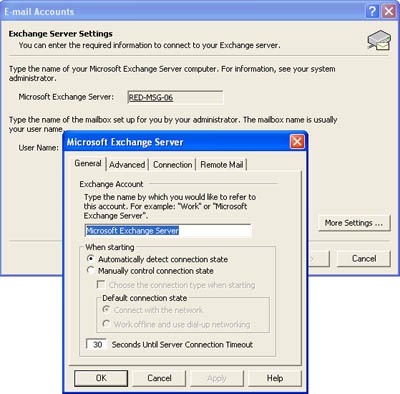
How you switch between working offline and on line depends on your e-mail account type. If you’re using Post Office Protocol 3 (POP3), Internet Message Access Protocol (IMAP), or HTML e-mail, select Work Offline from the File menu. If you’re using Exchange Server, the General tab in the properties dialog box for your Exchange Server e-mail account includes several options for automatically and manually connecting when you start Outlook, as shown in Figure 7-12. When using Exchange Server, you’ll have to restart Outlook to switch between working offline and on line.
Tip
Choose to work offline when you carry your tablet out of wireless network range to prevent a barrage of annoying "Unable to Connect to Server" messages.
Another method for managing e-mail while you’re on the road or otherwise away from the network is remote mail. Remote mail has the benefit of letting you identify which e-mail messages you want to read and respond to without having to download all your messages. Instead, when you dial in or connect in some other way to your e-mail server—perhaps over a long-distance call—you can download message headers, skipping the contents of the message bodies, and then disconnect from the server. Free from a potentially expensive or slow connection, you can sort and review the message headers, deciding which messages to download completely, which to keep on the server, and which you can simply delete at this point. You then connect to the server again to process the messages as you indicated. However, unlike offline folders, remote mail works only with messages in your Inbox.
Tip
Avoiding the costly and time-consuming download of large file attachments over a dial-up connection is reason enough for using remote mail.
Remote mail requires that you’ve set up an offline folder file in Outlook (see the previous section for the steps required to do this) or have set up Outlook to deliver e-mail messages to personal folders. After connecting to your server, download message headers by tapping Tools, Send/Receive, Work With Headers.
Remote mail is available for Exchange Server accounts only, but there are comparable features for other e-mail account types, such as POP3 and IMAP. If your e-mail account uses POP3, you can set up your account to download only message headers and select which messages you want moved from the server to your computer, which you want downloaded while retaining a copy on the server, and which you want to delete without downloading. You can also set a limit on the size of the messages to download. With an IMAP e-mail account, simply turning off the preview pane and AutoPreview lets you see and edit message headers without downloading the entire message.
A virtual private network (VPN) lets you use the Internet as a secure path to your organization’s network. You can also set up a VPN to your home if you have a full-time Internet connection or phone line. VPNs are especially useful when you’re traveling because you can connect to your office network from any Internet connection anywhere in the world. The data that’s transmitted over the Internet is encrypted when it’s sent between the computers defining the private network.
Setting up a VPN is beyond the scope of this book, and if your office network allows VPN access, you’ll need the connection settings and passwords from your network administrator to set it up. My point in bringing it up here is both to let you know these connections exist and may be available at your company and to point out how VPNs can work around a Catch-22 of networks. Both VPNs and corporate networks are usually part of a domain, while home networks are usually workgroups. Your user profile on the tablet can log into a domain or a workgroup but not both. The situation comes up when you take your tablet that logs into a domain at work or for VPN access and try to log on to your home (workgroup) network, and you can’t do it. There is no good solution for this, but two workarounds are to have all your home computers connect to the domain via VPNs, which is only possible if you have a broadband Internet connection, or to create two user profiles for your tablet that share a My Documents folder. You would use the workgroup profile to use your home network and the domain profile to use the VPN or the office network.
Your tablet was practically built for wireless networks. On a wireless network, you can walk from your office to a conference room and always have access to data on the network. Moreover, some airports, conference centers, and even coffee shops have installed wireless networks so that their patrons can connect to the Internet. Most wireless networks follow the IEEE 802.11b standard, also known as Wi-Fi, have a range of 50 to 300 feet, and can transmit data at up to 11 megabits per second. That’s about one-tenth the speed of the average wired network but about ten times the speed of most broadband Internet connections. In other words, wireless may seem a bit slow transferring network files but Internet access will probably seem quite speedy.
Caution
If you’re working on line and walk out of network range, the network file you have open may close unexpectedly or cause an error. Be careful about dropping off a wireless network with network files open.
The wireless network connector on your tablet is communicating with a base station that broadcasts the network’s presence, manages the transmission and reception of data, and provides a check point for secure access. Security for wireless computers can be achieved by using Wireless Equivalent Privacy (WEP). WEP protects data transmissions using a string of information called a key. There are shorter (40-bit) keys and longer (104-bit) keys, but the important distinction for you to know is between open and shared keys. An open key is used for public networks, such as in a coffee shop, where any computer can connect to the network. This key encrypts your transmissions to the base station, so the guy at the next table can’t spy on your work, but anyone can join the network without permission. A shared key is a single password-like code that you must know to join the network. If you are prompted for a password when you try to connect to a wireless network it has a shared key. Shared keys are more secure than open keys, so long as the key itself remains secret. Most hardware that supports WEP uses a single key that’s shared by the network’s components. Shared keys should be changed frequently to hinder intruders from discovering them.
The support for wireless networks built into Windows XP automatically detects and connects to accessible networks within range. This feature is known as wireless zero configuration. As you use your tablet, Windows XP will build a list of the wireless networks you use and their settings. Automatic wireless network configuration will detect which network is available and adjust your network settings appropriately. You can configure Windows to try to connect to these various networks in the order in which you prefer by tapping the buttons to the right of the Preferred Networks list in the Wireless Network Connection Properties dialog box shown in Figure 7-13.

Note
For more information about wireless network setup and security, see Microsoft Windows Security Inside Out for Windows XP and Windows 2000 (Microsoft Press, 2002).
Like everything else with computers, wireless networks don’t work perfectly all the time. If you have trouble connecting to a wireless network, check to be sure that Windows is set up for automatic configuration. Open the Wireless Network Connection Properties dialog box for your wireless connection, and confirm that the option Use Windows To Configure My Wireless Network Settings is checked. Also check whether the Wireless Zero Configuration service is running on your computer. Do this by displaying the list of services (double-tap Services in the Administrative Tools folder in Control Panel) and checking whether the Status column shows that the Wireless Zero Configuration service is running. You should start the service if it’s not running. Sometimes switching to the wired network and then back to the wireless one will reset the network settings and fix a problem. Plaster walls in old homes and buildings can interfere with wireless network signals. If you’re having trouble getting a good signal through walls in an old building, this might be the problem.
There is an additional level of network authentication with wireless networks that is controlled on the Advanced tab of the Wireless Network Connection Properties dialog box for a given wireless network. Normally this option can be left untouched, but if you have the problem of your tablet joining a network and then immediately dropping back off, try disabling this level of authentication. This problem is most common with home wireless-network base stations.
Try This
An ad-hoc wireless network lets two computers communicate directly with each other without any cables and without setting up a workgroup or a domain. This is a great way to exchange large files between two wireless-capable computers. To set up an ad-hoc wireless network, open the Network Connections control panel and double-tap your wireless network device. In the Wireless Network Connection Status dialog box, tap the Properties button on the General tab to open the Wireless Network Connection Properties dialog box. To add your own ad-hoc network, tap the Wireless Networks tab and then tap the Add button. Give the network a name, and check the option for a computer-to-computer (ad-hoc) network. When you tap OK, your computer should start broadcasting its availability for connection. On the other computer, double-tap the wireless network device in the Network Connections control panel. The network you just created should be available. It may take some experimenting with different WEP, authentication, and key settings to get everything connected, but once you get it working, it’s really cool. Of course, whenever you connect to someone else’s computer and exchange files, be sure your anti-virus software is running and up-to-date.
As you travel from network to network and place to place with your tablet, you will be logging in and being authenticated all the time. The login and password management tools used by Windows XP are not unique to the tablet, but because it’s such a mobile computer, they deserve a brief mention here. For more information on login and password management, see the book, Microsoft Windows XP Inside Out (Microsoft Press, 2001).
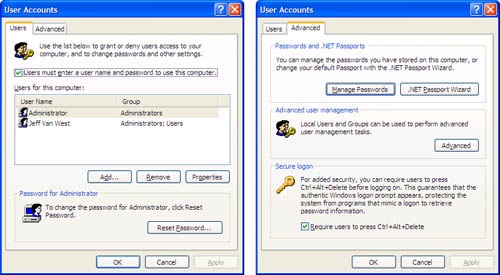
The User Accounts control panel is the tool you use to manage your login and passwords. This control panel lets you control all the user passwords for your tablet, manage your .NET Passport and network passwords, and control what a user must do to log on to your tablet. The view of the User Accounts control panel is different depending on whether your tablet is part of a domain. Each view has essentially the same capabilities, but the steps to perform different operations and the location of options are different. Figure 7-14 and Figure 7-15 show the User Accounts control panel when your tablet is not part of a domain and when your tablet is part of a domain.

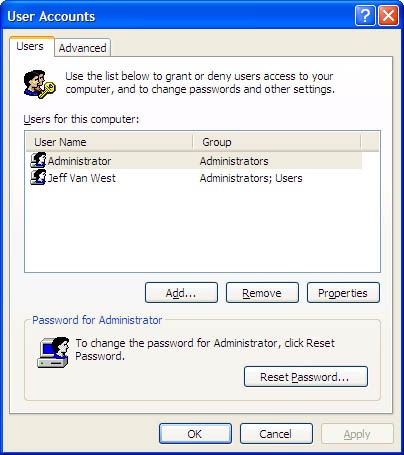
There are two login and password features worth looking at. One is the .NET Passport built into Windows XP, and the other is network password management. Both features can be accessed by opening your user account in the User Accounts control panel.
.NET Passport allows you to add a passport to a user account and then use that secure login to access hundreds of .NET Passport–enabled services and Web sites without having to log in over and over again. .NET Passport also lets you use the Windows Messenger service that is linked with Outlook in Office XP. Windows XP will probably launch the .NET Passport Wizard shown in Figure 7-16 automatically, but if it does not, or if you want to edit your account, you can access it through the User Accounts control panel.

Note
.NET Passport uses your e-mail address as your login name and a password of your choosing. While .NET is quite secure, it’s still a good idea to use a different password than you use to log in to your corporate network.
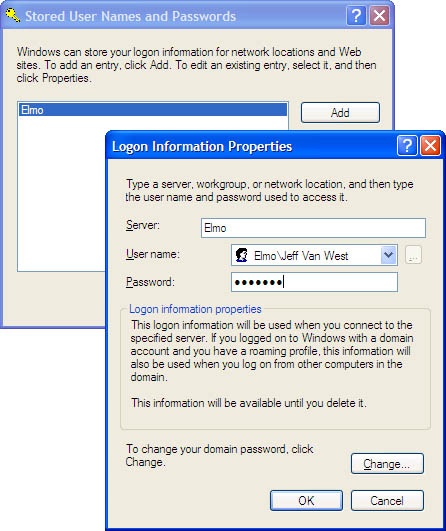
When you log on to remote networks, you are often asked for a username and password. Entering these on the tablet can be a real pain without a keyboard available. Windows XP can save the login information and enter it for you, but the settings can be hard to find. Once you open your user account in the User Accounts control panel, tapping the Manage My Network Passwords option (or Manage Passwords button if your tablet is part of a domain) opens the Stored User Names And Passwords dialog box. Editing or creating an entry opens the Logon Information Properties dialog box shown in Figure 7-17. In this dialog box, you can specify the server you are logging in to, your username on that server, and your password. Once you have entered the information, Windows XP will enter the login automatically whenever you access that server.
The disadvantage of automatic login is that anyone with access to your tablet can now log in from your user account. To protect your user account, you should set up your tablet so that users must log in with a username and password when the tablet starts up and potentially when it resumes from standby and hibernate. Setting up your tablet so that it requires a password when resuming from standby is discussed in the "Security Concerns" section later in this chapter.
If your tablet is not part of a domain, the easiest way to access all your login and password options at once is to open the Run dialog box from the Start menu, type control userpasswords2 in the Open box, and press Enter. The alternative User Accounts control panel shown in Figure 7-18 appears, which is essentially the User Accounts control panel displayed when your tablet is part of a domain.
Tip
For logon security, make sure the Users Must Enter A User Name And Password To Use This Computer check box (when tablet is not part of a domain) and the Require Users To Press Ctrl+Alt+Delete (tablet security button) check box are checked.
During the course of writing this book, I took the tablet on a business trip from Seattle, Washington, to Providence, Rhode Island, to Columbus, Ohio, and back to Seattle. Before the trip, I was pretty enamored with the tablet. After the trip, I was in love. The physical form of the tablet made it so much easier to use away from my desk that I ended up using it in places I just couldn’t use a normal computer, such as standing in line at the airport. Mobility is a personal thing, but here are a few of my insights from my travels.
All portable computers have one inherent risk: your data is very vulnerable. The computer can be stolen, dropped, forgotten, or damaged as you travel. Even if the computer is fine, the data on hard drives is susceptible to strong magnetic fields and sudden shocks. If you’re going to travel a fair amount with your tablet, you should consider an on-the-road backup solution. Even if you have a normal backup plan, a complete backup of your work that’s still at home or on an office server that you can’t access is virtually useless. The on-the-road backup need not be a complete backup of everything on your computer because having the ability to reinstall Office on a tablet that was stolen doesn’t help much. What you want is a backup of your critical files—usually part or all of your My Documents folder and perhaps your Outlook files—that you can continue to update as you travel and that you can retrieve files from in an emergency. Because these files occupy only a fraction of your hard drive, you have several options for backup devices.
Following is a list of some portable backup devices that you could use to store your data files.
Removable Media
Writable CDs, Iomega Zip, and other drives work well for large amounts of data, but they aren’t the best thing for the road. They require you to carry both the media drive and blank CDs or discs and usually require their own power supply. If your computer is gone and you need to use a rented machine, sometimes these drives will work immediately and sometimes they require special software to be installed.
USB and FireWire Hard Drives
These are portable drives capable of lightning-fast transfer rates for huge quantities of data, over 100 GB in some cases. They usually weigh a pound or less and draw their power from the computer or from their own rechargeable batteries. These drives work on most modern computers without installing special software as well. If you have a lot of data you need available by backup, such as large audio or video files, these drives are a good solution.
Tip
Want a FireWire hard drive for backups that also plays tunes and functions as a PDA? Apple’s iPod works with Windows, too.
USB Pen Drives
If your work is mostly text and a few PowerPoint presentations that don’t take up much space, it will probably fit on a pen drive. These drives are about the size of a fat highlighter and can fit on a keychain, weigh only an ounce or two, don’t require a power supply, and have no moving parts to break. They also work on virtually any modern computer without any special software. They don’t hold nearly as much data as a USB or FireWire hard drives, but for many people they offer the easiest and most portable backup solution. Since most of my work was in Word, PowerPoint, and Windows Journal, I backed up to a 256-MB pen drive on my trip.
Internet Backup
Backing up over the Internet has the advantage that it requires no additional hardware and can’t be stolen, but it does require an Internet connection and either remote access to your company server or an account with one of the Internet backup services. Internet backups are also slower and less readily accessible in an emergency than hard drives in your physical possession.
PDA Backup
Your PDA or cell phone calendar and address book can be a useful part of your backup solution. Because I synchronize Outlook with my PDA and leave copies of my e-mail messages on my e-mail server, I never back up my Outlook files on the road.
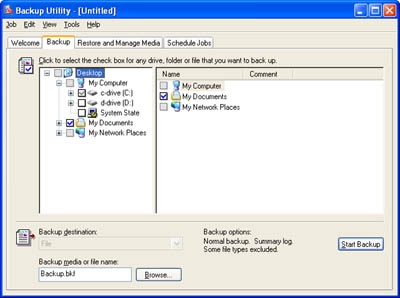
Most backup solutions, including the Windows Backup utility, create one large backup file containing all the selected files on your hard drive. Figure 7-19 shows Windows Backup in advanced mode. Windows Backup is accessible from ProgramsAccessoriesSystem ToolsBackup.
This is a space-efficient way to back up, but it isn’t what you want on the road because retrieving your files requires the software that created the backup (which was probably lost with your damaged or missing computer) and a lot of time. This is not the situation you want to find yourself in five minutes before your presentation starts! Instead, use a synchronization program that maintains a complete copy of your files the same way offline file access does as described earlier in this chapter. This way you can simply plug in your backup media to another computer and immediately access any of your files without any delays.
There’s a saying among system administrators that having only one backup is almost as bad as having no backups. In the unlikely event that something happens while you’re creating a backup, you could lose both files. If you want some extra security, back up to more than one folder. Figure 7-20 shows my backup system for this book, in which I synchronized files with different directories depending on the day of the week. This also allowed me to go back a few days to look at an old version of a file if I needed it. Once you have a backup system, find a time to use it that best fits your work habits or program the software to prompt you to back up on a specific schedule. Synchromagic by Gelosoft (http://www.gelosoft.com) is a great and inexpensive synchronization and backup application that works well under Windows XP and provides plenty of options for backup style and scheduling.
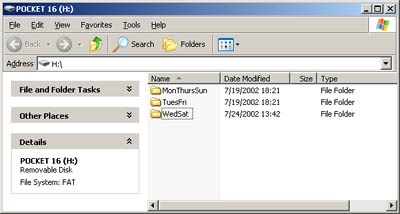
Figure 7-20. Your on-the-road backup solution should back up individual files rather than create one large backup file. You may also want to back up to more than one folder.
Tip
Keep a copy of your synchronization software installer and registration number on your backup drive. If you use a loaner computer for an extended period while yours is unavailable, you will be able to continue using your backup regimen.
If you use Outlook at your company, then all of your Outlook information is backed up on the company server. If you synchronize it with a PDA, then your e-mail is not backed up, but the synchronized calendar, contacts, tasks, and notes are. If you don’t fall into one of these categories, or you want to keep a backup of your Outlook data with you, you need to find the folder containing your Outlook data files and add them to your backup. To see the data files used by Outlook, tap Data File Management on the File menu to see the Outlook Data Files dialog box. Next select one of the files listed (in many cases there is only one) and tap Settings. The dialog box that appears contains the location of the data file in the Filename field, as shown in Figure 7-21.

Once you know the location of the Outlook data file, you can include the entire folder that contains the data file in your list of folders to back up. For example:
C:Documents and Settings<username>Local SettingsApplication DataMicrosoftOutlook
The Local Settings folder is hidden by default and may not be available if you browse for the folder. You can still copy and paste the directory location into your backup software. You can also use the Folder Options control panel to show hidden files and folders.
Note
Close Outlook before backing up the Outlook data files.
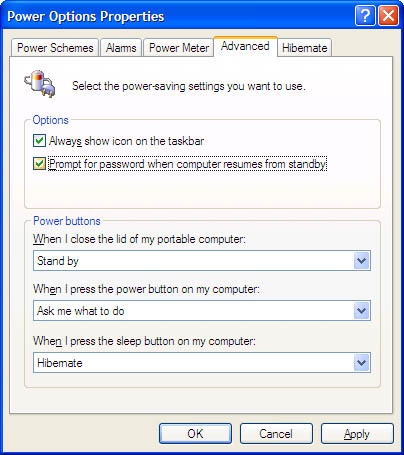
If your data contains privileged information, unscrupulous persons might use it in ways you do not want them to. Your tablet may have built-in security and encryption software and hardware that are beyond the scope of this book, but anyone can add password security from the Power Options control panel. If this is a concern for you, open the Power Options control panel to the Advanced tab and check the Prompt For Password When Computer Resumes From Standby check box as shown in Figure 7-22. Once this box is checked, the computer will be locked whenever it resumes from standby or hibernation, and the computer will require your login password to function. If you need this additional security, you may want to increase the duration before your computer automatically switches into standby so that you aren’t constantly reentering your password.
As you travel, you must start and stop your tablet several times; turn it on to prove to security personnel it really is a computer, turn it off while you board the airplane and while it climbs, turn it on to work, off while you watch the movie, on to find your hotel reservations, and so on. Hibernation is often the best option for these situations. Shutting the tablet down and restarting it takes a lot of time. Standby is a low-power mode, but it still draws power, and some applications can actually wake the computer from standby without your knowledge. Switching your tablet to standby also does not comply with the regulation to turn it off during takeoff and landing on an airplane. Hibernation allows for a relatively fast on and off, but draws no power and is considered turning the computer off as far as the FAA is concerned. If you have a second battery, hibernation is also a great way to change batteries without completely shutting down or plugging the tablet into a power outlet.
Tip
If your tablet has a laptop configuration, set it that way to get through airport security. Laptops are a familiar sight, and security personnel ask fewer questions.
Sitting in the airport waiting for your flight is a perfect time to sit and review your e-mail. Anticipating this, you already downloaded your messages before you left and switched Outlook to work offline as described earlier in the chapter. The other helpful trick for improving your Outlook experience on the tablet is customizing the Outlook layout and toolbars.
The Outlook layout was designed around a landscape orientation and doesn’t work as well in the portrait mode when horizontal space is at a premium. Portrait mode is more comfortable on a tablet. The default Outlook layout uses the Outlook Bar. The Outlook Bar is handy, but its large icons use a lot of space, and there’s no button to quickly show and hide it. Most of the Outlook Bar functions are available using the Folder List instead. In addition, the Advanced toolbar contains buttons to show and hide the Folder List with a single tap and has plenty of room for adding custom buttons for commonly used tablet commands, such as Work Offline. Figure 7-23 shows Outlook in a portrait orientation with the Outlook Bar and with the Folder List and the Advanced toolbar with custom buttons added.
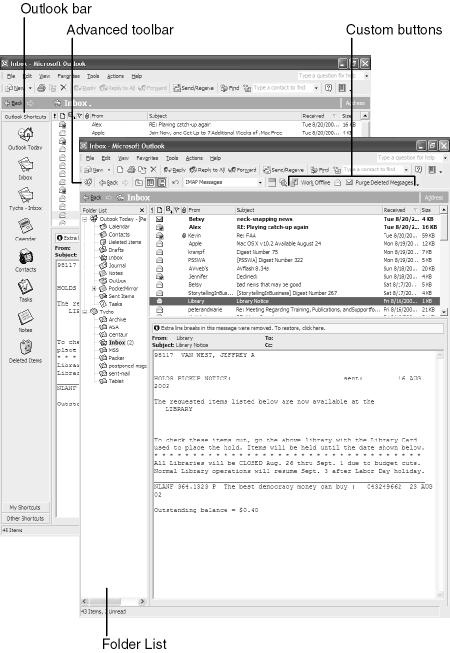
Figure 7-23. Outlook with the Outlook Bar and Outlook with the Folder List and the Advanced toolbar.
To adjust your Outlook layout, open the Toolbars submenu on the View menu and check the Advanced toolbar. Next use the View menu to uncheck the Outlook Bar. Now you can use the Folder List button on the Advanced toolbar to quickly show and hide the Folder List and maximize your limited horizontal space. The Advanced toolbar also has a button for show/hide of the Preview pane. Turning off the Preview pane lets you see all your e-mail subjects without seeing the contents as you select them. This is handy if you are quickly deleting many messages you are certain you no longer want.
To add custom buttons to the Outlook toolbars, tap the Customize option on the Tools menu. The Commands tab, shown in Figure 7-24, lists all the command categories on the left and the commands in that category on the right.
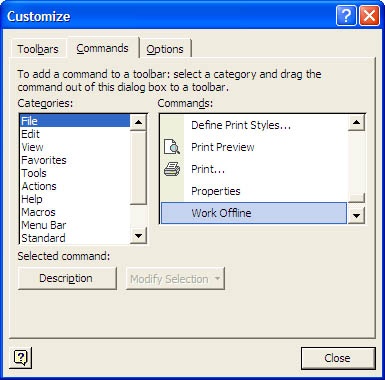
Find a command you use often, such as Work Offline, in the right-hand pane, and drag it up to the toolbar. If there was an icon next to the command, the icon will appear on the toolbar. If not, the text will appear on the toolbar as a button. You can also use the Customize feature to remove items from any toolbar.
Tip
With Outlook on a tablet, the keyboard command you will miss the most is probably Delete. Don’t forget about the Delete button on the Standard toolbar (it’s a large X), and keep in mind the possibility of mapping Delete to a hardware button.
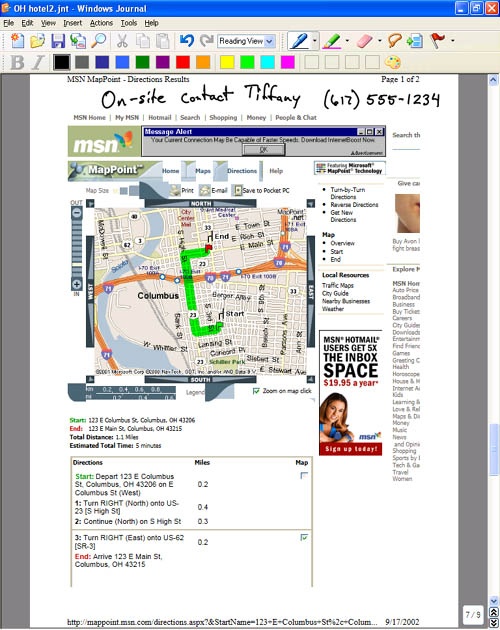
Part of my trip had me driving to a hotel and a seminar center in Ohio. As is often common now, the client sent me directions using an Internet mapping service, so my directions were on a Web page. To take the directions with me on my tablet, I could have made the Web page available offline. I wanted something a bit more versatile, however, so I imported the Web pages into Journal instead.
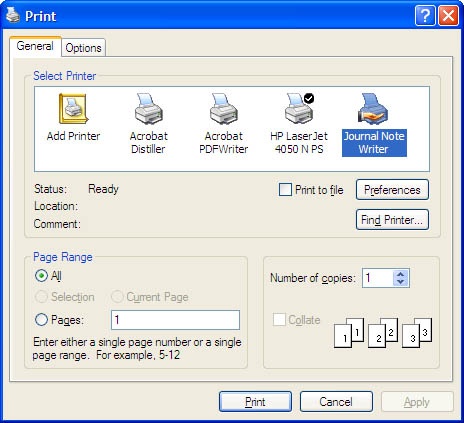
Since the Web page I wanted wasn’t a document on my hard drive, I actually printed it into Journal to import it. To do this, select Print from the File menu in Internet Explorer. Next choose Journal Note Writer as the printer, as shown in Figure 7-25, and tap Print. A Save As dialog box will appear, allowing you to specify a location and a name for the new note. The new note will then open in Journal with the Web page as its background.
I actually wanted a few maps at different magnifications, so I printed it a few different ways. I also printed my airline, hotel, and car rental information, my client contact information, and the seminar schedule and combined all the pages into a single Journal note. This note now contained all of my trip information in the order in which I needed it. By setting the view to reading view, I could easily page through it one-handed, even while driving. Since it was a note, I could also highlight and make notes on the document as I traveled, such as adding the phone number shown in Figure 7-26 that I wrote down while waiting for a rental car in Columbus.
Tip
The tablet screen can be difficult to read in outdoor sunlight. If you know you’ll use a tablet document outside, make it as high contrast (bold black text on a white background) as possible. If you’re driving, holding the tablet closer to the roof often cuts the glare and makes it easier to read.
One of the great disadvantages of a conventional laptop in a meeting is the "clamshell" design. When you have the laptop open so that you can see the screen, the screen itself is a barrier between you and the person you’re talking with. Furthermore, there’s always room for wonder in their mind whether you’re really listening or just playing Minesweeper. The tablet changes this phenomenon entirely. Not only is there no barrier, but also they can see what you are working on, and it’s actually easy to hand them the tablet to look at as you discuss specific items. (Although if it is the first time they have seen a tablet, you might have to spend a few moments giving them a tour of its features.)
Tip
Battery life is critical in meetings where you might be on batteries for a long time. Review the suggestions for extending battery life in Chapter 1 if you use your tablet this way.
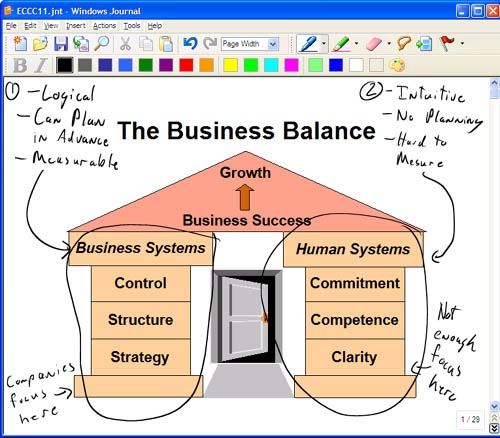
Another great use for Journal is working collaboratively in a meeting while referencing a document. On this trip, I had to review some concepts in a PowerPoint presentation with two colleagues. I imported the PowerPoint presentation into Journal, and we passed around the tablet and wrote notes directly on the slides, as shown in Figure 7-27. I later converted these notes to text and added them to my slide show notes for my presentation.
Once you’ve mastered the cool presentation pen tools discussed in Chapter 6, making PowerPoint presentations with your tablet is essentially the same as making presentations with a laptop. One potential conflict, however, is that if you have your tablet set up without its keyboard available, you no longer have access to all the keyboard shortcuts shown in Figure 7-28. These shortcuts are very handy during a slide show. You can still access most of the commands on the slide show shortcut menu, but that distracts from your presentation. A better solution is to remap your hardware buttons for the appropriate commands, as described in Chapter 1. Since PowerPoint runs in landscape configuration, you can remap the buttons for the primary landscape orientation and leave the buttons you normally use in portrait orientation untouched. If your projector can flip an image upside down and project it, you can even use the secondary landscape orientation as a custom PowerPoint setup. Since I had only three buttons available, I mapped them to the three most important functions for me: next slide, previous slide, and a black screen.
Tip
Be sure to switch your power scheme to one that does not let your tablet standby, hibernate, or turn off the screen automatically during your presentation.

Figure 7-28. If you don’t have a keyboard available while you present, change the hardware buttons for a landscape orientation to provide key PowerPoint commands.
Note
For help troubleshooting problems with connecting your laptop to a video projector, see the section on "Using External Monitors" in Appendix A.
Use offline files and offline Web pages to keep network files available as you travel.
Use Outlook or your regular e-mail client in an offline mode when you work off the network.
If you run into trouble with a wireless network, experiment with network settings for Wireless Equivalent Privacy (or WEP), type of key, and authentication.
Create a traveling backup solution that accommodates all of your important data and allows instant access to individual files.
Use the Folder List, Advanced toolbar, and custom toolbar buttons for a better Outlook experience in portrait orientation.
Import maps, directions, and other key information into Journal for quick access as you travel.
Map your hardware buttons in landscape orientation for important PowerPoint commands.