
This chapter presents guidance and recommendations that will help you build secure ASP.NET Web applications. Much of the guidance and many of the recommendations presented in this chapter also apply to the development of ASP.NET Web services and .NET Remoting objects hosted by ASP.NET.
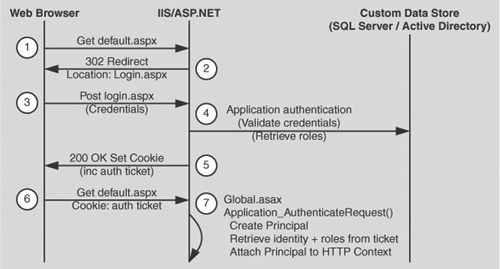
ASP.NET works in conjunction with IIS, the .NET Framework, and the underlying security services provided by the operating system, to provide a range of authentication and authorization mechanisms. These are summarized in Figure 8.1 on the next page.
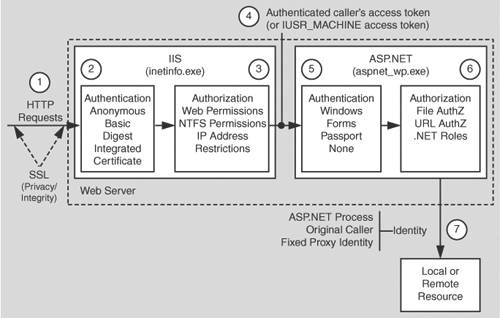
Figure 8.1 illustrates the authentication and authorization mechanisms provided by IIS and ASP.NET. When a client issues a Web request, the following sequence of authentication and authorization events occurs:
The HTTP(S) Web request is received from the network. SSL can be used to ensure the server identity (using server certificates) and, optionally, the client identity.
IIS authenticates the caller by using Basic, Digest, Integrated (NTLM or Kerberos), or Certificate authentication. If all or part of your site does not require authenticated access, IIS can be configured for anonymous authentication. IIS creates a Windows access token for each authenticated user. If anonymous authentication is selected, IIS creates an access token for the anonymous Internet user account (which, by default, is IUSR_MACHINE).
IIS authorizes the caller to access the requested resource. NTFS permissions defined by ACLs attached to the requested resource are used to authorize access. IIS can also be configured to accept requests only from client computers with specific IP addresses.
IIS passes the authenticated caller’s Windows access token to ASP.NET (this may be the anonymous Internet user’s access token, if anonymous authentication is being used).
ASP.NET authenticates the caller.
If ASP.NET is configured for Windows authentication, no additional authentication occurs at this point. ASP.NET will accept any token it receives from IIS.
If ASP.NET is configured for Forms authentication, the credentials supplied by the caller (using an HTML form) are authenticated against a data store; typically a Microsoft® SQL Server™ database or Active Directory® directory service. If ASP.NET is configured for Passport authentication, the user is redirected to a Passport site and the Passport authentication service authenticates the user.
ASP.NET authorizes access to the requested resource or operation.
The UrlAuthorizationModule (a system provided HTTP module) uses authorization rules configured in Web.config (specifically, the <authorization> element) to ensure that the caller can access the requested file or folder.
With Windows authentication, the FileAuthorizationModule (another HTTP module) checks that the caller has the necessary permission to access the requested resource. The caller’s access token is compared against the ACL that protects the resource.
.NET roles can also be used either declaratively or programmatically to ensure that the caller is authorized to access the requested resource or perform the requested operation.
Code within your application accesses local and/or remote resources by using a particular identity. By default, ASP.NET performs no impersonation and as a result, the configured ASP.NET process account provides the identity. Alternate options include the original caller’s identity if impersonation is enabled, or a configured service identity.
The authorization points or gatekeepers within an ASP.NET Web application are provided by IIS and ASP.NET:
With anonymous authentication turned off, IIS permits requests only from users that it can authenticate either in its domain or in a trusted domain.
For static file types (for example .jpg, .gif and .htm files—files that are not mapped to an ISAPI extension), IIS uses the NTFS permissions associated with the requested file to perform access control.
The ASP.NET gatekeepers include the UrlAuthorizationModule, FileAuthorizationModule and principal permission demands and role checks.
You can configure <authorization> elements within your application’s Web.config file to control which users and groups of users should have access to the application. Authorization is based on the IPrincipal object stored in HttpContext.User.
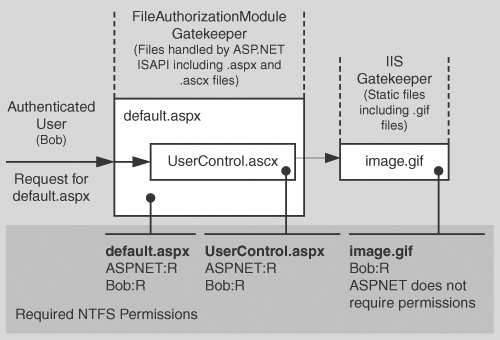
For file types mapped by IIS to the ASP.NET ISAPI extension (Aspnet_isapi.dll), automatic access checks are performed using the authenticated user’s Windows access token (which may be IUSR_MACHINE) against the ACL attached to the requested ASP.NET file.
The FileAuthorizationModule class only performs access checks against the requested file, and not for files accessed by the code in the requested page, although these are access checked by IIS.
For example, if you request Default.aspx and it contains an embedded user control (Usercontrol.ascx), which in turn includes an image tag (pointing to Image.gif), the FileAuthorizationModule performs an access check for Default.aspx and Usercontrol.ascx, because these file types are mapped by IIS to the ASP.NET ISAPI extension.
The FileAuthorizationModule does not perform a check for Image.gif, because this is a static file handled internally by IIS. However, as access checks for static files are performed by IIS, the authenticated user must still be granted read permission to the file with an appropriately configured ACL.
This scenario is shown in Figure 8.2.
Note to system administrators:
The authenticated user requires NTFS read permissions to all of the files involved in the scenario. The only variable is regarding which gatekeeper is used to enforce access control. The ASP.NET process account only requires read access to the ASP.NET registered file types.
In this scenario you can prevent access at the file gate. If you configure the ACL attached to Default.aspx and deny access to a particular user, the user control or any embedded images will not get a chance to be sent to the client by the code in Default.aspx. If the user requests the images directly, IIS performs the access checks itself.
In addition to the IIS and ASP.NET configurable gatekeepers, you can also use principal permission demands (declaratively or programmatically) as an additional fine-grained access control mechanism. Principal permission checks (performed by the PrincipalPermissionAttribute class) allow you to control access to classes, methods, or individual code blocks based on the identity and group membership of individual users, as defined by the IPrincipal object attached to the current thread.
Note
Principal permission demands used to demand role membership are different from calling IPrincipal.IsInRole to test role membership; the former results in an exception if the caller is not a member of the specified role, while the latter simply returns a Boolean value to confirm role membership.
With Windows authentication, ASP.NET automatically attaches a WindowsPrincipal object that represents the authenticated user to the current Web request (using HttpContext.User). Forms and Passport authentication create a GenericPrincipal object with the appropriate identity and no roles and attaches it to the HttpContext.User.
For more information about configuring security, see "Configuring Security" later in this chapter.
For more information about programming security (and IPrincipal objects), see "Programming Security" later in this chapter.
ASP.NET provides a number of declarative and programmatic authorization mechanisms that can be used in conjunction with a variety of authentication schemes. This allows you to develop an in depth authorization strategy and one that can be configured to provide varying degrees of granularity; for example, per-user or per-user group (role-based).
This section shows you which authorization options (both configurable and programmatic) are available for a set of commonly used authentication options.
The authentication options that follow are summarized here:
Windows authentication with impersonation
Windows authentication without impersonation
Windows authentication using a fixed identity
Forms authentication
Passport authentication
The following table shows you the set of available authorization options. For each one the table indicates whether or not Windows authentication and/or impersonation are required. If Windows authentication is not required, the particular authorization option is available for all other authentication types. Use the table to help refine your authentication/authorization strategy.
Table 8.1. Windows authentication and impersonation requirements
Authorization Option | Requires Windows Authentication | Requires Impersonation |
|---|---|---|
FileAuthorizationModule | Yes | No |
UrlAuthorizationModule | No | No |
Principal Permission Demands | No | No |
.NET Roles | No | No |
Enterprise Services Roles application) | Yes | Yes (within the ASP.NET Web |
NTFS Permissions (for directly requested static files types; not mapped to an ISAPI extension) | N/A–These files are not handled by ASP.NET. With any (non-Anonymous) IIS authentication mechanism, permissions should be configured for individual authenticated users. With Anonymous authentication, permissions should be configured for IUSR_MACHINE. | No (IIS performs the access check.) |
NTFS Permissions (for files accessed by Web application code) | No | No If impersonating, configure ACLs against the impersonated Windows identity, which is either the original caller or the identity specified on the <identity> element in Web.config*. |
The following configuration elements show you how to enable Windows (IIS) authentication and impersonation declaratively in Web.config or Machine.config.
Note
You should configure authentication on a per-application basis in each application’s Web.config file.
<authentication mode="Windows" />
<identity impersonate="true" />
With this configuration, your ASP.NET application code impersonates the IIS-authenticated caller.
When you use Windows authentication together with impersonation, the following authorization options are available to you:
Windows ACLs
Client Requested Resources. The ASP.NET FileAuthorizationModule performs access checks for requested file types that are mapped to the ASP.NET ISAPI. It uses the original caller’s access token and ACL attached to requested resources in order to perform access checks.
For static files types (not mapped to an ISAPI extension), IIS performs access checks using the caller’s access token and ACL attached to the file.
Resources Accessed by Your Application. You can configure Windows ACLs on resources accessed by your application (files, folders, registry keys, Active Directory objects, and so on) against the original caller.
URL Authorization. Configure URL authorization in Web.config. With Windows authentication, user names take the form DomainNameUserName and roles map one-to-one with Windows groups.
<authorization>
  <deny user="DomainNameUserName" />
  <allow roles="DomainNameWindowsGroup" />
</authorization>
Enterprise Services (COM+) Roles. Roles are maintained in the COM+ catalog. You can configure roles with the Component Services administration tool or script.
Programmatic security refers to security checks located within your Web application code. The following programmatic security options are available when you use Windows authentication and impersonation:
PrincipalPermission Demands
Explicit Role Checks. You can perform role checking using the IPrincipal Sinterface.
IPrincipal.IsInRole(@"DomainNameWindowsGroup");
Enterprise Services (COM+) Roles. You can perform role checking programmatically using the ContextUtil class.
ContextUtil.IsCallerInRole("Manager")
Use Windows authentication and impersonation when:
Your application’s users have Windows accounts that can be authenticated by the server.
You need to flow the original caller’s security context to the middle tier and/or data tier of your Web application to support fine-grained (per-user) authorization.
You need to flow the original caller’s security context to the downstream tiers to support operating system level auditing.
Before using impersonation within your application, make sure you understand the relative trade-offs of this approach in comparison to using the trusted subsystem model. These were elaborated upon in "Choosing a Resource Access Model" in Chapter 3.
The disadvantages of impersonation include:
Reduced application scalability due to the inability to effectively pool database connections.
Increased administration effort as ACLs on back-end resources need to be configured for individual users.
Delegation requires Kerberos authentication and a suitably configured environment.
For more information about Windows authentication, see "Windows Authentication" later in this chapter.
For more information about impersonation, see "Impersonation" later in this chapter.
For more information about URL authorization, see "URL Authorization Notes" later in this chapter.
For more information about Enterprise Services (COM+) roles, see Chapter 9.
For more information about PrincipalPermission demands, see "Identities and Principals" in Chapter 2, "Security Model for ASP.NET Application."
The following configuration elements show how you enable Windows (IIS) authentication with no impersonation declaratively in Web.config.
<authentication mode="Windows" />
<!-- The following setting is equivalent to having no identity element -->
<identity impersonate="false" />
When you use Windows authentication without impersonation, the following authorization options are available to you:
Windows ACLs
Client Requested Resources. The ASP.NET FileAuthorizationModule performs access checks for requested file types that are mapped to the ASP.NET ISAPI. It uses the original caller’s access token and ACL attached to requested resources in order to perform access checks. Impersonation is not required.
For static files types (not mapped to an ISAPI extension) IIS performs access checks using the caller’s access token and ACL attached to the file.
Resources accessed by your application. Configure Windows ACLs on resources accessed by your application (files, folders, registry keys, Active Directory objects) against the ASP.NET process identity.
URL Authorization. Configure URL Authorization in Web.config. With Windows authentication, user names take the form DomainNameUserName and roles map one-to-one with Windows groups.
<authorization>
  <deny user="DomainNameUserName" />
  <allow roles="DomainNameWindowsGroup" />
</authorization>
The following programmatic security options are available:
Use Windows authentication without impersonation when:
Your application’s users have Windows accounts that can be authenticated by the server.
You want to use a fixed identity to access downstream resources (for example, databases) in order to support connection pooling.
For more information about Windows authentication, see "Windows Authentication" later in this chapter.
For more information about URL authorization, see "URL Authorization Notes", later in this chapter.
For more information about PrincipalPermission demands, see "Principals" within the "Getting Started" section of this book.
The <identity> element in Web.config supports optional user name and password attributes, which allows you to configure a specific fixed identity for your application to impersonate. This is shown in the following configuration file fragment.
<identity impersonate="true"
          userName="registry:HKLMSOFTWAREYourSecureApp
                    identityASPNET_SETREG,userName"
          password="registry:HKLMSOFTWAREYourSecureApp
                    identityASPNET_SETREG,password" />
This example shows the <identity> element where the credentials are encrypted in the registry using the aspnet_setreg.exe utility. The clear text userName and password attribute values have been replaced with pointers to the secured registry key and named values that contain the encrypted credentials. For details about this utility and to download it, see article Q329290, "HOWTO: Use the ASP.NET Utility to Encrypt Credentials and Session State Connection Strings" in the Microsoft Knowledge Base.
Using a fixed impersonated identity is not recommended when using the .NET Framework 1.0 on Windows 2000 servers. This is because you would need to give the ASP.NET process account the powerful "Act as part of the operating system" privilege. This privilege is required by the ASP.NET process because it performs a LogonUser call using the credentials that you have provided.
The following configuration elements show how you enable Forms authentication declaratively in Web.config.
<authentication mode="Forms">
  <forms loginUrl="logon.aspx" name="AuthCookie" timeout="60" path="/">
  </forms>
</authentication>
When you use Forms authentication, the following authorization options are available to you:
Windows ACLs
Client Requested Resources. Requested resources require ACLs that allow read access to the anonymous Internet user account. (IIS should be configured to allow anonymous access when you use Forms authentication).
ASP.NET File authorization is not available because it requires Windows authentication.
Resources Accessed by Your Application. Configure Windows ACLs on resources accessed by your application (files, folders, registry keys, and Active Directory objects) against the ASP.NET process identity.
URL Authorization
Configure URL Authorization in Web.config. With Forms authentication, the format of user names is determined by your custom data store; a SQL Server database, or Active Directory.
If you are using a SQL Server data store:
<authorization>
<deny users="?" />
  <allow users="Mary,Bob,Joe" roles="Manager,Sales" />
</authorization>
If you are using Active Directory as your data store, user names, and group names appear in X.500 format:
<authorization>
  <deny users="[email protected]" />
  <allow roles ="CN=Smith James,CN=FTE_northamerica,CN=Users,
                DC=domain,DC=corp,DC=yourCompany,DC=com" />
</authorization>
The following programmatic security options are available:
Forms authentication is most ideally suited to Internet applications. Use Forms authentication when:
Your application’s users do not have Windows accounts.
You want users to log on to your application by entering credentials using an HTML form.
For more information about Forms authentication, see "Forms Authentication" later in this chapter.
For more information about URL authorization, see "URL Authorization Notes" later in this chapter.
The following configuration elements show how you enable Passport authentication declaratively in Web.config.
<authentication mode="Passport" />
Passport authentication is used on the Internet when application users do not have Windows accounts and you want to implement a single-sign-on solution. Users who have previously logged on with a Passport account at a participating Passport site will not have to log on to your site configured with Passport authentication.
This section shows you the practical steps required to configure security for an ASP.NET Web application. These are summarized in Figure 8.3 on the next page.
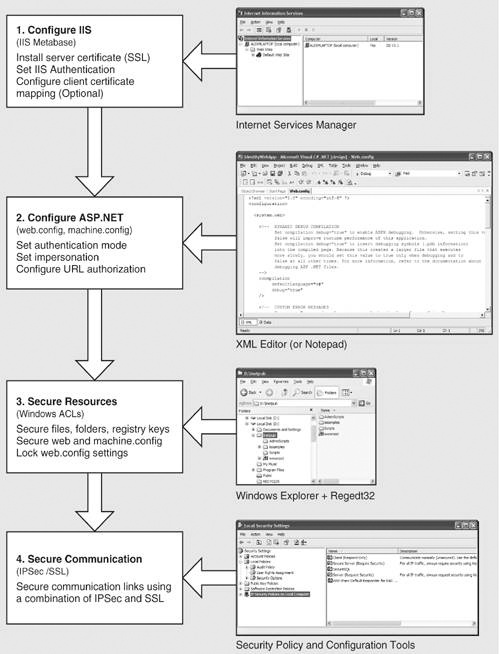
To configure IIS security, you must perform the following steps:
Optionally install a Web server certificate (if you need SSL).
For more information, see "Appendix " in the Reference section of this book.
Configure IIS authentication.
Optionally configure client certificate mapping (if using certificate authentication).
For more information about client certificate mapping, see article Q313070, "How to Configure Client Certificate Mappings in Internet Information Services (IIS) 5.0" in the Microsoft Knowledge Base.
Set NTFS permissions on files and folders. Between them, IIS and the ASP.NET FileAuthorizationModule check that the authenticated user (or the anonymous Internet user account) has the necessary access rights (based on ACL settings) to access the requested file.
Application level configuration settings are maintained in Web.config files, which are located in your application’s virtual root directory and optionally within additional subfolders (these settings can sometimes override the parent folder settings).
Configure authentication. This should be set on a per-application basis (not in Machine.config) in the Web.config file located in the application’s virtual root directory.
<authentication mode="Windows|Forms|Passport|None" />
Configure Impersonation. By default, ASP.NET applications do not impersonate. The applications runs using the configured ASP.NET process identity (usually ASPNET) and all resource access performed by your application uses this identity. You only need impersonation in the following circumstances:
You are using Enterprise Services and you want to use Enterprise Services (COM+) roles to authorize access to functionality provided by serviced components.
IIS is configured for Anonymous authentication and you want to use the anonymous Internet user account for resource access. For details about this approach, see "Accessing Network Resources" later in this chapter.
You need to flow the authenticated user’s security context to the next tier (for example, the database).
You have ported a classic ASP application to ASP.NET and want the same impersonation behavior. Classic ASP impersonates the caller by default.
To configure ASP.NET impersonation use the following <identity> element in your application’s Web.config.
<identity impersonate="true" />
Configure Authorization. URL authorization determines whether a user or role can issue specific HTTP verbs (for example, GET, HEAD, and POST) to a specific file. To implement URL authorization, you perform the following tasks.
Add an <authorization> element to the Web.config file located in your application’s virtual root directory.
Restrict access to users and roles by using allow and deny attributes. The following example from Web.config uses Windows authentication and allows Bob and Mary access but denies everyone else.
<authorization>
  <allow users="DomainNameBob, DomainNameMary" />
  <deny users="*" />
</authorization>
Take note of the following when you configure URL authorization:
"*" refers to all identities.
"?" refers to unauthenticated identities (that is, the anonymous identity).
You don’t need to impersonate for URL authorization to work.
Authorization settings in Web.config usually refer to all of the files in the current directory and all subdirectories (unless a subdirectory contains its own Web.config with an <authorization> element. In this case the settings in the subdirectory override the parent directory settings).
Note
URL authorization only applies to file types that are mapped by IIS to the ASP.NET ISAPI extension, aspnet_isapi.dll.
You can use the <location> tag to apply authorization settings to an individual file or directory. The following example shows how you can apply authorization to a specific file (Page.aspx).
<location path="page.aspx" />
  <authorization>
    <allow users="DomainNameBob, DomainNameMary" />
    <deny users="*" />
  </authorization>
</location>
Users and roles for URL authorization are determined by your authentication settings:
When you have <authentication mode="Windows" /> you are authorizing access to Windows user and group accounts.
User names take the form "DomainNameWindowsUserName"
Role names take the form "DomainNameWindowsGroupName"
When you have <authentication mode="Forms" /> you are authorizing against the user and roles for the IPrincipal object that was stored in the current HTTP context. For example, if you used Forms to authenticate users against a database, you will be authorizing against the roles retrieved from the database.
When you have <authentication mode="Passport" /> you authorize against the Passport User ID (PUID) or roles retrieved from a store. For example, you can map a PUID to a particular account and set of roles stored in a SQL Server database or Active Directory.
When you have <authentication mode="None" /> you may not be performing authorization. "None" specifies that you don’t want to perform any authentication or that you don’t want to use any of the .NET authentication modules and want to use your own custom mechanism.
However, if you use custom authentication, you should create an IPrincipal object with roles and store it into the HttpContext.User. When you subsequently perform URL authorization, it is performed against the user and roles (no matter how they were retrieved) maintained in the IPrincipal object.
The following list shows the syntax for some typical URL authorization examples:
Deny access to the anonymous account
<deny users="?" />
Deny access to all users
<deny users="*"/>
Deny access to Manager role
<deny roles="Manager"/>
Forms authentication example
<configuration>
  <system.web>
      <authentication mode="Forms">
        <forms name=".ASPXUSERDEMO"
               loginUrl="login.aspx"
               protection="All" timeout="60" />
      </authentication>
      <authorization>
        <deny users="[email protected]" />
        <deny users="?" />
      </authorization>
  </system.web>
</configuration>
Use Windows ACLs to secure resources that include files, folders, and registry keys.
If you are not impersonating, any resource your application is required to access must have an ACL that grants at least read access to the ASP.NET process account.
If you are impersonating, files and registry keys must have an ACL that grants at least read access to the authenticated user (or the anonymous Internet user account, if anonymous authentication is in effect).
Secure Web.config and Machine.config:
Use the Correct ACLs. If ASP.NET is impersonating, the impersonated identity requires read access. Otherwise, the ASP.NET process identity requires read access. Use the following ACL on Web.config and Machine.config.
System: Full Control
Administrators: Full Control
Process Identity or Impersonated Identity : Read
If you are not impersonating the anonymous Internet user account (IUSR_MACHINE), you should deny access to this account.
Remove Unwanted HTTP Modules. Machine.config contains a set of default HTTP modules (within the <httpModules> element. These include:
WindowsAuthenticationModule
FormsAuthenticationModule
PassportAuthenticationModule
UrlAuthorizationModule
FileAuthorizationModule
OutputCacheModule
SessionStateModule
If your application doesn’t use a specific module, remove it to prevent any potential future security issues associated with a particular module from being exploited within your application.
Optionally, lock configuration settings by using the <location> element together with the allowOverride="false" attribute as described below.
Configuration settings are hierarchical. Web.config file settings in subdirectories override Web.config settings in parent directories. Also, Web.config settings override Machine.config settings.
You can lock configuration settings to prevent them being overridden at lower levels, by using the <location> element coupled with the allowOverride attribute. For example:
<location path="somepath" allowOverride="false" />
. . . arbitrary configuration settings . . .
</location>
Note that the path may refer to a Web site or virtual directory and it applies to the nominated directory and all subdirectories. If you set allowOverride to false, you prevent any lower level configuration file from overriding the settings specified in the <location> element. The ability to lock down configuration settings applies to all types of setting and not just security settings such as authentication modes.
In the context of machine.config, the path must be fully qualified and include the Web site, virtual directory name and optionally a sub directory and filename. For example:
<location path="Web Site Name/VDirName/SubDirName/PageName.aspx" >
. . .
</location>
In the context of web.config, the path is relative from the application's virtual directory. For example:
<location path="SubDirName/PageName.aspx" >
. . .
</location>
You can use the HttpForbiddenHandler class to prevent certain file types from being downloaded over the Web. This class is used internally by ASP.NET to prevent the download of certain system level files (for example, configuration files including web.config). For a complete list of file types restricted in this way, see the <httpHandlers> section in machine.config.
You should consider using the HttpForbiddenHandler for files that your application uses internally, but are not intended for download.
Note
You must also secure the files with Windows ACLs to control which users can access the files, when logged on to the Web server.
▸ To use the HttpForbiddenHandler to prevent a particular file type from being downloaded
Create an application mapping in IIS for the specified file type to map it to Aspnet_isapi.dll.
On the taskbar, click the Start button, click Programs, click Administrative Tools, and then select Internet Information Services.
Select your application’s virtual directory, right-click, and then click Properties.
Select Application Settings, click Configuration.
Click Browse, and select c:winntMicrosoft.NETFrameworkv1.0.3705aspnet_isapi.dll.
Enter the file extension for the file type you want to prevent being downloaded (for example, .abc) in the Extension field.
Ensure All Verbs and Script engine is selected and Check that file exists is not selected.
Click OK to close the Add/Edit Application Extension Mapping dialog box.
Click OK to close the Application Configuration dialog box, and then click OK again to close the Properties dialog box.
Add an <HttpHandler> mapping in Web.config for the specified file type. An example for the .abc file type is shown below.
<httpHandlers>
  <add verb="*" path="*.abc"
    type="System.Web.HttpForbiddenHandler"/>
  </httpHandlers>
After you establish your Web application’s configurable security settings, you need to further enhance and fine-tune your application’s authorization policy programmatically. This includes using declarative .NET attributes within your assemblies and performing imperative authorizing checks within code.
This section highlights the key programming steps required to perform authorization within an ASP.NET Web application.
The following summarizes the basic pattern for authorizing users within your Web application:
Retrieve credentials
Validate credentials
Put users in roles
Create an IPrincipal object
Put the IPrincipal object into the current HTTP context
Authorize based on the user identity / role membership
Important
Steps 1 to 5 are performed automatically by ASP.NET if you have configured Windows authentication. For other authentication mechanisms (Forms, Passport and custom approaches), you must write code to perform these steps, as discussed below.
You must start by retrieving a set of credentials (user name and password) from the user. If your application does not use Windows authentication, you need to ensure that clear text credentials are properly secured on the network by using SSL.
If you have configured Windows authentication, credentials are validated automatically using the underlying services of the operating system.
If you use an alternate authentication mechanism, you must write code to validate credentials against a data store such as a SQL Server database or Active Directory.
For more information about how to securely store user credentials in a SQL Server database, see "Authenticating Users against a Database" within Chapter 12.
Your user data store should also contain a list of roles for each user. You must write code to retrieve the role list for the validated user.
Authorization occurs against the authenticated user, whose identity and role list is maintained within an IPrincipal object (which flows in the context of the current Web request).
If you have configured Windows authentication, ASP.NET automatically constructs a WindowsPrincipal object. This contains the authenticated user’s identity together with a role list, which equates to the list of Windows groups to which the user belongs.
If you are using Forms, Passport, or custom authentication, you must write code within the Application_AuthenticateRequest event handler in Global.asax to create an IPrincipal object. The GenericPrincipal class is provided by the .NET Framework, and should be used in most scenarios.
Attach the IPrincipal object to the current HTTP context (using the HttpContext.User variable). ASP.NET does this automatically when you use Windows authentication. Otherwise, you must attach the object manually.
Use .NET roles either declaratively (to obtain class or method level authorization), or imperatively within code if your application requires more fine-grained authorization logic.
You can use declarative or imperative principal permission demands (using the PrincipalPermission class), or you can perform explicit role checks by calling the IPrincipal.IsInRole() method.
The following example assumes Windows authentication and shows a declarative principal permission demand. The method that follows the attribute will only be executed if the authenticated user is a member of the Manager Windows group. If the caller is not a member of this group, a SecurityException is thrown.
[PrincipalPermission(SecurityAction.Demand,
                     Role=@"DomainNameManager")]
public void SomeMethod()
{
}
The following example shows an explicit role check within code. This example assumes Windows authentication. If a non-Windows authentication mechanism is used, the code remains very similar. Instead of casting the User object to a WindowsPrincipal object, it should be cast to a GenericPrincipal object.
// Extract the authenticated user from the current HTTP context.
// The User variable is equivalent to HttpContext.Current.User if you are
// using an .aspx or .asmx page
WindowsPrincipal authenticatedUser = User as WindowsPrincipal;
if (null != authenticatedUser)
{
// Note: To retrieve the authenticated user's username, use the
// following line of code
// string username = authenticatedUser.Identity.Name;

// Perform a role check
if (authenticatedUser.IsInRole(@"DomainNameManager") )
{
  // User is authorized to perform manager functionality
}
}
else
{
  // User is not authorized to perform manager functionality
}For a practical implementation of the above pattern for Forms authentication, see the "Forms Authentication" section later in this chapter.
The GenericPrincipal class provided by the .NET Framework should be used in most circumstances when you are using a non-Windows authentication mechanism. This provides role checks using the IPrincipal.IsInRole method.
On occasion, you may need to implement your own IPrincipal class. Reasons for implementing your own IPrincipal class include:
You want extended role checking functionality. You might want methods that allow you to check whether a particular user is a member of multiple roles. For example:
CustomPrincipal.IsInAllRoles( "Role", "Role2", "Role3" )
CustomPrincipal.IsInAnyRole( "Role1", "Role2", "Role3" )
You may want to implement an extra method or property that returns a list of roles in an array. For example:
string[] roles = CustomPrincipal.Roles;
You want your application to enforce role hierarchy logic. For example, a Senior Manager may be considered higher up in the hierarchy than a Manager. This could be tested using methods like the ones shown below.
CustomPrincipal.IsInHigherRole("Manager");
CustomPrincipal.IsInLowerRole("Manager");
You may want to implement lazy initialization of the role lists. For example, you could dynamically load the role list only when a role check is requested.
You may want to implement the IIdentity interface to have the user identified by an X509ClientCertificate. For example:
CustomIdentity id = CustomPrincipal.Identity;
X509ClientCertificate cert = id.ClientCertificate;
For more information about creating your own IPrincipal class, see "Appendix " in the Reference section of this book.
Use Windows authentication when the users of your application have Windows accounts that can be authenticated by the server (for example, in intranet scenarios).
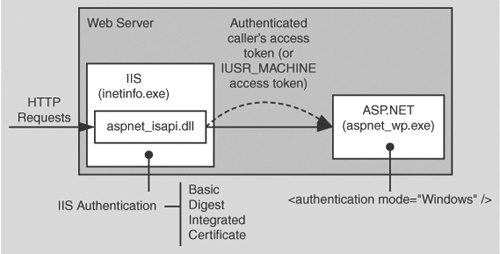
If you configure ASP.NET for Windows authentication, IIS performs user authentication by using the configured IIS authentication mechanism. This is shown in Figure 8.4.
The access token of the authenticated caller (which may be the Anonymous Internet user account if IIS is configured for Anonymous authentication) is made available to the ASP.NET application. Note the following:
This allows the ASP.NET FileAuthorizationModule to perform access checks against requested ASP.NET files using the original caller’s access token.
File authorization does not require impersonation. With impersonation enabled any resource access performed by your application uses the impersonated caller’s identity. In this event, ensure that the ACLs attached to resources contain an Access Control Entry (ACE) that grants at least read access to the original caller’s identity.
ASP.NET associates a WindowsPrincipal object with the current Web request. This contains the identity of the authenticated Windows user together with a list of roles that the user belongs to. With Windows authentication, the role list consists of the set of Windows groups to which the user belongs.
The following code shows how to obtain the identity of the authenticated Windows user and to perform a simple role test for authorization.
WindowsPrincipal user = User as WindowsPrincipal;
if (null != user)
{
  string username = user.Identity.Name;
  // Perform a role check
  if ( user.IsInRole(@"DomainNameManager") )
  {
    // User is authorized to perform manager functionality
  }
}
else
{
  // Throw security exception as we don't have a WindowsPrincipal
}When you are using Forms authentication, the sequence of events triggered by an unauthenticated user who attempts to access a secured file or resource (where URL authorization denies the user access), is shown in Figure 8.5.
The following describes the sequence of events shown in Figure 8.5:
The user issues a Web request for Default.aspx.
IIS allows the request because Anonymous access is enabled. ASP.NET checks the <authorization> elements and finds a <deny users=?" /> element.
The user is redirected to the login page (Login.aspx) as specified by the loginUrl attribute of the <forms> element.
The user supplies credentials and submits the login form.
The credentials are validated against a store (SQL Server or Active Directory) and roles are optionally retrieved. You must retrieve a role list if you want to use role-based authorization.
A cookie is created with a FormsAuthenticationTicket and sent back to the client. Roles are optionally stored in the ticket. By storing the role list in the ticket, you avoid having to access the database to re-retrieve the list for each successive Web request from the same user.
The user is redirected with client-side redirection to the originally requested page (Default.aspx).
In the Application_AuthenticateRequest event handler (in Global.asax), the ticket is used to create an IPrincipal object and it is stored in HttpContext.User.
ASP.NET checks the <authorization> elements and finds a <deny users=?" /> element. However, this time the user is authenticated.
ASP.NET checks the <authorization> elements to ensure the user is in the <allow> element.
The user is granted access to Default.aspx.
The following list highlights the key steps that you must perform to implement Forms authentication:
Configure IIS for anonymous access.
Configure ASP.NET for Forms authentication.
Create a logon Web form and validate the supplied credentials.
Retrieve a role list from the custom data store.
Create a Forms authentication ticket (store roles in the ticket).
Create an IPrincipal object.
Put the IPrincipal object into the current HTTP context.
Authorize the user based on user name/role membership.
Your application’s virtual directory must be configured in IIS for anonymous access.
▸ To configure IIS for anonymous access
A sample configuration is shown below.
<authentication mode="Forms">
  <forms name="MyAppFormsAuth"
       loginUrl="login.aspx"
       protection="Encryption"
       timeout="20"
       path="/" >
  </forms>
</authentication>Validate credentials against a SQL Server database, or Active Directory.
Obtain roles from a table within a SQL Server database, or groups/distribution lists configured within Active Directory. Refer to the preceding resources for details.
Store the retrieved roles in the ticket. This is illustrated in the following code.
// This event handler executes when the user clicks the Logon button
// having supplied a set of credentials
private void Logon_Click(object sender, System.EventArgs e)
{
  // Validate credentials against either a SQL Server database
  // or Active Directory
  bool isAuthenticated = IsAuthenticated( txtUserName.Text,
                                          txtPassword.Text );
  if (isAuthenticated == true )
  {
    // Retrieve the set of roles for this user from the SQL Server
    // database or Active Directory. The roles are returned as a
    // string that contains pipe separated role names
    // for example "Manager|Employee|Sales|"
    // This makes it easy to store them in the authentication ticket

    string roles = RetrieveRoles( txtUserName.Text, txtPassword.Text );

    // Create the authentication ticket and store the roles in the
    // custom UserData property of the authentication ticket
    FormsAuthenticationTicket authTicket = new
       FormsAuthenticationTicket(
                    1,                          // version
                    txtUserName.Text,           // user name
                    DateTime.Now,               // creation
                    DateTime.Now.AddMinutes(20),// Expiration
                    false,                      // Persistent
                    roles );                    // User data
    // Encrypt the ticket.
    string encryptedTicket = FormsAuthentication.Encrypt(authTicket);
    // Create a cookie and add the encrypted ticket to the
    // cookie as data.
    HttpCookie authCookie =
              new HttpCookie(FormsAuthentication.FormsCookieName,
                             encryptedTicket);

    // Add the cookie to the outgoing cookies collection.
    Response.Cookies.Add(authCookie);
    // Redirect the user to the originally requested page
    Response.Redirect( FormsAuthentication.GetRedirectUrl(
                       txtUserName.Text,
                       false ));
  }
}
Create the IPrincipal object in the Application_AuthenticationRequest event handler in Global.asax. Use the GenericPrincipal class, unless you need extended role-based functionality. In this case create a custom class that implements IPrincipal.
The creation of a GenericPrincipal object is shown below.
protected void Application_AuthenticateRequest(Object sender, EventArgs e)
{
  // Extract the forms authentication cookie
  string cookieName = FormsAuthentication.FormsCookieName;
  HttpCookie authCookie = Context.Request.Cookies[cookieName];
  if(null == authCookie)
  {
    // There is no authentication cookie.
    return;
  }
  FormsAuthenticationTicket authTicket = null;
  try
  {
    authTicket = FormsAuthentication.Decrypt(authCookie.Value);
  }
  catch(Exception ex)
  {
    // Log exception details (omitted for simplicity)
    return;
  }
  if (null == authTicket)
  {
    // Cookie failed to decrypt.
    return;
  }
  // When the ticket was created, the UserData property was assigned a
  // pipe delimited string of role names.
  string[] roles = authTicket.UserData.Split(new char[]{'|'});

  // Create an Identity object
  FormsIdentity id = new FormsIdentity( authTicket );
  // This principal will flow throughout the request.
  GenericPrincipal principal = new GenericPrincipal(id, roles);
  // Attach the new principal object to the current HttpContext object
  Context.User = principal;
}Use SSL when capturing credentials using an HTML form.
In addition to using SSL for the login page, you should also use SSL for other pages, whenever the credentials or the authentication cookie is sent across the network. This is to mitigate the threat associated with cookie replay attacks.
Authenticate users against a custom data store. Use SQL Server or Active Directory.
Retrieve a role list from the custom data store and store a delimited list of roles within the UserData property of the FormsAuthenticationTicket class. This improves performance by eliminating repeated access to the data store for each Web request and also saves you from storing the user’s credentials in the authentication cookie.
If the list of roles is extensive and there is a danger of exceeding the cookie size limit, store the role details in the ASP.NET cache object or database and retrieve them on each subsequent request.
For each request after initial authentication:
Retrieve the roles from the ticket in the Application_AuthenticateRequest event handler.
Create an IPrincipal object and store it in the HTTP context (HttpContext.User). The .NET Framework also associates it with the current .NET thread (Thread.CurrentPrincipal).
Use the GenericPrincipal class unless you have a specific need to create a custom IPrincipal implementation; for example, to support enhanced role-based operations.
Use two cookies; one for personalization and one for secure authentication and authorization. Make the personalization cookie persistent (make sure it does not contain information that would permit a request to perform a restricted operation; for example, placing an order within a secure part of a site).
Use a separate cookie name (using the Forms attribute of the <forms> element) and path for each Web application. This will ensure that users who are authenticated against one application are not treated as authenticated when using a second application hosted by the same Web server.
Ensure cookies are enabled within client browsers. For a Forms authentication approach that does not require cookies, see "Cookieless Forms Authentication" later in this chapter.
If you are hosting multiple Web applications that use Forms authentication on the same Web server, it is possible for a user who is authenticated in one application to make a request to another application without being redirected to that application’s logon page. The URL authorization rules within the second application may deny access to the user, without providing the opportunity to supply logon credentials using the logon form.
This only happens if the name and path attributes on the <forms> element are the same across multiple applications and each application uses a common <machineKey> element in Web.config.
If you need a cookieless Forms authentication solution, consider using the approach used by the Microsoft Mobile Internet Toolkit. Mobile Forms Authentication builds upon Forms Authentication but uses the query string to convey the authentication ticket instead of a cookie.
Use Passport authentication when the users of your application have Passport accounts and you want to implement a single-sign-on solution with other Passport enabled sites.
When you configure ASP.NET for Passport authentication, the user is prompted to log in and then is redirected to the Passport site. After successful credential validation, the user is redirected back to your site.
To configure ASP.NET for Passport authentication, use the following Web.config settings.
<authentication mode="Passport">
  <passport redirectUrl="internal" />
</authentication>
<authorization>
  <deny users="?" />
  <allow users="*" />
</authorization>
To map a Passport identity into roles, implement the PassportAuthentication_OnAuthentication event handler in Global.asax as shown below.
void PassportAuthentication_OnAuthenticate(Object sender,
                                           PassportAuthenticationEventArgs e)
{
  if(e.Identity.Name == "0000000000000001")
  {
    string[] roles = new String[]{"Developer", "Admin", "Tester"};
    Context.User = new GenericPrincipal(e.Identity, roles);
  }
}The following code fragment shows how to retrieve the authenticated Passport identity and check role membership within an aspx page.
PassportIdentity passportId = Context.User.Identity as PassportIdentity;
if (null == passportId)
{
  Response.Write("Not a PassportIdentity<br>");
  return;
}
Response.Write("IsInRole: Develeoper? " + Context.User.IsInRole("Developer"));If none of the authentication modules supplied with the .NET Framework meet your precise authentication needs, you can use custom authentication and implement your own authentication mechanism. For example, your company may already have a custom authentication strategy that is widely used by other applications.
To implement custom authentication in ASP.NET:
Configure the authentication mode in Web.config as shown below. This notifies ASP.NET that it should not invoke any of its built-in authentication modules.
<authentication mode="None" />
Create a class that implements the System.Web.IHttpModule interface to create a custom HTTP module. This module should hook into the HttpApplication.AuthenticateRequest event and provide a delegate to be called on each request to the application when authentication is required.
An authentication module must:
Obtain credentials from the caller.
Validate the credentials against a store.
Create an IPrincipal object and store it in HttpContext.User.
Create and protect an authentication token and send it back to the user (typically in a query string, cookie, or hidden form field).
Obtain the authentication token on subsequent requests, validate it, and reissue it.
Run ASP.NET (specifically the Aspnet_wp.exe worker process) by using a least privileged account.
Use a least privileged account to lessen the threat associated with a process compromise. If a determined attacker manages to compromise the ASP.NET process that runs your Web application, they can easily inherit and exploit the privileges and access rights granted to the process account. An account configured with minimum privileges restricts the potential damage that can be done.
Don’t use the highly-privileged SYSTEM account to run ASP.NET and don’t grant the ASP.NET process account the "Act as part of the operating system" privilege. You may be tempted to do one or the other to allow your code to call the LogonUser API to obtain a fixed identity (typically for network resource access). For alternate approaches, see "Accessing Network Resources" later in this chapter.
Reasons for not running as SYSTEM, or granting the "Act as part of the operating system privilege" include:
It significantly increases the damage that an attacker can do when the system is compromised, but it doesn’t affect the ability to be compromised.
It defeats the principle of least privilege. The ASPNET account has been specifically configured as a least privileged account designed to run ASP.NET Web applications.
For more information about the "Act as part of the operating system" privilege, see the Microsoft Systems Journal August 1999 Security Briefs column.
In general, it is not advisable to run your Web server on a domain controller, because a compromise of the server is a compromise of the domain. If you need to run ASP.NET on a domain controller, you need to give the ASP.NET process account appropriate privileges as outlined in article Q315158, "BUG: ASP.NET Does Not Work with the Default ASPNET Account on a Domain Controller," in the Microsoft Knowledge Base.
The local ASPNET account has been configured specifically to run ASP.NET Web applications with the minimum possible set of privileges. Use ASPNET whenever possible.
By default, ASP.NET Web applications run using this account, as configured by the <processModel> element within Machine.config.
<processModel userName="machine" password="AutoGenerate" />
Note
The machine user name indicates the ASPNET account. The account is created with a cryptographically strong password when you install the .NET Framework. In addition to being configured within the Security Account Manager (SAM) database, the password is stored within the Local System Authority (LSA) on the local computer. The system retrieves the password from the LSA, when it launches the ASP.NET worker process.
If your application accesses network resources, the ASPNET account must be capable of being authenticated by the remote computer. You have two choices:
Reset the ASPNET account’s password to a known value and then create a duplicate account (with the same name and password) on the remote computer. This approach is the only option in the following circumstances:
The Web server and remote computer are in separate domains with no trust relationship.
The Web server and remote computer are separated by a firewall and you do not want to open the necessary ports to support Windows authentication.
If ease of administration is your primary concern, use a least privileged, domain account.
To avoid having to manually update and synchronize passwords, you can use a least privileged domain account to run ASP.NET. It is vital that the domain account is fully locked down to mitigate the process compromise threat. If an attacker manages to compromise the ASP.NET worker process, he or she will have the ability to access domain resources, unless the account is fully locked down.
Note
If you use a local account and the account becomes compromised, the only computers subject to attack are the computers on which you have created duplicate accounts. If you use a domain account, the account is visible to each computer on the domain. However, the account still needs to have permission to access those computers.
The <processModel> element in the Machine.config file contains the userName and password attributes which specify the account that should be used to run the ASP.NET worker process (Aspnet_wp.exe).
Note
In contrast to the way classic ASP applications run, ASP.NET code never runs in the dllhost.exe process or as the IWAM_MACHINENAME account even when the application protection level is set to High (Isolated) in IIS.
ASP.NET requests sent to IIS are directly routed to the ASP.NET worker process (Aspnet_wp.exe). The ASP.NET ISAPI extension, Aspnet_isapi.dll, runs in the IIS (Inetinfo.exe) process address space. (This is controlled by the InProcessIsapiApps Metabase entry, which should not be modified). The ISAPI extension is responsible for routing requests to the ASP.NET worker process. ASP.NET applications then run in the ASP.NET worker process, where application domains provide isolation boundaries.
In IIS 6, you will be able to isolate ASP.NET applications by configuring application pools, where each pool will have its own application instance.
You have a number of options for configuring the <processModel> userName attribute. For example:
"machine". The worker process runs as the default least privileged ASPNET account. The account has network access but cannot be authenticated to any other computer on the network because the account is local to the computer and there is no authority to vouch for the account. On the network, this account is represented as "MachineNameASPNET".
"system". The worker process runs as the local SYSTEM account. This account has extensive privileges on the local computer and also has the ability to access the network using the credentials of the computer. On the network, this account is represented as "DomainNameMachineName$".
Specific credentials. When you supply credentials for userName and password, remember the principle of least privilege. If you specify a local account, the Web application cannot be authenticated on the network unless you create a duplicate account on the remote computer. If you elect to use a least privileged domain account, ensure it is not an account that has permission to access more computers on the network than it needs to.
In the .NET Framework version 1.1 you will have the ability to store encrypted userName and password attributes in the registry.
If you use custom credentials, use the aspnet_setreg.exe utility to store encrypted credentials in the registry. Avoid storing plain text credentials in machine.config.
For details about this utility and to download it, see article Q329290, "HOWTO: Use the ASP.NET Utility to Encrypt Credentials and Session State Connection Strings" in the Microsoft Knowledge Base.
The following sample shows the format of the userName and password attributes before and after using this utility. Notice how the attribute values point to the secured registry key and named values that contain the encrypted credentials.
<!--Before -->
<processModel userName="SomeCustomAccount"
              password="ClearTextPassword" . . ./>

<!-- After -->
<processModel
         userName="registry:HKLMSOFTWAREYourSecureAppprocessModel
                   ASPNET_SETREG,userName"
         password="registry:HKLMSOFTWAREYourSecureAppprocessModel
ASPNET_SETREG,password" . . ./>For more information about accessing network resources from ASP.NET Web applications, see "Accessing Network Resources," later in this chapter.
For detailed information about how to create a custom account for running ASP.NET, see "Appendix " in the Reference section of this book.
With the introduction of the FileAuthorizationModule, and with the efficient use of gatekeepers and trust boundaries, impersonation may prove more of a disadvantage than a benefit in ASP.NET.
If you use impersonation and access local resources from your Web application code, you must configure the ACLs attached to each secured resource to contain an ACE that grants at least read access to the authenticated user.
A better approach is to avoid impersonation, grant permissions to the ASP.NET process account, and use URL authorization, File authorization, and a combination of declarative and imperative role-based checks.
If you use impersonation and then access remote resources from your Web application code, the access will fail unless you are using Basic, Forms, or Kerberos authentication. If you use Kerberos authentication, user accounts must be suitably configured for delegation. They must be marked as "Sensitive and cannot be delegated" within Active Directory.
For more information about how to configure Kerberos delegation, see:
"Appendix " in the Reference section of this book.
ASP.NET performs no impersonation by default. As a result, if your Web application accesses local system resources, it does so using the security context associated with the Aspnet_wp.exe worker process. The security context is determined by the account used to run the worker process.
Least privileged accounts have sufficient permissions to be able to write records to the event log by using existing event sources. However, they do not have sufficient permissions to create new event sources, This requires a new entry to be placed beneath the following registry hive.
HKEY_LOCAL_MACHINESYSTEMCurrentControlSetServicesEventlog<log>
To avoid this issue, create the event sources used by your application at installation time, when administrator privileges are available. A good approach is to use a .NET installer class which can be instantiated by the Windows Installer (if you are using .msi deployment) or by the InstallUtil.exe system utility if you are not.
If you are unable to create event sources at installation time, you must add permission to the following registry key and grant access to the ASP.NET process account (of any impersonated account if your application uses impersonation).
HKEY_LOCAL_MACHINESYSTEMCurrentControlSetServicesEventlog
The account(s) must have the following minimum permissions:
Query key value
Set key value
Create subkey
Enumerate subkeys
Notify
Read
The following code can be used to write to the Application event log from ASP.NET once permissions have been applied to the registry:
string source = "Your Application Source";
string logToWriteTo = "Application";
string eventText = "Sample Event";

if (!EventLog.SourceExists(source))
{
  EventLog.CreateEventSource(source, logToWriteTo);
}
EventLog.WriteEntry(source, eventText, EventLogEntryType.Warning, 234);In classic ASP, requests are processed using threads from the Single Threaded Apartment (STA) thread pool. In ASP.NET, requests are processed using threads from the Multithreaded Apartment (MTA) thread pool. This has implications for ASP.NET Web applications that call Apartment model objects.
When an ASP.NET Web application calls an Apartment model object (such as a Visual Basic 6 COM object) there are two issues to note:
You must mark your ASP.NET page with the AspCompat directive, as shown below.
<%@ Page Language="C#" AspCompat="True" %>
Don’t create your COM objects outside of specific Page event handlers. Create COM objects in Page event handlers (such as Page_Load and Page_Init). Don’t create COM objects in the page’s constructor.
By default, ASP.NET uses MTA threads to process requests. This results in a thread-switch when an Apartment model object is called from ASP.NET, because the Apartment model object can’t be accessed directly by MTA threads (COM would use an STA thread).
Specifying AspCompat causes the page to be processed by an STA thread. This avoids a thread switch from MTA to STA. This is important from a security perspective if your Web application is impersonating because a thread switch results in a lost impersonation token. The new thread would not have the impersonation token associated with it.
The AspCompat directive is not supported for ASP.NET Web services. This means that when you call Apartment model objects from Web service code, a thread switch does occur and you lose the thread impersonation token. This typically results in an Access Denied exception.
See the following Knowledge Base articles for more information:
Article Q303375, "INFO: XML Web Services and Apartment Objects"
Article Q325791, "PRB: Access Denied Error Message Occurs When Impersonating in ASP.NET and Calling STA COM Components"
For more information about how to determine the identity of the currently executing code, see the "Determining Identity" section of Chapter 13, "Troubleshooting."
Don’t create COM object outside of specific Page event handlers. The following code fragment illustrates what not to do.
<%@ Page Language="C#" AspCompat="True" %>
<script runat="server">
  // COM object created outside of Page events
  YourComObject obj = new apartmentObject();
  public void Page_Load()
  {
    obj.Foo()
  }
</script>
When you use Apartment model objects, it is important to create the object within specific Page events such as Page_Load, as shown below.
<%@ Page Language="C#" AspCompat="True" %>
<script runat="server">
public void Page_Load()
{
  YourComObject obj = new apartmentObject();
  obj.Foo()
}
</script>Microsoft C#® development tool and Microsoft Visual Basic® .NET development system support all threading models (Free-threaded, Neutral, Both, and Apartment). By default, when hosted in COM+, C# and Visual Basic .NET objects are marked as Both. As a result, when they are called by ASP.NET, access is direct and you do not incur a thread switch.
Your application may need to access network resources. It is important to be able to identify:
The resources your application needs to access.
For example, files on file shares, databases, DCOM servers, Active Directory objects, and so on.
The identity used to perform the resource access.
If your application accesses remote resources, this identity must be capable of being authenticated by the remote computer.
Note
For information specific to accessing remote SQL Server databases, see Chapter 12.
You can access remote resources from an ASP.NET application by using any of the following techniques:
Use the ASP.NET process identity.
Use a serviced component.
Use the Anonymous Internet user account (for example, IUSR_MACHINE).
Use the LogonUser API and impersonating a specific Windows identity.
Use the original caller.
When the application is not configured for impersonation, the ASP.NET process identity provides the default identity when your application attempts to access remote resources. If you want to use the ASP.NET process account for remote resource access, you have three options:
Use mirrored accounts.
This is the simplest approach. You create a local account with a matching user name and password on the remote computer. You must change the ASPNET account password in User Manager to a known value (use a strong password). You must then explicitly set this on the <processModel> element in Machine.config, and replace the existing "AutoGenerate" value. Avoid clear text credentials. Use the aspnet_setreg.exe utility to store encrypted credentials in the registry as described earlier.
Important
If you change the ASPNET password to a known value, the password in the LSA will no longer match the SAM account password. If you need to revert to the "AutoGenerate" default, you will need to do the following:
Run Aspnet_regiis.exe, to reset ASP.NET to its default configuration. For more information, see article Q306005, "HOWTO: Repair IIS Mapping After You Remove and Reinstall IIS" in the Microsoft Knowledge Base.
Create a custom, least privileged local account to run ASP.NET and create a duplicate account on the remote computer.
Run ASP.NET using a least-privileged domain account.
This assumes that client and server computers are in the same or trusting domains.
For more information about configuring an ASP.NET process account, see "Appendix " in the Reference section of this book.
You can use an out of process serviced component, configured to run as a fixed identity to access network resources. This approach is shown in Figure 8.6.
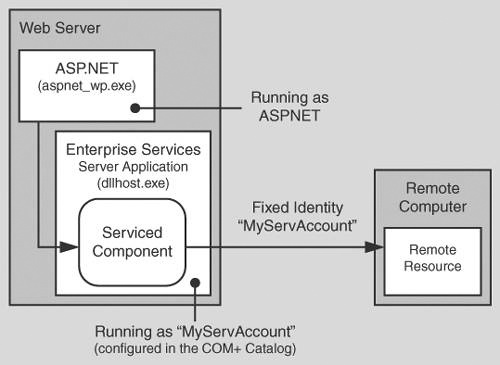
Figure 8.6. Using an out of process serviced component to provide a fixed identity for network resource access
Using an out of process serviced component (in an Enterprise Services server application) has the following advantages:
Flexibility in terms of the identity used. You don’t just rely on the ASP.NET identity.
Trusted or higher-privileged code can be isolated from your main Web application.
An additional process hop raises the bar from a security perspective. It makes it much tougher for an attacker to cross the process boundary to a process with raised privileges.
If you need to hand-craft impersonation with LogonUser API calls, you can do so in a process that is separated from your main Web application.
You can use the anonymous Internet user account to access network resources if IIS is configured for Anonymous authentication. This is the case if one of the following is true:
Your application supports anonymous access.
Your application uses Forms, Passport, or Custom authentication (where IIS is configured for anonymous access).
▸ To use the anonymous account for remote resource access
Configure IIS for Anonymous authentication. You can set the ASP.NET authentication mode to Windows, Forms, Passport, or None, depending upon the authentication requirements of your application.
Configure ASP.NET for impersonation. Use the following setting in Web.config:
<identity impersonate="true" />
Configure the anonymous account as a least privileged domain account,
–or–
Duplicate the anonymous account by using the same user name and password on the remote computer. This approach is necessary when you are making calls across non-trusting domains or through firewalls where the necessary ports to support Integrated Windows authentication are not open.
To support this approach, you must also:
Use Internet Services Manager to clear the Allow IIS to Control Password checkbox for the anonymous account.
If you select this option, the logon session created using the specified anonymous account ends up with NULL network credentials (and therefore cannot be used to access network resources). If you don’t select this option, the logon session is an interactive logon session with network credentials.
Set the account’s credentials both in User Manager and in Internet Services Manager.
Important
If you impersonate the anonymous account (for example, IUSR_MACHINE), resources must be secured against this account by using appropriately configured ACLs. Resources that your application needs to access must grant read access (at minimum) to the anonymous account. All other resources should deny access to the anonymous account.
You can use a separate anonymous Internet user account for each virtual root within your Web site. In a hosted environment, this allows you to separately authorize, track, and audit requests that originate from separate Web applications. This approach is shown in Figure 8.7.
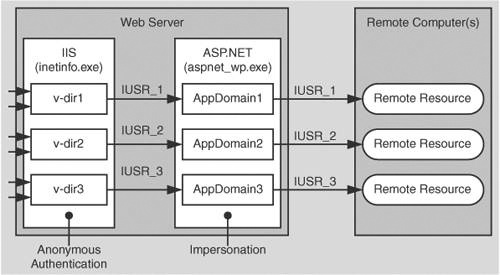
▸ To configure the anonymous Internet user account for a specific virtual directory
Start Internet Services Manager from the Administrative Tools programs group.
Select the virtual directory you want to configure, right-click, and then click Properties.
Click Edit within the Anonymous access and authentication control group.
Select Anonymous access, and then click Edit.
Enter the user name and password of the account that you want IIS to use when anonymous users connect to the site.
Make sure that Allow IIS to control password is NOT selected.
You can impersonate a specific identity by configuring user name and password attributes on the <identity> element in Web.config, or by calling the Win32® LogonUser API in your application code.
Important
As mentioned earlier in this chapter, use of LogonUser or a fixed impersonated identity is not recommended when using the .NET Framework 1.0 on Windows 2000 servers because it forces you to give the ASP.NET process account the powerful "Act as part of the operating system" privilege.
Microsoft Windows .NET Server 2003 lifts this restriction. Additionally, the .NET Framework version 1.1 will provide an enhancement for this scenario on Windows 2000. The logon will be performed by the IIS process, so that ASP.NET does not require the "Act as part of the operating system" privilege.
To use the original caller’s identity for remote resource access, you must be able to delegate the caller’s security context from the Web server to the remote computer.
Scalability Warning
If you access the data services tier of your application using the original caller’s impersonated identity, you severely impact the application’s ability to scale, because database connection pooling is rendered ineffective. The security context for database connections is different for each user.
The following authentication schemes support delegation:
Kerberos. For more information, see "Appendix " within the Reference section of this book.
Client certificates mapped to Windows accounts. The mapping must be performed by IIS.
Basic. Basic authentication supports remote resource access because the original caller’s credentials are available in clear text at the Web server. These can be used to respond to authentication challenges from remote computers.
Basic authentication must be used in conjunction with an interactive or batch logon session. The type of logon session that results from Basic authentication is configurable in the IIS Metabase. For more information, see the Platform SDK: Internet Information Services 5.1 on MSDN.
Important
Basic authentication is the least secure of the approaches that support delegation. This is because a clear text user name and password are passed from the browser to the server over the network and they are cached in memory at the Web server. You can use SSL to protect credentials while in transit but you should avoid caching clear text credentials at the Web server where possible.
▸ To use the original caller for remote resource access
Configure IIS for Integrated Windows (Kerberos), Certificate (with IIS certificate mapping), or Basic authentication.
Configure ASP.NET for Windows authentication and impersonation.
<authentication mode="Window" />
<identity impersonate="true" />
If you use Kerberos delegation, configure Active Directory accounts for delegation.
For more information about configuring Kerberos delegation, see "Appendix " in the Reference section of this book.
For more information about IIS certificate mapping, see http://www.microsoft.com/technet/treeview/default.asp?url=/technet/prodtechnol/ad/windows2000/howto/mapcerts.asp.
For more information about ASP.NET Impersonation, see the .NET Framework Developers Guide on MSDN.
If your application needs to access files on a Universal Naming Convention (UNC) share using ASP.NET, it is important to add NTFS permissions to the share’s folder. You will also need to set the share’s permissions to grant at least read access to either the ASP.NET process account or the impersonated identity (if your application is configured for impersonation).
If your application needs to access non-Windows resources such as databases located on non-Windows platforms or mainframe applications, you need to consider the following questions:
What are the gatekeepers and trust boundaries associated with the resource?
Does the resource need to know the original caller identity, or does it trust the calling application (using a fixed process or service identity)?
What is the performance cost associated with establishing connections? If the cost is significant you may need to implement connection pooling; for example, by using the object pooling feature of Enterprise Services.
If the resource needs to be able to authenticate the original caller (and Windows authentication is not an option), you have the following options:
Pass credentials using (method call) parameters.
Pass credentials in a connection string. Use SSL or IPSec to secure clear text credentials passed over a network.
Store credentials securely within your application, for example by using DPAPI. For more information about securely storing database connection strings, see "Storing Database Connection Strings Securely" in Chapter 12.
Use a centralized data store for authentication that both platforms can access; for example, an LDAP directory.
Use SSL to secure the communication link between browser and Web server. SSL provides message confidentiality and message integrity. Use SSL and/or IPSec to provide a secure channel from Web server to application server or database server.
For more information about secure communication, see "Chapter 4.
Web applications often need to store secrets. These need to be secured against rogue administrators and malicious Web users, such as:
Rogue administrators. Rogue administrators and other unscrupulous users should not be able to view privileged information. For example, the administrator of the Web server should not be able to read the password of a SQL Server login account on a SQL Server computer located across the network.
Malicious Web users. Even though there are components (such as the FileAuthorizationModule) that prevent users from accessing privileged files, if an attacker does gain access to a configuration file, the secret in the file should not be in plain text.
Typical examples of secrets include:
SQL connection strings. A common mistake is to store the user name and password in plain text. The recommendation is to use Windows authentication instead of SQL authentication. If you can’t use Windows authentication, see the following sections in Chapter 12, which present secure alternatives:
"Storing Database Connections Securely"
"Secure Communications"
Credentials used for SQL application roles. SQL Application roles must be activated with a stored procedure that requires the role name and associated password. For more information, see "Authorization" in Chapter 12.
Fixed identities in Web.config. For example:
<identity impersonate="true" userName="bob" password="inClearText"/>
The aspnet_setreg.exe utility allows you to replace clear text credentials with a pointer to a secured registry key that contains the encrypted credentials.
Process identity in Machine.config. For example:
<process userName="cUsTuMUzerName" password="kUsTumPazzWerD" >
As per the <identity> element, you should use aspnet_setreg.exe to store encrypted credentials in the registry.
Keys used to store data securely. It is impossible to safely store keys in software. However, certain tasks can mitigate the risk. An example is to create a custom configuration section handler which uses asymmetric encryption to encrypt a session key. The session key can then be stored in a configuration file.
SQL Server session state. To use SQL server to manage ASP.NET Web application session state, use the following Web.config settings.
<sessionState … stateConnectionString="tcpip=127.0.0.1:42424"
                sqlConnectionString="data source=127.0.0.1;
                user id=UserName;password=MyPassword" />
The aspnet_setreg.exe also supports the stateConnectionString and sqlConnectionString attributes on the <sessionState> element, which allows you to store these values in encrypted format in the registry.
Passwords used for Forms authentication against a database.
If your application validates authentication credentials against a database, don’t store passwords in the database. Use a hash of the password with a salt value and compare hashes.
For more information, see "Authenticating Users against a Database" in Chapter 12.
A number of approaches are available to .NET Web application developers to store secrets. These include:
.NET cryptography classes. The .NET Framework includes classes that can be used for encryption and decryption. These approaches require that you safely store the encryption key.
Data Protection API (DPAPI). DPAPI is a pair of Win32 APIs that encrypt and decrypt data by using a key derived from the user’s password. When using DPAPI, you do not deal with key management. The operating system manages the key which is the user’s password.
COM+ Constructor Strings. If your application uses serviced components, you can store the secret in an object construction string. The string is stored in the COM+ catalog in a clear text form.
CAPICOM. This is a Microsoft COM object which provides COM-based access to the underlying Crypto API.
Crypto API. These are low level Win32 APIs that perform encryption and decryption.
Consider installing Web application directories on a separate logical volume from the operating system (for example, E: instead of C:). This means that Machine.config (located under C:WINNTMicrosoft.NET) and potentially other files that contain secrets such as, Universal Data Link (UDL) files, are located on a separate logical volume from the Web application directories.
The rationale for this approach is to protect against possible file canonicalization and directory traversal bugs because:
File canonicalization bugs can expose files in the Web application folders.
Directory traversal bugs can expose files in other folders on the same logical volume.
No bugs of the sort described above have yet been published that exposed files on other logical volumes.
Web applications must manage various types of state including view state and session state. This section discusses secure state management for ASP.NET Web applications.
If your ASP.NET Web applications use view state:
Ensure the integrity of view state (to ensure it is not altered in any way while in transit) by setting the enableViewStateMac to true as shown below. This causes ASP.NET to generate a Message Authentication Code (MAC) on the page’s view state when the page is posted back from the client.
<% @ Page enableViewStateMac=true >
Configure the validation attribute on the <machineKey> element in Machine.config, to specify the type of encryption to use for data validation. Consider the following:
Secure Hash Algorithm 1 (SHA1) produces a larger hash size than Message Digest 5 (MD5) so it is considered more secure. However, view state protected with SHA1 or MD5 can be decoded in transit or on the client side and can potentially be viewed in plain text.
Use 3 Data Encryption Standard (3DES) to detect changes in the view state and to also encrypt it while in transit. When in this state, even if view state is decoded, it cannot be viewed in plain text.
Cookies that contain authentication or authorization data or other sensitive data should be secured in transit by using SSL. For Forms authentication, the FormsAuthentication.Encrypt method can be used to encrypt the authentication ticket, passed between client and server in a cookie.
The default (in-process) ASP.NET session state handler has certain limitations. For example, it cannot work across computers in a Web farm. To overcome this limitation, ASP.NET allows session state to be stored in a SQL Server database or remote state service.
SQL session state can be configured either in Machine.config or Web.config. The default setting in machine.config is shown below.
<sessionState mode="InProc"
              stateConnectionString="tcpip=127.0.0.1:42424"
              stateNetworkTimeout="10"
              sqlConnectionString="data source=127.0.0.1;user id=sa;password="
              cookieless="false" timeout="20"/>
By default, the SQL script InstallSqlState.sql, which is used for building the database used for SQL session state is installed at the following location:
C:WINNTMicrosoft.NETFrameworkv1.0.3705
When you use SQL session state there are two problems to consider.
You must secure the database connection string.
You must secure the session state as it crosses the network.
If you use SQL authentication to connect to the server, the connection string specified on the sqlConnectionString attribute contains a user name and password. Use the aspnet_setreg.exe utility to store an encrypted connection string in the registry. The following example shows the <sessionState> element before and after using aspnet_setreg.exe.
<!-- Before -->
<sessionState
    mode="SQLServer",
    sqlConnectionString="data source=Server;user id=userID;password=pwd" . . . />
<!-- After -->
<sessionState mode="SQLServer"
              sqlConnectionString="registry:HKLMSOFTWAREYourSecureApp
              sessionStateASPNET_SETREG,sqlConnectionString" />
Note
You can also use aspnet_setreg.exe to encrypt the stateConnectionString attribute if you use the ASP.NET state service.
If possible, you should use Windows authentication to the SQL Server state database. This has the added advantages that the connection string doesn't contain credentials and credentials are not passed over the network to the database server.
▸ To use Windows authentication, you can use the ASP.NET process identity (typically ASPNET)
Create a duplicate account (with the same name and password) on the database server.
Create a SQL login for the account.
Create a database user in the ASPState database and map the SQL login to the new user.
The ASPState database is created by the InstallSQLState.sql script.
Create a user defined database role and add the database user to the role.
Configure permissions in the database for the database role.
You can then change the connection string to use a trusted connection, as shown below:
sqlConnectionString="server=127.0.0.1;
                     database=StateDatabase;
Integrated Security=SSPI;"You may need to protect the session state as it crosses the network to the SQL Server database. This depends on how secure the network hosting the Web server and data servers is. If the database is physically secured in a trusted environment, you may be able to do without this extra security measure.
You can use IPSec to protect all IP traffic between the Web servers and SQL Server, or alternatively, you can use SSL to secure the link to SQL Server. With this approach, you have the option of encrypting just the connection used for the session state, and not all traffic that passes between the computers.
For more information about how to set up SQL Session State, see article Q317604, "HOW TO: Configure SQL Server to Store ASP.NET Session State," in the Microsoft Knowledge Base.
For more information about using SSL to SQL Server, see "Appendix " in the Reference section of this book.
For more information about using IPSec, see "Appendix " in the Reference section of this book.
In a Web farm scenario, there is no guarantee that successive requests from the same client are serviced by the same Web server. This has implications for state management and for any encryption that relies on attributes maintained by the <machineKey> element in Machine.config.
The default ASP.NET in-process session state handling (which mirrors previous ASP functionality) results in server affinity and cannot be used in a Web farm scenario. For Web farm deployments, session state must be stored out of process in either the ASP.NET State service or a SQL Server database as described earlier.
Note
You cannot rely on application state for maintaining global counters or unique values in Web farm (Web application configured to run on multiple servers) or Web garden (Web application configured to run on multiple processors) scenarios because application state is not shared across processes or computers.
DPAPI can work with either the machine store or user store (which requires a loaded user profile). If you use DPAPI with the machine store, the encrypted string is specific to a given computer and therefore you must generate the encrypted data on every computer. Do not copy the encrypted data across computers in a Web farm or cluster.
If you use DPAPI with the user store, you can decrypt the data on any computer with a roaming user profile.
For more information about DPAPI, see Chapter 12.
If you are using Forms authentication, it is essential that all of the servers in the Web farm share a common machine key, which is used for encryption, decryption, and validation of the authentication ticket.
The machine key is maintained by the <machineKey> element within Machine.config. The default setting is shown below.
<machineKey validationKey="AutoGenerate"
            decryptionKey="AutoGenerate"
            validation="SHA1"/>
This setting results in every machine generating a different validation and decryption key. You must change the <machineKey> element and place common key values across all servers in the Web farm.
The <machineKey> element located in Machine.config is used to configure the keys used for encryption and decryption of Forms authentication cookie data and view state integrity checking and encryption.
When the FormsAuthentication.Encrypt or FormsAuthentication.Decrypt methods are called, and when view state is created or retrieved, the values in the <machineKey> element are consulted.
<machineKey validationKey="autogenerate|value"
            decryptionKey="autogenerate|value"
            validation="SHA1|MD5|3DES" />
The value of the validationKey attribute is used to create and validate MAC codes for view state and Forms authentication tickets. The validation attribute signifies what algorithm to use when performing the MAC generation. Note the following:
With Forms authentication, this key works in conjunction with the <forms> protection attribute. When the protection attribute is set to Validation, and then when the FormsAuthentication.Encrypt method is called, the ticket value and the validationKey are used to compute a MAC which is appended to the cookie. When the FormsAuthentication.Decrypt method is called, the MAC is computed and compared to the MAC that is appended to the ticket.
With view state, the value of a control’s view state and the validationKey are used to compute a MAC, which is appended to the view state. When the view state is posted back from the client, the MAC is recomputed and compared to the MAC that is appended to the view state.
The value of the decryptionKey attribute is used to encrypt and decrypt Forms authentication tickets and view state. The DES or Triple DES (3DES) algorithms are used. The precise algorithm depends on whether or not the Windows 2000 High Encryption Pack is installed on the server. If it is installed 3DES is used, otherwise DES is used. Note the following:
With Forms authentication, the key works in conjunction with the <forms> protection attribute. When the protection attribute is set to Encryption, and the FormsAuthentication.Encrypt or Decrypt methods are called, the ticket value is encrypted or decrypted with the specified decryptionKey value.
With view state, the value of a controls view state is encrypted with the decryptionKey value when sent to the client and is decrypted when the client posts the data back to the server.
This attribute dictates what algorithm to use when validating, encrypting, or decrypting. It can take the values SHA1, MD5, or 3DES. The following describes these values:
SHA1. The HMACSHA1 algorithm is actually used when the setting is SHA1. It produces a 160 bit (20 byte) hash or digest of the input. HMACSHA1 is a keyed hashing algorithm. The key used as the input for this algorithm is specified by the validationKey attribute.
SHA1 is a popular algorithm because of its larger digest size compared to other algorithms.
MD5. This produces a 20 byte hash using the MD5 algorithm.
3DES. This encrypts data using the Triple DES (3DES) algorithm.
For information about how to create keys suitable for placing in Machine.config, see article Q312906, "HOW TO: Create Keys w/ C# .NET for Use in Forms Authentication," in the Microsoft Knowledge Base.
For more information about the Windows 2000 High Encryption Pack, see http://www.microsoft.com/windows2000/downloads/recommended/encryption/.
This chapter has described a variety of techniques and approaches for securing ASP.NET Web applications. Much of the guidance and many of the recommendations presented in this chapter also apply to the development of ASP.NET Web services and .NET Remoting objects hosted by ASP.NET. To summarize:
If your application uses Forms authentication and if performance is an issue when authenticating the user, retrieve a list of roles and store them in the authentication ticket.
If you use Forms authentication, create a principal and store it in the context on each request.
If there are too many roles to store in an authentication cookie, then use the global application cache to store the roles.
Don’t create a custom least privileged account to run ASP.NET. Instead, change the ASPNET account password and create a duplicate account on any remote Windows server that your application needs to access.
If you must create a custom account to run ASP.NET, use the principle of least privilege. For example:
Use a least privileged domain account if administration is the main concern.
If you use a local account. you must create a duplicated account on any remote computer that the Web application needs to access, You must use local accounts when your application needs to access resources in non-trusting domains, or where a firewall prevents Windows authentication.
Don’t run ASP.NET using the local SYSTEM account.
Don’t give the ASPNET account "Act as part of the operating system" privilege.
Use SSL when:
Security sensitive information is passed between browser and Web server.
When Basic authentication is used (to protect credentials).
When Forms authentication is used for authentication (as opposed to personalization).
Avoid storing secrets in plain text.
Don’t store plain text credentials in machine.config or web.config. Use the aspnet_setreg.exe utility to store encrypted credentials in the registry for the <identity>, <processModel> and <sessionState> elements.