
Web services often need to be able to authenticate their callers (other applications) in order to perform authorization. Client certificates provide an excellent authentication mechanism for Web services. When you use client certificates, your application also benefits from the creation of a secure channel (using Secure Sockets Layer [SSL]) between the client application and Web service. This allows you to securely send confidential information to and from the Web service. SSL ensures message integrity and confidentiality.
This How To describes how to call a Web service that is configured to require client certificates.
The solution presented in this How To uses a serviced component configured to run in an Enterprise Services server application, using a custom service account. The ASP.NET Web application calls the serviced component, which makes the call to the Web service (passing a client certificate). This solution configuration is illustrated in Figure 1 on the next page.
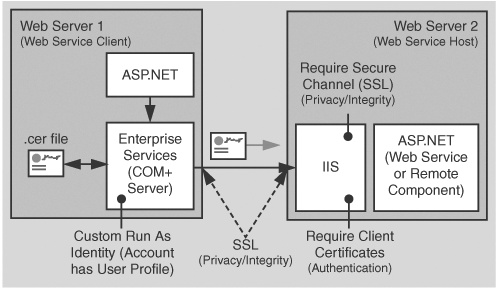
This arrangement is to ensure that the system has access to a user profile when communicating with the Web service. This is required for the initial SSL handshake.
Note
The ASPNET account used to run Web applications has the "Deny interactive logon" privilege, which prevents you from logging on interactively with this account. As a result, this account does not have a user profile.
Do not grant the ASPNET account (or any account used to run Web applications) the interactive logon capability. Always follow the principle of least privilege when configuring accounts to run Web applications and grant them as few privileges as possible. For more information, see "Appendix " in the Reference section of this book.
When you make a request to a Web service that requires client certificates, there is an SSL handshake that takes place between the client and server. A few of the components exchanged are the server certificate, client certificate, and a "pre-master secret" which is generated by the client. This secret is used later in the protocol to generate a "master secret."
In order for the server to verify that the presenter of the certificate is indeed the holder of the private key, the client must encrypt the pre-master secret with the private key and send the encrypted pre-master secret to the server. In order for the system to access the client’s private key to sign the pre-master secret it must access the private key from the key store of the client. The key store is located in the client’s profile which must be loaded.
The following items describe the recommended hardware, software, network infrastructure, skills and knowledge, and service packs you will need.
Microsoft® Windows® 2000 operating system
Microsoft Visual Studio® .NET development system
Access to a Certificate Authority (CA) to generate new certificates
A Web server with an installed server certificate
For more information about installing Web server certificates, see "Appendix ".
The procedures in this How To also require that you have knowledge of the Microsoft Visual C#™ development tool.
This How To includes the following procedures:
Create a Simple Web Service
Configure the Web Service Virtual Directory to Require Client Certificates
Create a Custom Account for Running a Serviced Component
Request a Client Certificate for the Custom Account
Test the Client Certificate using a Browser
Export the Client Certificate to a File
Develop the Serviced Component Used to Call the Web Service
Configure and Install the Serviced Component
Develop a Web Application to Call the Serviced Component
▸ To create a simple Web service on the Web service host computer
Start Visual Studio .NET and create a new C# ASP.NET Web Service application called SecureMath.
Open math.asmx.cs and rename the Service1 class as math.
Add the following Web method to the math class.
[WebMethod]
public long Add(long operand1, long operand2)
{
    return  (operand1 + operand2);
}
On the Build menu, click Build Solution to create the Web service.
This procedure uses Internet Information Services to configure your Web service’s virtual directory for SSL and to require certificates.
This procedure assumes that you have a valid certificate installed on your Web server. For more information about installing Web server certificates, see "Appendix " in the Reference section of this book.
▸ To configure the Web service virtual directory to require client certificates
Start Internet Information Services on the Web service host computer.
Navigate to the SecureMath virtual directory.
Right-click SecureMath, and then click Properties.
Click the Directory Security tab.
Under Secure communications, click Edit.
If Edit is unavailable, it is most likely that you haven’t installed a Web server certificate.
Select the Require secure channel (SSL) check box.
Select the Require client certificates option.
Click OK, and then click OK again.
In the Inheritance Overrides dialog box, click Select All, and then click OK to close the SecureMath properties dialog box.
This applies the new security settings to all subdirectories beneath the virtual directory root.
This procedure creates a new user account on the Web service client computer that you will use to run the serviced component that calls the Web service.
▸ To create a custom account for running the serviced component
Create a new user account with a strong password on the client computer. Clear the User must change password at next logon check box, and then select the Password never expires option.
Add the account to the Administrators group.
The account used to load a user profile must be an administrator on the local computer.
In this procedure, you will log on to the client computer using the new custom account. You will then issue a request for a certificate. This procedure assumes that you are using Microsoft Certificate Services. If you are not using Microsoft Certificate Services to create new certificates, issue a request to your preferred CA for a client certificate and install the certificate, while logged on using the custom account.
This procedure also assumes that Microsoft Certificate Services is configured to automatically issue certificates in response to certificate requests. It can also be configured for pending requests, which require an administrator to explicitly issue the certificate.
▸ To check the Microsoft Certificate Services setting
On the Microsoft Certificate Services computer, click Certification Authority in the Administrative Tools programs group.
Expand Certification Authority (Local), right-click the certification authority, and click Properties.
Click the Policy Module tab, and then click Configure.
Check the default action.
The following procedure assumes that Always issue the certificate is selected.
▸ To request a client certificate for the custom account
Log off the client computer and log back on using the custom account.
This forces the creation of a user profile for the custom account.
Browse to the CA in order to request a client certificate. For example, if your CA is located on the CAServer computer, browse to the following location.
http://caserver/certsrv
Click Request a certificate, and then click Next.
Ensure User Certificate is selected, and then click Next.
Click Submit.
A request is generated and sent to the CA for processing.
After the certificate is issued and you receive a response from the CA server, click Install this certificate.
Ensure that the issuing CA’s certificate is installed as a trusted root certificate authority on the local computer.
To confirm this, perform the following steps:
On the taskbar, click the Start button, and then click Run.
Type mmc, and then click OK.
On the File menu, click Add/Remove Snap-in.
Click Add.
Click Certificates, and then click Add.
Click Computer account, and then click Next.
Click Local Computer: (the computer this console is running on), and then click Finish.
Click Close, and then click OK.
In the left pane of the MMC snap-in, expand Certificates (Local Computer).
Expand Trusted Root Certification Authorities, and then click Certificates.
Confirm that your CA’s certificate is listed.
If the CA’s certificate isn’t listed, perform the following steps:
In this procedure, you will browse to the Web service in order to confirm that there are no problems with either the server or client certificates.
▸ To test the client certificate using a browser
Use Internet Explorer and navigate to https://server/SecureMath/Math.asmx.
Make sure that you specify "https" because the site is configured to require SSL.
A Client Authentication dialog box should appear. Select your client certificate, and then click OK.
Confirm that the Web service test page is displayed successfully within your browser.
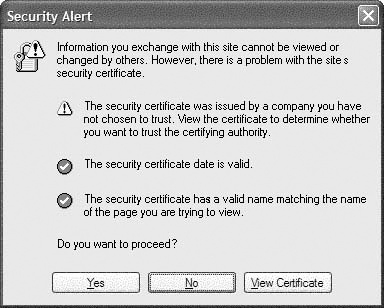
If you see the dialog box illustrated in Figure 2, you need to install the certificate authority’s certificate into the Trusted Root Certification Authorities store, as described in the previous procedure.
This procedure exports the client certificate to a file. This is subsequently retrieved by the serviced component, when it needs to pass the certificate to the Web service.
▸ To export the client certificate to a file
Within Internet Explorer, click Internet Options on the Tools menu.
Click the Content tab.
Click the client certificate, and then click Export.
Click Next to move past the welcome dialog box of the Certificate Export Wizard.
Confirm that No, do not export the private key is selected, and then click Next.
Make sure that DER encoded binary X.509 (.CER) is selected, and then click Next.
You must use this format, because the .NET Framework does not support Base-64 or PKCS #7 formats.
Enter an export file name. Note the location of the .cer export file, because you will require this again in a subsequent procedure.
Click Next, and then click Finish to export the certificate.
Close Internet Explorer.
Log off the computer and log back on using your regular development account.
This procedure creates a new C# Class Library application and creates the serviced component used to call the Web service. This procedure assumes that you are working on the client computer.
▸ To develop the serviced component used to call the Web service
Start Visual Studio.NET and create a new C# Class Library project called WebServiceRequestor.
Add a Web reference to the SecureMath Web service.
Important
You must temporarily reconfigure your Web service’s virtual directory to not require client certificates (although still require SSL), prior to adding the Web reference. After you successfully add the Web reference, change the virtual directory configuration back to require client certificates.
In practice, if a site requires client certificates, the publisher of the service makes the WSDL available as a separate offline file, which the consumers (of the service) can use to create the proxy.
In the Add Web Reference dialog box, be sure to specify https when specifying the Web service location. Failure to do so results in an error because the Web service virtual directory is configured to require SSL.
Rename class1.cs as ProfileManager.cs.
Add the following class definition to ProfileManager.cs (replacing the skeleton class1 class). The ProfileManager class uses P/Invoke to call the LoadUserProfile and UnloadUserProfile Win32 APIs.
internal class ProfileManager
{
  [DllImport("Userenv.dll", SetLastError=true,
             CharSet=System.Runtime.InteropServices.CharSet.Auto)]
  internal static extern bool LoadUserProfile(IntPtr hToken,
                                              ref PROFILEINFO lpProfileInfo);

  [DllImport("Userenv.dll", SetLastError=true,
           CharSet=System.Runtime.InteropServices.CharSet.Auto)]
  internal static extern bool UnloadUserProfile(IntPtr hToken,
                                                IntPtr hProfile);

  [StructLayout(LayoutKind.Sequential, CharSet=CharSet.Ansi)]
  public struct PROFILEINFO
  {
    public int dwSize;
    public int dwFlags;
    public String lpUserName;
    public String lpProfilePath;
    public String lpDefaultPath;
    public String lpServerName;
    public String lpPolicyPath;
    public IntPtr hProfile;
  }
}
Add a second class file called MathServiceComponent.cs to the project.
Add the following using statements to MathServiceComponent.cs below the existing using statement.
using System.Net;
using System.Web.Services;
using System.Security.Principal;
using System.EnterpriseServices;
using System.Runtime.InteropServices;
using System.Security.Cryptography.X509Certificates;
using WebServiceRequestor.WebReference1;
Add the following class definition, which provides a public CallMathWebService method. You will call this method in a later procedure from a client ASP.NET Web application.
Note
In the following code, replace the account name used to load the user profile with the name of the custom account you created in Step 3, "Create a Custom Account for Running the Serviced Component."
// This class calls the web service that requires a certificate.
public class MathServiceComponent : ServicedComponent
{
  [DllImport("advapi32.dll", CharSet=CharSet.Auto, SetLastError=true)]
  private extern static bool DuplicateToken(IntPtr ExistingTokenHandle,
                                           int SECURITY_IMPERSONATION_LEVEL,
                                           ref IntPtr DuplicateTokenHandle);

  [DllImport("kernel32.dll", CharSet=CharSet.Auto)]
  private extern static bool CloseHandle(IntPtr handle);

  // Calls the Web service that requires client certificates
  // certFilepath points to the .cer file to use
  // url is the Web service url
  // operand1 and operand2 are the parameters to pass to the Web service
  public long CallMathWebService(String certFilepath,
                                String url, int operand1, int operand2)
  {
    bool retVal = false;
    // Need to duplicate the token. LoadUserProfile needs a token with
    // TOKEN_IMPERSONATE and TOKEN_DUPLICATE.
    const int SecurityImpersonation = 2;
    IntPtr dupeTokenHandle = DupeToken(WindowsIdentity.GetCurrent().Token,
                                       SecurityImpersonation);
    if(IntPtr.Zero == dupeTokenHandle)
    {
      throw new Exception("Unable to duplicate token.");
    }
    // Load the profile.
    ProfileManager.PROFILEINFO profile = new ProfileManager.PROFILEINFO();
    profile.dwSize = 32;
    //TODO: Replace with custom account name created in step 3.
    profile.lpUserName = @"machinenamecustomaccountname";
    retVal = ProfileManager.LoadUserProfile(dupeTokenHandle, ref profile);
    if(false == retVal)
    {
      throw new Exception("Error loading user profile. " +
                          Marshal.GetLastWin32Error());
    }
    // Instantiate the Web service proxy
    math mathservice = new math();
    mathservice.Url = url;
    String certPath = certFilepath;
    mathservice.ClientCertificates.Add(
                                X509Certificate.CreateFromCertFile(certPath));
    long lngResult = 0;
    try
    {
      lngResult = mathservice.Add(operand1, operand2);
    }
    catch(Exception ex)
    {
      if(ex is WebException)
      {
         WebException we = ex as WebException;
         WebResponse webResponse = we.Response;
         throw new Exception("Exception calling method. " + ex.Message);
      }
   }
     ProfileManager.UnloadUserProfile(WindowsIdentity.GetCurrent().Token,
                                      profile.hProfile);
     CloseHandle(dupeTokenHandle);
     return lngResult;
   }

   private IntPtr DupeToken(IntPtr token, int Level)
   {
     IntPtr dupeTokenHandle = new IntPtr(0);
     bool retVal = DuplicateToken(token, Level, ref dupeTokenHandle);
     if (false == retVal)
     {
       return IntPtr.Zero;
     }
     return dupeTokenHandle;
   }
} // end class
This procedure configures the service component, generates a strong name, installs it in the global assembly cache and registers it with COM+.
Open assemblyinfo.cs and add the following using statement beneath the existing using statements.
using System.EnterpriseServices;
Add the following assembly level attribute to assemblyinfo.cs to configure the serviced component to run within a COM+ server application.
[assembly: ApplicationActivation(ActivationOption.Server)]
Open a command prompt window and change to the current project directory.
Use the sn.exe utility to generate a key file that contains a public-private key pair.
sn.exe -k WebServiceRequestor.snk
Return to Visual Studio .NET.
Locate the [AssemblyKeyFile] attribute within assemblyinfo.cs and modify it to reference the key file in the project directory as follows.
[assembly: AssemblyKeyFile(@"....WebServiceRequestor.snk")]
On the Build menu, click Build Solution.
Return to the command prompt and run the following command to add the assembly to the global assembly cache.
gacutil.exe /i bindebugwebservicerequestor.dll
Run the following command to register the assembly with COM+.
regsvcs bindebugwebservicerequestor.dll
Start Component Services (located beneath the Administrative Tools program group).
Expand the Component Services, Computers, and My Computer nodes.
Expand the COM+ Applications folder.
Right-click WebServiceRequestor, and then click Properties.
Click the Identity tab.
Select the This user: option and enter the account details corresponding to the custom account that you created earlier.
This configures the COM+ application to run using your custom account.
Click OK to close the Properties dialog box.
Close Component Services.
This procedure creates a simple ASP.NET Web application that you will use as the client application to call the Web service (via the serviced component).
▸ To develop a Web application to call the serviced component
On the Web service client computer, create a new C# ASP.NET Web application called SecureMathClient.
Add a reference to System.EnterpriseServices
Add a reference to the WebServiceRequestor serviced component.
Browse to WebServiceRequestor.dll located within the bindebug folder beneath the WebServiceRequestor project directory.
Open WebForm1.aspx.cs and add the following using statement beneath the existing using statements.
using WebServiceRequestor;
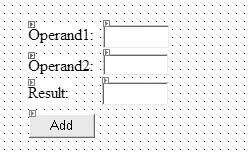
View WebForm1.aspx in Designer mode and create the form shown in Figure 3 using the following IDs:
operand1
operand2
result
add
Double-click Add to create a button-click event hander.
Add the following code to the event handler.
Note
Set the certPath string to the location of the certificate file that you exported during Procedure 6, "Export the Client Certificate to a File."
Set the url string with the HTTPS URL to your Web service.
private void add_Click(object sender, System.EventArgs e)
{
  // TODO: Replace with a valid path to your certificate
  string certPath = @"C:CustomAccountCert.cer";
  // TODO: Replace with a valid URL to your Web service
  string url = "https://wsserver/securemath/math.asmx";
  MathServiceComponent mathComp = new MathServiceComponent();

  long addResult = mathComp.CallMathWebService( certPath,
                                                url,
                                                Int32.Parse(operand1.Text),
                                                Int32.Parse(operand2.Text))
  result.Text = addResult.ToString();
  }
On the Build menu, click Build Solution.
Run the application. Enter two numbers to add, and then click Add.
The Web application will call the serviced component which will call the Web service using SSL and passing the client certificate.
For more information, see "Appendix " in the Reference section of this book.