


Deploying LUNs on N series for VMware vSphere 4.1
This chapter explains how to set up the N series storage system for VMware ESX Server installation and for guest servers. It shows the boot options that are available for VMware ESX Servers. Finally, it guides you through the setup of logical unit numbers (LUNs) for installation of the guest servers.
This chapter includes the following topics:
•Preparing N series for the VMware ESXi Server
•Preparing N series LUNs for VMware vSphere
•Partition alignment
•Storage growth management
7.1 Preparing N series LUNs for VMware vSphere
When provisioning LUNs for access through FC or iSCSI, LUNs must be masked so that only the appropriate hosts can connect to them. Within Data ONTAP, LUN masking is handled by the creation of initiator groups (igroup).
An initiator group includes all of the FC worldwide port names (WWPNs) or iSCSI qualified names (IQNs) of each of the VMware ESXi servers. This task is done from a pre-determined scope, so when assigning a LUN to an igroup, all the hosts listed within can see the LUNs.
The igroup scope design depends on the virtual environment design as a whole. If you are dividing your VMWare servers into clusters that support different application tiers, for example, you need to create an igroup for each of those clusters. That way you ensure that all the hosts within that cluster have access to the same LUNs. And you avoid having the hosts from one cluster being able to see LUNs that are not relevant to them.
|
igroups for FC and iSCSI protocols: If a cluster of servers is to use both the FC and iSCSI protocols, create separate igroups for the FC and iSCSI LUNs.
|
To identify the WWPN or IQN of the servers, for each VMware ESXi Server in vCenter, select a server. Then click the Configuration tab and select one of the storage adapters to see the SAN Identifier column, as in Figure 7-1.

Figure 7-1 Identifying WWPN or IQN numbers using the Virtual Infrastructure Client connected to vCenter
The most common option for a VMware environment is to create LUNs and format them as VMFS (VMware file system) for the guest operating systems. The VMFS file system was developed by VMware and is used to store the guest operating system’s disk files (.vmdk files) and its configuration files (.vmx files).
Other file extensions that are also part of the virtualization solution, such as Snapshot files, can also be stored in a VMFS volume. One of the main features of the VMFS file system is the ability to manage multiple access and support large files. Each LUN formatted as VMFS for a guest operating system’s store is called a datastore.
Figure 7-2 shows an example of using a datastore through the vCenter console.

Figure 7-2 A sample datastore
7.2 Setting up thin provisioning
You can enable thin provisioning at the LUN level or volume level by using either the CLI or the GUI. The following sections guide you through this process using the GUI during the creation of the volumes or LUNs.
7.2.1 Enabling volume-level thin provisioning
To enable volume level thin provisioning, follow these steps:

Figure 7-3 Selecting the Add option

Figure 7-4 Volume Wizard Welcome panel
3. In the Volume Type Selection panel (Figure 7-5), select the type of volume you want to create. The Flexible option is the most popular because of its useful properties. Therefore, in this example, we select Flexible. Click Next.

Figure 7-5 Selecting the volume type
4. In the Volume Parameters panel (Figure 7-6), enter a volume name of your choice. In this example, we choose vol1 and accept the default settings of the other fields. Click Next.

Figure 7-6 Naming the volume parameters
5. In the Flexible Volume Parameters panel (Figure 7-7), for Containing Aggregate, select the aggregate where you want to create the volume. For Space Guarantee, select none.
This option enables volume-level thin provisioning. Then click Next.
This option enables volume-level thin provisioning. Then click Next.

Figure 7-7 Specifying the flexible volume parameters
6. Select the size of the volume and the percentage reserved for snapshots, and click Next.
7. Click Commit to create the thin-provisioned volume.

Figure 7-8 Volume level thin provisioning
7.2.2 Creating a thin provisioned LUN on N series systems
To create a thin provisioned LUN, follow these steps:
1. Open FilerView:
http://Nseries/na_admin
2. Select LUNs.
3. Select Wizard.
4. In the Wizard window, click Next.
5. In the LUN Wizard: Specify LUN Parameters window (Figure 7-9), complete these steps:
a. Enter the path.
b. Enter the LUN size.
c. Enter the LUN type. For VMFS, select VMware, or for RDM, select the guest OS type.
d. Clear the space-reserved check box.
e. Enter a description.
f. Click Next.

Figure 7-9 Enabling thin provisioning on a LUN
6. In the last window that opens, click Finish.
After the LUN is created, you see a message at the top of the window that says LUN Create: succeeded. You have now created a thin provisioned LUN. You can verify that it exists by running the command shown in Example 7-1.
Example 7-1 LUN-level thin provisioning
itsotuc3> df -g /vol/nfs_vol
Filesystem total used avail capacity Mounted on
/vol/nfs_vol/ 50GB 2GB 47GB 5% /vol/nfs_vol/
/vol/nfs_vol/.snapshot 0GB 0GB 0GB ---% /vol/nfs_vol/.
snapshot
itsotuc3>
When you enable N series thin provisioning, configure storage management policies on the volumes that contain the thin-provisioned LUNs. The use of these policies aids in providing the thin-provisioned LUNs with storage capacity as they require it. The policies include automatic sizing of a volume, automatic Snapshot deletion, and LUN fractional reserve.
Volume Auto Size is a policy-based space management feature in Data ONTAP. With this feature, a volume can grow in defined increments up to a predefined limit if the volume is nearly full. For VMware ESX Server environments, set this value to On, which requires setting the maximum volume and increment size options.
To enable these options, follow these steps:
1. Log in to the N series console.
2. Set the volume autosize policy with the following command:
vol autosize <vol-name> [-m <size> [k/m/g/t]] [-i <size> [k/m/g/t]] on
Snapshot Auto Delete is a policy-based space-management feature that automatically deletes the oldest Snapshot copies on a volume when that volume is nearly full. For VMware ESX Server environments, set this value to delete Snapshot copies at 5% of available space. In addition, set the volume option to have the system attempt to grow the volume before deleting Snapshot copies.
To enable these options, follow these steps:
1. Log in to the N series console.
2. Set the Snapshot autodelete policy with the following command:
snap autodelete <vol-name> commitment try trigger volume target_free_space 5 delete_order oldest_first
3. Set the volume autodelete policy with the following command:
vol options <vol-name> try_first volume_grow
LUN Fractional Reserve is a policy that is required when you use N series Snapshot copies on volumes that contain VMware ESX Server LUNs. This policy defines the amount of additional space reserved to guarantee LUN writes if a volume becomes 100% full. For VMware ESX Server environments where the following conditions exist, set this value to 0%.
•If Volume Auto Size and Snapshot Auto Delete are in use
•If you separated the temp, swap, pagefile, and other transient data onto other LUNs and volumes
Otherwise, leave this setting at its default of 100%.
To enable this option, follow these steps:
1. Log in to the N series console.
2. Set the volume Snapshot fractional reserve with the following command:
vol options <vol-name> fractional_reserve 0
7.2.3 Creating an initiator group on N series systems
To deliver a LUN to a server, set up the N series as follows:
1. Log in to the FilerView of your N series system, pointing a web browser to the IP of your storage.
2. In this example, we are setting up an initiator group for the iSCSI protocol:
a. In the left pane of the FilerView panel, select LUNs → LUN ConfigCheck → Initiator Groups.
b. In the Add Initiator Group panel (Figure 7-10), complete the following steps:
i. For Group Name, choose any name you want for the initiator group. We use iSCSI_ig.
ii. For Type, select the protocol that is to be used by the initiator group. In this case, select iSCSI.
iii. For Operating System, select VMware, because the LUN is to be formatted as VMFS and is to be used by the guest operating systems.
iv. For Initiators, enter the IQN of the ESX server.
v. Click Add.

Figure 7-10 Setting up the initiator group
7.2.4 Creating a non-thin provisioned LUN on N series systems
1. Create a LUN for the initiator group iSCSI_ig. In the Add LUN pane (Figure 7-11), complete the following steps:
a. For Path, give the path for the volume and the LUN name. In this example, we use the /vol/vol_vm_2/iSCSI path.
b. For LUN Protocol Type, choose VMware.
c. For Description, type any helpful description that you want.
d. For Size, insert the size of the LUN.
e. For Units, select the GB (GigaBytes) option because we are creating a 12-GB LUN.
f. For Reserved Space, leave this check box selected so that the N series system can allocate all the space needed for this LUN.
g. Click Add.

Figure 7-11 Creating a LUN for the initiator group
2. Map the new LUN to an initiator group (Figure 7-12):
a. In the left pane of the FilerView panel, click LUNs → Manage.
b. In the Manage LUNs pane, click the No Maps link.

Figure 7-12 Mapping the LUN to an initiator group

Figure 7-13 Clicking the Add Groups to Map link
d. In the LUN Map Add Groups pane (Figure 7-14), select the initiator group iSCSI_ig that we just created. Click Add.

Figure 7-14 Selecting the initiator group
e. To complete the process, in the LUN Map pane (Figure 7-15), type the number that you want to assign to that LUN. Click Apply.

Figure 7-15 Completing the mapping process
The new LUN is now ready to be rescanned in vClient (Figure 7-16).
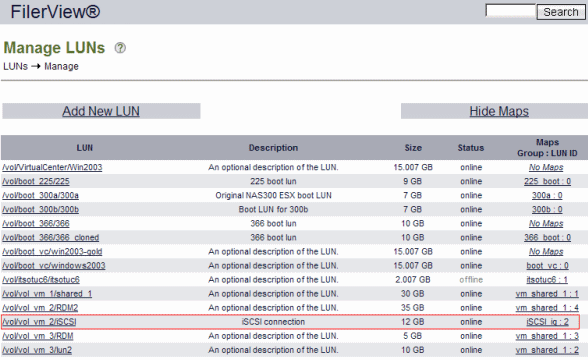
Figure 7-16 iSCSI - LUN ready for use
7.2.5 Adding licenses to N series systems
Before you create a LUN in the N series system, you must properly license the protocols that are to be used to present the LUN to the host system. The protocols that we use are FCP, iSCSI, and Network File System (NFS).
To properly license the N series system, open the command prompt. Run telnet to the system, and use the license add command, as shown in Figure 7-17.
|
C:> telnet 9.11.218.238
Data ONTAP (itsotuc4.itso.tucson)
login: root
Password: *******
itsotuc4*> license add <license_key>
|
Figure 7-17 Adding a license to N series using telnet
Alternatively, you can use FilerView to add the licenses to the N series system. After logging in the GUI, select Filer → Manage Licenses in the left pane, as shown in Figure 7-18.

Figure 7-18 FilerView to add licenses
7.3 Presenting LUNs to an ESXi server over Fibre Channel
In this section, you allocate a LUN to a host, so it can be used as a datastore and provide virtual disks for your virtual machines.
The following steps are considered to be completed prerequisites before you proceed:
•Creation of a LUN
•An FCP Initiator Group with the WWPNs of the ESX hosts
•The mapping of that LUN to the FCP Initiator group
Follow these steps to create a VMFS datastore over an FC LUN:
1. Click the Virtual Infrastructure Client icon to launch the console.
2. Point to your vCenter IP or name, then enter your user name and password when prompted.
– Use a domain account to log in if your vCenter server is part of a domain.
– Otherwise, use a local account of the vCenter server, as shown in Figure 7-19.

Figure 7-19 Logging using the Virtual Infrastructure Client
After the console is opened, you can see the ESX host in the left pane and its properties in the right pane.
3. Rescan the storage LUNs to make the new LUNs available to the ESX host:
a. Select the ESXi Host.
b. On the Configuration tab, click Storage. Click the Rescan link.
Selecting Rescan forces a rescan of all Fibre Channel and iSCSI HBAs, which is how VMware ESXi discovers changes in the storage available for use.
4. Repeat these steps for each host in the data center.
|
Double scan: Some FCP HBAs require you to scan them twice to detect new LUNs.
See VMware KB1798 at the following web address for further details: |
After the LUNs are identified, you can provision them to the host as a datastore or assign them to a guest as an RDM.
To add a LUN as a datastore, follow these steps:
1. With vCenter opened, select a host.
2. In the right pane, select the Configuration tab.

Figure 7-20 Adding storage

Figure 7-21 Add Storage wizard

Figure 7-22 Selecting a LUN
6. Check the information about the LUN, which is shown to confirm that you selected the correct one, as in Figure 7-23. Determine if it is the desired LUN and click Next.

Figure 7-23 LUN information
7. Enter a name for the datastore and click Next.
The default block size of datastores is 1 MB, which supports files up to a maximum of 256 GB in size. After you have formatted the datastore, there is no way to change the block size, unless you delete the datastore and recreate it with a different block size. For that reason, we advise using 8 MB, so you can have large files if you need them, as shown in Figure 7-24.

Figure 7-24 VMFS block size
8. Select the block size and click Next.

Figure 7-25 Review the information before click finish
10. Clicking the datastore, you can find the same information previously shown during the datastore creation (Figure 7-26).

Figure 7-26 Datastore information
7.4 Using N series LUNs for Raw Device Mapping
With Raw Device Mapping (RDM), a guest operating system can access an external storage system regardless of the disk format. It is based on a VMDK file in a VMFS volume. This file is not a regular data file, but rather a pointer to external storage. This VMDK pointer file contains only the disk information describing the mapping to the external LUN of the ESX server.
RDM uses dynamic name resolution for access to the external storage system. With dynamic name resolution, you can give a permanent name to a device by referring to the name of the mapping file in the /vmfs subtree. All mapped LUNs are uniquely identified by VMFS, and the identification is stored in its internal data structures.
Any change in the SCSI path, such as a Fibre Channel switch failure or the addition of a new host bus adapter, has the potential to change the vmhba device name. The name includes the path designation (initiator, target, or LUN). Dynamic name resolution compensates for these changes by adjusting the data structures to re-target LUNs to their new device names.
The RDM device is most commonly used when virtual infrastructure administrators need to build a virtual-to-physical cluster where the quorum disk is mounted in an external storage device. You can only use RDM over the iSCSI protocol and FCP.
As an external storage system, RDM devices are compatible with such features as VMotion and snapshots (when in Virtual Compatibility mode). These devices are also fully visible and are configured through the Virtual Infrastructure Client console.
7.4.1 RDM compatibility mode
RDM devices can be used in virtual or physical mode:
•With virtual mode, you can use raw disks to realize the benefits of VMFS, such as advanced file locking for data protection and snapshots. No direct access is available to the external storage.
•In physical mode, the guest operating system has direct access to the raw physical storage with a minimum of virtualization layer. When using physical mode, you lose the ability to use Snapshot on this raw device.
7.4.2 Attaching an RDM disk device to a virtual machine
To attach a raw device to a guest operating system, follow these steps:
1. Create a LUN in the N series storage system, as discussed in 5.3.1, “Preparing N series LUNs for the ESXi boot from SAN” on page 64.
|
Bootable LUN: The procedure described in 5.3.1, “Preparing N series LUNs for the ESXi boot from SAN” on page 64, refers to the creation of a bootable LUN. In this case, the LUN need not be bootable; it can be a regular LUN.
|
2. Go to the Virtual Infrastructure Client and rescan the datastore so that the ESX can reach the new LUN. On the Configuration tab, select the storage adapters, and then click Rescan.
3. Click the VM to which you want to add the RDM device, and click Edit Settings.
4. To add a new RDM device to the guest system, in the Virtual Machine Properties window (Figure 7-27), click the Add button.

Figure 7-27 Adding a new device
5. In the Add Hardware Wizard – Select a Device Type panel (Figure 7-28), select Hard Disk and click Next.

Figure 7-28 Adding a new hard disk

Figure 7-29 Selecting the disk type
7. In the Select and Configure a Raw LUN panel Figure 7-30, select the LUN that is to be mounted in this guest system. Then click Next.

Figure 7-30 Selecting the LUN
8. In the Select a Datastore panel Figure 7-31, store the LUN mapping file either in the guest operating system directory or in another VMFS datastore. In this example, we choose the Store with Virtual Machine option. Then click Next.

Figure 7-31 Selecting the datastore to map the LUN
9. In the Select Compatibility Mode panel (Figure 7-32), select Physical. For compatibility mode information, see 7.4.1, “RDM compatibility mode” on page 120. Click Next.

Figure 7-32 Selecting the compatibility mode
10. In the Specify Advanced Options panel (Figure 7-33), specify the virtual SCSI ID for the new disk device and for the SCSI mode. Accept the default options and click Next.

Figure 7-33 Specifying the advanced options

Figure 7-34 Summary of settings
12. After the wizard finishes, and you return to the Virtual Machine Properties window Figure 7-35, you see the new hard disk that you configured. Click OK to finish the process. When that is finished, the virtual machine is ready to use the RDM device.

Figure 7-35 RDM hard disk attached
7.5 Creating a VMKernel portgroup on VMware vSphere 4.1
In order to communicate to a storage using the network (as opposed to accessing it through Fibre Channel), VMware requires a special connection named VMkernel.
VMkernel is a portgroup on a Virtual Switch (also known as vSwitch) that handles storage traffic and vMotion capacities. It is a best practice to separate the VMkernel used for vMotion from the one used for storage access. The purpose here is to ensure that each one does not affect the performance of the other one.
The following steps show how to set up a VMkernel portgroup, required for network storage access as iSCSI and NFS.
To configure the iSCSI connectivity, follow these steps:
1. Open vCenter.
2. Select a host.
3. In the right pane, select the Configuration tab.
4. In the Hardware box, select Networking.

Figure 7-36 Adding network

Figure 7-37 Adding a VMkernel port
7. Select the NIC that is to be bound to this switch, as shown in Figure 7-38.

Figure 7-38 Creating a new switch and selecting the physical NIC attached to it
|
Tip: Although a vSwitch can have multiple NICs and portgroups, any given NIC can be bound to a single vSwitch only. That is why the vmnic0 is not available.
|
8. Enter a name for the portgroup that you are creating. A descriptive name can help to better identify the networks, thus easing management and troubleshooting. Because this portgroup is used to communicate with the storage only, none of the check boxes are marked. We named it VMKernel_storage, as in Figure 7-39.

Figure 7-39 Naming the portgroup
9. Enter the IP information for the VMKernel portgroup, as in Figure 7-40, and then click Next. If you need to change your VMkernel Default Gateway, click Edit and change the address accordingly.

Figure 7-40 IP configuration of VMKernel
10. In the next panel, review the information entered and click Finish to create the VMKernel portgroup. Figure 7-41 shows the added vSwitch and its VMkernel portgroup.

Figure 7-41 The new vSwitch, named vSwitch1, and its VMkernel portgroup
7.6 Presenting LUNs to VMware ESXi Server over iSCSI protocol
This section explains how to present a storage LUN to the VMware ESX host by using the iSCSI protocol:
1. Highlight the iSCSI Adapter and click the Properties link in the Details box, as shown in Figure 7-42.

Figure 7-42 Selecting an iSCSI initiator
2. The iSCSI configuration panel displays. Click Configure... Then click the Enable select box, as shown in Figure 7-43.

Figure 7-43 Enabling iSCSI Software adapter
3. The iSCSI software adapter is enabled, as shown Figure 7-44.

Figure 7-44 An enabled iSCSI adapter, and its IQN
4. In the iSCSI Initiator Properties window, select the Dynamic Discovery tab. Click Add and enter the IP address of the iSCSI-enabled interface of the N series system. Then type the IP address of the iSCSi target storage, then click OK.
5. Repeat these steps for all targets (Figure 7-45).

Figure 7-45 Adding iSCSI targets
6. For additional security, select the CHAP Authentication tab to configure CHAP Authentication. Verify iSCSI access before you enable CHAP Authentication.
7.7 Presenting an iSCSI LUN directly to a virtual machine
LUNs can be presented directly to virtual machines when using Fibre Channel through RDM. In the same way, LUNs can be directly accessed by a guest machine using iSCSI.
To implement this procedure, use the following steps:
1. On Windows 2008, click Start → Administrative Tools → iSCSI Initiator. On Windows 2003, the iSCSI client must be downloaded from the following website:
You can then install it by just accepting the defaults.
2. You might receive a message stating that the iSCSI service is not running yet. Click Yes to enable it.
3. On the iSCSI menu, click the Configuration tab and check the server‘s IQN, as shown in Figure 7-46. If you want to change it, click the Change button and make your modifications accordingly.

Figure 7-46 Collecting the VM‘s IQN
4. Create an iSCSI Initiator group, as described in 7.2.3, “Creating an initiator group on N series systems” on page 110.
5. Create and assign a LUN to it.
6. Click the Discovery tab, then click Discover Portal. Type the N series data IP interface for “IP address or DNS name”, as shown in Figure 7-47.

Figure 7-47 Adding the storage iSCSI data interface

Figure 7-48 Connect to the target iSCSI
8. Accept the message and enable multipath if you have multiple NICs configured to access the storage. This choice is highly preferable. It changes the status to Connected.
9. Open Server Manager within that VM. Expand Storage and select Disk Management. The assigned LUN is shown there, as in Figure 7-49. If not, right-click Disk Management and select Rescan.

Figure 7-49 The allocated LUN shows in Disk Management
7.8 NFS volumes on VMware vSphere 4.1
NFS is widely used by server administrators due to its low cost and flexibility. An NFS volume can be increased (grown) and reduced (shrunk) at the N series level at any time without downtime.
This section explains how to set up an N series system for VMware ESXi host for NFS use.
7.8.1 Overview of NFS
With NFS, you have access to a volume hosted in a storage system over an Internet Protocol network. Servers can take advantage of NFS to mount storage volumes as though they were locally attached. An N series system and Virtual Infrastructure 3 support the use of NFS.
Virtual Infrastructure 3 requires the creation of a VMkernel switch for NFS. This is necessary because all the traffic between the storage system and the host must flow through the VMkernel virtual switch.
7.8.2 Setting up an NFS volume on N series
To make an NFS share available to an ESX host, follow these steps:
1. Create a volume structure in the N series system. We created an 80-GB volume named vol_nfs, as shown in Figure 7-50.

Figure 7-50 Creating a volume structure
2. After the volume is set up in the N series system, mount it in the VMware side:
a. Using the Virtual Infrastructure Client (Figure 7-51), in the left pane, click the host you want to mount the NFS volume in. On the Configuration tab, under Hardware, select Storage. Then click Add Storage.

Figure 7-51 Clicking the Add Storage... button
3. In the Add Storage Wizard – Select Storage Type panel (Figure 7-52), click Network File System. Then click Next.

Figure 7-52 Selecting the storage type
4. In the Locate Network File System panel (Figure 7-53), complete these steps:
i. Enter the storage system and volume name so that the ESX host can locate it.
ii. Optional: Select Mount NFS read only, if your NFS volume is read only.
iii. In the field Datastore Name, enter the display name of the NFS volume in the ESX host.
iv. Click Next.

Figure 7-53 Locating the network file system
5. In the summary window, review the information provided and click Finish.
After the connection between the ESX host and the N series is established, the NFS volume is mounted, as shown in Figure 7-54. The NFS volume is now available as a new datastore in the VMware ESX host and is ready for use.

Figure 7-54 Newly mounted NFS volume
7.8.3 NFS datastore limits and options
By default, VMware ESX Server allows 8 NFS datastores. However, this limit can be increased to 64 to meet your infrastructure needs. To increase the value, perform the following steps from within the Virtual Infrastructure Client:
1. Open Virtual Center.
2. Select a host.
3. In the right pane, select the Configuration tab.
4. In the Software left box, select Advanced Settings.
5. In the Advanced Settings window (Figure 7-55), complete the following steps:
a. Select NFS in the left pane.
b. Change the value of NFS.MaxVolumes to 64.
c. Change the value of NFS.HeartbeatFrequency to 12.
d. Change the value of NFS.HeartbeatMaxFailures to 10.
e. Select Net in the left pane.
f. Change the value of Net.TcplpHeapSize to 30. The change of this setting is implemented only after an ESXi server restart, so plan accordingly.
6. Repeat these steps for each host.
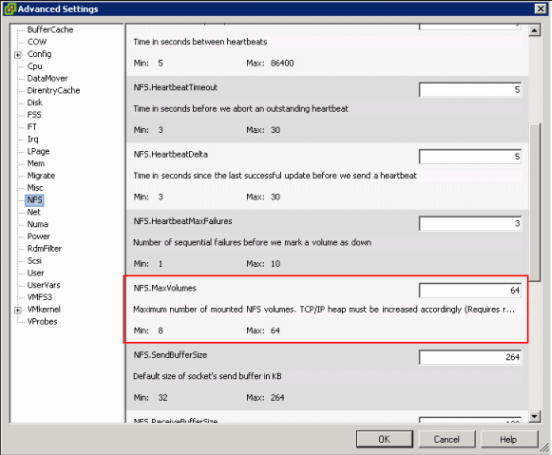
Figure 7-55 Increasing NFS.MaxVolumes
When deploying VMDKs on NFS, disable the access time updates that occur by default on the NFS. To disable the access time updates, log in to the N series console and run the following command:
vol options <vol-name> no_atime_update on
7.9 Partition alignment
In many cases, by default, a file system block is not aligned to the storage array. This type of alignment means that, for each random read or write, two blocks must be read or written. This situation can negatively impact the performance of the storage array. Sequential writes can also be affected, although to a lesser extent. Even when having a misaligned partition, performance degradation might not be noticed or reported, as it depends on the I/O load of each virtual machine. Misaligned guests with low I/O requirements might not justify the work to realign the disks.
In a non-virtualized environment, block alignment is done by selecting the appropriate LUN protocol type when the LUN is created. However, virtualization products, such as VMware, add another layer of complexity to alignment. In this situation, the VMFS datastore must be correctly aligned to the storage blocks, and the guest OS file system must be aligned with the other two layers. Misalignment of file systems is shown in Figure 7-56.

Figure 7-56 Guest OS partition not aligned with VMFS and array partitions
When aligning the partitions of virtual disks for use with N series storage systems, the starting partition offset must be divisible by 4096. The preferred starting offset value is 65,536.
On Windows servers, the misalignment problem occurs on versions running Windows 2003 and its predecessors. During the operating system installation, it creates the boot partition with a value slightly below 32KB - 32256 bytes (the correct value would be 32768 bytes). Thus, a mismatch occurs between the 4 KB physical block below it and the logical partition.
|
Tip: Windows 2008 servers installed from scratch (not upgraded from 2003 servers) do not have this problem. The reason is that the aligned partitions are created either during the installation or later through the Disk Management interface.
|
To find the start offset of a partition on Windows, run msinfo32 from a prompt command. Expand Components, Storage, then select Disks, and you typically find that the guest is running with a default starting offset value of 32256 (see Figure 7-57). It can occur if the partition was created through graphical interface, such as Microsoft Disk Management. Or it can occur if the boot partition was created automatically by Windows during its installation.

Figure 7-57 Using system information to identify the partition starting offset
Avoiding misalignment is better than correcting it later. So a best practice is to have aligned disks on your templates (which are virtual machine base images that are cloned to create new servers). Also, always create the Windows partitions through the diskpart command line utility.
|
Important: Windows versions prior to 2008 always create misaligned partitions from the Disk Management graphical utility.
|
You can format a virtual disk with the correct offset at the time of its creation. Simply boot the guest before you install an operating system and manually set the partition offset. For Windows guest operating systems, the Windows Preinstall Environment boot CD is an excellent tool.
7.9.1 Creating an aligned partition on a Windows guest OS
This section explains how to create an aligned partition for a future guest OS installation. The aligned partition is saved as a template. Then it is used for all new deployments in the environment so that all new guest operating systems will have the correct alignment. This practice avoids a possible performance issue.
|
WinPE: The following steps use a tool called WinPE to adjust the block alignment. WinPE is a bootable CD that has disk tools on it. In this case, we use the Diskpart tool to adjust the partition alignment of the virtual machine. For more information about WinPE and to download it, see the following website:
|
To create an aligned partition for a future guest OS installation, follow these steps:
1. Create a standard virtual machine:
2. Mount the WinPE.iso file in CD/DVD drive 1 of the virtual machine. Select Edit Settings → CD/DVD device 1 and browse the location of the WinPE.iso file. Make sure that the Connect at power on check box is selected.
3. Power on the virtual machine, which will boot through the WinPE.iso file, as shown in Figure 7-58.

Figure 7-58 Booting with the WinPE.iso file
When the boot is complete, start the partition alignment from the command prompt that opens (Figure 7-59).

Figure 7-59 Boot complete and command prompt available
4. At the command prompt, issue the commands shown in Figure 7-60 to fix the partition alignment.
|
C:> diskpart
DISKPART> list disk (you might see only disk 0)
DISKPART> select disk 0
DISKPART> create partition primary align=64
|
Figure 7-60 Diskpart commands
5. Shut down the virtual machine and unmount the WinPE.iso file.
Now the partition of the virtual machine disk is aligned and ready for the operating system installation.
When creating data partitions after the OS install, use diskpart, which is included on Windows systems, with the same commands as shown in Figure 7-60.
|
Important: Windows versions prior to 2008 always create misaligned partitions from Disk Management graphical utility, so use diskpart to create new partitions.
|
6. After the Microsoft operating system in installed and running, click Start → Run and type msinfo32.exe. In the left pane of the System Information window (Figure 7-61), expand Components → Storage → Disk. In the right pane, look for Partition Starting Offset, which must have a value of 65,536 bytes.

Figure 7-61 Fixed partition alignment
Now you can use this virtual machine with the correct partition aligned as a template for future guest operating systems deployment.
7.9.2 Realigning existing partitions
For disks that were created misaligned, you can use the mbraling and mbrscan utilities to realign the disk, without having to create a new disk and transfer all the data into it. These utilities are included in the host utility kit at the following website:
For currently running guests that are misaligned, correct the offset of only those guests that are experiencing I/O performance issues. The performance penalty is more noticeable on systems that are completing a large number of small read and write operations.
Although we advise using ESXi through the entire book, this command must be executed from an ESX host, because this version has a service console management to install.
The following steps show how to realign a partition misaligned by the operating system:
1. Make a backup of the disk that you want to align.
2. Download ESX Host Utilities 5.2.1 from this website:
3. Transfer it to your ESX server:
a. Connect to your ESX host using Virtual Infrastructure Client.
b. Select the Configuration tab, then in the Hardware panel on the left, choose Storage.
c. Select one of the datastores listed, right-click it, and select Browse Datastore...
as shown in Figure 7-62.
as shown in Figure 7-62.

Figure 7-62 Browse Datastore to upload/download files from your datastore

Figure 7-63 Select Upload files to transfer data into your datastore
e. Browse your local disk to find the ESX Host Utilities downloaded and upload them to the datastore.
4. Unzip it running the command tar -xzvf netapp_esx_host_utilities_5_2.1.tar.gz
5. Change your directory to the santools: cd /opt/netapp/santools:
Check the alignment of a disk by running mbrscan and the full path of the disk: [root@esx2 santools]# ./mbralign /vmfs/volumes/n5500-01NFS1/Win2000/Win2000.vmdk
6. You receive a message like this one; type yes and press Enter:
MBRAlign will align with a blocksize of 8 kB.
Part Type Old LBA New Start LBA New End LBA Length in KB
P1 07 63 64 20948761 10474348
NOTICE:
This tool does not check for the existence of Virtual Machine snapshots or linked clones.
The use of this tool on a vmdk file that has a snapshot or linked clone associated with it
can result in unrecoverable data loss and/or data corruption.
Are you sure that no snapshots or linked clones exist for this vmdk file(s)? (yes/no)
7. You need at least the same space of the virtual disk being aligned free on the datastore to complete the operation. Here is the output during the alignment:
Creating a backup of /vmfs/volumes/81eee9e4-8f38a96f/Win2000/Win2000.vmdk
Creating a backup of /vmfs/volumes/81eee9e4-8f38a96f/Win2000/Win2000-flat.vmdk
Creating a copy of the Master Boot Record
Working on partition P1 (3): Starting to migrate blocks from 32256 to 32768.
12801 read ops in 15 sec. 11.72% read (6.33 mB/s). 11.72% written (6.33 mB/s)
8. The results look like this example:
Working on space not in any partition: Starting to migrate blocks.
100.00 percent complete. 100.00 percent written. .
Making adjustments to /vmfs/volumes/81eee9e4-8f38a96f/Win2000/Win2000-flat.vmdk.
Adjusting the descriptor file.
Alignment complete for /vmfs/volumes/81eee9e4-8f38a96f/Win2000/Win2000.vmdk
9. The new Start LBA value is 64, showing that the disk is now aligned, and you are ready to start the virtual machine again.
7.10 Advanced guest operating system I/O configurations
This section explains tasks you can perform within the operating system of the guest systems.
7.10.1 Setting SCSI time-out values for N series failover events
To increase the resiliency of guests during storage failover events, modify the default SCSI disk time-out values within the guest operating system.
To modify these values in a Windows guest, follow these steps:
1. Connect to the virtual machine.
2. Open the registry editor.
3. Go to HKEY_LOCAL_MACHINESYSTEMCurrentControlSetServicesDiskTimeOutValue.
4. Change the value to 190 (in decimal).
5. Close the registry editor.
7.10.2 Modifying the SCSI time-out value for RHEL4 (Kernel 2.6) guests
To modify the SCSI time-out value for RHEL4 (Kernel 2.6) guests, follow these steps:
1. Connect to the guest.
2. Log in as root.
3. Execute the following command:
touch /sbin/scsi_disktimeout.sh
4. Edit the file from step 3 and enter the following content:
#!/bin/bash
for for device_dir in `ls -d /sys/block/sd*`
do
device_name=`basename ${device_dir}`
echo "190" > /sys/block/${device_name}/device/timeout
done
5. Execute the following command:
chmod +x /sbin/scsi_disktimeout.sh
6. Execute the following command:
touch /etc/udev/rules.d/52-nseries.rules
7. Edit the file from step 6 and enter the following content:
BUS="scsi", PROGRAM="/sbin/scsi_timeout.sh"
8. Restart the udev by executing the following command:
/sbin/udevstart
To modify the SCSI time-out value for Red Hat Enterprise Linux 5 guests, follow these steps:
1. Connect to the guest.
2. Log in as root.
3. Back up the udev file by running the following command:
cp /etc/udev/rules.d/50-udev.rules /etc/udev/rules.d/50-udev.rules.orig
4. Edit the /etc/udev/rules.d/50-udev-default.rules file and modify the following line:
ACTION=="add", SUBSYSTEM=="scsi" , SYSFS{type}=="0|7|14", RUN+="/bin/sh -c 'echo 60 > /sys$$DEVPATH/timeout'"
Set the disk time-out value to 190 seconds:
ACTION=="add", SUBSYSTEM=="scsi" , SYSFS{type}=="0|7|14", RUN+="/bin/sh -c 'echo 190 > /sys$$DEVPATH/timeout'"
5. Restart the udev file by executing the following command:
/sbin/udevstart
To modify the SCSI time-out value for SUSE Linux Enterprise Server 9 (Kernel 2.6) guests, follow these steps:
1. Connect to the guest.
2. Log in as root.
3. Execute the following command:
touch /sbin/udev.scsi_disktimeout.sh
4. Edit the file from step 3 and enter the following content:
#!/lib/klibc/bin/sh
for device_dir in `ls -d /sys/block/sd*`
do
device_name=`basename ${device_dir}`
echo "190" > /sys/block/${device_name}/device/timeout
done
5. Execute the following command:
chmod +x /sbin/udev.scsi-disktimeout.sh
6. Copy the binary files referenced in step 4 by running the following command:
cp /bin/ls /lib/klibc/bin/ls
cp /bin/echo /lib/klibc/bin/echo
cp /bin/basename /lib/klibc/bin/basename
7. Back up the udev file by running the following command:
cp /etc/udev/udev.rules /etc/udev/udev.rules.orig
8. Edit the /etc/udev/udev.rules file:
a. Find the following line:
"BUS="scsi", PROGRAM="/sbin/udev.get_persistent_device_name.sh", NAME="%k" SYMLINK="%c{1+}""
b. Above this line, add the following line:
KERNEL="sd*" PROGRAM="/sbin/udev.scsi_timeout.sh"
9. Restart the udev file by executing the following command:
/sbin/udevstart
To modify the SCSI time-out value for SUSE Linux Enterprise Server 10 guests, follow these steps:
1. Connect to the guest.
2. Log in as root.
3. Back up the udev file by running the following command:
cp /etc/udev/rules.d/50-udev-default.rules /etc/udev/rules.d/50-udev-default.rules.orig
4. Edit the /etc/udev/rules.d/50-udev-default.rules file:
a. Modify the following line:
ACTION=="add", SUBSYSTEM=="scsi" , SYSFS{type}=="0|7|14", RUN+="/bin/sh -c 'echo 60 > /sys$$DEVPATH/timeout'"
b. Set the disk time-out value to 190 seconds:
ACTION=="add", SUBSYSTEM=="scsi" , SYSFS{type}=="0|7|14", RUN+="/bin/sh -c 'echo 190 > /sys$$DEVPATH/timeout'"
5. Restart the udev file by executing the following command:
/etc/init.d/boot.udev force-reload
To modify the SCSI time-out value for Solaris 10 x86 guests, follow these steps:
1. Connect to the guest.
2. Log in as root.
3. Back up the /etc/system file by running the following command:
cp /etc/system /etc/system.orig
4. Add the following line to the /etc/system file:
set sd:sd_io_time=0xbe
5. Restart the virtual machine.
7.11 Monitoring and management
This section provides information about monitoring and managing the IBM System Storage N series storage system.
7.11.1 Monitoring storage utilization with Operations Manager
IBM offers the Operations Manager product to monitor, manage, and generate reports on all of the IBM System Storage N series systems in an organization. When you are using N series thin provisioning, deploy Operations Manager and set up email and pager notifications to the appropriate administrators. With thin provisioned storage, it is important to monitor the free space that is available in storage aggregates. Proper notification of the available free space ensures that additional storage can be made available before the aggregate becomes full.
7.11.2 Setting up notifications in Operations Manager
For more information about setting up notifications in the version of Operations Manager you are using, see the Operations Manager Administration Guide at this website:
|
Access to IBM Systems support: You must register for access to IBM Systems support applications and content. You can register at the following address:
|
7.12 Storage growth management
This section explains growing the different storage components that make up the datacenter.
7.12.1 Growing VMFS volumes
Beginning on vSphere 4, VMFS growing on the fly is supported, which means that you can grow your datastore with all VMs running without any disruption.
To grow a datastore, follow these steps:
1. Open FilerView:
http://Nseries/na_admin
2. Select LUNs.
3. Select Manage.
4. In the left pane, select the LUN from the list.

Figure 7-64 Expanding a LUN
6. Open vCenter.
7. Select a host.
8. In the right pane, select the Configuration tab.
9. In the Hardware box, select the Storage, then click Rescan All.
10. After the rescan, right-click and select the datastore that you want to grow and then select Properties.
11. When you see the new size of the LUN right next to the red array, now the datastore has to be extended to that size. Click Increase on the left upper corner, as in Figure 7-65.

Figure 7-65 Increasing datastore capacity

Figure 7-66 Extended LUN

Figure 7-67 New datastore structure
14. Mark the box to expand the datastore to the maximum size of the LUN and click Next.
15. Review the new datastore structure and click Finish.
16. Check the new values of your datastore by clicking it, as in Figure 7-68.

Figure 7-68 The new values for the expanded datastore
7.12.2 Growing a virtual disk
In an analog way to Datastores, Virtual disks can be extended while the VM is running.
However, growing the virtual disk is only half of the equation to increasing available storage. You still need to grow the file system after the guest boots. Root volumes, such as C: in Windows and / in Linux, cannot be grown dynamically or while the system is running. For these volumes, see “Growing bootable volumes” on page 151.
For all other volumes, you can use native operating system tools to grow the volume. To grow a virtual disk, follow these steps:
1. Open vCenter.
2. Right-click the desired Virtual Machine and select Properties.
3. Select a virtual disk, and in the right pane, increase its size, as shown in Figure 7-69. Then click OK.

Figure 7-69 Growing a virtual disk
7.12.3 Growing an RDM
Growing an RDM has components of growing a VMFS and a virtual disk. This process requires the guest to be powered off. To grow RDM-based storage, follow these steps:
1. Open vCenter.
2. Right-click the desired Virtual Machine and select Edit Settings.
3. Highlight the hard disk to be resized, and click Remove.
4. As shown in, select Remove from virtual machine and delete files from disk to delete the mapping file. However this option does not remove any data from the RDM LUN. Then click OK.
5. Open FilerView:
http://Nseries/na_admin
6. Select LUNs.
7. Select Manage.
8. From the list in the left pane, select the LUN.
9. In the Size box, enter the new size of the LUN and click Apply.
10. Return to vCenter.
11. In the right pane, select the Configuration tab.
12. In the Hardware box, select the Storage, then click the Rescan All...
13. Right-click the guest and select Edit Settings to open the Edit Settings window.
14. In the next panel, highlight Select a Disk, and in the right pane, select Raw Device Mappings. Then click Next.
15. In the Select and Configure a Raw LUN panel, select the LUN and click Next.
16. Specify the VMFS datastore that will store the mapping file.
17. Start the guest. Remember that, although you have grown the LUN, you still need to grow the file system within it. Follow the guidelines in the next section, “Expanding the guest file system (NTFS or EXT3)”.
7.12.4 Expanding the guest file system (NTFS or EXT3)
When a virtual disk or RDM has been increased in size, you still need to grow the file system that resides on it after booting the guest.
Growing the file system
You can perform this process live while the system is running by using native or freely distributed tools:
1. Remotely connect to the guest.
2. Grow the file system.
For Windows guests, you can use the diskpart utility to grow the file system. For more information, see the topic “A Description of the Diskpart Command-Line Utility”:
For Linux guests, you can use ext2resize to grow a file system. For more information, see the following web page from SourceForge:
Growing bootable volumes
Root volumes, such as C: in Windows guests and / in Linux guests, cannot be grown while the guest is running. However, you can expand these file systems in a way that does not require the acquisition of any additional software beyond ext2resize. This process requires the VMDK or LUN that has been resized to be connected to another guest of the same operating system type, by using the processes defined in “Growing a virtual disk” on page 149:
1. Shut down the Virtual Machine that has the disk to be expanded, for this example, VM1.
2. Add the virtual disk containing the boot volume of VM1 to another VM, in this example, VM2.
3. Rescan the disks on Disk Management from Windows, and the new added disk will display. It shows as a disk with 1 GB of free space, as in Figure 7-70.

Figure 7-70 System drive attached to another VM in order to be increased a a normal drive
4. Extend it as a normal disk.
5. Shut down the VM, detach the virtual disk, and read it to the original VM.
6. Start the original VM and check if the partition was extended accordingly.
..................Content has been hidden....................
You can't read the all page of ebook, please click here login for view all page.