


Backup and recovery to a separate system
The N series storage systems provide a facility called SnapVault. It uses the Snapshot principles to make copies of the data of the primary storage system and put them onto a secondary system. With this method, the secondary system can replace tape backup for normal backup operations.
However, if tape is required, for example, with long data retention periods, tape backups can be taken off the secondary system. This task does not require a special out-of-hours backup window, because backups do not impact the primary system.
This chapter includes the following topics:
11.1 Licensing the SnapVault locations
To use SnapVault, you must license the primary and secondary SnapVault locations:
•You enable SnapVault Primary on the N series server that you will back up from (source).
•You also enable SnapVault Secondary on the N series to which you intend to back up.
To license the SnapVault locations, follow these steps:
1. In the left navigation pane of FilerView, select Filer → Manage Licenses.
2. In the SnapVault ONTAP Primary field (Figure 11-1), enter your primary license.

Figure 11-1 Entering the SnapVault license
3. Verify that the license was installed successfully (Figure 11-2).

Figure 11-2 SnapVault license installed
4. Repeat these steps on the secondary system, entering the license details into the SnapVault ONTAP Secondary field.
11.2 Setting up the primary storage
If you are setting up a new environment, you can plan your primary storage based upon the backup schedule that you require. Where possible, co-locate data with similar backup requirements together on the same volumes. Or more importantly, try not to store data with separate requirements on the same volume. For example, make sure that your transient data is stored on separate volumes from your vital data.
The steps for setting up your primary storage are similar to setting up any N series storage for Virtual Infrastructure 4. See Chapter 10, “Recovery options” on page 177. The difference is that storage that is to be replicated by using SnapVault requires an extra level between the volume and the LUN called a Qtree. A Qtree provides additional flexibility to assign the specific LUNs to be backed up and restored.
|
Volumes without LUNs: Volumes without LUNs do not require a Qtree on the primary storage. Snapshots are taken at the volume level.
|
11.3 Creating a Qtree
After you create your volumes (or if you have existing volumes), each of them will need at least one Qtree. Do these steps:

Figure 11-3 Adding a Qtree
2. In the Add QTree pane (Figure 11-4), enter the volume in which you want the Qtree to be created, and the Qtree name. Then click Add.

Figure 11-4 Qtree properties
3. Verify that the Qtree was created successfully (Figure 11-5).
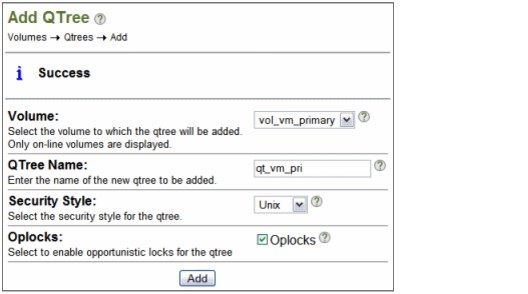
Figure 11-5 Qtree created
4. If you did not yet create LUNs in the volume, create them now. Specify the Qtree in the path by using the following syntax:
/vol/<vol_name>/<qtree_name>/<lun_name>
For example, the LUN shown in Figure 11-6 is being created in the Qtree created in Figure 11-6.

Figure 11-6 Creating a LUN in the Qtree
5. If your LUN exists in the volume, change the path. In the left navigation pane of FilerView, select LUNs → Manage. The LUN shown in Figure 11-7 was moved into a Qtree.

Figure 11-7 LUN moved to a Qtree
11.4 Setting up auxiliary storage
After your primary storage is configured correctly, set up the auxiliary storage, which is where the backups are to be stored. The auxiliary storage must be configured with a volume at least as large as, or larger than, each primary volume that you intend to back up. You must set the Snapshot reserve to 0.
To set up auxiliary storage, follow these steps:
1. Disable scheduled Snapshots on the volume, because you will use SnapVault for any backups that are required. In FilerView, in the left navigation pane (Figure 11-8), select Volumes → Snapshots → Configure.

Figure 11-8 Selecting to configure the Snapshot schedule
2. In the Configure Snapshots pane (Figure 11-9), select the secondary volume that you just created. For Scheduled Snapshots, clear the Scheduled check box.

Figure 11-9 Disabling the schedule
3. Verify that the Snapshot configuration was successful (Figure 11-10).

Figure 11-10 Snapshot schedule not set
You do not need to set up any Qtrees on the secondary volume. SnapVault creates the Qtrees for you.
11.5 Configuring SnapVault
To configure backups using SnapVault, you must perform an initial backup to put the data on the secondary system. Then you must set up a schedule for ongoing SnapVault Snapshots. You can configure this schedule for as often as once each hour, depending on your backup needs.
11.5.1 Running the CLI
SnapVault configuration is done by using the N series command line interface (CLI). To run the CLI, use telnet to access the IP address of the N series server. Alternatively, start the command line from FilerView by selecting Filer → Use Command Line from the navigation pane (Figure 11-11).

Figure 11-11 Choosing the CLI option
The examples in the following sections show commands that you can run on either the primary or secondary system. Therefore, you need to have the CLI open on both systems while doing the configuration.
11.5.2 Setting permissions
Set the permissions to allow the secondary system to access SnapVault on the primary system by using the following command on the primary system (Example 11-1):
options snapvault.access host=<secondary>
Example 11-1 Setting SnapVault permissions
itsotuc3> options snapvault.access host=9.11.218.238
itsotuc3>
Enter the same command on the secondary system, specifying the primary as the host:
options snapvault.access host=<primary>
By using this command, the primary can perform restore operations from the secondary system later.
11.5.3 Performing an initial SnapVault transfer
To perform the initial SnapVault transfer, follow these steps:
1. Set up the initial backup by entering the following command on the secondary system (Example 11-2 on page 207):
snapvault start -S <primary>:<primary_qtree> <secondary>:<secondary_qtree>
The secondary Qtree does not exist yet. It is created with the name you provide in the command.
Example 11-2 Initial SnapVault
itsotuc4*> snapvault start -S 9.11.218.237:/vol/vol_vm_5/qtree_vm1 itsotuc4:/vol/vol_vm_Vault/qtree_vm_Vault1
Snapvault configuration for the qtree has been set.
Transfer started.
Monitor progress with 'snapvault status' or the snapmirror log.
The initial SnapVault might take some time to create, depending on the size of the data on the primary volume and the speed of the connection between the N series systems.
Example 11-3 Checking the SnapVault Status: Initial SnapVault in progress
itsotuc4*> snapvault status
Snapvault secondary is ON.
Source Destination State Lag Status
9.11.218.237:/vol/vol_vm_5/qtree_vm1 itsotuc4:/vol/vol_vm_Vault/qtree_vm_Vault1 Uninitialized - Transferring (4086 MB done)
itsotuc4>
After the initial SnapVault is complete, the snapvault status command is displayed as idle (Example 11-4).
Example 11-4 Check SnapVault Status - Initial SnapVault complete
itsotuc4> snapvault status
Snapvault secondary is ON.
Source Destination State Lag Status
9.11.218.237:/vol/vol_vm_5/qtree_vm1 itsotuc4:/vol/vol_vm_Vault/qtree_vm_Vault1 Snapvaulted 00:38:27 Idle
itsotuc4>
3. Check the volumes on the secondary system in FilerView to ensure that they are using the expected amount of space. They need about the same amount as on the primary system.
4. Check that the Qtree created by the initial SnapVault is listed in FilerView.
You are now ready to set up the SnapVault schedule for automated Snapshot transfers for the future.
11.5.4 Configuring the schedule
Unlike the initial setup of SnapVault, the schedules are configured at the volume level rather than at the Qtree level. The schedule must be configured on both the primary and auxiliary storage systems. This way, the primary system can create a Snapshot locally and then the destination transfers the data across to itself.
Setting up the primary schedule
Set up the SnapVault schedule on the primary system by entering the following command on the primary system:
snapvault snap sched <volume_name> <snap_name> <sched_spec>
where <sched_spec> is <copies>[@<hour_list>][@<day_list>]
For example, you might want to schedule snapshots to run three times a day at 8 a.m., 4 p.m., and midnight, retaining two days worth of backups (that is, six copies). Example 11-5 shows the command and resulting output for this configuration.
Example 11-5 Scheduling SnapVault Snapshots on the primary system
itsotuc1> snapvault snap sched vol_vm_pri 8_hourly 6@0,8,16
itsotuc1> snapvault snap sched
create vol_vm_pri 8_hourly 6@0,8,16
itsotuc1>
Use the snapvault snap sched command to check the newly created schedule.
Setting up the secondary schedule
You must also configure the schedule for the auxiliary storage system in a similar way. However, the secondary needs to transfer the snapshot from the primary system. Therefore, the command is a little different:
snapvault snap sched -x <volume_name> <snap_name> <sched_spec>
where <sched_spec> is <copies>[@<hour_list>][@<day_list>]
The -x option tells the secondary system to transfer the snapshot from the primary system.
In the previous example, where three backups are taken per day, you might want to retain backups on the secondary system for a longer period. For example, you might want to retain backups for a week (that is, 21 backups in total). Example 11-6 shows the command and resulting output in this situation.
Example 11-6 Scheduling SnapVault Snapshot transfers on the secondary system
itsotuc4> snapvault snap sched -x vol_vm_vault2 8_hourly 21@0,8,16
itsotuc4> snapvault snap sched
xfer vol_vm_vault2 8_hourly 21@0,8,16
itsotuc4>
After the scheduled time passes, look for your Snapshots in FilerView on both the primary and auxiliary storage systems. Their names are based on the snap_name that you set previously. Figure 11-12 shows an example from the secondary system.

Figure 11-12 SnapVault Snapshots in FilerView
11.5.5 Scripting a schedule
Similar to regular snapshots, you take VMware guest snapshots before the SnapVault scheduled Snapshot or transfer to provide a consistent, recoverable guest state.
You can script this schedule by using the following Virtual Infrastructure 3 commands:
•The snapvault snap sched command is used to set the retention.
•The snapvault snap create command is used to create the snapshots.
You still perform the initial snapshot from the secondary system as described previously. Then you run the snapvault snap sched command once on the primary system to set the retention of the snapshots to be scripted. Do not specify the times to run (Example 11-7).
Example 11-7 SnapVault Snapshot retention on the primary system
itsotuc1> snapvault snap sched vol_vm_pri 8_hourly 6@-
itsotuc1> snapvault snap sched
create vol_vm_pri 8_hourly 6@-
itsotuc1>
The VMware and SnapVault script can now be run on the primary system by using the same snapname specified in the schedule. Example 11-8 shows the snapvault command included in the script.
Example 11-8 SnapVault command in the VMware Snapshot script
itsotuc1> snapvault snap create vol_vm_pri 8_hourly
itsotuc1>
The secondary system can have a normal SnapVault schedule configured that is timed to start a little after the script is run on the primary systems, as shown in Example 11-9.
Example 11-9 Schedule for SnapVault Snapshot transfers on the secondary system
itsotuc4*> snapvault snap sched -x vol_vm_vault2 8_hourly 21@0,8,16
itsotuc4*> snapvault snap sched
xfer vol_vm_vault2 8_hourly 21@0,8,16
itsotuc4*>
11.6 Taping backups from the SnapVault secondary system
Where off-site backup is required, or if longer retention periods exist than are economical to store on disk, snapshots from the auxiliary storage system can be written to tape. You can perform this task by using the N series dump command with a local tape system. Alternatively, you can use an NDMP-enabled backup application, such as IBM Tivoli Storage Manager.
The volumes of the auxiliary storage system can be mapped directly by the backup server, and the Snapshots are stored as subdirectories. Therefore, you can perform backup to tape of the required snapshots at any convenient time before the snapshot retention period expires.
For details about using Tivoli Storage Manager to back up an N series storage system, see Using the IBM System Storage N series with IBM Tivoli Storage Manager, SG24-7243.
11.7 Restoring SnapVault snapshots
Similar to regular snapshots, the type of recovery is determined by the level of restoration that is required. This section explains how to recover a Qtree from a SnapVault Snapshot. The concepts for recovering a virtual machine or file within a virtual machine are the same as for regular snapshots. For additional information about some of these procedures, see Chapter 10, “Recovery options” on page 177.
11.7.1 Preparation
If you did not do so already, set the permissions on the secondary to allow the primary to perform the restore by entering the following command on the secondary system (Example 11-1 on page 206):
options snapvault.access host=<primary>
Before recovering SnapVault Snapshots to Virtual Infrastructure 4.x, the ESX host must be configured to allow Volume Resignaturing.
11.7.2 Restoring the Qtree
Performing a LUN restore from SnapVault places the restored LUN on a volume on the primary storage system. You enter the following command (Example 11-10) from the primary system:
snapvault restore -S <secondary>:<secondary_qtree> <destination_qtree>
The destination Qtree does not yet exist. It is created with the name you provide in the command. This command restores all LUNS from the secondary Qtree to the new Qtree. The new Qtree can be in the same volume or in a different volume from the original source data.
Example 11-10 SnapVault restore command
itsotuc1> snapvault restore -S 9.11.218.238:/vol/vol_vm_vault2/qt_vm_vault2 /vol/vol_vm_pri/qt_rest1
Restore from 9.11.218.238:/vol/vol_vm_vault2/qt_vm_vault2 to /vol/vol_vm_pri/qt_rest1 started.
Monitor progress with the 'snapvault status' command.
Abort the restore with ^C.
The CLI for the primary system is unavailable for commands until the restore is complete. Alternatively, you can press Ctrl+C to end the restore. To view the status, use the snapvault status command on the secondary system as shown in Example 11-11.
Example 11-11 SnapVault status: Restore underway
itsotuc4> snapvault status
Snapvault secondary is ON.
Source Destination State Lag Status
9.11.218.114:/vol/vol_vm_pri/qt_vm_pri itsotuc4:/vol/vol_vm_vault2/qt_vm_vault2 Snapvaulted 04:13:04 Idle
itsotuc4:/vol/vol_vm_vault2/qt_vm_vault2 itsotuc1:/vol/vol_vm_pri/qt_rest1 Source - Transferring (3991 MB done)
itsotuc4>
As with the initial Snapshot, the restore might take some time, depending on how much data in the Qtree is restored. When it is completed, the primary CLI shows a success message and becomes available again (Example 11-12).
Example 11-12 Successful restore
Made qtree /vol/vol_vm_pri/qt_rest1 writable.
Restore to /vol/vol_vm_pri/qt_rest1 completed successfully.
itsotuc1>
The secondary system also shows that the restore is complete, when using the snapvault status command (Example 11-13).
Example 11-13 SnapVault Status: Restore completed
itsotuc4> snapvault status
Snapvault secondary is ON.
Source Destination State Lag Status
9.11.218.114:/vol/vol_vm_pri/qt_vm_pri itsotuc4:/vol/vol_vm_vault2/qt_vm_vault2 Snapvaulted 04:27:37 Idle
itsotuc4:/vol/vol_vm_vault2/qt_vm_vault2 itsotuc1:/vol/vol_vm_pri/qt_rest1 Source 04:13:36 Idle
itsotuc4>
11.7.3 Restoring a previous backup
You saw how to restore from the most recent SnapVault backup that exists on the secondary system in 11.7, “Restoring SnapVault snapshots” on page 210. To restore from a previous backup version, enter the following command:
snapvault restore -s <secondary_snapname> -S <secondary>:<secondary_qtree> <destination_qtree>
Here is how to find the secondary snapshot name for the volume where the required Qtree is on the secondary system. In FilerView on the secondary system, select Volumes → Snapshots → Manage. The name must be the name that you gave the snapshot on the secondary SnapVault schedule. It must be appended with a number to show which retained version it is, where the numbers start from zero. For example, the most recent version is 0, the previous backup was 1. The command shown in Example 11-14 restores the third most recent backup from the secondary system to a different volume from the original.
Example 11-14 Restoring a previous SnapVault backup
itsotuc1> snapvault restore -s 8_hourly.2 -S 9.11.218.238:/vol/vol_vm_vault2/qt_vm_vault2 /vol/vol_vm_rest/qt_rest1
Restore from 9.11.218.238:/vol/vol_vm_vault2/qt_vm_vault2 to /vol/vol_vm_rest/qt_rest1 started.
Monitor progress with the 'snapvault status' command.
Abort the restore with ^C.
Made qtree /vol/vol_vm_rest/qt_rest1 writable.
Restore to /vol/vol_vm_rest/qt_rest1 completed successfully.
itsotuc1>
11.7.4 Mapping the LUN
After the restore is completed, the restored LUNs are displayed in the new Qtree on the primary system. You must map the required LUNs to allow them to be accessed by the VMware host.
Follow the instructions provided in 10.2.2, “Configuring the cloned LUN to be accessed” on page 183to map the LUNs.
11.7.5 Mounting a restored image in the VMware host
After the LUN is mapped, rescan the adapters on the VMware hosts, as explained in 10.2.2, “Configuring the cloned LUN to be accessed” on page 183. The data is now accessible. Depending on the restoration you require, perform one of the following actions:
•Start the restored guests from the restored location:
a. Check that the original guests are no longer running, or stop them.
a. Open the recovered datastore on an ESXi host.
b. Add each guest to the inventory.
c. Start the recovered guests.
•Copy the required guests across to an existing datastore:
a. Open the original and restored datastores in vCenter.
b. Copy the required guest folders from the restored datastore to the original datastore.
c. Start the guests in the original datastore.
d. Delete the restored Qtree with data.
•Temporarily mount a guest to recover individual guest files:
a. Connect the .vmdk file of the restored datastore to a temporary guest.
b. Copy the required files from the restored .vmdk to the original guest.
c. Disconnect and remove the restored Qtree with data.
..................Content has been hidden....................
You can't read the all page of ebook, please click here login for view all page.