
8. Working with Pages
In This Chapter
- Learn how to manually insert a page break to start on a new page.
- Switch to a different paper size or orientation.
- Learn how to subdivide a page into multiple sections.
- Discover how to include page numbers, headers, and footers in your documents.
- Use the Suppress and Delay Codes features to prevent certain page elements from printing.
- Add some punch with a plain or fancy border around a page.
- Use Make It Fit to shrink or expand a document into a certain number of pages.
In previous chapters, you learned how to format sections of selected text and paragraphs. This chapter deals with formatting that you apply to the entire page. Features such as headers and footers, page numbers, and borders are applied to a whole page, not just a section of a page.
In those situations in which you don’t want these elements included on a page, you can use the Suppress and Delay Codes features. For example, you might want the title page included in the page count, but you don’t want to print a page number at the bottom of the title page.
Inserting a Page Break
You’ve probably already noticed that WordPerfect creates a new page for you whenever you fill up the current one. It happens automatically, so you don’t even have to think about it. However, there are situations when you want to create a new page even though you haven’t filled up the current page. Title pages come to mind, and so do headings that you want to place at the beginning of a new page.
To create a new page, you insert a page break on the current page. This type of page break is known as a hard page. The new page that WordPerfect creates for you is called a soft page.
 Tip
TipIn a long document, you might decide to precede a major section with a hard page break so that each section begins on a new page. If, during heavy revisions, these hard pages get moved around to the wrong places, use Find and Replace to quickly strip out all the hard page codes (or only the ones that you don’t need anymore).
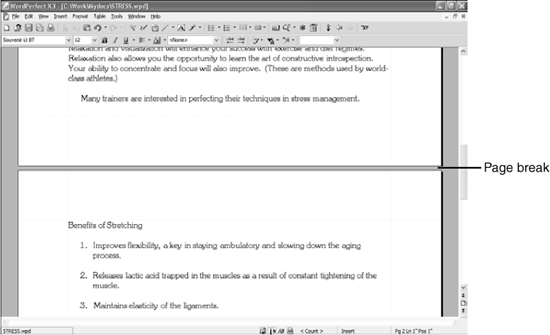
To insert a hard page break, press Ctrl+Enter. In Page view mode, you will see a gray space between the two pages (see Figure 8.1). In Draft view mode, a page break displays as a horizontal double line.
Figure 8.1 In Page view mode, a representation of the printed page is displayed, so you can see the space between pages.
When you insert a page break, a hard page code [HPg] is inserted in the document. To remove a page break, delete the [HPg] code using one of the following methods:
- Click at the end of the paragraph, just before a page break, and press Delete.
- In the Reveal Codes window, if the red cursor is to the left of a code, press Delete; if the red cursor is to the right of a code, press Backspace.
- You also can click and drag a code out of the Reveal Codes window to delete it.
Changing Paper Size and Orientation
By default, the paper size in the U.S. version of WordPerfect is 8 1/2 inches by 11 inches (other countries have different standards for paper size). Text is formatted in portrait orientation, which means that the paper is taller than it is wide. Think of a portrait photograph.
If you create only standard business documents, you might never switch to a different paper size. However, when you need to create an envelope, print on legal-size paper, or rotate a document to landscape orientation, you switch to a different paper size.
To change to a different paper size
- Choose Format, Page, Page Setup, or choose File, Page Setup.
- If necessary, click the Page Setup tab to display the paper sizes available for the current printer (see Figure 8.2).
Figure 8.2 You can choose a different paper size or switch to a different orientation in the Page Setup dialog box.
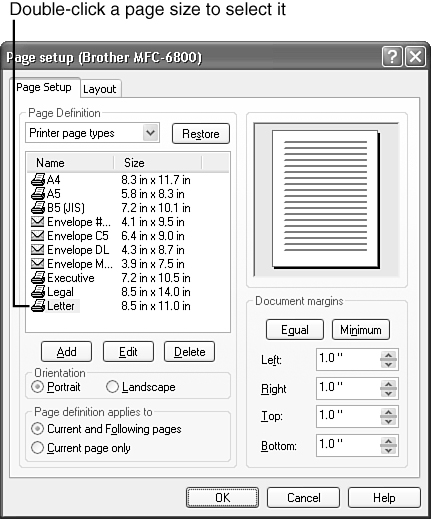
- Scroll down through the list of paper sizes and select a new paper size.
- (Optional) If you want to rotate your text into a landscape orientation, click Landscape.
- Select Current Page Only if you want to change the paper size only for the current page, or select Current and Following Pages to apply the change to the current page and the rest of the document.
- Click OK when finished.
 Note
NoteRemember that being able to print on different sizes of paper depends on the printer you are using. Some printers can accommodate a wide variety of different types of paper, but others are fairly restrictive.
Subdividing Pages
A single physical page can be subdivided into multiple logical pages. Let’s say that you need to design some invitations to a reception, and you want to print four of them on an 8 1/2×11-inch piece of card stock. You would subdivide the page into four logical pages—each with a copy of the invitation. Another example might be a notice that you want to distribute to your child’s classroom. I usually put two notices on a page so that I can quickly tuck the notice into their folders. In this case, you would divide the page in half, so you can place one notice on the top and one on the bottom.
The physical page maintains the original dimensions of the paper. Logical pages are pieces of the physical page, but they are still considered individual pages for purposes of page numbering. For example, if you subdivide a page into six logical pages and then turn on page numbering, the logical pages are numbered 1 through 6. The Labels feature uses the same concept to separate a sheet of paper into individual labels.
To subdivide a page
- Choose File, Page Setup or Format, Page, Page Setup.
- Click the Layout tab, and then take a look at the Divide page section (see Figure 8.3).
Figure 8.3 By default, the number of columns and rows is set to 1.
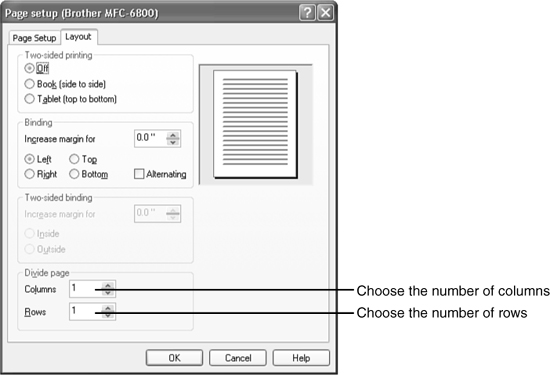
- Choose the number of columns and rows by either typing in the number or clicking the spinner arrows. The sample page illustrates how the paper will be subdivided.
- Before you click OK, click the Page Setup tab and look at the margin settings. WordPerfect uses the current margins for each logical page, so if you keep the default 1-inch margins, you will have a 1-inch border around each logical page that you won’t be able to use. That’s a lot of wasted space.
- Click the Minimum button to quickly set the margins to the minimum allowed by your printer.
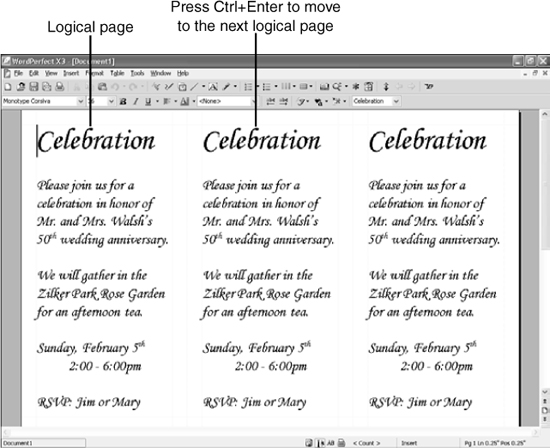
- Click OK. Figure 8.4 shows the first logical page in a subdivided page. To move to the next page, press Ctrl+Enter.
If you are creating invitations or announcements, it’s common practice to center the text on the page. Because each section is a logical page, you format it just as if it were a full-size page. Click in the logical page that you want to center and then choose Format, Page, Center. Choose Current Page if you want to center only the current page, or choose Current and Subsequent Pages to center all the pages from this point forward.
Figure 8.4 Each logical page can be formatted as a separate page. In this example, a total of three logical pages are in one physical page.
When you divide the current page, it affects all following pages in the document. To switch back to a single physical page, you will have to go back into the Page Setup dialog box and set the rows and columns back to 1. Be sure the insertion point is at the top of the page that you want to switch back to, or you might accidentally revert a subdivided page back to a single physical page. If this happens, each subdivided page becomes a physical page, so you won’t lose your text; it just gets spread out. Choose Undo to get things back the way they were.
To go back to a single physical page
- Choose File, Page Setup.
- Click the Layout tab.
- Choose 1 in the Columns text box and 1 in the Rows text box.
- Click OK.
Adding Page Numbers
Page numbers should be used on virtually every document longer than 4–5 pages. Page numbers help us keep our places when we are reading, not to mention saving our reputations when we drop a stack of printouts on the office floor.
WordPerfect’s page number feature has some depth to it. You can start by inserting page numbers at the bottom of every page and progress to creating customized page numbers using chapter and volume numbers. This book covers most of the page numbering features, but if you want more information on the complex uses for page numbering, you should refer to the WordPerfect Help topics.
Inserting Page Numbers in a Preset Position
The quickest way to add page numbers is to choose from the 10 different predefined locations where page numbers can be inserted. WordPerfect inserts the code for the page number and keeps the page numbers updated, no matter how many changes you make to the document.
To insert a page number
- Move to the page where you want the numbering to start.
- Choose Format, Page, Numbering to display the Select Page Numbering Format dialog box.
- Open the Position drop-down list to open the list of positions that you can choose from (see Figure 8.5).
Figure 8.5 The quickest way to insert a page number is to choose one of the predefined page number positions.
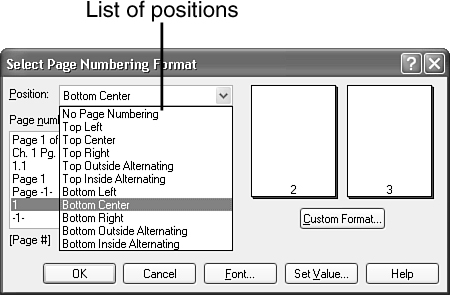
- Select a page number position from the list.
- Click OK to insert a basic page number that starts on the current page and continues through the rest of the document. Figure 8.6 shows a document with simple page numbers at the bottom center of the page.
If you don’t want the page number to appear on the first page (or on any other page), see the section titled, “Using the Suppress Feature,” later in this chapter.
Page numbers are printed on the top or bottom line in the text area of the page, not in the margin space. WordPerfect inserts a blank line to separate the page number from the rest of the document text. This reduces the amount of text that would normally fit on the page by two lines. If you decrease your top or bottom margin (depending on where you put the page numbers) to approximately 2/3 inch, you can regain the lost space, and the page numbers will appear to print in the margin space.
Figure 8.6 The most common page-numbering scheme is to position the number at the bottom center of every page.

That’s the quick way to insert a page number. If you want to get a little fancier, there are plenty of other page-numbering options to choose from:
- Page numbering format list—Choose from the list to select a different format for the page numbers, such as letter and Roman number styles.
- Font—Open the Page Numbering Font dialog box, where you can choose a font, font size, color, or attributes for the page number.
- Custom Format—Open the Custom Page Numbering dialog box. From here, you can create a combination page number style that can include the volume number, chapter number, or secondary page number. You can also create a customized “page x of y” page number style that includes a volume or chapter number.
- Set Value—Open the Values dialog box, where you can type the new number to use for any of the page numbering components. This is also where you can reset page numbering by setting the page number back to 1.
A “page x of y” page number tells you the number of the current page (x) and the total number of pages in the document (y). To create a “page x of y” page number; select Page 1 of 1 in the Page numbering format list box.
Frequently, different numbering styles are used for the introductory pages, the body of the document, and the closing sections. This is easily accomplished in WordPerfect. Select the format for the page numbers at the top of the document, again at the main body, and then again at the closing section. While you’re switching to a different number format, you can restart the page numbering at the same time.
Inserting Page Numbers Manually
Although there is plenty of flexibility in the 10 predefined page number positions, you’re not limited to them. You can insert a page number anywhere in the document. You might, for example, want to refer to the current chapter number within the text. Or you might want to insert a chapter or volume number directly into a title.
 Caution
WordPerfect uses the font set in the Document Initial Font dialog box for page numbers. This might or might not match the font that you selected in the document. There are two ways to synch the fonts. You can set the font that you want for the body text and the page number in the Document Initial Font dialog box (by choosing File, Document, Default Font). Or, choose a font in the Page Numbering Font dialog box that matches the one you’ve used in the document.
To insert a page number elsewhere in a document
- Position the insertion point where you want the page number to appear.
- Choose Format, Page, Insert Page Number. The Insert Page Number dialog box appears with options for inserting primary and secondary page numbers, chapter and volume numbers, and the total pages number (see Figure 8.7).
Figure 8.7 Use the Insert Page Number dialog box to insert a page number anywhere in a document.
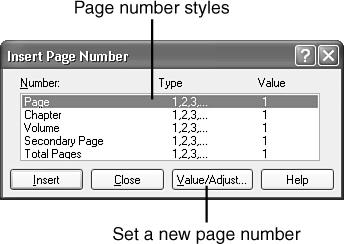
- Choose the type of number that you want to insert.
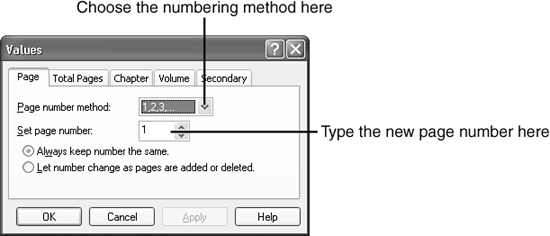
- (optional) Click Value/Adjust to open the Values dialog box, where you can change to a different page number method (numbers, letters, or Roman numerals) or set the page number (see Figure 8.8). Click Apply and then click OK when you’re finished.
Figure 8.8 Choose a different numbering method in the Values dialog box.
- Click Insert (in the Insert Page Number dialog box). The number is inserted at the insertion point.
- Continue inserting numbers as needed: Click in the document window and reposition the insertion point; then click in the dialog box to make it active again. Choose another number type, and then click Insert.
- Click Close when you’re finished inserting page numbers.
Adding a Header or Footer
Headers are used for inserting information that you want printed at the top of every page; footers are for information that you want printed at the bottom of every page. Headers and footers can contain page numbers, titles, the filename, revision dates, the author’s name, or any other information about the document.
Creating a Header or Footer
Generally, you need to create the header or footer on the page where you want it to start. On pages where you don’t want the headers and footers to print (such as the title page, first page of a letter, and so on), you can suppress the header and footer by selecting it in the Suppress dialog box. You can also use Delay Codes to postpone the effect of a formatting code.
1. Position the insertion point on the page where you want the header or footer to appear.
2. Choose Insert, Header/Footer to open the Headers/Footers dialog box (see Figure 8.9).
Figure 8.9 In the Headers/ Footers dialog box, Header A is already selected.
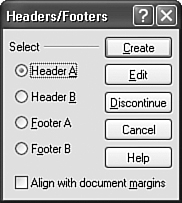
3. Click the button for the header or footer you want to create.
4. Click Create. What happens next depends on which view mode you’re using. Either way, the property bar now has some handy buttons you can use:
• In Page view mode, the insertion point moves up to the top of the page, within the header guidelines (see Figure 8.10).
• In Draft view mode, the insertion point moves to a separate header/ footer-editing window. You won’t be able to see the document text, only the text of the header as you type it.
Figure 8.10 In Page view mode, you create and edit the header or footer onscreen, not in a separate window, as with Draft view mode.
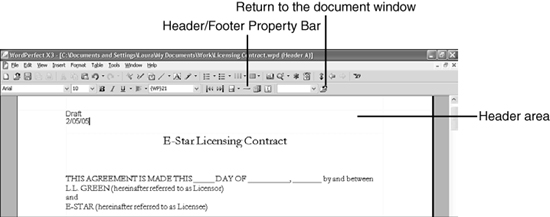
5. Type the text of the header or footer. Using the menus, add the necessary graphics, tables, and other formatting elements. (Features that can’t be used in a header or footer are grayed out on the menus.)
![]()
6. Click the Close button, or press Ctrl+F4, to switch back to the document window. If you are in Page view, you can click in the body of the document.
If you are working in Page view mode, you will see the header or footer text onscreen with the rest of the document text. In Draft view mode, you won’t see header or footer text unless you edit the header or footer.
Working with Headers and Footers
For the most part, it’s faster to create a new document by revising an existing document, especially if a lot of specific formatting is involved. If you’re doing this, be sure that you edit the header or footer to reflect the changes in the document.
To edit a header or footer
- Choose Insert, Header/Footer.
- Select the appropriate header or footer from the Headers/Footers dialog box.
- Click Edit.
WordPerfect automatically inserts a blank line between the document text and the header or footer. Don’t insert a blank line in the header or footer unless you want to increase the distance to two lines.
Because headers and footers are printed within the text area of a page, you should decrease the margins to allow more space for the body text. It’s more attractive to pull the header or footer into the margin space. Be sure to change the margins in the DocumentStyle (choose File, Document, Current Document Style), or your changes won’t affect the placement of the headers and footers. In fact, any formatting codes that you want to apply to headers and footers, as well as the body text, should be inserted in the DocumentStyle rather than in the document itself.
As you continue to work with headers and footers, take note of the header/footer buttons on the property bar:
- Click the Header/Footer Prev button to move to the previous header or footer.

- Click the Header/Footer Next button to move to the next header or footer.

- Click the Page Numbering button to insert page numbers. A drop-down list of options appears, so you can select the type of page number you want to insert.

- Click the Horizontal Line button to insert a graphic line in the header or footer.

- Click the Header/Footer Placement button to open the Header or Footer Placement dialog box (see Figure 8.11). The default is to print the header or footer on every page.

Be sure the insertion point is on a blank line when you click the Horizontal Line button; otherwise, the graphics line will land right on top of your text.
Figure 8.11 Specify on which pages you want the header or footer to print in the Placement dialog box.

- Click the Header/Footer Distance button, and then type the distance that you want between the header or footer and the body text in the Distance dialog box (see Figure 8.12).

Figure 8.12 You can adjust the space between the header (or footer) and the text in the Distance dialog box.

Suppressing and Delaying Formatting
There are distinct advantages to placing all the formatting codes at the top of your documents. For one, it’s much harder to accidentally delete a code that is at the very top of a document (versus at the top of any page). Another advantage is that everything is all in one place, and you don’t have to go hunting around for a code.
So, you put all the codes at the top of the document, and they take effect on the first page. Fabulous! Except for one thing. You don’t want the header and footer to print on the title page. So, how do you keep your codes at the top of the document, and keep the header and footer from printing? By using Suppress and Delay Codes.
Using the Suppress Feature
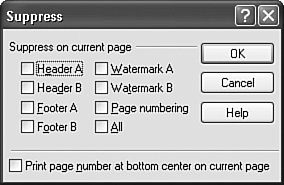
The Suppress feature is designed to prevent headers, footers, watermarks, and page numbers from printing on a particular page. Suppress is frequently used to keep these items from printing on a title page. Simply place a Suppress code at the top of every page on which you don’t want a header, footer, page number, or watermark to print and let WordPerfect take care of the rest!
To suppress a header, footer, page number, or watermark
- Move to the page where you want to suppress the element.
- Choose Format, Page, Suppress. The Suppress dialog box opens (see Figure 8.13).
- Click the check box next to the elements that you want to suppress, or click the check box next to All to select all the elements at one time.
- Click OK.
Figure 8.13 In the Suppress dialog box, choose the page elements you do not want to print on the current page.
Inserting a Delay Code
The Delay Codes feature is used to postpone the effect of formatting changes for a specified number of pages. Delay Codes are used when you want to skip more than one page (such as skipping past the table of contents, preface, or other introductory material before printing headers, footers, or page numbers).
To create a Delay Code
- Choose Format, Page, Delay Codes. The Delay Codes dialog box appears (see Figure 8.14).
Figure 8.14 Type the number of pages that you want to skip in the Delay Codes dialog box.
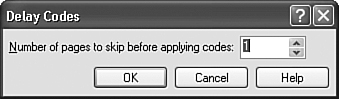
- Type the number of pages in the Number of Pages to Skip Before Applying Codes text box (or click the spinner arrows to select the number).
- Click OK to switch to the Define Delayed Codes editing window.
- Use the menus or the buttons on the feature bar to insert the necessary formatting codes (see Figure 8.15).
Figure 8.15 You can postpone the action of many formatting codes by placing them in delay codes.
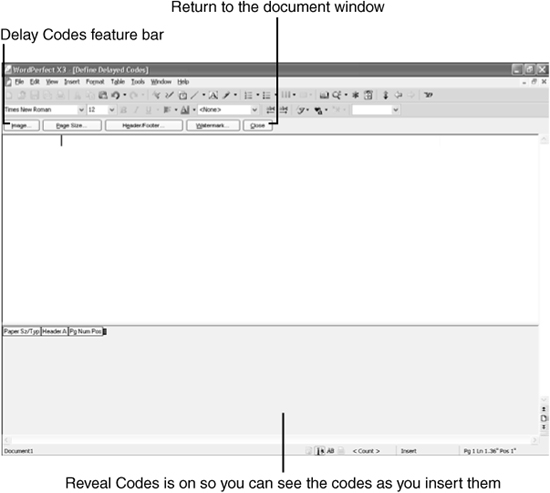
- Click the Close button to return to the document window.
Even if the insertion point is in the middle of a page, WordPerfect places this Delay Code at the top of the page: [Delay: #]. The # represents the number of pages you want to skip. (WordPerfect calculates the number of pages to skip based on physical pages, not page numbers.) If your insertion point is on page 5 and you set a Delay Code to skip 3 pages, the code [Delay: 3] is inserted at the top of page 5. On the page where the formatting takes effect, a [Delay Codes] code that contains the actual codes is inserted at the top of that page. Move the red Reveal Codes cursor to the left of this code to expand the code and reveal the codes within.
You might consider putting Delay Codes in the default document style (DocumentStyle) so that they are safe from accidental deletion. The DocumentStyle code is the very first code in a document. To edit the DocumentStyle, turn on Reveal Codes and double-click the [Open Style: DocumentStyle] code at the top of the document. Or choose File, Document, Current Document Style.
The key to understanding the Delay Code feature is recognizing that you are actually inserting formatting codes into a code, not in the document. If you create Header B in a Delay Code, you can’t edit that code from the document window; you can only create another Header B. The two headers are independent of each other. In fact, the header/footer that you create in a Delay Code will override the header/footer that you create in the document.
To adjust the formatting in a Delay Code, you must edit the Delay Code by turning on Reveal Codes and double-clicking the [Delay: #] code.
Adding Borders Around Pages
WordPerfect comes with a nice collection of decorative borders that you can place around a page. These ready-to-use designs are perfect for announcements, invitations, and a variety of presentation materials. Some of the designs can be used to create your own decorative paper.
There are two types of borders: line and fancy. The line borders are more formal, but they are also more versatile. There are 32 predefined line borders to choose from, and because you can edit these predefined borders to change the color and the line style, the possibilities are endless.
To add a border around the page
1. Move to the page where you want to add a border.
2. Choose Format, Page, Border/Fill. The Page Border/Fill dialog box opens (see Figure 8.16).
Figure 8.16 In the Page Border/Fill dialog box, you can choose the border that you want to place around the page.
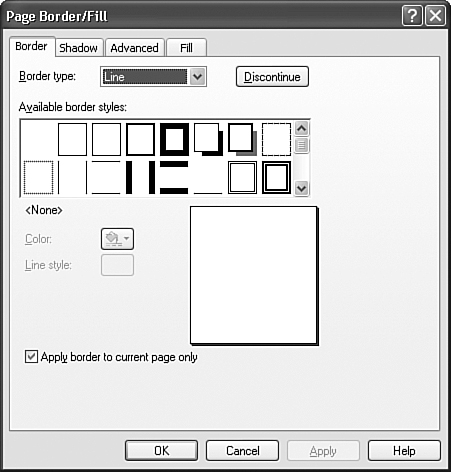
3. Scroll through the Available Border Styles list box to see all the predefined borders; then select a border. After you’ve chosen a border, you have the following options:
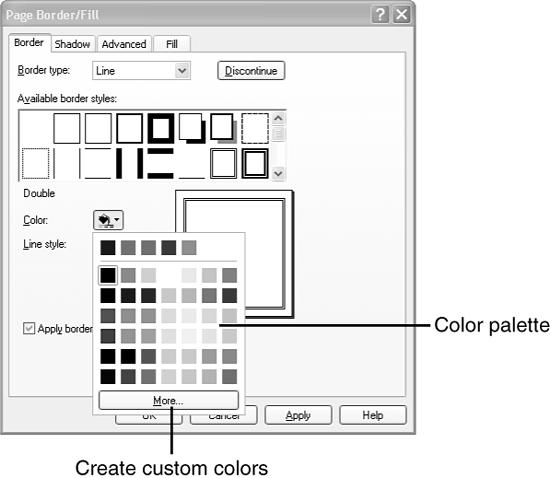
• You can change the color of the border. Click the Color button, and then click a color swatch on the palette (see Figure 8.17).
Figure 8.17 You can choose any color from this palette to add color to a page border.
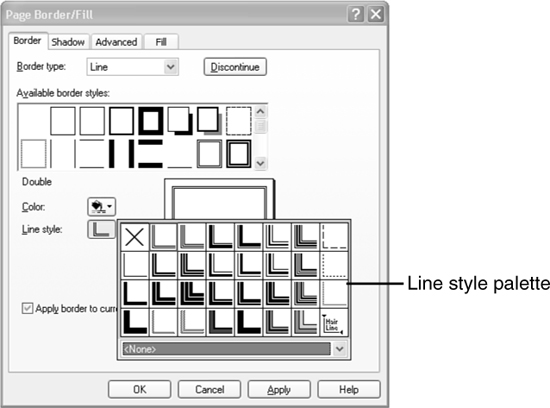
• You can change the line style used in the border. Click the Line Style button, and then click a line style from the palette (see Figure 8.18).
Figure 8.18 You can choose a line style from this palette for the page border.
• By default, Apply Border to Current Page Only is selected. Disable this option if you want the border to be applied to the current page and all other pages in the document.
• To remove a page border, click in the page; choose Format, Page, Border/Fill to open the Page Border/Fill dialog box; and click the Discontinue button.
When you create a border using the line styles, WordPerfect automatically allows space between the text and the border, which is positioned on the margins. A fancy border can overwrite the text, so you might have to make some adjustments to the margins.
The line borders are the “serious” borders. The fun borders are called “fancy” borders. There are 36 to choose from. Fancy borders are automatically applied to the current page and the following pages. You can remove a fancy border from the current and following pages by choosing Discontinue in the Page Border/Fill dialog box. To give you an example, suppose you create a 10-page document and want to apply the fancy border to the first three pages only. To accomplish this, you would click on page 1 and apply the border. Then, you would scroll down and click on page 4 so you can open the Page Border/Fill dialog box, and choose Discontinue.
To select a fancy page border
- Choose Format, Page, Border/Fill.
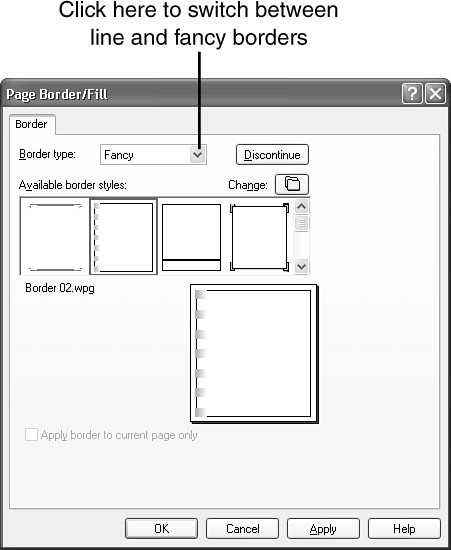
- Open the Border Type drop-down list and choose Fancy. The list of fancy borders appears in the Available Border Styles window (see Figure 8.19). A preview of the selected border shows you how a page will look with the border.
Figure 8.19 There are 36 different fancy borders to choose from in the Page Border/Fill dialog box.
Using the Make It Fit Feature
It happens to the best of us. You’ve just finished a carefully thought-out memo, and you’re ready to send it off. However, when you print it, you notice that the last two lines of the memo have spilled over to the second page. Ack! You really need to get it down to one page, so you sit down to play around with the margins and font size.
Stop! There is a feature that can do this for you, in just seconds. Make It Fit makes text fit in the number of pages that you specify—within reason, of course. You can’t make one page of text stretch out into three pages, and you can’t take three pages of text and expect to squeeze it into one page. The number of pages that you specify must be at least 50% of the current size.
You can use Make It Fit on selected text or on the entire document; so if you want to work on only a section of text, select it first.
To use Make it Fit on your document
- Choose Format, Make It Fit to open the Make It Fit dialog box (see Figure 8.20). If you selected text, the Top and Bottom margin options won’t be available.
Figure 8.20 Make It Fit adjusts margins, font size, and line spacing to resize a document so that it fits within a certain number of pages.
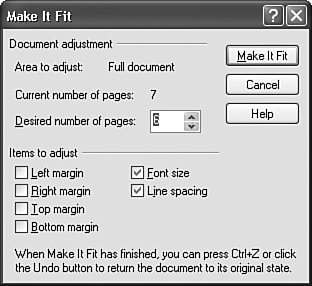
- Take a look at the current number of pages, and then type the number of pages that you want to fill in the Desired Number of Pages text box.
- Select the options that you want Make It Fit to use to reformat the text.
- Click Make It Fit.
If you have hard page codes in the document, you will get a message to warn you that these codes might affect how well the document is formatted.