
The CGI.pm module makes it much easier to produce HTML code from CGI scripts written in Perl. If your goal is to produce self-contained CGI applications that include both the program logic and the interface (HTML), then CGI.pm is certainly the best tool for this. It excels for distributable applications because you do not need to distribute separate HTML files, and it’s easy for developers to follow when reading through code. For this reason, we use it in the majority of the examples in this book. However, in some circumstances, there are good reasons for separating the interface from the program logic. In these circumstances, templates may be a better solution.
HTML design and CGI development involve very different skill sets. Good HTML design is typically done by artists or designers in collaboration with marketing folks and people skilled in interface design. CGI development may also involve input from others, but it is very technical in nature. Therefore, CGI developers are often not responsible for creating the interface to their applications. In fact, sometimes they are given non-functional prototypes and asked to provide the logic to drive it. In this scenario, the HTML is already available and translating it into code involves extra work.
Additionally, CGI applications rarely remain static; they require maintenance. Inevitably, bugs are found and fixed, new features are added, the wording is changed, or the site is redesigned with a new color scheme. These changes can involve either the program logic or the interface, but interface changes are often the most common and the most time consuming. Making specific changes to an existing HTML file is generally easier than modifying a CGI script, and many organizations have more people who understand HTML than who understand Perl.
There are many different ways to use HTML templates, and it is very common for web developers to create their own custom solutions. However, the many various solutions can be grouped into a few different approaches. In this chapter, we’ll explore each approach by looking at the most powerful and popular solutions for each.
One thing we won’t do in this chapter is present a novel template parser or explain how to write your own. The reason is that there are already too many good solutions to warrant this. Of the many web developers out there who have created their own proprietary systems for handling templates, most turn to something else after some time. In fact, one of your authors has experience doing just this.
The first custom template system I developed was like SSI but with control structures added as well as the ability to nest multiple commands in parentheses (commands resembled Excel functions). The template commands were simple, powerful, and efficient, but the underlying code was complicated and difficult to maintain, so at one point I started over. My second solution included a hand-coded, recursive descent parser and an object-oriented, JavaScript-like syntax that was easily extended in Perl. My thinking was that many HTML authors were comfortable with JavaScript already. I was rather proud of it when it was finished, but after a few months of using it, I realized I had created an over-engineered, proprietary solution, and I ported the project to Embperl.
In both of my attempts, I realized the solutions were not worth the effort required to maintain them. In the second case, the code was very maintainable, but even minor maintenance did not seem worth the effort given the high-quality, open source alternatives that are already tested, maintained, and available for all to use. More importantly, custom solutions require other developers and HTML authors to invest time learning systems that they would never encounter elsewhere. No one told me I had to choose a standard solution over a proprietary one, but I discovered the advantages on my own. Sometimes ego must yield to practicality.
So consider the options that are already available and avoid the urge to reinvent the wheel. If you need a particular feature that is not available in another package, consider extending an existing open source solution and give your code back if you think it will benefit others. Of course, in the end what you do is up to you, and you may have a good reason for creating your own solution. You could even point out that none of the solutions presented in this chapter would exist if a few people hadn’t decided they should create their own respective solutions, maintain and extend them, and make them available to others.
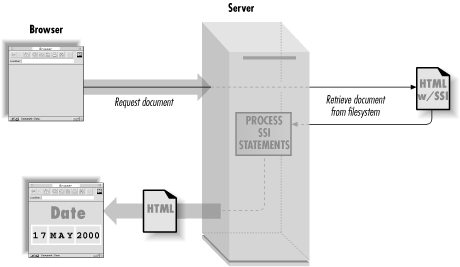
Many times we want to create a web page that contains very little dynamic information. It seems like a lot of work to go through the trouble of writing a full-fledged application in order to display a single piece of dynamic information such as the current date and time, file modification time, or the user’s IP address, in an otherwise static document. Fortunately, there is a tool included with most web servers called Server Side Includes , or SSI.
SSI allows us to embed special directives in our HTML documents to execute other programs or insert various pieces of data such as environment variables and file statistics. While SSI has technically nothing to do with CGI, it is an important tool for incorporating dynamic information, as well as output from CGI programs, into otherwise static documents, and you should definitely be aware of its abilities and limitations because in some cases it can provide a simpler and more efficient solution than a CGI script.
For example, say you want to have a web page display the
last date it was modified. You could
create a CGI script to display the file and use Perl’s
-M
operator to determine the age of the
file. However, it’s much simpler to enable SSI and include the
following line:
Last modified: <!--#echo var="LAST_MODIFIED" -->
The terms within the HTML comment are an SSI command. When the browser requests this document from a web server, the server parses it and returns the result (see Figure 6.1). In this case, it replaces the SSI command with a timestamp reflecting the last time this document was modified. The server does not automatically parse all files looking for SSI directives, but only documents that are associated with SSI. We will look at how to configure this in the next section.
Note
Note that SSI cannot parse CGI output; it only parses otherwise static HTML files. The new architecture in Apache 2.0 should eventually support SSI parsing of CGI output if the CGI outputs a particular Content-type header. Other web servers do not support this.
Because the SSI engine is compiled into the web server, it is many times more efficient than a CGI script. However, SSI commands are limited and can only handle basic tasks; in one sense this simplicity is good because SSI is very easy to learn. HTML designers with no programming experience can easily add SSI commands to their documents. Later in this chapter we’ll see how other template solutions provide more powerful alternatives aimed at developers.
The server must know which files to parse for SSI commands. We’ll see how to configure the Apache web server in this section. If you are using another web server, it should be equally easy to configure; refer to its documentation.
You have the following options with SSI:
You may configure the web server to only recognize SSI documents in a particular directory or directories or throughout the entire site.
You can configure the web server to parse all HTML documents for SSI commands or just documents with a particular extension (typically .shtml ).
You can set whether SSI commands have the ability to execute external programs in order to generate their output. This can be useful, but it can also be a security risk.
To enable SSI for a particular directory or
directories, add
Includes as an option in each directory. If you
wish to enable SSI throughout your web site for all files ending in
.shtml, then add the following to
httpd.conf (or access.conf
if used):
<Location />
...
Options     Includes
AddHandler  server-parsed .shtml
...
</Location>
Note that your configuration files probably have other lines between
the <Location /> and </Location> tags as well as other
entries for Options; you can leave these as they
are.
You are not restricted to using the .shtml extension; you can have the server parse all HTML documents with this directive:
AddHandler server-parsed .html
However, you should do this only if all of your pages are dynamic because parsing each HTML document increases the amount of work the web server must do and reduces performance.
You should also add the following lines to
httpd.conf
outside any
Location or Directory tags (or
srm.conf, if used):
DirectoryIndex   index.html index.shtml
AddType          text/html     .shtml
The DirectoryIndex directive tells the server that
if the URL refers to a directory and that directory contains
index.shtml, then it should display it if
index.html is not found. The
AddType server directive tells the server that the
media type of parsed files is HTML instead of the default, which is
typically plain text.
We’ll look at the syntax of SSI commands in a moment, but one particular SSI command, exec, allows you to execute external applications and include the output in your document. You may not wish to enable this for security reasons; you may not wish to give HTML authors the same level of trust in this regard that you give to CGI developers. Also, if you do enable exec and you have a CGI script on your site that creates static HTML files from users’ input (as some popular guestbook and message board CGI scripts do), make sure that SSI is not enabled for files created by this CGI script. If someone using this CGI script enters the following and SSI tags are not removed by the CGI application, then their malicious command will be executed the first time their comment is read:
<!--#exec cmd="/bin/rm -rf *" -->
This would remove all the files from all the directories the server can write to. The following could be just as disastrous on a Windows server:
<!--#exec cmd="del /f /s /q c:" -->
Most CGI scripts that generate files such as this create them with a .html extension, so you would not want to enable exec and configure the web server to parse all .html files. Note that this is not as much of a concern if CGI scripts are not allowed to generate .html files.
To enable SSI without enabling the
exec tag, use the following option instead of
Includes:
Options IncludesNoExec
Older versions of Apache and other web servers actually required that the CGI script execution also be enabled in order to use the exec command:
Options Includes ExecCGI
As you’ll recall from Chapter 1, there are good reasons to restrict CGI scripts to particular directories. Previously you had to choose between enabling CGI script execution and disallowing the exec command. Fortunately, this restriction has been lifted: you can now enable the exec command while disallowing CGI execution.
Now let’s see what SSI can do for us. All SSI directives have the following syntax:
<!--#element attribute="value" attribute="value" ... -->
Table 6.1 lists the available SSI commands. In this chapter, we will discuss each of these directives in detail.
Table 6-1. Server Side Include Commands
|
Element |
Description | |
|---|---|---|
|
var |
Displays the value of environment variables, special SSI variables and any user-defined variables. | |
|
Inserts the contents of a particular file into the current document | ||
|
file |
Path of the file relative to the current directory, you cannot use an absolute path or reference files outside the document root; the file contents are included directly into the page with no additional processing. | |
|
virtual |
Virtual path (URL) relative to the document root; the server interprets the path just as if it were another HTTP request, so you can use this attribute to insert the results of a CGI program or another SSI document. | |
|
Inserts the size of a file. | ||
|
file |
Path of the file relative to the current directory. | |
|
virtual |
Virtual path (URL) relative to the document root. | |
|
file |
Inserts the last modification date and time for a specified file. | |
|
Executes external programs and inserts the output in current document
(unless SSI has been configured with
| ||
|
cmd |
Path to any executable application relative to the current directory. | |
|
cgi |
Virtual path to a CGI program; however, you
cannot pass a query string—if you want to
pass a query string, use | |
|
Displays a list of environment variables and their values. | ||
|
var |
Sets the value for a new or existing environment variable; the variable only lasts throughout the current request (but it is available to CGI scripts or other SSI documents included in this document). | |
|
expr |
Starts conditional. | |
|
Starts the “else” part of the conditional. | ||
|
Ends conditional. | ||
|
Modifies various aspects of SSI. | ||
|
errmsg |
Default error message. | |
|
sizefmt |
Format for size of the file. | |
|
timefmt |
Format for date and time. |
You can insert the values of environment variables in an otherwise static HTML document. Here is an example of a document that will contain the server name, the user’s remote host, and the current local date and time:
<HTML>
<HEAD>
    <TITLE>Welcome!</TITLE>
</HEAD>
<BODY>
<H1>Welcome to my server at <!--#echo var="SERVER_NAME"-->...</H1>
<HR>
Dear user from <!--#echo var="REMOTE_HOST"-->,
<P>
There are many links to various CGI documents throughout the Web,
so feel free to explore.
<P>
<HR>
<ADDRESS>Webmaster (<!--#echo var="DATE_LOCAL"-->)</ADDRESS>
</BODY>
</HTML>
In this example, we use
the
echo SSI
command with the var attribute to display the
IP name or address of the serving
machine, the remote host name, and the local time. All
environment variables that
are available to CGI programs are also available to SSI directives.
There are also a few variables that are exclusively available for use
in SSI directives, such as
DATE_LOCAL, which contains the current
local time. Another is
DATE_GMT, which
contains the time in Greenwich Mean Time:
The current GMT time is: <!--#echo var="DATE_GMT" -->
Here is another example that uses some of these exclusive SSI environment variables to output information about the current document:
<H2>File Summary</H2>
<HR>
The document you are viewing is:  <!--#echo var="DOCUMENT_NAME"-->,
which you can access it a later time by opening the URL to:
<!--#echo var="DOCUMENT_URI"-->.
<HR>
Document last modified on <!--#echo var="LAST_MODIFIED"-->.
This will display the name, URL, and modification time for the current HTML document.
For a listing of CGI environment variables, refer to Chapter 3. Table 6.2 shows the additional variables available to SSI pages.
Table 6-2. Additional Variables Available to SSI Pages
|
Environment Variable |
Description |
|---|---|
|
The current filename | |
|
Virtual path to the file | |
|
Unencoded query string with all shell metacharacters escaped with “” | |
|
Current date and time in the local time zone | |
|
Current date and time in GMT | |
|
Last modification date and time for the file requested by the browser |
The config command allows you to select the manner in which error messages, file size information, and date and time are displayed. For example, if you use the include command to insert a nonexisting file, the server will output a default error message like the following:
[an error occurred while processing this directive]
By using the config command, you can modify the default error message. If you want to set the message to “[error-contact webmaster]” you can use the following:
<!--#config errmsg="[error-contact webmaster]" -->
You can also set the file size format that the server uses when displaying information with the fsize command. For example, this command:
<!--#config sizefmt="abbrev" -->
will force the server to display the file size rounded to the nearest kilobyte (KB) or megabyte (MB). You can use the argument “bytes” to set the display as a byte count:
<!--#config sizefmt="bytes" -->
Here is how you can change the time format:
<!--#config timefmt="%D (day %j) at %r" -->
My signature was last modified on:
<!--#flastmod virtual="/address.html"-->.
The output will look like this:
My signature was last modified on: 09/22/97 (day 265) at 07:17:39 PM
The %D
format inserts the current date in mm/dd/yy
format, %j inserts the day of the year, and
%r the current time in hh/mm/ss
AM|PM format. Table 6.3 lists
all the data and time formats you can use.
Table 6-3. Time and Date Formats
|
Format |
Value |
Example |
|---|---|---|
|
|
Day of the week abbreviation |
Sun |
|
|
Day of the week |
Sunday |
|
|
Month name abbreviation |
Jan |
|
|
Month name |
January |
|
|
Date |
01 (not 1) |
|
|
Date as |
06/23/95 |
|
|
Date |
1 |
|
|
24-hour clock hour |
13 |
|
|
12-hour clock hour |
01 |
|
|
Decimal day of the year |
360 |
|
|
Month number |
11 |
|
|
Minutes |
08 |
|
|
AM | PM |
AM |
|
|
Time as |
07:17:39 PM |
|
|
Seconds |
09 |
|
|
24-hour time as |
16:55:15 |
|
|
Week of the year (also |
49 |
|
|
Day of the week number |
5 |
|
|
Year of the century |
95 |
|
|
Year |
1995 |
|
|
Time zone |
EST |
There are times when you will have certain information that you repeat in numerous documents on the server such as a copyright notice, the webmaster’s email address, etc. Instead of maintaining this information separately in each file, you can include one file that has all of this information. It is much easier to update a single file if this information changes (for example, you may need to update the copyright notice the beginning of next year). Example 6.1 shows an example of such a file that itself contains SSI commands (note the .shtml extension).
Example 6-1. footer.shtml
<HR>
<P><FONT SIZE="-1">
Copyright 1999-2000 by My Company, Inc.<BR>
Please report any problems to
  <A HREF="mailto:<!--#echo var="SERVER_ADMIN"-->">
  <!--#echo var="SERVER_ADMIN"--></A>.<BR>
This document was last modified on <!--#echo var="LAST_MODIFIED"-->.<BR>
</FONT></P>
It may look messy to include an SSI command within another HTML tag, but don’t worry about this being invalid HTML because the web server will parse it before it sends it to the client. Also, you may wonder if we were to include this file in another file which file the server uses to determine the LAST_MODIFIED variable. LAST_MODIFIED is set once by the server for the file that the client requested. If that file includes other files, such as footer.shtml, LAST_MODIFIED will still refer to the original file; so this footer will do what we want.
Because included files are not complete HTML documents (they have no <HTML>, <HEAD>, or <BODY> tags), it can be easier to maintain these files if you differentiate them by creating a standard extension for them or keeping them in a particular directory. In our example we’ll create a folder called /includes in the document root and place footer.shtml here. We can then include the file by adding the following line to other .shtml files:
<!--#include virtual="/includes/footer.shtml" -->
This SSI command will be replaced with a footer containing a copyright notice, the email address of the server administrator, and the modification date of the file requested.
You can also use the file attribute instead of virtual to reference the file, but file has limitations. You cannot use absolute paths, the web server does no processing on the requested file (e.g., for CGI scripts or other SSI commands), and you may not reference files outside the document root. This last restriction prevents someone from including a file like /etc/passwd in an HTML document (since it’s possible that someone is able to upload files to a server without otherwise having access to this file). Given these restrictions, it’s typically easier to simply use virtual.
You can use Server Side Includes to embed the results of an entire CGI program into a static HTML document by using either exec cgi or include virtual . This is convenient for those times when you want to display just one piece of dynamic data, such as:
This page has been accessed 9387 times.
Let’s look at an example of inserting output from CGI programs. Suppose you have a simple CGI program that keeps track of the number of visitors, called using the include SSI command in an HTML document:
This page has been accessed
<!--#include virtual="/cgi/counter.cgi"--> times.
We can include this tag in any SSI-enabled HTML page on our web server; each page will have its own count. We don’t need to pass any variables to tell the CGI which URL we need the count for; the DOCUMENT_URI environment variable will contain the URL of the original document requested. Even though this is not a standard CGI environment variable, the additional SSI variables are provided to CGI scripts invoked via SSI.
The code behind an access counter is quite short. A Berkeley DB hash file on the server contains a count of the number of visitors that have accessed each document we’re tracking. Whenever a user visits the document, the SSI directive in that document calls a CGI program that reads the numerical value stored in the data file, increments it, and outputs it. The counter is shown in Example 6.2.
Example 6-2. counter.cgi
#!/usr/bin/perl -wT

use strict;
use Fcntl;
use DB_File;

use constant COUNT_FILE => "/usr/local/apache/data/counter/count.dbm";
my %count;
my $url = $ENV{DOCUMENT_URI};
local *DBM;

print "Content-type: text/plain

";

if ( my $db = tie %count, "DB_File", COUNT_FILE, O_RDWR | O_CREAT ) {
    my $fd = $db->fd;
    open DBM, "+<&=$fd" or die "Could not dup DBM for lock: $!";
    flock DBM, LOCK_EX;
    undef $db;
    $count{$url} = 0 unless exists $count{$url};
    my $num_hits = ++$count{$url};
    untie %count;
    close DBM;
    print "$num_hits
";
} else {
    print "[Error processing counter data]
";
}
Don’t worry about how we access the hash file; we’ll discuss this in Chapter 10. Note that we output the media type. You must do this for included files even though the header is not returned to the client. An important thing to note is that a CGI program called by an SSI directive cannot output anything other than text because this data is embedded within the document that invoked the directive. As a result, it doesn’t matter whether you output a content type of text/plain or text/html, as the browser will interpret the data with the media type of the calling document. Needless to say, your CGI program cannot output graphic images or other binary data.
There are a few common errors that
you can make when using server side includes. First, you should not
forget the #:
<!--echo var="REMOTE_USER" -->
Second, do not add extra spaces between the preceding
<!-- and #:
<!-- #echo var="REMOTE_USER" -->
Finally, if you do not enclose the value of the final attribute in
quotes, you may need to insert an additional
space before the trailing -->. Otherwise, the
SSI parser may interpret those characters as part of the
attribute’s value:
<!--#echo var=REMOTE_USER-->
Generally it is simpler and clearer to use quotes.
If you make either of the first two mistakes, the server will not recognize the SSI command and will pass it on as an HTML comment. In the last case, the command will probably be replaced with an error message.
SSI is quite powerful, but it does have limitations. Its advantages are that it is efficient and simple enough for HTML designers without programming experience to use. The disadvantages are that it only has a handful of commands, and it only parses static documents. HTML::Template is a simple template parser that addresses both of these issues while still maintaining a simple interface.
HTML::Template actually has fewer commands than SSI, but because the value of its variable tags can be set to anything by a CGI script, it is more flexible. While it’s true that an SSI document can include CGI output, this becomes unwieldy if a page includes several complex components that must each execute a CGI script. HTML::Template supports complex templates with the execution of a single CGI script.
Let’s look at a very simple example that displays the current date and time. Example 6.3 shows the template file.
This is a standard HTML file with one added tag:
<TMPL_VAR NAME="current_date” >.
HTML::Template’s
commands can be formatted like standard HTML tags or as comments. The
following is also acceptable:
<!-- TMPL_VAR NAME="current_date" -->
This alternate syntax makes the commands easier to input into HTML editors that may be restrictive about the tags they allow. In order to use this template, we must create a CGI script that is the target of the request. The code for this is shown in Example 6.4.
We create a constant called TMPL_FILE that points
to the template file we will use. We then create an HTML::Template
object, assign a parameter, and output it. Most tags have a
NAME
attribute; this value of this attribute corresponds to a parameter
set by a CGI script via HTML::Template’s
param method, which (by design) works much like
CGI.pm’s param
method. In fact, you can import
parameters from CGI.pm when you create a HTML::Template
object:
my $q    = new CGI;
my $tmpl = new HTML::Template( filename  => TMPL_FILE,
                               associate => $q );
This loads all of the form parameters that your CGI script just
received; you can of course still use the param
method to add additional parameters or override those loaded from
CGI.pm.
HTML::Template’s commands are summarized in Table 6.4.
Table 6-4. Commands Available in HTML::Template
|
Element |
Attribute |
Description |
|---|---|---|
|
TMPL_VAR |
NAME="param_name" |
This tag is replaced by the value of the parameter param_name; has no closing tag. |
|
ESCAPE="HTML|URL" |
If this is set to “HTML”, then the value substituted for
this tag is HTML escaped (e.g., | |
|
TMPL_LOOP |
NAME="param_name" |
Loops over content between its opening and closing tags for each item in the array that corresponds to param_name, see below. |
|
TMPL_IF |
NAME="param_name" |
Content within this tag is omitted unless the parameter param_name is true. |
|
TMPL_ELSE |
This reverses the condition for the remaining content within a TMPL_IF or TMPL_UNLESS tag. | |
|
TMPL_UNLESS |
NAME="param_name" |
The reverse of TMPL_IF. Content within this tag is omitted unless the parameter param_name is false. |
|
TMPL_INCLUDE |
NAME="/file/path" |
Includes the contents of another file; has no closing tag. |
Only the TMPL_LOOP, TMPL_IF, and TMPL_UNLESS commands have opening and closing tags; the others are single tags (like <HR> or <BR>).
One of the most convenient features that HTML::Template offers is the ability to create loops. The previous example didn’t take advantage of this, so let’s look at a more complex example. HTML::Template requires an array of hashes for loops. It loops over each element in the array and creates variables corresponding to the hash keys. You can visualize this structure as a table, as in Table 6.5, which can be represented in Perl as an array of hashes, as in Example 6.5.
Table 6-5. A Sample Table of Data
|
Name |
Location |
Age |
|---|---|---|
|
Mary |
Minneapolis |
37 |
|
Fred |
Chicago |
24 |
|
Martha |
Orlando |
51 |
|
Betty |
Los Angeles |
19 |
|
... |
... |
... |
Example 6-5. A Perl Data Structure Corresponding to Table 6.5
@table = (
    { name     => "Mary",
      location => "Minneapolis",
      age      => "37" },
    { name     => "Fred",
      location => "Chicago",
      age      => "24" },
    { name     => "Martha",
      location => "Orlando",
      age      => "51" },
    { name     => "Betty",
      location => "Los Angeles",
      age      => "19" },
    ...
);
Example 6.6 contains a script that will display all of the standard colors available on systems that support the X Window system.
Example 6-6. xcolors.cgi
#!/usr/bin/perl -wT

use strict;
use HTML::Template;

my $rgb_file = "/usr/X11/lib/X11/rgb.txt";
my $template = "/usr/local/apache/templates/xcolors.tmpl";

my @colors   = parse_colors( $rgb_file );

print "Content-type: text/html

";
my $tmpl = new HTML::Template( filename => $template );

$tmpl->param( colors => @colors );
print $tmpl->output;


sub parse_colors {
    my $path = shift;
    local *RGB_FILE;
    open RGB_FILE, $path or die "Cannot open $path: $!";

    while (<RGB_FILE>) {
        next if /^!/;
        chomp;
        my( $r, $g, $b, $name ) = split;

        # Convert to hexadecimal #RRGGBB format
        my $rgb = sprintf "#%0.2x%0.2x%0.2x", $r, $g, $b;

        my %color = ( rgb => $rgb, name => $name );
        push @colors, \%color;
    }

    close RGB_FILE;
    return @colors;
}
This CGI script uses the rgb.txt file that is
typically found on X Window systems at
/usr/X11/lib/X11/rgb.txt. This file contains a
list of colors along with their 8-bit values for red, green, and
blue:
! $XConsortium: rgb.txt,v 10.41 94/02/20 18:39:36 rws Exp $
255 250 250	    snow
248 248 255	    ghost white
248 248 255	    GhostWhite
245 245 245	    white smoke
245 245 245	    WhiteSmoke
...
We read the red, green, and blue values and convert them to the
hexadecimal equivalent that is used on HTML pages (e.g.,
#336699). We create a separate hash for each color
with an entry for the RGB value and the name of the color. Then we
add each hash to the array @colors. We need to
pass only @colors as a parameter to
HTML::Template, which we can use as a loop variable within our HTML
template. Within the loop, we have access to the “rgb”
and “name” elements of our hashes, as shown in Example 6.7.
Example 6-7. xcolors.tmpl
<HTML>
<HEAD>
<TITLE>X11 Color Viewer</TITLE>
</HEAD>
<BODY BGCOLOR="white">
<DIV ALIGN="center">
<H1>X11 Color Viewer</H1>
<HR>
<TABLE BORDER="1" CELLPADDING="4" WIDTH="400">
<TMPL_LOOP NAME="colors">
<TR>
<TD BGCOLOR="<TMPL_VAR NAME="rgb">">
</TD>
<TD><TMPL_VAR NAME="name"></TD>
</TR>
</TMPL_LOOP>
</TABLE>
</DIV>
</BODY>
</HTML>This loop structure is flexible enough to allow us to display other forms of data, such as hashes. Example 6.8 lists a CGI script that generates all of the environment variables and their values.
Example 6-8. env_tmpl.cgi
#!/usr/bin/perl -wT

use strict;
use HTML::Template;

use constant TMPL_FILE => "$ENV{DOCUMENT_ROOT}/templates/env.tmpl";

my $tmpl = new HTML::Template( filename => TMPL_FILE,
                               no_includes => 1 );
my @env;

foreach ( sort keys %ENV ) {
    push @env, { var_name => $_, var_value => $ENV{$_} };
}

$tmpl->param( env => @env );

print "Content-type: text/html

",
      $tmpl->output;
HTML::Template has no facility for handling
hashes directly, but because it will loop
over arrays of
hashes, we build a hash for each pair in %ENV and
add it to an array, @env. We then pass a reference
to @env as a parameter to our HTML::Template
object and output the parsed file. Our template file is shown in
Example 6.9.
Note that we called param once, even though
there are three different HTML::Template tags in this file. The
var_name and var_value
variables were set because they corresponded to hash keys within the
@env array.
HTML::Template offers two ways to create a conditional just like Perl: TMPL_IF and TMPL_UNLESS. You can use these to include or omit particular portions of your HTML template. Both tags take a NAME attribute that corresponds to a parameter, just like previous tags, which is evaluated in a boolean context. There is no way to create expressions to evaluate within your templates, since the goal is to keep templates simple. Note also that you do not always have to set a separate parameter in order to use these tags. For example, you could include a block like this in your document:
<TMPL_IF NAME="secret_msg" >
  <P>Psst, here's your secret message: <TMPL_VAR NAME="secret_msg">.</P>
</TMPL_IF>
Here the same parameter is used in both the TMPL_IF and TMPL_VAR commands. If there is a secret message, it is displayed. If there isn’t (i.e., if it is an empty string), then nothing is displayed instead.
You can also use loop parameters as conditions. If the loop parameter contains any values, it returns true; otherwise it returns false. This is useful for displaying search results when there are no matches:
<P>Here are the results of your query:</P>

<TABLE>
  <TR>
    <TH>Software Title</TH><
    <TH>HomePage</TH></TR>
  </TR>

 <TMPL_LOOP NAME="results">
  <TR>
    <TD><TMPL_VAR NAME="sw_title"></TD>
    <TD><A HREF="<TMPL_VAR NAME="url">"><TMPL_VAR NAME="sw_url"></A></TD>
  </TR>
 </TMPL_LOOP>

 <TMPL_UNLESS NAME="results">
  <TR>
    <TD COLSPAN="2">
      No software titles match your query.
    </TD>
  </TR>
 </TMPL_UNLESS>

</TABLE>
In this example, a user is searching for software according to some criteria. If the query matches any titles, then the name and home page of the titles are displayed on separate rows in a table. If no rows match, then the script says this instead. This template gives the interface designer full control over how the results are presented to the user without being too complicated to understand.
The final command, TMPL_INCLUDE, includes the content of other files in your template. The content of these files is included before loops and variables are parsed, so you can include files that contain loop and variable tags (or even other include tags). This is similar to the SSI include command, except there is no ability to provide a virtual path to the file; you must provide a filesystem path. HTML::Template does no validation that the file is within the document root, so an HTML developer could easily include the following statement in a file and HTML::Template would act accordingly:
<TMPL_INCLUDE NAME="/etc/passwd" >
This is not as serious a security issue as it might appear, since an
HTML designer could always copy the contents of
/etc/passwd into an HTML file manually or create
a symbolic link to it. However, this potential is something you
should be aware of. You can disable includes entirely with the
no_includes option when you create an
HTML::Template object.
HTML::Template is certainly a very elegant solution for projects where the roles of HTML designers and developers are clearly separated. HTML::Template has only been available a short while but has matured quickly. It also offers more advanced features including caching output that we haven’t discussed. The features we discussed are accurate as of Version 1.7, but new features are still being added, so check the documentation for more information. You can find HTML::Template on CPAN; for the latest information, including information on the mailing list and CVS, consult the online documentation.
SSI and HTML::Template are simple template solutions that allow you to add basic tags to static and dynamic HTML files. The HTML::Embperl module, often referred to simply as Embperl, takes a different approach; it parses HTML files for Perl code, allowing you to shift your code into your HTML documents. This approach is similar to Java Server Pages or Microsoft’s ASP technology that moves programming languages into documents. There are actually several modules available for embedding Perl within HTML documents, including Embperl, ePerl, HTML::EP, HTML::Mason, and Apache::ASP. We’ll look at Embperl and Mason in this chapter.
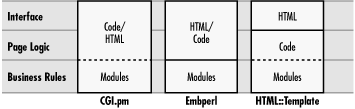
The theory behind moving code into HTML pages is somewhat different from the standard reason for using HTML templates. Both strategies attempt to separate the interface from the program logic, but they draw the lines at different places (see Figure 6.2). Basic template solutions like HTML::Template draw the line between HTML and all code, at least as much as possible. For Embperl and similar solutions, the logic for creating the page is folded into the HTML for the page, but common business rules are collected into modules that can be shared across pages. Business rules are those core elements of your application or applications that are separate from the interface, data management, etc. Of course, in practice not everyone creates as many modules as the model suggests, and you can create modules like this with any of the approaches (as the dotted lines suggest). Thus, the model for complex template solutions like Embperl and ASP often end up looking like CGI.pm, except that instead of including HTML in the code, the code is included in the HTML. This isn’t a bad thing, of course. Both CGI.pm and Embperl are excellent solutions for tying together HTML and program code, and you should choose whatever solution makes the most sense to you for each project. The point is simply that those who argue about the different approaches of using CGI.pm versus templates sometimes are not as far apart as they may seem; the extremes of each seem more alike than different.[8]
Embperl can be used in a variety of ways. You can call Embperl from your CGI scripts and have it parse a template file, just as you would with HTML::Template. In this mode, it simply gives you much more power than the latter since you can include full Perl expressions in the template (at the expense of making your templates more complex). However, because you have the entire Perl language at your disposal inside your template files, it really isn’t necessary to have an additional CGI script initiate the request. Thus, Embperl can be configured as a handler so that your template files can become the target of HTTP requests; this works similar to the way that the SSI handler allows .shtml files to be the target for HTTP requests.
Embperl can also be used with or without mod_perl. It is optimized for mod_perl, but it is written in C as well as Perl, so the compiled C code does run faster than a comparable Perl module would if you are not using mod_perl.
To call Embperl from your CGI scripts, use its
Execute function and pass it the path to the
template along with any parameters to use when parsing the template.
For example,
my $template = "/usr/local/apache/htdocs/templates/welcome.epl";
HTML::Embperl::Execute( $template, $time, $greeting );
This parses welcome.epl, using the values of
$time and $greeting as
parameters, and writes the result to STDOUT. Note that we called the
function as
HTML::Embperl::Execute
and not simply
Execute. Embperl doesn’t export any
symbols, nor is it an object-oriented module. Thus, you must fully
qualify the Execute function.
You can also call Execute and pass it a
reference to a hash with named parameters. This gives you more
options when using Embperl. For example, you can read the template
input from a scalar variable instead of a file and you can write the
output to a file or a variable instead of STDOUT.
Here is how we can parse the welcome.epl template and write the result to welcome.html:
my $template = "/usr/local/apache/htdocs/templates/welcome.epl";
my $output   = "/usr/local/apache/htdocs/welcome.html";

HTML::Embperl::Execute( { inputfile  => $template,
                          param      => [ $time, $greeting ],
                          outputfile => $output } );
Embperl also has options to cache compiled versions of pages when used with mod_perl. Refer to the Embperl documentation for the full list of parameters.
If you are using mod_perl, you would register Embperl as a handler by adding the following to httpd.conf (or srm.conf if used):
<Files *.epl>
    SetHandler  perl-script
    PerlHandler HTML::Embperl
    Options     ExecCGI
</files>
AddType text/html .epl
Then any file that has a .epl suffix will be parsed and executed by Embperl.
If you aren’t using mod_perl but want your Embperl files to handle requests directly without a CGI script, you can also use the embpcgi.pl CGI script that is distributed with Embperl. You place this script in your CGI directory and pass it the URL of the file to parse as part of its path info. For example, you might have a template file in the following path:
/usr/local/apache/htdocs/templates/welcome.epl
To have Embperl handle this file via embpcgi.pl, you would use the following URL:
| http://localhost/cgi/embpcgi.pl/templates/welcome.epl |
As a security feature, embpcgi.pl will only handle files that are located within your web server’s document root. This prevents someone from trying to get at important files like /etc/passwd. Unfortunately, this means that people can attempt to access your Embperl file directly. For example, someone could view the source to our welcome.epl file with the following URL:
| http://localhost/templates/welcome.epl |
Allowing people to view the source code of executable files on your web server is not a good idea. Thus, if you use embpcgi.pl, you should create a standard directory where you will store your Embperl templates and disable direct access to these files. Here is how you would do this for Apache. Add the following directives to httpd.conf (or access.conf if used) to disable access to any file below the directory named templates:
<Location /templates>
  deny from all
</Location>
This works by denying access to this directory (and any subdirectories) to all HTTP request from all web clients.
Some HTML editors restrict authors from including tags that they do
not recognize as proper HTML tags. This can be a problem when using
these editors to create HTML templates that often have their own
style of custom tags. Embperl was created with this in mind. It does
not use commands that resemble HTML tags so you can enter code as text in
WYSIWYG editors. Embperl will also interpret any characters that have
been HTML encoded (such as > instead of
>) and remove extraneous tags (such as
and <BR>) within Perl code before
that code is evaluated.
In an Embperl document,
Perl commands
are surrounded by a bracket plus another character, which we will
refer to as a bracket pair. As an example,
[+
is a starting bracket pair and
+] is an ending bracket pair. Embperl supports a
number of bracket pairs and treats the contents differently for each.
Example 6.10 provides a simple Embperl document that
uses most of them.
Example 6-10. simple.epl
<HTML>
<HEAD>
  <TITLE>A Simple Embperl Document</TITLE>
</HEAD>

<BODY BGCOLOR="white">
<H2>A Simple Embperl Document</H2>

[- $time = localtime -]

<P>Here are the details of your request at [+ $time +]:</P>

<TABLE>
  <TR>
    <TH>Name</TH>
    <TH>Value</TH>
  </TR>

  [# Output a row for each environment variable #]
  [$ foreach $varname ( sort keys %ENV ) $]
    <TR>
      <TD><B>[+ $varname +]</B></TD>
      <TD>[+ $ENV{$varname} +]</TD>
    </TR>
  [$ endforeach $]

</TABLE>

</BODY>
</HTML>
Embperl recognizes blocks of code within the following bracket pairs:
-
[+...+] These brackets are typically used for variables and simple expressions. Embperl executes the enclosed code and replaces it with the result of the last expression evaluated. This is evaluated in a scalar context, so something like this:
[+ @a = ( 'x', 'y', 'z' ); @a +]
yields an output of “3” (the number of elements in the array) and not “xyz” or “x y z”.
-
[-...-] These brackets are used for most of your program logic such as interfacing with outside modules, assigning values to variables, etc. Embperl executes the enclosed code and discards the result.
-
[!...!] These brackets are used with subroutines declarations and other code that needs to be initialized only once. Embperl treats these bracket pairs just like
[- ... -]except that it only executes the enclosed code once. This distinction is most relevant to with mod_perl: because Embperl stays resident between HTTP requests, having code run once means once per the life of the web server child, which may handle a hundred requests (or more). With CGI, code within this block is only executed once per request. These bracket pairs were introduced in Embperl 1.2.-
[$...$] These brackets are used with Embperl’s meta-commands, such as the
foreachandendforeachcontrol structure we used in our example. Embperl’s meta-commands are listed in Table 6.6 later in this chapter.-
[*...*] These brackets are used when working with local variables and for Perl control structures. Embperl treats this like
[- ... -]except that it executes all the code in the these blocks in a common scope (sort of, see the Section 6.4.2.2 subsection below). This allows code within these blocks to share local variables. They can also contain Perl control structures. Instead of using Embperl’s meta-commands as control structures, we could have used Perl’sforeachloop instead of Embperl’s to create the table in our previous example:[# Output a row for each environment variable #] [* foreach $varname ( sort keys %ENV ) { *] <TR> <TD><B>[+ $varname +]</B></TD> <TD>[+ $ENV{$varname} +]</TD> </TR> [* } *]The difference is brackets versus meta-command blocks. Note that code within
[*and*]must end with a semicolon or a curly bracket, and these blocks are evaluated even inside Embperl comment blocks (see below). These bracket pairs were introduced in Embperl 1.2.-
[#...#] These brackets are used for comments. Embperl ignores and strips anything between these bracket pairs so the contents do not end up in the output sent to the client. These can also be used to remove large sections of HTML or code during testing, but unfortunately this does not work for code within
[* ... *], since these blocks are evaluated first. These bracket pairs were introduced in Embperl 1.2.
Because blocks begin with [ in Embperl, you must
use [[ if you need to output the [ character in
your HTML. There is no need to escape ] or
other characters. Also, Embperl ties STDOUT
to its output stream so you can use print within
Embperl blocks and it will behave correctly.
Each block of code within a set of bracket pairs is evaluated as a
separate block within Perl. This means that each one has a separate
variable
scope. If you declare a lexical variable (a variable declared
with my) in one block, it will not be visible in
another block. In other words, this will not work:
[- my $time = localtime -]
<P>The time is: [+ $time +].</P>
The result is roughly analogous to the following in Perl:
&{sub { my $time = localtime }};
print "<P>The time is: " . &{sub { $time }} . ".</P>";
Similarly,
pragmas that depend on scope such
as use strict will only affect the current block
of code. To enable the strict pragma globally, you must use the
var meta-command (see Table 6.6).
The [* ... *] blocks are a little different. They
all share a common scope so local variables (variables declared with
local) can be shared between them. However,
lexical variables still can not. This does not mean that you should
entirely abandon declaring your variables with
my in Embperl.
Lexical variables are still useful as temporary variables that you only need within a particular block. Using lexical variables for temporary variables is more efficient than using global variables because they are reclaimed by Perl as soon as the surrounding block ends. Otherwise, they persist until the end of the HTTP request. Under CGI, of course, all global variables are cleaned up at the end of the request because perl exits. However, even when running under mod_perl, by default Embperl undefines all global variables created within the scope of your pages at the end of each HTTP request.
Embperl offers several meta-commands for creating control structures plus other miscellaneous functions shown in Table 6.6. The parentheses shown with some of the control structures are optional in Embperl, but including them can make these commands clearer and look more like Perl’s corresponding control structures.
Table 6-6. Embperl’s Meta-commands
|
Meta-command |
Description |
|---|---|
[$ foreach $loop_var ( list ) $] |
Similar to Perl’s |
[$ endforeach $] |
Indicates the end of a foreach loop. |
[$ while ( expr ) $] |
Similar to Perl’s |
[$ endwhile $] |
Indicates the end of a while loop. |
[$ do $] |
Indicates the beginning of an until loop. |
[$ until ( expr ) $] |
Similar to Perl’s |
[$ if ( expr ) $] |
Similar to Perl’s |
[$ elsif ( expr ) $] |
Similar to Perl’s |
[$ else $] |
Similar to Perl’s |
[$ endif $] |
Indicates the end of an if conditional. |
[$ sub subname $] |
This allows you to treat a section containing both HTML and Embperl
blocks as a subroutine that can be called as a normal Perl subroutine
or via Embperl’s |
[$ endsub $] |
Indicates the end of a sub body. |
[$ var $var1 @var2 %var3 ... $] |
This command is equivalent to the following in a Perl script: use strict; use vars qw( $var1 @var2 %var3 ... ); Your pages will be more efficient if you use this, especially when running with mod_perl. Remember, however, that if you do, you must declare every variable here that is shared between Embperl blocks because of the scope restriction (see Section 6.4.2.2, earlier). |
[$ hidden [ %input %used ] $] |
This generates hidden fields for all elements in the first hash that
are not in the second hash. Both hashes are optional, and one
typically uses Embperl’s default, which are
|
Embperl monitors and responds to HTML as it is output. You can have it construct tables and prefill form elements for you automatically.
If you use the $row, $col, or
$cnt variables in code within a table, Embperl
will loop over the contents of the table, dynamically build the table
for you, and set these variables to the current row index, the
current column index, and the number of cells output, respectively,
with each iteration. Embperl interprets the variables as follows:
If
$rowis present, everything between <TABLE> and </TABLE> is repeated until the expression containing$rowis undefined. Rows consisting entirely of <TH> ... </TH> cells are considered headers and are not repeated.If
$colis present, everything between <TR> and </TR> is repeated until the expression containing$colis undefined.$cntis used in the same manner for either rows or columns if it is present and$rowor$colare not.
Let’s look at an example. Because $row and
$col are set to the index of the current row and
column, they are typically used as
array indices when
building tables, as shown here:
[- @sports = ( [ "Windsurfing", "Summer",   "Water"    ],
               [ "Skiing",      "Winter",   "Mountain" ],
               [ "Biking",      "All Year", "Hills"    ],
               [ "Camping",     "All Year", "Desert"   ] ); -]
<TABLE>
  <TR>
    <TH>Sport</TH>
    <TH>Season</TH>
    <TH>Terrain</TH>
  </TR>
  <TR>
    <TD>[+ $sports[$row][$col] +]</TD>
  </TR>
</TABLE>
The previous code will create the following table:
<TABLE>
  <TR>
    <TH>Sport</TH>
    <TH>Season</TH>
    <TH>Terrain</TH>
  </TR>
  <TR>
    <TD>Windsurfing</TD>
    <TD>Summer</TD>
    <TD>Water</TD>
  </TR>
  <TR>
    <TD>Skiing</TD>
    <TD>Winter</TD>
    <TD>Mountain</TD>
  </TR>
  <TR>
    <TD>Biking</TD>
    <TD>All Year</TD>
    <TD>Hills</TD>
  </TR>
  <TR>
    <TD>Camping</TD>
    <TD>All Year</TD>
    <TD>Desert</TD>
  </TR>
</TABLE>If you use $row within a
list or select menu, Embperl will
repeat each element until $row is undefined, just
as it does with tables. For select menus, Embperl will also
automatically check options that match name and value pairs in
%fdat and add names and values to
%idat (see below).
Outputting
input and
text area tags with Embperl is similar to
outputting these tags with CGI.pm: if you create an element with a
name matching an existing parameter, the value of the parameter is
filled in by default. When an element is created, Embperl checks
whether the name of that element exists within the
%fdat hash (see below); if it does, then its value
is automatically filled in. Also, as HTML elements are generated,
Embperl adds the name-value (if given) to %idat.
Embperl defines a number of global variables that you can use within your templates. Here is a list of the primary variables:
-
%ENV This should look familiar. Embperl sets your environment variables to match standard CGI environment variables when running under mod_perl.
-
%fdat This contains the name and value of all form fields that have been passed to your CGI script. Embperl, like CGI.pm, does not distinguish between GET and POST requests and loads parameters from either the query string or the body of the request as appropriate. If an element has multiple values, these values are separated by tabs.
-
%idat This contains the name and value of the form fields that have been created on the current page.
-
%mdat This is only available when running under mod_perl with the Apache::Session module. You can use this hash to store anything and it will be available to every future request for the same page, even if those requests are to different httpd child processes.
-
%udat This is only available when running under mod_perl with the Apache::Session module. You can use this hash to store anything and it will be available to any future request made by the same user. This sends a HTTP cookie to the user, but no cookies are sent if this hash is not used in your code. See Section 11.3.
-
@param If you use the Execute function to invoke Embperl pages, the parameters you supply are available to your page via this variable.
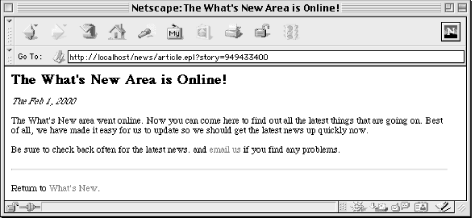
Let’s look at an example of using Embperl. For our example, we will create a basic “What’s New” section that displays the headlines of recent stories. If users click on a headline, they will be able to read the story. This in itself isn’t that impressive, but we will create administrative pages that make it very simple for someone administering the site to add, delete, and edit news stories.
There are a total of four pages to our application, the “What’s New” page that displays current headlines; an article page where users can read a story; a main administrative page that lists the current headlines and provides buttons for adding, deleting, and editing stories; and an administrative page that provides a form for entering a headline and article body, which is used for both editing existing stories as well as creating new stories. These pages are shown later in Figure 6.3 through Figure 6.6.
Traditional Embperl solutions use .epl files as the target of our requests. This example will work either via mod_perl or embpcgi.pl.
Let’s look at the main “What’s New” page first. The code for news.epl is shown in Example 6.11.
Example 6-11. news.epl
<HTML>

[!
  use lib "/usr/local/apache/lib-perl";
  use News;
!]
[- @stories = News::get_stories(  ) -]

<HEAD>
  <TITLE>What's New</TITLE>
</HEAD>

<BODY BGCOLOR="white">
<H2>What's New</H2>

<P>Here's the latest news of all that's happening around here.
  Be sure to check back often to keep up with all the changes!</P>

<HR>

<UL>
  <LI>
    [- ( $story, $headline, $date ) = @{ $stories[$row] } if $stories[$row] -]
    <A HREF="article.epl?story=[+ $story +]">[+ $headline +]</A>
    <I>[+ $date +]</I>
  </LI>
</UL>

[$ if ( !@stories ) $]
  <P>Sorry, there aren't any articles available now. Please check
    back later!</P>
[$ endif $]

</BODY>
</HTML>
The result looks like Figure 6.3.

Embperl programs are much easier to read and maintain if you reduce the amount of Perl that is included in the HTML. We do this by moving much of our code into a common module, News.pm, which we place in /usr/local/apache/perl-lib.
We’ll look at the News module in a moment, but let’s
finish looking at news.epl first. We call the
News module’s get_stories function. This
returns an array of stories with each element of the array containing
a reference to an array of the story number, its headline, and the
date it was written.
Thus, within our unordered list later in the file, we loop over each
story using Embperl’s special $row variable
and extract these elements of each story to the
$story, $headline, and
$date variables. Embperl will loop and create a
list item until the expression containing $row
evaluates to an undefined value. We then use these variables to build
a link to a story as a list element.
If there are no stories, then we print a message telling the user this. That’s all there is to this file. Example 6.12 shows a relevant section of the News module.
Example 6-12. News.pm (part 1 of 3)
#!/usr/bin/perl -wT

package News;
use strict;

use Fcntl qw( :flock );

my $NEWS_DIR = "/usr/local/apache/data/news";

1;


sub get_stories {
    my @stories = (  );
    local( *DIR, *STORY );

    opendir DIR, $NEWS_DIR or die "Cannot open $NEWS_DIR: $!";
    while ( defined( my $file = readdir DIR ) ) {
        next if $file =~ /^./;       # skip . and ..
        open STORY, "$NEWS_DIR/$file" or next;
        flock STORY, LOCK_SH;
        my $headline = <STORY>;
        close STORY;
        chomp $headline;
        push @stories, [ $file, $headline, get_date( $file ) ];
    }
    closedir DIR;
    return sort { $b->[0] <=> $a->[0] } @stories;
}


# Returns standard Unix timestamp without the time, just the date
sub get_date {
    my $filename = shift;
    ( my $date = localtime $filename ) =~ s/ +d+:d+:d+/,/;
    return $date;
}
We store the path to the news directory in
$NEWS_DIR. Note that we use a lexical variable
here instead of a constant because if this script is used with
mod_perl, as is often the case with Embperl,
using constants can generate extra messages in the log file.
We’ll discuss why this happens in Section 17.3.
The format for our article files is rather basic. The first line is
the headline, and all following lines are the body of the article,
which should contain HTML formatting. The files are named according
to the time that they are saved, using the result of Perl’s
time function—the number of seconds after
the epoch.
For the sake of this example we will assume that there is only one administrator who has access to create and edit files. If this were not the case, we would need to create a more elaborate way to name the files to prevent two people from creating stories at the same second. Plus, we would need to create a system to avoid having two administrators edit the same file at the same time; one way to do this would be to have the edit page retrieve the current time into a hidden field when it loads a file for editing, which could then be compared against the last modification time of the file when the file is saved. If the file has been modified since it was loaded, a new form would need to be presented to the administrator showing both sets of changes so they can be reconciled.
The get_stories function opens this news
directory and loops through each file. It skips any files starting
with a dot, including the current and parent directories. If we
encounter any system errors reading directories we die; if we have
problems reading a file, we skip it. Filesystem errors are not
common, but they can happen; if you wish to generate a more friendly
response to the user than a cryptic 500 Internet Service
Error, use
CGI::Carp with
fatalsToBrowser to catch any
die calls.
We get a shared
lock
on the file to make sure that we are not reading a file that is in
the process of being written by the administrator. Then we read the
story’s headline and add the story’s file number,
headline, and date created to our list of stories. The
get_date function simply generates a Unix
timestamp from the file number via Perl’s
localtime function. That looks like this:
Sun Feb 13 17:35:00 2000
It then replaces the time with a comma in order to get a basic date that looks like this:
Sun Feb 13, 2000
Finally, we sort the list of stories from largest to smallest according to the article number. Because this is the same as the date the file was created, newest headlines will always appear at the beginning of the list.
When the user selects a headline from the list, the application fetches the corresponding article. Example 6.13 shows the page that displays the articles.
Example 6-13. article.epl
<HTML>

[!
  use lib "/usr/local/apache/lib-perl";
  use News;
!]
[- ( $headline, $article, $date ) = News::get_story( $fdat{story} ) -]

<HEAD>
  <TITLE>[+ $headline +]</TITLE>
</HEAD>

<BODY BGCOLOR="white">
  <H2>[+ $headline +]</H2>
  <P><I>[+ $date +]</I></P>
  [+ local $escmode = 0; $article +]

  <HR>
  <P>Return to <A HREF="news.epl">What's New</A>.</P>

</BODY>
</HTML>
The result looks like Figure 6.4.
Because most of the work is done by the News module, this file is
also quite simple. The links to this page from the main
“What’s New” page include a query string that
specifies the number of the story to view. We use Embperl’s
special %fdat hash to retrieve the number of the
story and pass it to the
News::get_story function,
which gives us the headline, article contents, and date of the
article.
Then we simply need to include tags for these variables in our
document where we want to display the data.
$article requires some extra consideration. The
body of the article contains HTML, but by default
Embperl escapes any HTML
generated by your Perl blocks, so for example, <P> will be
converted to <P>. In order to
disable this, we set Embperl’s special
$escmode variable to 0, and
because we provide a local scope to the
variable, this change only lasts for the current block and the former
value of $escmode is reset after the article is
output.
Example 6.14 contains the
get_story function from the News module.
Example 6-14. News.pm (part 2 of 3)
sub get_story {
    my( $filename ) = shift(  ) =~ /^(d+)$/;
    my( $headline, $article );

    unless ( defined( $filename ) and -T "$NEWS_DIR/$filename" ) {
        return "Story Not Found", <<END_NOT_FOUND, get_time( time );
<P>Oops, the story you requested was not found.</P>
<P>If a link on our What's New page brought you here, please
notify the <A HREF="mailto:$ENV{SERVER_ADMIN}">webmaster</A>.</P>
END_NOT_FOUND
    }

    open STORY, "$NEWS_DIR/$filename" or
      die "Cannot open $NEWS_DIR/$filename: $!";
    flock STORY, LOCK_SH;
    $headline = <STORY>;
    chomp $headline;
    local $/ = undef;
    $article = <STORY>;

    return $headline, $article, get_date( $filename );
}
This function takes the story number as a parameter, and the first
thing this function does is verify that it is the expected format.
The regular expression assignment
followed by the defined test may seem like a
roundabout way to test this, but we do this in order to untaint the
filename;
we explain tainting and why it’s important in Section 8.4. Finally we make sure that this story exists
and is a text file.
If any of our checks fail, we return an error to the user formatted like a standard story. Otherwise, we open the file read the headline and contents, get its date, and return this to the page.
Now let’s look at the administrative pages. The administrative pages should be placed in a subdirectory beneath the other files. For example, the files could be installed in the following locations:
.../news/news.epl
.../news/article.epl
.../news/admin/edit_news.epl
.../news/admin/edit_article.epl
This enables us to configure the web server to restrict access to the admin subdirectory. Example 6.15 shows the main administrative page, admin_news.epl.
Example 6-15. admin_news.epl
<HTML>

[!
    use lib "/usr/local/apache/lib-perl";
    use News;
!]

[-
    if ( my( $input ) = keys %fdat ) {
        my( $command, $story ) = split ":", $input;

        $command eq "new" and do {
            $http_headers_out{Location} = "edit_article.epl";
            exit;
        };
        $command eq "edit" and do {
            $http_headers_out{Location} = "edit_article.epl?story=$story";
            exit;
        };
        $command eq "delete" and
            News::delete_story( $story );
    }

    @stories = News::get_stories(  )
-]

<HEAD>
  <TITLE>What's New Administration</TITLE>
</HEAD>

<BODY BGCOLOR="white">
  <FORM METHOD="POST">
    <H2>What's New Administration</H2>

    <P>Here you can edit and delete existing stories as well as create
      new stories. Clicking on a headline will take you to that article
      in the public area; you will need to use your browser's Back button
      to return.</P>
    <HR>

    <TABLE BORDER=1>
    <TR>
      [- ( $story, $headline, $date ) = @{ $stories[$row] } if $stories[$row] -]
      <TD>
        <INPUT TYPE="submit" NAME="edit:[+ $story +]" VALUE="Edit">
        <INPUT TYPE="submit" NAME="delete:[+ $story +]" VALUE="Delete"
          onClick="return confirm('Are you sure you want to delete this?')">
      </TD>
      <TD>
        <A HREF="../article.epl?story=[+ $story +]">[+ $headline +]</A>
        <I>[+ $date +]</I>
      </TD>
    </TR>
    </TABLE>

    <INPUT TYPE="submit" NAME="new" VALUE="Create New Story">
  </FORM>

  <HR>
  <P>Go to <A HREF="../news.epl">What's New</A>.</P>

</BODY>
</HTML>
The result looks like Figure 6.5.
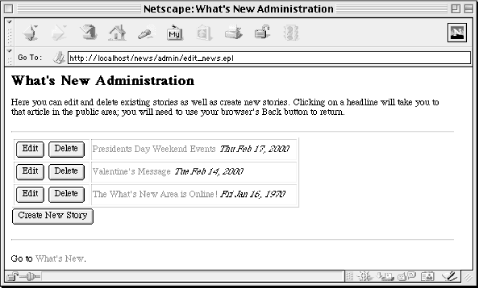
This page must handle a few different requests. If it receives a parameter, it uses a series of conditions to determine how to handle the request. Let’s return to these statements after looking at the rest of the file because when the administrator first visits this page, there are no parameters.
Like news.epl, we fetch an array of stories from
get_stories, but instead of creating an ordered
list and looping over list items, we output a table and loop over
rows in this table. For each story, we output a corresponding Edit
and Delete button as well as a link to the story. Note that the name
of the Edit and Delete buttons contain the command as well as the
number of the story separated by a colon. This allows us to pass both
pieces of information when the administrator clicks on a button,
without restricting us from changing the label of the button.
Finally, we add a submit button to the bottom of the page to allow
the administrator to add a new story.
All the form elements on these page are submit buttons, and they will
only send a name-value pair if they are clicked. Thus, if the
administrator clicks a button, the browser will request the same page
again, passing a parameter for the selected button. Returning to the
conditions at the top of the file, if there is a parameter passed to
this file, it is split by colon into $command and
$story.
You may have noticed that if the administrator selects the button to
create a new story, then the supplied parameter will not include a
colon. That’s okay because in this case,
split will set $command to
“new” and $story to
undef. If $command is set to
“new”, we forward the user to the
edit_article.epl file. To do this, we assign
Embperl’s special %http_headers_out
variable. Setting the “Location” key to a value outputs a
Location HTTP header; we can then exit this
page.
If the administrator edits an existing story, we also forward to the
edit_article.epl file and exit, but in this case
we pass the story number as part of the query string. If the
administrator deletes a story, we invoke the
delete_story function from our News module and
continue processing. Because we gather the list of stories after this
deletion, this page will display the updated list of headers.
We also add a JavaScript handler to the delete button to prevent stray mouse clicks from deleting the wrong file. Even if you have decided not to use JavaScript on your public site, it can be very useful for administrative pages with limited access such as this, where you typically can be more restrictive about the browsers supported.
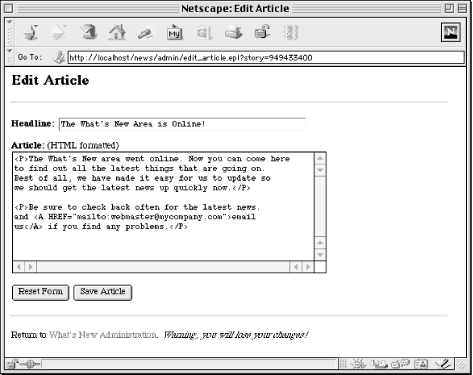
Finally, Example 6.16 presents edit_article.epl, the page that allows the administrator to create or edit articles.
Example 6-16. edit_article.ep
<HTML>

[!
    use lib "/usr/local/apache/lib-perl";
    use News;
!]

[-
    if ( $fdat{story} ) {
        ( $fdat{headline}, $fdat{article} ) =
            News::get_story( $fdat{story} );
    }
    elsif ( $fdat{save} ) {
        News::save_story( $fdat{story}, $fdat{headline}, $fdat{article} );
        $http_headers_out{Location} = "edit_news.epl";
        exit;
    }
-]

<HEAD>
  <TITLE>Edit Article</TITLE>
</HEAD>

<BODY BGCOLOR="white">
  <H2>Edit Article</H2>

  <HR>
  <FORM METHOD="POST">
    <P><B>Headline: </B><INPUT TYPE="text" NAME="headline" SIZE="50"></P>

    <P><B>Article:</B> (HTML formatted)<BR>
      <TEXTAREA NAME="article" COLS=60 ROWS=20></TEXTAREA></P>

    <INPUT TYPE="reset" VALUE="Reset Form">
    <INPUT TYPE="submit" NAME="save" VALUE="Save Article">
    [$ hidden $]
  </FORM>

  <HR>
  <P>Return to <A HREF="edit_news.epl">What's New Administration</A>.
    <I>Warning, you will lose your changes!</I></P>

</BODY>
</HTML>
The result looks like Figure 6.6.
If the administrator is editing a page, then the story number will be
supplied in the query string. We get this from
%fdat and fetch the headline and article contents
using get_story. We then set these fields in
%fdat so that when Embperl encounters the
headline and article form
elements later in this file, it will pre-fill these defaults values
for us automatically. The hidden command in the form below will be
replaced with the story number if it was supplied. This is all we
need to do in order to have the form handle new stories as well as
edits.
When the administrator submits these changes, the story number (which
will be present for edits and undefined for additions), the headline
text, and the article text are supplied to the
save_story function and the administrator is
redirected back to the main administrative page.
The administrative functions from News are shown in Example 6.17.
Example 6-17. News.pm (part 3 of 3)
sub save_story {
my( $story, $headline, $article ) = @_;
local *STORY;
$story ||= time; # name new files based on time in secs
$article =~ s/�15�12|�15|�12/
/g; # make line endings consistent
$headline =~ tr/�15�12//d; # delete any line endings just in case
my( $file ) = $story =~ /^(d+)$/ or die "Illegal filename: '$story'";
open STORY, "> $NEWS_DIR/$file";
flock STORY, LOCK_EX;
seek STORY, 0, 0;
print STORY $headline, "
", $article;
close STORY;
}
sub delete_story {
my $story = shift;
my( $file ) = $story =~ /^(d+)$/ or die "Illegal filename: '$story'";
unlink "$NEWS_DIR/$file" or die "Cannot remove story $NEWS_DIR/$file: $!";
}The save_story function takes an optional story
file number, a headline, and article contents. If a number is not
provided for the story, save_story assumes that
this is a new story and generates a new number from
date. We convert line endings from browsers on
other platforms to the standard line ending for our web server and
trim any line-ending characters from the headline because these would
corrupt our data.
Again, we test the story number to make sure it is valid and then
open this file and write to it, replacing any previous version if
this is an update. We get an exclusive lock while we are writing so
someone else does not try to read it before we finish (and get a
partial news story). The delete_story function
simply tests that the filename is
valid and removes it.
As we have seen, Embperl presents a very different approach to generating dynamic output with Perl. We’ve covered what you need to know in order to develop most Embperl pages, but Embperl has many features and options that we simply do not have room to present. Fortunately, Embperl has extensive documentation, so if you want to learn more about HTML::Embperl, you can download it from CPAN and visit the Embperl website at http://perl.apache.org/embperl/.
The HTML::Mason Perl module, often referred to as Mason, is another template solution. Like Embperl, it allows you to embed full Perl expressions within HTML documents. However, unlike the other template solutions already mentioned, Mason focuses on supporting components that can be embedded within one another. This goes beyond creating modular CGI code. For many web sites, especially large ones, multiple elements on each page as well as overall page layout is shared across many pages. Mason allows you to modularize HTML as well as code and reuse both throughout your web site.
For example, a web page may be composed of a header and footer that is shared across your web site and possibly a navigation sidebar that is shared across many pages. With Mason you can create components for each of these that can easily be included in documents. Mason does not distinguish between static components and dynamic components; any component may include code and include other components. Mason also allows components to act as filters.
Although it also supports a CGI mode, Mason—more than Embperl—essentially requires mod_perl . First, due to the component nature of Mason, it makes much more sense to have it handle files directly instead of having requests pass through a CGI script. Second, because Mason is written entirely in Perl (unlike Embperl, which contains compiled C), it is much less efficient when not used with mod_perl, because with mod_perl the Perl source is only loaded, interpreted, and compiled once instead of with each request.
Thus, Mason is not truly CGI technology. On the other hand, given Mason’s increasing popularity, it seems inappropriate to omit Mason in a discussion of HTML template solutions. We will limit our discussion to an overview that allows you to compare against other solutions. For more information on Mason, visit the site at http://www.masonhq.com/.
Mason’s component approach differs from the other solutions we’ve discussed; those solutions differed from each other primarily by the degree of power and complexity of their template commands. You can create a component architecture with the other template solutions as well, but not to the same degree that you can with Mason. Here is how the other solutions compare in this regard:
As we saw in our footer example earlier (see Chapter 6), SSI’s include command works great but SSI commands are limited to static documents: you can include CGI script output in HTML documents but not vice versa.
HTML::Template has a similar TMPL_INCLUDE command, but you can only include literal file contents that are interpreted as part of the same template and executed in the context of the current CGI script. HTML::Template was not designed to allow the dynamically generated output of one CGI script in the output of another. It is possible, but it’s messy (refer to the FAQ section of the HTML::Template documentation).
Embperl is powerful enough that you can make it do just about whatever you need, but its emphasis is not on components, and it does not have all of the features that Mason has for filtering or automatically executing components according to preset rules.
Mason does not draw a distinction between files containing code, files containing HTML, or even files containing data. Any text file can be included as a component within any other file. Mason also supports filters and autohandlers that allow you to modify the output of existing components without editing them directly.
For the sake of comparison, CGI.pm does not offer a way to include the output of one dynamic request within another without using another module such as LWP. Typically, however, you would move the code that needs to be shared into a module that can be used by several CGI scripts. Static content can of course be manually included by reading and printing the file in Perl.
Does this mean that Mason is a better solution than the others? Not at all—it is only better suited for those sites with many shared components that can benefit from it. Mason can make such sites easier to maintain if they are designed well, but it does add complexity because maintainers must understand all of the interactions between the different components. What looks like a single page to a browser may be comprised of several separate components, so maintainers need to know where to look to make changes. It also requires HTML designers to work closely with CGI developers because the line between the two can get fuzzy with Mason. However, for large sites where it makes sense, it can certainly be an elegant solution.
[8] Jason Hunter (author of Java Servlet Programming from O’Reilly & Associates) made a similar argument from a Java perspective. His article, “The Problem with JSP,” is available at http://www.servlets.com/soapbox/problems-jsp.html.