
CHAPTER
17
Threads
 or many of you, the concept of threads might not be a new one. Many popular languages support threading, either inherently or through the use of external libraries. In spite of this, it is possible that you might not have used threads at all— most of the time, when you write a program, creating threads is not a general requirement. What’s more, writing multithreaded code is hard and debugging such code makes it worse. So do we really need to care about learning threads? Yes, we do. The programs you studied so far in the book have been trivial, focusing on a certain Java language feature. In real-life applications, it is hard to find a Java program that does not use threading. In fact, Java developers considered threading to be so important that the threading libraries were introduced from the beginning in JDK 1.0.
Let’s discuss why we should use threading. Multithreaded code can provide a huge speed boost, especially when it runs on modern computers containing multiple CPUs and cores. Consider a simple application that sums up an enormous list of numbers. Splitting the summing process in two halves (or, even better, multiple parts) and assigning each half to an independent person would obviously speed up the entire computation. When each person finishes his totaling, the ultimate sum may be computed by adding the partial results. And that is what we do in a parallel program. A task that can be split into parts is divided and executed on multiple CPUs, and those parts are run in parallel, thus increasing the program throughput substantially. Summing a large set of numbers is just one example where the parallelism of an algorithm can be exploited; in many other situations in real life such parallelism can be observed. Consider the case of a stock exchange, where multiple trades occur simultaneously on the exchange in real time. All such trades are executed using the same algorithm. Without threads, it would be impossible to meet the demands traders place on these exchanges. We discuss many applications in the securities domain (and other domains) in this and the next two chapters to demonstrate the power of threading.
![]()
NOTE
Not all applications benefit from multiple threads, and some cannot be multithreaded.
Even if your machine does not contain a multiple-core CPU, there are reasons for using threads in your applications. Consider a simple file-copy program. While copying a file, the user will want the ability to cancel the copying process at any time. This can be implemented by creating a separate thread that continually monitors user input sources, such as the keyboard and mouse, and that can cause an interruption in the copy process whenever a user request to do so is detected. These two threads may not truly run in parallel if only one core is available in the machine. In such cases, the operating system pretends to run multiple threads at the same time by time-slicing the CPU—that is, constantly switching between the two threads. This gives the illusion to the user of doing two things at the same time.
These days, multicore machines have become so common that it is hard to find a single-core machine in today’s market. Parallel programming has become important in exploiting the power of these machines. Java SE 8 and 9 help you parallelize your program code with many new language/ API additions.
Thread programming is a complex topic. Fortunately, Java provides many simple constructs to create and use threads. In fact, many features of the threading system are built into the core language itself. As stated earlier, threading support has been available since JDK 1.0. The J2SE 5.0 introduced a concurrency framework that makes it easier to create concurrent programs that support parallelism and share data among multiple threads. Java SE 7 made further enhancements by supporting fine-grained parallelism in algorithms. In this and the next two chapters, you learn many techniques for creating threaded applications and exploiting the full potential of modern multicore machines. So let’s begin by discussing what a thread is and then a few basics of thread programming in this chapter.
In particular, you will learn the following in this chapter:
Processes and Threads
Before we delve into programming, let’s first go over what a thread is. You have heard about processes in operating systems. So what is a process? When an application is loaded in memory and made ready to run, we say that a process is created.
A multitasking operating system creates several processes and runs them on multiple CPUs or the cores of a single CPU. In the rare situation that you have a single-core CPU in your box, the OS will switch the CPU between these processes, giving you the illusion of concurrently running processes. Processes are usually large and can be further split into smaller units of execution. For example, a spreadsheet application may allow the user to interact with it while it performs calculations in the background. A word processing application might perform a background spell check while the user edits the document. To implement these kinds of features, the developer splits the process into two units—one that is responsible for calculations and the other for handling user interactions. Such units of execution are called threads. The application developer may create multiple threads by partitioning the application into a number of logical units and creating a thread for each. In some situations, this can dramatically improve application performance and user responsiveness, thus providing a rich experience to its users.
The life cycle of all the threads created in your application is managed by the operating system. The operating system periodically allocates the available cores to waiting threads so that each one gets a chance to execute its code. Such allocation may be on a simple round-robin basis or may use a more sophisticated algorithm. The same way the operating system assigns the CPU to a thread, it also has the privilege of taking away the CPU from a running thread. Scheduling threads while ensuring that no thread is starved for CPU time forever itself becomes a highly complex algorithm to implement; fortunately, we do not have to bother with this—the operating system developers have taken care of it for us.
A thread undergoes several stages during its entire life cycle, as detailed next.
Thread States
The operating system (OS) maintains a queue of “ready-to-run” threads. A newly created thread is added at the bottom of this queue. The OS picks up a thread from the top of the queue and allocates the CPU to it within a fixed slice of time. After this time slice is over, the thread is returned to the bottom of the queue and the next waiting thread at the top of the queue is allocated to the CPU. This process continues forever, and each thread gets its own turn periodically. The different states of a thread are depicted in Figure 17-1.
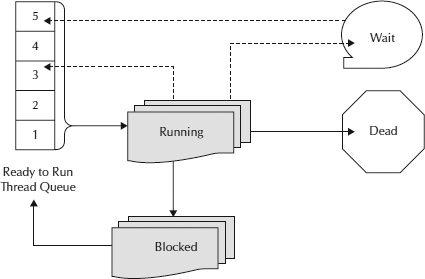
FIGURE 17-1. Thread states
Eventually, a thread may finish its job. Such a thread will be put into the dead state. A thread that’s dead cannot be restarted and should be garbage-collected. What happens when you try to restart a dead thread is explained later in this chapter.
A thread may voluntarily block itself. This happens when a thread is waiting for some I/O operation to occur, or it could simply be generous enough to yield control to another waiting thread. A thread may go to sleep for a specified amount of time and enter a Blocked state. A blocked thread will wake up after a specified amount of time and/or when the external operation on which it has been waiting is completed. The OS wakes up these sleeping threads. A thread that is woken up will not be allocated the CPU immediately. Instead, it will be returned to the bottom of the Ready to Run queue and will eventually be allocated to the CPU.
As stated previously, a thread might need to wait for some external event to occur. For example, a thread might need to wait for some other thread to complete its job before proceeding with its own program code. The OS maintains a queue of threads waiting on other objects. When the object the thread is waiting on is ready, it signals the waiting thread. The waiting thread will then be brought into the queue of ready-to-run threads, where eventually it will receive the CPU cycles. Note that more than one thread could be waiting on the same object. In this case, a notification is sent to all such waiting threads.
Having seen how an OS implements threading, let’s look at how the JVM implements it. To understand the different implementations of the JVM on different platforms, first you need to know what a thread priority is and how threads are scheduled for execution.
Thread Priorities
With several threads running on a system, you may want to prioritize their execution. You do so by assigning a priority level to each thread. In Java, the thread priority levels range from 1 to 10. The priority 0 is reserved for the virtual machine. Java also provides a few predefined constants for setting the thread priority. MAX_PRIORITY designates the top priority of 10, MIN_PRIORITY designates the minimum priority of 1, and NORM_PRIORITY specifies the normal priority of 5. A thread with a higher priority gets the CPU first. The OS maintains a separate queue for all threads belonging to each priority level (refer to Figure 17-2).
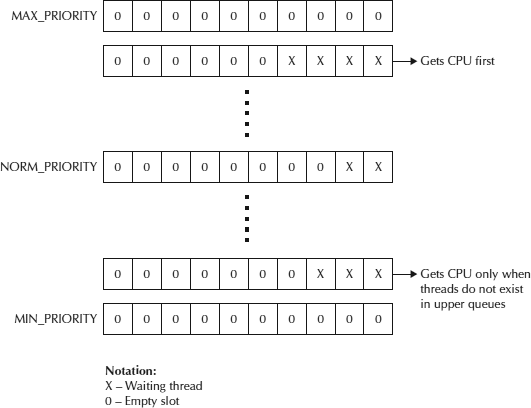
FIGURE 17-2. Thread priority queues
Because threads with the higher priority level get the CPU first, this implies that a thread with a lower priority will starve for CPU cycles forever if the higher-priority threads never finish. However, this is not exactly true. The OS periodically raises the priority of these “starving” threads until they reach the currently executing thread priority level. At this level, each thread will eventually get its time slice. After the time slice is over, the thread will be returned to the queue of its original priority.
![]()
CAUTION
The thread scheduling described here is generic. A JVM vendor may implement a different scheduling policy than the one described here, most likely to take advantage of the underlying platform’s implementation, as you will see in the section that follows.
Next, we briefly look at preemptive and nonpreemptive scheduling.
Thread Scheduling
The two strategies for scheduling threads on the CPU are preemptive and nonpreemptive scheduling. In case of preemptive scheduling, a thread with a higher priority (the moment it is created or acquires a higher priority) will preempt the running thread and acquire the CPU for execution. A preemptive scheduling scheme may also use time slicing, whereby threads at the same priority level will be allocated the CPU for a maximum of a certain fixed time interval. Windows NT is an example of a preemptive OS.
In case of nonpreemptive scheduling, a running thread continues using CPU cycles even if a thread with a higher priority exists. Thus, a running thread may be required to relinquish the CPU voluntarily so that other threads get a chance to execute. In this scheme, a badly written program can lock up your OS (a system hang-up). Nonpreemptive scheduling may also be time-sliced, where the user may decide the amount of time for the slice. For example, Windows 3.1 is a nonpreemptive OS, where the user can switch from one application to another by making the desired application active. Thus, the user decides the length of time for which the CPU is allocated to a running application. The active application continues using the CPU until the user makes it inactive by switching to another application.
A JVM may derive its functionality of thread scheduling from the underlying OS. Therefore, you should be careful when coding threads in Java because the application behavior may change depending on the underlying platform.
JVM Threading Implementations
Each JVM has its own implementation of the threading model, depending on its vendor and the platform for which it is written. While implementing a threading model, it may exploit the features provided by the underlying platform or it may have its own model that is not based on the model implemented by the underlying platform. We will now look at some of the JVM implementations on several popular platforms. Java is a platform-independent language, so studying the different implementations of JVMs is mainly unimportant to a developer. However, in a few cases, understanding these variations in implementation details do matter, as you will see shortly.
Green Threads
The most common threading model is the simple green thread model. In this model, each thread is an abstraction within the virtual machine; the OS does not know anything about the threads that exist in the JVM. Thus, from the OS perspective, the JVM is a single process and a single thread. It means that whenever a JVM creates a thread, it must hold all information related to the thread within the thread object itself. Such information includes the thread’s stack, a program counter to track the currently executing instruction, and other bookkeeping data. The VM also becomes responsible for context switching and the entire life cycle (discussed previously). As far as the OS is concerned, it is executing a single thread of execution of JVM code and whatever code switching is happening inside the JVM is unknown to it. These types of threads are also called user-level threads because they exist only within the user level of the OS. In the early days of Java, this green thread model was fairly common.
![]()
NOTE
Most operating systems are logically divided into two parts: user level and system level. The OS kernel runs at the system level, and the user applications run at the user level. To use the OS services, the program transits from the user level to the system level. After the service is provided, the OS switches from system to user level, restricting privileges to a running program.
Windows Implementation
The native threading model in 32-bit Windows uses a one-to-one mapping between Java threads and operating system threads. Because Windows provides only seven priority levels, there is some overlap when Java’s 11 distinct priority levels are mapped to the Windows levels. These mappings vary among the different implementations of the JVM on the same Windows platform. Therefore, your program may exhibit slightly different behavior on JVMs provided by different vendors. The scheduling of Java threads is now subject to the underlying scheduling of OS threads.
The actual Windows thread scheduler is more complex than the simple priority-based scheduler described earlier. It uses a complex priority calculation, taking into consideration how recently a thread has run. The actual priority is the difference between the assigned priority and a value that indicates the elapsed time since the last run. This value is continually adjusted so that the thread will acquire a CPU eventually at some point in time. A thread that has not run for a very long time gets a temporary priority boost, thus preventing threads from absolute starvation and at the same time giving preference to a higher-priority thread over a lower-priority one. Likewise, threads that have a keyboard or mouse focus are given a priority boost. This complex mechanism of actual priority computation results in an unpredictable order of thread execution, but at the same time ensures that threads do not starve.
Solaris Implementation
The older Solaris 7 had system-level lightweight processes (known as LWPs) in addition to user-level threads. Java threads were considered equivalent to user-level threads and there was an M-to-N mapping between these user-level threads and LWPs. Developers were allowed to influence the priorities of these user-level threads and not those of LWPs. In Solaris 9, there is a one-to-one mapping quite similar to Windows; however, the implementation as compared to the Windows implementation is quite different. Solaris 8 supported both models and allowed the user to make a selection. The CPU-intensive Java programs perform better with the one-to-one mapping model and therefore you may find that certain Java applications run faster on Solaris 9 than Solaris 7. Like Windows, Solaris uses a complex priority calculation, ensuring that all threads get an adequate amount of CPU time without starving for a long period of time. In Solaris, there are 60 different runnable priorities and 128 application-level priorities. In Java versions up to J2SE 1.4 (inclusive), priorities were mapped to the full range of 0 to 127. The default priority was therefore in the middle of this range, whereas the default priority for a C/C++ program was 127. Therefore, when a CPU-intensive C program was run along with a CPU-intensive Java program, the Java program was always at a disadvantage. In J2SE 5.0, this was taken care of and now all Java threads with a priority of NORM_PRIORITY or higher are mapped to the 127 level.
Linux Implementation
Prior to J2SE 1.3, the virtual machines on the Linux platform mostly used the green thread model, with only a few using the native threads. The Linux kernel back then did not support a large number of concurrent threads. J2SE 1.3 added support for native threads; however, the kernel still did not provide optimal support for threaded applications. The new kernels use the Native POSIX Thread Library. This library provides a one-to-one mapping between Java and kernel threads as well as complex priority calculations similar to other operating systems. J2SE 1.4.2 is the first version to support this new kernel.
One last term we should discuss before digging into code is the daemon thread.
Daemon Versus Non-Daemon Threads
There are two types of threads in Java:
A daemon thread terminates automatically as soon as the parent thread that created this thread terminates. A non-daemon thread, however, continues to live even when the parent dies. As long as there is at least one thread alive, we say that the process is alive. When all non-daemon threads along with the remaining daemon threads of an application die, we say that the process is dead. Every Java application has at least one non-daemon thread, which is the main thread. When the program quits this thread or the user closes the application, the main thread dies. However, the process can continue to live if it has already spawned other non-daemon threads. You will learn how to create both types of threads in the sections that follow.
Creating Threads
Java implements thread functionality by using the following classes/interfaces:
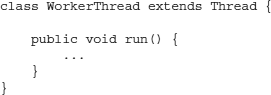
To create threads in your Java program, you need to implement the runnable interface in your Java class. As a part of the interface implementation, you provide the implementation of the run method. In the run method, you program the desired functionality for your thread:
![]()
After creating this thread class, you need to create its instance of the Thread class and pass an object of the preceding class as a parameter to the Thread class constructor. This is done as follows:
![]()
![]()
The created thread executes the run method defined in the WorkerThread class. When the run method completes its execution, the thread becomes dead and cannot be rescheduled for another run.
Alternatively, you can create a thread by subclassing the Thread class:
![]()
In this case, you are overriding the run method to implement your own desired functionality. Once your thread class is created, some other thread will need to instantiate it and invoke its start method. The following code snippet illustrates how to achieve this:
![]()
![]()
When you start the thread, this does not mean it gets the CPU immediately. Rather, it is put in the Ready to Run queue, discussed earlier, where eventually it will receive a CPU time slice for execution.
![]()
TIP
Implementing Runnable is considered an object-oriented approach and is recommended over the technique of subclassing the Thread class. Also, if your class is already extending some other class, you will not be allowed to extend from Thread class simultaneously.
The ThreadGroup class allows you to group all logically related threads into a single group, whereby you will be able to apply simultaneous changes to all such threads belonging to a single group. For example, you can raise the priorities of all threads belonging to a certain group to the maximum priority by calling the setMaxPriority method on the group object. You can mark all threads within a group as “daemon” or “non-daemon” by calling its setDaemon method. A group of threads responsible for printing documents can be sent a simultaneous notification for aborting printing. By default, all threads you create belong to the same group. However, it is possible to create additional groups of your own and add newly created threads to them. A thread group may contain other thread groups. Thus, you can build a tree hierarchy for your threads.
![]()
TIP
J2SE 5.0 introduced better features for operating on a collection of threads, making the use of a thread group somewhat redundant.
Creating Your First Threaded Application
The application we develop in this section draws two superimposed sine waves on the application screen. These waves are animated and keep moving to the right as the time progresses. The application interface is shown in Figure 17-3.

FIGURE 17-3. Output of a threaded sine wave animator
To create the animation, we create two threads: One thread draws a vertical line whose end coordinates are the points on a sine wave, and the other thread periodically calls the repaint method on the first thread to redraw the line. Before redrawing the line, however, it makes sure the line is shifted in the x-direction by a fixed amount. This gives the effect of a moving sine wave from left to right. To make things more dramatic, the equations for computing the top and bottom y-coordinates of the line are kept different by using different sine wave frequencies in the two calculations. You may want to run the application first for a better understanding of how it works. The entire program code is given in Listing 17-1, followed by its explanation.
![]()
Listing 17-1 A Threaded Sine Wave Animator
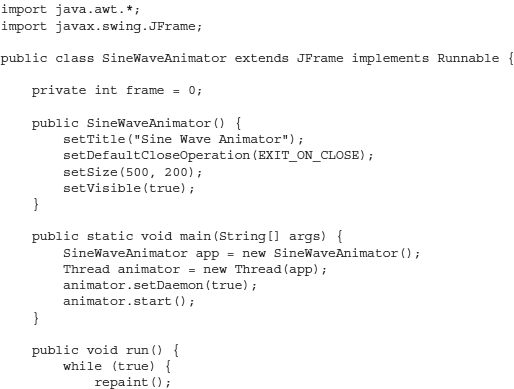

The SineWaveAnimator is our main class and extends its functionality from JFrame. It also implements the Runnable interface. Thus, it will need to implement the run method:
![]()
![]()
The instance of this class will be submitted to the Thread class constructor; the object of Thread class will execute the run method of this class. Before discussing the implementation of the run method, let’s look at the code in the main method. In the main method, we create a new thread by calling the Thread class constructor, as follows:
![]()
![]()
The constructor receives the instance of our main application class as a parameter. We mark this thread as a daemon thread so that it gets cleaned up whenever its parent thread dies:
![]()
![]()
To start the thread, we call its start method:
![]()
![]()
The start method puts the created thread in the Ready to Run queue discussed earlier. Thus, at this stage, we have two application threads—one is the main thread that was started as a part of the application startup, and the second is the animator thread we created in the main method. Now, let’s look at the implementation of the run method.
The run method simply keeps on calling the repaint method in an infinite loop:
![]()
![]()
So that the second thread has an opportunity to run, it puts itself to sleep for a specified amount of time in the same while loop:
![]()

The sleep method takes a parameter that specifies the number of milliseconds for which the thread should sleep. During this sleep time, the thread is put into the blocked state. After the sleep time is over, the JVM will awaken the thread and put it in the Ready to Run queue. Thus, the thread will not get the CPU for a guaranteed minimum period of 100 milliseconds in our case. Note that usually it takes longer than 100 milliseconds to get the CPU due to other threads waiting in the queue. Whenever it gets the CPU, the thread continues with its rest of the work (which is incrementing the frame number) in our infinite for loop and again goes to sleep when it encounters another call to the sleep method.
Note that the Thread.sleep method is enclosed in a try-catch block. This is a checked exception that must be caught or re-thrown. A sleeping thread may be interrupted from its sleep and awakened by another thread. Thus, a thread may receive a CPU time slice earlier than its sleeping period of 10 milliseconds provided some other thread interrupts it. You learn about this interrupt processing and exception handling during interruptions in the sections that follow.
In the exception handler, we do nothing and proceed with another iteration of the while loop. Before starting another iteration, we increment the frame counter, which moves the x-position of the sine wave during its painting.
Finally, in the paint method, which gets called whenever we call the frame’s repaint method, we draw a vertical line. We first obtain the dimensions of the drawing area by calling the getBounds method on the container:
![]()
![]()
We clear this area on every repaint operation to erase the previously drawn line by calling the clearRect method of the Graphics context:
![]()
![]()
We now draw a series of vertical lines throughout the width of the container by using a for loop:
![]()
![]()
The top coordinate of the desired line is computed using the following statement, which uses the sine function:
![]()
![]()
Likewise, the bottom coordinate is computed using the following statement:
![]()
![]()
The constants 0.09 and 0.01 in these equations decide the sine wave frequencies. Finally, the vertical line is drawn between the two computed coordinates via a call to the drawLine method of the Graphics class:
![]()
![]()
Note that we keep the same x-value for the two end coordinates so as to draw a vertical line.
When you run the program, two threads will be running. One thread draws the vertical lines throughout the container width, and the second thread periodically keeps on shifting the position of these lines to the right, thus giving an illusion of a moving sine wave.
Creating Non-Daemon Threads
The program we just discussed terminates properly, cleaning all the spawned threads. This is because the animator thread we created in the program was a daemon thread and therefore was terminated when the main thread died as a result of closing the application.
![]()
TIP
When code running in some thread creates a new Thread object, the new thread becomes a daemon thread if and only if the creating thread is a daemon. Also, the initial priority of the created thread equals the priority of the creating thread.
To help you better understand the implications of creating non-daemon threads in your programs, we will discuss another threaded application. We will write a thread class that generates and displays a list of prime numbers to the user console. The application thread will create an instance of this thread class and set it to run along with itself. We will study the two cases of when this worker thread is marked “daemon” and “non-daemon,” respectively. Look at the code in Listing 17-2.
![]()
Listing 17-2 Prime Number Generator in a Non-Daemon Thread
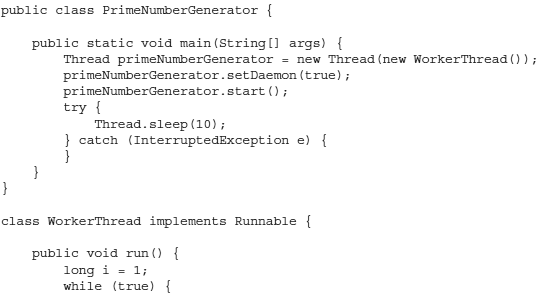
We create a class called WorkerThread that implements Runnable. In the run method, we generate prime numbers and print each generated number to the user console. (Note that we won’t go into the details of the algorithm for prime number generation here.) In the main method of the application class, we create a Thread instance by passing the WorkerThread object in its constructor:
![]()
![]()
We mark this instance as “daemon.”
![]()
CAUTION
The thread instance must be marked “daemon” or “non-daemon” before it is started; otherwise, it acquires its default state depending on the state of its creator. A thread created on a user thread becomes non-daemon by default. Therefore, in the preceding code, we have explicitly called setDaemon to mark the created thread as daemon.
Next, we schedule the created thread to run by calling its start method. We then put the current thread to sleep for 10 milliseconds, giving the worker thread an opportunity to run.
Run the application and observe its output. You will see a list of prime numbers on the console. Every time you run the application, the last generated number varies, indicating that the worker thread is getting a different amount of CPU time on each run. Now modify the parameter to the setDaemon method by setting it to false. Run the application and you will find that the random-number-generation process never stops indicating that the worker thread continues to run even though the main thread has died after a while. Thus, a non-daemon thread continues to run even when its creator is dead. To terminate the application, you need to kill the process by pressing CTRL-C (on Windows) or the appropriate key combination according to your operating system.
![]()
CAUTION
In a nonpreemptive OS (which is difficult to find these days because most are now preemptive), there may be a difference in the execution of the preceding code depending on how the native thread or threads that make up the Java process are affected by the competing priorities of other processes on the OS.
Now that you understand how to create threaded programs, let’s look at a few details of Thread class, such as its constructors and the various static methods it provides.
Thread Class Constructors
As mentioned earlier, there are two ways to create a thread in your application. One is to implement the Runnable interface, and the other is to extend your class from the Thread class. This is possible because the Thread class itself implements the Runnable interface, and that is why you could create a class extending a Thread class to create threads. The Thread class is defined as follows:
![]()
![]()
Thus, to create a thread, you would extend your class from a Thread class and override its default run method implementation. Another way of creating threads, as you know, is to implement a Runnable interface in your class. You then pass an instance of this Runnable object to the Thread class constructor. You have already used this technique in the previous examples.
Besides the constructor that takes a Runnable instance as a parameter, the Thread class defines several more constructors that accept the two more types of parameters and their combinations. The two other types of parameters are the String that specifies the name for the created thread and the ThreadGroup that specifies the group to which the created thread will be added. A thread may be referred to later in the code by its assigned name after it is created. As mentioned earlier, you will use the ThreadGroup to group the threads for performing certain common operations on them collectively.
Static Methods of Thread
The Thread class defines several static methods. As you are aware, the static methods can be invoked without creating an instance of the class. We will discuss a few frequently used static methods.
The activeCount method returns the number of active threads in the current thread’s thread group. For example, if you add the following statement in the main method of your PrimeNumberGenerator class, discussed earlier, you will get the number of active threads in the current thread group along with its name printed to the console:
![]()
![]()
The preceding statement generates the following output on the console:
![]()
![]()
Note that the getThreadGroup method is not a class method and therefore requires an instance to operate upon.
![]()
TIP
You can obtain a reference to the instance of the currently running thread by calling the Thread.currentThread method.
The getName method returns the name of the ThreadGroup on which it is invoked.
The yield method yields the control of execution to another waiting thread at the same priority. The sleep method voluntarily puts the current thread to sleep for the specified amount of time. The time may be specified as a number of milliseconds or a number of milliseconds plus a number of nanoseconds.
The enumerate method returns the details on each thread belonging to the current thread group and its subgroups. Add the following code fragment to the main method of the PrimeNumberGenerator class:
![]()

Run the program and you will get the following output:
![]()
![]()
The two threads in the main thread group are named main and Thread-1; both have a priority level of 5, which is the normal priority.
Finally, the currentThread static method returns a reference to the currently executing thread object. Other static methods are defined in the Thread class, which you should look up in the documentation. We discuss some of the remaining ones, when required, in the remainder of this chapter. Next, we focus on some of the essential and common operations on a thread.
Some Essential Operations on Thread
Once a thread object is created, you can carry out many different operations on it, as listed here:
We will now discuss each of these operations in the following sections.
Setting the Daemon Property
A thread object may be marked as “daemon” or “non-daemon” by calling its setDaemon method. We used this operation in some of our earlier code.
Starting the Thread
Calling its start method starts a thread object and schedules the thread for execution. The created thread will execute the run method of the Runnable object. It is illegal to call a start method more than once. If you do so on a thread that is still executing its code defined in the run method, the JVM will throw an IllegalThreadStateException. When the run method runs to completion, we say that the thread is dead. You should not call the start method on a dead thread. If you do so, no exception is thrown to you. The JVM detects that the thread is dead and does not call its run method. Interestingly, calling the isAlive method after invoking the start method on a dead thread returns true. However, be assured that the run method will never be executed again. If your Thread class defines methods in addition to its mandatory run method, you will be able to invoke these methods on a thread object that is dead. This means that the object of a dead thread is not removed from the system and is available to you as any other object.
Stop, Suspend, and Resume Operations
The stop, suspend, and resume operations mentioned in the preceding task list have been deprecated since J2SE 1.2. You should refrain from calling the stop, suspend, and resume methods because they are prone to causing deadlocks (discussed later). Just so you know what these methods are, a thread may be stopped by calling the stop method, a thread may be suspended by calling the suspend method, and a suspended thread may be resumed by another running thread by calling the resume method.
Yielding Control
A thread may voluntarily yield control to another waiting thread by calling the yield method. Usually a thread awaiting a certain result created by another thread with the same priority will yield its control. Let’s look at a situation of where you would use yield. The java. NIO2 allows you to lock a file. Consider a case where multiple threads may be accessing a single file—some readers and other writers. Both readers and writers will lock the file while accessing it to ensure data integrity and consistency. Both readers and writers may be running at the same priority level. Now, a reader who is holding the lock on the file may periodically yield its control to another contending thread that is waiting to write some new content to the file. This way, the writer threads are ensured to always get a better opportunity to write the latest news to the file.
![]()
TIP
The yield is a hint to the VM that a thread can take a break but is not done. Unfortunately, Java cannot guarantee deterministically the scheduling of its threads, so yield is a hint rather than a stronger requirement. Moreover, the designers did not actually specify whether this hint allows threads of a lower priority to gain some CPU time, or just the ones at the same priority (although the latter is how most implementations have interpreted it). In any event, this is a method that is not frequently called; it can be used by more advanced developers when “tuning” an application to see if they can squeeze out better throughput.
When you call yield, another waiting thread with the same priority as the running thread gets the CPU. If no waiting thread has the same priority, the control returns to the currently running thread. Logically, what happens here is that the thread that executes yield remains in the runnable state, except that it is moved to the bottom of its priority queue. The JVM may now pick up a new thread for execution from this queue, assuming that no higher priority threads exist at this point of time. There is no guarantee which thread will be selected for execution. The scheduler may pick the thread that has yielded control, even though other threads are available at the same priority.
Yielding control is just being nice to other threads at the same priority level. It’s a thread’s way of saying, “I’ve had enough CPU time and want to let others have an opportunity to run; I will run the rest of my code at a later time. If no other threads can be run, give the CPU back to me and I will continue with the rest of my code.” This is different from executing the sleep method, where the thread says, “I do not want to run for n milliseconds. Even if no other thread wants to run, don’t make me run.”
Setting the Priority
You may change the priority of a thread by calling its setPriority method. We discussed thread priorities in depth earlier in this chapter.
Waiting on Other Objects
A thread may wait for some object to signal that the object on which it is waiting is now ready to use by calling the obj.wait() method from the running thread, where obj refers to the object the current thread wants to wait on. You will learn the use of this method later in this chapter when we discuss thread synchronization.
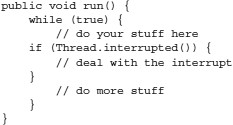
Interrupting Threads
You need to learn three important methods to understand interrupts: interrupt, isInterrupted, and interrupted. A running thread may be interrupted in its work by some other thread or itself. When a thread is interrupted, it does not mean that the thread will stop whatever it is doing. It’s like patting your friend on his shoulder—he might ignore your interruption and continue with whatever he was doing. However, he will remember your patting and might listen to you at a later time. Something similar happens in the case of threads. A thread has an internal flag that is set to true whenever it is interrupted. The interrupted method returns the status of this flag. This is a static method and therefore does not require an object reference. Also, a call to this method clears the flag. Therefore, if you call this method twice, the second call will always return false, assuming that the thread has not been interrupted one more time between your two calls to the interrupted method.
When a thread is first created, it has not been interrupted so far; therefore, calling the interrupted method on it will return false. To interrupt the thread, you call the interrupt method on it. Thus, if the reference to your thread is animator, you would use the syntax animator.interrupt() to interrupt it. This sets the interrupt flag in the animator thread. The thread would continue its work except in special cases when it is sleeping or waiting for an object, which are explained further. A call to the interrupted method within the thread’s body would now return true. What happens in those situations where the thread is in sleep mode (that is, after the thread has executed the Thread.sleep() method) or is waiting on an object (that is, when it has executed the wait method, which is discussed later in this chapter)? In these situations, because the thread is in a blocked state, it cannot respond to an interrupt. To overcome this situation, the designers of Java have made it mandatory to wrap the sleep and wait commands in a try/catch block and you have to catch the InterruptedException. That is why most developers do not provide any code in the InterruptedException block; in other words, it is okay not to handle this exception in most of the situations (see the Tip at the very end of this section for more information). You can just add a comment in this block to explain to the reader what happens when this exception is raised. For a very detailed explanation on dealing with InterruptedException, refer to http://www.ibm.com/developerworks/java/library/j-jtp05236/index.html.
If the thread is not sleeping or waiting, you may use the interrupted method to check whether it has been interrupted. The following code fragment shows how to do this:
![]()
Finally, we come to the remaining method, isInterrupted. This method is similar to the interrupted method in the sense that it returns the status of the interrupt flag. However, this method is nonstatic and therefore requires an object reference for invocation. Also, a call to this method does not clear the flag.
We will now demonstrate the use of these methods through a program example. We will modify our earlier prime number generation program for this purpose. The main thread after starting the thread that continually generates the prime numbers will wait for keyboard input. When the user hits the ENTER key, we interrupt the number generator thread, which on its own will decide the logical point for stopping and will terminate itself at an appropriate time. We also create another lazy worker thread in the same application that does not do any work other than sleep. We will send an interrupt to this thread, which is sleeping, and observe how the thread is awakened.
![]()
NOTE
Running this code from a command prompt will display the generated prime numbers on the console as the generator thread waits to be interrupted, which occurs when the user hits the ENTER key. NetBeans unfortunately does not update its console until the thread is interrupted, at which time it dumps all previously generated prime numbers to the console.
Look at the program in Listing 17-3 for the implementation of these features.
![]()
Listing 17-3 Understanding Interrupt Processing in Threads
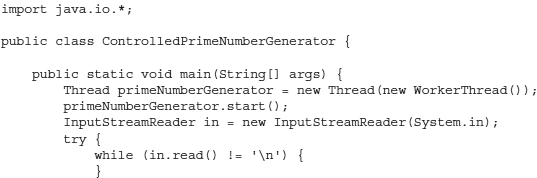

In the main method, we create a thread that runs the WorkerThread for generating prime numbers:
![]()
![]()
We start this thread as usual by calling its start method:
![]()
![]()
Next, we wait for the user to press the ENTER key on the keyboard:
![]()
![]()
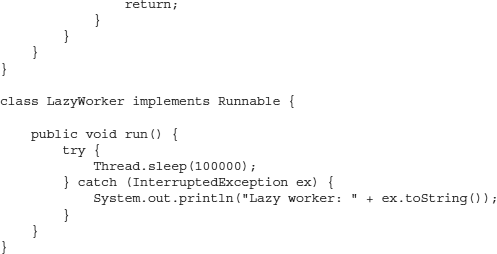
After the user input is received, we interrupt the number generator thread:
![]()
![]()
This sets the interrupt flag in the designated thread. Note that it will not stop the primeNumberGenerator thread, which may choose to ignore this interruption completely.
Next, we check the status of the interrupt flag in the primeNumberGenerator thread, which mostly remains true at this time, assuming that the primeNumberGenerator thread has not got a chance to process the request and reset its interrupt flag so far:
![]()

If you make the main thread sleep for a certain amount of time (uncomment the commented lines in the program to do so) before calling the preceding code, the primeNumberGenerator thread will have probably processed the request and reset its internal flag. In this situation, you see the message printed in the preceding else clause. To honor and process the interrupt request, the WorkerThread, in its infinite while loop, checks the status in each iteration by calling the Thread.interrupted method:
![]()

If the thread has been interrupted, we print a message to the user and return to the caller, effectively terminating the thread’s run method.
Finally, let’s look at the lazy worker thread. In the run method of LazyWorker, we simply cause the thread to sleep for a very long time:
![]()

Whenever the thread is awakened from its sleep, we print the message to confirm the reason for the interruption.
The main method simply creates an instance of LazyWorker and starts it. The main thread puts itself to sleep for some time before sending an interrupt to LazyWorker thread. Sample output is shown here:
![]()
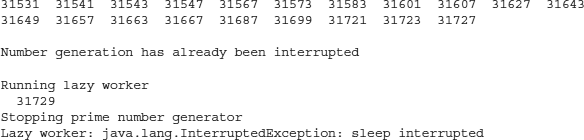
Note that the output shows the number 31729 generated even after the thread was interrupted. This is because the number generator thread has not got its CPU slot before the main thread prints the “has already been interrupted” message to the terminal.
If you introduce the Thread.sleep statement, the interrupt, and isInterrupted calls, you will get output similar to what’s shown here:
![]()

Now, the program prints the message stating that the number generator has already honored our interrupt request. Finally, observe the request processed by the lazy worker thread. The message shows that the thread was interrupted in its sleep.
![]()
TIP
A blocking method, when it catches the InterruptedException, clears the interrupt status flag. If you want to preserve the evidence that the interruption occurred so that code higher up on the call stack can learn about it, call the interrupt method to set the flag once again, as shown in the code fragment here:
Joining
A thread may join with another thread; in such a case, the thread that wants to join with another thread will have to wait for the other thread to complete its job (that is, run to completion) before it continues. If the other thread never completes its job, the joining thread will have to wait indefinitely. To overcome this situation, a thread may join for a specified period of time. In this case, the thread will acquire control after the other thread has run to completion or the specified time period is over, whichever occurs first.
Thread Synchronization
From our discussions so far, it is obvious that CPU allocation for thread execution is totally asynchronous and therefore the thread execution order cannot be assumed. When these threads access a common resource, keeping its state consistent becomes a great challenge in thread programming. If a thread has partially modified a resource when it loses the CPU, no other thread should be given access to this resource unless and until the first thread acquires the CPU again and completes its modification of the resource, leaving it in a consistent state at all times. Consider the stock exchange scenario, where several buyers may be trying to grab a stock’s sale order placed at a very attractive price. The inventory that is the sale quantity for this order now becomes a common resource that many buyers compete over to acquire. The access to this resource must be carefully guarded and synchronized. In a banking scenario, the simultaneous withdrawals by many concurrent users may leave the bank’s cash repository in an inconsistent state, which certainly the bank won’t want to have happen. A web-based bulletin board may be written to concurrently by many users—one user giving sports updates, another user discussing political news, and other users just gossiping. Without controlled access to this bulletin board, the articles can get mixed up at times.
In many situations in real life, you need to guard a common resource for which many compete. The problem is solvable and is typically done using resource-locking techniques. Many low-level constructs are available for providing synchronized access to a common resource. If you have taken a course on operating systems, you have encountered terms such as semaphores, monitors, and critical sections. Java initially abstracted most of these from developers by introducing a single keyword, synchronized, in its initial version. Beginning in J2SE 5.0, access to these low-level constructs was provided. You will learn these other constructs in the next chapter. In this chapter, we focus on the synchronized keyword to better understand the thread synchronization.
To explain the synchronization issues and understand their solutions, we start with a concrete example.
Bucket Transfers
Let’s suppose we have two buckets of balls and two threads, as illustrated in Figure 17-4. One thread transfers a few balls from the left bucket into the right one, while the other thread does the reverse operation. When a thread performs a transfer, it removes a few balls from one bucket and puts them in the other bucket. Both these operations should be atomic (done as a single unit) to keep the total system consistent. The total system consists of both the buckets and their contents. At any time after the transfer is completed, the total number of balls in the two buckets together must always remain constant. This can be achieved only if access to both buckets is guarded during each transfer. Therefore, a thread should acquire exclusive access to both the buckets until the transfer is complete, and only then can a consistent system state be guaranteed.
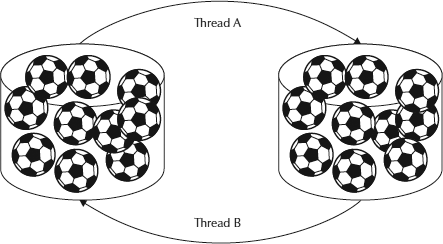
FIGURE 17-4. Threads transfer balls from one bucket to another
We will now discuss the program code that implements the bucket transfers so you can see what happens when we do not have guarded access to the buckets. The full source for the bucket transfers is given in Listing 17-4.
![]()
Listing 17-4 Bucket Ball Game Demonstrating Thread Synchronization

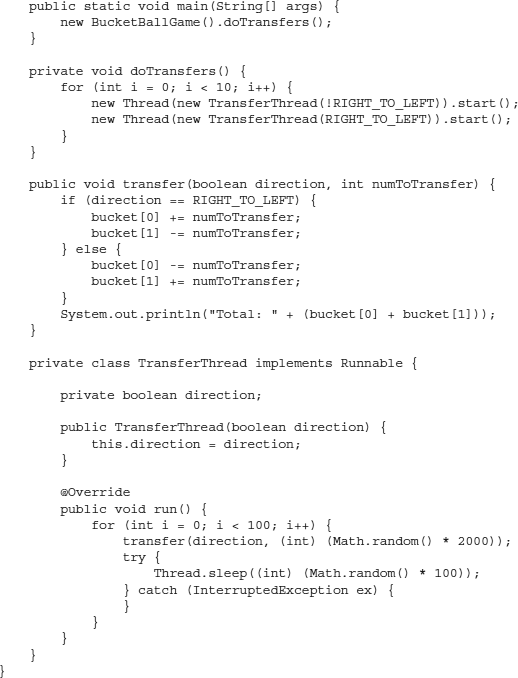
We first create two buckets by declaring an integer array of size 2:
![]()
![]()
We also define a constant for determining the transfer direction:
![]()
![]()
In the main method, we create an application instance and call its doTransfers method:
![]()
![]()
In the doTransfers method, we create 10 instances of our TransferThread class that transfer balls from left to right and 10 more instances that transfer from right to left:
![]()

TransferThread is our thread, which is a private inner class and discussed later.
Subtracting the desired number from the first bucket and adding the same to the second bucket performs the transfer of balls:
![]()
![]()
After the transfer is over, we print the total number of balls from the two buckets:
![]()
![]()
Finally, we look at the transfer thread class implementation:
![]()
![]()
The class constructor receives a parameter, which we copy into a class variable for further use. In the run method, we perform 100 transfers:
![]()
![]()
For each transfer, we create a random number in the range of 0 to 1999:
![]()
![]()
We then cause the thread to sleep for a random time, in the range of 0 to 100 milliseconds:
![]()
![]()
Now, run the application and observe the output. Initially, the output shows a total of 20,000, which is correct because the number of balls in each bucket is 10,000. For a first few iterations, this total remains 20,000; however, after a while this total changes to a figure other than 20,000. Typical partial output is shown here:
![]()

How is it that the total does not remain constant at 20,000? Have we lost some balls? In some runs, you will find the total is more than 20,000. Are new balls created then? No. The answer to the original question is that we do not perform the ball removal and insertion operations as an atomic unit—that is, as a unit that is not broken up. When one thread removes the balls from the bucket, before it puts them into the second bucket, another thread gets the CPU. This new thread modifies the bucket states without the knowledge of what the first thread has done. This leaves the total system in an inconsistent state. To solve this problem, we must perform the ball removal and insertion operations atomically. In other words, even if the running thread loses the CPU in between the two operations, no other thread should be given access to the buckets unless and until the first thread resumes and completes its previously uncompleted operation. To achieve this, Java provides a simple keyword called synchronized. Let’s make a small change in our program to implement this synchronization. Simply put the synchronized keyword between the public and void literals in the transfer function declaration, as shown here:
![]()
![]()
Now run the program and observe the output. You will find that the output now remains constant to 20,000. This is because each time only one thread at a time can perform a transfer.
Producer/Consumer Problem
The scenario described in the previous section is a very trivial situation used for demonstrating synchronized access to a common resource. In real-life situations, you would require synchronization between many contending threads. Java provides a special wait/notify mechanism to achieve this—and that is what we will be discussing in this section. To teach wait/notify implementation, it is common to use a pedagogical producer/consumer problem, which is what we’ll do here.
We will first look at the classical producer/consumer problem in thread programming (see Figure 17-5) and then show its implementation in a Java program.
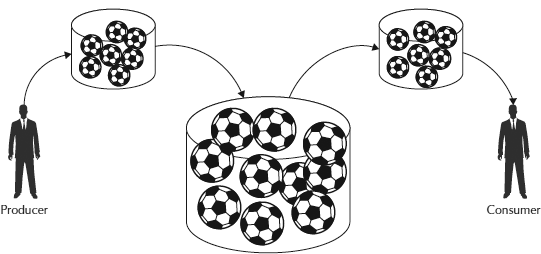
FIGURE 17-5. Producer/consumer scenario
Consider a situation where we have an empty bucket. A producer produces a pack of balls and puts it in the bucket. As soon as the pack is placed, the consumer (who is waiting for the pack) immediately picks it up. The producer now creates another pack and puts it in the bucket. As soon as this pack of balls is in the bucket, the waiting consumer is notified and again immediately picks up the pack from the bucket. This process continues in tandem, where the producer keeps on producing packs of balls and the consumer keeps on consuming those packs as soon as they are available in the bucket. Note that the producer and consumer work independent of each other. Therefore, the consumer must be notified whenever the producer adds a pack to the bucket. Java provides the wait/notify construct to implement this functionality. The use of this functionality is illustrated in Listing 17-5.
![]()
Listing 17-5 A Producer/Consumer Scenario in Thread Programming

In the main method, we first create a bucket:
![]()
![]()
We discuss the Bucket class later. In the main method, we create and start two threads:
![]()
![]()
The Producer thread produces the balls and puts them in the bucket after they are produced. The Consumer thread waits for the balls to become available in the bucket and then removes them from the bucket when they do become available.
The Consumer class implements Runnable and receives the Bucket object as an argument to its constructor. In the run method, the consumer fetches the pack of balls from the bucket 10 times.
![]()
![]()
To fetch the pack, it calls the get method of the Bucket class.
Like the Consumer class, Producer is a thread class that receives a reference to the Bucket object at the time of its construction. In the run method, it puts 10 packs in the bucket. The pack size is set to a random number in the range 0 to 99:
![]()
![]()
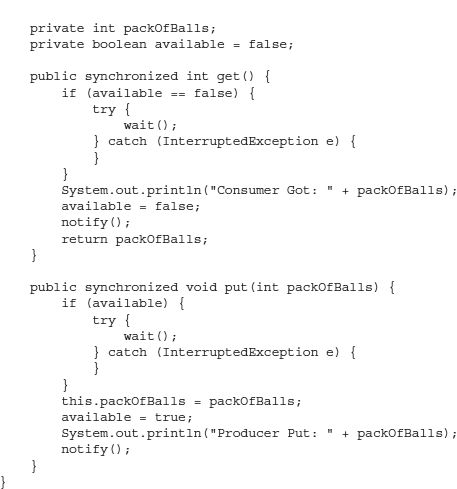
Let’s now discuss the most important class—Bucket. The Bucket class declares two class variables:
![]()
![]()
Here, packOfBalls indicates the number of balls added to the bucket at any point in time, and available is a boolean flag that is set to true whenever a pack is added to the bucket and is reset after the pack is removed from the bucket. The get method is used for retrieving the pack from the bucket:
![]()
![]()
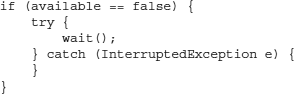
The get method is synchronized because the method implementation uses the wait method, which can be used only within a synchronized method or block. In the get method, we test the condition of the available flag. If the flag is reset, we simply wait on the current object for the condition to become true:
![]()
The JVM will awaken this thread whenever some other thread sets the available condition. When this happens, we reset the flag, notify the consumer, and return the value of packOfBalls to the caller:
![]()
![]()
The producer ensures that the packOfBalls value is set before waking the waiting consumer thread. This is done in the put method. The put method of the Bucket class is also synchronized because it uses the notify method in its implementation:
![]()
![]()
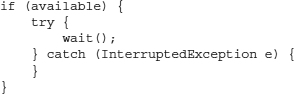
The put method first checks whether it is allowed to put the balls in the bucket by checking the bucket’s available status. If the bucket is not available, the method waits for it to become available:
![]()
It then copies the received parameter in the class variable, packOfBalls, and sets the available flag to true:
![]()
![]()
It then calls the notify method to inform the consumer that the balls are now available in the bucket for its consumption:
![]()
![]()
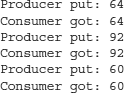
Therefore, whenever the producer calls the put method on the Bucket, a notification is sent to the waiting consumer. The consumer uses the get method to wait and retrieve the pack of balls whenever it is available. The process will continue in tandem forever. Sample, partial output is shown here:
![]()
This producer/consumer problem is observed in many real-life situations. Consider a chat room application where many users concurrently read/write their messages in a single room. If the getter/setter methods are not synchronized, messages will get jumbled up. A similar thing happens for a bulletin board that is read and written concurrently by many users. An auction site might receive many bids and offers for a single item in a very short period of time. Therefore, access to the board that displays the last bid/offer must be synchronized. If a single bank account is accessible by a group of users, the deposits and withdrawals must be synchronized. A typical database application where several records are read, written, and modified in a single table must provide synchronized access to the table to avoid data corruption. These situations illustrate the need for the proper synchronization of common resources in real-life applications.
Object Locks
When you use the synchronized keyword, it actually obtains a lock on the current object. In Java, every object has an associated lock. You have so far seen the use of the synchronized keyword on the method declarations. This, however, can be used on any block of code. For example, you may provide an atomicity of operations on a block of code by enclosing it in a synchronized block, as shown here:
![]()
![]()
This synchronized statement obtains a lock on the current object specified by the this keyword and executes all the program statements enclosed in the curly braces as an atomic operation. Instead of this, which is just a reference to the current object, you may use any other object reference. The program will obtain a lock on this specified object.
![]()
CAUTION
Be aware that this will lock the whole object while execution of the block is occurring on the “winning” thread. Therefore, any other thread will have to wait to call any other method on that object.
When to Synchronize
Synchronization is essential for avoiding data corruption and race conditions that can lead to a program crash, incorrect results, or unpredictable behavior. Even worse, these conditions are likely to occur rarely and sporadically. Thus, an application may pass all its test conditions in a development environment, yet fail sporadically in a production environment. Such problems are hard to detect and reproduce. This, however, does not imply that you should synchronize each and every method. In fact, doing so can lead you into a deadlock if the calls to synchronized methods are not properly ordered, as explained in the next section. Inappropriate or excessive synchronization also leads to an application’s poor performance. A synchronized call to an empty method may be 20 times slower than the corresponding unsynchronized call. To understand why, let’s discuss what synchronized really means.
The synchronized semantics guarantees that only one thread has access to the protected section at any given time. Consider a case where you have two threads running on two different processors, both having access to a common variable. This variable obviously resides in the common main memory of your machine. Both processors may cache this variable. Thus, in the absence of synchronization, the two threads may see a different value to a common variable read from the processors’ respective caches. When synchronizing on a monitor, the Java Memory Model (JMM) requires this cache to be immediately invalidated after the lock is acquired and then flushed before it is released. Flushing the cache frequently can be expensive. This explains the performance penalty in using synchronization.
![]()
NOTE
Other platforms typically implement the critical section facilities with an atomic “test and set bit” machine instruction, thus making them perform better than the Java platform in similar situations.
It is important to understand that even when a program contains only a single thread running on a single processor, a synchronized method call will take longer to execute than an unsynchronized method call. If the synchronization requires contending for the lock, the performance penalty is substantially greater. This is because before a lock is obtained, several thread switches and system calls may be happening in the system.
Therefore, the bottom line is this: A multithreaded program requires a good balance between synchronizing enough to protect your shared data from corruption and yet not so much as to risk a deadlock or cause poor performance. Using a volatile keyword can result in a more efficient way to synchronize as explained in the sidebar.
Using volatile for Thread Synchronization
Marking the variable with the volatile keyword ensures that the same value is seen by all threads at any given point in time—the threads are not allowed to keep local copies of a volatile variable. Consider the following code fragment:
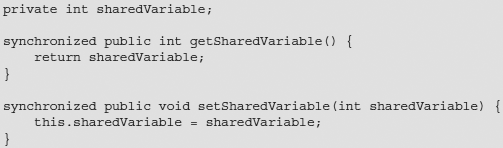
Here, the access to the sharedVariable is guarded by setting the accessor/mutator methods as synchronized. A better way to do this is with the following code:
Now, we have marked the variable as volatile instead of making the access methods synchronized. This is more efficient because volatile only synchronizes the value of just one variable between the thread and main memory, whereas synchronizing a method requires it to provide synchronization for all its variables between the thread and main memory besides locking and releasing a monitor.
The Deadlock
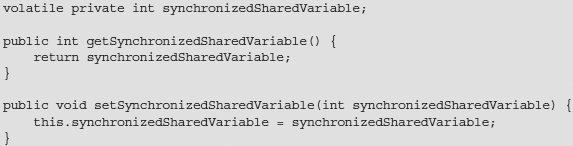
One of the major problems in thread programming is the occurrence of deadlocks in programs that are not carefully designed. When two or more threads compete to obtain a lock on a shared resource and none of them can proceed until the other releases the lock it holds, a deadlock occurs and none of the competing threads can continue. This is like when two people are standing at a door, both holding it open for the other to pass through. Such a situation should obviously be avoided. Figure 17-6 shows an example of a deadlock.
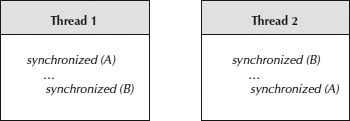
FIGURE 17-6. A deadlock situation
In this figure, the two threads perform synchronized access to their code. Consider the situation where Thread 1 obtains a lock on Object A and then loses the CPU. Now Thread 2, which gains the CPU, obtains a lock on Object B and executes a few code lines before losing the CPU. Thread 1, which now has the CPU, proceeds with its code to obtain a lock on Object B. However, because Object B has been locked by Thread 2, it cannot proceed and has to wait until the lock on Object B is released by Thread 2. Now, Thread 2 gains the CPU one more time and proceeds with its own code, in which it tries to obtain a lock on Object A. Because Object A has previously been locked by Thread 1, Thread 2 cannot continue unless the lock on Object A is released by Thread 1. You can see that each thread must wait on the other to release its lock and therefore neither can proceed. This situation is called deadlock.
Solutions to Deadlock
Deadlocks have no simple solution. They can be avoided only by careful coding. However, three techniques can be used to help you in detecting and preventing deadlocks in your code:
Lock Ordering
In our earlier example, deadlock can be avoided by maintaining the order in which the locks are obtained and released by two threads. If locks on multiple objects are obtained and released in the same order by both threads, a deadlock cannot occur. Thus, if both threads in our example obtain the locks in the order Object A first, followed by Object B, a deadlock will not occur. The general rule here is that in case of multiple locks, if all locks are always taken in the same order by any thread, deadlocks cannot occur. However, knowing about all the locks needed ahead of taking any of them may not always be the case.
Lock Timeout
Putting a timeout on lock attempts helps in preventing a deadlock situation. Let’s look at how this happens. If a thread does not succeed in obtaining all the necessary locks within the given timeout period, it will back up, freeing all locks taken so far. It then waits for a random amount of time before making another attempt to obtain the locks. The random amount of waiting time gives a fair opportunity for others to obtain locks. The problem with this technique is that the synchronized keyword has no facility to specify this timeout. To use a timeout facility, use the java.util.concurrent.locks.Lock interface introduced in J2SE 5.0 for thread synchronization.
The ReentrantLock class in the same package implements this interface. The use of this class is illustrated in the following code snippet:
![]()
You may use the tryLock (long timeout, TimeUnit timeUnit) method to specify the timeout for attempts to acquire a lock.
To demonstrate how to use this Lock implementation, we modify the BucketBallGame class discussed previously. To maintain the integrity of the entire system, earlier we used the synchronized keyword on the transfer method. The same effect can be achieved by using locks, as shown in the modified class in Listing 17-6.
![]()
Listing 17-6 Modified Bucket Ball Game Using Locks
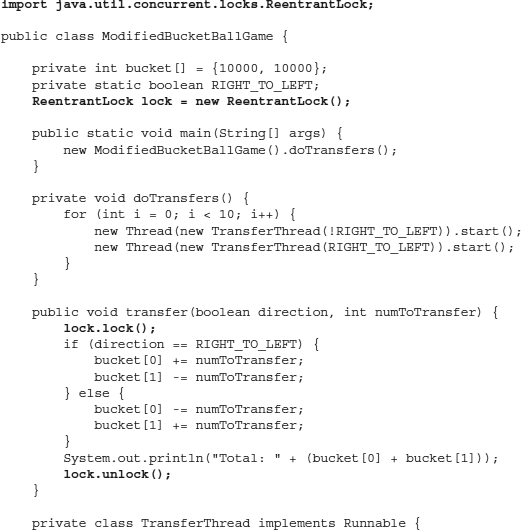
The changes made to the original class definition are shown in bold typeface. We create the Lock instance as an instance variable:
![]()
![]()
Once a lock object is available, we can enclose the critical section code anywhere in the program by calling the lock method at the beginning of the critical section and the unlock method at the end. Look at the placement of the lock.lock and lock.unlock statements in the listing. The code enclosed between these two calls would be executed as an atomic operation, and the system’s integrity is never compromised.
Deadlock Detection
If both these remedies of lock ordering and timeout are not feasible, we can resort to deadlock detection, which is definitely a more difficult solution of deadlock prevention. In this solution, we record every request and acquire a lock by all threads. Generally, this is stored in a map or graph for ease of traversal. When a request for a lock is denied, the thread traverses this lock graph to check for deadlocks. Consider the lock graph shown in Figure 17-7.
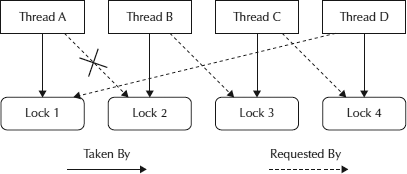
FIGURE 17-7. Graph used in deadlock detection
Here, Thread A is holding Lock 1 and has requested Lock 2. The request fails. Therefore, Thread A tries to find out why the request failed. It realizes from the graph that Lock 2, which it has requested, is currently being held by Thread B. Now it moves further in the graph to detect that Thread B is waiting for Lock 3. Continuing on, it finds out that Thread C is holding Lock 3, which is requested by Thread B. Going further, it detects that Thread C is waiting on Lock 4, which is currently held by Thread D. One more step and it finds out that Thread D is waiting for Lock 1, which is held by Thread A itself. Now, Thread A knows that a deadlock has occurred and its request for Lock 2 will not be fulfilled until the deadlock is resolved. So how do we resolve it?
A possible approach would be to release all locks and withdraw all pending requests, and then wait a random amount of time before every thread tries acquiring the desired locks. There is no guarantee that this second attempt of acquiring locks all over again would succeed, and we may be required to repeat the entire process several times, especially if the number of threads involved is large. A possible remedy to this could be to do a priority-based backup, where only certain threads that have been assigned lower priorities are made to back up, while other threads continue holding their locks. The priority for the backup itself may be randomly assigned whenever a deadlock is detected.
From these discussions, we can make one conclusion for sure: Avoiding deadlocks is not always easy, but careful coding can mitigate the situation.
Summary
Thread programming is considered one of the most important aspects of learning a new language, and at the same time it is the most complex aspect to learn. In this chapter, you learned how to create and use threads in your Java applications. A thread is a single unit of execution within an operating system process. A process may contain multiple threads. The OS schedules these threads on the CPU based on a predetermined scheduling policy. We discussed the preemptive and nonpreemptive scheduling policies. Each thread is assigned a certain priority. In the case of preemptive scheduling, a thread with a higher priority preempts the running thread, whereas in the case of nonpreemptive scheduling, a running thread continues using the CPU even when a thread with a higher priority is waiting. The JVM may derive its thread-scheduling functionality from the underlying platform. We discussed the variations in JVM implementations on various popular platforms. Threads are assigned a priority level. Java defines these levels in the range 1 to 10. A separate queue for scheduling threads on the CPU is maintained for threads at each priority level.
To create threads in Java, you have two mechanisms. One is to implement the runnable interface, and the other one is to subclass the Thread class. Implementing the runnable interface is the recommended way. The Thread class provides several static methods to perform various thread-related operations. You studied several of these methods in this chapter.
When multiple threads access a common resource, resource contention may occur. To avoid this, you need to use locking mechanisms. Java provides an easy way of locking resources with the use of the synchronized keyword. You learned the synchronization techniques with the help of two code examples. In the next chapter, you learn about the concurrency framework introduced in J2SE 5.0.