
CHAPTER
15
Graphics and User Gestures Processing
 n Chapter 13, you learned about GUI building and event processing. In Chapter 14, you learned about creating sophisticated GUIs using layout managers. In those two chapters, the JFrame container was used to create a stand-alone Java application. In this chapter, you learn about another class of applications called applets. Applets have a somewhat different life cycle and runtime requirements than a stand-alone application. Applets require a web browser to run. Java does supply a command-line utility for testing applets; however, for an end user, using a browser is the preferred way of running an applet.
Along with applet programming, you learn lots of other techniques for detecting and processing user gestures in this chapter. You learn how to process mouse events and draw graphics on the screen. You create a popup menu for an application and learn to intercept keystrokes in a GUI application. Like in the earlier chapters, we use the Swing framework for developing applications in this chapter. Swing is a newer framework that supersedes the earlier AWT and offers many more advantages, although there is a lot of similarity in the use of Swing and AWT. Swing provides an equivalent for most of the components available in AWT. The names of these components are also identical, except for an uppercase J added in front of the name. All these new components have the same interface as their older counterparts, with a good number of additions to the interface in several cases. Sometimes, you may be able to convert your old AWT-based applications to newer Swing-based ones just by merely adding J in front of the component class names used in older applications.
Many developers these days use only Swing. Therefore, we will continue using it in this chapter, leaving AWT for those who have some special reason to stay with the older AWT APIs.
Here is what you will be learning in this chapter:
What Is an Applet?
An applet is a Java program that can be embedded in a HTML page and opened in a browser. The HTML pages are located on a remote web server. When the client opens a HTML page in his browser, the HTML code gets downloaded to the client machine. Along with the HTML code, any Java applets embedded in the page also get downloaded to the client machine. The applet code then runs under the JVM installed on the client machine. Chapter 1 mentioned the misconception in the early days that the browser runs an applet. Although it is true that a browser is required to run an applet, the browser must be enabled with a JVM. If you turn off the JVM in a browser, it will not display an applet in its HTML page. An applet can be run without a browser, as you will see later in this chapter, by using the AppletViewer utility provided in JDK.
Also discussed in Chapter 1, if applet code is downloaded from a remote machine, it runs under several security restrictions, unless explicitly allowed greater freedom by the user. Contrary to this, a stand-alone application is available locally and is therefore not subjected to the same security restrictions. With the introduction of J2SE 1.2, applications are also subjected to security policies set by the user.
You will create applets whenever you want to make your applications available to your users from a remote machine. This means that the applications need not be preinstalled on the client machines. This is one of the greatest benefits in creating applets. The programs can now be deployed on remote servers, and the client can download and use the application on his machine whenever required. Because the client downloads the program every time he needs it, the client is assured to have the latest updates to it. This saves a lot of effort in distributing updates to your applications.
Creating applets is trivial. You simply declare a class that inherits from the Applet (AWT) or JApplet (Swing) class. It is said that developers like to get their hands dirty by quickly jumping in and coding. Therefore, we’ll now get our hands dirty by creating an applet before discussing its life cycle.
Creating Your First Applet
As stated earlier, to create an applet you extend your class from Applet (of AWT package) or JApplet (of Swing package) and override its methods to provide the desired functionality. That’s all that’s required to create an applet. Once you create an applet class, you compile and embed it into an HTML page, which is opened in your browser for running the applet. You may embed multiple applets in an HTML page, which are positioned at the locations specified in the HTML code.
To add functionality to the applet, you override the appropriate methods of the applet class. One such method you will be overriding is the paint method. Whenever the applet needs repainting, the runtime calls its paint method. In your overridden paint method, you provide whatever drawing you wish to create on the applet’s surface. The paint method for this purpose receives a device context (Graphics) object as its parameter. You use the various methods of the Graphics object to create some useful graphics. The code in Listing 15-1 shows how to create an applet and override its paint method to print a message on the applet’s surface.
![]()
Listing 15-1 First Java Applet

The JApplet class is defined in the javax.swing package, so we need to import this in our source program. The FirstApplet class inherits JApplet, and we override the paint method. Whenever the applet needs repainting, the runtime calls this paint method. The paint method receives a Graphics object that allows the user to draw graphics on the applet’s surface. In our case, the overridden paint method calls the drawString method of the Graphics object to display a string on the applet’s surface. The string to be displayed is passed as the first parameter to the drawString method. The second and third parameters specify the x and y coordinates of a point where the string is to be displayed.
![]()
NOTE
The Graphics class provides a lot more functionality than just drawing a string message. It provides the framework for all graphics operations within AWT and Swing. It plays two different but related roles. First, it is a graphics context that sets the background and foreground colors, the font, the drawing region, and the eventual destination (screen or image) of the graphics operations themselves. Second, the Graphics class provides methods for drawing simple geometric shapes, text, and images to the destination.
Running the Applet
Place the code in Listing 15-1 in your favorite editor and store it under the filename FirstApplet.java. Compile the file to create a corresponding .class file. Next, you will need to write some HTML code to run this .class file in a browser window. The HTML code (FirstApplet.html) that does this is given in Listing 15-2.
![]()
Listing 15-2 HTML Code for Running the Applet
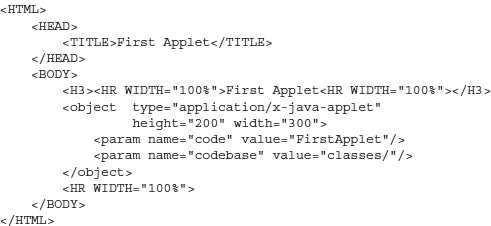
In the HTML code, you set up the page title within the TITLE tag and set the page contents in the BODY tag. In the page body, we first print the heading “First Applet.” To include the applet in the HTML body, we use the object tag:
![]()

The type parameter in the object tag specifies the type of application to run. The width and height parameters specify the size that the applet should occupy within the HTML page. The code parameter specifies the name of the .class file to run, and the codebase parameter specifies the path where the mentioned .class file can be found. This path is relative to the current folder from where the HTML code is opened.
![]()
NOTE
HTML tags are not case sensitive. To prove this point, we use a mix of upper- and lowercase tags in the preceding HTML code.
Once you have set up the HTML page and the .class file in the classes folder, simply open the page in your favorite browser. You will see the output shown in Figure 15-1.

FIGURE 15-1. Running the applet in a browser
Using AppletViewer
If you do not wish to use the browser every time you develop and test a new applet, you can use the AppletViewer utility provided as a part of the JDK. On the command prompt, type the following:
![]()
![]()
The applet will now open and run within the AppletViewer application. The output is shown in Figure 15-2.

FIGURE 15-2. Running an applet in the AppletViewer application
![]()
TIP
If you use NetBeans for developing your applets, right-click your applet source and click the Run File option. NetBeans will start the AppletViewer and run your source applet within it.
Understanding Applet Life-cycle Methods
When the applet runs, it provides several callback methods during its life cycle. You can override these methods to provide whatever functionality you want. The life-cycle methods are init, start, paint, stop, and destroy. You have already used the paint method in your first applet to draw some graphics on the applet.
The init method is typically used for creating resources required during the life of the applet. Usually, you build the GUI in the init method. The start method is called just before the applet starts executing. This happens when the applet is loaded the first time and whenever the user revisits the page that contains the applet.
![]()
NOTE
The init method is called only once when the applet is loaded the first time, whereas the start method may be called several times during the applet’s life cycle.
The stop method is called just before the applet stops its execution. This happens whenever the user leaves the applet’s page or quits the browser. Typically, the resources that are not required for the entire life cycle are allocated and deallocated in the start and stop methods, respectively. An example would be making a socket connection to the server.
![]()
CAUTION
Under the default security policy, an applet is not allowed to make a socket connection to any server other than the one from where it originated.
Because this socket connection is not required whenever the applet loses focus, you may make the connection in the start method and release it in the stop method. Another example would be playing an audio file; you can play the music while the applet is in focus and stop it whenever it goes in the background.
The destroy method is called before the applet is finally unloaded. You use this method to clean up the resources you may have allocated in the init method. Finally, the paint method is called several times during the applet’s life cycle. It is first called by the runtime whenever it determines that the displayed contents must be refreshed onscreen. The paint method is then called whenever the programmer explicitly calls repaint or update.
To appreciate the practical applications of these methods, consider a video viewer applet. In developing such an applet, in the init method you might draw the viewer controls and start loading the video file. The start method would wait for the file to be fully loaded before playing it. The stop method would pause the video and not rewind it. Thus, the next invocation of the start method would continue the video from the last stopping point. The destroy method may remove the video from memory, implying that a call to init is required to start the video all over from the beginning.
Now that you have learned how to create an applet and understand its life-cycle methods, we will now create a very simple drawing tool (compared to the popular Paintbrush program) based on an applet. During the creation of this application, you will learn how to detect and process mouse clicks, mouse motion, and keyboard input. You will also create popup menus and use a few more Swing controls. Note that all the user-gesture-detection and -processing techniques described in this section can be applied to stand-alone Swing applications and are not restricted to use with applets.
Processing Mouse Events
A drawing tool typically uses a mouse as a pointing device for creating graphics. For drawing graphics on the application screen, your application must respond to user gestures such as mouse moves and mouse clicks. Whenever a user clicks a mouse button or moves the mouse, the mouse events occur. Java provides three listener classes for processing these mouse events. It differentiates between the mouse click and mouse motion events. The user moves the mouse around most of the time while using the computer. Thus, several mouse motion events are continuously generated as the mouse is moved. However, the user less frequently clicks the buttons on the mouse; thus, only a few mouse click events are generated during the program’s use. Therefore, it makes sense to separate the mouse click and mouse motion event listener interfaces. Additionally, a listener interface is provided for receiving mouse wheel events. Let’s first look at how to process mouse click events.
Mouse Clicks
To process mouse click events, Java provides the MouseListener interface. This interface provides five different methods corresponding to certain actions. When a mouse enters a component, a mouseEntered event is generated, and when it leaves the component, a mouseExited event is generated. Similarly, when a user presses the mouse button, a mousepressed event is generated, and when the button is released, a mouseReleased event is generated. Additionally, there is one more callback method, called mouseClicked. This is called whenever the user clicks (presses and releases) the mouse button.
To start building our drawing tool, we begin with processing mouse click events. Our application will simply print the coordinates where the mouse is clicked. The coordinates are printed at the click location. The full program is given in Listing 15-3.
![]()
Listing 15-3 Processing Mouse Click Events

In the init method, we set up the listener for the mouse events:
![]()
![]()
Note that we use an anonymous class here to process mouse events. The other option would have been to implement the mouseListener interface. However, this would require providing the implementation for all five methods defined in the interface. Because we are interested in processing only a single mouse click event, the use of an adapter class is recommended. The adapter classes were discussed in Chapter 13. In the anonymous class, we override the mouseClicked method:
![]()
![]()
The method receives a parameter of type MouseEvent that contains the details of the mouse click event. From this parameter, we retrieve the x and y coordinates of the click point and assign those to the pt variable:
![]()
![]()
The program then calls the repaint method to post a paint request to the applet. This results in executing the applet’s paint method.
![]()
CAUTION
The repaint method may not result in an immediate invocation of the paint method. The applet screen is not refreshed on every click, and you will see the overlapped coordinates printed on each mouse click. When you resize the applet, the text will disappear from the screen.
The paint method receives a parameter of type Graphics. This is a device context for printing graphics on the device:
![]()
![]()
The paint method prepares a string containing the coordinates taken from the pt variable and prints it at the same location as pt:
![]()
![]()
The drawString method of the Graphics class takes the string to be printed as the first parameter. The second and third parameters to the method specify the x and y coordinates, respectively, of the point where the string is to be displayed.
Now, when you run the applet and click the mouse anywhere on the applet surface, the program will read the coordinates where the mouse is clicked and print the same on the applet. Some typical output is shown in Figure 15-3.
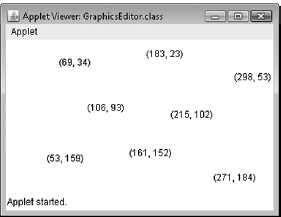
FIGURE 15-3. Applet displays the coordinates of the clicked point
Mouse Motion Events
Java provides an interface called MouseMotionListener to process mouse motion events. There are two types of motion events—one when the mouse is moved with the button pressed and the other without the button being pressed. Accordingly, the interface provides two methods: mouseDragged and mouseMoved. The mouseDragged method is called whenever the mouse button is pressed on a component and then dragged. The drag event is delivered to the component continuously until the time the mouse button is released. This may not happen within the component boundaries; however, the event continues to be delivered as long as the button is not released. Because the drag-and-drop operation is platform dependent, this event may not be delivered during a native drag-and-drop operation. The mouseMoved method is invoked when the mouse cursor is moved over a component but no button has been pressed. We use this event in our application to draw lines.
Whenever the user clicks on the applet, the line drawing begins. To indicate this, we change the cursor from its default arrow shape to a crosshair. As the user moves the cursor, a line will be drawn from the starting point to the current cursor position, thus producing a rubber band effect. When the user clicks the mouse one more time, the drawing stops and a line is permanently drawn from the start position to the last position where the mouse was clicked. The user can continue drawing more lines by clicking the mouse one more time and dragging it to a new position. Some sample program output is shown in Figure 15-4.

FIGURE 15-4. Line-drawing applet
The start and end coordinates of all the lines are stored in an ArrayList, which is a type of Collection. Collections are covered in Chapter 16. The applet displays all drawn line segments whenever it is repainted.
Listing 15-4 presents the code for our line-drawing applet.
![]()
Listing 15-4 Line-Drawing Applet That Consumes Mouse Motion Events


The GraphicsEditor2 class that inherits JApplet declares three point-type variables:
![]()
![]()
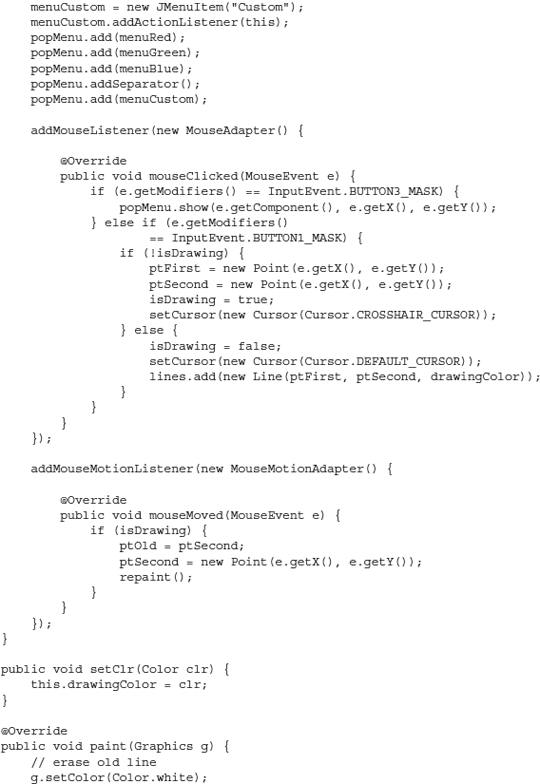
The ptFirst variable stores the start point of a line segment, and the ptSecond variable stores its end point. The ptOld variable is used for storing the previous value of the end point. It also declares two more variables: isDrawing and lines. The isDrawing variable is of type boolean and is set to true whenever the user begins the line drawing by clicking the mouse button. This flag is reset when the user clicks the mouse button while in the drawing mode. The lines variable is of type ArrayList. You have already used this class in Chapter 12. You will learn more about this class in the next chapter. At this stage, just know that ArrayList is used for holding a list of objects. In our current case, the objects are of type Line. Each Line object stores the start and end points of each line segment. The definition of the Line class is very simple; it contains two point variables, respective getter methods, and a class constructor.
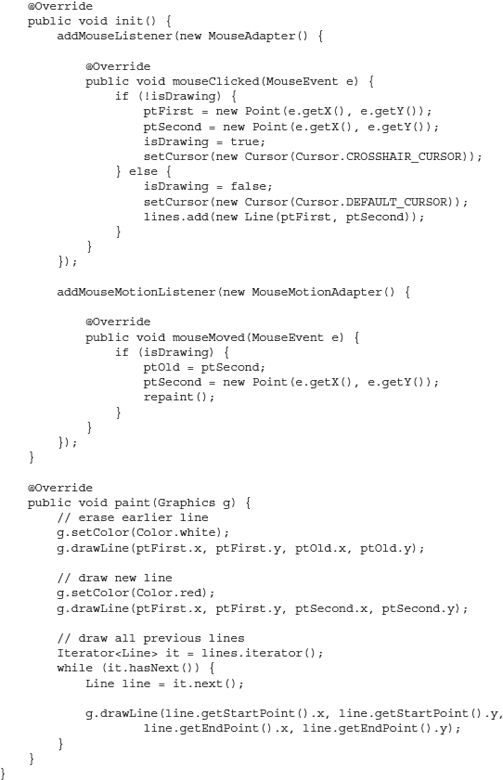
In the init method, we set up the two listeners for processing both mouse click and motion events. We use the adapter classes for both the listeners to avoid some extra typing of methods we do not need. We use anonymous classes for both types of events. First, the mouse listener is implemented by instantiating the MouseAdapter class:
![]()
![]()
We override a single method of this class—mouseClicked:
![]()
![]()
Within the method body, we check the drawing mode. If we’re not currently drawing, we record the current mouse click position in both ptFirst and ptSecond:
![]()
![]()
We then set the drawing mode to true and change the cursor to a crosshair:
![]()
![]()
To change the cursor shape, we call the setCursor method of the Component class. The constructor takes a parameter that specifies the cursor shape. JDK provides several constants for predefined cursor shapes.
In the mouse click event, if the drawing mode is not active, we reset the isDrawing flag to false. We then change the cursor back to its original default shape:
![]()
![]()
Finally, we record the start and end point coordinates of the line segment in the lines collection:
![]()
![]()
![]()
TIP
To store the two points, we could use a built-in Rectangle class rather than creating a Line class. The purpose behind creating a Line class is to add more properties, such as color, width, and so on, in later exercises.
Next, we set up the listener for mouse motion events. Once again, we create an anonymous class by instantiating the required adapter class:
![]()
![]()
We then override the mouseMoved method:
![]()
![]()
In the method body, we check whether the drawing mode is currently active; if it is, we record the coordinates of the current mouse position in the ptSecond variable and repaint the applet to show the line segment:
![]()

The last thing we need to do is override the applet’s paint method for the actual drawing of the lines. In the paint method, we first set the drawing color to white by calling the setColor method of the Graphics object:
![]()
![]()
We draw the line by calling the drawLine method. The drawLine method receives four parameters. The first two parameters specify the x, y coordinates of the start point, and the last two parameters specify those of the end point:
![]()
![]()
This draws the line segment in white, which is the current background color. This will erase the earlier drawn line, if there is one, from the screen. We now draw another line segment in red:
![]()
![]()
Note that as we move the mouse on the screen, the value of ptSecond will keep changing. Drawing the line segment from the first point to the old second point in the background color effectively removes the earlier line from the screen. A new line segment is then drawn in red, producing a rubber-band effect as the cursor is moved around.
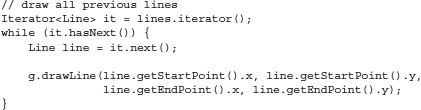
Additionally, in the paint method, we draw all the previously created line segments by iterating through the lines collection (this Iterator class is covered in more detail in the next chapter):
![]()
This completes our code discussion. Now, compile and run the program. Click the mouse anywhere on the applet. Release the mouse button and then move the mouse within the applet. As you move the mouse, you will see a line drawn in red from the first clicked point to the new mouse position. Click the mouse button one more time. A line is now drawn permanently, and the rubber-band effect is stopped. Click the mouse at another position on the applet to draw another line segment.
Creating popup Menus
So far, you have learned just a few techniques of GUI programming. One of the important needs of a graphics application is a menu system. Menus are useful in general because they allow the user to navigate to different parts of the application easily, to make selections, to apply actions, and so on. Because an applet cannot have a conventional menu system, shown in the top bar of an application, it has to use popup menus. You learn how to create popup menus in this section. Although the technique discussed here is for an applet, it may very well be adapted to a stand-alone GUI application with a few minor changes. A popup menu appears on the screen whenever the user clicks the right mouse button. Therefore, you will also learn to process right-button clicks as the mouse event.
We will extend our graphics-drawing program of the previous section to allow the user to select the drawing color of the line segment. By right-clicking the applet, the user can select a color from a menu that pops up onscreen. This popup menu displays a few color choices to the user. The user selects a desired color by clicking the menu item. When he makes the selection, the popup menu disappears from the screen and the next line segment that’s drawn will use the selected color.
The program output with the popup menu is shown in Figure 15-5.

FIGURE 15-5. Popup menu on an applet
The program that does all this is given in Listing 15-5.
![]()
Listing 15-5 Selecting a Drawing Color Through a Popup Menu

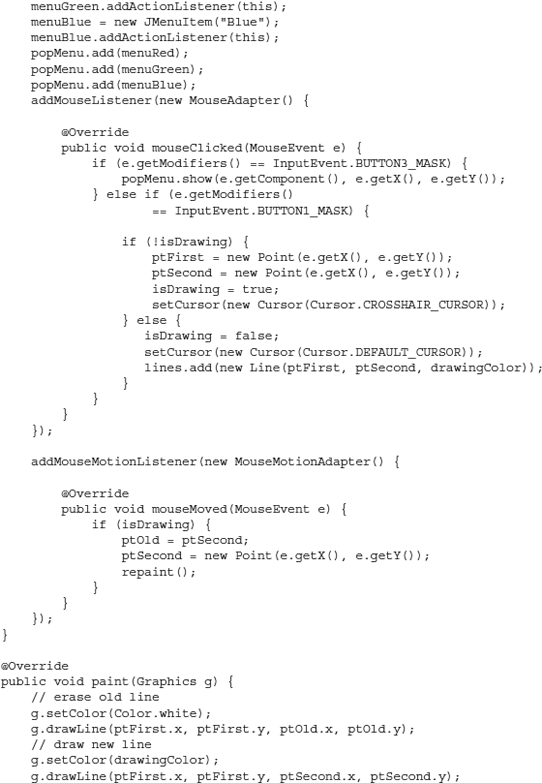

As in earlier cases, the GraphicsEditor3 class inherits JApplet and implements an action listener:
![]()
![]()
An action listener is required for processing the menu-selection events. Whenever a user selects a menu item, an ActionEvent is generated.
![]()
NOTE
There is no adapter class for the ActionListener interface because it has only a single method to implement.
As before, we now declare a few class variables to store our point objects, drawing mode, and line segments. To store the reference to the popup menu, we create a variable of type JpopupMenu, which is a built-in class in Swing:
![]()
![]()
Next, we declare three variables of type JMenuItem:
![]()
![]()
We will be creating three menu items pertaining to three color choices for the line segment. We declare a Color variable and assign an initial value to it:
![]()
![]()
In the init method, we instantiate the JpopupMenu class:
![]()
![]()
The class constructor receives a string argument, which is the name given to this menu. Note that you can create multiple menus in your application and select a different menu each time, depending on the application context. We use this name while referring to the desired menu. Next, we create a few menu items:
![]()
Each menu item has a string associated with it, which is displayed to the user. We also need to add an action listener to each menu item to process its action event whenever the user clicks the item. The action listener for all three menu items is set to the current applet instance, which provides the actionperformed method. We add the three menu items to the popup menu by calling its add method:
![]()
![]()
After creating the menu system, we set up the listener for processing the right mouse click events. Like in earlier examples, we use the anonymous adapter class:
![]()
![]()
In the mouseClicked event handler, we now check whether the user has clicked the right mouse button:
![]()
![]()
The getModifiers method helps us in determining which button is clicked. BUTTON3_MASK refers to the right button. If the right button is clicked, we display the popup menu to the user by calling its show method:
![]()
![]()
The menu is displayed at the clicked location. When the user selects a certain menu item, an action event is generated. This results in calling the actionperformed event handler:
![]()

In the event handler, we check the event source. Depending on the source, we set the drawingColor variable to an appropriate color.
The implementation of the paint method is the same as the earlier example, except that we set the drawing color to the user-selected value rather than a hard-coded color (red).
Customizing the Drawing Color
So far we have created a drawing tool that allows the user to draw lines on the screen and select the drawing color from one of three predefined options. Now, we will enhance our tool so that the user can set the drawing color to any color of his choice. Rather than providing a fixed set of color values, we allow the user to select RGB component values to set an arbitrary color. In the process, you will learn to use a few more Swing components. We use a scroll bar control to set the component color value in the range of 0 to 255. We also use a custom canvas on which the effect of the color selection will be displayed immediately. The java.awt package defines the Canvas class. Like a traditional canvas on which you paint, the instance of Canvas in Java is used for creating drawings. You typically draw primitives such as lines and circles on it to create a drawing. In this example, we use the canvas to display the user-selected color. We paint the entire canvas using this color. The user interface for the color selection dialog frame is shown in Figure 15-6.
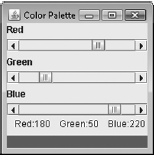
FIGURE 15-6. User interface for customizing the drawing color
The dialog frame displays three scroll bar controls to the user. The range of each scroll bar is 0 to 255. Each scroll bar corresponds to one of the three colors: red, green, or blue. When the user changes the scroll positions, the effective color is displayed on a custom canvas at the bottom of the screen. We also create another custom canvas that displays the currently set RGB values, which are shown just above the color custom canvas.
The complete code for the modified drawing editor is given in Listing 15-6.
![]()
Listing 15-6 Scroll Bar and Canvas Demonstration


We add a new menu item to the existing popup menu by creating one more instance of JMenuItem, as shown here:
![]()

We process the click event on this custom menu with the following code:
![]()
![]()
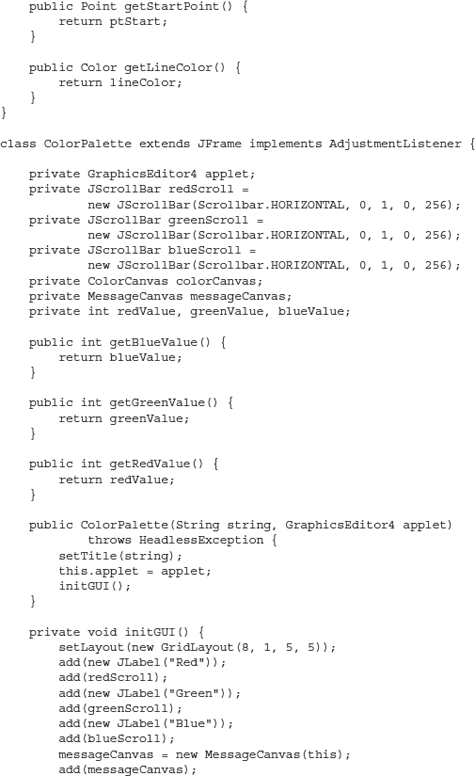
Now let’s look at the Colorpalette class that creates the dialog frame shown in Figure 15-6:
![]()
![]()
The Colorpalette class implements the AdjustmentListener interface. This interface is required for processing the scroll bar events. Like the ActionListener, the AdjustmentListener interface has only one method to implement, so no adapter class is available for this interface.
Next, we declare a few class variables. First, we create a variable called redScroll of the JScrollbar type:
![]()
![]()
The redScroll variable is initialized with an instance of JScrollbar. The class constructor takes five parameters. The first parameter indicates the scroll bar orientation, which is set to horizontal in this case. The other possible orientation is vertical. The second parameter indicates the initial value of the scroll bar. The value 0 here indicates that the scroll bubble will be at the leftmost position in the beginning. The third parameter indicates the visible amount of the scroll bar. Typically this represents the size of the bubble. The fourth and fifth parameters indicate the minimum and maximum values, respectively, of the scroll.
We create two more variables of the JScrollbar type, similar to redScroll, to represent the green and blue colors. After this, we declare two variables of custom class types:
![]()
![]()
ColorCanvas and MessageCanvas are custom classes used to display the selected color and the RGB values, respectively. Both these classes derive from a Canvas class and are discussed later. Finally, we declare three integer-type variables to store RGB values:
![]()
![]()
In the initGUI method, we build the GUI. First, we set the layout manager, which is a grid layout having eight rows and one column:
![]()
![]()
We now add the appropriate labels and the previously created scroll bar controls in the first six rows of the grid:
![]()
![]()
In the seventh row, we add an instance of MessageCanvas:
![]()
![]()
In the eighth row, we add an instance of ColorCanvas:
![]()
![]()
Finally, we set the event listener for each scroll bar control:
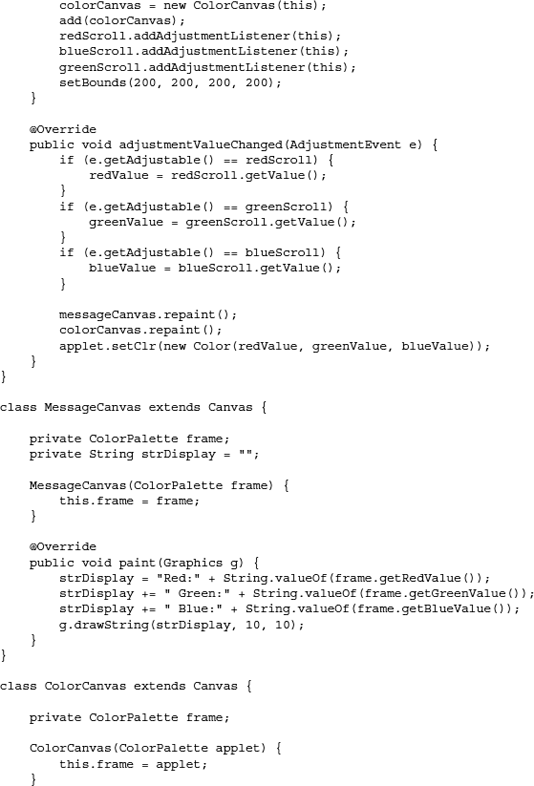
![]()
![]()
The applet class acts as an event listener for the scroll bar event. The event handler method receives a parameter of type AdjustmentEvent:
![]()
![]()
The getAdjustable method of the event object returns the control that generated this event. We first check this for the redScroll control. If this returns true, we read the current value of the control in the nRed variable:
![]()
![]()
Likewise, the program reads the current values of the remaining two scroll bar controls. Finally, the program repaints both canvases to reflect the current RGB values:
![]()
![]()
We will now discuss the custom canvas classes. Java provides a panel class for placing components. Similarly, for drawing graphics, it provides a Canvas class. We create a custom class based on this Canvas class and provide the drawing functionality in its overridden paint method. Thus, our MessageCanvas class extends Canvas:
![]()
![]()
The class declares a variable of type Colorpalette that is our dialog frame class:
![]()
![]()
When the frame instantiates the MessageCanvas, it passes its own reference (this) to the class constructor. The MessageCanvas class stores this in a local variable and then uses it later to access the members of the Colorpalette class:
![]()
![]()
In the overridden paint method, we build the string by reading the current RGB values from the frame and then call the drawString method of the Graphics object to display it to the user:
![]()

The ColorCanvas class definition is similar to MessageCanvas, except for the implementation of its paint method. In the paint method, we fill the entire canvas area by obtaining its bounds, setting the fill color to the current RGB values taken from the frame, and calling the fillRect method of the Graphics object:
![]()
Now, compile and run the program. Click the right mouse button to view the popup menu. Select the Custom menu option. A dialog frame with three scroll bars appears. Change the scroll positions and observe the color change at the bottom of the frame. Now, click the applet and draw a line segment. The segment is drawn in the selected color. Try changing the color and draw more segments. Note that each line segment is drawn in the currently selected color.
Processing Keyboard events
Finally, in this section, we discuss how to process keyboard events. For inputting text into your program, you will obviously prefer to use a JTextField control. However, if you want to type text directly on a drawing created in your application, you will need to process the keyboard events. To process the keyboard events, you need to implement the KeyListener interface. The KeyListener interface provides three callback methods. The Keypressed method is invoked when the user presses a key. When the user releases a key, the KeyReleased method is called. When the user “types” a key (meaning presses and releases the key), the KeyTyped method is called.
In this section, you learn how to add a text caption at any desired point in your drawing. Rather than extending the code from Listing 15-6, which has already become quite bulky, I will demonstrate the technique by creating an independent application and leave the integration to you as an exercise. In our application, we will be able to input text at any location on the screen by clicking the mouse at that location. When the mouse is clicked, the cursor changes to text mode. As you type on the keyboard, the characters are displayed starting at the current location. To terminate the text entry, simply click the left button one more time. To input text at another location, follow the same procedure. The application remembers all previous text entries and displays them at their set locations.
Listing 15-7 shows the complete code for this application.
![]()
Listing 15-7 Demonstrating Keyboard Processing
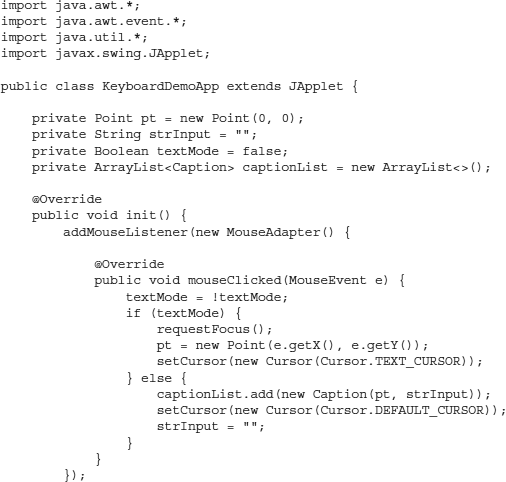
In the applet’s init method, first we add a mouse listener by creating an instance of an anonymous class based on MouseAdapter:
![]()
![]()
In the overridden mouseClicked method, we toggle the state of the textMode variable:
![]()
![]()
When this variable is set to true, we are in the text input mode. In this mode, we record the coordinates of the clicked point and set the cursor to text mode:
![]()

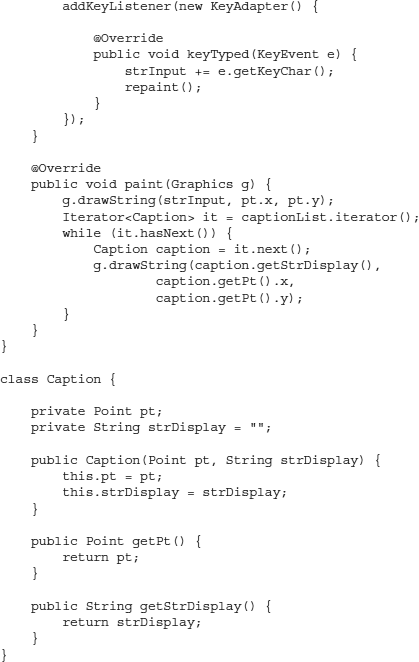
On the second click, the textMode is set to false. This time, we record the input text and the point of display in the Caption object that is added to the captionList array:
![]()
![]()
The Caption class stores the caption text and the point at which this text is to be displayed. Next, we reset the cursor and nullify the string variable used for storing the input text:
![]()
![]()
Now comes the important point of this program—how to process keyboard input. Like in earlier programs, we use the adapter class to process keyboard events. In the init method, we add an instance of an anonymous KeyAdapter to the applet:
![]()
![]()
The KeyTyped callback method receives the Keyevent as its parameter:
![]()
![]()
The getKeyChar method of the event object returns the Unicode corresponding to the key pressed by the user. We add this to the string variable and repaint the applet to display the string to the user:
![]()
![]()
In the applet initialization, we also call the requestFocus method to ensure that all keyboard inputs are sent to the applet when the applet is initially displayed to the user. Once an applet is running, the user may change the focus to some other application. When he returns to the applet, he will have to click the mouse on the applet surface to get the focus back on the applet. The keyboard input will then be sent to the applet.
The overridden paint method simply shows the constructed string at a specified fixed location by calling the drawString method of the Graphics class. It also iterates through the list of all previously entered captions and prints them on the screen:
![]()

Some typical screen output is shown in Figure 15-7.
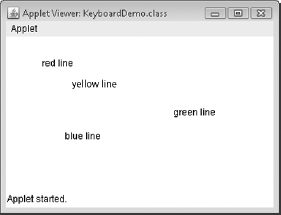
FIGURE 15-7. Demonstrating keyboard input
![]()
TIP
So far, you used an applet to draw some graphics on its surface. However, an applet is a container and can therefore hold components such as labels, text fields, list boxes, and so on. In other words, you can build a complex GUI on the applet’s surface. For building a GUI, use the layout managers discussed in Chapter 14, create instances of any desired components, and add them to the applet container.
Summary
In Java, you can create two types of client applications: stand-alone applications and applets. An applet is deployed on a remote server. A client downloads the applet code and runs it locally. Because applet code is always download from the server, applets have the latest updates, which eases maintenance tremendously. You create an applet by subclassing an Applet or JApplet class and overriding a few methods in it. During the life cycle of an applet, the init, start, paint, stop, and destroy methods are called. You override these methods to provide the desired application functionality in an applet. A GUI application may respond to mouse gestures. To process mouse clicks, Java provides the MouseListener interface, and to process mouse motion events, it provides the MouseMotionListener interface. An applet may require menus. You provide them via popup menus. Java provides a Canvas class that provides you with the surface for creating drawings. To process keyboard events, the KeyListener interface is provided.
In the next chapter, you will be learning one of the frequently used Java APIs—the Collections framework.