
CHAPTER
3
Classes
 he main motive behind using object-oriented programming is the code reuse. Java is an object-oriented programming language and therefore allows you to reuse your code. A typical Java application contains many objects. An object is an instance of a class. A program may contain many classes. In this chapter, you learn what a class is, what an instance of a class is, and how to use classes in your Java programs. We have looked at several Java programs in earlier chapters; however, all these programs used only one class. Therefore, object orientation was not really exploited in earlier chapters. This chapter introduces you to the concepts behind object-oriented programming and its features. We’ll also talk more about classes. The chapter covers several features of a class and its use in Java programming.
In particular, you will learn the following:
Object-Oriented Programming (OOP) Concepts
In nature, we see numerous objects—birds, animals, plants, and so on. Each object possesses certain characteristics that are unique to it. For example, a bird can fly, an animal has four legs, and a plant cannot move (unless you help it move to another location). The wings of a bird can be considered a characteristic that is unique to it. In object-oriented programming, we call this an attribute of an object. An object in nature, which is a real-world entity, exhibits unique behavior. For example, a bird can fly with the help of its wings. Flying may be described as an operation that an object performs. We call this as a method of an object. Our object-oriented programming derives several of its concepts from nature.
In object-oriented programming, we talk about objects—just as nature has various kinds of objects. Suppose we want to write a program for computing the monthly payroll for the employees in our company. We can immediately think of “employee” as one of the objects in such a system. Each employee object will have a unique ID, name, and gender, which are publicly declared characteristics of the employee object. The employee object will also contain some additional characteristics, such as basic salary, 401(k) plan account, leave travel allowance, and so on. Naturally, we would not want this data to be globally accessible to every other person in the company. This is sensitive data and should therefore be protected from the eyes of other employees. Also, when we define functionality such as computing the monthly salary of each employee, we consider that such functionality will be implemented in functions that operate on the data belonging to the particular employee under consideration.
Every employee object in our payroll system will hold data similar to every other employee object in the system, and every employee object will also exhibit functionality that is exactly identical to the functionality exhibited by every other employee object in the system. Naturally, we would want to create some template on which to base our employee object. In word processing, we create templates for various purposes, such as writing a resume, invoice, a memo, and so on. An applicant would create her resume to give to a prospective employer using a resume template. Every applicant could use the same template for writing the resume. In object-oriented programming, we create templates to define or to represent objects having common behavior. Such templates are called classes in object-oriented programming. A class is really the heart of object-oriented programming, the basis on which the entire system is built. By the end of this chapter, you will understand a class’s various features.
First, however, let’s look at the important features of object-oriented programming.
OOP Features
The three major features of object-oriented programming are encapsulation, inheritance, and polymorphism. We discuss each of these features in detail in this section.
Encapsulation
As described in the previous section, it is a good practice to provide a coupling between the data and the methods that operate on the data (method is another name for a function or a procedure, also called an operation). Such data should be hidden from the outside world; this means it should be inaccessible to code outside the current context (to be more precise, the current object). This process of information hiding and combining data and methods in a single logical unit is called encapsulation. We say that the data and the methods that operate on this data are encapsulated into a single unit called a class.
A class consists of data (more precisely called attributes) and methods. These are called the members of the class. The attributes of the class should be considered “private” to an instance of a class; only the class methods would have access to these attributes. When you define a class, you can set the visibility access to these attributes. They may be made visible to the code outside the current class definition. We talk more on this later in the chapter when we discuss classes in depth. Right now, just know that we encapsulate the data and the related methods in a logical unit called a class.
Inheritance
You know from earlier that a class contains attributes and the methods that operate on them. A class acts like a template. It is the basis on which different objects are created. Each object possesses data unique to it; however, all the objects of the same class type possess the same characteristics. For example, when we create an Employee class, each Employee object will contain the same data attributes, such as ID, name, base salary, 401(k) plan, leave travel allowance, and so on. The values assigned to these attributes will vary from employee to employee. Each Employee object exhibits the same functionality that is defined by the methods of the Employee class. At some later time, we may want to represent a manager in our software. For this, we would create a Manager class that inherits the characteristics of the Employee class; after all, a manager is also an employee.
In nature, we observe that children inherit some traits from their parents. We find various families of classes in nature, such as birds, animals, mammals, and so on. Each family consists of several objects. All objects in a given family share common characteristics (or in the context of object-oriented programming, a common functionality). The children in the family inherit these characteristics from their parents. A child may also exhibit characteristics (functionality) in addition to what it has inherited from its parents.
In software engineering, when we develop software, we search for the presence of a family of classes similar to what we observe in nature. For example, to represent different types of cars in a software application, we may design a parent class called Vehicle. The class Vehicle defines functionality that is common to all automobiles. We can further define classes based on this parent class (Vehicle), such as Car, Truck, and so on. Each such class adds some functionality to the functionality inherited from the Vehicle class. The added functionality is unique to the defining class. This means that a Car and a Truck will add some functionality to Vehicle that is different from the functionality of the other classes in the same family. For example, a Car may describe the passenger capacity as its characteristic, whereas a Truck may define the maximum load capacity as one of its added characteristics.
A Car may be further classified as a sports car, a passenger car, a sports utility vehicle (SUV), and so on. We can define classes for these classifications. An SUV class will inherit from the Car class, which in turn inherits from the Vehicle class. Thus, SUV exhibits the functionality of not only the Car class but also the Vehicle class. This class hierarchy is depicted in Figure 3-1.

FIGURE 3-1. Class hierarchy
The concept of inheritance helps preserve our investment in existing code by allowing us to extend the functionality of existing classes.
Polymorphism
In our classification of automobiles, we have different classes in our class hierarchy for the Car object. Each such Car object exhibits several common functionalities. For example, a “drive” method could be defined in each class that is applicable to all the Car objects. Because this is a common functionality, we should define this in our parent class. The child class will also define a “drive” method and may modify the inherited “drive” method. Both methods may use the same name (that is, drive). Driving a truck is different from driving a sports car or an SUV. However, we may say, “we drive the vehicle” with regard to both the vehicles. Thus, the name of the functionality remains the same, even though the implementation varies across objects. This feature is called polymorphism in object-oriented terminology. Polymorphism originates from the Greek word polymorph, meaning having different faces to the same object.
Polymorphism is an important feature of object-oriented languages and will be explained in depth in Chapter 4.
OOP Benefits
Now that we have examined the three main features of object-oriented programming, you can see how OOP helps us in creating well-structured programs where the code, once developed, is easily reusable. Programs can be easily extended with little effort, allowing us to reuse the existing code (which has been previously tested) and thereby reducing the maintenance cost for the software.
The Class
A class is a template that encapsulates data and the methods that operate on this data, as in the Employee or Automobile class described earlier. A class is a user-defined data type that embeds methods to operate on the enclosed data. You create objects based on this template, and you use the new keyword in Java to create an object (in which case, we say that the class is instantiated). You can create many objects from one single class. All these objects have the same type with a predefined set of data members. The values held in these data members vary from object to object. Although each object is similar to another object of the same type, each object has its own unique identity. For example, two cars of the same type and color will have two different vehicle identification numbers (VINs) as their unique identifiers.
Defining a Class
The general form for defining a class is as follows:
![]()
![]()
![]()
NOTE
The notation used here is a pseudo notation. The Java Language Specification (JLS) defines the full grammar in JLS notation. Here is a partial definition of a class definition in JLS form:
![]()
JLS is complex. For more information, you can download the Java Language Specification from http://java.sun.com/docs/books/jls/.
To define a class, you use the class keyword. The ClassName is a valid identifier that defines a unique name for a class. This name should be unique within the entire application. However, you may use the same name for classes belonging to two independent applications or Java packages.
![]()
NOTE
Every class has a fully qualified name that has the form packagename.ClassName. The ClassName may be repeated if the packagename differs. This is explained in detail in Chapter 5, which describes Java packages.
The modifier in front of the class keyword defines the visibility of the class. Do not worry about this modifier right now. We discuss it in great detail later in this chapter as well as in subsequent chapters.
A typical class declaration looks like this:
![]()

![]()
NOTE
A class declaration may contain a declaration of another class, which is then called a member class of the outer declaring class.
The class definition is enclosed in opening and closing braces. Within the body of the class definition, you define zero or more attributes, zero or more constructors, and zero or more methods. The attributes of a class are its data members. These are also called fields. The fields provide the state of the class and its objects. For example, for an Employee class, as described earlier, ID is its field. A class constructor is a special method of the class that we use while initializing new objects. A class may contain other methods that define the behavior of the class and its objects.
![]()
NOTE
The Java Language Specifications uses the term fields in place of attributes. Henceforth, the term field will be used to refer to a class attribute.
We’ll now turn our attention to defining the fields, constructors, and methods of a class. We’ll start with a very simple class that holds only the fields and no methods. Later on, we’ll add more functionality to this base class template.
Declaring a Point Class
The following code snippet shows a declaration for the Point class.
![]()

The class is defined using the keyword class followed by its name, Point. The modifier field is optional and is not applied in this definition. The modifier defines the class visibility, and the possible values for this modifier are discussed later. The body of the class is enclosed in braces. The body of this class consists only of fields.
![]()
NOTE
C++ requires a class definition to be terminated with a semicolon. In Java, the use of a semicolon is not mandatory.
Our Point class declaration contains two fields, x and y, of type int. This simple Point class definition does not contain any methods. As mentioned earlier, methods define the functionality of a class. Our Point class currently does not exhibit any functionality.
As shown in this example, it is possible to create a class that does not contain any methods and has only fields. It is also possible to create a class that has an empty body—meaning no fields, no constructors, and no methods. However, creating such a class is usually meaningless, except for the name and/or whether it inherits from another one.
![]()
NOTE
A top-level class such as Vehicle or Employee (discussed earlier) may have an empty body. The classes that inherit from these top-level classes will have the fields and methods added to their definitions.
Using Classes
A class definition serves as a template from which you create objects for the use of your application code. For example, by using our class definition of Point, we can create several Point objects. Each Point object will be characterized by two distinct fields, x and y, which specify the x-coordinate and y-coordinate of the point, respectively. Each Point object will have its own copy of the data members x and y. These members are called instance variables of an object because they belong to a particular instance of the class. The process of creating an object from a class definition is called class instantiation. We say that a class has been instantiated when we create an object.
To create an object, we use the following declaration:
![]()
![]()
We use the new keyword to instantiate a class. We specify the class name after the new keyword, followed by opening and closing parentheses. The opening and closing parentheses indicate a method call—a call to a class constructor. We discuss class constructors later in the chapter. Once a class is instantiated, memory will be allocated for the object of the class to hold its data. The reference to this memory allocation must be copied and saved somewhere so that the created object can be accessed at a later time in your program code. In the preceding statement, we copy this memory reference to the variable p declared on the left-hand side of the assignment operator. The type of variable p is Point, indicating that p holds a reference to a Point-type object.
When the preceding program statement is executed, an object of type Point is created at runtime. This Point object contains two fields: x and y. The object will be referred to by the variable p later in the program. The two fields, x and y, take a default integer value of 0. The default value assigned to a field depends on its type.
Accessing/Modifying Fields
Accessing the fields declared in the preceding example is simple. To access the x-coordinate of the point p, you use the syntax p.x, and to access the y-coordinate, you use the syntax p.y. The general form for accessing a field is objectReference.fieldName. With respect to our example, objectReference is p and fieldname is y or x.
The Class Example Program
We’ll now write a Java program to declare a Point class, instantiate it, and use it in the application. Listing 3-1 gives the full program for declaring and using a Point class.
![]()
Listing 3-1 The Class Example Program

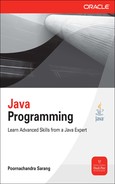
The program output is shown here:
![]()

![]()
NOTE
To run the code, you need to specify TestPoint on the command line because the main method is defined in TestPoint.
The Point class definition in Listing 3-1 is the same as the one we discussed earlier. To test the Point class, you need to write another class. The preceding program defines this other class, called TestPoint. The TestPoint class declares a main method where the program execution begins. In the main method body, we create an instance of the Point class using the following program statement:
![]()
![]()
We access the fields x and y of the created object using following statements:
![]()
![]()
These statements set the values of the two data members (that is, the fields). As stated earlier, these members are also called instance variables because they belong to a particular instance of the class; in this case, the instance is p. If we create another instance (say, p2), it will have its own copy of the x and y fields. Here, we use the syntax objectReference.fieldName to access a field. The two statements assign values to the two fields. We verify this assignment by printing the object contents in the next two lines of the program code:
![]()
![]()
Here, we use the same syntax, p.x and p.y, as in the earlier case for retrieving the instance variables.
Declaring Methods
Our Point class declared in the previous section contains only fields. Now, we will add a method to the Point class to help you understand the method declaration and calling syntax. The purpose of adding a method to the class definition is to provide some functionality to it. The functionality we are going to add to our Point class involves determining the distance of the point from the origin. Therefore, we will add a method called getDistance that returns the distance between the point and the origin.
The modified program is given in Listing 3-2.
![]()
Listing 3-2 Program Illustrating How to Declare Methods in a Class


When we compile and run this program, we see the following output:
![]()
The Point class now has a method added to its definition. The method getDistance computes the point’s distance from the origin and returns a double value to the caller:
![]()
![]()
The distance is computed using the sqrt method of the built-in Math class. You will learn to use many such built-in classes throughout this book.
In the main method of the TestPoint class, we first create an instance, p1, of the Point class and then initialize its data members using the syntax we used in our earlier example. Next, we call the getDistance method to determine the point’s distance from the origin:
![]()
![]()
To invoke a method, we use the syntax objectReference.methodName. In our case, objectReference is the reference to the Point object (that is, p1) and methodName is getDistance. To dump the object’s contents along with the distance, we use the StringBuilder class (you used this in Syntax Reference 2):
![]()

![]()
NOTE
You could also use the printf method on System.out, as described in an earlier chapter, instead of the Formatter class used here.
After building the string, we print it to the console. To illustrate that we can create more than one Point object in our application using the same class definition, we have created another instance of the Point class called p2. The program initializes its fields to some values, computes its distance from the origin by calling the getDistance method, and dumps it along with the object’s contents to the console. As you can see, the same functionality (getDistance) is exhibited by both objects of the Point class. Thus, the methods allow us to define a common functionality for all objects belonging to the same class type.
![]()
NOTE
The delete method of the StringBuilder class clears the contents of its object, starting at an index specified by its first parameter and the number of characters specified by the second parameter.
![]()
CAUTION
C++ allows you to define method bodies outside the class declaration. In Java, you must define the method body in the class declaration itself.
Memory Representation of Objects
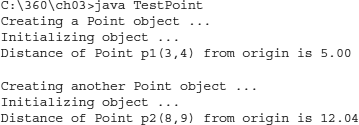
The Point object contains two fields, x and y, of type int. The space for storing these fields is allocated within the object’s memory space. An object occupies more space than the space occupied by its fields because it also holds some hidden information in its footprint to indicate its type. The memory representation of the Point object is shown in Figure 3-2.
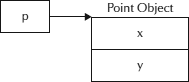
FIGURE 3-2. Memory allocation of an object
You may create multiple Point objects by declaring several variables of the Point class type and assigning instances of the Point class type to each one of them. The following code fragment creates three Point objects:
![]()
![]()
For each variable declaration, an independent memory block is allocated, as shown in Figure 3-3.

FIGURE 3-3. Memory allocation for multiple objects
Note that each Point variable declaration receives its own copy of instance variables x and y.
![]()
CAUTION
Although the memory layout in Figure 3-3 indicates the contiguous allocation for the three objects, this may not always be the case.
Information Hiding
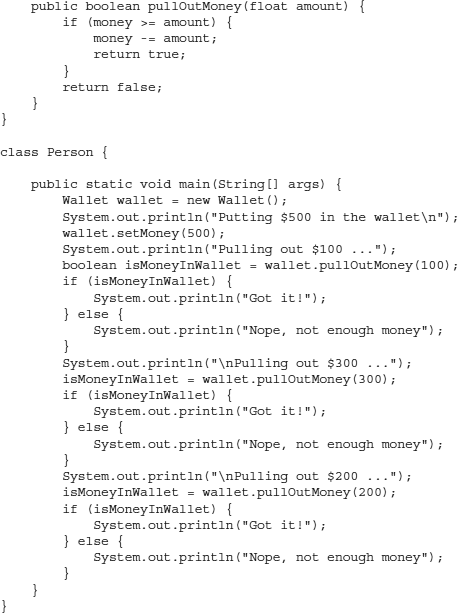
In our everyday life, many of us oftentimes try to hide information from other people. In many situations, the information hiding is an essential part of our life. For example, when you go grocery shopping, do you allow the store clerk to withdraw money from your wallet? The wallet (which is an object in object-oriented terms) hides money (which is the information or attribute/field of an object) from outsiders. A wallet may provide a method called “pull out X dollars” that, when executed by an outside object, results in handing over X dollars to the caller without disclosing how much money is in it. This is called information hiding in object-oriented programming.
Let’s now put these concepts to work via a practical example. The program shown in Listing 3-3 contains classes for the wallet and a person who pulls money out of a wallet object.
![]()
Listing 3-3 Program to Illustrate the Concept of Information Hiding
When we compile and run this program, we see the following output:
![]()

The Wallet class declares one field called money, as you would expect it to do. Naturally, the type of this field is set to float so that we can keep our small change in the wallet:
![]()
![]()
Notice the private keyword in front of this field declaration. This is the access modifier mentioned earlier. This access modifier controls the visibility of the declaration to which it is attached. In this case, it is attached to a field declaration. You can also apply access modifiers to class and method declarations. One such method we have used so far is the main method in our earlier programs. This main method has a public modifier attached to it. In Syntax Reference 1, when we used this method for the first time, we discussed that the main method is declared public so that it can be invoked by the JVM—or to be more precise, by an external object. It is mandatory for the main method to be declared public. The other methods we create in our class definition need not be public; for example, the getDistance method in our earlier example of the Point class is not public. (Note that when you do not specify the modifier, the visibility is package-private, which has a lesser scope than a public visibility.) We also apply the access modifiers to the class declarations. You will learn more about these two access modifiers—private and public—as you read the rest of this chapter.
Coming back to our definition of the Wallet class, the class defines a method called setMoney, as follows:
![]()
![]()
The method takes a float argument and does not return a value to the caller. The method is declared public and therefore can be invoked by the code in an external object, as you will soon see (obviously, you want to load the wallet with some money when you go shopping).
Inside the method’s body, we copy the value of money received as the method parameter to the instance variable with the same name, money. Because the method parameter and the instance variable use the same name, we need to differentiate between them in our code. This is done with the help of the this keyword. The this keyword is a reference to the current object, and thus the syntax “this.” A dot following the object reference refers to some variable or a method within the object. The syntax this.money refers to the money field of the current object. We set this field to the value passed in the method parameter. This method helps in loading our wallet with some money. Incidentally, this method is called a setter or a mutator method because it sets the value of a field. Setter methods, by convention, start with the word set, followed by the name of the field on which they operate, with the first letter of the field capitalized. Similar to the setter methods, there are getter methods that start with the word get and return the value of a field to the caller. We will use getter methods in some of our upcoming programs.
Let’s now look at the next method defined in our Wallet class. The pullOutMoney method takes a float value as a parameter and returns a boolean to the caller:
![]()
![]()
In this method’s implementation, we check whether the requested amount is less than the current balance in the wallet; if so, we subtract the requested amount from the balance amount and return the amount to the caller:
![]()

In case of insufficient funds, we return false to the caller.
Note that the pullOutMoney method declaration contains a public access modifier, indicating that this method is accessible to an external object.
Now we turn our attention to the Person class that uses this Wallet. In the main method of the Person class, we first create an object of the Wallet class:
![]()
![]()
We load the wallet by calling the setMoney method:
![]()
![]()
This sets the money variable of the wallet object to 500. Because the method setMoney is declared public, it can be called from the code within the Person class. Had this been declared with a private modifier, the compiler would have complained with an “illegal access” error while compiling the Person class.
Now, let’s try withdrawing some money from the wallet. We call the public method pullOutMoney on the wallet object. Because this method is declared public like the setMoney method, it can be invoked from the code in an external class:
![]()
![]()
Depending on the returned value, we print an appropriate message to the user’s console. Note that the pullOutMoney method does not reveal what the current balance is (thus implementing information hiding). Next, we withdraw money for a second and third time. The second time we withdraw $300, and third time we withdraw $200. Note that none of these withdraw operations reveal the balance amount in the wallet. In fact, in the last withdrawal, when the operation fails, it still does not reveal how much can be withdrawn—an effective implementation of information hiding.
Now, what if we really want to know what the current balance in the wallet is? If so, we would provide a public getter method to read the field value. The getter method declaration is shown in the following code fragment:
![]()
![]()
![]()
NOTE
The getter methods are also called accessor methods because they are used for accessing attribute values.
The method getMoney uses the standard convention for a getter method—the get followed by the attribute’s name, with its first letter capitalized. The method does not take any arguments and returns a float value to the caller. The implementation simply returns the current value of the money attribute. The method is declared public so that it can be invoked by an external object. To read the current balance in our code now, we use the syntax wallet.getMoney().
![]()
TIP
According to the principles of object-oriented programming and good design practice, all fields in a class definition should be declared private and you should provide the required getter/setter public methods to access them.
Now the question is, why do we need to apply access modifiers to our declarations? So far, you have seen two access modifiers—private and public. The private modifier makes the corresponding field, method, or class declaration truly private to the code to which it belongs. In our example, the variable money is declared private and is therefore visible only to the code within the Wallet class. Therefore, using the earlier dot syntax (wallet.money) will result in a compilation error. The only way to access the money field is to use the public getter/setter methods that operate on this attribute. Making money private also helps in protecting it from any accidental modifications by an external code because one cannot use the objectReference.fieldName syntax to access it.
Encapsulation
In the previous section, you saw the importance of information hiding. Another big concept associated with object-oriented programming is encapsulation. Every class contains some data in its fields. We hide these fields by declaring them private. We define getter/setter methods to access them. When we assign a value to a field, do we validate the value before assigning it? By providing a setter method, we get an opportunity to provide such a validation. As an example, consider the definition of a Date class declared as follows:
![]()

This class declares three public fields.
Although it is against the object-oriented programming best practices, these fields are declared public to illustrate the problems associated with public declarations.
If d is an object of the Date class, we could use the following statement to set its month value:
![]()
![]()
The code is syntactically correct and will execute without any errors. However, this is obviously a wrong assignment, which may be due to a simple typing error. To protect from such not-so-inevitable errors, be sure to make your fields private, define a setter method to assign values to them, and provide the validation in the setter methods before making an assignment. Thus, we could write the setter method for the month field as follows:
![]()

This implementation checks whether the value we are trying to assign is within the bounds of a calendar month. This ensures that an invalid value cannot be assigned to the month field. Similar validations can be performed in the setter methods for the day and year fields.
The process of putting the data and the methods that operate on this data together in the class definition is called encapsulation. As you saw, encapsulating getter/setter methods helps in creating robust objects. When we talk about encapsulation, we are not just referring to the getter/ setter methods. There could be other methods in the class that logically belong to it. For example, let’s take a method called printDate that prints the values of the date attributes in some predefined date format. It makes perfect sense to declare and define the printDate method in the Date class itself. This is exactly what encapsulation is. You encapsulate the methods in a class definition that operate on the class’s fields and make logical sense being in the class definition. The Date class, for example, could provide several methods, such as for the addition of dates, determining whether the current date is in a leap year, and so on. These should be defined in methods that belong to the Date class.
Here’s something else to consider about using encapsulation: If you do not encapsulate the appropriate methods in a class definition, you will have to provide error-checking code in several places within your application. For example, if you do not provide the validations in the setter methods of the Date class, you will need to repeat the validation code in several places in your application, and if this validation ever changes, you will have the big task of ensuring that it occurs in every place you have set the field values.
![]()
NOTE
As a designer of an object-oriented system, it is your duty to identify and provide the encapsulation of appropriate data and methods in all your class definitions.
Declaring Constructors
A constructor is a special method that the runtime executes during the object-creation process. In an earlier section, you saw that the following statement calls the class constructor:
![]()
![]()
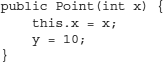
When you instantiate a class using the declaration shown here, an object is created with some default values assigned to its fields. However, you may want to create an object with an initial state that is different from the default state set by the compiler. For example, you might want to create a Point object with its initial values x and y set to 4 and 5, respectively. This can be achieved with the help of a constructor. To create a constructor, you write a method as shown here:
![]()

This method has a name that is the same as the class name. This is one of the rules for defining a constructor. Also, note that the method does not declare any return type, not even void. This is the second rule for defining the constructor—a constructor does not have a return type. The rules for constructor declaration are summarized later in this section.
Now, let’s look at the other features of the constructor. The constructor in this case does not take any arguments. In general, a constructor can accept zero or more arguments. If the constructor does not specify an argument, it is called a no-argument constructor. Sometimes, this is also referred to as a default or a parameterless constructor.
In the constructor body, we put two assignment statements that initialize the values of the x and y fields to the desired values. You may assign any values you choose. When the object is created, it will have those values.
Once you write a constructor like this in the class definition, any time you instantiate the class, your constructor is called. This is demonstrated in the program shown in Listing 3-4.
![]()
Listing 3-4 A Program Illustrating a Class with a Constructor

The class Point, just like in our earlier examples, declares two fields, x and y, of type int. The class also declares a constructor, as follows:
![]()

The constructor initializes both fields to a common value of 10. This is a no-argument constructor. The class also declares two getter methods for accessing the values of the two fields. Note that we do not define any setter methods here because our program does not need to set the values of these fields to anything other than the default values set in the constructor.
In the main method of the CustomConstructorApp class, we instantiate the Point class, as follows:
![]()
![]()
The execution of this statement results in calling the constructor we defined in the class definition. The constructor sets the values of both x and y fields to 10. We can verify this by dumping the object’s contents via the following statement:
![]()
![]()
Note the use of getter methods for obtaining the x and y values. When we run the program, we get the following output:
![]()
![]()
After the object is constructed, we may still call its setter methods (provided we defined them in the class definition) to change the value of data members to any other value. By providing a no-argument constructor, we ensure that any newly created object will have its data members set to the default values specified in the constructor.
Now, what if we want to set the data members to a different value each time we create an object? For this, we need to pass the values as parameters to the constructor. Therefore, we need to declare a constructor that takes parameters. Such a constructor is shown in the following code fragment:
![]()

We assign the values specified by the two parameters to the two instance variables using this as a reference to the current object. To call this constructor in our program code, we use the following statement:
![]()
![]()
When we call the constructor, we set the values for its arguments. The instance variables will now be initialized using these values. We can verify this by dumping the object’s contents as illustrated in the previous example.
Sometimes, we may want to initialize only one of the instance variables while letting the other variable have some default value. In such a case, we declare another constructor for our Point class, as follows:
![]()
This constructor takes only one argument, the value of which is assigned to the x field. The other instance variable, y, is set to a value of 10. If we do not assign a value to the variable y, it will take a default value of 0, which is provided by the compiler. We can now call the constructor with the following statement:
![]()
![]()
This creates the Point object (5, 10), which can be verified by printing the object’s contents.
![]()
NOTE
You cannot write two constructors that have the same number and type of arguments for the same class because the platform would not be able to differentiate between them. Doing so causes a compile-time error.
A class may declare more than one constructor in its definition. If this is the case, how do you know which constructor is called when the class is instantiated? The compiler decides which constructor to call depending on the number of parameters and their types. Look at the following code fragment:
![]()
![]()
The first statement calls the no-argument constructor and creates the object p1(10, 10). The second statement creates the object p2(15, 10), and the third statement creates the object p3(5, 10). Thus, the compiler has decided which constructor to call depending on the number of parameters passed to it.
Default Constructor
In the previous section, you learned to write your own constructor. In all our previous examples, we hadn’t written any constructors. So is there any constructor provided by default? Yes, there is. If you do not write a constructor, the Java compiler provides a constructor with no arguments. This is called the default constructor, and the implementation of the default constructor is null, which means it does not contain any code.
![]()
CAUTION
If you provide a constructor of your own—either a no-argument one or one with the arguments in the class definition—the compiler will not provide a default constructor.
![]()
NOTE
Like C++, Java does not provide destructors. Java relies on its garbage collector to clean up the resources held by unused objects.
For further details on constructors and how they are called, see Chapter 5.
Rules for Defining a Constructor
The rules for constructor creation can be summarized as follows:
Source File Layout
You have learned enough from the examples given thus far to get started writing Java programs. Now, let’s discuss the complete structure of a Java source file. When you write a Java source program, it needs to follow a certain structure or template. This template is shown in Listing 3-5.
![]()
Listing 3-5 Layout of a Java Source File
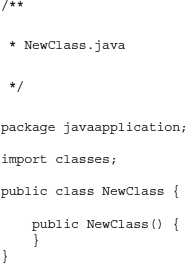
The import statement makes the declarations of external classes available to the current Java source program at the time of compilation.
As stated earlier in the book, you may use any text editor for writing a Java source program. The entire program may consist of more than one source file. Each Java source file must have the same name as a public class that it declares. Each Java source file can contain only one public class declaration. The file extension must be .java. The filename is case-sensitive. Therefore, the preceding source code must be stored in a file named NewClass.java. The source file may contain more than one class declaration; however, not more than one such declaration can be public.
The source consists of three major sections—the package, import, and class definition—besides the comments, which you may embed anywhere in the source. A multiline comment is shown at the top of Listing 3-5, which shows the name of the file under which this code must be saved. We discussed the class declaration earlier, so let’s turn our attention to the package and import sections.
The package Statement
The package statement allows you to group logically related classes into a single unit. In our earlier programs, we have used import statements such as the following:
![]()
![]()
Both java.io and java.util in these statements are packages. All I/O-related classes are grouped together and put under the package java.io. Similarly, all the utility classes are grouped together under the java.util package. The Java Development Kit defines many such packages, grouping the various classes in different logical units depending on their functionality. When you develop several classes in your application or when you create several applications, you may also want to arrange your classes into logical units. You do so by creating packages in your application. To create a package, you need to use a package statement. The basic syntax of the package statement is shown here:
![]()
![]()
A package name may consist of zero or more subpackage names, each separated by a dot. Here are a few valid package declarations:
![]()
![]()
The first statement declares a top-level package called mypackage. The second statement declares a subpackage called reports within mypackage. The third statement declares a package hierarchy where mypackage is the top-level package, with the reports package within it, the accounts package within reports, and finally the salary package within accounts.
When you declare a package, the declaration must follow certain rules:
![]()
NOTE
A comment may precede the package statement because it is not treated as a program statement.
As the first rule states, a package declaration must be a top-level statement in your source file. Writing a package declaration statement anywhere else in the source program results in a compile-time error.
As the second rule states, you cannot have more than one package declaration in a single source file. Note that a source file may contain multiple class declarations; however, it can contain only one package declaration. All classes defined in the source file will be grouped together in a package declared at the top of the source file.
As the third rule states, if you decide to use subpackages, the entire name must be hierarchical and the subnames must be separated by a dot. Imagine the hierarchical package name as a directory structure containing a main directory, followed by a subdirectory in each, until the end of the full package name. A class belonging to the package will be put under this last subdirectory following the entire directory structure. The directory layout for a source containing a package statement is described in the next section.
Finally, the last rule states that if the source file does not contain a package declaration, all classes defined in the source file will be grouped together in a default package. The directory for this default package is the current directory itself. Thus, all classes defined in this source file will be put in the current folder when compiled.
![]()
NOTE
The package statement carries more meaning to it than just the logical grouping of classes. It controls the visibility of the classes, as well as the fields and methods defined in its source program. We discuss these visibility rules when we cover inheritance and visibility in Chapter 5.
The import Statement
Immediately following the package declaration, you have import declarations. You use the import statement to tell the compiler where to find the external classes required by the source program under compilation. The full syntax of the import statement is as follows:
![]()
![]()
or
![]()
![]()
Here are a few examples of the import statement:
![]()

The first statement imports the definition of the MyClass class that is defined in the mypackage package. The second statement imports the definition of EmployeeClass belonging to the mypackage.reports.accounts.salary package. The third statement imports the JDK-supplied BuffferedWriter class belonging to the java.io package. The fourth statement imports all the classes belonging to the java.awt package. Note that the asterisk (*) in the fourth statement indicates that all classes are included.
As the syntax suggests, you may import a single class or all the classes belonging to a package. To import a single class, you specify the name of the class, and to import all classes you specify *.
![]()
NOTE
The import statement specifies the path for the compiler to find the specified class. It does not actually load the code, as is the case with an #include statement in C or C++. Therefore, the import statement with * does not affect the application’s runtime performance.
Directory Layout and Packages
You have learned how to create Java packages and how to import the classes defined in those packages. Now, let’s look at the package hierarchies. As mentioned earlier, packages follow a hierarchical structure. When you compile your source program, the compiler generates a folder structure defined in your package and creates a .class file for your program in the innermost subfolder. To instruct the compiler to generate the folder hierarchy, you need to specify the −d option on the compiler command line. For example, let’s say your source program called Employee.java contains the following package statement:
![]()
![]()
When you compile this source program, use the following command line:
![]()
![]()
The -d option tells the compiler to create the folder hierarchy in the directory specified on the command line following the -d option. In this example, the starting directory is a dot (.), indicating that this is the current working directory. Therefore, when the compiler compiles the program, it creates a folder hierarchy, as shown in Figure 3-4, in the current working directory and creates a .class file in the salary subfolder, as shown.

FIGURE 3-4. Folder hierarchy for the compiled code
If you do not specify the -d option during compilation, the compiler will generate the Employee.class file in the current folder. You will then need to create the folder structure yourself and copy the .class file in the salary folder. To run this .class file (assuming it contains a main method) from the command line, use the following command:
![]()
![]()
Note that you need to mention the full folder structure while running the .class file. This is because the fully qualified name of Employee.class is packagename.ClassName. If you try running the Employee class without the package name, as shown next, you will get a “class not found” error at the runtime:
![]()
![]()
If you navigate to the Salary folder and try to run the Employee class from within the salary subfolder, as shown next, the runtime still generates an error:
![]()
![]()
![]()
CAUTION
If you use a package statement in your Java source file to access the created .class file, you must use the fully qualified class name.
![]()
TIP
When you reference a class defined using a package, its fully qualified path must be available with respect to the current folder, assuming that the current folder is defined in your CLASSPATH environment variable. You may edit the CLASSPATH environment using the tools provided by your operating system. Alternatively, you may specify the CLASSPATH on the command line when you run the application.
Summary
Java is object oriented. A Java program consists of classes. A class is a template for object creation. A running Java program contains several objects. You create an object by instantiating a class. A class may contain data members and methods that operate on this data. A class may be defined having a null implementation, in which case it does not have any data and method declarations. Each member of the class is declared with an access modifier that defines its visibility in the entire application. You used two types of modifiers in this chapter: public and private. It is recommended that all data members of the class be declared using the private modifier. A data member declared with a private modifier cannot be accessed by code external to the class definition using dot syntax. You need to define getter and setter methods, also called accessor and mutator methods, respectively, to access private variables from external code. This is known as information hiding. Defining setter methods for mutuating fields also helps in validating data input before it is assigned to the variables.
To instantiate a class, you use the new keyword. The instantiation results in calling a class constructor. A constructor is a special method defined in a class that is used for initializing the state of the created object. The compiler provides a default constructor with a null body. You may write your own constructors. A constructor can take arguments, which you can use to supply the initial values to the fields of the newly created object. A class may contain multiple constructors having different sets of arguments. A constructor declaration must obey a set of predefined rules. The compiler decides which constructor to call based on the number of parameters and their types.
A Java source program follows a predefined layout. It consists of package, import, and class definition sections. The package statement helps in grouping the logically related classes to control their visibility in the entire application. A package may create a hierarchical structure for logical organization of the classes. When a source program declares the package statement, the compiler generates a folder hierarchy defined in the package declaration. You must use the -d option on the compiler command prompt to enable the compiler to generate this hierarchy. You use the import statement to import the external classes in your source program. The import statement must specify the fully qualified name of the imported class.
In the next chapter, you will learn a very important principle of object-oriented programming—inheritance.