

CHAPTER
20
Network Programming
 o far you have learned many aspects of Java programming. The last three chapters covered the important topic of thread programming. In this chapter, you will learn another important feature in Java—network programming. As a matter of fact, network programs are so common that you might be wondering why we did not cover them earlier in the book. Network programs most of the time are multiuser applications. These are essentially client/server applications, where a single server application serves many clients. The server application, because it uses the same application logic for serving different clients, requires the use of threads for efficient processing. Therefore, it would have made little sense discussing network programming without first covering threads.
Network programming plays a vital role in today’s distributed computing era. Whatever applications you use these days generally require a collaboration with applications running on other machines—whether local or remote. This requires applications to support network programming. There are many examples of network applications in real life. The Yahoo! or Google chat application you use everyday is a network application. An online stock-trading application is a network application. Checking your bank balances online involves yet another network application. Browsing oracle.com in your web browser involves a network application. In fact, any web-based application requires network programming, and that’s what you will be learning in this chapter.
Java, right from its beginning, provided excellent support for network programming. JDK 1.0 provided a rich set of libraries for creating networked applications; in fact, at one stage, Java was “advertised” as a network programming language.
You will be learning the following in this chapter:
Networking
To understand how different computers connected on a network communicate with each other, let’s consider the telephone network within the premises of a fictional office. In the office, a telephone receptionist is appointed. The receptionist waits on incoming calls. When the phone rings, she responds to the call and connects the caller to the requested person. The two parties—the caller and the requested person in the organization—communicate with each other without the receptionist overhearing the conversation. The receptionist now waits for another call. When a new call comes in, once again she responds to the call and connects the new caller to someone in the organization. The process continues until all the incoming lines available in the office are busy. Anyone calling the office number will now get a busy signal. This entire process is illustrated in Figure 20-1.

FIGURE 20-1. Our office telephone network
A similar process occurs when multiple computers connected in a physical network want to communicate with each other over a centralized server. We will first consider the case of two computers communicating with each other, and later on expand the idea to multiple computers. The case of point-to-point communication is illustrated in Figure 20-2.

FIGURE 20-2. Two machines communicating with each other in a network programming model
For two machines to communicate with each other based on the network programming model, one of the machines must be in listening mode, as in the case of the telephone operator in the office scenario. The machine shown on the right side in Figure 20-2 is a listener to the incoming calls. Every machine connected to a network has a certain unique IP (Internet Protocol) address. The server sets up a port on which it is continually listening for incoming requests. An IP and port are similar to an office telephone number. Your office telephone has a fixed number that you let your clients know. The clients dial this number to connect to your office. Similarly, any machine that wants to connect to the server (the machine on the right in Figure 20-2) uses the known IP and the port number while making the connection. How does the client connect to the server? We say that the client makes a socket connection to the server by creating a Socket object from the classes provided in the Java library. So what is a socket? A socket is a software endpoint that establishes bidirectional communication between a server and a client. A socket associates the server program with a specific IP and port number. A client anywhere in the physical network holding a reference to this socket communicates with the server program using this socket. The client obtains this socket object with the following statement:
![]()
![]()
The Socket constructor takes two arguments: The first argument is the URL (Uniform Resource Locator) string, and the second argument is a port number. The URL represents the IP address of the server. Each server connected to the Internet has a unique address provided by an organization called InterNIC, which provides worldwide Internet domain name registration services. The port number is any number in the range 0 to 0xFFFF that you designate to your server application. Note that a certain range of numbers has been reserved universally for certain kinds of applications. When you create server applications, you will have to be sure not to use the reserved port numbers. The port number 80 is one such reserved number on which an HTTP (Hypertext Transfer Protocol) server is set up. Several other constructors are defined in the Socket class; some of these use the InetAddress class we will be discussing later in the book. You are encouraged to look up the API documentation to learn the other constructors.
When a Socket object is successfully created, the two machines will communicate with each other with the help of an established socket, which is general terminology used in the network programming model to indicate an endpoint of a communication link between the two processes. Java and some other languages use the name “Socket” to refer to a socket connection.
After a socket connection is established, we use the streams to send data back and forth between the two processes. A socket holds two streams—one for data input and the other for data output. This is shown in Figure 20-3.

FIGURE 20-3. Using streams on a TCP/IP socket connection
The server creates a server socket and keeps listening on it for incoming requests. A client makes a socket connection to the server. The server may accept or reject the client request. If a request is accepted, the client and server are connected using a common socket. The client opens input and output streams on the created socket. To send data to the server, it writes to the output stream. To read data coming from the server, it reads the input stream. When the communication is over, generally the client will close the socket, breaking the link between the two machines. Let’s look at this concept further via a concrete program example.
Simple Home Page Reader
When you surf on the Net, your browser makes connections to HTTP servers located worldwide and retrieves the contents of the pages hosted by those sites. For example, when you type a typical URL (such as http://www.oracle.com) into your browser, a socket connection is made to the remote server hosted by Oracle, an HTTP request gets its contents, its home page (index.html) is fetched, and finally the page contents are displayed in the browser’s client area. The browser interprets the HTML tags in the page contents and renders formatted output in its display area. We will now develop an application that does exactly this for a browser, but at a very crude level. In particular, our application will not have an HTML interpreter and will simply display the page contents in plain-text format on the console.
First, the application makes a socket connection to a well-known IP and port number. Once a socket connection is established, it opens the input and output streams on it. Then it sends a GET request through the output stream to the server. The server may respond to the request by sending the contents of its home page to our application. The client simply waits for the server to respond, and whenever the contents arrive, it reads and prints them to the console line by line.
The home page reader application is shown in Listing 20-1.
![]()
Listing 20-1 A Web Home Page Reader Application Using Sockets

Java defines its network classes in the java.net package. Therefore, we first import this package into our application:
![]()
![]()
In the main function, we make a socket connection by constructing an object of the Socket class:
![]()
![]()
The first argument to the constructor is the IP address of a known domain—in this case, it is Yahoo!. You could also replace this IP address with the string “87.248.122.122”, which is the physical IP assigned to yahoo.com and is subject to change at any time in future. All the web browsers listen to the standard port number 80 for serving contents based on HTTP. Therefore, we specify a port number of 80 in the preceding statement.
![]()
NOTE
If you are running this code in your office environment, a proxy server may be installed for HTTP connections. In this case, you need to use another constructor that specifies the type of proxy to be used.
![]()
If this attempt to connect fails, the program generates an exception. We catch this exception and print the stack trace to understand the type of error that occurred. If the connection succeeds, the program obtains the output stream associated with the connected socket.
![]()
![]()
Next, we construct an HTTP GET request:
![]()
![]()
GET is the most common HTTP method. It says, “Get me this resource.” The resource itself is specified as the next token in the string. The slash (/) in the preceding statement indicates the desired resource, which means “Get me the contents of the default home page file from the path’/’ at the specified host address.” The home page may be index.html or default.html or any other file, as decided by the server. The protocol used for communication is HTTP version 1.0, as specified by the next token in the preceding string. We now send this string to the server through the output stream object we obtained earlier:
![]()
![]()
Now, we need to read the response from the server. For this, we obtain the input stream object from the socket connection:
![]()
![]()
We create a Scanner object and repeatedly read the contents provided by the server until no more lines are found:
![]()

At the end, the program closes the socket connection:
![]()
![]()
![]()
NOTE
It is important that your application closes the socket connection after its use. The open sockets are not garbage-collected and need to be explicitly closed for freeing the resources.
When you run the program, you will get the following output:
![]()
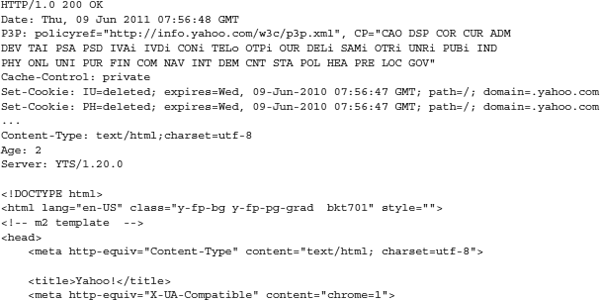
The complete output is not shown here. Obviously, the output on your machine will differ, depending on the current home page hosted at the time. Note the html tag toward the end of the shown output. Your browser interprets this HTML code and renders a formatted output in its client area. Because our client application does not understand these HTML tags, it simply gives the output in text format.
The home page reader application discussed here is a pretty low-level application that uses sockets directly. Java provides a higher abstraction to retrieve a webpage hosted on any server in the world. You will now learn about two new classes—URL and URLConnection—for doing this.
The URL Class
The URL class makes accessing web resources as easy as accessing a local file on your machine. URL stands for Uniform Resource Locator. The syntax for a URL is specified as follows:
![]()
![]()
A sample URL string looks like this:
![]()
![]()
The “http” part of the URL represents the scheme, popularly known as the protocol. The “www.oracle.com” part is the domain. The port, when not specified, takes a default value of 80. The substring “/us/technologies/java/index.html” specifies the path. This particular URL string does not contain the query_string subpart.
The Java URL class is an abstraction of the URL identifier. It provides functions for opening a connection to a specific URL, reading/writing data from/to this URL, and reading/writing header information as well as performing several other operations on the URL. You will be using the same I/O classes from the java.io package to read from and write to a URL that you used on files and socket connections.
The URL class provides several overloaded constructors. In its simplest form, it takes a single string parameter that specifies the URL, as just illustrated. The other versions accept protocol, host, port, and other types of parameters. You are encouraged to look up the javadocs for further details. The openConnection method opens a connection to the remote object. It provides several get methods to retrieve the parts of the URL string. You use the getInputStream and getOutputStream methods to obtain the input and output streams, respectively, for reading from and writing to a remote URL.
The URLConnection Class
Opening a connection on the URL instance returns an object of type URLConnection. This is an abstract class that represents a communication link between the application and a URL. HttpURLConnection and JarURLConnection provide the concrete implementations of this class. Once a connection is established, you call the setDoInput method to set the inward communication from the server to the application, which is the default. Similarly, to write to the server, you set the connection to the output mode by calling the setDoOutput method; the default value for the doOutput flag is false.
Let’s now consider an example that shows the use of URLConnection class. We will develop a simple webpage browser in the next section that uses the URL and URLConnection classes. Unlike the home page reader discussed earlier, this application is able to read from a remote web object using several available protocols.
Webpage Reader
The webpage reader application first constructs a URL object based on the specified URL string. Then it opens a connection on this URL and reads the contents in the specified remote object. The application code is given in Listing 20-2.
![]()
Listing 20-2 A URL-based Webpage Reader

The main method declares a URL string strURL, as follows:
![]()
![]()
This URL string can be anything you want. If the string points to an invalid URL, the program will catch an exception at runtime. You may also use other protocols such as ftp to retrieve the contents of the remote object using FTP (File Transfer Protocol).
The following statement constructs a URL object:
![]()
![]()
A connection to this URL is made by calling the openConnection method on it that returns an object of type URLConnection:
![]()
![]()
To read the data from the remote object, we obtain the input stream from the connection object:
![]()
![]()
Now, we can use our usual InputStream methods to read the contents from the remote machine and print them to the console. At the end, we close the input stream by calling its close method. Invoking the close method on the InputStream or OutputStream of a URLConnection after a request may free network resources associated with this instance, unless particular protocol specifications specify different behavior for it.
So far we’ve looked at the client side of network programming. Before moving on to server programming, I will like to discuss one more important class—java.net.HttpCookie.
The HttpCookie Class
A website uses a cookie to send state information to a user’s browser, and a browser uses the cookie to return the state information to the original site. Websites use cookies for client session management, personalization, and tracking a user’s web-browsing habits. If you look at the output of the program given in Listing 20-1, presented earlier, you will notice the presence of Set-Cookie fields in it. The general syntax of an HTTP response is shown here:
![]()

The web server sends these lines of Set-Cookie when it wants the browser to store cookies. The Set-Cookie is a directive to the browser to store the cookie and send it back in future requests to the server. If the browser does not support cookies or if cookies are disabled, obviously this directive is ignored. The browser, in its new request, sends the cookies back to the server using the following general syntax:
![]()

The server now knows that the new request is related to the previous one. The server may answer the request by sending the requested page, possibly adding other cookies.
The HttpCookie class represents these cookies in Java. It provides several methods to parse the cookie contents. Methods include getDomain, getName, getValue, hasExpired, and so on. You will be using some of these methods in the CookieSpy program we are going to discuss shortly. To retrieve the cookies from the HTTP response, the class provides a static parse method that returns a list of HttpCookie objects constructed from the Set-Cookie and Set-Cookie2 header strings. Like the getter methods, the class provides several setter methods that a server uses after creating a cookie object.
To handle cookies, the java.net package provides two more classes (CookieManager and CookieHandler) and two interfaces (CookiePolicy and CookieStore). The CookieManager provides a concrete implementation of CookieHandler that provides methods for getting/putting cookies besides other functions. The CookiePolicy implementation decides the policy for accepting/ rejecting cookies. Lastly, as its name indicates, the CookieStore represents storage for cookies. You will be using these interfaces and classes in the CookieSpy program.
Spying for Cookies
Generally, websites don’t tell you when they send cookies to your machine. Although cookies cannot carry viruses and cannot install malware on your computer, they can be used to track your browsing activities (which is considered an invasion of privacy by law in some countries). Also, hackers can steal them to gain access to your web account and other sensitive information the cookies may contain. Therefore, we will develop a spy program that lists out the cookies sent to your machine by any website you usually browse. The code for the CookieSpy program is given in Listing 20-3.
![]()
Listing 20-3 A Spy Utility for Web Cookies
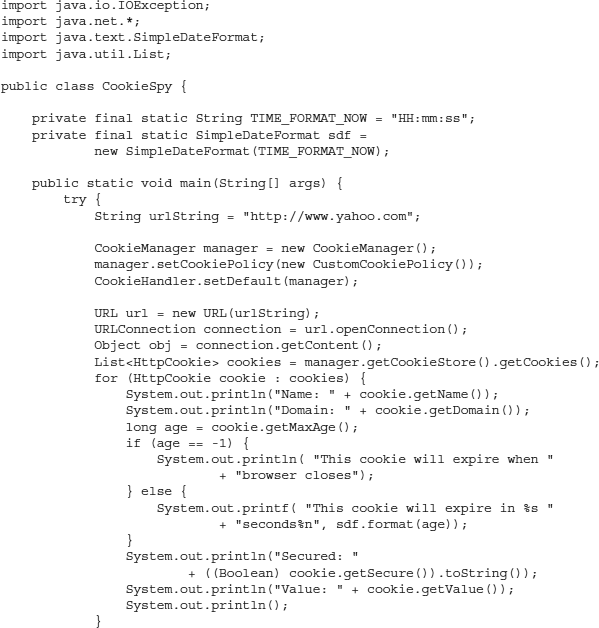

The main method first creates an instance of the CookieManager class:
![]()
![]()
Besides the no-argument constructor used here, the CookieManager class provides another constructor that takes two parameters—a CookieStore and a CookiePolicy. You would use this constructor if you want the manager to use your customized store and policy for accepting/ rejecting cookies. If you just want to use customized policies and not a customized store, the CookieManager provides a method called setCookiePolicy to set your own policies and continue using its default store. In our case, we set our customized policy:
![]()
![]()
We then set this manager as the default in the CookieHandler:
![]()
![]()
CookieHandler is at the core of all cookie management. It uses the manager set in the preceding statement to use the customized store and policies, if provided. When you get a response to your web request, this handler will intercept the response and store the cookies, if any, in its store. To send a web request and get a response, we use the following code:
![]()
![]()
We now obtain the list of received cookies by calling the getCookies method of the CookieStore:
![]()
![]()
For each cookie in the list, we print its various members:
![]()

Now, let’s look at the CustomCookiePolicy class that implements CookiePolicy. The interface provides one sole method, called shouldAccept, that we implement as follows:
![]()
![]()
The method simply returns true, suggesting that regardless of the values of the two parameters it receives, it would accept any cookie. Now, suppose you want to accept the cookies conditionally; for example, you may decide not to accept any cookies coming from yahoo.com. You would do so by replacing the preceding return statement with the following:
![]()
![]()
Now, try running this code on the specified Yahoo! site. You will see output similar to the partial output shown here:
![]()

Try setting the policy so as to reject cookies from yahoo.com, as explained earlier. This time, you will not get any cookies listed on your terminal. Try the program with different sites such as google.com to see what cookies it sends to your machine.
One last thing to cover before we close this section: the implementation of a custom cookie store. The default cookie store provided in Java’s implementation should suffice in most cases. You would want to implement your own store should you wish to keep cookies in your own persistent storage. To create your own store, you create a custom store class that implements CookieStore:
![]()
![]()
As a part of the interface implementation, you need to provide definitions for the add, remove, and removeAll methods as well as the get, getCookies, and getURIs methods. You may create a store in an internal HashMap or persistent storage on your disk. The CookieManager will automatically call your add method to save cookies for every incoming HTTP response, and it will call the get method to retrieve cookies for every outgoing HTTP request. Remember, it is your responsibility to remove any cookie instances that have expired.
Having seen how to write the client applications that communicate with a remote server, we will now cover how to write an HTTP server application.
Echo Server Application
In the previous section, you learned how to write a client application. In this section, you will learn how to write a server application. The server application requires you to use the ServerSocket class. This class implements server sockets. A server socket is a socket (endpoint of communication— remember the definition of socket given previously) that waits for requests to come in over the network. Based on the request, it performs some operation and optionally returns a result to the requester.
In this section, we develop an echo server application. The echo server sets up a server socket listening on a certain port for incoming client requests. A client makes a connection to the server using this port number and writes some data to our echo server. The echo server will read the data and send it back to the client “as is.” The full program is given in Listing 20-4.
![]()
Listing 20-4 A Server That Echoes Back the Client Message
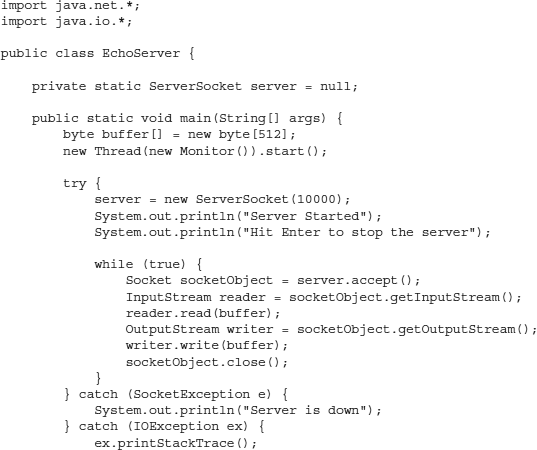
We declare a class field of type ServerSocket:
![]()
![]()
In the main function, we declare a buffer for storing the data that comes from the input stream:
![]()
![]()
We create a Monitor thread and submit it for execution:
![]()
![]()
The Monitor thread waits for the user to hit the ENTER key and then closes the server. The Monitor class is discussed later.
We create a server socket by instantiating the ServerSocket class:
![]()
![]()
The class constructor takes one argument that specifies the port number on which the server would be listening. In our example, the server listens to incoming requests on port 10000. Note that you cannot arbitrarily pick up any number for assignment to a port. There are many ports that are already reserved. A few well-known reserved ports include port 80 (HTTP), port 21 (FTP), port 25 (SMTP), port 23 (Telnet), and port 53 (DNS). The port numbers range from 0 to 65535 and are divided into three ranges: the well-known ports (0 through 1023), the registered ports (1024 through 49151), and the dynamic and/or private ports (49152 through 65535). For a complete list of ports, refer to the IANA registry (www.iana.org/assignments/port-numbers). A value of 0 in the port numbers registry indicates that no port has been allocated. Passing 0 as an argument to the ServerSocket constructor results in the automatic allocation of a port.
After the server socket is created, we need to make it wait for the input requests. This is done by calling its accept method:
![]()
![]()
The accept method is a blocking call and will wait indefinitely until a client request is received. When it breaks from this blocking call, it returns an object of the Socket type. This is your socket connection to the client who is currently connected to you. Just the way the client opens input and output streams on the connected socket, similarly the server program obtains the input and output streams on the connected socket. The following statement obtains the input stream from the socket:
![]()
![]()
The program now reads the data from the input stream by calling the read method of the InputStream class:
![]()
![]()
We now obtain the output stream on the socket and write the buffer contents to it:
![]()
![]()
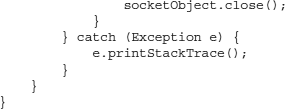
Finally, we close the socket by calling its close method:
![]()
![]()
The program now does another iteration of the while loop, where it will block again for another request from a client. Because this is an infinite loop, we need some means of shutting down the server. This is exactly the purpose behind creating the Monitor thread.
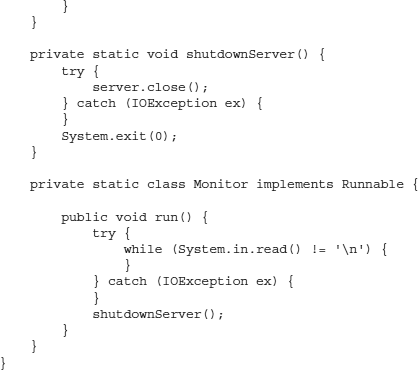
The Monitor class implements Runnable, and its run method simply blocks itself for keyboard input from the user:
![]()
![]()
The loop ignores all input except the ENTER key. At this event, it calls the shutdownServer method of the application. In the shutdownServer method, we close the server socket and quit the application by calling the System.exit method:
![]()
![]()
Closing the socket also results in closing an associated channel, if any. After the server socket is closed, any thread currently blocked in accept throws a SocketException. We catch this exception and print the “Server down” message to the user. Note that if there is no thread that is currently blocked in the accept method, this message will not be printed to the console. Later on in this chapter, you will be developing a multiuser server application that creates multiple threads, each thread holding its own socket connection. In this situation, the chances of a SocketException occurring are greater, and you will likely see the “Server down” message on the console.
With any other type of exception, we print a stack trace. Note that the SocketException is a subclass of IOException:
![]()

Now, let’s look at what kinds of exceptions can occur in this code. Creating an instance of ServerSocket can generate three types of exceptions: An IOException is generated if an I/O error occurs while opening the socket, a SecurityException occurs if a security manager exists and its method does not allow this operation, and an IllegalArgumentException occurs if the port parameter is outside the specified range of valid port values. A call to the accept method may generate four different types of exceptions: IOException, SecurityException, SocketTimeoutException, and IllegalBlockingModeException. The first two types of errors occur under the conditions explained earlier. The SocketTimeoutException error occurs if a timeout was previously set and has now been reached. The IllegalBlockingModeException occurs if this socket has an associated channel that is in nonblocking mode and there is no connection ready to be accepted. The close method throws an IOException if an I/O error occurs while closing the socket. As mentioned earlier, closing the server socket will make the thread blocked in the socket’s accept method throw a SocketException.
Testing the Echo Server Application
To test the echo server application, compile and run the code in a command window. You will see the message “Server Started” on the console. The server keeps waiting for clients to connect. We will use the client HomePageReader.java, developed in the previous section. Simply modify the URL and the port number in the socket connection statement as follows:
![]()
![]()
The URL is now set to localhost, which specifies the IP for your local machine. The port is set to 10000, which is where our echo server is listening to incoming requests.
Recompile the client program and run it from a different command window. The client program will print the following message in its command window:
![]()

Note that it prints your GET request along with the two newline characters embedded in the request. Thus, the server echoes back the client message “as is.” You may try changing the request string and observe the program output. Now, shut down the server by terminating the server application and try running the client application. You will see an error message printed to the console informing you that the connection to the server is refused.
Serving Multiple Clients
The echo server developed previously is capable of serving only a single client at a time. While it is serving one client, if another client tries to connect to the server, the new client will get the “connection refused” error. A client may try repeatedly to make a socket connection for a predefined timeout period.
![]()
TIP
To specify a timeout for making a socket connection, use the following code snippet. The second parameter to the connect method specifies the time in milliseconds. The first parameter to the connect method is an instance of the InetSocketAddress class that specifies the URL and the port number to which you wish to connect.
![]()
If the server response time is much smaller than the frequency at which the client requests arrive at the server, the “connection refused” error may not occur frequently and would be acceptable to the clients. If the client receives this error; at the most, it will have to retry connecting to the server, with a good possibility that the next time the connection will succeed. However, if the server takes a long time to process the client request and to send a response to the client, this “connection refused” error may not be acceptable to many waiting clients. We will now modify our server application so that it can provide better service to the simultaneous multiple clients. The idea is depicted in Figure 20-4.
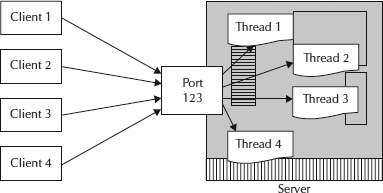
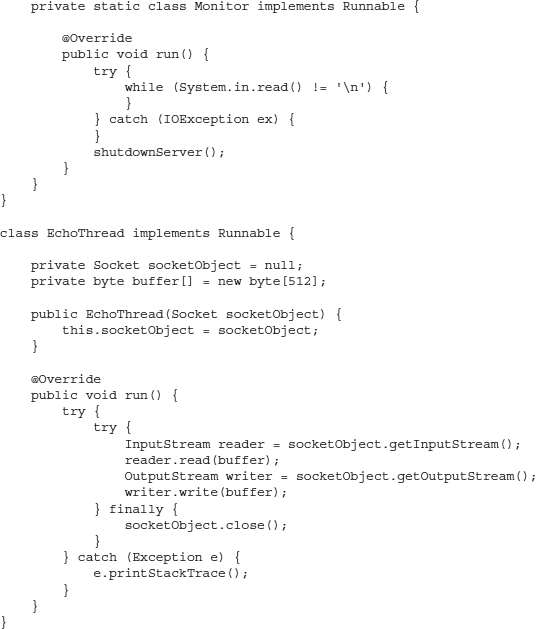
FIGURE 20-4. Serving multiple clients by creating threads on the server
As in the previous case, our server application listens to the incoming requests on a designated port. Multiple clients will connect to the server using this port number. Whenever a client requests a connection, the server spawns a thread and passes the connected socket to the created thread. The client and this thread will now communicate with each other using the connected socket. For every client that requests a connection to the server, the server application creates a new thread and assigns it to the requesting client. Thus, we can now have multiple clients connecting to the server at the same time, and these clients are served by independent threads assigned by the server. When large numbers of clients attempt to connect to the server, the server may eventually run out of resources, and in such a case the connection to the new client would be refused. This situation will not occur that frequently, as in the earlier case. We will now modify our echo server application to implement this concept.
Serving Simultaneous Clients
To serve multiple clients, the modified server application will need to create a thread for each received client request. We will pass the connected client socket to this thread so that the client and the corresponding thread can communicate directly with each other. The server will now be free to receive the next client request. The modified EchoServer application is given in Listing 20-5.
![]()
Listing 20-5 A Threaded Server Application That Services Multiple Clients

In the main method, we create a cached thread pool for executing our worker threads and a single instance of the Monitor thread:
![]()
![]()
We create a Monitor thread and submit it for execution:
![]()
![]()
The Monitor thread waits for the user to hit the ENTER key and then closes the server. The Monitor class was discussed earlier with the EchoServer class.
We also create an instance of ServerSocket listening to port 10000:
![]()
![]()
We then set up an infinite loop for accepting client requests:
![]()
![]()
The accept method call is a blocking call that waits for client requests to arrive. After a client request arrives, the accept method returns a Socket object. We now create a thread and pass this socket object in the thread’s constructor and submit the created thread to the thread pool for execution:
![]()
![]()
The program loops back to the accept method, where it waits for another client to connect. The EchoThread class implements the Runnable interface:
![]()
![]()
The class constructor receives a Socket object as a parameter and copies it to a local variable for later use. In the run method, we obtain the input stream on the socket object and read the data into the buffer from the input stream:
![]()
![]()
We write this data back to the output stream on the same socket. Thus, whatever data we receive from the client is echoed back to the client:
![]()
![]()
Finally, we close the socket by calling its close method.
![]()
![]()
Note that the EchoThread simply sends back the received string to the client. If this thread were to do something more, such as accessing a server resource, you would be required to implement the various synchronization techniques you learned in the previous chapters to ensure resource integrity.
Running the EchoMultiServer Application
To run the EchoMultiServer application, you first compile the application using the javac compiler. After the program compiles successfully, you run it on the command prompt as follows:
![]()
![]()
When the server starts, it prints an appropriate message to the user console and waits for the clients to connect.
Testing the EchoMultiServer Application
To test the EchoMultiServer application, we will modify our earlier HomepageReader application. The modified program creates 100 clients, each making an independent socket connection to the multiserver. You will observe that the server serves all these clients concurrently. The modified client application is shown in Listing 20-6.
![]()
Listing 20-6 A Client Application for Testing the Multiserver


In the main method, we simply create a loop to instantiate 100 client threads:
![]()

The client is a Runnable class that accepts the counter as a parameter to its constructor. The counter is a static class field that numbers the created threads:
![]()
![]()
The client is declared private and static, the same as our previous declarations. The run method creates a Socket and binds it to the localhost at port 10000. We also set a timeout of 1,000 milliseconds just to ensure that the client tries for a successful socket connection for a reasonable amount of time:
![]()

The rest of the client code is similar to the socket client application discussed in Listing 20-1. It basically writes a message to the server and prints the “server returned” message to the console.
When you run the application, you will see the following typical output:
![]()

Also, observe the server console. You will notice that several threads are created. Each created thread prints an informative message to the console. The server output is shown here:
![]()

Try changing the timeout in the socket connection statement. If this time is set to a low value, you may see a few timeout exceptions on the console. If you do not get any timeouts, it means the server is running really fast to serve all these clients promptly. You might now introduce a deliberate time lag between the two accept calls in the server’s infinite while loop by placing the thread to sleep for some time.
Writing a File Storage Server Application
Now that you have learned the basics of network programming, we will discuss how to develop a more practical application. We will be developing a file storage server where you can upload a file of your choice. For this, the server will need to create a server socket and listen to the incoming requests. A client makes a connection to the server and sends a file to the server for storage. The server receives the file contents over the established socket connection to the client, and it stores the file by appending a unique string to its filename. The client can later on request the file back from the server. In this case, the file stored on the server will be downloaded to the client machine.
We will discuss the construction of both the server and client applications. First, let’s look at the server implementation.
A Cloud Storage Server
The file storage server sets up a server socket and waits for the client requests. A client request consists of a command followed by a filename and its contents. The command is an integer value of 0 or 1, where 0 indicates the request for storage and 1 indicates a request for retrieval. The server accepts only text-based files for storage. The complete program is given in Listing 20-7.
![]()
Listing 20-7 A File Storage Server Application


The main function creates a server socket listening to port 10000:
![]()
![]()
It sets up an infinite loop that awaits client requests. When a request is received, it creates a thread for processing the request and passes the socket object to it during its construction:
![]()

Now, let’s look at the thread implementation that processes the request:
![]()
![]()
The RequestProcessor is a static private inner class. The class constructor receives a Socket object as a parameter and stores it in its instance field.
The run method creates DataInputStream and DataOutputStream objects on the socket connection:
![]()
![]()
The readInt method of the DataInputStream class reads the command from the client application:
![]()
![]()
The readUTF method reads the name of the file that the client is going to upload:
![]()
![]()
We call the uploadFile or downloadFile method, depending on the user’s command.
In the uploadFile method, we create a file in the server’s current working directory with the prefix “server-” added to the filename and then create a BufferedWriter on it:
![]()
![]()
The program now continuously reads from the input stream and writes to the output file created in the server’s current working directory until the string “-1” is received, which marks the end-of-file condition:
![]()

At the end, we attempt to close both the input and output streams:
![]()
![]()
In the downloadFile method, we create a reader on the previously stored file:
![]()
![]()
We now read the file line by line and send its contents to the output stream using a while loop:
![]()

We mark the end-of-data condition by writing “-1” to the output stream. Finally, we attempt to close both files. Note that in the case of an error, the server simply logs the error, which the server administrator can look up at a later time; no error is reported to the client.
Having discussed the server code, we will now discuss the client implementation.
A Cloud Store Client
The cloud store client developed in this section can both upload and download a file from the remote sever. This is a command-line application that accepts two parameters: The first parameter specifies the get/put command, and the second specifies the filename. The program establishes a socket connection to the remote server and uses it for uploading/downloading the specified file. The client program is given in Listing 20-8.
![]()
Listing 20-8 A File Upload/Download Program
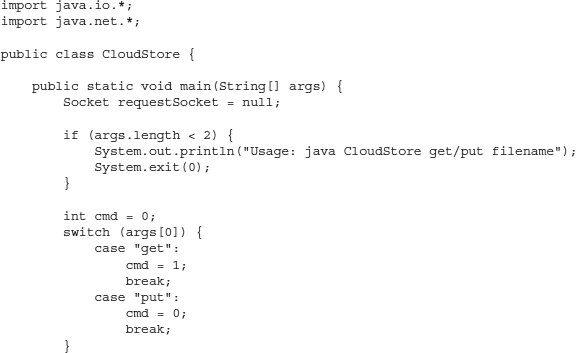

In the main method, the client establishes a socket connection. (I used the same machine for running the server, so the server is specified as localhost.) If you use a remote server, specify the appropriate URL for the server or its IP address.
![]()
![]()
The client application now opens DataOutputStream on the output stream of the established socket:
![]()
![]()
The writeInt method writes the command, and the writeUTF method writes the filename to the socket stream:
![]()
![]()
To read the contents of the file specified on the command line, we use the BufferedReader class:
![]()
![]()
The program reads the file contents, line after line, by calling the readLine method of the stream reader class and writes the read contents to the output stream by calling its writeUTF method:
![]()
![]()
At the end, we write the string “-1” to the output stream to indicate the end of contents:
![]()
![]()
![]()
CAUTION
The use of “-1” as the EOF marker might not be appropriate because your text file might contain this string, resulting in a partial reading of the file at the client’s end. When you use low-level sockets for communication, you need to be careful in designing the proper protocol and handshaking between the two machines.
For downloading the previously stored file, we open a DataInputStream on the socket connection:
![]()
![]()
We also create a file for writing the downloaded contents:
![]()
![]()
We keep on reading from the input stream until we receive the terminating string specified by -1:
![]()
![]()
For each line read, we write its contents followed by a newline character to the local file:
![]()
We also print the read line to the user’s console for a quick look at the downloaded file:
![]()
![]()
Testing the File Upload/Download Utility
Compile the server application, open a command window, and then start the server using the following command:
![]()
![]()
You will see the following message on your console:
![]()
![]()
The server is now waiting for the client requests. Open another command window and run the client using the following command:
![]()
![]()
The program will upload the notes.txt file to the server. The file must be available in the local folder from where the application is run. After the file is uploaded, the application prints a message to the user:
![]()
![]()
Note that this message is not a guarantee that the server received the file contents without errors and saved it on its local storage. The server does not return any error conditions to the client. To check whether there were any errors in this operation, you will need to check the server console. You will see the following message on the server console if the file was successfully saved:
![]()
![]()
You can verify the physical presence of this file on the server in the working directory where you started the server application and check its contents. To download the previously uploaded file, use the following command:
![]()
![]()
The contents of the previously uploaded notes.txt file will be downloaded from the server and stored in the local file with the same name in the working directory where you started the client application.
![]()
NOTE
To focus on socket programming, we have kept the server and client applications simple by avoiding the handshaking in communications, especially for error reporting. To develop an application similar to this for uploading/downloading files to a remote machine, you would probably use a web container and servlets/JSPs (Java Server Pages). A web container would use sockets for communication like the one described in this application.
The InetAddress Class
The InetAddress class is a utility class that represents an IP address, which is either a 32-bit or 128-bit unsigned number used by Internet Protocol (IP). The protocols such as Transmission Control Protocol (TCP), User Datagram Protocol (UDP), and Stream Control Transport Protocol (SCTP) are built on top of IP. The instance of this class consists of an IP address and possibly its corresponding host name. The class converts numeric addresses to host names, and vice versa. The other networking classes that you have studied previously, such as Socket and ServerSocket, use this class for identifying hosts.
The class does not have any public constructors, which means you cannot create any arbitrary addresses. All created addresses must be checked with DNS (Domain Name System). To create an InetAddress object, you must use one of the available factory methods. The getLocalHost factory method returns the InetAddress object that represents the local host. The getByName method accepts the host name as its parameter and returns the corresponding InetAddress object. Both methods throw an UnknownHostException if they are unable to resolve the host name. The getAllByName factory method returns an array of InetAddress objects that represent all the addresses the given name resolves to—note that DNS mappings allow you to associate a single name with a set of machines (IP addresses). This method may throw an UnknownException like the other two methods if it cannot resolve the name to at least one address.
The class provides various getter methods that return the host name, address, and so on. The isMulticastAddress method checks whether the InetAddress is an IP multicast address. Inet4Address and Inet6Address are the two direct, known subclasses of this class. As the name indicates, Inet4Address represents an IP version 4 address and Inet6Address represents an IP version 6 address. For so many years, we have been using IPv4 addresses that consist of four parts—each being a byte of data. The IPv6 address consists of eight 16-bit pieces and will soon be in use as the Internet keeps growing.
We have used a variation of the class InetSocketAddress in our earlier examples while connecting to a remote server. The simple example given in Listing 20-9 illustrates the use of this class.
![]()
Listing 20-9 DNS Resolution Application


In the main method, we call the getAllByName static method of the InetAddress class. The method takes a host as the parameter and returns an array of the associated IP addresses. First, we list out all servers hosted by Google and then by CNN. At the end, we list out the IP address of our local machine. When you run this application, you will see output similar to the following (note that by the time you run this code, Google/CNN might have changed/added a few servers):
![]()

From this output, you can see that Google has hosted their website on five different IPs, whereas CNN hosts their website on six known servers. The output shows that the local machine has only one IP associated with it (which, of course, goes without saying).
Broadcasting Messages
So far what you have seen in this chapter is the development of client/server applications, where one or more clients connect to a known server and communicate with it. This communication takes place over TCP, which provides reliable, ordered delivery of a stream of bytes from a program running on one computer to another program running on another computer. In some situations, you might need to make a general broadcast of a message on a network, without caring about the guaranteed and orderly delivery of data. Consider the case of a news network that continually transmits news on its channel regardless of whether anyone is watching. A client that connects to the channel receives the news currently being broadcast. All previous broadcasts are not delivered to the client. A client might not even be interested in the past broadcasts.
We will now develop such an application in Java using a DatagramSocket, which is Java’s mechanism for network communication via UDP instead of TCP. This class represents a socket that is used for sending and receiving datagram packets. It can be used for sending multiple packets on a network. When multiple packets are sent from one machine to another, each one may take a different route and therefore the packets at the receiving end may not arrive in the same order as the sending order. In situations where datagrams are used, this is acceptable. For example, consider a server that broadcasts news on a channel; the order in which the news items are received by the client rarely matters. In some cases, the packets could be lost in the transit and the client might not receive them. Consider a server that broadcasts atomic clock time ticks on the network. Let us say that the server broadcasts a message every second. If a few of these messages are lost, the client does not care because it is usually interested in the current time and not all the older beeps that the server has broadcasted.
We will now discuss the construction of such a broadcasting server. We cover the server application first, followed by a client that receives the current broadcasts from the server.
Writing a Stock Quotes Server
Our server application will broadcast the latest trade executed on the stock exchange. Such broadcasts take place periodically as trades are executed. The server application is given in Listing 20-10.
![]()
Listing 20-10 Exchange Server Broadcasting Trades


The main method of the application creates and runs an instance of StockTradesGenerator that generates random trades periodically for a predefined list of stocks:
![]()
![]()
The main application thread terminates when the user hits the ENTER key.
In the StockTradesGenerator thread class, we declare a DatagramSocket variable and a few strings that represent some of the stock symbols:
![]()
![]()
The class constructor creates an instance of DatagramSocket that binds to port 4445:
![]()
![]()
In the run method, we set up an infinite loop for broadcasting the trade as and when it executes on the exchange. To simulate a real-life-like situation, we pick up the stock symbol from the stockSymbols array at random. We also generate the trade price at random and add it to a fixed value for each stock symbol:
![]()
![]()
We now format the last trade (the generated price and the current time) in a string and get its contents in a byte buffer:
![]()
![]()
The method now gets the current system time and formats it using a predefined formatter. The program then sets up an IP address for broadcast:
![]()
![]()
A datagram packet is constructed by instantiating the DatagramPacket class:
![]()
![]()
The first parameter to the constructor defines the packet contents, the second parameter decides the contents’ length, the third parameter specifies the IP, and the fourth parameter specifies the port number. The packet is broadcast on the network by calling the send method of the socket:
![]()
![]()
We sleep for some time before sending the next packet:
![]()
![]()
Because this is a server application, we maintain a log of exceptions for the administrator to examine at a later time. So let’s look at what kind of exceptions this server application may generate at runtime. Constructing a DatagramSocket may generate a SocketException or a SecurityException. A Socketexception is generated if the socket could not be opened or could not bind to the specified local port. The Securityexception is generated if a security manager exists and its checkListen method does not allow this operation. The DatagramPacket constructor we have used in our application does not throw any exceptions. The class declares a few more overloaded constructors. The constructors that take a SocketAddress as one of the parameters may throw an IllegalArgumentexception and a Socketexception. The constructor we have used here takes InetAddress as one of the parameters. The getByName method of the InetAddress class may throw an UnknownHostexception if no IP address for the specified host can be found. A Securityexception may be thrown for the usual reasons that the security manager exists and its checkConnect method does not allow the current operation. Finally, the send operation of DatagramSocket may generate various exceptions. Obviously, it would throw an IOexception if an I/O error occurs during sending. A Securityexception occurs for the usual reasons that the security manager exists and the checkMulticast or checkConnect method does not allow the send operation. The method may throw a PortUnreachableexception if the socket is connected to a currently unreachable destination port—throwing of this exception is not guaranteed. If the socket has an associated channel, which is in nonblocking mode, the method will throw an IllegalBlockingModeexception. Lastly, if the socket is connected and the connected address and packet address differ, an IllegalArgumentexception would be thrown. Note that when any of these exceptions occur, we log them on the server and do not attempt to inform the client, which is really not required because this type of communication (datagram) is not really guaranteed.
When you run the application, the server keeps broadcasting the trade packets continuously. Let’s now look at a client application that connects to the server and displays the contents of the received packets on its console.
Writing the Stock Trader Client
The stock trader client connects to the multicast stock trades server described in the previous section and prints trade information to the user console whenever such information is received from the server. The full source for the client is given in Listing 20-11.
![]()
NOTE
We intentionally declare the main method of the following client application as throwing an IOException so as to keep the exception-handling code away from the main application logic and not clutter it up. As said in Chapter 8, a good practice is to handle errors close to where they occur.
![]()
Listing 20-11 Client Program That Receives Trades from a Stock Exchange Server Application
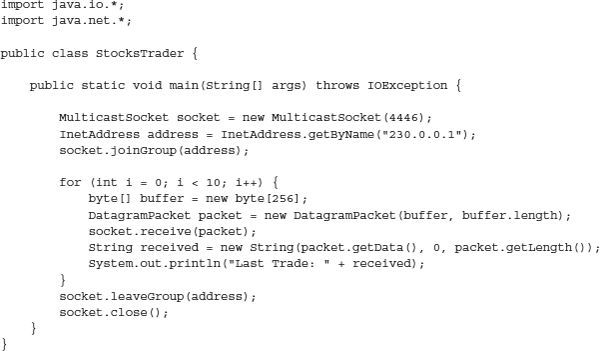
The main method creates an instance of MulticastSocket that binds to port 4446:
![]()
![]()
The program builds an InetAddress corresponding to the broadcast address set up in the server:
![]()
![]()
We call the joinGroup method on the socket to bind it to the multicast group:
![]()
![]()
We then read the last 10 trades broadcast by the server. For this, we create a DatagramPacket and pass it as a parameter to the receive method of the socket instance:
![]()
![]()
Note that receive is a blocking call and therefore waits for the server broadcast. After receiving the packet, we retrieve its contents in a string:
![]()
![]()
The getData method retrieves the packet contents, and the getLength method returns the length of its contents. The program then prints these contents to the console:
![]()
![]()
After reading the last 10 trades, we disconnect the socket from the multicast group and close it:
![]()
![]()
Let’s now look at the various exceptions this program may generate. The MulticastSocket constructor may generate an IOException if an I/O error occurs while creating the socket. It may also throw a Securityexception if the checkListen method of the existing security manager does not allow this operation. The joinGroup method may generate an IOexception if an error occurs while joining or the specified address is not a multicast address. It throws a Securityexception if the checkMulticast method of the existing security manager does not allow the join operation. The leaveGroup method may generate an IOexception and Securityexception for reasons similar to a join operation. The receive operation on the socket may generate various kinds of exceptions. An IOexception is thrown if an I/O error occurs. A SocketTimeoutexception occurs if a timeout was previously set and it has expired. The PortUnreachableexception is thrown if the socket is currently connected to an unreachable destination, and lastly the IllegalBlockingModeexception is thrown when the associated channel of the socket is in nonblocking mode. On the occurrence of any of these errors, we simply print a stack trace to the user console for detailed information on the type of error that occurred. Typically, for network applications, the stack trace helps in better understanding and diagnosing, if required, the type of error rather than using a customized error message.
Running the Server and Client
To run the server, on a new command window type the following command:
![]()
![]()
Leave the server running in this window and open another window for starting the client. Type the following command to run the client:
![]()
![]()
You will see the following messages printed on the console.
![]()

Note that the output on your machine will differ from the preceding output and will differ on every run due to the randomization used to generate trades.
Support for SCTP
So far you have seen the use of two network protocols—TCP and UDP. Another option is SCTP. It provides the reliable, ordered delivery of data like TCP but operates in the message-oriented fashion like UDP. It is session oriented, and an association between the two endpoints must be established before any data can be transmitted. The connection between two endpoints is referred to as an association between those endpoints. It has direct support for multihoming. This means that an endpoint may be represented by more than one address. This is illustrated in Figure 20-5.

FIGURE 20-5. Multihoming in an SCTP connection
Each address may be used for sending and receiving data, thus providing network redundancy. Endpoints exchange a list of addresses during association setup. One address is designated as a primary address; the peer communicates to this default address.
The I/O operations operate on messages, and message boundaries are preserved. Each association may support multiple independent logical streams. This is illustrated in Figure 20-6.
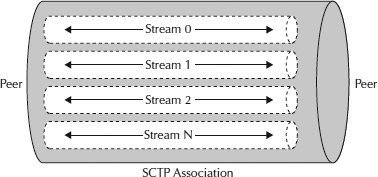
FIGURE 20-6. SCTP association containing multiple streams
The data packet now includes stream identifiers in addition to the usual sequence numbers. SCTP monitors the association paths using a built-in heartbeat. If a path failure is detected, it sends traffic over the alternate path. The application need not even know that a failover recovery occurred. Failover can also be used to maintain network application connectivity. Thus, SCTP provides a powerful mechanism for supporting high availability and increased reliability.
Along with SCTP, there is also a need for other protocols such as the Session Initiation Protocol (SIP), which is used for negotiating and defining a communication session’s parameters. To explain the purpose and enrollment process, you use the Session Description Protocol (SDP), which defines a format for session characterization and media definition. SDP can be used with a number of transport protocols, such as Session Announcement Protocol (SAP), SIP, HTTP, and others.
The Java API now defines a new package, com.sun.nio.sctp, to support SCTP. The API and implementation are publicly accessible, so you can write your network applications based on SCTP. However, SCTP is not a part of the Java SE platform at this time.
Summary
In this chapter, you studied another important set of classes from the Java libraries for networking. Java right from its beginning provided good support for creating network applications. The java.net package provides a set of classes for this purpose. The Socket class represents a client socket, and a ServerSocket class is used for creating a server application. The communication over the socket is abstracted using stream classes. You open an input stream for reading from a socket and an output stream to send data out on a socket. To serve multiple clients, you would create a thread on the server for each accepted request. You pass the connected socket object to this thread. The client and the thread on the server communicate with each other using this socket.
In this chapter, you learned to write home page and webpage reader applications based on the URL and URLConnection classes. You also developed a cookie spy application that checks on the incoming cookies sent by websites. You developed an echo server that responds to requests coming from many concurrent clients.
The network applications include programs such as chat, file server, and news broadcast. You learned to create a simple file storage server that allows clients to upload files on the server. You also learned the use of the InetAddress class that represents an IP address.
The communication in a network application need not always be point-to-point. In certain situations such as a news broadcast, the server will broadcast messages on a channel on a continuous basis. A client connects to the server and receives the currently broadcasted messages. Java supports this functionality through the use of the DatagramSocket and DatagramPacket classes. In addition to TCP and UDP, Java libraries now support SCTP.
In the next chapter, you learn a few more classes from the Java libraries.