
Chapter 11
Deploying Web Services with WCF
![]() Create a Web Service
Create a Web Service
![]() Deploy a Web Service
Deploy a Web Service
![]() Write a Client That Consumes the Web Service
Write a Client That Consumes the Web Service
Windows Communication Foundation (WCF) is a .NET technology for creating Web services. A Web service is software that provides functionality that can be used by any other software application, using any programming language, on any hardware and operating system that can communicate over a network.
The functionality of Web services can be either public or private. Examples of public Web services might be a weather service where you provide the location and you get back a forecast data that you can display on your screen or an address verification application that will validate if a postal address exists or suggest alternatives. Examples of private Web services might be the ability for multiple applications in a large corporation to call a customer Web service with a customer ID and receive that customer’s record, or perhaps an ordering system where you can submit a new customer order and the Web service would process the submission in the background for you.
What’s common about all of the examples in the preceding paragraph is that, regardless of public or private, the Web service is useful for more than one application or system. Everyone needs the same service from the Web service, so why should each application re-invent the wheel every time? Just set up one service and everyone can work with that one service.
You must be wondering how such a broad claim can be made that one technology is accessible by any system regardless of platform, language, or software. The Web service is separated from the calling system via open standards and a well-defined interface. There are ubiquitous communications protocols, such as HTTP, and data format standards, such as XML, that Web services can use. So, if both systems that communicate use Hypertext Transfer Protocol (HTTP) and XML in the same way, then the Web service can be useful. For example, if an application were built on a Sun workstation running Solaris, saving data in an Oracle database, and written in Java, it could still communicate with your WCF service, which is on an Intel-based server, running Windows 2008, saving data in SQL Server, and written in VB. It doesn’t matter because the Java system will translate its call into XML and send the XML data via HTTP to the WCF service. The WCF service understands the XML because it was the WCF service that told the Java application what format to put the XML into. If you’re curious about the format, it’s called Web Service Description Language (WSDL), which is a contract (or interface) that tells callers how to package the XML and what operations (such as GetWeather) can be called on the Web service. There’s more that the WSDL does behind the scenes, but the primary point to make is that clients, such as the Java app, use the WSDL to package their XML and send it to the WCF service. The service translates the XML into a call to a method, runs the method, packages the results back into XML (as defined by the WSDL), and sends the results back to the Java application. Essentially, a WCF service uses open standards so that any other system can use those same open standards to communicate.
This chapter will show you how VS helps you create WCF services, how to create a client that communicates with a WCF service, and how to deploy WCF services. The deployment information in this chapter is also useful to know for other types of Web applications, such as ASP.NET MVC and Silverlight. Let’s start off with creating a WCF project.
Starting a WCF Project
To create a new WCF project, press CTRL-SHIFT-N to start a new project, and then select WCF Service Library, name the project WcfDemo, and set the location to anywhere you want the project to reside in the file system. This will produce a project similar to Figure 11-1.

Figure 11-1 A WCF Service Library project
The WCF Service Library starts with two files with default names of IService1.cs (IServicel.vb for VB) and Service1.cs (Servicel.vb for VB), which contain an interface and a class that implements that interface. If you need to brush up on interfaces, review Chapter 4 because an interface is an integral part of WCF development.
Specifying a Contract with WCF Interfaces
The IService1.cs (IServicel.vb in VB) class in Figure 11-1 contains an interface. As you learned in Chapter 4, interfaces define a set of members that do not have implementations. The actual implementation will be provided by classes that implement the interface. You can consider the interface to be a contract that guarantees a set of operations for a service. In addition to the interface, the types associated with the service are part of the service contract. The contract is important because when you write code that uses the Web service, it is the contract that your code will see and everything that is not in the contract will not be visible. Any application wishing to use a Web service will make calls to the Web service based on what is specified in the contract. In this section, you’ll see how to define a WCF contract with an interface, built-in types, and custom types. Later sections will show how to implement and consume the contract, bringing the importance of the contract full circle so that you can see how the contract is defined, implemented, and consumed.
Examining the VS-Generated Contract
You really don’t want to work with an interface named IService1; it doesn’t mean anything. So, rename IService1.cs to ICustomerService.es (IServicel.vb to ICustomerService.vb for VB), because it will be configured to manage customer records. You’ll receive a message box for renaming the code, and you should respond affirmatively. When you open the ICustomerService.cs file, you’ll see the same code as Listing 11-1, containing an interface and attributes for defining the ICustomerService contract.
Listing 11-1 A WCF service interface
using System;
using System.Collections.Generic;
using System.Linq;
using System.Runtime.Serialization;
using System.ServiceModel;
using System.Text;

namespace WcfDemoCS

{
    // NOTE: You can use the "Rename" command on the
    //"Refactor" menu to change the interface name
    //"IService1" in both code and config file together.
    [ServiceContract]
    public interface ICustomerService
    {
    [OperationContract]
    string GetData(int value);

    [OperationContract]
    CompositeType GetDataUsingDataContract
       (CompositeType composite);

    // TODO: Add your service operations here
  }
    // Use a data contract as illustrated in the sample
    // below to add composite types to service operations
    [DataContract]
    public class CompositeType
    {
        bool boolValue = true;
        string stringValue = "Hello";

        [DataMember]
        public bool BoolValue
        {
            get { return boolValue; }
            set { boolValue = value; }
        }
        [DataMember]
        public string StringValue
        {
            get { return stringValue; }
            set { stringValue = value; }
        }
      }
    }
VB:
'NOTE: You can use the "Rename" command on the
'context menu to change the interface name "IService1"
'in both code and config file together.
<ServiceContract()>

Public Interface ICustomerService

    <OperationContract()>
    Function GetData(ByVal value As Integer) As String

    <OperationContract()>
    Function GetDataUsingDataContract(
        ByVal composite As CompositeType) As CompositeType

    'TODO: Add your service operations here

End Interface

'Use a data contract as illustrated in the sample below
'to add composite types to service operations

<DataContract()>
Public Class CompositeType

    <DataMember()>
    Public Property BoolValue() As Boolean

    <DataMember()>
    Public Property StringValue() As String

End Class
There are two types in Listing 11-1: ICustomerService and CompositeType. Both of these types were generated by VS to provide an example of how you can define a service contract. After explaining the default code, we’ll modify the code to make it usable for working with Customer objects.
Starting with the ICustomerService interface, the two most important parts of the code are the ServiceContract and OperationContract attributes. The ServiceContract attribute states that this interface defines a contract for a WCF Web service. Without the ServiceContract attribute, this interface won’t be recognized by WCF. The OperationContract attribute specifies methods that are exposed by the WCF service. Without the OperationContract attribute, a method will not be visible as part of the WCF service.
A WCF service method can work with any of the built-in types for parameters or return types, demonstrated by the GetData method that takes an int parameter and returns a string. When working with custom types, you need additional syntax to specify what parts of the type are part of the contract. The types are parameters and return types of the service methods, and are part of the contract in addition to the interface.
The GetDataUsingDataContract method illustrates a method that uses a custom type, CompositeType, as a parameter and return type. Being a custom type, CompositeType has attributes that help define its contract: DataContract and DataMember. The DataContract attribute identifies CompositeType as a type that can be included in a WCF service contact. Without the DataContract attribute, a type can’t be included as part of the service contract. The DataMember attribute decorates type members that are part of the contract for this service. Without the DataMember attribute, a type member will not be visible as part of the contract.
Creating Your Own Contract
We won’t explicitly construct our data types for DataContracts, as shown in the CompositeType in Listing 11-1. Instead, we’ll use a built-in capability of LINQ to SQL that gives LINQ to SQL entities a DataContract. To use LINQ to SQL entities, create a new LINQ to SQL item in the same project the WCF service resides in and add the Customer table to the designer. Then click the design surface, not the Customer entity, and view properties. Set Serialization Mode to Unidirectional, as shown in Figure 11-2.
Now, instead of creating a custom type and copying LINQ to SQL entity data into the custom type and returning the custom type, it will be possible to perform a LINQ to SQL query and return the LINQ to SQL entity.

Figure 11-2 Setting the LINQ to SQL Serialization Mode property
We started customizing the contract when changing the name of IService1 to ICustomerService, but we need to continue by defining the methods that will become part of the CustomerService contract: GetCustomers, GetCustomer, InsertCustomer, UpdateCustomer, and DeleteCustomer. In practice, there will be more methods you’ll want, just to customize the contract for the special needs of your application, but these methods depict typical scenarios you’ll frequently encounter and are representative of any work you’ll perform. Listing 11-2 shows the modifications to ICustomerService to support customer operations. After making the changes in Listing 2, your application won’t compile until you implement the ICustomerService interface in the next section. Please make the changes, if you’re following along, and keep reading until the next section.
Listing 11-2 WCF service contract implementation
C#:
[ServiceContract]
public interface ICustomerService
{
    [OperationContract]
    Customer GetCustomer(int custID);

    [OperationContract]
    List<Customer> GetCustomers();

    [OperationContract]
    int InsertCustomer(Customer cust);

    [OperationContract]
    void UpdateCustomer(Customer cust);

    [OperationContract]
    void DeleteCustomer(int custID);
}
VB:
<ServiceContract()>
Public Interface ICustomerService

    <OperationContract()>
    Function GetCustomer(ByVal custID As Integer) As Customer

    <OperationContract()>
    Function GetCustomers() As List(Of Customer)
    <OperationContract()>
    Function InsertCustomer(ByVal cust As Customer) As Integer

    <OperationContract()>
    Sub UpdateCustomer(ByVal cust As Customer)

End Interface
You already know how to specify an interface, and the preceding section explained the purpose of ServiceContract and OperationContract attributes. Listing 11-2 shows that all you need to do is specify the methods that you want to be included as part of the contract.
There are times when you’ll need to return a custom type from a WCF service. For example, if you need to fill in a drop-down list, all you need is a key for the value and a name for the text. So, you can create a custom CustomerLookup class, as shown in Listing 11-3, that specifies DataContract and DataMember attributes. Listing 11-3 demonstrates how a custom type could be coded if you ever needed to do this.
Listing 11-3 A custom type for a WCF service contract
C#:
[DataContract]
public class CustomerLookup
{
    [DataMember]
    public int CustomerID { get; set; }

    [DataMember]
    public string CustomerName { get; set; }
}
VB:
<DataContract()>
Public Class CustomerLookup

    <DataMember()>
    Public Property CustomerID() As Integer

    <DataMember()>
    Public Property CustomerName() As String

End Class
Using a custom type for the purpose of lookup controls at the UI level, such as the CustomerLookup class in Listing 11-3, opens the potential to only communicate information that is necessary, rather than an entire object where all of the data isn’t being used. Considering the potential slowness of network communication, limiting the amount of information transmitted between the Web service and your application can increase the performance of your application.
Now that you have a contract in place, the next step is writing a class that implements that contract.
Implementing Logic with WCF Classes
The contract created in the preceding section was important because it specifies what must be implemented. As you know, interfaces only specify members, which are the contract, but you must write a class that contains code that implements the interface. This section will implement the ICustomerService interface with a class named CustomerService.
The first thing you should do is rename the Service1.cs (Service1.vb in VB) file to CustomerService.es (CustomerService.vb in VB) and click Yes when VS asks if you want to change the code. Listing 11-4 shows what VS generates as a WCF service class, with the rename applied to the class.
Listing 11-4 Default WCF service implementation class
C#:
using System;
using System.Collections.Generic;
using System.Linq;
using System.Runtime.Serialization;
using System.ServiceModel;
using System.Text;

namespace WcfDemoCS
{
    // NOTE: You can use the "Rename" command on the
    // "Refactor" menu to change the class name "Service1"
    // in both code and config file together.
    public class CustomerService : ICustomerService
    {
        public string GetData(int value)
        {
            return string.Format("You entered: {0}", value);
        }
        public CompositeType GetDataUsingDataContract(
            CompositeType composite)
        {
            if (composite == null)
        {
            throw new ArgumentNullException("composite");
        }
            if (composite.BoolValue)
        {
            composite.StringValue +="Suffix";
        }
            return composite;
      }
    }
  }
VB:
' NOTE: You can use the "Rename" command on the
' context menu to change the class name "Service1"
' in both code and config file together.
Public Class Service1
    Implements ICustomerService

    Public Function GetData(
        ByVal value As Integer) As String
        Implements ICustomerService.GetData
        Return String.Format("You entered: {0}", value)
    End Function

    Public Function GetDataUsingDataContract(
        ByVal composite As CompositeType) As CompositeType
        Implements ICustomerService.GetDataUsingDataContract
        If composite Is Nothing Then
            Throw New ArgumentNullException("composite")
        End If
        If composite.BoolValue Then
            composite.StringValue &= "Suffix"
        End If
        Return composite
      End Function

End Class
The methods of the CustomerService class in Listing 11-4 show skeleton implementations of the ICustomerService interface. As you know, Listing 11-2 provided new methods to the ICustomerService interface, so the code in Listing 11-4 will not compile because it doesn’t implement the ICustomerService methods. To fix this problem, delete the GetData and GetDataUsingDataContract methods from the CustomerService class. Then select the ICustomerService identifier in the CustomerService.cs file, which will display an underline on the left of the ICustomerService identifier. Hover over that underline to open a menu with an option to implement the ICustomerService interface, which will generate skeleton code for each member of the ICustomerService interface inside of the CustomerService class. The default method implementations throw a NotImplementedException exception, meaning that you need to write the code to implement those methods based on the ICustomerService interface. Listing 11-5 shows the implementation of the ICustomerService interface in the CustomerService class. If using C#, add the code to each method. If using VB, which doesn’t have the same interface refactoring support as C#, add all methods and code to the CustomerService class as specified in Listing 11-5.
Listing 11-5 A WCF service implementation
C#:
using System;
using System.Collections.Generic;
using System.Linq;
using System.Runtime.Serialization;
using System.ServiceModel;
using System.Text;

namespace WcfDemoCS
{
    public class CustomerService : ICustomerService
    {
        public Customer GetCustomer(int custID)
        {
            var ctx = new MyShopDataContext();

            var customer =

                (from cust in ctx.Customers
                where cust.CustomerID == custID
                select cust) .
                SingleOrDefault();
                return customer;
            }
            public List<Customer> GetCustomers()

            {
                var ctx = new MyShopDataContext();

                return
                    (from cust in ctx.Customers
                    select cust)
                    .ToList();
            }

            public int InsertCustomer(Customer cust)
            {
                var ctx = new MyShopDataContext();

                ctx.Customers.InsertOnSubmit(cust);

                ctx.SubmitChanges();

                return cust.CustomerID;
            }

            public void UpdateCustomer(Customer cust)
            {
                var ctx = new MyShopDataContext();

                var customer =
                    (from cst in ctx.Customers
                    where cst.CustomerID == cust.CustomerID
                    select cst)
                    .SingleOrDefault();

                if (customer != null)
                {
                    customer.Age = cust.Age;
                    customer.Birthday = cust.Birthday;
                    customer.Income = cust.Income;
                    customer.Name = cust.Name;

                    ctx.SubmitChanges();
                }
            }
            public void DeleteCustomer(int custID)
            {
                var ctx = new MyShopDataContext();

                var customer =
                    (from cst in ctx.Customers
                    where cst.CustomerID == custID
                    select cst)
                    .SingleOrDefault();

                if (customer != null)
                {
                    ctx.Customers.DeleteOnSubmit(customer);

                    ctx.SubmitChanges();
                }
            }
          }
        }
VB:
' NOTE: You can use the "Rename" command on the context
' menu to change the class name "Service1" in both code
' and config file together.
Public Class CustomerService
    Implements ICustomerService

    Public Function GetCustomer(ByVal custID As Integer) As Customer
        Implements ICustomerService.GetCustomer

        Dim ctx As New MyShopDataContext

        Dim customer =
            (From cust In ctx.Customers
            Where cust.CustomerID = custID
            Select cust).SingleOrDefault()

        Return customer

    End Function

    Public Function GetCustomers() As List(Of Customer) Implements
  ICustomerService.GetCustomers

        Dim ctx As New MyShopDataContext
        Return (From cust In ctx.Customers
            Select cust).ToList()

     End Function

     Public Function InsertCustomer(ByVal cust As Customer) As Integer
        Implements ICustomerService.InsertCustomer
        Dim ctx = New MyShopDataContext

        ctx.Customers.InsertOnSubmit(cust)

        ctx.SubmitChanges()

        Return cust.CustomerID

    End Function

    Public Sub UpdateCustomer(ByVal cust As Customer)
        Implements ICustomerService.UpdateCustomer
        Dim ctx As New MyShopDataContext

        Dim customer = (From cst In ctx.Customers
                        Where cst.CustomerID = cust.CustomerID
                        Select cst).SingleOrDefault()

        If Not (customer Is Nothing) Then

            With customer
                .Age = cust.Age
                .Birthday = cust.Birthday
                .Income = cust.Income
                .Name = cust.Name
            End With

            ctx.SubmitChanges()

         End If

    End Sub

    Public Sub DeleteCustomer(ByVal custID As Integer)

        Dim ctx As New MyShopDataContext

        Dim customer = (From cst In ctx.Customers
                        Where cst.CustomerID = custID
                        Select cst).SingleOrDefault()

      If Not (customer Is Nothing) Then

        ctx.Customers.DeleteOnSubmit(customer)

        ctx.SubmitChanges()

    End If

  End Sub

End Class
The implementation of CustomerService is similar to what you’ve seen in previous chapters. The difference is that the implementation is in a Web service, which must be consumed differently. We’ll soon get to the section of this chapter that shows how to consume a Web service, but you must understand that a Web service is a component that you communicate with over a network. In previous chapters, you’ve seen code that works with data integrated with application code. However, Web services must be hosted by a server, such as Internet Information Services (IIS), and consuming code must connect and communicate through calls to IIS. The next section points you in the right direction about hosting a Web service in IIS.
Hosting a WCF Service
The VS development environment will automatically host your service, but eventually you’ll need to deploy your service to Internet Information Services (IIS), which is the Web server that hosts .NET applications. The instructions included in this section are general guidance on how the deployment process works. It is very likely that subsequent operating system patches and service packs could change the results for you. It is also possible that the particular operating system and IIS configuration on your computer is different. Additionally, the behavior of software on other operating systems, such as Windows Server 2003 and Windows Server 2008, can differ in subtle, but significant, ways. As such problems are unrelated to VS itself, you should consult your operating system documentation on how to properly configure IIS and operating system security. Although operating system behavior is not a function of VS, the guidance below is intended to point you in the right direction.
Following General Hosting Procedures
For better security, IIS doesn’t install with the default installation of the Windows OS. There are different versions of Windows for desktop and server, so I’ll provide a general description of what you need to do for installing IIS. The first step is to find the Control Panel in the Windows Operating System (OS). Older Windows versions have a link for Add And Remove Programs, but newer versions call the link Programs And Features, which you need to open. Server OS versions have a control panel you can use to install IIS. Next, search for a link for adding and removing Windows Components (or Windows Features) and click that link. Find IIS and install it and remember to turn on File Transfer Protocol (FTP) support if you want to deploy using FTP. FTP is an Internet protocol that allows you to work with files; it is useful in deployment because it allows moving files from one server to another. You’ll need to enable ASP.NET on newer versions of Windows, which I’ll explain how to do in a later section.
Once IIS is installed, you can host your application. On desktop versions of Windows, IIS 6 only supports a single Web site, but you can add multiple Web sites to any server OS or IIS 7 and later. To create the Web site, you’ll need to either create a virtual directory (in the case of desktop versions of IIS 6) or a Web application. You can do this by opening IIS, which you can find via the Administrative Tools menu; you can often find the Administrative Tools menu from the Control Panel. Find Web Sites, right-click, and select Create New Web Application. If you’re using IIS 6 on a desktop, you’ll need to go down an additional level, right-click Default Web Site, and select Create Virtual Directory. Don’t change any of the default values while stepping through the wizard, but you will need to specify a name for the virtual directory or site name and the physical path. The virtual directory/site name is the location that a user would add to the address bar. The physical path is the location in your file system that you want the application to reside in. This location defaults to c:inetpub, assuming that your OS is deployed to the c: drive.
Installing IIS 7 on Windows 7
The following is a walk-through for setting up IIS 7 on Windows 7.
1. Select Start | Control Panel | Programs And Features, which will display the Uninstall Or Change A Program window, shown in Figure 11-3.
2. Click the “Turn Windows features on or off” link, which will display the Windows Features window, shown in Figure 11-4.

Figure 11-3 The Uninstall Or Change A Program window

Figure 11-4 The Windows Features window
3. This example enables FTP, which is one of the ways you can deploy a Web site. Ensure the option for “Ensure IIS Metabase and IIS 6 configuration compatibility,” under the IIS 6 Management Compatibility branch, is selected. When you click OK, the IIS server will be installed.
Creating a Web Site on IIS 7 on Windows 7
Next, you’ll need to create a Web site on IIS 7 on Windows 7 by following these steps:
1. Select Start | Control Panel | Administrative Tools, which will display the Administrative Tools window, shown in Figure 11-5.
2. Double-click Internet Information Services (IIS) Manager to display the Internet Information Services (IIS) Manager window, shown in Figure 11-6.

Figure 11-5 The Administrative Tools window
3. Right-click Sites and select Add Web Site, or click the Add Web Site link on the Actions panel to show the Add Web Site window, shown in Figure 11-7.
4. Give the Web site a name and specify the physical location. As shown in Figure 11-7, the name of the site is WcfDemo and the site will be physically located at c:WebSitesWcfDemo. Notice that the Port in the Binding section is set to 8080. The default for a Web site port is 80, but you can have only a single site with that port. Alternatively, you could change the host name and keep port 80. In this case, we decided to set the port to 8080 so that the addresses of the Web sites don’t overlap. Use a different port number if 8080 is already used on your system. Clicking OK will create the Web site.

Figure 11-6 The IIS Manager window
5. Ensure that the WcfDemo Web site is selected in IIS Manager and click the Add FTP Publishing link on the Actions pane, which is on the right side of IIS Manager. You’ll see the Binding And SSL Settings window, shown in Figure 11-8.
6. Accept the defaults on the Binding And SSL Settings window and click Next to show the Authentication And Authorization window, shown in Figure 11-9.
7. Set options on the Authentication And Authorization window according to who you want to be able to access this Web site. Anonymous allows anyone to access the site and is less secure. A more secure option would be to restrict access to specified users or groups that you trust. Basic authorization shows a login screen when someone connects to the FTP site. Clicking Finish will enable this site for FTP access.

Figure 11-7 The Add Web Site window
8. In IIS Manager, select Application Pools. An application pool is a process that you can assign Web sites to. This gives Web sites protection from each other because if one process crashes, it doesn’t bring down Web sites in other processes. IIS created an application pool for your Web site with the same name when creating it previously. Double-click the application pool named after your Web site and set its .NET Framework version to v4. The exact version number could vary in the future, so you want to ensure it’s the same .NET Framework version number that you build your application with in VS.
Once your Web site is set up, you can deploy, which is discussed next.

Figure 11-8 The Binding And SSL Settings window
Deploying the WCF Service to IIS
If you want to run the WCF service in VS, you don’t have to do anything because VS already set the project up to run with a built-in server. The discussion in this section is intended to help you deploy to IIS on a Windows 2008 server. If you just want to run the Web service in VS, you can skip this section for now and move to the next section on how to build a client that communicates with the Web service. Then return to this section when you’re actually ready to deploy to IIS.
To deploy a Web service project, you’ll need to obtain the address of the Web site, modify the project configuration file, and use the VS Publish tool.

Figure 11-9 The Authentication And Authorization window
TIP
You must run VS as Administrator to publish. To do this, close VS (if running), locate the VS Start menu item (don’t click yet), right-click, and select Run As Administrator.
The technique used in the preceding section to create a Web site distinguished the Web site by making it run on port 8080. Although the Web site is named WcfDemo, it’s located on the local machine, whose domain is localhost. If you deployed the Web service to a site that already had a domain, you would use that domain name. For example, the domain for the C# Station community site is csharp-station.com, which is addressed as http://www. csharp-station.com. Each Web service at a location is addressed by a *.svc file name and the name that VS creates is called WcfDemoCS.CustomerService.svc. Putting the pieces of WcfDemo site together results in an address of http://localhost:8080/WcfDemoCS. CustomerService.svc.
When you create a new WCF Service project, VS adds a file named app.config to the project, which is a file that belongs only to VS. The app.config file is never deployed with your Web service, but it generates a file named web.config, which is deployed with the project. In WPF projects, VS uses the app.config file to generate a file named projectname.exe.config in the same folder as the projectname.exe file. WCF Service projects don’t generate a config file in the output folder, but they do generate a web.config file when you deploy. You’ll see web.config soon, after deployment.
During development, you work with the app.config file, which is easy to find and open in your project. The app.config file has a lot of information in it, so Listing 11-6 is a small excerpt that shows you the salient elements of the WCF configuration.
Listing 11-6 The WCF service address in app.config
<?xml version=“1.0” encoding=“utf-8” ?>
<configuration>
…
  <system.serviceModel>
    <bindings>
        …
    </bindings>
    <client />
    <services>
      <service name="WcfDemoCS.CustomerService">
        …
        <endpoint address="mex" binding="mexHttpBinding"
contract="IMetadataExchange" />
        <host>
          <baseAddresses>
            <add baseAddress=
"http://localhost:8732/Design_Time_Addresses
/WcfDemoCS/CustomerService/" />
        </baseAddresses>
      </host>
    </service>
</services>
…
</system.serviceModel>
…
</configuration>
Following the path in Listing 11-6— configuration, system.serviceModel, services, service, host, and baseAddresses —you’ll find a baseAddress element in bold. The baseAddress in Listing 11-6 is split into two lines to fit the book, but remember to combine it into a single line. The baseAddress is declaring that applications can communicate with this service via this address. This is a VS development Web server address that was generated for this WCF service. Previously, you saw how we figured out what the deployment address of this application should be. Therefore, when you deploy, comment out the development address and replace it with the deployment address, like this:
<baseAddresses>
  <!--<add baseAddress=
"http://localhost:8 732/Design_Time_Addresses/WcfDemoCS/Service1/" />-->
  <add baseAddress=" http://localhost:8080/WcfDemoCS.CustomerService
.svc " />
</baseAddresses>
The <!-- and --> are comment delimiters, and anything in between them won’t be interpreted as part of the configuration. Notice how the deployment address is used (uncommented) as the base address. After deployment, you can comment the deployment address and uncomment the development address so that you can continue working with the WCF service with the VS Web server.
In addition to the baseAddress, you need to ensure your database connection is updated for the deployment environment. In the development environment, the default DB connection string defaults to using Integrated Security = true as login credentials, which uses the identity of the currently logged-in user. The result in the deployment environment is that the application will run as the identity of the application pool the Web site is assigned to. The problem with this is that the application pool doesn’t have access to your database. The best approach is to create a user for your application only, give that user access to your database, and then set the connection string to use the credentials of that user.
Create a user in your Windows OS that will be used for SQL Server and then give that user access to the database. If you’re using an Express version of SQL Server, it can help if you download the free SQL Server Express Management Studio. Because of all the variables that can affect setting up security, refer to SQL Server documentation for more guidance. This chapter uses SQL authentication, so go ahead and create a Windows or SQL user for the MyShop database.
With the user account set up for the database, update the app.config file of the service to use the credentials of that user account, like this. For best security, please remember to change the password:
<add name=
"WcfDemoCS.Properties.Settings.MyShopConnectionString"
  connectionString=
"Data Source=.sqlexpress;Initial Catalog=MyShop;
User ID=MyUserAccount;Password=G7b@H8m2a%lM6y;Pooling=False"
  providerName="System.Data.SqlClient" />
To deploy, right-click the Web Services project, WcfDemo, and click Publish, which will display the Publish WCF Service window shown in Figure 11-10.
In the Publish WCF Service window, set the Target Location to the address where the WCF Service is deployed. You saw how to figure out the address earlier in this section. You can choose to either replace only matching files or delete all files in the deployment location. You normally only want to copy files needed to run this application because the deployment will be quicker with fewer files and possibly more secure by only deploying what is necessary. The check box for Include Files From The App_Data Folder is disabled because there isn’t an App_Data folder in the WCF Service project. However, this same tool is used to deploy an ASP.NET Web site, which might have an App_Data folder.

Figure 11-10 The Publish WCF Service window
Normally, you don’t want to deploy the App_Data folder because it might hold a database file that is huge and would slow down your application considerably. Of course, if you have SQL Server Express installed at the deployment location and need the database in App_Data to be deployed, check this box to include the database in the deployment. Click Publish to deploy your service.
When deployment is complete, you’ll see a message on the VS status bar stating either Publish Succeeded or Publish Failed. If publishing fails, open the Output window, CTRL-W, O, to see the reason why. There are many reasons a deployment can fail, so look at the error message to see if it’s something that makes sense to you. Verify that your Web site is properly set up, as explained in the preceding section. Other sources of information include the Microsoft Developer Network (MSDN), at http://msdn.microsoft.com, where you can search for Knowledge Base support articles. Alternatively, you can copy the error message and paste it into your favorite search engine. Many problems with deployment surround IIS setup, so it is worthwhile to learn more about how IIS works. McGraw-Hill offers Windows Server 2008: A Beginner’s Guide, by Marty Matthews (2008), which does include IIS 7 information. There’s also a Windows Server 2003 edition if you are deploying to IIS 6.
Now that you know how to develop and deploy a WCF service, you’ll need to know how to write programs that use that service, which is covered next.
Communicating with a WCF Service
Any .NET application can communicate with a Web service. In fact, one of the benefits of having a Web service is to expose functionality that can be used by multiple applications. In theory, any application on any platform can communicate via Web services because the underlying technology relies on open standards, such as HTTP and XML. In practice, the goal of cross-platform communication is an advanced technique accomplished by architects and engineers with detailed knowledge of the inner workings of Web services. For just getting started, it’s sufficient to know that you can communicate with Web services with any .NET technology. The following sections show you how to make your applications, clients, communicate with Web services. Let’s look at the task of generally creating a reference to a Web service first.
Creating a Service Reference
Regardless of what type of application you’re building, you create a reference to a Web service, called a service reference, in the same way. You start off with a project, any project type—Console, WPF, ASP.NET, or Silverlight will do. Right-click the project

Figure 11-11 The Add Service Reference window
and select Add Service Reference. You’ll see the Add Service Reference window, shown in Figure 11-11.
As you may recall from previous discussion in this chapter, we spent some time on setting up a Web service and configuring the Web service address. Now the address comes into focus because it is where the Web service is deployed—you type it into the Address box in the Add Service Reference window, shown in Figure 11-11. If you are using the Web server built into VS to use a Web service project in the same solution, it is convenient to click the Discover button, which will give you a list of Web services in the same solution as the project you are adding the service reference to. The address in Figure 11-11 is different from what you’ll see on your computer because the project name, port number, and service name will be different.
If you need to use a deployed Web service, you would put the address of the deployed Web service in the Address box. For example, earlier in this chapter you saw how we deployed a Web service to the local IIS server and that to use that deployed Web service you would put http://localhost:8080/WcfDemo.CustomerService.svc into the Address box. In the deployed service, the service name might not be WcfDemo.CustomerService.svc as shown in this demo. To find out what the real service name file should be, navigate to the physical directory where the service was deployed to and use the file name of the *.svc file. Sometimes, you’ll need to use Web services by third parties or another organization in your company. In those cases, you’ll get the address to use from a person in the other organization or read their documentation to learn what address to use. If you add your own address, click Go to get more information on the Web service.
After either clicking Discover or adding an address and clicking Go, you’ll have one or more services in the Services list. At this point, if you receive an error, it will be because the address is incorrect, the service is experiencing an outage, or (in the case of referencing a service in your own project) the service won’t compile. First check the address if you entered it yourself. If you are referencing a project in your solution, go back and recompile the Web Service project to make sure it builds, fix any problems, and try to create the service reference again. Once you’ve ensured that you’ve corrected all the problems on your side of the wire, contact whoever owns the Web service to troubleshoot the problem.
When a Web service can be communicated with successfully, you’ll see the list of services. You can drill down on each service until you find the interface for the service you’re interested in. In Figure 11-11, the ICustomerService is selected, which displays all available operations. Looking back at the previous discussion of creating the CustomerService, you can see the interface that was created and the methods. If you don’t see an interface or a method, check the attributes in the code to ensure the interface has a ServiceContract attribute and that any methods that should be exposed have an OperationContract attribute.
The Web service will create a proxy, which is a class that communicates with the Web service, in your project, using the default namespace declared in the Properties for your project. The namespace in the Add Service Reference defaults to Service1, and you’ll want to change that to something meaningful, such as CustomerService, as shown in Figure 11-11. This will result in a proxy class created in MyProjectNamespace.CustomerService. This is important to know because you will need to create an instance of the proxy and must know the namespace that the proxy resides in. Click OK to create the service reference such as the one shown in Figure 11-12.
As you can see in Figure 11-12, the project has a new folder, named Service References. The CustomerService reference under ServiceReferences is named after the namespace you specified in the Add Service Reference window.

Figure 11-12 A new service reference in a project
Now that you have a service reference, you can use it in any .NET application. The following section shows you how to write code to communicate with the Web service.
Coding Web Service Calls
This section will explain how to write code that communicates with a Web service. You’ll see explanations of the individual statements required to call the Web service and then you’ll see the entire listing of all of those statements together. The program that calls the Web service is a Console application. You should create a new Console application and add the code in this section inside of the Main method. If you felt like skipping ahead before reading the explanation, you can see the entire code listing of the Console application that calls the Web service in Listing 11-7. However, we’ll begin at the first statement and follow until you see all of the code that’s required to call and interact with the CustomerService Web service created in the preceding sections.
When creating a service reference, as explained in the preceding section, VS will generate a new class, called a proxy. The proxy looks just like your Web service class but doesn’t contain any of the same code. Instead, the proxy will translate calls from the client and communicate with the Web service. The proxy, created after adding the service reference in the preceding section, is named CustomerServiceClient. Remember to add a using statement (Imports in VB) for the Web service proxy. Since the default namespace of the example code for this chapter is CustomerConsole, the namespace of the Web service proxy is CustomerConsole.CustomerService. Here’s code that instantiates the proxy:
C#:
var svc = new CustomerServiceClient();
VB:
Dim svc = New CustomerServiceClient
The proxy is named after the service reference, with Client appended to the name. As with any other class, you instantiate the proxy, resulting in a reference to the proxy, named svc. Using the proxy makes your code feel like everything is in the same project, but really the proxy makes a call over HTTP, sending an XML package to the Web service. The Web service translates the XML into a method call, executes the code for the method call, and translates the results back into XML. Meanwhile, the proxy is waiting on the Web service and will receive the XML response, translate that response into a .NET object, and pass the object back to your calling code. If the method returns void instead of a type, then there isn’t any value to return.
With the service reference, you can begin communicating with the Web service. The following example creates a new customer record, calling the InsertCustomer method on the Web service proxy:
C#:
var newCust = new Customer
{
    Age = 36,
    Birthday = new DateTime(1974, 8, 22),
    Income = 56000m,
    Name = "Venus"
};

var newCustID = svc.InsertCustomer(newCust);
VB:
Dim newCust = New Customer

With newCust

    .Age = 36
    .Birthday = New DateTime(1974, 8, 22)
    .Income = 56000
    .Name = "Venus"
End With

Dim newCustID As Integer

newCustID = svc.InsertCustomer(newCust)
At this point, you might be wondering where the Customer type came from. As you may recall from the previous section of the chapter that discussed custom objects, the Customer type is a proxy type for the Customer that was defined in LINQ to SQL. Since we set the Serialization Mode of the LINQ to SQL entity model to Unidirectional, the Web service was able to pass the definition of the Customer with the Web service interface, resulting in a Customer proxy.
To perform the insert operation, use the service proxy reference, svc, to pass the instance of the Customer proxy. The following example shows how to get a specified customer from the Web service:
C#:
Customer cust = svc.GetCustomer(newCustID);
VB:
Dim cust As New Customer
cust = svc.GetCustomer(newCustID)
Here, the service proxy reference is used to call GetCustomer with an ID of the requested customer, returning an instance of the Customer proxy. The next example shows how to update a Customer instance:
C#:
cust.Income = 49000m;

svc.UpdateCustomer(cust);
VB:
cust.Income = 49000

svc.UpdateCustomer(cust)
The cust reference in this example is the same reference that was created previously. In this example, we are only changing the Income property. Next, we use the service proxy to call the UpdateCustomer method, passing the Customer proxy reference. If you wanted to see the changes that were made, you could call the GetCustomer method again, like this:
C#:
Customer updatedCust = svc.GetCustomer(cust.CustomerID);
VB:
Dim updatedCust As Customer

updatedCust = svc.GetCustomer(cust.CustomerID)
Similarly, you can delete a Customer, as follows:
C#:
svc.DeleteCustomer(updatedCust.CustomerID);
VB:
svc.DeleteCustomer(updatedCust.CustomerID)
As in the previous example, we use the service proxy reference to call the DeleteCustomer method, passing in an ID from the updated customer. The updatedCust reference was from the previous call to GetCustomer. If you wanted to get all of the Customer records from the Web service, you could call GetCustomers, like this:
C#:
Customer[] customers = svc.GetCustomers();
VB:
Dim customers As Customer()

customers = svc.GetCustomers()
While this is similar to other method calls in previous examples, you might notice that the return value from GetCustomers here is an array of Customer, Customer[] (Customer() in VB). However, the Web service defined GetCustomers as returning a List of Customer, List<Customer> (List(Of Customer) in VB), as specified in the ICustomerService interface in Listing 11-2 and implemented in the CustomerService class in Listing 11-5. As you may recall, the proxy is responsible for translating the XML return value from the Web service into an object, or collection of objects in this case. By default, the proxy translates all collections into an array. However, you can change the return collection type by right-clicking the Service Reference in your project and selecting Configure Service Reference, showing the Service Reference Settings window in Figure 11-13.
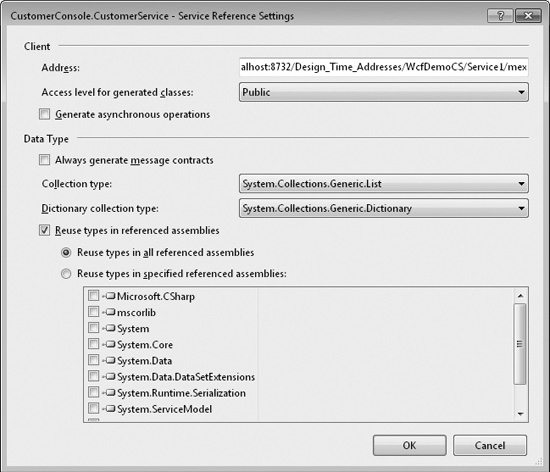
Figure 11-13 The Service Reference Settings window
Most of the items in the Service Reference Settings are advanced options, but focus on the Collection Type setting in the Data Type section. Switch the Collection Type from System.Array to System.Collections.Generic.List and click OK to close. Then change the previous call to GetCustomers to the following:
C#:
List<Customer> customers = svc.GetCustomers();
VB:
    Dim cust As New Customer

    cust = svc.GetCustomer(newCustID)
This example shows that the proxy will translate the results into a List<Customer> (List(Of Customer) in VB). While I showed you how to make this setting after creating the Web service, I chose this sequence because it shows the value of changing the collection return type. However, you can make this setting when first creating the Web reference. Looking at Figure 11-11, you can see an Advanced button at the bottom of the Add Service Reference window. Clicking the Advanced button will show you the Service Reference Settings window, shown in Figure 11-13, allowing you to set the collection return type when first creating the service reference.
Now, you’ve seen all five operations of the Web service. Remember that exactly the same techniques are used here as in any other type of .NET application. For your convenience, Listing 11-7 shows you the entire example for using a Web service.
Listing 11-7 An application using a Web service
C#:
using System;
using System.Collections.Generic;
using System.Linq;
using System.Text;
using CustomerConsole.CustomerService;

namespace CustomerConsole
{
    class Program
    {
        static void Main()
    {
            var svc = new CustomerServiceClient();

            var newCust = new Customer

            {
                Age = 36,
                Birthday = new DateTime(1974, 8, 22),
                Income = 56000m,
                Name = "Venus"
            };

            var newCustID = svc.InsertCustomer(newCust);

            Console.WriteLine("New Customer ID: " + newCustID);

            Customer cust = svc.GetCustomer(newCustID);
            Console.WriteLine("New Customer: " + cust.Name);

            cust.Income = 49000m;

            svc.UpdateCustomer(cust);

            Customer updatedCust = svc.GetCustomer(cust.CustomerID);

            Console.WriteLine("Economic Adjustment: " + cust.Income);

            svc.DeleteCustomer(updatedCust.CustomerID);

            //Customer[] customers = svc.GetCustomers();

            List<Customer> customers = svc.GetCustomers();

            Console.WriteLine("
All Customers:
");
            foreach (var custItem in customers)

            {

                Console.WriteLine(custItem.Name);
            }

            Console.ReadKey();

          }

        }

    }
VB:
Imports CustomerConsoleVB.CustomerService

Module Module1

      Sub Main()

          Dim svc = New CustomerServiceClient

          Dim newCust = New Customer

          With newCust
              .Age = 36
              .Birthday = New DateTime(1974, 8, 22)
              .Income = 56000
              .Name = "Venus"
          End With

          Dim newCustID As Integer
          newCustID = svc.InsertCustomer(newCust)

          Console.WriteLine("New Customer ID: " & newCustID)

          Dim cust As New Customer

          cust = svc.GetCustomer(newCustID)

          cust.Income = 49000

          svc.UpdateCustomer(cust)

          Dim updatedCust As Customer

          updatedCust = svc.GetCustomer(cust.CustomerID)

          Console.WriteLine("Economic Adjustment: " & cust.Income)

          svc.DeleteCustomer(updatedCust.CustomerID)

          Dim customers As List(Of Customer)
          'Dim customers As Customer()

          customers = svc.GetCustomers()

      End Sub

End Module
Deploying a Client That Consumes a Web Service
When deploying a client that uses a Web service, you need to update the address of the service in the configuration file. The configuration file can vary, based on the type of application you’ve built. Table 11-1 describes the configuration files for the application types covered in this book.
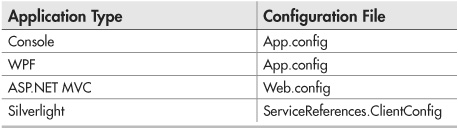
Table 11-1 Configuration Files for Each Application Type
Regardless of the name, each configuration file will have a system.serviceModel element with configuration settings for the Web service. Listing 11-8 shows parts of the configuration file that you should find to change the address of the Web service to communicate with.
Listing 11-8 Web service client configuration
<?xml version="1.0" encoding="utf-8" ?>
<configuration>
    <system.serviceModel>
…
        <client>
            <endpoint address=" http://localhost:8732
/Design_Time_Addresses/WcfDemoCS/CustomerService /"
                binding="wsHttpBinding"
bindingConfiguration="WSHttpBinding_ICustomerService"
                contract="CustomerService.ICustomerService"
name="WSHttpBinding_ICustomerService">
…
    </system.serviceModel>
</configuration>
Following the path system.serviceModel, client, endpoint, you’ll find an address attribute. In the preceding example, the address is set to the address of the WcfDemo project inside the same solution. When you deploy your client, you’ll want it to communicate with the deployed Web service. The following modification allows this client to communicate with the Web service deployed to IIS as discussed previously in this chapter:
<endpoint
address="http://localhost:8080/WcfDemoCS.CustomerService.svc"
binding="wsHttpBinding"
bindingConfiguration="WSHttpBinding_ICustomerService"
contract="CustomerService.ICustomerService"
name="WSHttpBinding_ICustomerService">
The address includes a filename, WcfDemoCS.CustomerService.svc, which was automatically generated when deploying the WcfDemo service. You can see the name of this file by looking at the physical folder where the Web service is deployed.
Creating a Web Service in a Web Site
The previous discussion of creating a Web service created a separate project for the Web service. This approach assumes that you have the ability to configure an IIS Web site for the Web service and can have another IIS Web site for your application if you have a Web application as the Web service client. However, this might not be possible if you are deploying to a hosted server by a third-party Internet service provider where you only have a single Web site. In that case, you have the additional option of adding a Web service directly to an existing Web site.
To see how this works, create a new ASP.NET MVC Web site. Right-click the project, select Add | New Item, and create a new WCF Service. What you’ll see is an interface file, IService1.cs; an addressable service file; an implementation class, Servicel.svc; and Servicel.svc.cs, which you can find under the Service1.svc branch. All of the information you’ve learned previously in this chapter applies to coding a Web service that is part of the Web application. You should know that this is an option if it fits your needs.
Summary
You’ve learned how to build a Web service, how to deploy the Web service, and how to write a client that consumes the Web service. The discussion on creating the Web service showed you how to define the Web service contract with an interface and applicable attributes. You saw how to implement the service also. The deployment discussion explained how to host a Web service with IIS and how to use the VS Publish Wizard for deployment. You also saw how to write a client that creates a reference to a Web service and writes code to communicate with the Web service.