
![]()
CHAPTER 4
Scanning and Enumeration
In this chapter you will learn about
• Describing the CEH scanning methodology, scan types, and the objectives of scanning
• Describing the use of various scanning and enumeration tools
• Describing scan types, such as ping sweep, SYN, Stealth, XMAS, NULL, and many more
• Describing TCP communication (three-way handshake and flag types)
• Understanding OS fingerprinting through banner grabbing
• Listing scanning countermeasures
• Understanding enumeration and its techniques
• Describing NULL sessions and its countermeasures
• Describing SNMP enumeration and their countermeasures
• Describing the steps involved in performing enumeration
![]()
If this were a movie instead of a book, we’d be watching our hero begin a career in ethical hacking instead of reading about how to do it ourselves. Deciding to become a hacker (maybe this would be during the opening credits), he’d spend the first few scenes researching vulnerabilities and keeping track of the latest news—checking in on websites and playing around with tools in his secret lab. Very soon thereafter, he would get his first break and sign a written contract allowing him to test a client—a client holding a secret that could change the very fabric of modern society (this is a movie, after all).
Before we’re even halfway through the buttered popcorn, he has completed some footprinting work and has tons of information on potential targets. Some of it seems harmless enough, while some is so bizarre he’s not even sure what it is. He leans in, looking at the multitude of monitors all around him (while foreboding music leads us all to the edge of our seats). The camera zooms in for a close-up, showing his eyes widening in wonder. The crescendo of music hits as he says, “OK…so what do I do now?”
Welcome to Chapter 4, where you learn what to do with all those targets you identified in the last chapter. You know how to footprint your client; now it’s time to learn how to dig around what you found for relevant, salient information. As somewhat of an interesting side note here (and a brief glimpse into the “real” world of pen testing versus exam study), it’s important for you to consider which targets are worth scanning and which aren’t. If you know some targets are easy, don’t risk discovery by scanning them. If you know an army of nerds is arrayed against you, maybe social engineering is a better option. In any case, scanning can be viewed as a necessary evil, but needs to be approached with caution and respect.
When it comes to your CEH study, which is what all this is supposed to be about, you’ll need to stick with the flow and move through the steps as designed. So, after footprinting, you’ll need to scan for basics—the equivalent of knocking on all your neighbors’ doors to see who is home and what they look like. Then, when you find a machine up and about, you’ll need to get to know it really well, asking some rather personal questions—but don’t worry, systems don’t get upset. We’ll go over all you’ll need to know for the exam regarding scanning and enumeration, and play with some pretty fun tools along the way.
Scanning for Targets
Our first step after footprinting a target is to get started with scanning. While in the footprinting stage, we were gathering all sorts of information; with scanning, however, we’re talking about a much more focused effort. In short, scanning is the process of discovering systems on the network and taking a look at what open ports and applications may be running. With footprinting, we wanted to know how big the network was and some general information about its makeup: in scanning, we’ll actually go into the network and start touching each device—to find out more about it.
When it comes to scanning, there are three major types—network scanning, port scanning, and vulnerability scanning—as well as a basic set of steps for the ethical hacker to follow. It’s important to remember, though, that just as the steps of the overall hacking process can blend into one another, these steps are simply a general guideline and are not a hard-and-fast set of rules to follow. When you’re out on the job, situations and circumstances will occur that might force you to change the order of things. Sometimes the process of completing one step will seamlessly blend directly into another. Don’t fret—just go with the flow and get your job done. The steps for a scanning methodology are:
1. Identify live systems. Something as simple as a ping can provide this. This gives you a list of what’s actually alive on your network subnet.
2. Discover open ports. Once you know which IP addresses are active, find what ports they’re listening on.
3. Identify the OS and services. Banner grabbing and OS fingerprinting will tell you what operating system is on the machines and which services they are running.
4. Scan for vulnerabilities. Perform a more focused look at the vulnerabilities these machines haven’t been patched for yet.
Identifying Active Machines
In your first step after footprinting, you’ll want to find out which IP addresses are actually “alive.” The simplest and easiest way to do this is to take advantage of a protocol that’s buried in the stack of every TCP/IP-enabled device on the planet—ICMP (Internet Control Message Protocol). As I’m sure you’re already aware, IP is what’s known as a connectionless, “fire and forget” protocol. It creates a packet by taking data and appending a header, which holds bunches of information, including a “From” and “To” address, and allows the sender to fire packets away without regard, as quickly as the stack on the machine will allow. This is done by relying on other layer protocols for transport, error correction, and so on.
However, some shortfalls needed to be addressed at the network layer. IP itself has no error messaging function, so ICMP was created to provide for it. It allows for error messaging at the network layer, and presents the information back to the sender in one of several ICMP types. Table 4-1 lists some of the more relevant message type codes. The most common of these are Type 8 (Echo Request) and Type 0 (Echo Reply). An ICMP Type 8 packet received by a host tells the recipient, “Hey! I’m sending you a few packets. When you get them, reply back with the same number so I know you’re there.” The recipient will respond with an ICMP Type 0, stating, “Sure, I’m alive. Here are the data packets you just sent me as proof!”
ICMP message types you’ll need to know for your exam are listed in Table 4-1. Because ICMP is built into each TCP/IP device, and the associated responses provide detailed information about the recipient host, it makes a good place to start when network scanning. For example, consider an Echo Request (Type 8) sent to a host that returns a Type 3. The code could tell us whether the host is down (Code 7), the network route is missing or corrupt in our local route tables (Type 0), or a filtering device, such as a firewall, is preventing ICMP messages altogether (Type 13).
This process, called a ping, has been part of networking since its inception, and combining pings to each and every address within a subnet range is known as a ping sweep. A ping sweep is the easiest method available to identify active machines on the network; just keep in mind it’s not necessarily the only, or even best, way to do it. Although ICMP is a part of every TCP/IP stack, it’s not always enabled. As a matter of fact, many administrators will disable ping responses on many network systems and devices, and will configure firewalls to block them.
| ICMP Message Type | Description and Important Codes |
| 0: Echo Reply | Answer to a Type 8 Echo Request |
| 3: Destination Unreachable | Error message indicating the host or network cannot be reached. Codes:
0—Destination network unreachable 1—Destination host unreachable 6—Network unknown 7—Host unknown 9—Network administratively prohibited 10—Host administratively prohibited 13—Communication administratively prohibited |
| 4: Source Quench | A congestion control message |
| 5: Redirect | Sent when there are two or more gateways available for the sender to use, and the best route available to the destination is not the configured default gateway.
Codes: 0—Redirect datagram for the network 1—Redirect datagram for the host |
| 8: ECHO Request | The packet took too long to be routed to the destination (Code 0 is TTL expired). |
| 11: Time Exceeded | The packet took too long to be routed to the destination (Code 0 is TTL expired). |
Table 4-1 Relevant ICMP Message Types | |
| EXAM TIP Know ICMP very, very well. Pay particular attention to Type 3 messages and the associated codes, especially Code 13, which lets you know a poorly configured firewall is preventing the delivery of ICMP packets. | |
Additionally, not only will a great many devices not respond to the ping, the actual ping sweep itself is very noisy and the systems will alert anyone and everyone as to what’s going on. Network intrusion detection systems (NIDS) and host-based IDS (HIDS) will both easily and readily pick up on a ping sweep. With this in mind, be very cautious and deliberate with your sweep—slow and random are your friends here. Remember, hacking isn’t a race, it’s a test of will, patience, and preparation.
In addition to the ping command on its own, several applications will provide a ping sweep for you. Angry IP Scanner is one of the more prevalent tools available (just be careful with it, because a lot of antivirus programs consider it a virus). Some other tools of note include, but are not limited to, Pinger, WS_Ping, SuperScan, and Friendly Pinger. Sample use of a ping sweep tool is covered in Exercise 4-1.
A Wolf in Ping’s Clothing
When you send a ping, the actual payload of the packet itself can range greatly in value amount. The Request for Comment (RFC) that created and still governs ping never got around to identifying what data is supposed to go into the payload, so it’s usually just enough ASCII code to build the packet up to sufficient length. This was by design, to allow traffic experts to test and monitor how the network would respond to varying packet lengths and such.
Unfortunately, just like other great inventions and applications on the network, it can be hijacked and used for illicit purposes. The payload of an ICMP packet could wind up being the perfect covert channel for hackers to communicate with each other, using the payload area to simply embed messages. Most people—even security types—wouldn’t even bother with a ping packet or two crossing their paths, never knowing what information was being funneled away right beneath their noses.
There are a few Intrusion Detection System (IDS) signatures that do look for this. For example, a lot of ping utilities designed to take advantage of this have default signatures that any decent IDS can pick up on; in nmap, a “0 byte field” can trigger it, for example. Windows and other operating systems have specific defaults that are supposed to be found in the packet, and their alteration or omission can also trigger a hit. But none of this changes the fact that it’s still a cool hack.
Exercise 4-1: Using a Ping Sweep Tool
A couple of notes are necessary before you begin this exercise. First, for some odd reason, Angry IP Scanner is considered a virus by many antivirus (AV) programs out there. To be safe, you should create a folder explicitly for your hack tools and exclude it from your AV scans and auto-protect (or kill the AV protection on your test machine altogether). Second, Angry IP Scanner is bound by the connection limitations of the machine on which you run it. Most laptop or desktop Windows XP or Windows 7 machines will only allow 10 concurrent sessions. Therefore, you’ll only be able to run a sweep on 10 IPs at a time. For this exercise, I’m assuming you are on a home network set with the default 192.168.1.x /24 subnet. Simply adjust the IP range if your particular subnet differs.
Here are the steps to follow:
1. Install Angry IP Scanner by simply copying the executable to a folder location on your system.
2. Double-click the ipscan executable. You may see several additional screens, such as the one shown in Figure 4-1, identifying issues and providing tips. Click Yes to view information and/or continue.

Figure 4-1 Angry IP Scanner installation information window
3. Within the main window, set the IP range to your network specification. Angry IP Scanner should automatically default to the correct IP range and subnet mask for you, but you can change the range if you wish.
4. Click the Select Fetchers icon just to the right of the Start button (see Figure 4-2).
5. Add all available fetchers by selecting them in the right column and clicking the double arrows in the center to move them over to the left column. When you’re done, click OK.
6. Click the Start button. Angry IP Scanner will display the results in column format. Double-click any live system for more details (see Figure 4-3).
One last quick note on scanning for active machines before we move forward: Remember that at the opening of this section I mentioned that the scanning steps may bleed into one another? As I mentioned earlier, identifying active machines on the network using a ping sweep is not the only method available. Sometimes it’s just as easy to combine the search for active machines with a port scan—especially if you’re trying to be sneaky about it.
 | NOTE If you want to be legitimately sneaky, there are tons of methods available. Check out the details here for a fun option: www.aldeid.com/index.php/Tor/Usage/Nmap-scan-through-tor. |
![]()
Figure 4-2 The Fetchers icon

Figure 4-3 Ping sweep results
Port Scanning
Remember all that time you spent in Networking 101, or some other class with a silly name, learning the basics of computing? Remember the OSI Reference Model and all those steps computers take to talk to one another? And remember how you thought at the time, “Why are we bothering with this? When are we going to get to real networking?” Well, congratulations, this is where all that time and effort pays off. Very quickly, let’s take a walk down memory lane, for reminder’s sake, so we can fully understand our next topic—port scanning.
As you’ll recall, when a recipient system gets a frame, it checks the physical address to see who the message is intended for. If the address is indeed correct, it opens the frame, checks to make sure it’s valid, and ditches the header and trailer, passing the remainder up to the network layer. There, the layer 3 address is verified in the packet header, along with a few other assorted goodies, and the header is stripped off. The remaining PDU, now called a segment, is passed on to layer 4. At the transport layer, a whole host of important stuff happens—end-to-end delivery, segment order, reliability, and flow control are all layer 4 functions—including the salient issue in our discussion here: port numbering.
Why the heck do we even need port numbers in networking? Well, consider where we are at right now in this communications process. The recipient has verified the frame and packet belongs to it, and knows it has a segment available for processing. But how is it supposed to know which application-layer entity is supposed to process it? Maybe it’s an FTP datagram. Or maybe a Telnet request. Or maybe even e-mail. Without something to identify which upper-layer protocol to hand this information to, the system sits there like a government mid-level manager, paralyzed by indecision.
A port number, inside the transport-layer protocol header (TCP or UDP), identifies which upper-layer protocol should receive the information contained within. Systems use them to identify to recipients what they’re trying to accomplish. The port numbers range from 0 to 65,535 and are split into three different groups:
• Well-known: 0-1023
• Registered: 1024-49151
• Dynamic: 49152-65535
| NOTE Ever wonder why port numbers go from 0 to 65,535? If you’ve ever taken a Cisco class and learned any binary math, the answer is rather evident: The field in which you’ll find a port number is 16 bits long. Sixteen bits give you 65,536 different combinations, from 0 all the way up to 65,535. |
Of particular importance to you on the CEH exam are the well-known port numbers. No, you don’t need to memorize all 1,024 of them, but you do need to know a good many of them. The ports listed in Table 4-2 are absolutes—you simply must memorize them, or quit reading and studying for your exam here.
Port scanning is the method by which systems on a network are queried to see which ports they are listening to. Assuming you know which well-known port number is associated with which upper-layer protocol, you can tell an awful lot about what a system is running just by knocking on the port doors to see what is open. A system is said to be listening for a port when it has that port open.
For example, assume you have a server hosting a website and an FTP service. When the server receives a message, it needs to know which application is going to handle the message. At the same time, the client that made the request needs to open a port on which to hold the conversation (anything above 1023 will work). Figure 4-4 demonstrates how this is accomplished—the server keeps track of which application to use via the port number in the destination port field of the header, and answers to the source port number.
| Port Number | Protocol | Transport Protocol | Port Number | Protocol | Transport Protocol |
| 20/21 | FTP | TCP | 110 | POP3 | TCP |
| 22 | SSH | TCP | 135 | RPC | TCP |
| 25 | SMTP | TCP | 137–139 | NetBIOS | TCP and UDP |
| 53 | DNS | TCP and UDP | 161/162 | SNMP | UDP |
| 67 | DHCP | UDP | 389 | LDAP | TCP and UDP |
| 69 | TFTP | UDP | 443 | HTTPS | TCP |
| 80 | HTTP | TCP | 445 | SMB | TCP |
Table 4-2 Important Port Numbers | |||||

Figure 4-4 Port numbers in use
Exercise 4-2: Examining Open Ports
This exercise is designed simply to show you the open ports you have on your Windows machine right now. If you’re using something other than a Windows machine, open one up in a VM or borrow one from your friend. Many tools are available for this, but we’ll stick with just two—CurrPorts and Fport. Here are the steps to follow:
1. Download and install CurrPorts (http://currports.softlate.com/?gclid=CI23uYCBwqgCFYjsKgodgEs7vQ). It’s a stand-alone executable, so ignore any of the additional add-on offers and just download the application.
2. Navigate to the folder Currports installed in and double-click the CurrPorts icon to launch the program. The CurrPorts window opens and runs immediately, displaying all ports on your machine (see Figure 4-5).
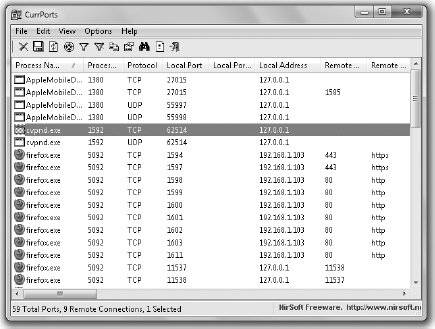
Figure 4-5 CurrPorts screen
3. Select a port and go to File | Properties. Note the process ID, port number, and other information listed. Close the Properties window.
4. To close a suspicious connection, select the offender and choose File | Close Selected TCP Connections, or File | Kill Processes of Selected Ports. (Note: Be careful you don’t close something that’s actually valuable and legitimate!)
5. Download and install Fport (the download is a ZIP file—simply extract it in the C: drive).
6. Open a command prompt and navigate to C:fport.
7. Type fport.exe. The running processes and ports will be shown, much like this:
     C:>fport
     FPort v2.0 - TCP/IP Process to Port Mapper
     Pid Process Port Proto Path
     392 svchost -> 135 TCP C:WINNTsystem32svchost.exe
     8 System -> 139 TCP
     8 System -> 445 TCP
     508 MSTask -> 1025 TCP C:WINNTsystem32MSTask.exe
     392 svchost -> 135 UDP C:WINNTsystem32svchost.exe
     8 System -> 137 UDP
     8 System -> 138 UDP
     8 System -> 445 UDP
     224 lsass -> 500 UDP C:WINNTsystem32lsass.exe
     212 services -> 1026 UDP C:WINNTsystem32services.exe
Switches are available with Fport to sort by port, application, PID, or process.
So, now that we know what ports are, how they’re used, and why it’s so important to scan for them on our target subnet, the question becomes, “How do we do it?” The answer is, of course, by using several different methods and with several different tools. We can’t possibly cover them all here, but we’ll definitely spend some time on those you’ll see most often on your exam. Regardless, all port scanners work by manipulating transport layer protocol flags in order to identify active hosts and scan their ports. So, in order to learn about port scanners and how they get their job done, we first need to cover what a TCP flag is and how the communications process works.
TCP and UDP Communication
When two TCP/IP-enabled hosts communicate with each other, as you no doubt already know, two methods of data transfer are available at the transport layer: connectionless and connection-oriented. Connectionless communication is fairly simple to understand: The sender doesn’t care whether the recipient has the bandwidth (at the moment) to accept the message, nor does the sender really seem to care whether the recipient gets the message at all. Connectionless communication is “fire and forget.” In a much faster way of sending datagrams, the sender can simply fire as many segments as it wants out to the world, relying on other upper-layer protocols to handle any problems. This, obviously, comes with some disadvantages as well (no error correction, retransmission, and so on).
At the transport layer, connectionless communication is accomplished with UDP. UDP, as you can tell from the segment structure shown in Figure 4-6, is a low-overhead, very simple, and very fast transport protocol. Generally speaking, the application protocols that make use of this transport method are moving very small amounts of data (sometimes just a single packet or two), and usually are moving them inside a network structure (not across the Internet). Examples of protocols making use of UDP are TFTP, DNS, and DHCP.
| NOTE Although it’s true TFTP can be used to move a fairly significant amount of data, it’s usually almost always used inside a single network segment—thus greatly reducing the opportunity for packet loss. DNS and DHCP use UDP because most of their communication consists of single packets. |
Connection-oriented communication using TCP, although a lot slower than connectionless, is a much more orderly form of data exchange and makes a lot more sense for transporting large files or communicating across network boundaries. Senders will reach out to recipients, before data is ever even sent, to find out if they’re available and if they’d be willing to set up a data channel. Once data exchange begins, the two systems continue to talk with one another, making sure flow control is accomplished, so the recipient isn’t overwhelmed and can find a nice way to ask for retransmissions in case something gets lost along the way. How does all this get accomplished? Through the use of header flags, and something known as the three-way handshake. Figure 4-7 shows the TCP segment structure.

Figure 4-6 UDP segment structure

Figure 4-7 TCP segment structure
Taking a look at Figure 4-7, you can see that six flags can be set in the TCP header. Depending on what the segment is intended to do, some or all of these flags may be put into use. The TCP header flags are:
• URG (Urgent) When this flag is set, it indicates the data inside is being sent out of band.
• ACK (Acknowledgment) This flag is set as an acknowledgment to SYN flags. This flag is set on all segments after the initial SYN flag.
• PSH (Push) This flag forces delivery of data without concern for any buffering.
• RST (Reset) This flag forces a termination of communications (in both directions).
• SYN (Synchronize) This flag is set during initial communication establishment. It indicates negotiation of parameters and sequence numbers.
• FIN (Finish) This flag signifies an ordered close to communications.
To fully understand these flags and their usage, consider what happens during a normal TCP data exchange. First, a session must be established between the two systems. To do this, the sender forwards a segment with the SYN flag set, indicating a desire to synchronize a communications session. This segment also contains a sequence number—a theoretically random number that helps maintain the legitimacy and uniqueness of this session. As an aside, the generation of these numbers isn’t necessarily all that random after all, and plenty of attack examples point that out. For study purposes, though, just remember what the sequence number is and what its purpose is.
| EXAM TIP Know the TCP flags and the three-way handshake very, very well. You’ll definitely be asked questions on what flags are set at different points in the process, what responses a system provides given a particular flag receipt, and what the sequence numbers look like during a data exchange. |
When the recipient gets this segment, it responds with the SYN and ACK flags set, and acknowledges the sequence number by incrementing it by one. Additionally, the return segment contains a sequence number generated by the recipient. All this tells the sender, “Yes, I acknowledge your request to communicate and will agree to synchronize with you. I see your sequence number and acknowledge it by incrementing it. Please use my sequence number in further communications with me so I can keep track of what we’re doing.” The three-way handshake is illustrated in Figure 4-8.
When this segment is received by the original sender, it generates one more segment to finish off the synchronization. In this segment, the ACK flag is set, and the recipient’s own sequence number is acknowledged. At the end of this three-way handshake, a communications channel is opened, sequence numbers are established on both ends, and data transfer can begin.
Lastly, there are two other fields of great importance while we’re on the subject. The source and destination port fields, in TCP or UDP communication, define the protocols that will be used to process the data. Better stated, they actually define a channel on which to work, and that channel has been generally agreed upon by default to support a specific protocol, but you get the point.
Knowing the TCP flags and the communications setup process, I think it’s fairly obvious how a hacker (with a tool capable of crafting segments and manipulating flags) could manipulate, disrupt, manufacture, and even hijack communications between two systems. Now that you know a little more about this process, we can focus on how to put it all into use. For now we’re concentrating on port scanning and how manipulating TCP flags can assist us, and that’s where nmap comes into play.

Figure 4-8 The three-way handshake
nmap
Without a doubt, the most widely used scanning and enumeration tool on the planet is nmap, so you’ll need to be very familiar with it for the exam. nmap can perform many different types of scans (from simply identifying active machines to port scanning and enumeration) and can also be configured to control the speed at which a scan operates—in general, the slower the scan, the less likely you are to be discovered. It comes in both a command-line version and a GUI version (now known as Zenmap), works on multiple OS platforms, and can even scan over TCP and UDP. And the best thing of all? It’s free.
nmap syntax is fairly straightforward:
nmap <scan options> <target>
The target for nmap can be a single IP address, multiple individual IPs separated by spaces, or an entire subnet range (using CIDR notation). For example, to scan a single IP, the command might look like
nmap 192.168.1.100
whereas scanning multiple IPs would look like
nmap 192.168.1.100 192.168.1.101
and scanning an entire subnet would appear as
nmap 192.168.1.0/24
Starting nmap without any of the options runs a “regular” scan and provides all sorts of information for you. But to get really sneaky and act like a true ethical hacker, you’ll need to learn the option switches—and there are a bunch of them. Table 4-3 lists some of the more relevant nmap switches you’ll need to know.
As you can see, quite a few option switches are available for the command. The “s” commands determine the type of scan to perform, the “P” commands set up ping sweep options, and the “o” commands deal with output. The “T” commands deal with speed and stealth, with the serial methods taking the longest amount of time. Parallel methods are much faster because they run multiple scans simultaneously. Again, the slower you run scans, the less likely you are to be discovered. The choice of which one to run is yours. For a full and complete rundown of every switch and option, visit nmap’s man page, or check with the originator’s documentation page at http://nmap.org/docs.html.
Combining option switches can produce specific output on any given target. For example’s sake, suppose you wanted to run a SYN port scan on a target as quietly as possible. The syntax would look something like this:
nmap 192.168.1.0/24 -sS -T0
If you wanted an aggressive XMAS scan, perhaps the following might be to your liking:
nmap 192.168.1.0/24 -sX -T Aggressive
| nmap Switch | Description | nmap Switch | Description | ||
| -sA | ACK scan | -PI | ICMP ping | ||
| -sF | FIN scan | -Po | No ping | ||
| -sI | IDLE scan | -PS | SYN ping | ||
| -sL | DNS scan (a.k.a. List scan) | -PT | TCP ping | ||
| -sN | NULL scan | -oN | Normal output | ||
| -sO | Protocol scan | -oX | XML output | ||
| -sP | Ping scan | -T paranoid or -T0 | Serial, slowest scan | ||
| -sR | RPC scan | -T sneaky or -T1 | Serial, slow scan | ||
| -sS | SYN scan | -T polite or -T2 | Serial, normal speed scan | ||
| -sT | TCP Connect scan | -T normal or -T3 | Parallel, normal speed scan | ||
| -sW | Windows scan | -T aggressive or -T4 | Parallel, fast scan | ||
| -sX | XMAS tree scan | -T Sneaky | Parallel, fastest scan | ||
Table 4-3 nmap Switches | |||||
The combinations are literally endless and provide worlds of opportunity for your port-scanning efforts.
| EXAM TIP It is literally impossible for me to stress enough how well you need to know nmap. You will be asked tricky questions on syntax, scan types, and responses you’d expect from open and closed ports. The list goes on. Please do not rely solely on this writing, or any other, for your study. Download the tool. Play with it. Use it. It may very well mean the difference between passing and failing your exam. | |
Deciding which options to set really comes down to which type of scan you’re wanting to run. A scan type will be defined by three things: what flags are set in the packets before delivery, what responses you expect from ports, and how stealthily the scan works. Generally speaking, there are seven generic scan types for port scanning:
• TCP Connect Runs through a full connection (three-way handshake) on all ports. Easiest to detect, but possibly the most reliable. Open ports will respond with a SYN/ACK, closed ports with a RST/ACK.
• SYN Known as a “half-open scan.” Only SYN packets are sent to ports (no completion of the three-way handshake ever takes place). Responses from ports are the same as they are for a TCP Connect scan.
• FIN Almost the reverse of the SYN scan. FIN scans run the communications setup in reverse, sending a packet with the FIN flag set. Closed ports will respond with RST, whereas open ports won’t respond at all.
• XMAS A Christmas scan is so named because the packet is sent with multiple flags (FIN, URG, and PSH) set. Port responses are the same as with a FIN scan.
• ACK Used mainly for Unix/Linux-based systems. ACK scans make use of ICMP destination unreachable messages to determine what ports may be open on a firewall.
• IDLE Uses a spoofed IP address to elicit port responses during a scan. Designed for stealth, this scan uses a SYN flag and monitors responses as with a SYN scan.
• NULL Almost the opposite of the XMAS scan. The NULL scan sends packets with no flags set. Responses will vary, depending on the OS and version, but NULL scans are designed for Unix/Linux machines.
Table 4-4 will help greatly in your study efforts for the exam. You’ll be asked repeatedly on the exam about a scan type and what response to expect from an open or closed port. A quick-and-easy tip to remember is that all scans return an RST on a closed port, with the exception of the ACK scan, which returns no response.
nmap handles all these scans, using the switches identified earlier, and more. In addition to those listed, nmap offers a “Windows” scan. It works much like the ACK scan but is intended for use on Windows networks, and provides all sorts of information on open ports. Many more switches and options are available for the tool. Again, although it’s a good bet to study the information presented here, you absolutely need to download and play with the nmap tool to be successful on the exam and in your career.
| Scan Type | Initial Flags Set | Open Port Response | Closed Port Response | Notes |
| Full (TCP Connect) | SYN | SYN/ACK | RST | Noisiest but most reliable |
| Half Open (Stealth or SYN Scan) | SYN | SYN/ACK | RST | No completion of three-way handshake. Designed for stealth but may be picked up on IDS sensors |
| XMAS | FIN/URG/ PSH | No response | RST/ACK | Doesn’t work on Windows machines |
| FIN | FIN | No response | RST/ACK | Doesn’t work on Windows machines |
| NULL | No flags set | No response | RST/ACK | Doesn’t work on Windows machines |
| ACK | ACK | RST | No response | Used in firewall filter tests |
Table 4-4 Network Scan Types | ||||
A Fine Line
All our actions to this point have been beyond reproach—we know without a doubt they’re legal because the information you gather in footprinting is open and available to anyone. Port scanning, though, is one of those gray areas in the virtual world. Is knocking on every port to see what’s open and available the same thing as documenting everything I can find on the Internet about my target company? In 2000, a security consultant named Scott Moulton found himself in a very sticky situation involving a port scan, and wound up setting a precedent on the whole matter.
While testing security on the systems he was under contract for (the county’s 911 call center), his port scan wound up touching a county-owned website and walking its firewall. His activities were quickly discovered and he was asked to stop scanning immediately—which he did. The county, however, filed a police report on the “suspicious activity” and on a web server owned by another business entity. His activities were reported as suspicious behavior, and the contractor lost his job and contract. Several weeks later, the Georgia Bureau of Investigation actually arrested him.
Mr. Moulton filed a countersuit, accusing the company of making false and defamatory criminal allegations against him. In deciding the case, the federal judge assigned to the case ruled, among other things, that this port scan did not constitute a crime: “The tests run by Plaintiff Moulton did not grant him access to Defendant’s network. The public data stored on Defendant’s network was never in jeopardy.” In short, because the port scan itself did no damage and did not actually put the data at risk, there was no crime.
A benchmark case in the matter, this ruling generally established that port scanning is not a crime (with one huge caveat: The ruling was not given in a Circuit Court of Appeals and, therefore, is not a blanket precedent everywhere in the U.S.). However, use caution in your scanning. A denial-of-service attack is considered a crime, and depending on the effect of your scan on a particular network segment or device, you could be charged anyway. A good rule of thumb, especially because you’re an ethical hacker, is simply to do your absolute best to avoid scanning anything you don’t already have permission to touch. That way, you won’t have to worry about crossing this very fine line.
| NOTE Port sweeping and enumeration on a machine is also known as fingerprinting, although the term is normally associated with examining the OS itself. You can fingerprint operating systems with tools we’ve discussed already, along with goodies such as SolarWinds, Queso, and an old favorite, Cheops. Also, tools such as Netcraft and HTTrack are useful for fingerprinting web servers specifically. |
Knowing how to read nmap output is just as important is learning the syntax of the command itself. The GUI version of the tool, Zenmap, makes reading this output very easy; however, the good news is the command-line output is just as simple. Additionally, the output is available via several methods. The default is called interactive, and it is sent to standard output (text sent to the terminal). Normal output displays less runtime information and warnings because it is expected to be analyzed after the scan completes rather than interactively. You can also send output as XML (which can be parsed by graphical user interfaces or imported into databases) or in a “greppable” format (for easy searching). A very brief example is displayed in Figure 4-9. Ports are displayed in output as open, closed, or filtered. Open is obvious, as is closed. Filtered means an FW or router is interfering with the scan.
Although nmap is the unquestioned leader of the port scanning pack, other tools are available that can also get the job done. SuperScan, available as a free download (evaluation) from McAfee, is another easy-to-use GUI-based program. It works well and provides several options from an intuitive front-end interface, providing for ping sweeps and port scans against individual systems or entire subnets. SuperScan’s interface is shown in Figure 4-10.
hping is another very powerful tool for both ping sweeps and port scans (among other things). hping works on Windows and Linux versions, can act as a packet builder, and runs nearly any scan nmap can put out. The only real downside, for people like me who prefer pictures and clicking things, is that it’s still a command-line-only tool. Just as with nmap, hping3 has specific syntax for what you’re trying to accomplish, with tons of switches and options. For example, a simple ping sweep can be accomplished by typing in hping3 -1 IPaddress. Here are some other hping3 syntax examples of note:

Figure 4-9 nmap output

Figure 4-10 SuperScan
• Ping sweep hping3 -1 IPaddress
• SYN scan hping3 -8 IPaddress
• ACK scan hping3 -A IPaddress
• XMAS scan hping3 -F -P -U IPaddress
• UDP scan hping3 -2 IPaddress
| NOTE hping3 is much, much more than just a scanner. We cover it here because you may see it listed as such on the exam; however, hping3 is a serious packet manipulator as well. |
Exercise 4-2: Using Port Scanning
For this exercise, you’ll be running nmap against your own home network—however that network is set up. I’m using 192.168.1.0/24 as the subnet, because it is by far the most common private address range you’ll find on home networks. You may need to adjust the range and targets to your own network—just adjust as you need and the steps will flow fine. Document your findings after each step and compare them—you may be surprised what you find!
1. To determine which systems are live on your network, run a ping sweep with nmap using the code here (“sP” provides for the ping, and “v” sets it to verbose mode):
nmap -sP –v 192.168.1.0/24
2. To ensure we hit every device—because some may be blocking ICMP requests—try a TCP sweep. (Note: nmap uses port 80 on TCP scans by default. If you’d like to try a different protocol number, it follows the –PT switch.)
nmap -PT 192.168.1.0/24
3. Port-scan one of your targets using a SYN scan. (Use any IP address you discover. “100” is used here as an example.)
nmap -sS 192.168.1.100
Note: A return of “filtered” indicates the system is protected by a firewall.
4. Attempt a UDP scan on the host (“port unreachable” indicates a closed port):
nmap -sU 192.168.1.100
5. Try to fingerprint an operating system on the host:
nmap -sS -O 192.168.1.100
6. Run a TCP full Connect scan on a host, outputting the results to a file called results.txt:
nmap -sT -oN results.txt 192.168.1.100
Regardless whether your choice is running nmap on a Linux machine, harnessing command-line option power like a pro, or the simplicity of using SuperScan’s GUI interface on a Windows machine, the goal is the same. Port scanning identifies which ports are open, and gives you more information in building your attack vectors. Each scan type you attempt will react differently and take different lengths of time to pull off (a UDP scan of Linux machines can take a very long time, for instance), and you’ll definitely need to know the output to look for with each one. However, the tools are all designed to achieve the same overall end.
Other Scanning Tips and Tools
Scanning for ethical hacking isn’t just using port scanners and identifying what’s open on computer systems. A couple of other methods that may not immediately come to mind can help you build your ethical hacking case. (Unless, of course, you’re an ‘80s movie buff and know exactly what I mean when I say, in a computerized voice, “Would you like to play a game?”)
In 1983, a movie about a teenage hacker infiltrating the highest levels of our nation’s defenses was released. War Games had the young (and very unethical, I might add) hacker break in to a system designed to control nuclear missile deployment. The system was covered by a multitude of security controls, but its designers had left one overlooked option open to the world, which the young man easily discovered—it was ready to answer the phone.
War dialing is a process by which an attacker dials a set of phone numbers specifically looking for an open modem. As you know, modems are designed to answer the call, and can easily provide back-door access to a system otherwise completely secured from attack. Although it’s true there aren’t as many modems in place anymore as there were in 1983, you’d be surprised how many are still in use as “emergency backup” for network administrators’ remote access. A hacker finding one of these has to plan for a few minutes of gleeful dancing celebration before continuing with the attack.
| EXAM TIP Tools for accomplishing war dialing are ToneLoc, THC-Scan, WarVOX (designed explicitly for VoIP systems), PAWS, and TeleSweep. | |
In addition to modems, another attack vector you can search for during scanning is wireless access points. War driving used to refer to, quite literally, driving around in a car looking for open access points. In the ethical hacking realm, it still indicates a search for open WAPs; however, the car may not be so necessary. With the proliferation of handheld devices making use of 802.11 wireless standards, finding access points is as easy as simply wandering around the facility. Additionally, several tools are available to help you not only in discovering wireless entry points, but in finding vulnerabilities in wireless networking. Silica, AirMagnet, and AirCheck (Fluke) are all tools on handheld devices that allow an attacker to walk around and gather—and sometimes even exploit—wireless access point vulnerabilities. We’ll get into wireless hacking tools in Chapter 10.
One final thought on scanning—whether you’re port scanning, war dialing, or searching for wireless openings, stealth is important. Hiding your activities from prying security-professional eyes is something you’ll need to prepare for and master in each step of the hacking phases, and may be essential in scanning. Sometimes scanning can be interrupted by pesky firewalls or monitoring devices, and you’ll be forced to disguise who you are and what you’re up to. Options for accomplishing this include proxies, spoofing an IP address, tunneling, hiding files, and using source routing or an anonymizer.
A proxy is nothing more than a system you set up to act as an intermediary between you and your targets. In many instances, proxies are used by network administrators to control traffic and provide additional security for internal users. Hackers, though, can use that technology in reverse—sending commands and requests to the proxy, and letting the proxy relay them to the targets. Anyone monitoring the subnet sees the proxy trying all this naughtiness—not the hacker.
Proxying can be done from a single location or spread across multiple proxies, to further disguise the original source. Hundreds of free, public proxies are available to sign up for, and a simple Internet search will point you in the right direction. If you want to set up proxy chains, where multiple proxies further hide your activities, you can use tools such as ProxyChains (http://proxychains.sourceforge.net/), Soft-Cab’s Proxy Chain Builder (www.softcab.com/proxychain/index.php), and Proxifier (www.proxifier.com).
Another great method for anonymity on the Web is The Onion Routing (Tor). Tor basically works by installing a small client on the machine, which then gets a list of other clients running Tor from a directory server. The client then bounces Internet requests across random Tor clients to the destination, with the destination end having very little means to trace the original request back. Communication between Tor clients is encrypted, with only the last leg in the journey—between the Tor “cloud” and the destination—sent unencrypted. One really important thing to keep in mind, though, is that anyone can be a Tor endpoint, so signing up to voluntarily have goodness-knowswhat passing through your machine may not be in your best interests.
Spoofing an IP address is exactly what it sounds like—the hacker uses a packetcrafting tool of some sort to obscure the source IP address of packets sent from his machine. Many tools are available for this—hping, Scapy, or Komodia, for example. You can also find this functionality built into a variety of other scanning tools. Ettercap and Cain, usually thought of more for their sniffing capabilities, provide robust and powerful spoofing capabilities as well—heck, even nmap can spoof if you really want it to. Just be cautious in spoofing—sometimes you can spoof so well the information you’re working so hard to obtain never finds its way back to you.
| EXAM TIP Remember, spoofing an IP address means any data coming back to the fake address will not be seen by the attacker. For example, if you spoof an IP address and then perform a TCP scan, the information won’t make its way back to you. | |
Source routing provides yet another means to disguise your identity on a network. It was originally designed to allow applications to specify the route a packet takes to a destination, regardless of what the route tables between the two systems says. It’s also beneficial to network managers in forcing traffic around areas of potential congestion. How is this useful to a hacker? The attacker can use an IP address of another machine on the subnet and have all the return traffic sent back, regardless of which routers are in transit. Protections against source-routing attacks are prevalent and effective, not to mention most firewalls and routers detect and block source-routed packets, so this may not be your best option.
Another ridiculously easy method for disguising your identity, at least for port 80 (HTTP) traffic, is to use an anonymizer. Anonymizers are services on the Internet that make use of a web proxy to hide your identity. Thousands of anonymizers are available—simply do a Google search and you’ll see what I mean. Be careful in your choice, though—some of them aren’t necessarily safe, and their owners are set up specifically to steal information and plant malware. I’ve personally used Anonymouse.org before and, other than annoying ads in the corner, have had no issues. Also, plenty of pay sites are available—just use common sense.
| EXAM TIP Ways to disguise your identity are built into a lot of tools and will be covered in more detail throughout the rest of this book. What you need to know about these methods for your exam are examples of tools that can accomplish the task and what each method means. | |
Whereas footprinting leads us to gather readily available information that provides a high-level view of the target, scanning is the next step along the path. In scanning, you’re knocking on virtual doors to see who is home and what they’re doing. We haven’t gone inside yet, and we’re certainly planning on doing so, but we still need to dig for some more information. Good hackers will spend 90 to 95 percent of their time gathering information for an attack. Let’s continue on that path.
Enumeration
In its basic definition, to enumerate means to specify individually, to count off or name one by one. Enumeration in the ethical hacking world is just that—listing off the items we find within a specific target. If ports are doors and windows, and port scanning can be equated to knocking on them to see if they are open, enumerating is more akin to chatting with the neighbor at the door. When we enumerate a target, we’re moving from passive information-gathering to a much more active state. No longer satisfied with just knowing which ports are open, we now want to find things like open shares and any easy-to-grab user account information. We can use a variety of tools and techniques, and a lot of it bleeds over from scanning. Before we get fully involved in enumerating, though, it’s helpful to understand the security design of your target.
Windows Security Basics
Hands down the most popular operating system in the world is Microsoft Windows. Everything from old Windows 2000 to Windows 7 systems will constitute the vast majority of your targets out in the real world. Taking some time to learn some of the basics of its design and security features will pay dividends in the future.
Obviously enumeration can and should be performed on every system you find in your target network, regardless of operating system. However, because Windows machines will undoubtedly make up the majority of your targets, we need to spend a little more time on them. As a family of operating systems, Windows provides a wide range of targets, ranging from the ridiculously easy to the fairly hardened machines. Windows 2000 machines are still roaming around out there, and present an easy target, whereas Windows 2003 Server and Windows 7 up the ante quite a bit. Regardless of version, there are a few things that remain constant despite the passage of time. Some of this you may already know, and some of it you may not, but all of it is important to your future.
Everything in a Windows system runs within the context of an account. An account can be that of a user, running in something called user mode, or the system account, which runs in kernel mode. Actions and applications running in user mode are easy to detect and contain. Those running in kernel mode, though, can be hidden and run with absolute authority. Knowing this, a hacker must attempt to get code running in kernel mode as often as possible.
Only the Strong Survive
Almost every hacking course or lecture I’ve attended always winds up with a subset of the attendees asking, “Why did he spend all that time on fill-in-the-old-operating-system machines? Sure, we can hack those, but I thought he’d be showing us how to hack fill-in-the-new-operating-system machines.” And I’m fairly sure there are a few of you out there thinking this already. Trust me, though, there’s a method to the madness.
To illustrate this, imagine you’re a bank thief casing your next victim. There are two banks right here in our little town, right across the street from each other. One has been around for a few decades, the other was just recently built. Without knowing anything else about the two banks, which one do you suppose might present more of an opportunity for you? Which one might have some complacency in its security staff? Which one is more likely to have older locks and vaults to deal with? Which one might have some routines you might be able to monitor and take advantage of? Unless you’re trying to make a name for yourself as the greatest bank robber in the world, it’s the older place every time.
When you’re searching for information on a network to pen test, you’re not looking for the latest and greatest. The idea is to find an opening that’s worth trying. A machine, device, or setting that maybe got overlooked along the way is where I want to spend my time—not endlessly knocking at personal firewalls and trying to find a code break in some obscure Windows subroutine. No one in her right mind is going to try to steal gold out of Fort Knox—it’s too well protected and a pointless site to spend time on. Gold that’s stored under Mr. Johnson’s mattress just down the road? Now we’re talkin’.
Lions on the savannah don’t choose prey with strong defenses. They go after targets they know they can take down with little effort and time. Be selective in your targets and don’t worry so much about getting your name in the paper for breaking into the most recent OS release. Only the strong survive, so spend your time looking for the weak.
This is not to say that there are only two means of security control when it comes to accounts—quite the contrary, as I’m sure some of you were already running off to your MCSE books and pointing out the difference between rights and permissions and their effect on accounts. User rights are granted via an account’s membership within a group and determine which system tasks an account is allowed to perform. Permissions are used to determine which resources an account has access to. The method by which Windows keeps track of which account holds what rights and permissions comes down to SIDs and RIDs.
A Security Identifier (SID) identifies user, group, and computer accounts and follows a specific format. A Resource Identifier (RID) is a portion of the overall SID identifying a specific user, computer, or domain. SIDs are composed of an 'S',followed by a revision number, an authority value, a domain or computer indicator, and an RID. The RID portion of the identifier starts at 500 for the administrator account. The next account on the system, Guest, is RID 501. All users created for the system start at 1000 and increment from that point forward—even if their usernames are re-created later on. For example’s sake, consider the following SID:
S-1-5-21-3874928736-367528774-1298337465-500
We know this is an administrator account because of the 500 at the end. An SID of S-1-5-22-3984762567-8273651772-8976228637-1014 would be the account of the 14th person on the system (the 1014 tells us that).
| NOTE Linux uses a User ID (UID) and a Group ID (GID) in much the same way as Windows uses SIDs and RIDs. On a Linux machine, these can be found in the /etc/passwd file. |
Another interesting facet of Windows security architecture you’ll need to know as basic information involves passwords and accounts. As you know, a user ID and a password are typed in by users attempting to log in to Windows. These accounts are identified by their SIDs (and associated RIDs), of course, but the passwords for them must be stored somewhere, too. In Windows, that somewhere is C:WindowsSystem 32ConfigSAM. The SAM database holds (in encrypted format, of course) all the local passwords for accounts on the machine. For those machines that are part of a domain, the passwords are stored and handled by the domain controller. We’ll definitely get into cracking and using the SAM later on.
This section isn’t necessarily a discussion of enumeration steps in and of itself, but it does cover some basics you’ll definitely need to know moving forward. It doesn’t do me any good to teach you enumeration steps if you don’t really know what you’re looking for. And now that we do have the basics down, let’s get to work.
Enumeration Techniques
One enumeration/hacking technique that has been addressed with Windows XP and Windows 7 (and the couple of dozen Vista machines still running out there) is setting up a null session to take advantage of Windows underlying communication protocols. A null session occurs when you log in to a system with no user ID and password at all. In older Windows versions (2000), a null session could be set up using the net command, as follows:
net use \<target>IPC$ "" /u:""
Null sessions require TCP ports 135, 137, 139, and 445 to work, and have been virtually eliminated from the hacking arsenal since Windows XP was released.
Although many Windows XP and 7 machines have updated registry keys to prevent null sessions and the enumerations they provide, I guarantee you’ll find more than a few vulnerable machines on the target network. Some tools that make use of the null session are SuperScan, User2SID, and SID2User. SuperScan is a great choice, due to its ease of use and the easy-to-read interface. After opening the tool, choose the Windows Enumeration tab, input the target name or IP address, and—voilà—one simple click and the users, shares, and other NetBIOS information on the target is on full display (see Figure 4-11).
User2SID and SID2User are also very valuable tools in your arsenal, allowing you to enumerate the SID given the user name, or the user name given the SID. For the sake of this discussion, if your target’s security staff has changed the name of the administrator account on the machine, these two tools can save the day. From our discussion earlier regarding SIDs on Windows machines, we know the Administrator account on the machine ends in 500. Therefore, you can use User2SID to discover the SID for the usernames found in your enumeration.
Banner grabbing is one of the easiest enumerating methods. Basically the tactic involves sending an unsolicited request to an open port to see what, if any, default message (banner) is returned. Depending on what version of the application is running on the port, the returned banner (which could be an error message, HTTP header, or login message) can indicate a potential vulnerability for the hacker to exploit. A common method of performing banner grabbing is to use a simple tool already built into most operating systems—Telnet.
As we know already, Telnet runs on port 23. Therefore, if you simply type telnet <IPaddress> you’ll send TCP packets to the recipient with the destination port set to 23. However, you can also point it at any other port number explicitly to test for connectivity. If the port is open, you’ll generate some form of banner response. For
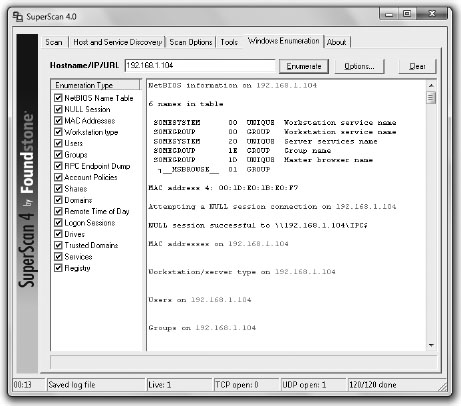
Figure 4-11 SuperScan enumeration screen
example, suppose you sent a Telnet request to port 80 on a machine. The result may look something like this:
C:	elnet 192.168.1.15 80
HTTP/1.1 400 Bad Request
Server: Microsoft – IIS/5.0
Date: Sat, 29 Jan 2011 11:14:19 GMT
Content – Type: text/html
Content – Length: 87
<html><head><title>Error</title></head>
<body>The parameter is incorrect. <body><html>
Connection to host lost.
Just a harmless little error message, designed to show an administrator he may have made a mistake, right? It just happens to also tell an ethical hacker there’s an old version of IIS on this machine (IIS/5.0). Other ports can also provide interesting nuggets. For example, if you’re not sure if a machine is a mail server, try typing telnet <ipaddress> 25. If it is a mail server, you’ll get an answer something like the following, which I received from a Microsoft Exchange Server:
220 mailserver.domain.com Microsoft ESMTP MAIL Service, Version: 5.0.2195.5329 ready at Sat, 29 Jan 2011 11:29:14 +0200
In addition to testing different ports, you can also use a variety of different tools and techniques for banner grabbing. One such tool is netcat (which we’ll visit again later in this book). Known as the “Swiss army knife of hacking tools,“ netcat is a command-line networking utility that reads and writes data across network connections using TCP/IP. It’s also a tunneling protocol, a scanner, and an advanced hacking tool. To try banner grabbing with this little jewel, simply type nc <IPaddress or FQDN> <port number>. Some sample netcat output for banner grabbing is shown here:
 C: nc 192.168.1.20 80
HEAD / HTTP/1.0
HTTP/1.1 200 OK
Date: Mon, 28 Jan 2011 22:10:40 EST
Server: Apache/2.0.46 (Unix) (Red Hat/Linux)
Last-Modified: Tues, 18 Jan 2011 11:20:14 PST
ETag: "1986-69b-123a4bc6"
Accept-Ranges: bytes Content-Length: 1110
Connection: close
Content-Type: text/html
As you can see, banner grabbing is a fairly valuable tool in gathering target information. Telnet and netcat can both perform it, but numerous other tools are available. As a matter of fact, most port scanners—including the ones we’ve covered already—are fully capable of banner grabbing and make use of it in preparing their output.
Another enumerating technique across the board is attempting to take advantage of SNMP. Simple Network Management Protocol was designed to manage IP-enabled devices across a network. As a result, if it is in use on the subnet, you can find out loads of information with properly formatted SNMP requests. Later versions of SNMP make this a little more difficult, but plenty of systems out there are still using the protocol in version 1.
SNMP works much like a dispatch center. A central management system set up on the network will make requests of SNMP agents on the devices. These agents respond to the requests by going to a big virtual filing cabinet on each device called the Management Information Base (MIB). The MIB holds all sorts of information, and it’s arranged with numeric identifiers (called Object Identifiers, or OIDs) from general information to the very specific. The request points out exactly what information is requested from the MIB installed on that device, and the agent responds with only what is asked. MIB entries can identify what the device is, what operating system is installed, and even usage statistics. In addition, some MIB entries can be used to actually change configuration settings on a device. When the SNMP management station asks a device for information, the packet is known as an SNMP GET Request. When it asks the agent to make a configuration change, the request is an SNMP SET Request.
SNMP uses a community string as a form of password. The read-only version of the community string allows a requester to read virtually anything SNMP can drag out of the device, whereas the read-write version is used to control access for the SNMP SET requests. Two major downsides are involved in the use of both these community string passwords. First, the defaults, which are active on every SNMP-enabled device right out of the box—all of them—are ridiculously easy. The read-only default community string is public, whereas the read-write string is private. Assuming the network administrator left SNMP enabled and/or did not change the default strings, enumerating with SNMP is a snap.
| NOTE There are a couple of other quick notes worth bringing up with SNMP. First, SNMP enumeration doesn’t work as well with later versions. SNMP version 3 encrypts the community strings, which makes enumeration harder. Second, although “public” and “private” are the default strings, some devices are configured to use other strings by default. It might be worthwhile researching them before you begin your efforts. |
The second problem with the strings is that they are sent in clear text. So, even if the administrators took the time to change the default community strings on all devices (and chances are better than not they’ll miss a few here and there), all you’ll need to do to grab the new strings is watch the traffic—you’ll eventually catch them flying across the wire. Tools you can use to enumerate with SNMP include SNMPUtil, OpUtils 5, and IP Network Browser (SolarWinds).
Chapter Review
Scanning and enumeration are important information-gathering steps for the ethical hacker. Scanning is the process of discovering systems on the network and taking a look at what open ports and applications they may be running. The steps for a generic scanning methodology are identifying live systems, discovering open ports, identifying the OS and services, and scanning for vulnerabilities.
A ping sweep is the easiest method for identifying active machines on the network. An ICMP Echo Request (Type 8) message is sent to each address on the subnet. Those that are up (and not filtering ICMP) reply with an ICMP Echo Reply (Type 0). Several tools can provide for ping sweeps—Angry IP Scanner, Pinger, WS_Ping, SuperScan, and Friendly Pinger are all examples.
Port scanning is the method by which systems on a network are queried to see which ports they are listening to. A port number, inside the transport layer protocol header (TCP or UDP), identifies which upper-layer protocol should receive the information contained within. Source numbers are set dynamically by the sender, using any port above 1023, whereas the destination port is usually one of the well-known ports—to identify what upper-layer application to talk to. The port numbers range from 0 to 65,535 and are split into three different groups: Well-known (0–1023), Registered (1024–49151), and Dynamic (49152–65535). Some of the more important well-known port numbers to remember are FTP (20/21), Telnet (23), SMTP (25), DNS (53), POP3 (110), NetBIOS (137–139) and SNMP (161/162).
At the transport layer, connectionless communication is accomplished with UDP (simple and very fast, but no reliability). TCP provides for connection-oriented communication (slower, but reliable). In TCP data exchange, a session must be established between the two systems first. To do this, the sender will forward a segment with the SYN flag set, indicating a desire to synchronize a communications session. This segment also contains a sequence number—a random number that helps maintain the legitimacy and uniqueness of this session.
When the recipient gets this segment, it responds with the SYN and ACK flags set, and acknowledges the sequence number by incrementing it by one. Additionally, the return segment will contain a sequence number generated by the recipient. When this segment is received by the original sender, it generates one more segment to finish off the synchronization. In this segment, the ACK flag is set, and the recipient’s own sequence number is acknowledged. At the end of this three-way handshake, a communications channel is opened, sequence numbers are established on both ends, and data transfer can begin. In short, the abbreviated handshake reads “SYN, SYN/ACK, ACK.”
One of the more important port-scanning tools available is nmap, which can perform many different types of scans (from simply identifying active machines to port scanning and enumeration) and can also be configured to control the speed at which the scan operates. In general, the slower the scan, the less likely you are to be discovered. It comes in both a command-line version and a GUI version (now known as Zenmap) and works on multiple OS platforms. nmap syntax is simple:
nmap <scan options> <target>
Dozens and dozens of scan options (or switches) are available, and combining them can produce several scan options. The “s” commands determine the type of scan to perform, the “P” commands set up ping sweep options, and the “o” commands deal with output. The “T” commands deal with speed and stealth, with the serial methods taking the longest amount of time. Parallel methods are much faster because they run multiple scans simultaneously. nmap switches you’ll definitely see on the exam are –sS (SYN scan), - sA (ACK scan), -sO (protocol scan), -sX (XMAS scan), and all of the T commands.
There are seven generic scan types for port scanning. TCP Connect scans run through a full connection (three-way handshake) on all ports. They are the easiest to detect, but possibly the most reliable. Open ports will respond with a SYN/ACK, closed ports with an RST/ACK. SYN scans are known as half-open scans, with only SYN packets sent to ports (no completion of the three-way handshake ever takes place). Responses from ports are the same as they are for a TCP Connect scan. FIN scans run the communications setup in reverse, sending a packet with the FIN flag set. Closed ports respond with RST, whereas open ports won’t respond at all. XMAS scans send multiple flags set (FIN, URG, and PSH). Port responses are the same as with a FIN scan. ACK scans are used mainly for Unix/Linux-based systems, and make use of ICMP destination unreachable messages to determine what ports may be open on a firewall. IDLE scans use a spoofed IP address to elicit port responses during a scan. Designed for stealth, this scan uses a SYN flag and monitors responses as with a SYN scan. Finally, NULL scans send packets with no flags set. Responses will vary, depending on the OS and version, but NULL scans are designed for Unix/Linux machines.
nmap output can be manipulated as well. The default is called “interactive,” and it is sent to standard output. Normal output displays less runtime information and warnings because it is expected to be analyzed after the scan completes rather than interactively. You can also send output as XML (which can be parsed by graphical user interfaces or imported into databases) or in a “greppable” format (for easy searching). Other port-scanning tools include SuperScan, IPeye, THC-Amap, hping, and SNMP scanner.
War dialing is a process by which an attacker dials a set of phone numbers specifically looking for an open modem. As you know, modems are designed to answer the call, and they can easily provide back-door access to a system otherwise completely secured from attack. Tools for accomplishing war dialing are ToneLoc, THC-Scan, WarVOX (designed explicitly for VoIP systems), PAWS, and TeleSweep.
War driving used to refer to driving around in a car looking for open access points. In the ethical hacking realm, it still indicates a search for open WAPs; however, with the proliferation of handheld devices making use of 802.11 wireless standards, finding access points is as easy as simply wandering around the facility. Additionally, several tools are available to help you not only in discovering wireless entry points, but in finding vulnerabilities in wireless networking. Silica, AirMagnet, and AirCheck (Fluke) are all tools on handheld devices that allow an attacker to walk around and gather—and sometimes even exploit—wireless access point vulnerabilities.
Hiding your activities from prying security-professional eyes can be done using a proxy, spoofing an IP address, using source routing, or using an anonymizer. A proxy server is nothing more than a system you set up to act as an intermediary between you and your targets. The hacker sends commands and requests to the proxy, and the proxy relays them to the targets. Anyone monitoring the subnet sees the proxy trying all this naughtiness—not the hacker. Spoofing an IP address is exactly what it sounds like—the hacker uses a packet-crafting tool of some sort to obscure the source IP address of packets sent from his machine. There are many tools available for this, such as hping, Scapy, and Nemesis.
Source routing provides yet another means to disguise your identity on a network. It was originally designed to allow applications to specify the route a packet would take to a destination, regardless of what the route tables between the two systems said. The attacker can use an IP address of another machine on the subnet and have all the return traffic sent back regardless of which routers are in transit. Protections against sourcerouting attacks are prevalent and effective, so this may not be your best option. Another easy method for disguising your identity for port 80 (HTTP) traffic is to use an anonymizer. Anonymizers are services on the Internet that make use of a web proxy to hide your identity.
Good hackers will spend 90 to 95 percent of their time gathering information for an attack, and after scanning comes enumeration. Enumeration in the ethical hacking world is listing off the items we find within a specific target. When we enumerate a target, we’re moving from passive information-gathering to a much more active state. No longer satisfied with just knowing which ports are open, we now want to find things such as open shares and any easy-to-grab user account information.
Microsoft Windows machines—everything from old Windows 2000 to Windows 7 systems—will constitute the vast majority of your targets out in the real world, so it’s important to know some security basics before enumerating them. Everything in a Windows system runs within the context of an account. An account can be that of a user, running in something called user mode, or the system account, which runs in kernel mode. Actions and applications running in user mode are easy to detect and contain. Those running in kernel mode, though, can be hidden and run with absolute authority.
User rights are granted via an account’s membership within a group and determine which system tasks an account is allowed to perform. Permissions are used to determine which resources an account has access to. The method by which Windows keeps track of which account holds what rights and permissions comes down to SIDs and RIDs. A security identifier (SID) identifies user, group, and computer accounts and follows a specific format. A resource identifier (RID) is a portion of the overall SID identifying a specific user, computer, or domain.
SIDs are composed of an S, followed by a revision number, an authority value, a domain or computer indicator, and an RID. The RID portion of the identifier starts at 500 for the administrator account. The next account on the system, Guest, is RID 501. All users created for the system start at 1000 and increment from that point forward—even if their usernames are re-created later on.
Accounts are identified by their SID (and associated RID), of course, but the passwords for them must be stored somewhere, too. In Windows, passwords are stored in C:WindowsSystem 32ConfigSAM. The SAM database holds encrypted versions of all the local passwords for accounts on the machine. For those machines that are part of a domain, the passwords are stored and handled by the domain controller.
A null session occurs when you log in to a system with no user ID and password at all. In older Windows versions (Windows 2000), a null session could be set up using the following command:
net use \<target>IPC$ "" /u:""
Null sessions require TCP ports 135, 137, 139, and 445 to work, and have been virtually eliminated from the hacking arsenal since Windows XP was released.
Linux systems use a User ID (UID) and a Group ID (GID) in much the same way as Windows uses SIDs and RIDs. On a Linux machine, these can be found in the /etc/ passwd file.
Banner grabbing is one of the easiest enumerating methods and involves sending an unsolicited request to an open port to see what, if any, default error message (banner) is returned. Depending on what version of application is running on the port, the returned banner can indicate a potential vulnerability for the hacker to exploit. A common method of performing banner grabbing is to use Telnet aimed at a specific port. For example, to banner-grab from a suspected web server, telnet <IPAddress> 80 would attempt a connection over port 80.
Another tool for banner grabbing (and other uses) is netcat. Known as the “Swiss army knife of hacking tools,“ netcat is a command-line networking utility that reads and writes data across network connections using TCP/IP. It’s also a tunneling protocol, a scanner, and an advanced hacking tool. To try banner grabbing with this little jewel, simply type nc <IPaddress or FQDN> <port number>.
SNMP enumeration may also prove useful. SNMP uses a community string as a form of password, with the read-only version of the community string allowing a requester to read virtually anything SNMP can drag out of the device. The read-write version is used to control access for SNMP SET requests, which can actually change settings on a device. The defaults for both of these strings are public (read-only) and private (read-write). Assuming the network administrator left SNMP enabled and/or did not change the default strings, enumerating with SNMP is relatively easy, and tools for accomplishing this are SNMPUtil and IP Network Browser (SolarWinds).
Questions
1. You are assigned to a pen test team and one of your peers tells you SNMP enumeration on the subnet today will be easy. You surmise this means SNMP is enabled and the defaults are still in place on many devices. When using a tool to craft your SNMP requests, what community string will you use for read-write?
A. public
B. private
C. readwrite
D. control
2. You want to perform banner grabbing against a machine (212.77.64.88) you suspect as being a web server. Assuming you have the correct tools installed, which of the following command-line entries will successfully perform a banner grab? (Choose all that apply.)
A. Telnet 212.77.64.88 80
B. Telnet 80 212.77.64.88
C. nc –v –n 212.77.64.88 80
D. nc –v –n 80 212.77.64.88
3. You are enumerating Windows machines and decide to attempt a null session. Which of the following statements is false regarding null sessions on Windows machines?
A. Syntax for a null session is net use \IPAddress IPC$ "" /u: "".
B. Null session attacks require SMB services and ports 135 and 137.
C. Null session attacks work on all versions of Windows operating systems.
D. Tools such as SID2User rely on a successful null session establishment to function.
4. You’re using nmap to run port scans. What syntax will attempt a half-open scan as stealthily as possible?
A. nmap –sT 192.168.1.0/24 –T0
B. nmap –sX 192.168.1.0/24 –T0
C. nmap –sO 192.168.1.0/24 –T0
D. nmap –sS 192.168.1.0/24 –T0
5. What flag or flags are sent in the segment during the second step of the TCP three-way handshake?
A. SYN
B. ACK
C. SYN-ACK
D. ACK-FIN
6. What is the port number used by DNS?
A. 161
B. 445
C. 53
D. 67
7. A user on a computer wants to surf a web page on a server. The first segment leaving his machine has the SYN flag set, in order to set up a TCP communications channel over which he will receive the web page (HTML). When that segment leaves his machine, which of the following would be found in the port number in the Source Port field?
A. 25
B. 80
C. 1022
D. 49153
8. Which flag forces a termination of communications in both directions?
A. RST
B. FIN
C. ACK
D. PSH
9. You are examining the output of a recent SYN scan. You see a port from one machine has returned an RST-ACK. What is the state of the port?
A. Open
B. Closed
C. Filtered
D. Unknown
10. What is the term used to describe searching for open modems on a target?
A. Port scanning
B. Vulnerability scanning
C. War driving
D. War dialing
11 . Which of the following methods of concealment involves a hacker spoofing an IP address to have packets returned directly to him regardless of the routers between sender and receiver?
A. Proxy server
B. Anonymizer
C. Filtering
D. Source routing
12. You are attempting to identify active machines on a subnet. What is the process of sending ICMP Echo requests to all IP addresses in the range known as?
A. Ping sweep
B. Ping crawl
C. Port scan
D. Enumeration
Answers
1. B. The default read-write community string for SNMP is private. Public is the default read-only string.
2. A and C. Both Telnet and netcat, among others, can be used for banner grabbing. The correct syntax for both have the port number last.
3. C. Null sessions are not a valid attack vector on Windows XP and newer machines. A null session is set up by typing net use \IPAddress IPC$ "" /u: "" and requires SMB services and ports 135 and 137. Tools such as SID2User, DumpSec, and others rely on a successful null session establishment to function.
4. D. The syntax nmap –sS 192.168.1.0/24 –T0 runs a SYN (half-open) scan against the subnet 192.168.1.0 (.1 through .254) in “paranoid” mode.
5. C. A three-way TCP handshake has the originator forward a SYN. The recipient, in step 2, sends a SYN and an ACK. In step 3, the originator responds with an ACK. The steps are referred to as SYN, SYN-ACK, ACK.
6. C. DNS uses port 53 (both TCP and UDP).
7. D. Source port numbers are set by the originator, and come from the Dynamic port range (49152–65535). Well-known ports (0–1023) are used to identify the upper-layer application that will answer the request.
8. A. The RST flag forces both sides of the communications channel to stop. A FIN flag signifies an ordered close to the communications.
9. B. Closed ports during a SYN scan will return an RST-ACK. A SYN-ACK will be returned for open ports.
10. D. War dialing is the process of dialing all phone numbers in a given range to discover modems.
11. D. Source routing specifies the route a packet will take to a destination, regardless of what the route tables between the two systems say.
12. A. A simple means of identifying active machines on the network is to perform a ping sweep. It may not be the most reliable method, due to ICMP filtering, but it’s still a good place to start.