
Chapter One. Getting Started
Every new version of the Adobe Creative Suite brings with it an array of powerful new features. Creative Suite 5 (CS5) is no exception—from Photoshop’s Content-Aware Fill and Puppet Warp to Illustrator’s Perspective Drawing and Variable-width Strokes to InDesign’s Grid-ified tools and rich-media document capabilities to Dreamweaver’s CMS framework integration and HTML5 support to Flash Professional’s new Text Layout Framework and under-the-hood physics engine.
Along with the updates to veteran applications, newcomers like Flash Catalyst and the CS Live suite of online services make the CS5 Design Premium edition an unprecedented set of creative, productivity, and publishing tools capable of transforming your visual communication across the ever-changing media landscape, from print, to the Web, to mobile devices.
Beyond the specific features, though, a new version of CS5 brings with it a fresh start—a chance to explore new creative possibilities, improve existing workflows, and learn new skills. Once you’ve peeled off the shrinkwrap and installed the new software, use this book to help you fast-track that process.
So let’s get started.
#1. Synchronizing Suite Color Settings
Maintaining color consistency is a challenge that designers have been dealing with since the beginning of the digital design age. Precision color output ultimately relies on understanding the destination device (inkjet printer, offset printing press, RGB display, etc.) of your design and effectively communicating a project’s color information to that device. For print projects, talking with your printer (the person, not the device) is highly recommended. Many printers will gladly provide you with well-tested settings files calibrated to their devices.
On a more general level, however, there are a few basic settings in CS5 that will get you off on a good foot toward reliable color outcome in most situations. The settings that we discuss in this tip apply to Photoshop, Illustrator, InDesign, and Acrobat only. Flash Professional, Flash Catalyst, and Dreamweaver do not include color-management tools.
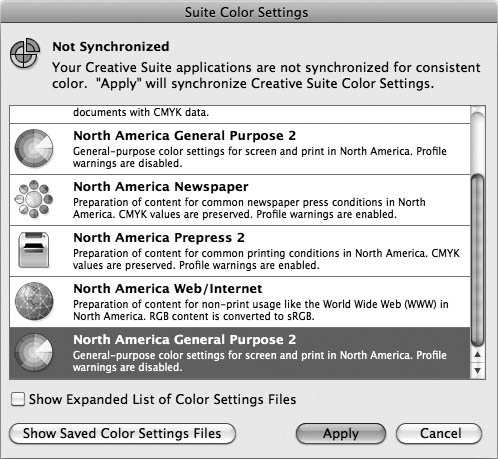
Before diving into your next project, make sure to synchronize your color settings so that Photoshop, Illustrator, InDesign, and Acrobat are all on the same page. You can do this simultaneously (for all but Acrobat) from Adobe Bridge by choosing Edit > Creative Suite Color Settings. If you’ve ever modified one application’s color settings separately, the dialog box may indicate that your settings are unsynchronized (Figure 1a).
Figure 1a. Bridge CS5’s Suite Color Settings dialog box indicating that the various suite applications are not using consistent color settings.
To synchronize Photoshop, Illustrator, and InDesign, click the Apply button, and the color setting selected in the dialog box will be applied to all applications. The default setting in the U.S. English version of CS5 is North America General Purpose 2, which includes specific settings for RGB and CMYK working spaces, color-management policies, and conversion options.
If you want to deviate from this default, you can modify the color settings in any of those applications (the Color Settings dialog boxes in each are nearly identical), then save your custom settings and apply them suite-wide from Bridge.
One change you might want to make is to the RGB working space. sRGB is the default, but sRGB is a relatively small color space. By changing that to Adobe RGB (1998) you broaden your working color space to the much wider dynamic range that CS5 applications are capable of. When picking a CMYK working space, it’s best to choose the profile that your printer (the person, not the device) provides so that your translation between RGB images and CMYK printers is accurate and the best possible conversion for the specific printing destination occurs. With your settings changed to suit your needs, save them as a color-settings file (.csf). By default, they’ll be stored in the same Settings folder where all other color-settings files are saved for CS5.
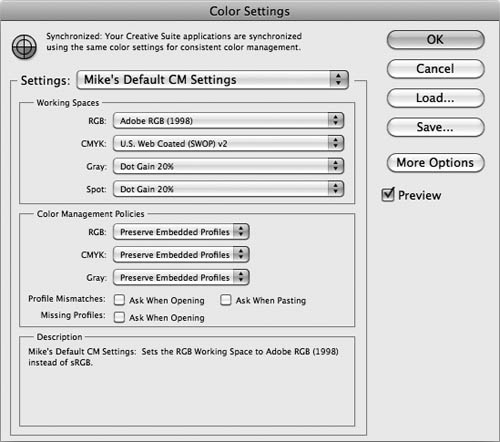
Once you’ve customized and saved your settings, then applied them suite-wide from Bridge, you’ll see the settings reflected in Photoshop, Illustrator, and InDesign as well as an icon indicating that your suite settings are synchronized (Figure 1b). From that point on, each application is using the same color profiles and color-management policies to ensure consistent color.
Figure 1b. Photoshop’s Color Settings dialog (Edit > Color Settings...) indicating that those Creative Suite applications that can be synchronized have been, using a custom color-settings file.
#2. Setting Preferences
Every application in CS5 has its own preferences. Command-K (Ctrl-K) is the keyboard shortcut for accessing Illustrator, InDesign, and Photoshop preferences. Dreamweaver uses Command-U (Ctrl-U); Flash Catalyst uses Command-comma (Ctrl-comma); and Flash Professional has no default keyboard shortcut.
The behavior of preference settings is uniform across CS5. If you want to change a preference for all future documents you create in a given application, make your preference changes while no documents are open. If you want to change preferences for a specific document only, make your preference changes while that document is open. All other documents will continue to honor the application’s defaults.
Before you dive right in and start using CS5, get off to the right start by paying attention to a few preferences in certain applications that we think should be set differently. This is all subjective, of course, but after many years of working with these applications, there are some things we’ve become accustomed to setting up differently than Adobe thinks we should.
Photoshop Recommendations
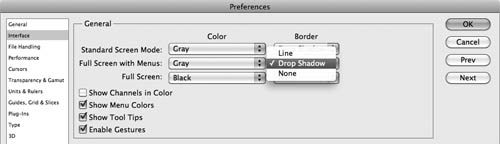
Photoshop CS5’s user interface was modified slightly to add a drop shadow around the image canvas in Standard and Full Screen modes. This is a bit distracting. We prefer not to have any visual clutter when we work, so we turn off this default right from the start (Figure 2a).
Figure 2a. In the canvas border options in Photoshop’s interface preferences, you can replace the drop shadow border (added to the canvas as a default in CS5) with either a line or no border at all.
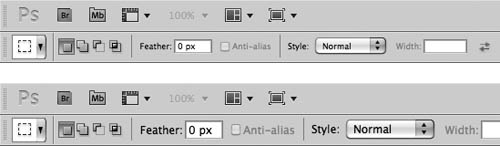
Photoshop is holding up beautifully after 20 years, but some of us using it might find that our eyes aren’t. If the text in the application’s interface is causing you to squint, you can modify the UI font sizes (Preferences > Interface) from their default (Small) to either Medium or Large (Figure 2b). Most UI preference changes like this in the CS5 applications don’t become active until you’ve restarted the application.
Figure 2b. Photoshop’s default “Small” UI fonts (top) compared to the new “Large” setting available in the Interface preference options (bottom).
Illustrator Recommendations
Illustrator CS5 finally adds functionality that many InDesign users are already used to: using Command-Click (Ctrl-click) to select an object that’s behind another object. This is the new default setting, and we recommend letting it stand. (If you prefer things the old way, you can turn it off in the Selection & Anchor Display preferences, but this is a new default we like a lot.)
Scale Strokes & Effects has been off by default for more versions that we can remember. Not scaling should be the exception, not the rule, so turn Scale Strokes & Effects on in Illustrator’s General preferences.
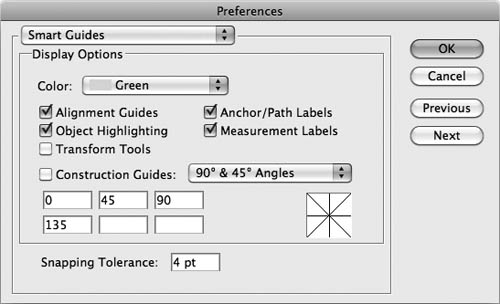
Illustrator’s Smart Guides feature has Object Highlighting on by default so everything “lights up” when you mouse over it. This is another needless visual distraction. Many people turn off Smart Guides altogether. Unfortunately, when they do so, they lose all the other great functionality like dynamic alignment guides and measurement data. Instead of taking an all-or-nothing approach, turn off just Object Highlighting in the Smart Guides area of Illustrator’s preferences (Figure 2c).
Figure 2c. Use the Smart Guides preferences to turn off Illustrator’s intrusive Object Highlighting, but retain the other useful Smart Guides features.
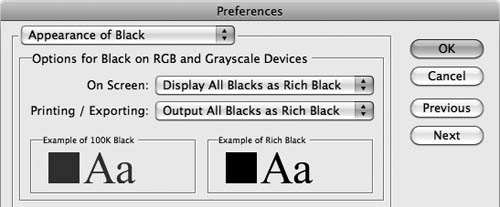
The Appearance of Black preferences (see Figure 2d) are set to “Display All Blacks as Rich Black.” This is a big mistake for print design. When we look at our print jobs, we want to see what they’re really going to look like. The difference between a swatch at 100 percent Black and Rich Black (a black made up of 100 percent black, plus percentages of cyan, magenta, and yellow) is quite pronounced. You may want your large, bold headlines in Rich Black, but not your body copy. It’s important to see your blacks on screen as people will see them in print. To do that, change this preference to “Display All Blacks Accurately.” This is also a preference in InDesign, and we recommend the same setting in that application, too.
Figure 2d. The preference for displaying and outputting all blacks as Rich Black in Illustrator’s default Appearance of Black settings can produce misleading screen appearances and lead to unwanted results in print.
InDesign Recommendations
InDesign’s Type preferences have “Apply Leading to Entire Paragraphs” turned off (unchecked) by default. This opens the door to inconsistency, especially in larger projects, so turn this on as your application default. You can always turn it off on a per-document basis if circumstances warrant it.
Under Units and Increments, change the Keyboard Increments to smaller, more useful values, like those in Figure 2e. By default, tapping the up and down arrow keys changes font size, leading, and baseline shift by 2 points. Typographic adjustments are typically more subtle, so we like to set this value to 0.5 point. The Kerning/Tracking setting is also a bit high for our tastes. We set this from 20/1000 em to 5/1000 em. The Cursor Key value determines how far a selected object is “nudged” by the arrow keys. This value can be as low as 0.1 point, but we prefer to keep it to the lowest round number: 1 point. Many of these preference settings are available in Illustrator, too, so to get the default behavior you like in both applications, make the same changes in Illustrator’s Type preferences.
Figure 2e. Our preferred settings for keyboard increments in both InDesign and Illustrator.

Dreamweaver Recommendations
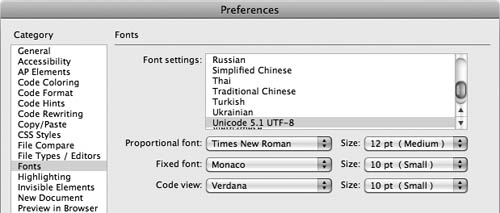
We’re amazed that Dreamweaver’s Code view still defaults to a very small and nearly unreadable font after many versions. Do your eyes a favor and switch Dreamweaver’s Code View font to something larger and more legible (Figure 2f). Personally, we like Verdana in the 10- to 12-point range.
Figure 2f. Dreamweaver’s font preferences.
#3. Setting Up Workspaces
CS5 is made up of multiple separate applications that you use for distinct purposes—InDesign for page layout, Dreamweaver for Web-site design and management, Photoshop for image editing, and so on. However, the applications are so feature-rich that, within each, you may frequently find yourself concentrating on a specific kind of task that uses only a small subset of its features.
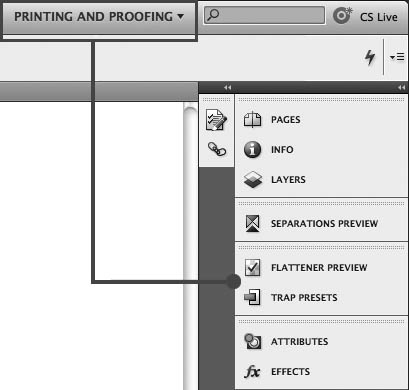
When designing a print brochure in InDesign, you may make extensive use of the Paragraph Styles, Effects, Stroke, and Text Wrap panels. But when the client has approved the job and it’s time to go to press, you’ll be making greater use of output-related panels such as Links, Preflight, and Flattener Preview. Using prebuilt or customized workspaces, you can optimize InDesign’s working environment for distinctly different phases of a project (Figure 3a).
Figure 3a. A set of prepress-specific panels given prominence when InDesign’s Printing and Proofing workspace is made active from the application bar.
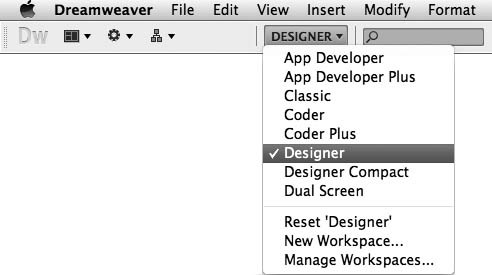
The same is true for Photoshop, Illustrator, Flash Professional, Dreamweaver, Flash Catalyst, and Bridge. Each application ships with a set of useful workspaces defined for sets of related tasks (Figure 3b). Photoshop comes preconfigured with workspaces optimized for painting, photography, and 3D; Illustrator includes workspaces that mimic the basic setup of InDesign, Photoshop, and even Freehand; and Flash Professional ships with workspaces specifically geared toward animators, developers, or designers.
Figure 3b. Dreamweaver CS5’s workspace menu optimizes the application environment for different working modes, including one for a dual-screen setup.
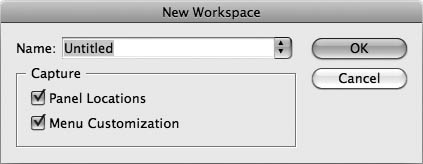
You can also set up your own optimized arrangement of panels, menu items, and menu-item highlighting and save that as a custom workspace. The process is the same across all applications in the suite. Simply open and arrange the panels you want to have available, and close those you don’t. Once everything is arranged to your liking, save your workspace for future use. In most CS5 applications, you go to Window > Workspace > New Workspace and, in the New Workspace dialog box (Figure 3c), give your new workspace a name and click OK (or Save). There are some subtle differences to this otherwise consistent feature, however. In Illustrator, it’s Window > Workspace > Save Workspace, and in Dreamweaver, it’s Window > Workspace Layout > New Layout.
Figure 3c. The New Workspace dialog box allows you to save customized workspaces. Photoshop and InDesign allow you to save individual panel locations and any menu customization you may have done.
#4. Extending the Power of CS5
When you purchase CS5, you get more than just what’s included in the box (or the downloaded installers). There are numerous online resources that can dramatically extend the power of the applications in the suite.
Adobe Exchange
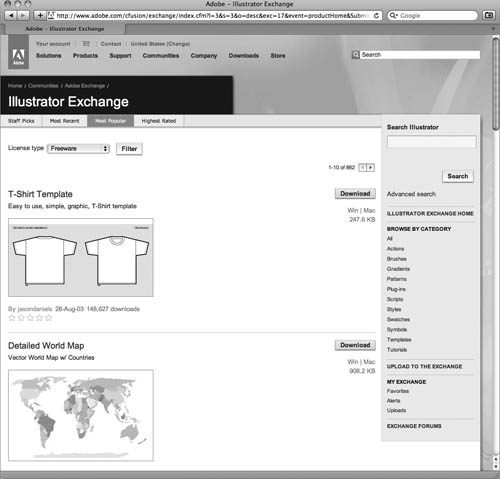
The Adobe Marketplace & Exchange (www.adobe.com/go/exchange) offers downloadable artwork, brushes, and scripts, as well as thousands of plug-ins and extensions from Adobe and third-party developers. The plug-ins and extensions can help you automate tasks, customize workflows, create specialized professional effects, and more. Each application in CS5 Design Premium has its own Exchange (Figure 4a).
Figure 4a. The Illustrator Exchange site includes templates, brushes, vector artwork, and other free or paid resources specific to Illustrator.
Each application-specific Exchange offers specialized plug-ins and other tools:
• InDesign users can download a wizard to automatically generate a calendar layout, a script that automates the placement of multipage PDFs, and more.
• Illustrator users can download free extensions, vector artwork, custom brushes, and templates.
• Photoshop users can download custom Actions and brushes, backgrounds, button art, and gradients.
• Dreamweaver users can find custom widgets, jQuery and Spry navigational elements, CSS-based menus, video players, and page-layout templates.
• Flash developers can download components, players, preloaders, and more.
The Exchanges offer a mix of both free and paid resources. For example, widgets on the Dreamweaver Exchange (See Chapter 6, Tip #55, “Using the Widget Browser”) are often free, but many of the other items are paid products with commercial-use licenses.
Adobe Labs
Feeling cutting edge? Adobe Labs (labs.adobe.com) is your source for public beta software that Adobe has yet to release as ready-for-primetime products. This is where Lightroom, BrowserLab, and Flash CS5 Professional’s new Text Layout Framework, among other game-changing technologies, started out. Recently, exciting new extensions to Creative Suite products like the Adobe Illustrator CS5 HTML5 Pack have been made available here in an effort to keep applications aligned with the rapid pace of change in the photography, design, print, Web, and application development fields.
Kuler
Kuler is an extension that installs with InDesign, Photoshop, Illustrator, Flash Professional, and Flash Catalyst to give you access to color combinations created by and shared among the Adobe community. In any of these applications, go to Window > Extensions > Kuler to open the Kuler panel (Figure 4b).
Figure 4b. The Kuler panel in Photoshop with swatch sets filtered by the highest ratings. The tool tip indicates the set’s creator, its average rating, and upload date.
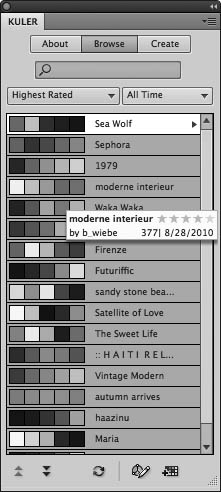
You must be online to use Kuler, in which case you’ll see swatch sets containing combinations of colors, called themes. Themes are organized and sortable by categories like highest rated, most popular, newest, and so on, and you can filter what’s displayed in the Kuler panel by category and date range.
Illustrator has the best support for Kuler themes. When you find a theme you’d like to add, select it in Illustrator’s Kuler panel and click the Add Selected Theme to Swatches button ![]() at the bottom of the panel. The swatches are added as a theme in the Swatches panel, and named identically to the original Kuler theme.
at the bottom of the panel. The swatches are added as a theme in the Swatches panel, and named identically to the original Kuler theme.
In Photoshop, it’s a bit more involved. There, you’d choose Preset Manager from the Swatches panel. In the resulting dialog, select all swatches, hit the Delete key then exit the dialog. The Swatches panel should contain no swatches at all.
Next, select the theme you want in Photoshop’s Kuler panel and click the Add Selected Theme to Swatches button. The Swatches panel will be populated with the swatches in that theme.
Finally, from the Swatches panel menu, select Save Swatches, which saves the theme using an “.aco” extension. It should be saved in the default location for swatch settings (on the Mac: youruserfolder/Library/Application Support/Adobe/Adobe Photoshop CS5/Presets/Color Swatches; on Windows: youruserfolderAppDataRoamingAdobeAdobe Photoshop CS5PresetsColor SwatchesSets). You’ll have to quit and relaunch Photoshop to see the custom swatch set as an option in the Swatches panel menu, but it will appear near the bottom of the menu, grouped with other custom swatch sets (Figure 4c).
Figure 4c. A custom Kuler color theme saved as a Photoshop Swatch set.
You can then get Photoshop’s default swatches back by choosing Reset Swatches from the Swatches panel menu. This will not delete any custom Kuler themes you’ve added.
Kuler themes added to Flash Professional are saved as Flash Color Set (.clr) files and should be saved in youruserfolder/Library/Application Support/Adobe/Flash CS5/en_US/Configuration/Color Sets (on the Mac) or youruserfolderAppDataLocalAdobeFlash CS5en_USConfigurationColor (on Windows).
When you add a Kuler theme in InDesign, the swatches are added to the current document (or to the entire application if no documents are open) at the bottom of the Swatches panel. InDesign does not support organization of swatches by themes or swatch sets, so the new Kuler swatches will appear in the panel with all other document swatches.
Kuler support for Dreamweaver is available only via a free, third-party plug-in, available at www.webassist.com/free-downloads/dreamweaver-extensions/palettepicker.
#5. Setting Up an Adobe ID
With your purchase of CS5 Design Premium edition comes one year’s free access to a number of online services collectively known as CS Live (See Chapter 11, “Using the CS Live Services”). These services include:
• Acrobat.com—an online service for document sharing, Web-based meetings, and video conferencing.
• Buzzword—a collaborative online word-processing application built into Acrobat.com.
• Adobe CS Review—a collaborative review and commenting service for shared online project reviews that’s integrated into Photoshop, InDesign, and Illustrator.
• SiteCatalyst NetAverages—a Web analytics service.
• BrowserLab—a Web-based service that tests your Web pages in a number of different browsers on different platforms.
• Adobe Story—a script-writing application integrated into Adobe’s video applications in the Production Premium edition of CS5.
During this free-access period, using any of these services requires only one thing: an Adobe ID.
An Adobe ID is simply the user name and password you create to access these and other Adobe services online.
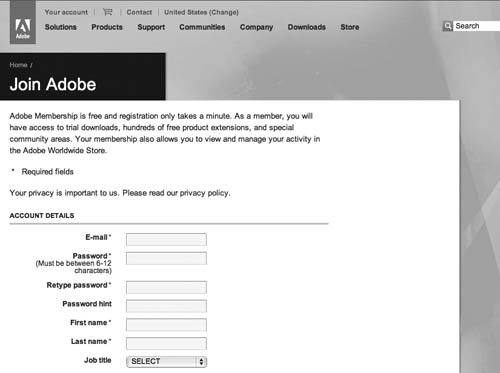
To create your Adobe ID, go to adobe.com and click the Your Account link at the top of the home page. On the next page (Figure 5a), enter an ID (preferably your e-mail address) and a password. Once your account is set up, you have full access to all of the new CS Live services and many other resources available on Adobe.com.
Figure 5a. Creating an account on Adobe.com.
#6. Keeping CS5 Design Premium Up-to-Date
Remember waiting for disk-based software updates to come in the mail? Or hearing second-hand that an update or bug fix was available months after it had been released? Back in the day, it was up to you to seek out needed updates. Now, those updates are effortlessly pushed out via the Internet to all registered users. Receiving notifications, downloading, and installing interim updates to applications in CS5 is now a seamless process.
When you install CS5, the Adobe Application Manager installs a background application that periodically checks for updates online and notifies you with an icon in the Windows taskbar or Mac OS menu bar (Figure 6a). A numeral next to the icon indicates the number of applications for which there are updates.
Figure 6a. The Adobe Application Manager’s update icon in the Mac OS menu bar, indicating four available updates.

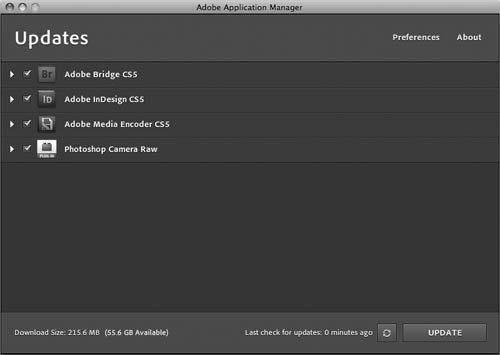
Choosing Open Updater from the update icon’s menu launches the Adobe Application Manager, an AIR application that lists what updates are available for which applications (Figure 6b) and allows you to install all or just a few of the available updates. If you need to quit or restart applications, the Application Manager prompts you along the way.
Figure 6b. Available updates in the Adobe Application Manager.
If you tend to ignore these updates, you might want to rethink that behavior. In the first six months of CS5’s release, the pace of change and updates to applications has been unprecedented. In addition to the usual patches and bug fixes, Adobe has added significant new features to some of its applications as updates (See Chapter 6, Tip #58, “Working with HTML5 and CSS3 in Dreamweaver”) and all evidence indicates that it will continue to do so throughout the CS5 product life cycle.