
Chapter 3. Formatting and organization
Follow these guidelines to format and organize information so that it stands out and is easy to locate.
Headings
Use headings to organize information into a logical structure.
Format of headings
Format headings consistently and logically:
• In books and topic-based information, do not number headings other than chapter titles. Numbering headings and subheadings is acceptable in articles, white papers, quick start guides, and other shorter publications.
• Make sure that the typographic style is consistent for each heading of a particular level in your publication. Use the formatting features of your authoring tool to apply a consistent style.
• Avoid placing one heading directly after another without text between the two. If the text that separates headings is trivial, one of the headings might be unnecessary. Consider reorganizing the information.
Wording of headings
Make headings brief and descriptive. Use the appropriate type of heading for each information type:
• Use gerunds for headings of tasks. If the subject is a functional overview, use a heading such as Introduction or Overview rather than a pseudo-task-oriented heading that begins with Understanding, Introducing, or Learning.
• Use nouns or noun phrases for headings of concepts or reference information.
• If a heading is clearly about a singular item, use the singular form. If the item can be either singular or plural, use the plural form.
• Use question-style headings, such as “How do I subscribe to updates?” only in troubleshooting topics and frequently asked questions (FAQs). Do not use question-style headings in concept, task, and reference topics.
Exception for marketing content: Questions are sometimes allowed as headings in marketing documents. For details and examples, see “Exceptions for marketing content” on page 274.
Punctuation with headings
Use appropriate punctuation in headings:
• Do not end a heading with a period or colon.
• Use a colon between a heading and subheading; do not use parentheses or dashes. Do not insert a space before the colon, and insert one space after the colon. Capitalize the first letter of the subheading.
• In books, use a period in titles for chapters and appendixes. Insert the period after the name of the entity and the identifying number or letter and before the descriptive name.
Abbreviations in headings
Avoid using abbreviations in headings unless an abbreviation is well known or the spelled-out form is too long. If you use an abbreviation for the first time in a heading, ensure that you include the spelled-out form either in the heading or in the text that immediately follows the heading.
Lists
Use a vertical list to visually organize a long series at the end of a sentence or a series of parallel sentences or paragraphs.
Lists can make information easier to read and to translate, if they are not too long. Avoid in-sentence enumerations in technical information. Do not overuse lists; text that consists of a series of vertical lists that are loosely tied together with short introductory sentences can look more like an outline than a finished work.
Unordered lists
Use an unordered (bulleted) list when the sequence of list items is not significant. In an unordered list, arrange list items in a logical way. If there is no better method for arranging them, put them in alphabetical order. If you group items in a way that is not obvious, briefly explain how you grouped them. Where applicable, list the products of your own company first, for example in lists of hardware or software.
Ordered lists
Use an ordered (numbered) list when the sequence is significant, for example, when writing procedures or ranking items. If the items in a list represent rules or other types of information that you want to refer to, you can refer to them by number. For example, in a list of rules, the item numbered 1 is implied to be Rule 1. For guidelines about writing procedural steps, see “Procedures” on page 84.
Definition lists
Use definition (or term) lists to describe terms or explain concepts. Use bold for the term or descriptive name unless your library or tool has overriding coding requirements, such as italic for message variables, program keywords, or program variables. Use a period at the end of the definition.
Make sure that terms or descriptive names and their definitions are visually separated. Capitalize the first word of each term or descriptive name, unless it usually would not be capitalized, for example, num_circles or prodname, and capitalize the first word of each definition.
Avoid using an unordered list with bold, as shown in the following incorrect example. Instead, use a definition list. You can write the definition list in one of three styles, as shown in the three correct examples. In the first correct example, the term that is defined is the first word of a defining sentence. In the second correct example, the defined term is not part of the defining sentence. In the third correct example, the definition is a fragment (glossary style). Be consistent when writing definition lists; do not mix these three styles.
Capitalization in lists
Capitalize the first word of each item in a vertical list.
Wording of list items
Use list items that are grammatically parallel. For example, do not mix passive voice with active voice or declarative sentences with imperative sentences.
Remember: To avoid translation problems, consider using complete sentences or noun phrases for list items.
Length of lists
Use at least two list items in an ordered list. You can have one item in an unordered list if the intention is to match the format of other unordered lists in the same area.
Long lists of items can be overwhelming. Try to keep lists to a maximum of nine items. If a list exceeds this limit, consider using more than one list. Longer lists of reference information in alphabetical order can be acceptable because readers browse reference lists to select the data that they need rather than reading them from beginning to end.
Alphabetization and sorting methods of lists
To manually sort lists of items that have no other obvious sorting criteria, use letter-by-letter alphabetization. The sorting of indexes and glossaries is usually controlled by the authoring tool, not by the writer.
To alphabetize items in a list, excluding index entries, use the letter-by-letter method, rather than the word-by-word method. The differences between the methods are shown in the following example:

If an item includes a hyphen, slash, or apostrophe, ignore the punctuation and treat the item as a single word.
If the list of items to be sorted contains symbols or numbers, use this sorting order: symbols, numbers, alphabetic characters. For numbers, you might also want to create a spelled-out version if you think that users might look for the word that way. For symbols, use the following ASCII sort sequence unless you are using a tool that imposes a different sort sequence:
(space or null) ! “ # $ % & ’ ( ) * + , - . / : ; < = > ? @ [ ] ^ _ ` } | { ~ ¢ > ≤ ÷ °
Punctuation in lists
Write lists so that all or none of the items start with complete sentences. If list items comprise only complete sentences, include a period after each sentence. If list items comprise only sentence fragments, do not include any end punctuation.
If a list contains list items that start with sentence fragments, and one or more of the fragments are followed by complete sentences, include periods after all sentence fragments and sentences.
Apply the same rules to nested lists (lists within lists). Punctuate the lead-in wording to a nested list as you would punctuate the lead-in wording to a list.
Lead-in wording
Generally, use a sentence to introduce a list that is not a procedure. In a task topic, a lead-in sentence is optional if the list directly follows a “Before you begin,” “Prerequisites,” “Restrictions,” or similar heading. For guidelines about how to introduce a procedure, see “Procedures” on page 84 of the printed book.
Translation consideration: To avoid possible translation problems, use complete sentences to introduce lists and not phrases. Machine translators often translate at the sentence-level and return the best results when they have a complete sentence to parse.
Exception for marketing content: Using a fragment to introduce a vertical list is acceptable in marketing content. For details and examples, see “Exceptions for marketing content” on page 274.
Use a colon at the end of the lead-in sentence, unless another sentence intervenes between the lead-in sentence and the first list item. If a sentence intervenes, use a period to end both the lead-in sentence and the intervening sentence.
You can use an imperative sentence to introduce a numbered list.
Do not continue the lead-in sentence after the list, and do not use a conjunction at the beginning or end of a list item.
Nested lists
Avoid nesting ordered and unordered lists beyond two levels, and never nest more than three levels; restructure the information instead. Procedural steps should have no more than two levels; restructure the information instead.
When you create nested ordered lists to display in an outline format, use the following numbering scheme unless your authoring tool uses a different scheme.
• Begin each first-level item with an Arabic numeral, followed by a period.
• Begin each second-level item with a lowercase letter, followed by a period.
• If a third-level item is required, begin the item using a numbering scheme that is distinct from that of the first and second levels.
When you create nested unordered lists, make sure that the bullet symbol for the first level is different from the bullet symbol for the second level.
For information about adding lists using DITA, see DITA Best Practices: A Roadmap for Writing, Editing, and Architecting in DITA, Chapter 3, “Adding lists” and Chapter 4, “Adding lists.”
For more information about writing lists effectively, see Developing Quality Technical Information, Chapter 5, “Keep lists short” and “Use lists appropriately,” and Chapter 7, “Present list items consistently.”
Procedures
Use ordered (numbered) lists to describe tasks with more than one sequential step. Follow these general guidelines for writing numbered procedure steps.
Introducing the procedure
Use one of the following approaches to introduce a procedure:
• A lead-in sentence or infinitive phrase (one that starts with the word To)
• A heading such as “Procedure”
• A combination of a lead-in sentence or infinitive phrase with a heading such as “Procedure”
Translation consideration: To avoid translation problems, consider using a lead-in sentence instead of an infinitive phrase. Ensure that you use only one method of introducing a procedure consistently throughout your entire library.
If you use a sentence to introduce a procedure, use a colon at the end of the lead-in sentence unless another sentence intervenes between the lead-in sentence and the procedure. If a sentence intervenes, use a period to end both the lead-in sentence and the intervening sentence. If you use an infinitive phrase to introduce a procedure, use a colon at the end of the phrase.
Use a colon at the end of a sentence that introduces a subprocedure (nested ordered list) unless another sentence intervenes between the lead-in wording and the subprocedure. If a sentence intervenes, use a period to end both the lead-in sentence and the intervening sentence.
Writing steps
Write one step for each significant user action, but avoid being too granular. For all but novice computer users, use arrows to show a sequence of menu selections. If you tell the user to press Enter to complete the action, do so as part of the step, not in a separate step. If an ellipsis, colon, or other punctuation is part of an interface element label, do not include that punctuation in the description of the action.
Avoid writing excessively long procedures. Try to break up long procedures into smaller tasks. Procedural steps should have no more than two levels; restructure the information instead.
If a procedure consists of only one step, present it as a sentence or short paragraph, and do not number it.
Do not use please in any instructions. Terms of politeness are superfluous, convey the wrong tone for technical material, and are not regarded the same way in all cultures.
Use the imperative mood in the first sentence of each step. If it is necessary to provide an explanation, do so in the same step, after the imperative sentence, not in a new step. If possible, avoid describing the result of each step; instead, in the next step, orient the user to the location where that step is performed.
If you orient the user to the location where the action is performed or explain the purpose of the action, do so before describing the action.
If the procedure includes snippets of code as examples, place the code (or a link to the code, if the code is in a separate topic) in the step that it applies to. If the example of code applies to the whole task, place the code or link after the last step. Label the link to the code so that the purpose of the code is clear to users, for example, “Code for an SQL table.”
Indicating optional and conditional steps
If a step is optional, begin the step with the word Optional. If your authoring tool provides a semantic element to generate the word Optional, use that element.
If a step is conditional, state the condition or begin the step with an if clause.
Handling nonsequential actions
Do not use sequential steps to describe actions that are not sequential. When a procedure has mutually exclusive alternatives or any kind of branching condition, do not present the alternatives as sequential steps. Describe the branching condition in a single step, using an unordered list as a sublist or list of subprocedures to present the alternatives. Do not insert the word or between alternatives.
Ending the procedure
Do not include actions that are outside the scope of the procedure. Do not continue with steps for another procedure. If a subsequent procedure is necessary, direct the user to it after the final step in a cross-reference or, in online documentation, in a link. Otherwise, direct the user to other procedures in a paragraph that follows the procedure, or provide a link. Avoid using a statement at the end of a procedure that only informs the user that the procedure is complete.
For information about writing tasks using DITA, see DITA Best Practices: A Roadmap for Writing, Editing, and Architecting in DITA, Chapter 1, “Task orientation.”
For more information about writing procedures, see Developing Quality Technical Information, Chapter 2, “Provide clear step-by-step instructions,” Chapter 5, “Keep lists short” and “Use lists appropriately,” and Chapter 7, “Present list items consistently.”
Figures
Use figures within blocks of text to clarify or complement your information. Figures include nontextual visual elements such as graphics, illustrations, and screen captures.
Figure captions and legends
Include captions and legends if you must refer to your figures by figure title and number or if your figures are not self-explanatory or explained by the surrounding text. Otherwise, captions and legends are optional.
If you can describe a figure briefly and clearly without using a verb form, use a caption (less than a complete sentence). Use sentence-style capitalization. Do not use a period (.) at the end of a caption.
If you have to include a verb form to avoid ambiguity, use a legend (a complete sentence). A legend consists of one or more complete sentences that explain the figure.
A combined caption and legend begins with a caption and continues with one or more sentences that explain the figure. Use sentence-style capitalization. Use a period after the caption and after each sentence in the legend.
Font recommendation: Captions are shown in italic type. Many formatters produce italic captions by default.
In the caption for a figure, do not include the word figure, table, chart, or any other word that is redundant with the label.
If a figure is long and prints on more than one page, repeat the caption on the successive page.
Each section of the figure should contain some designation to indicate that it spans more than one page. The preferred method is to include “(Part x of y)” at the end of the caption. However, you might have to use another method, such as “(continued),” depending on the tool that you are using.
Figure numbering
Number figures consecutively throughout your documentation, including those in the appendixes. Your environment and tools might number figures differently. For example, if your authoring tool numbers your figures by starting with Figure 1 in each separate web-based topic, consider not numbering your captions.
Drawings, plates, photographs, icons, bitmaps, illustrations, and other figures and tables can be included without numbers and captions when they are self-explanatory or are explained by the surrounding text. It is not necessary to refer to them by figure or table titles or numbers.
If a figure must be split into two or more parts, qualify the figure number that precedes the caption or legend as shown in the following example.
The separate parts of such figures must have the same caption. (If different captions are necessary, create the parts as separate figures.) However, when combined captions and legends are used with a multiple-part figure, the legend portions can be different.
Font recommendation: Captions are shown in italic type. Many formatters produce italic captions by default.
Figure references
When making references to figures, use correct capitalization and appropriate placement. Note that a table can be referred to as a table or a figure. See “Tables” on page 96 of the printed book.
Use regular text instead of an inline link when a reference is near a figure. Always introduce a figure with a sentence immediately preceding it, and use a period or a colon to end the sentence. If you present the same type of information in two or more consecutive figures, you do not have to introduce each specific figure, but you must introduce the group of figures.
In text references, when a reference is not near a figure, use initial capital letters for the word Figure. (Italics are used here for emphasis; do not use italics in your actual text references.)
If a document has both figures and tables and they are labeled as such, include the page numbers or hypertext links in cross-references to them in the text. Do this only when it is not possible to use regular text to refer to the figure or table. This retrievability aid prevents the reader from turning to the page for Figure x when looking for Table x and vice versa. If your text formatter cannot provide the page numbers or hypertext links in cross-references to figures and tables, consider captioning them all as figures and numbering them in a single sequence.
It is not necessary to use a cross reference to a figure or table in text if the figure or table is not referred to, or if it is referred to in such a way that the figure or table can be identified without a number.
Enclose a subheading for a figure caption within parentheses and add it to the end of the descriptive wording.
If parts of a figure are labeled, use sentence-style capitalization for the labels.
Figure placement
Place a figure as close as possible to the principal reference to it.
• If the reference and the figure are in the same topic, implement one of these solutions:
• To refer to a figure that is close to the reference, use a text reference. For example, write “To see a complete list of requirements, see the following figure.”
• To refer to a figure that is not close to the reference, create a link to the figure. For example, write “To see a complete list of the requirements, see Process steps.”
• If the figure is on a separate page or in a separate topic, use a link to the page or topic that contains the figure.
Callouts in illustrations
When including illustrations or drawings in your information, include brief, appropriate sets of words or symbols that are connected by lines or arrows to parts of the illustration. These callouts provide immediate information about the various parts of the illustration. Use sentence-style capitalization for the callouts in an illustration.
When you number the callouts in an illustration, start with the callout in the upper-left corner of the illustration and number the callouts clockwise. If the callouts are in a row, number them from left to right. If the callouts are in a column, number them from top to bottom.
Example of a callout:
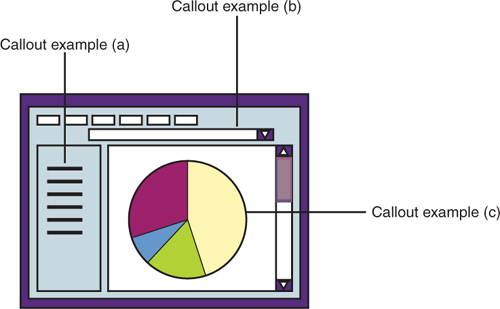
When you number illustrations that indicate steps in a procedure, display the steps in the sequence in which they are performed. To avoid confusion with the steps in a procedure, you can use letters to identify the callouts in the illustration.
Screen captures
Copying user interface elements in a form that readers can use as visual reference can be helpful in providing orientation, reducing confusion, and increasing retrievability. The decision to include screen captures can be complex, and you might want to consult your translation coordinator, information architect, management, and other interested parties as you consider the issues that are involved.
Do not translate or mirror screen captures. Capture the images from the national language versions of your product. Follow all international design guidelines for graphics, including guidelines that relate to cultural issues, acceptable graphic file formats, and expansion guidelines to ensure that the amount of space required for text is available.
Screen captures can be useful and successful when they achieve one or more of these objectives:
• Illustrate a user interface that is fairly complex or difficult to explain in text
• Help the user find a small element in a complex user interface
• Provide accessibility alternatives
• Show the results of a series of steps or user actions
• Orient readers who are reading the publication without the user interface in front of them
Screen captures can be less successful in these situations:
• Too many are used; for example, they are used to document the interface, as opposed to documenting the tasks that users want to do.
• They are used inconsistently, for example, by providing screen captures for some complex processes and no screen captures for others.
• Simple user interfaces are displayed that provide no additional help for the user.
• Inappropriate borders, highlighting, or other design elements are added, inhibiting quick identification.
• Poor-quality captures are used.
Consider these issues when you create screen captures:
• The ease of creating translated screen captures
• The accuracy of screen captures
• Maintenance in future releases
• Potential legal considerations for content that might be the intellectual property of another company
When you decide to include screen captures, follow these guidelines:
• Use captures of windows and other user interface elements sparingly.
• Include the cursor, mouse pointer, or menus only when their presence is significant.
• Capture just the part of the screen or window that users must focus on.
• Show the user interface elements exactly as they are displayed for most users for quick recognition.
• Keep your captures in proportion to each other.
• Annotate screen captures where it helps the reader find a user interface element.
• Note the user interface actions that are required for each capture and any system prerequisites that are required to duplicate the data. Share these detailed instructions with translators and language testers.
For information about including graphics when using DITA, see DITA Best Practices: A Roadmap for Writing, Editing, and Architecting in DITA, Chapter 3, “Including graphics.”
For information about using graphics effectively, see Developing Quality Technical Information, Chapter 10, “Use graphics that are meaningful and appropriate,” and “Choose graphics that complement the text.”
Tables
Often, text that is difficult to understand in paragraph form becomes clear in a table format. Tables help highlight relationships among similar pieces of information and are easily scanned for quick reference.
Text in tables
Follow these guidelines for the use of text in tables:
• Use grammatically parallel text for all cells in a column.
• Follow the normal rules of punctuation.
• Use sentence-style capitalization for these table elements:
• Cell contents
• Column headings
• Row labels
• Table captions
• Follow standard highlighting conventions inside a table.
• If you repeat a word or phrase in all cells in a column, consider rewording the column heading to include that word or phrase and eliminate the repetitiveness.
• If there is no information in a cell, leave the cell blank. Industry-standard screen readers are able to correctly interpret blank cells.
• If you use table notes, enclose them within the table. If your authoring tool does not support using footnotes within a table, use a note list and superscript numbers to achieve the required result. Use superscript numbers rather than letters to indicate table notes. However, if superscript is not available, include in the table an explicit phrase such as “See note 1.”
Example

Arrange the items in the first column of the table in a logical way, for example, largest to smallest or vice versa. If there is no better criterion for arranging them, put the items in alphabetical order. Although the use of captions and legends is optional, you can use a caption to describe the contents of the table. If necessary, use a legend to explain the organization of the table. When you do use captions or legends in your information, use them consistently for all of your tables. If the organization of the table requires more explanation than can fit in the caption or legend, explain it in the text. If the organization of the table is obvious, do not explain it.
Always introduce a table with a sentence immediately preceding it, and use a period or a colon to end the sentence. If you present the same type of information in two or more consecutive tables, you do not have to introduce each specific table, but you must introduce the group of tables.
Formatting tables
Follow these guidelines for formatting tables:
• Top-align and left-align the text in all table body cells. This helps clarify the row and column boundaries.
• Avoid putting too much information into a single table, and avoid creating a table that requires horizontal scrolling when it is viewed online. If possible, break large amounts of information into separate tables.
• Avoid scaling text in tables to smaller than 80%, or 8-point type.
• Use column widths that are proportional to the amount of information that the cells contain.
• Use a consistent format for all tables in the information unit. For example, if some tables do not have horizontal rules, do not use horizontal rules in any tables in the information unit.
Accessibility consideration: Consult other resources for more complete accessibility requirements for tables; however, consider the following accessibility requirements. Identify row and column headers for data tables. Do not use tabs or spaces to arrange tabular information. Instead, use data tables to display tabular data. Row and column headers enable screen readers to provide information about the relationship of data cells in a table to some visually impaired users. When a document format does not support the ability to define row and column headers, do not use data tables in the documentation. Some formats such as simple text-based documents do not support the ability to define row and column headers. Avoid tables in those types of documents.
Table headings
Follow these guidelines for table headings:
• Make sure that column headings are tagged in accordance with accessibility requirements. The specific tags that you must use depend on the tool that you use.
• Use sentence-style capitalization for column headings.
• Left-align the text in all column headings.
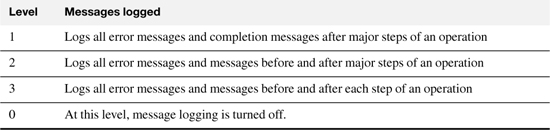
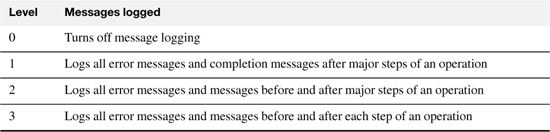
Table captions and legends
Include captions and legends if you must refer to your tables by table title and number or if your tables are not self-explanatory or are explained by the surrounding text. Otherwise, captions and legends are optional.
If you can describe a table briefly and clearly without using a verb form, use a caption (less than a complete sentence). Use sentence-style capitalization for a caption. If you have to include a verb form to avoid ambiguity, use a legend (a complete sentence).
Do not use a period (.) at the end of a caption unless it is followed by a legend.
Font recommendation: Captions are shown in italic type. Many formatters produce italic captions by default.
In the caption for a table, do not include the words table, chart, or any other word that is redundant with the label.
A legend consists of one or more complete sentences that explain the figure or table. Use a period at the end of a legend.
A combined caption and legend begins with a caption and continues with one or more sentences that explain the figure. Use sentence-style capitalization. Use a period after the caption and after each sentence in the legend.
If a table is long and prints on more than one page, repeat the caption on the successive page.
Each section of the table should contain some designation to indicate that it spans more than one page. The preferred method is to include “(Part x of y)” at the end of the caption. However, you might have to use another method, such as “(continued),” depending on the tool that you are using.
Table numbering
Number tables consecutively throughout your documentation, including tables in the appendixes. Your environment and tools might number tables differently. For example, if your authoring tool numbers your tables by starting with Table 1 in each separate web-based topic, consider not numbering your captions.
You can refer to a table as a table or as a figure. If your tables are captioned as Table, use separate numbering sequences for figures and tables and either include a separate list of tables in the front matter or do not list them at all.

If your tables are captioned as Figure, number the tables in the same sequence with the figures and, if you provide a list of figures in the front matter, include the tables in the same list.
If a table must be split into two or more parts, qualify the table number that precedes the caption or legend as shown in the following example.
The separate parts of such tables must have the same caption. (If different captions are necessary, the parts should be separate tables.) However, when combined captions and legends are used with a multiple-part table, the legend portions can be different.
Table references
In text, refer to a table as a table or as a figure, depending on how it is captioned. If a table is captioned Table, place the caption or legend above the table; if it is captioned Figure, place the caption or legend below the table. If a table has no caption, refer to it as either a table or a figure, whichever is more appropriate. If a publication has no illustrations other than tables and you are using captions, caption the tables as tables.
Use regular text instead of an inline link when a reference is near a table or figure.
In text references, when a reference is not near a table, use initial capital letters for Figure and Table. (Italics are used here for emphasis; do not use italics in text references.)
If a document has both figures and tables and they are labeled as such, include the page numbers or hypertext links in cross-references to them in the text. Do this only when it is not possible to use regular text to refer to the figure or table. This retrievability aid prevents the reader from turning to the page for Figure x when looking for Table x and vice versa. If your text formatter cannot provide the page numbers or hypertext links in cross-references to figures and tables, consider captioning them all as figures and numbering them in a single sequence.
Enclose a subheading for a table caption within parentheses and add it to the end of the descriptive wording.
It is not necessary to use a cross-reference to a table in text if the table is not referred to, or if it is referred to in such a way that the table can be identified without a number.
Table placement
Place a table as close as possible to the principal reference to it.
• If the reference and the table are in the same topic, implement one of these solutions:
• To refer to a table that is in close proximity to the reference, use a text reference. For example, write “To see a complete list of requirements, see the following table.”
• To refer to a table that is not in close proximity to the reference, create a link to the table. For example, write “To see a complete list of the requirements, see Process steps.”
• If the table is on a separate page or in a separate topic, use a link to the page or topic that contains the table.
For information about creating tables using DITA, see DITA Best Practices: A Roadmap for Writing, Editing, and Architecting in DITA, Chapter 4, “Creating tables.”
For more information about using tables, see Developing Quality Technical Information, Chapter 5, “Segment information into tables,” Chapter 10, “Maintain consistent placement of document elements, and “Ensure that all users can access the information.”
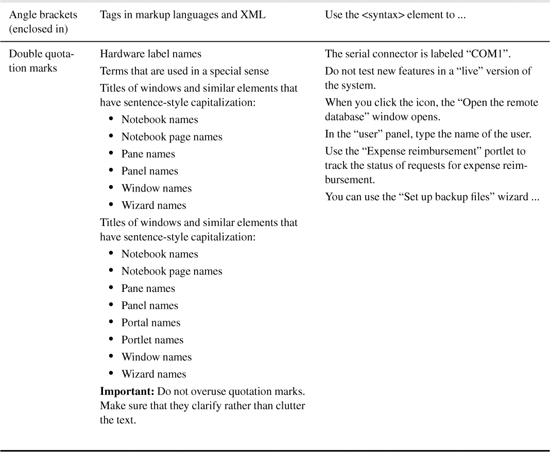
Highlighting
Use font styles, capitalization, and punctuation to distinguish elements and to show emphasis in text.
Important: For information that is written for the web, you can use bold instead of italic.
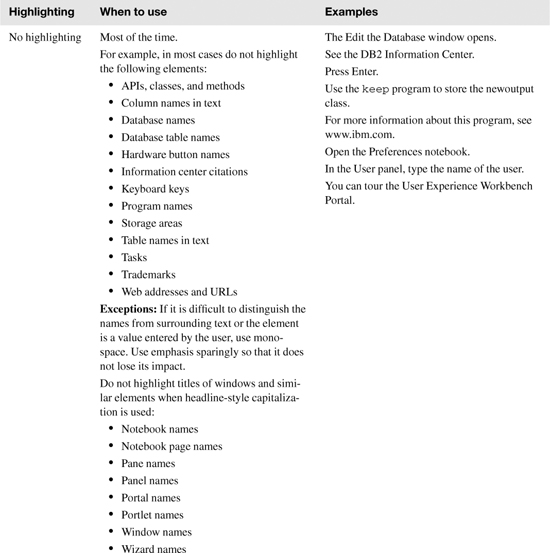
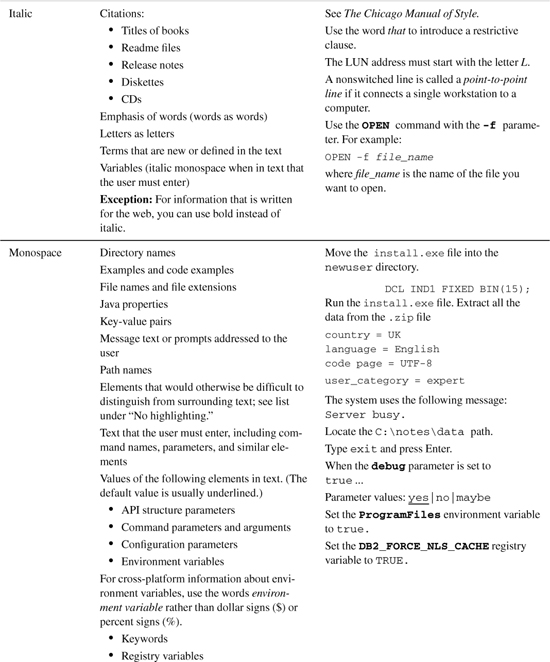
The following tables list the recommended highlighting and capitalization conventions. The first table is organized by element type, and the second table is organized by the type of highlighting to use. You might have to make judgment calls about situations such as matching the style of existing information or following product style conventions. Do not highlight any element that is not shown in these tables.
Table 1 Highlighting by element type
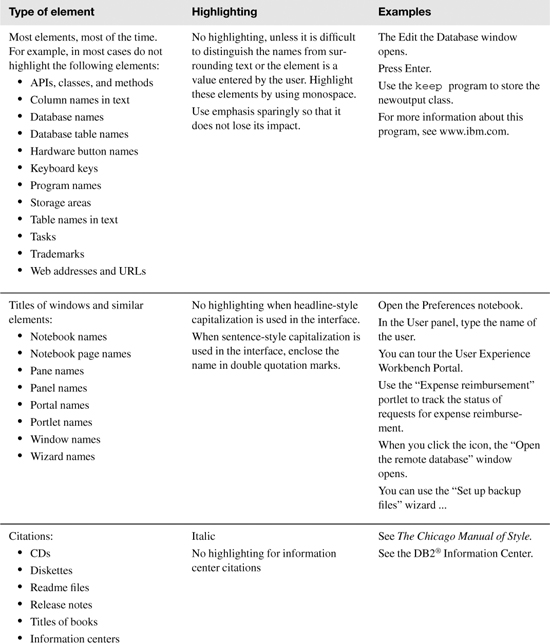
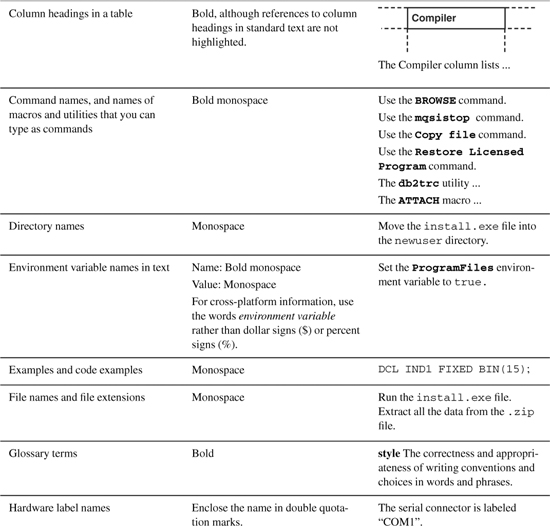


Table 2 Highlighting by font style and punctuation

For information about highlighting using DITA, see DITA Best Practices: A Roadmap for Writing, Editing, and Architecting in DITA, Chapter 3, “Highlighting new terms.”
For more information about using highlighting, see Developing Quality Technical Information, Chapter 7, “Provide practical and consistent highlighting.”
Notes and notices
Use notes and notices with discretion. If you overuse notes, they lose their significance. Use the correct type of notice to indicate the possibility of damage or injury.
Notes
To call attention to important hints, tips, guidance, restrictions, or advice that might be overlooked, use a meaningful label that describes the nature of the material. Consider labels such as Exception, Fast path, Important, Remember, Requirement, Restriction, and Tip. Avoid using Recommendation; see recommend in “Word usage” on page 357. The label, and the colon that follows the label, must be bold.
Do not interrupt a paragraph with a note. A note must not be inline; it must stand alone. Do not indent note text, and do not use notes where they distort the appearance of the surrounding text.
If two or more notes are together, use a plural label on a separate line and arrange the notes in the appropriate type of list.
If a note consists of more than one paragraph, consider reorganizing the information to make the note a subsection with a heading, rather than a note with a label. When a note is longer than one paragraph, differentiating the note text from the standard text is difficult.
Attention, CAUTION, and DANGER notices
Use special headings for notices that alert customers to the possibility of damage to hardware, software, or data or to physical risk or danger.
Attention notices
Use an Attention notice to indicate the possibility of damage to a program, device, system, or data. Begin an Attention notice with the label Attention in bold, followed by a colon and the text of the notice on the same line. The Attention notice must be a separate paragraph, with space above and below the notice. In a procedure, place the Attention notice before the step in which the risk exists.
Do not use the word warning in an Attention notice, either as the label or within the notice text. In some countries, the word warning is restricted to safety notices, which pertain to possible physical harm to people. In IBM publications, safety notices are either CAUTION or DANGER notices.
CAUTION notices
Use a CAUTION notice to call attention to a situation that is potentially hazardous to people because of some existing condition or a potentially dangerous situation that might develop because of some unsafe practice. For example, you might need a CAUTION notice to notify readers to use special care when they lift a piece of heavy equipment.
Consult the Safety department of your company before you use a CAUTION notice.
Set the CAUTION label in bold in all uppercase letters on a line by itself followed by a colon. If your authoring tool does not display the text of the notice in bold, create the text in bold manually. Always treat a CAUTION notice as a paragraph, with space above and below the notice. In a procedure, place the CAUTION notice before the step in which the risk exists.
DANGER notices
Use a DANGER notice to call attention to a situation that is potentially lethal or extremely hazardous to people. For example, after a computer side panel is removed, exposed high-voltage wires might be lethal.
Use the DANGER notice with discretion. Limit its use to situations where irreparable injury or loss of life might occur unless extreme care is used. Consult the Safety department of your company before you use a DANGER notice.
Set the DANGER label in bold and in all uppercase letters on a line by itself. Always enclose a DANGER notice in a box. If your authoring tool does not display the text of the notice in bold, create the text in bold manually. In a procedure, place the DANGER notice before the step in which the risk exists.
For information about creating notes using DITA, see DITA Best Practices: A Roadmap for Writing, Editing, and Architecting in DITA, Chapter 12, “Problem: Specifying the wrong note type or overusing the <note> element.”
For information about using notes appropriately, see Developing Quality Technical Information, Chapter 8, “Emphasize main points; subordinate secondary points,” and Chapter 9, “Provide helpful entry points.”
Revision indicators
Revision indicators inform reviewers, translation centers, and customers of new and changed information. If you use revision indicators, use them consistently throughout your information.
Use revision indicators only for content changes. Do not use them for editorial changes or in legal notices. If you use revision indicators, describe their use in the summary of changes or preface of a book, a “What’s new for this release” topic, or a topic about online help conventions.
Use a convention that readers understand and that conforms to accessibility standards:
Books
Changed and new information is indicated by a vertical bar (|) to the left of the change.
Online information
Changed and new information is indicated at the beginning and end of the new or changed information. The revision indicator characters might be inserted by your authoring tool, but are typically double angle brackets (<< and >>).
You can use different revision indicators to differentiate between different sets of online-only updates. For example, you might use a plus sign (+) revision indicator to show the latest changes, with all earlier changes indicated by a vertical bar. You can retain these different revision indicators until the next edition. Never use more than three sets of revision indicators; a proliferation of different revision indicators can confuse the reader.
For a new version of a product, remove all revision indicators. When you update the publication, remove all revision indicators from a previous release. If you think that it is helpful to the reader to include revision indicators for a release update, you can leave them in, provided that you do this in all documentation for the product.
Translation consideration: Placing revision tags within a sentence can increase the number of new and changed words that are flagged for translation in a subsequent release. When revision tags within a sentence are removed for a subsequent release, the translation tool might flag the sentence as being changed because the new version, without the tags, does not match the earlier version, with the tags. This problem does not occur when the revision tags are placed outside the sentence. Place revision tags at the sentence level or at a higher structural level to lessen the possibility of unnecessary translation work in a subsequent release.