Chapter 10 Streams
Time and time again in this book we have seen how the massively data-parallel execution engine on a GPU can provide stunning performance gains over comparable CPU code. However, there is yet another class of parallelism to be exploited on NVIDIA graphics processors. This parallelism is similar to the task parallelism that is found in multithreaded CPU applications. Rather than simultaneously computing the same function on lots of data elements as one does with data parallelism, task parallelism involves doing two or more completely different tasks in parallel.
In the context of parallelism, a task could be any number of things. For example, an application could be executing two tasks: redrawing its GUI with one thread while downloading an update over the network with another thread. These tasks proceed in parallel, despite having nothing in common. Although the task parallelism on GPUs is not currently as flexible as a general-purpose processor’s, it still provides opportunities for us as programmers to extract even more speed from our GPU-based implementations. In this chapter, we will look at CUDA streams and the ways in which their careful use will enable us to execute certain operations simultaneously on the GPU.
10.1 Chapter Objectives
Through the course of this chapter, you will accomplish the following:
• You will learn about allocating page-locked host memory.
• You will learn what CUDA streams are.
• You will learn how to use CUDA streams to accelerate your applications.
10.2 Page-Locked Host Memory
In every example over the course of nine chapters, you have seen us allocate memory on the GPU with cudaMalloc(). On the host, we have always allocated memory with the vanilla, C library routine malloc(). However, the CUDA runtime offers its own mechanism for allocating host memory: cudaHostAlloc(). Why would you bother using this function when malloc() has served you quite well since day one of your life as a C programmer?
In fact, there is a significant difference between the memory that malloc() will allocate and the memory that cudaHostAlloc() allocates. The C library function malloc() allocates standard, pageable host memory, while cudaHostAlloc() allocates a buffer of page-locked host memory. Sometimes called pinned memory, page-locked buffers have an important property: The operating system guarantees us that it will never page this memory out to disk, which ensures its residency in physical memory. The corollary to this is that it becomes safe for the OS to allow an application access to the physical address of the memory, since the buffer will not be evicted or relocated.
Knowing the physical address of a buffer, the GPU can then use direct memory access (DMA) to copy data to or from the host. Since DMA copies proceed without intervention from the CPU, it also means that the CPU could be simultaneously paging these buffers out to disk or relocating their physical address by updating the operating system’s pagetables. The possibility of the CPU moving pageable data means that using pinned memory for a DMA copy is essential. In fact, even when you attempt to perform a memory copy with pageable memory, the CUDA driver still uses DMA to transfer the buffer to the GPU. Therefore, your copy happens twice, first from a pageable system buffer to a page-locked “staging” buffer and then from the page-locked system buffer to the GPU.
As a result, whenever you perform memory copies from pageable memory, you guarantee that the copy speed will be bounded by the lower of the PCIE transfer speed and the system front-side bus speeds. A large disparity in bandwidth between these buses in some systems ensures that page-locked host memory enjoys roughly a twofold performance advantage over standard pageable memory when used for copying data between the GPU and the host. But even in a world where PCI Express and front-side bus speeds were identical, pageable buffers would still incur the overhead of an additional CPU-managed copy.
However, you should resist the temptation to simply do a search-and-replace on malloc to convert every one of your calls to use cudaHostAlloc(). Using pinned memory is a double-edged sword. By doing so, you have effectively opted out of all the nice features of virtual memory. Specifically, the computer running the application needs to have available physical memory for every page-locked buffer, since these buffers can never be swapped out to disk. This means that your system will run out of memory much faster than it would if you stuck to standard malloc() calls. Not only does this mean that your application might start to fail on machines with smaller amounts of physical memory, but it means that your application can affect the performance of other applications running on the system.
These warnings are not meant to scare you out of using cudaHostAlloc(), but you should remain aware of the implications of page-locking buffers. We suggest trying to restrict their use to memory that will be used as a source or destination in calls to cudaMemcpy() and freeing them when they are no longer needed rather than waiting until application shutdown to release the memory. The use of cudaHostAlloc() should be no more difficult than anything else you’ve studied so far, but let’s take a look at an example that will both illustrate how pinned memory is allocated and demonstrate its performance advantage over standard pageable memory.
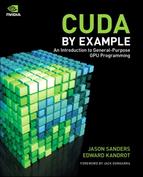
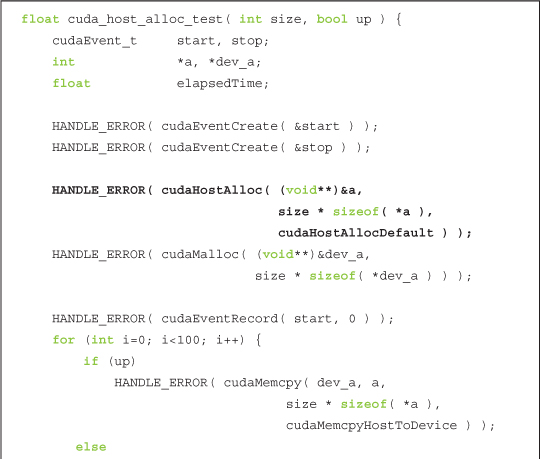
Our application will be very simple and serves primarily to benchmark cudaMemcpy() performance with both pageable and page-locked memory. All we endeavor to do is allocate a GPU buffer and a host buffer of matching sizes and then execute some number of copies between these two buffers. We’ll allow the user of this benchmark to specify the direction of the copy, either “up” (from host to device) or “down” (from device to host). You will also notice that, in order to obtain accurate timings, we set up CUDA events for the start and stop of the sequence of copies. You probably remember how to do this from previous performance-testing examples, but in case you’ve forgotten, the following will jog your memory:
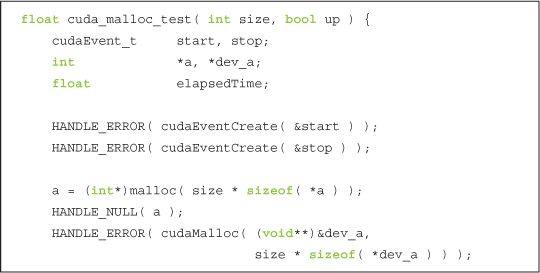
Independent of the direction of the copies, we start by allocating a host and GPU buffer of size integers. After this, we do 100 copies in the direction specified by the argument up, stopping the timer after we’ve finished copying.
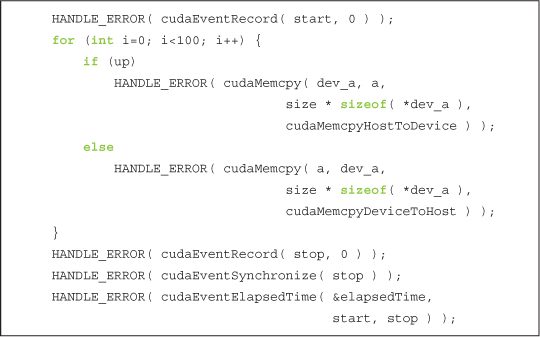
After the 100 copies, clean up by freeing the host and GPU buffers as well as destroying our timing events.
If you didn’t notice, the function cuda_malloc_test() allocated pageable host memory with the standard C malloc() routine. The pinned memory version uses cudaHostAlloc() to allocate a page-locked buffer.
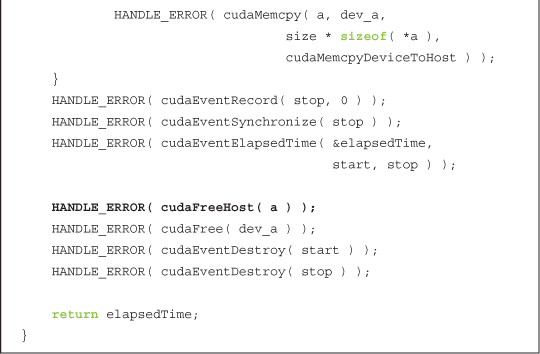
As you can see, the buffer allocated by cudaHostAlloc() is used in the same way as a buffer allocated by malloc(). The other change from using malloc() lies in the last argument, the value cudaHostAllocDefault. This last argument stores a collection of flags that we can use to modify the behavior of cudaHostAlloc() in order to allocate other varieties of pinned host memory. In the next chapter, we’ll see how to use the other possible values of these flags, but for now we’re content to use the default, page-locked memory so we pass cudaHostAllocDefault in order to get the default behavior. To free a buffer that was allocated with cudaHostAlloc(), we have to use cudaFreeHost(). That is, every malloc() needs a free(), and every cudaHostAlloc() needs a cudaFreeHost().
The body of main() proceeds not unlike what you would expect.
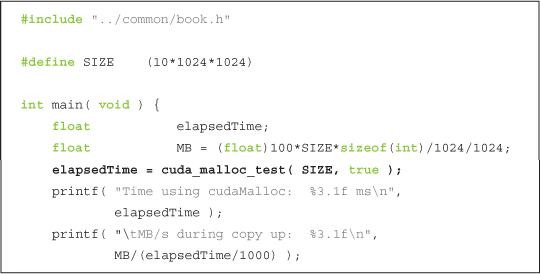
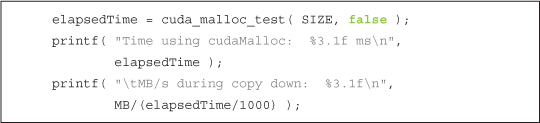
Because the up argument to cuda_malloc_test() is true, the previous call tests the performance of copies from host to device, or “up” to the device. To benchmark the calls in the opposite direction, we execute the same calls but with false as the second argument.
We perform the same set of steps to test the performance of cudaHostAlloc(). We call cuda_ host_alloc_test() twice, once with up as true and once with it false.

On a GeForce GTX 285, we observed copies from host to device improving from 2.77GB/s to 5.11GB/s when we use pinned memory instead of pageable memory. Copies from the device down to the host improve similarly, from 2.43GB/s to 5.46GB/s. So, for most PCIE bandwidth-limited applications, you will notice a marked improvement when using pinned memory versus standard pageable memory. But page-locked memory is not solely for performance enhancements. As we’ll see in the next sections, there are situations where we are required to use page-locked memory.
10.3 CUDA Streams
In Chapter 6, we introduced the concept of CUDA events. In doing so, we postponed an in-depth discussion of the second argument to cudaEventRecord(), instead mentioning only that it specified the stream into which we were inserting the event.

CUDA streams can play an important role in accelerating your applications. A CUDA stream represents a queue of GPU operations that get executed in a specific order. We can add operations such as kernel launches, memory copies, and event starts and stops into a stream. The order in which operations are added to the stream specifies the order in which they will be executed. You can think of each stream as a task on the GPU, and there are opportunities for these tasks to execute in parallel. We’ll first see how streams are used, and then we’ll look at how you can use streams to accelerate your applications.
10.4 Using a Single CUDA Stream
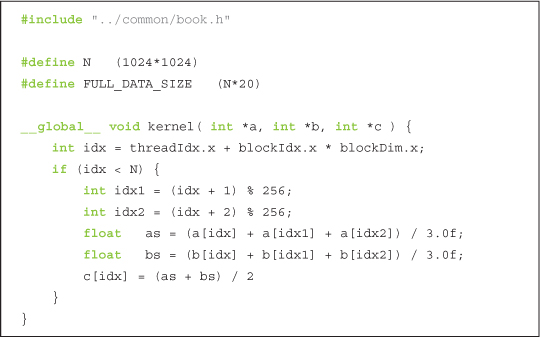
As we’ll see later, the real power of streams becomes apparent only when we use more than one of them, but we’ll begin to illustrate the mechanics of their use within an application that employs just a single stream. Imagine that we have a CUDA C kernel that will take two input buffers of data, a and b. The kernel will compute some result based on a combination of values in these buffers to produce an output buffer c. Our vector addition example did something along these lines, but in this example we’ll compute an average of three values in a and three values in b:
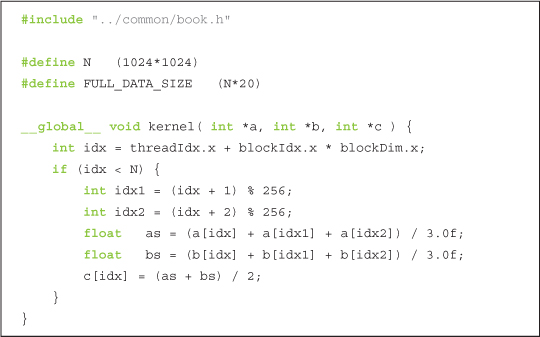
This kernel is not incredibly important, so don’t get too hung up on it if you aren’t sure exactly what it’s supposed to be computing. It’s something of a placeholder since the important, stream-related component of this example resides in main().
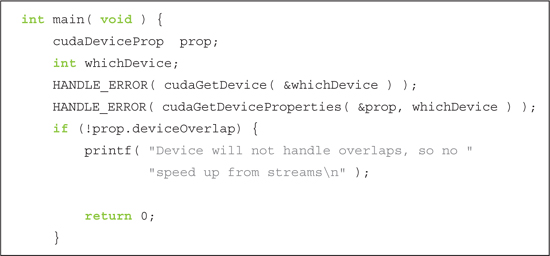
The first thing we do is choose a device and check to see whether it supports a feature known as device overlap. A GPU supporting device overlap possesses the capacity to simultaneously execute a CUDA C kernel while performing a copy between device and host memory. As we’ve promised before, we’ll use multiple streams to achieve this overlap of computation and data transfer, but first we’ll see how to create and use a single stream. As with all of our examples that aim to measure performance improvements (or regressions), we begin by creating and starting an event timer:
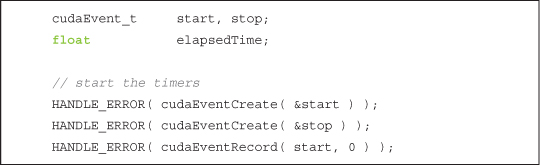
After starting our timer, we create the stream we want to use for this application:

Yeah, that’s pretty much all it takes to create a stream. It’s not really worth dwelling on, so let’s press on to the data allocation.
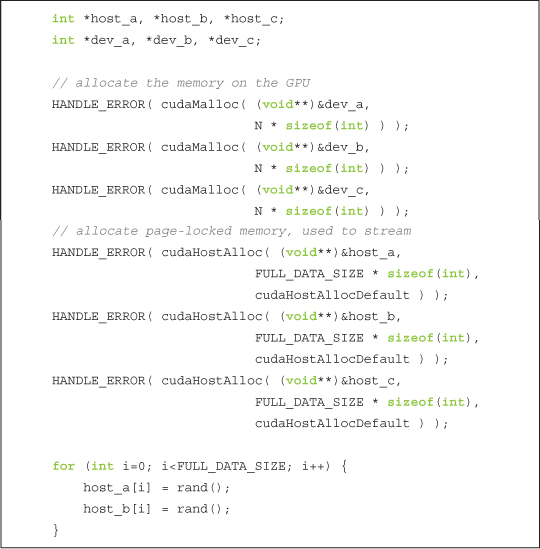
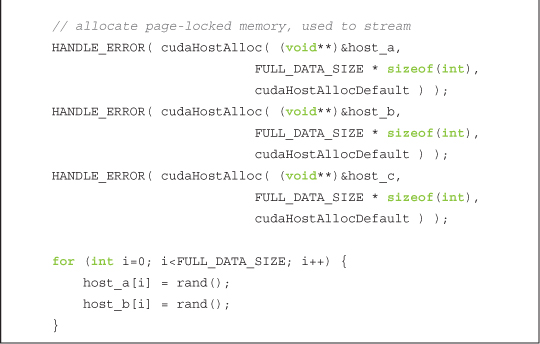
We have allocated our input and output buffers on both the GPU and the host. Notice that we’ve decided to use pinned memory on the host by using cudaHostAlloc() to perform the allocations. There is a very good reason for using pinned memory, and it’s not strictly because it makes copies faster. We’ll see in detail momentarily, but we will be using a new kind of cudaMemcpy() function, and this new function requires that the host memory be page-locked. After allocating the input buffers, we fill the host allocations with random integers using the C library call rand().
With our stream and our timing events created and our device and host buffers allocated, we’re ready to perform some computations! Typically we blast through this stage by copying the two input buffers to the GPU, launching our kernel, and copying the output buffer back to the host. We will follow this pattern again, but this time with some small changes.
First, we will opt not to copy the input buffers in their entirety to the GPU. Rather, we will split our inputs into smaller chunks and perform the three-step process on each chunk. That is, we will take some fraction of the input buffers, copy them to the GPU, execute our kernel on that fraction of the buffers, and copy the resulting fraction of the output buffer back to the host. Imagine that we need to do this because our GPU has much less memory than our host does, so the computation needs to be staged in chunks because the entire buffer can’t fit on the GPU at once. The code to perform this “chunkified” sequence of computations will look like this:
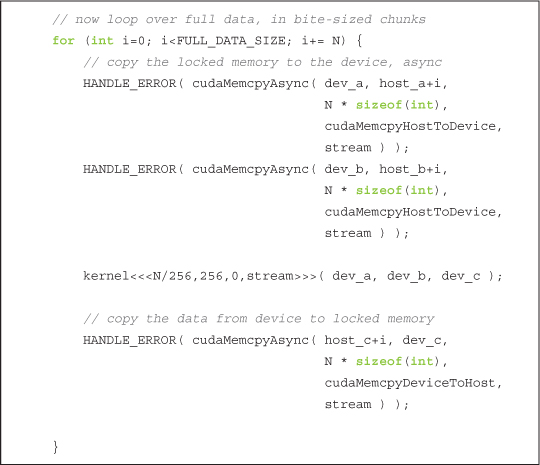
But you will notice two other unexpected shifts from the norm in the preceding excerpt. First, instead of using the familiar cudaMemcpy(), we’re copying the data to and from the GPU with a new routine, cudaMemcpyAsync(). The difference between these functions is subtle yet significant. The original cudaMemcpy() behaves like the C library function memcpy(). Specifically, this function executes synchronously, meaning that when the function returns, the copy has completed, and the output buffer now contains the contents that were supposed to be copied into it.
The opposite of a synchronous function is an asynchronous function, which inspired the name cudaMemcpyAsync(). The call to cudaMemcpyAsync() simply places a request to perform a memory copy into the stream specified by the argument stream. When the call returns, there is no guarantee that the copy has even started yet, much less that it has finished. The guarantee that we have is that the copy will definitely be performed before the next operation placed into the same stream. It is required that any host memory pointers passed to cudaMemcpyAsync() have been allocated by cudaHostAlloc(). That is, you are only allowed to schedule asynchronous copies to or from page-locked memory.
Notice that the angle-bracketed kernel launch also takes an optional stream argument. This kernel launch is asynchronous, just like the preceding two memory copies to the GPU and the trailing memory copy back from the GPU. Technically, we can end an iteration of this loop without having actually started any of the memory copies or kernel execution. As we mentioned, all that we are guaranteed is that the first copy placed into the stream will execute before the second copy. Moreover, the second copy will complete before the kernel starts, and the kernel will complete before the third copy starts. So as we’ve mentioned earlier in this chapter, a stream acts just like an ordered queue of work for the GPU to perform.
When the for() loop has terminated, there could still be quite a bit of work queued up for the GPU to finish. If we would like to guarantee that the GPU is done with its computations and memory copies, we need to synchronize it with the host. That is, we basically want to tell the host to sit around and wait for the GPU to finish before proceeding. We accomplish that by calling cudaStreamSynchronize() and specifying the stream that we want to wait for:

Since the computations and copies have completed after synchronizing stream with the host, we can stop our timer, collect our performance data, and free our input and output buffers.

Finally, before exiting the application, we destroy the stream that we were using to queue the GPU operations.

To be honest, this example has done very little to demonstrate the power of streams. Of course, even using a single stream can help speed up an application if we have work we want to complete on the host while the GPU is busy churning through the work we’ve stuffed into a stream. But assuming that we don’t have much to do on the host, we can still speed up applications by using streams, and in the next section we’ll take a look at how this can be accomplished.
10.5 Using Multiple CUDA Streams
Let’s adapt the single-stream example from Section 10.4: Using a Single CUDA Stream to perform its work in two different streams. At the beginning of the previous example, we checked that the device indeed supported overlap and broke the computation into chunks. The idea underlying the improved version of this application is simple and relies on two things: the “chunked” computation and the overlap of memory copies with kernel execution. We endeavor to get stream 1 to copy its input buffers to the GPU while stream 0 is executing its kernel. Then stream 1 will execute its kernel while stream 0 copies its results to the host. Stream 1 will then copy its results to the host while stream 0 begins executing its kernel on the next chunk of data. Assuming that our memory copies and kernel executions take roughly the same amount of time, our application’s execution timeline might look something like Figure 10.1. The figure assumes that the GPU can perform a memory copy and a kernel execution at the same time, so empty boxes represent time when one stream is waiting to execute an operation that it cannot overlap with the other stream’s operation. Note also that calls to cudaMemcpyAsync() are abbreviated in the remaining figures in this chapter, represented simply as “memcpy.”
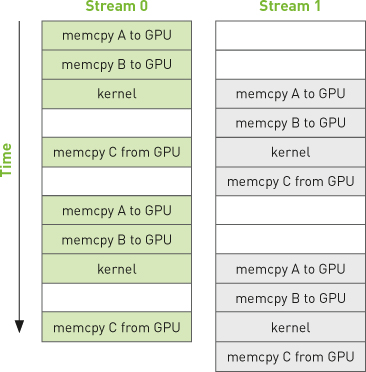
Figure 10.1 Timeline of intended application execution using two independent streams
In fact, the execution timeline can be even more favorable than this; some newer NVIDIA GPUs support simultaneous kernel execution and two memory copies, one to the device and one from the device. But on any device that supports the overlap of memory copies and kernel execution, the overall application should accelerate when we use multiple streams.
Despite these grand plans to accelerate our application, the computation kernel will remain unchanged.
As with the single stream version, we will check that the device supports overlapping computation with memory copy. If the device does support overlap, we proceed as we did before by creating CUDA events to time the application.

Next, we create our two streams exactly as we created the single stream in the previous section’s version of the code.

We will assume that we still have two input buffers and a single output buffer on the host. The input buffers are filled with random data exactly as they were in the single-stream version of this application. However, now that we intend to use two streams to process the data, we allocate two identical sets of GPU buffers so that each stream can independently work on chunks of the input.

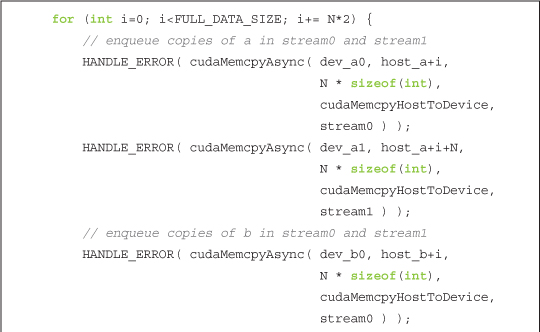
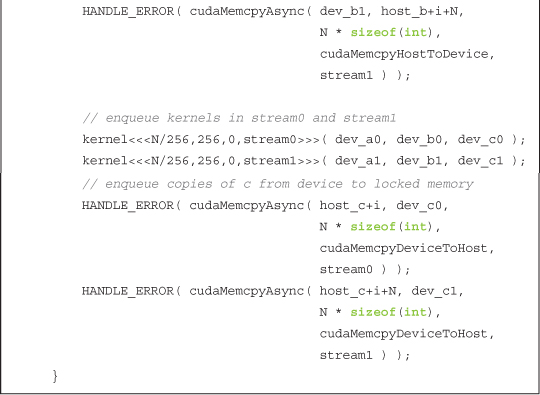
We then loop over the chunks of input exactly as we did in the first attempt at this application. But now that we’re using two streams, we process twice as much data in each iteration of the for() loop. In stream0, we queue asynchronous copies of a and b to the GPU, queue a kernel execution, and then queue a copy back to c:
After queuing these operations in stream0, we queue identical operations on the next chunk of data, but this time in stream1.
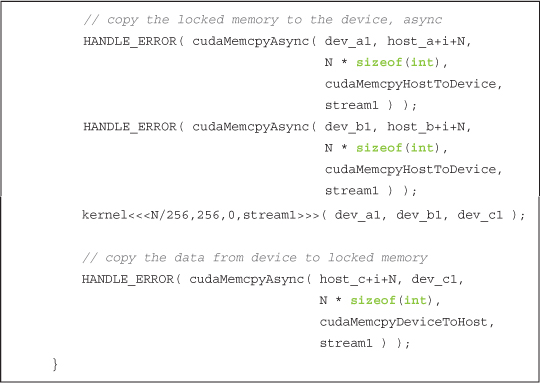
And so our for() loop proceeds, alternating the streams to which it queues each chunk of data until it has queued every piece of input data for processing. After terminating the for() loop, we synchronize the GPU with the CPU before we stop our application timers. Since we are working in two streams, we need to synchronize both.

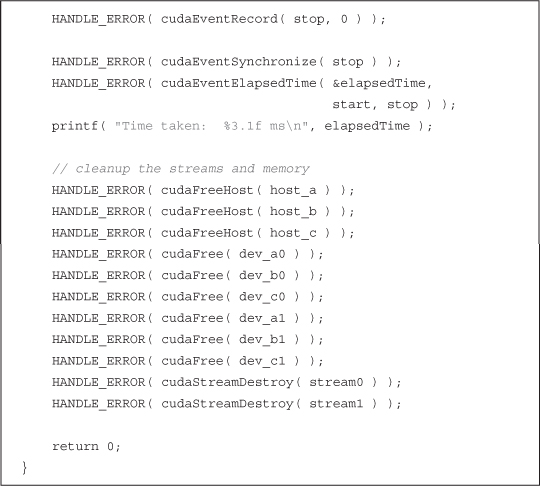
We wrap up main() the same way we concluded our single-stream implementation. We stop our timers, display the elapsed time, and clean up after ourselves. Of course, we remember that we now need to destroy two streams and free twice as many GPU buffers, but aside from that, this code is identical to what we’ve seen already:
We benchmarked both the original, single-stream implementation from Section 10.4: Using a Single CUDA Stream and the improved double-stream version on a GeForce GTX 285. The original version takes 62ms to run to completion. After modifying it to use two streams, it takes 61ms.
Uh-oh.
Well, the good news is that this is the reason we bother to time our applications. Sometimes, our most well-intended performance “enhancements” do nothing more than introduce unnecessary complications to the code.
But why didn’t this application get any faster? We even said that it would get faster! Don’t lose hope yet, though, because we actually can accelerate the single-stream version with a second stream, but we need to understand a bit more about how streams are handled by the CUDA driver in order to reap the rewards of device overlap. To understand how streams work behind the scenes, we’ll need to look at both the CUDA driver and how the CUDA hardware architecture works.
10.6 GPU Work Scheduling
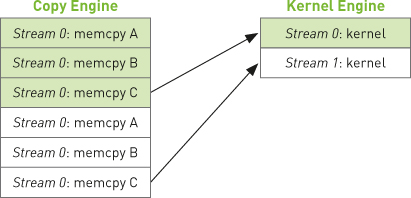
Although streams are logically independent queues of operations to be executed on the GPU, it turns out that this abstraction does not exactly match the GPU’s queuing mechanism. As programmers, we think about our streams as ordered sequences of operations composed of a mixture of memory copies and kernel invocations. However, the hardware has no notion of streams. Rather, it has one or more engines to perform memory copies and an engine to execute kernels. These engines queue commands independently from each other, resulting in a task-scheduling scenario like the one shown in Figure 10.2. The arrows in the figure illustrate how operations that have been queued into streams get scheduled on the hardware engines that actually execute them.
So, the user and the hardware have somewhat orthogonal notions of how to queue GPU work, and the burden of keeping both the user and hardware sides of this equation happy falls on the CUDA driver. First and foremost, there are important dependencies specified by the order in which operations are added to streams. For example, in Figure 10.2, stream 0’s memory copy of A needs to be completed before its memory copy of B, which in turn needs to be completed before kernel A is launched. But once these operations are placed into the hardware’s copy engine and kernel engine queues, these dependencies are lost, so the CUDA driver needs to keep everyone happy by ensuring that the intrastream dependencies remain satisfied by the hardware’s execution units.
Figure 10.2 Mapping of CUDA streams onto GPU engines

What does this mean to us? Well, let’s look at what’s actually happening with our example in Section 10.5: Using Multiple CUDA Streams. If we review the code, we see that our application basically amounts to a cudaMemcpyAsync() of a, cudaMemcpyAsync() of b, our kernel execution, and then a cudaMemcpyAsync() of c back to the host. The application enqueues all the operations from stream 0 followed by all the operations from stream 1. The CUDA driver schedules these operations on the hardware for us in the order they were specified, keeping the interengine dependencies straight. These dependencies are illustrated in Figure 10.3 where an arrow from a copy to a kernel indicates that the copy depends on the kernel completing execution before it can begin.
Figure 10.3 Arrows depicting the dependency of cudaMemcpyAsync() calls on kernel executions in the example from Section 10.5: Using Multiple CUDA Streams
Given our newfound understanding of how the GPU schedules work, we can look at a timeline of how these get executed on the hardware in Figure 10.4.
Figure 10.4 Execution timeline of the example from Section 10.5: Using Multiple CUDA Streams
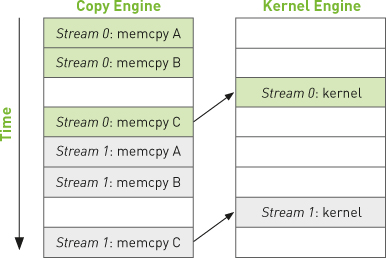
Because stream 0’s copy of c back to the host depends on its kernel execution completing, stream 1’s completely independent copies of a and b to the GPU get blocked because the GPU’s engines execute work in the order it’s provided. This inefficiency explains why the two-stream version of our application showed absolutely no speedup. The lack of improvement is a direct result of our assumption that the hardware works in the same manner as the CUDA stream programming model implies.
The moral of this story is that we as programmers need to help out when it comes to ensuring that independent streams actually get executed in parallel. Keeping in mind that the hardware has independent engines that handle memory copies and kernel executions, we need to remain aware that the order in which we enqueue these operations in our streams will affect the way in which the CUDA driver schedules these for execution. In the next section, we’ll see how to help the hardware achieve overlap of memory copies and kernel execution.
10.7 Using Multiple CUDA Streams Effectively
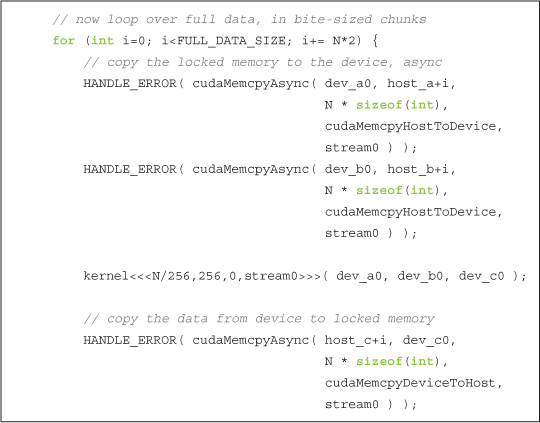
As we saw in the previous section, if we schedule all of a particular stream’s operations at once, it’s very easy to inadvertently block the copies or kernel executions of another stream. To alleviate this problem, it suffices to enqueue our operations breadth-first across streams rather than depth-first. That is, rather than add the copy of a, copy of b, kernel execution, and copy of c to stream 0 before starting to schedule on stream 1, we bounce back and forth between the streams assigning work. We add the copy of a to stream 0, and then we add the copy of a to stream 1. Then we add the copy of b to stream 0, and then we add the copy of b to stream 1. We enqueue the kernel invocation in stream 0, and then we enqueue one in stream 1. Finally, we enqueue the copy of c back to the host in stream 0 followed by the copy of c in stream 1.
To make this more concrete, let’s take a look at the code. All we’ve changed is the order in which operations get assigned to each of our two streams, so this will be strictly a copy-and-paste optimization. Everything else in the application will remain unchanged, which means that our improvements are localized to the for() loop. The new, breadth-first assignment to the two streams looks like this:
If we assume that our memory copies and kernel executions are roughly comparable in execution time, our new execution timeline will look like Figure 10.5. The interengine dependencies are highlighted with arrows simply to illustrate that they are still satisfied with this new scheduling order.
Figure 10.5 Execution timeline of the improved example with arrows indicating interengine dependencies
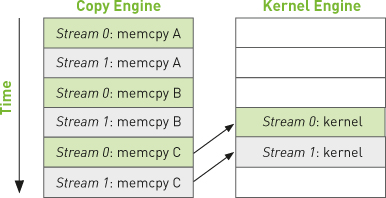
Because we have queued our operations breadth-first across streams, we no longer have stream 0’s copy of c blocking stream 1’s initial memory copies of a and b. This allows the GPU to execute copies and kernels in parallel, allowing our application to run significantly faster. The new code runs in 48ms, a 21 percent improvement over our original, naïve double-stream implementation. For applications that can overlap nearly all computation and memory copies, you can approach a nearly twofold improvement in performance because the copy and kernel engines will be cranking the entire time.
10.8 Chapter Review
In this chapter, we looked at a method for achieving a kind of task-level parallelism in CUDA C applications. By using two (or more) CUDA streams, we can allow the GPU to simultaneously execute a kernel while performing a copy between the host and GPU. We need to be careful about two things when we endeavor to do this, though. First, the host memory involved needs to be allocated using cudaHostAlloc() since we will queue our memory copies with cudaMemcpyAsync(), and asynchronous copies need to be performed with pinned buffers. Second, we need to be aware that the order in which we add operations to our streams will affect our capacity to achieve overlapping of copies and kernel executions. The general guideline involves a breadth-first, or round-robin, assignment of work to the streams you intend to use. This can be counterintuitive if you don’t understand how the hardware queuing works, so it’s a good thing to remember when you go about writing your own applications.