
15. Using Android Telephony APIs
![]()
Although the Android platform has been designed to run on almost any type of device, many of the Android devices currently available on the market are smartphones. Applications can take advantage of this fact by integrating phone or telephony features into their feature set. This chapter introduces you to the telephony-related APIs available in the Android SDK.
Working with Telephony Utilities
The Android SDK provides a number of useful utilities for applications to integrate phone features available on the device. Although devices run applications, phone operations generally take precedence on smartphones. Your application should not interrupt a phone conversation, for example. To avoid this kind of behavior, your application should know something about what the user is doing, so that it can react differently. For instance, an application might query the state of the phone and determine that the user is talking on the phone, and then choose to vibrate instead of play an alarm.

There are many different types of Android devices now available to consumers. If your application uses telephony features, make sure you set the <uses-feature> tag with the android.hardware.telephony feature (or one of its sub-features) in your application’s manifest file to ensure your application is installed only on compatible devices. See the Android SDK documentation for more details.
In other cases, applications might need to place a call or send a text message. Phones typically support a Short Message Service (SMS), which is popular for texting (text messaging). Enabling the capability to leverage this feature from an application can enhance the appeal of the application and add features that can’t be easily replicated on a desktop environment. Because many Android devices are phones, applications frequently deal with phone numbers and the contacts database; some might want to access the phone dialer to place calls or check phone status information. Adding telephony features to an application enables a more integrated user experience and enhances the overall value of the application to the users.
Many of the code examples provided in this chapter are taken from the SimpleTelephony application. The source code for this application is provided for download on the book’s websites.
Gaining Permission to Access Phone State Information
Let’s begin by looking at how to determine the telephony state of the device, including the capability to request the hook state of the phone, information of the phone service, and utilities for handling and verifying phone numbers. The TelephonyManager object in the android.telephony package is a great place to start.
Many of the method calls in this section require explicit permission set with the Android application manifest file. The READ_PHONE_STATE permission is required to retrieve information such as the call state, handset phone number, and device identifiers or serial numbers. The ACCESS_COARSE_LOCATION permission is required for cellular location information. Recall that we cover location-based services in detail in Chapter 13, “Using Location-Based Services APIs.”
The following block of XML is typically needed in your application’s AndroidManifest.xml file to access basic phone state information:
<uses-permission
android:name="android.permission.READ_PHONE_STATE" />
Requesting Call State
You can use the TelephonyManager object to retrieve the state of the phone and some information about the phone service itself, such as the phone number of the handset.
You can request an instance of TelephonyManager using the getSystemService() method, like this:
TelephonyManager telManager = (TelephonyManager)
getSystemService(Context.TELEPHONY_SERVICE);
With a valid TelephonyManager instance, an application can now make several queries. One important method is getCallState(). This method can determine the voice call status of the handset. The following block of code shows how to query for the call state and all the possible return values:
int callStatus = telManager.getCallState();
String callState = null;
switch (callStatus) {
case TelephonyManager.CALL_STATE_IDLE:
callState = "Phone is idle.";
break;
case TelephonyManager.CALL_STATE_OFFHOOK:
callState = "Phone is in use.";
break;
case TelephonyManager.CALL_STATE_RINGING:
callState = "Phone is ringing!";
break;
}
Log.i("telephony", callState);
The three call states can be simulated with the emulator through the Dalvik Debug Monitor Service (DDMS) tool. Querying for the call state can be useful in certain circumstances. However, listening for changes in the call state can enable an application to react appropriately to something the user might be doing. For instance, a game might automatically pause and save state information when the phone rings so that the user can safely answer the call. An application can register to listen for changes in the call state by making a call to the listen() method of TelephonyManager.
telManager.listen(new PhoneStateListener() {
public void onCallStateChanged(
int state, String incomingNumber) {
String newState = getCallStateString(state);
if (state == TelephonyManager.CALL_STATE_RINGING) {
Log.i("telephony", newState +
" number = " + incomingNumber);
} else {
Log.i("telephony", newState);
}
}
}, PhoneStateListener.LISTEN_CALL_STATE);
The listener is called, in this case, whenever the phone starts ringing, the user makes a call, the user answers a call, or a call is disconnected. The listener is also called right after it is assigned so an application can get the initial state.
Another useful piece of information is determining the state of the telephony service. This information can tell an application if the phone has coverage at all, if it can make emergency calls only, or if the radio for phone calls is turned off as it might be when in airplane mode. To do this, an application can add the PhoneStateListener.LISTEN_SERVICE_STATE flag to the listener described earlier and implement the onServiceStateChanged method, which receives an instance of the ServiceState object. Alternatively, an application can check the state by constructing a ServiceState object and querying it directly, as shown here:
int serviceStatus = serviceState.getState();
String serviceStateString = null;
switch (serviceStatus) {
case ServiceState.STATE_EMERGENCY_ONLY:
serviceStateString = "Emergency calls only";
break;
case ServiceState.STATE_IN_SERVICE:
serviceStateString = "Normal service";
break;
case ServiceState.STATE_OUT_OF_SERVICE:
serviceStateString = "No service available";
break;
case ServiceState.STATE_POWER_OFF:
serviceStateString = "Telephony radio is off";
break;
}
Log.i("telephony", serviceStateString);
A status such as whether the handset is roaming can be determined by a call to the getRoaming() method. A friendly and frugal application can use this method to warn the user before performing any costly roaming operations such as data transfers within the application.
Requesting Service Information
In addition to call and service state information, your application can retrieve other information about the device. This information is less useful for the typical application but can diagnose problems or provide specialized services available only from certain provider networks. The following code retrieves several pieces of service information:
String opName = telManager.getNetworkOperatorName();
Log.i("telephony", "operator name = " + opName);
String phoneNumber = telManager.getLine1Number();
Log.i("telephony", "phone number = " + phoneNumber);
String providerName = telManager.getSimOperatorName();
Log.i("telephony", "provider name = " + providerName);
The network operator name is the descriptive name of the current provider that the handset connects to. This is typically the current tower operator. The SIM operator name is typically the name of the provider that the user is subscribed to for service. The phone number is defined as the MSISDN, typically the directory number of a GSM handset (that is, the number someone would dial to reach that particular phone).
Monitoring Signal Strength and Data Connection Speed
Sometimes an application might want to alter its behavior based on the signal strength or service type of the device. For example, a high-bandwidth application might alter stream quality or buffer size based on whether the device has a low-speed connection (such as 1xRTT or EDGE) or a high-speed connection (such as EVDO or HSDPA). The TelephonyManager class can be used to determine such information.
If your application needs to react to changes in telephony state, you can use the listen() method of TelephonyManager and implement a PhoneStateListener to receive changes in service, data connectivity, call state, signal strength, and other phone state information.
Working with Phone Numbers
Applications that deal with telephony, or even just contacts, frequently have to deal with the input, verification, and usage of phone numbers. The Android SDK includes a set of helpful utility functions that simplify handling of phone number strings. Applications can have phone numbers formatted based on the current locale setting. For example, the following code uses the formatNumber() method:
String formattedNumber =
PhoneNumberUtils.formatNumber("9995551212");
Log.i("telephony", formattedNumber);
The resulting output to the log would be the string “999-555-1212” in my locale. Phone numbers can also be compared using a call to the PhoneNumberUtils.compare() method. An application can also check to see whether a given phone number is an emergency phone number by calling PhoneNumberUtils. isEmergencyNumber(), which enables your application to warn users before they call an emergency number. This method is useful when the source of the phone number data might be questionable.
There are a number of formatting utilities for formatting phone numbers based upon locale. Keep in mind that different countries format their numbers in different ways. For example, there is a utility method called formatJapaneseNumber() for formatting numbers with special prefixes in the Japanese style.
The formatNumber() method can also take an Editable as a parameter to format a number in place. The useful feature here is that you can assign the PhoneNumberFormattingTextWatcher object to watch a TextView (or EditText for user input) and format phone numbers as they are entered. The following code demonstrates the ease of configuring an EditText to format phone numbers that are entered:
EditText numberEntry = (EditText) findViewById(R.id.number_entry);
numberEntry.addTextChangedListener(
new PhoneNumberFormattingTextWatcher());
While the user is typing in a valid phone number, the number is formatted in a way suitable for the current locale. Just the numbers for 19995551212 were entered on the EditText shown in Figure 15.1.
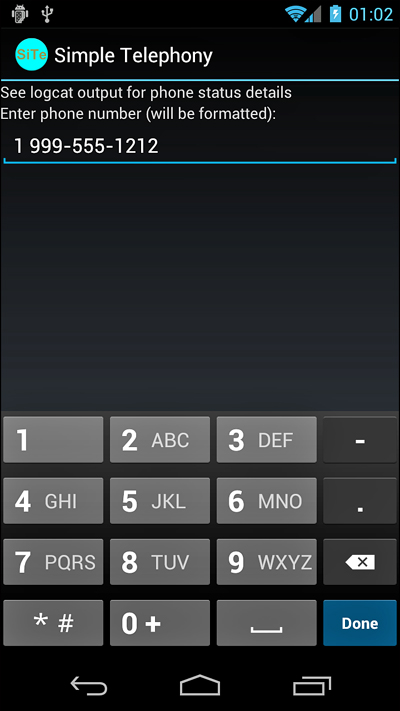
Figure 15.1. Screen showing formatting results after entering only digits.
 Using SMS
SMS usage has become ubiquitous in the last several years. Integrating messaging services, even if only outbound, to an application can provide familiar social functionality to the user. SMS functionality is provided to applications through the android.telephony package.
Gaining Permission to Send and Receive SMS Messages
SMS functionality requires two different permissions, depending on whether the application sends or receives messages. The following XML, to be placed with AndroidManifest.xml, shows the permissions needed for both actions:
<uses-permission
android:name="android.permission.SEND_SMS" />
<uses-permission
android:name="android.permission.RECEIVE_SMS" />
Sending an SMS
To send an SMS, an application first needs to get an instance of the SmsManager. Unlike other system services, this is achieved by calling the static method getDefault() of SmsManager:
final SmsManager sms = SmsManager.getDefault();
Now that the application has an SmsManager instance, sending an SMS is as simple as a single call:
sms.sendTextMessage(
"9995551212", null, "Hello!", null, null);
The application does not know whether the actual sending of the SMS was successful without providing a PendingIntent to receive the broadcast of this information. The following code demonstrates configuring a PendingIntent to listen for the status of the SMS:
Intent msgSent = new Intent("ACTION_MSG_SENT");
final PendingIntent pendingMsgSent =
PendingIntent.getBroadcast(this, 0, msgSent, 0);
registerReceiver(new BroadcastReceiver() {
public void onReceive(Context context, Intent intent) {
int result = getResultCode();
if (result != Activity.RESULT_OK) {
Log.e("telephony",
"SMS send failed code = " + result);
pendingMsgReceipt.cancel();
} else {
messageEntry.setText("");
}
}
}, new IntentFilter("ACTION_MSG_SENT"));
The PendingIntent pendingMsgSent can be used with the call to the sendTextMessage(). The code for the message-received receipt is similar but is called when the sending handset receives acknowledgment from the network that the destination handset received the message.
If we put all this together with the preceding phone number formatting EditText, a new entry field for the message, and a button, we can create a simple form for sending an SMS message. The code for the button handling looks like the following:
Button sendSMS = (Button) findViewById(R.id.send_sms);
sendSMS.setOnClickListener(new View.OnClickListener() {
public void onClick(View v) {
String destination =
numberEntry.getText().toString();
String message =
messageEntry.getText().toString();
sms.sendTextMessage(destination, null, message,
pendingMsgSent, pendingMsgReceipt);
registerReceiver(...);
}
}
After this code is hooked in, the result should look something like Figure 15.2. In this application, we used the emulator “phone number” trick (its port number). This is a great way to test sending SMS messages without using hardware or without incurring charges by the handset operator.
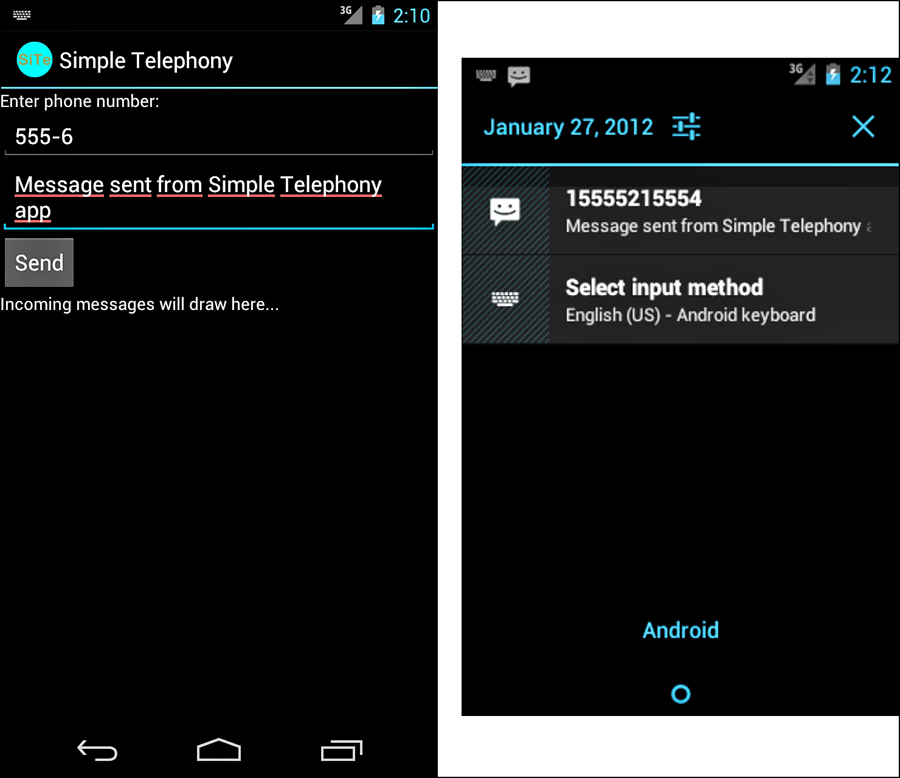
Figure 15.2. Two emulators, one sending an SMS from an application and one receiving an SMS.
A great way to extend this is to set the sent receiver to modify a graphic on the screen until the sent notification is received. Further, you could use another graphic to indicate when the recipient has received the message. Alternatively, you can use ProgressBar widgets to track the progress to the user.
Receiving an SMS
Applications can also receive SMS messages. To do so, your application must register a BroadcastReceiver to listen for the Intent action associated with receiving an SMS. An application listening to SMS in this way doesn’t prevent the message from getting to other applications.
Expanding on the previous example, the following code shows how any incoming text message can be placed within a TextView on the screen:
final TextView receivedMessage = (TextView)findViewById(
R.id.received_message);
rcvIncoming = new BroadcastReceiver() {
public void onReceive(Context context, Intent intent) {
Log.i("telephony", "SMS received");
Bundle data = intent.getExtras();
if (data != null) {
Object pdus[] =
(Object[]) data.get("pdus");
String message = "New message:
";
String sender = null;
for (Object pdu : pdus) {
SmsMessage part = SmsMessage.
createFromPdu((byte[])pdu);
message += part.
getDisplayMessageBody();
if (sender == null) {
sender = part.
getDisplayOriginatingAddress();
}
}
receivedMessage.setText(
message + "
From: "+sender);
numberEntry.setText(sender);
}
}
};
registerReceiver(rcvIncoming, new IntentFilter(
"android.provider.Telephony.SMS_RECEIVED"));
This block of code is placed in the onCreate() method of the Activity. First, the message Bundle is retrieved. In it, an array of Objects holds several byte arrays that contain PDU data—the data format that is customarily used by wireless messaging protocols. Luckily, the Android SDK can decode these with a call to the static SmsMessage.createFromPdu() utility method. From here, we can retrieve the body of the SMS message by calling getDisplayMessageBody().
The message that comes in might be longer than the limitations for an SMS. If it is, it will have been broken up in to a multipart message on the sending side. To handle this, we loop through each of the received Object parts and take the corresponding body from each, while only taking the sender address from the first.
When dealing with multipart text messages, it’s important to know that the user might be charged the full texting charge for each part of the message. This can add up quickly. Care should be taken to warn users that applications that use any text messaging, sending, or receiving might incur charges by their operator.
An application can send a similar multipart message by taking advantage of the SmsManager.divideMessage() method. This method breaks up a String into parts no larger than the maximum size allowed by the SMS specification. The application could then use the method called sendMultipartTextMessage(), passing in the result of the call to divideMessage().
Next, the code updates the text string in the TextView to show the user the received message. The sender address is also updated so that the recipient can respond with less typing. Finally, we register the BroadcastReceiver with the system. The IntentFilter used here, android.provider.Telephony.SMS_RECEIVED, is a well-known but undocumented IntentFilter used for this. As such, we have to use the string literal for it.

We strongly recommend watching for updates to the Android SDK in relation to this functionality. Future versions of the SDK might either add this string officially or remove the feature entirely. While it has continued to work for several versions of the platform, that is no guarantee of future functionality because it isn’t publicly documented.
Making and Receiving Phone Calls
It might come as a surprise to the younger generation (they usually just text), but phones are often still used for making and receiving phone calls. Any application can be made to initiate calls and answer incoming calls; however, these abilities should be used judiciously so as not to unnecessarily disrupt the calling functionality of the user’s device.
You can also use two emulator instances to test calling to another handset. As with the SMS sending, the port number of the emulator is the phone number that can be called.
Making Phone Calls
You’ve seen how to find out if the handset is ringing. Now let’s look at how to enable your application to make phone calls as well.
Building on the previous example, which sent and received SMS messages, we now walk through similar functionality that adds a call button to the screen to call the phone number instead of messaging it.
The Android SDK enables phone numbers to be passed to the dialer in two different ways. The first way is to launch the dialer with a phone number already entered. The user then needs to press the Send button to actually initiate the call. This method does not require any specific permissions. The second way is to actually place the call. This method requires the android.permission.CALL_PHONE permission to be added to the application’s AndroidManifest.xml file.
Let’s look at an example of how to enable an application to take input in the form of a phone number and launch the Phone dialer after the user presses a button, as shown in Figure 15.3.
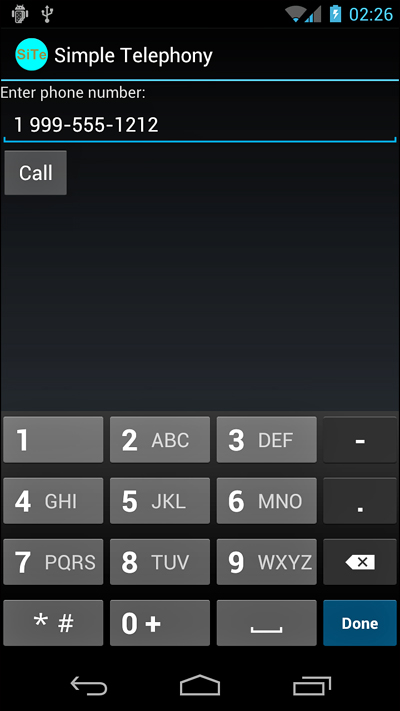
Figure 15.3. The user can enter a phone number in the EditText control and press the Call button to initiate a phone call from within the application.
We extract the phone number the user entered in the EditText field (or the most recently received SMS when continuing with the previous example). The following code demonstrates how to launch the dialer after the user presses the Call button:
Button call = (Button) findViewById(R.id.call_button);
call.setOnClickListener(new View.OnClickListener() {
public void onClick(View v) {
Uri number = Uri.parse("tel:" +
numberEntry.getText().toString());
Intent dial = new Intent(
Intent.ACTION_DIAL, number);
startActivity(dial);
}
});
First, the phone number is requested from the EditText and tel: is prepended to it, making it a valid Uri for the Intent. Then, a new Intent is created with Intent.ACTION_DIAL to launch in to the dialer with the number dialed in already. You can also use Intent.ACTION_VIEW, which functions the same. Replacing it with Intent.ACTION_CALL, however, immediately calls the number entered. This is generally not recommended; otherwise, calls might be made by mistake. Finally, the startActivity() method is called to launch the dialer, as shown in Figure 15.4.
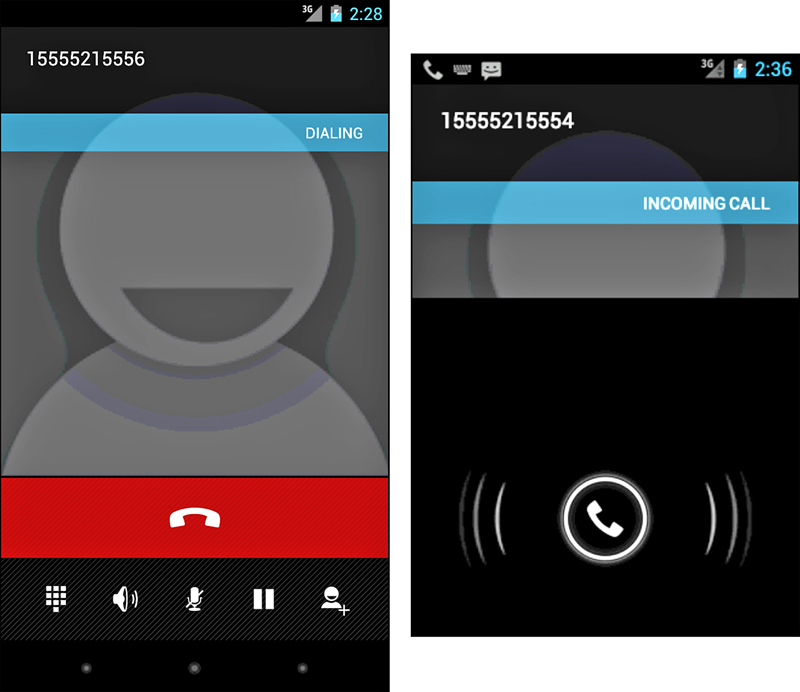
Figure 15.4. One emulator calling the other after the Call button is pressed in the application.
Receiving Phone Calls
Much like applications can receive and process incoming SMS messages, an application can register to answer incoming phone calls. To enable this in an application, you must implement a broadcast receiver to process intents with the action Intent.ACTION_ANSWER.
Remember, too, that if you’re not interested in the call itself, but information about the incoming call, you might want to consider using the CallLog.Calls content provider (android.provider.CallLog) instead. You can use the CallLog.calls class to determine recent call information, such as
• Who called
• When they called
• Whether it was an incoming or outgoing call
• Whether or not anyone answered
• The duration of the call
Working with SIP
Session Initiated Protocol (SIP) is a protocol for controlling communication sessions. SIP is at the same networking protocol level as HTTP or SMTP. The Android SDK addded support for SIP in API Level 9. The SIP APIs can be found in the android.net.sip package. Although the SIP APIs support generic sessions, the only type of session that is handled automatically is a VOIP session.
Using SIP requires that you have a SIP account with a SIP service provider. Using SIP also requires the android.permission.USE_SIP permission to be set in your application’s Android manifest file. Additionally, for market filtering, the <uses-feature> tag should be set with android.software.sip and android.software.sip.voip features.
For more information about creating an application that uses SIP, including a fully working sample application that comes with the Android SDK, please see the links provided in the “References and More Information” section at the end of this chapter.
What can you use SIP for? After all, aren’t most Android devices still phones? In-app voice communication can be useful. Perhaps your service provides a custom SIP server where users can make voice connections with each other.
Summary
The Android SDK provides many helpful telephony utilities to handle making and receiving phone calls and SMS messages (with appropriate permissions) and tools to help with formatting phone numbers entered by the user or from other sources.
These telephony utilities enable applications to work seamlessly with the device’s core phone features. Developers might also integrate voice calls and messaging features into their own applications, resulting in compelling new features. Messaging is more popular than ever, so integrating text messaging into an application can add a familiar and exciting social feature that users will likely enjoy.
References and More Information
3GPP specifications (SMS):
http://www.3gpp.org/specifications
Wikipedia’s writeup on SMS:
http://en.wikipedia.org/wiki/SMS
Android samples: “SipDemo”:
http://developer.android.com/resources/samples/SipDemo/index.html
Android Dev Guide: “Session Initiated Protocol”: