Customizing Your iPhone
Tens of millions of iPhones have been sold worldwide, yet like every iPhone user, you have the capability to customize many aspects of your phone to create a one-of-a-kind user experience.
In addition to picking and choosing which apps you’ll use from the more than 500,000 available from the App Store, you can easily customize the look of your iPhone’s Lock screen and Home screen by changing the Wallpaper. Plus, on the Home screen, it’s possible to move around the app icons and also sort them into folders.
In addition, you can customize the ringtones, audio alerts, and alarms the iPhone generates and, at the same time, personalize how many of your apps will function. It’s even possible to add password protection and/or parental controls to keep people from accessing your personal data.
This chapter focuses on how to customize your iPhone by taking advantage of its various user-adjustable settings and options.
Connecting Accessories to Your iPhone
One way you can customize your iPhone is by using features and functions built into iOS 5 and your apps. However, you can further make your iPhone uniquely your own by choosing a stylish (yet functional) case to protect your phone. Plus, you can use your iPhone with an ever-growing selection of accessories.
When it comes to accessories, some of your options include stereo headphones, a headset, external speakers, external battery packs, a docking station, a hands-free car kit, a car charger, a protective film for the iPhone’s screen, a blood pressure or heart rate monitor, and a credit card reader (for processing credit card transactions). Or you can alter the appearance of your iPhone by applying a removable skin (from a company like Gelaskins.com), that showcases a photo or design that matches your personality.
Using iOS 5’s AirPrint feature, you can print directly from your iPhone to a compatible printer. HP offers more than 20 different laser printers, photo printers, and inkjet printers that are AirPrint-compatible. Additional printer options are available from Canon. After making a wireless printer connection, you can print documents, files, data, photos, web pages, and other content from many different apps.
Optional accessory products can connect to your iPhone via its Dock Connector port, the iPhone’s Headphone jack, or a wireless Bluetooth or wireless network connection.
Customizing Your iPhone’s Home Screen
As an iPhone user, you’ll look at the Home screen most often. In just a few minutes, you can customize this screen in several different ways. You can
• Change the position of each icon.
• Add folders to your Home screen to organize your app icons.
• Change the Wallpaper image displayed in the background.
When you first upgrade your iPhone 3Gs or iPhone 4 to iOS 5, or purchase a new iPhone that already has iOS 5 installed, the icons displayed on the Home screen represent all the pre-installed apps that come with iOS 5. As you download and install additional apps from the App Store, app icons for these apps are also displayed on your Home screen.
Moving Icons Around on the Home Screen
At any given time, the main area of your iPhone’s Home screen can display three different types of icons: app icons, folder icons, and Safari web page shortcuts. When it comes to moving around and deleting these icons, you can treat them all the same way.
An app icon represents a single app installed on your iPhone. Tapping an app icon launches that app. A folder icon represents a folder that can hold multiple apps to better organize them on your Home screen.
![]() To learn more about creating folders on your Home screen, see “Creating an Onscreen App Folder on Your Home Screen,” (Chapter 3).
To learn more about creating folders on your Home screen, see “Creating an Onscreen App Folder on Your Home Screen,” (Chapter 3).
A Safari web page shortcut is created within Safari and is used to instantly launch the web browser and then automatically open a specific web page. If you visit certain websites frequently, creating Safari web page shortcuts is an alternative to using Bookmarks, for example, to quickly access your favorite websites without having to type their URLs (website addresses) manually.
![]() To learn more details about creating Safari web page shortcuts, see “Creating Web Page Shortcuts,” (Chapter 7).
To learn more details about creating Safari web page shortcuts, see “Creating Web Page Shortcuts,” (Chapter 7).
 SHOW ME Media 5.1—Moving Icons Around on the Home Screen
Access this video file through your registered Web edition at my.safaribooksonline.com/9780132954310/media.
![]() LET ME TRY IT
LET ME TRY IT
Moving Icons Around on the Home Screen
To move the various icons around on the Home screen, follow these steps:
1. Place your finger on any app icon on the Home screen and hold it there for several seconds. All the app icons begin to shake, and in the upper-right corner of certain apps, a black-and-white “X” icon appears (shown in Figure 5.1).
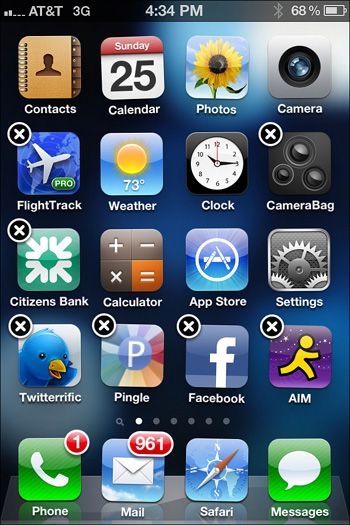
Figure 5.1 To move icons around on the Home screen, hold your finger on any one app icon to enter into the Home Screen edit mode. The icons start to shake.
2. When all your Home screen app and folder icons begin to shake, place your finger on one icon that you want to move and slowly drag it to a new position on your Home screen. One at a time, you can move around as many icons as you’d like.
3. When you’re done repositioning icons on the Home screen, press the Home button to save your changes and exit the Home Screen edit mode.
When your Home screen is in edit mode, the icons with the “X” icon represent the apps you’ve downloaded and installed on your iPhone. Tapping the “X” icon deletes the app from your iPhone altogether.
The app icons that do not display an “X” icon are the pre-installed apps. Although you can move these pre-installed apps around on the Home screen and place them into folders, they cannot be deleted.
Keep in mind, your Home screen can utilize multiple screens. On the first one or two of your its screens, place the icons that represent the apps you’ll use most frequently so that you can access them faster.
Each screen of your Home screen can display up to 16 apps, plus the 4 additional app icons constantly displayed on the bottom row of your Home screen.
Regardless of which screen of your Home screen you’re looking at, the 4 app icons placed along the bottom row always remain constant. Thus, you should place your most frequently used app icons in these positions.
To move icons from one Home screen to another, slowly drag one icon at a time toward the left or right edge of the iPhone’s screen. As you do this, the icon jumps to the next screen.
It’s also possible to rearrange your iPhone’s Home Screen icons from your computer. When you have your iPhone connected to your computer for the iTunes Sync process, select your iPhone from under the Devices heading on the left side of the iTunes screen, and then click on the Apps option that’s displayed near the top-center of the screen. When you see a re-creation of your iPhone’s Home Screen displayed, use the mouse to drag icons around to reposition them. Those changes will be made to your iPhone when you click the Sync icon to initiate an iTunes Sync.
You can move all app, folder, and Safari web page shortcut icons around on your Home screen and ultimately place them in any order to make it easier for you to intuitively find and access them faster.
Customizing the Lock Screen and Home Screen’s Wallpaper
Another easy thing you can do to customize the appearance of your iPhone is to change the Wallpaper used on the Lock screen and Home screen. The Wallpaper is the photo or graphic image you see in the background.
iOS 5 comes with more than 25 Wallpaper designs you can choose from. However, you can just as easily use any digital image taken using your iPhone’s camera or that’s stored on your iPhone as your Wallpaper. Figure 5.2 shows a Lock screen with a user-selected digital photo being used as the Wallpaper.

Figure 5.2 You can choose from more than 25 Wallpaper designs or select any digital image that’s stored on your iPhone to be your Wallpaper graphic.
Many people opt to use a photo of their family, friends, or pets as their Lock screen and/or Home screen Wallpaper as opposed to one of the precreated designs. However, you can opt to display a vacation photo, wedding photo, company logo, or any other photo or graphic that appeals to you. If you surf the web, you’ll easily find free downloadable wallpaper photos and designs that can be downloaded and used with your iPhone. For example, check out DeviantArt (www.deviantart.com).
SHOW ME Media 5.2—Change the Custom Wallpaper of Your Lock Screen and Home Screen
Access this video file through your registered Web edition at my.safaribooksonline.com/9780132954310/media.
![]() LET ME TRY IT
LET ME TRY IT
Changing the Wallpaper of Your Lock Screen and/or Home Screen
To change the Wallpaper displayed on your Lock screen and/or Home screen, follow these steps:
1. Launch the Settings app from your Home screen.
2. From the main Settings menu, tap the Wallpaper option.
3. When the Wallpaper screen appears, two thumbnails are displayed on the screen. One represents your Lock screen, and the other represents your Home screen (shown in Figure 5.3). Tap either thumbnail.
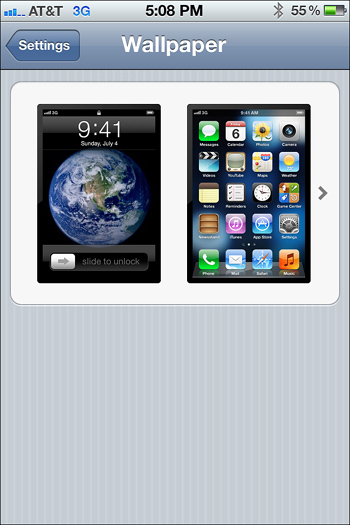
Figure 5.3 From the main Settings menu, tap the Wallpaper option to reveal this screen.
4. You can choose which Wallpaper graphic or image you want to use. At the top of the screen, you see an option labeled Wallpaper (shown in Figure 5.4). When you tap this, more than 25 precreated Wallpaper graphics are displayed (shown in Figure 5.5).

Figure 5.4 From this screen, you can choose to use a precreated Wallpaper graphic by tapping the Wallpaper option, or you can select a digital photo or graphic that’s stored in an Album that’s listed (such as Camera Roll or Photo Library).
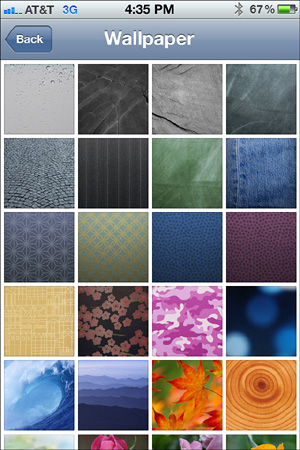
Figure 5.5 If you opt to use one of the 25+ Wallpaper graphics built into iOS 5, you see this thumbnail display that allows you to choose your favorite.
5. Below the Wallpaper listing (refer again to Figure 5.4), however, are listings for the various Albums within the Photos app that contain your digital images. Tap any of these Albums and then select a specific digital photo you want to use for your Wallpaper.
6. Whether you choose a precreated Wallpaper graphic or one of your own digital images from an Album, a Wallpaper Preview window appears after you make a selection. Tap the Set icon to continue.
7. A menu appears on the screen with four options, labeled Set Lock Screen, Set Home Screen, Set Both, or Cancel (shown in Figure 5.6).
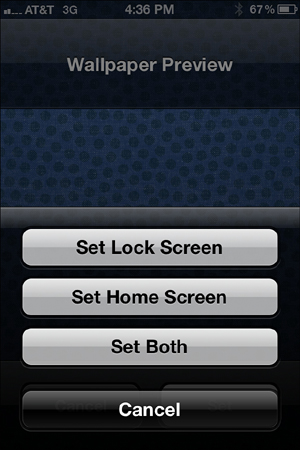
Figure 5.6 After you choose your Wallpaper graphic or image, decide whether you want to use it as your Lock screen or Home screen Wallpaper (or both).
Tap the Select Lock Screen option to use the selected wallpaper for just the Lock screen (you can then set the Wallpaper for the Home screen separately).
Tap the Select Home Screen option to use the selected wallpaper for just the Home screen wallpaper. (You can then set the Wallpaper for the Lock screen separately.)
To use the same Wallpaper graphic for both the Lock screen and Home screen, tap the Set Both icon or tap the Cancel icon to return to the Wallpaper Preview screen.
8. If you selected the Set Lock Screen or Set Home Screen option, you can repeat this process to customize the Wallpaper for the other screen. Or press the Home button to return to the Home screen. Now, when you view your Lock screen or Home screen, the new Wallpaper you selected is displayed.
Adjusting Your iPhone’s Screen Brightness
Depending on the lighting conditions where you’re using your iPhone, you might want to manually adjust the brightness level of your iPhone’s screen. By default, your iPhone is designed to monitor the lighting in the area it’s being used and adjust the brightness of the screen accordingly. However, you can easily override this setting, based on your personal preferences.
![]() LET ME TRY IT
LET ME TRY IT
Adjusting the Brightness of Your iPhone’s Screen
To manually adjust the brightness of your iPhone’s screen, follow these steps:
1. Launch the Settings app from the Home screen.
2. From the main Settings menu, tap the Brightness option.
3. Place your finger on the dot along the Brightness slider (shown in Figure 5.7) that’s displayed near the top of the screen. Move it to the left to darken the screen or move the large dot on the slider to the right to manually brighten the screen.
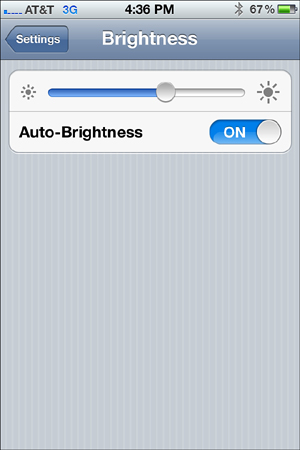
Figure 5.7 You can manually control the screen brightness of your iPhone or use the Auto-Brightness feature.
4. If you leave the Auto-Brightness option turned on, your personal brightness setting remains in affect until you turn off your iPhone or it goes into Sleep mode. If you want the customized brightness level to remain set until you manually change it again, tap the virtual switch associated with the Auto-Brightness option and turn it to the off position.
5. When you’re done, press the Home button to return to the Home screen.
Adjusting Your iPhone’s Sleep Mode Setting
When your iPhone is left dormant for a predetermined amount of time, it automatically places itself into Sleep mode to conserve battery life. By default, this happens after 1 minute.
To change the time your iPhone will remain dormant before automatically entering into Sleep mode, launch the Settings app and select the General option.
From the General menu within Settings, tap the Auto-Lock option (shown in Figure 5.8).
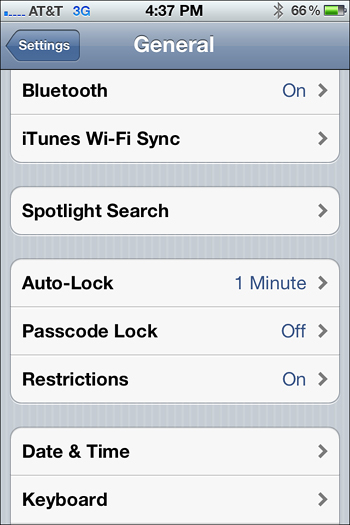
Figure 5.8 You can decide how quickly your iPhone will automatically enter into Sleep mode when left dormant.
You see a menu that allows you to predetermine the amount of time your iPhone can remain dormant before it goes into Sleep mode. Your options include 1, 2, 3, 4, or 5 minutes. However, you can also select the Never option, which means that your iPhone will remain in Active mode until you manually place it into Sleep mode or turn it off.
Some apps override the Auto-Lock option and keep your iPhone in Active mode as long as the app is running, even if the phone is in fact not otherwise being used. If you determine one of these apps is running, and it doesn’t need to be, shut down that app to conserve your iPhone’s battery life.
To shut down an app that’s running in the background, double-press the Home button to enter into Multitasking mode. Press and hold down an app displayed on the Multitasking bar for several seconds until the icons start to shake. Next, tap on the red-and-white negative sign icon for the app you want to shut down. Press the Home button again to exit Multitasking mode.
Adding Passcode Protection to Your iPhone
By default, when you wake up your iPhone from Sleep mode or turn it on, you first see the Lock screen. However, anyone who picks up your iPhone can slide a finger along the Slide To Unlock slider and then gain access to your iPhone and all the data, files, and content stored on it.
To prevent unauthorized people from accessing your iPhone, you can activate the Passcode option. This setting requires you to manually enter a secret four-digit numeric passcode (that you create) each time you wake up your iPhone or turn it on and then try to access the Home screen.
![]() LET ME TRY IT
LET ME TRY IT
Creating a Custom Passcode
To set a custom, four-digit passcode and then turn on this security feature, follow these steps:
1. Launch the Settings app from the Home screen.
2. Tap the General option from the main Settings menu.
3. From the General menu within Settings, tap the Passcode Lock option. (By default, this option is turned off.)
4. At the top of the Passcode Lock screen, tap the Turn Passcode On option (shown in Figure 5.9).

Figure 5.9 To passcode-protect your iPhone, you must first turn on this feature within Settings.
5. The Set Passcode screen is displayed (shown in Figure 5.10). Using the iPhone’s numeric virtual keyboard, select a four-digit passcode and enter it.
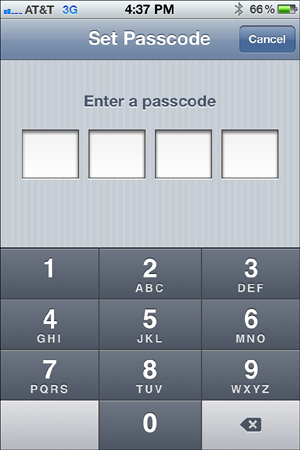
Figure 5.10 When the Passcode feature is activated, you need to create a custom four-digit passcode.
6. When prompted, enter the same passcode again to confirm it. Now, make sure you remember this password!
7. The passcode option is now activated. Starting the next time you turn on or wake up your iPhone, after swiping your finger on the Slide To Unlock slider on the Lock screen, the Passcode screen will appear. To access your Home screen, you must enter the correct passcode.
If someone enters the incorrect passcode 10 times in a row, you can set your iPhone to automatically erase all its data. To do this, at the bottom of the Passcode Lock menu screen within Settings, tap the virtual switch associated with the Erase Data option.
In addition, you can adjust the Require Passcode option from the Passcode Lock screen within Settings. This option determines when the iPhone will request the user to enter a passcode from the time it’s turned on or awakened from Sleep mode. The default option for this feature is Immediately. This is the best option to ensure the contents of your phone will remain safe from unauthorized users.
At any time, you can turn off the passcode feature altogether by accessing the Passcode Lock menu once again within Settings and then tap the Turn
Passcode Off option, which is displayed at the top of the screen. You are asked to confirm your passcode prior to this security feature deactivating.
Keep in mind, even if you activate the passcode feature, it is possible to receive and answer an incoming call without first entering the correct passcode. Other iPhone functionality, however, will remain locked until the passcode is entered.
Creating and Using a More Secure Alphanumeric Password
Instead of using a four-digit numeric passcode to access your iPhone, you can change the phone’s settings so it requires a more complex and longer alphanumeric password that you create.
To activate this enhanced security feature, follow these steps:
1. From the Home screen, launch the Settings app.
2. From the main Settings menu, tap the General option.
3. When the General menu appears within Settings, tap the Passcode Lock feature.
4. From the Passcode Lock screen, tap the Simple Passcode option and turn the virtual switch associated with it to the off position.
5. Tap the Turn Passcode On option, and when prompted, use the iPhone’s virtual keyboard to create and enter the alphanumeric password of your choice. It can be as long as you’d like and combine both numbers and letters.
6. Tap the Next icon that’s displayed in the upper-right corner of the screen and then confirm your password choice.
7. Tap the Done icon displayed in the upper-right corner of the screen to confirm your option.
From this point on, before accessing the Home screen when you turn on or wake up your iPhone, you will need to manually enter this password.
If you forget the passcode or password you create and ultimately enter the incorrect passcode too many times, eventually, you will need to contact Apple for help resetting your iPhone. This is also true with passcodes associated the Restrictions options discussed in the next section.
Adjusting the iPhone’s Restrictions
If you know that other people will be using your iPhone, you can set up restrictions as to which apps the other users will be able to access as well as what iPhone features and functions they’ll have access to.
For example, you can prevent others from using the Phone app to make or receive calls or keep them from using the Messages app to send or receive text messages. You can also prevent other users from watching a rated-R movie using the Videos app or from making purchases from the iTunes Store, App Store, iBookstore, or Newsstand.
To custom set the various Restrictions on your iPhone, launch the Settings app and select the General option from the main Settings menu. From the General menu, tap the Restrictions option.
At the top of the Restrictions menu screen, begin by tapping the Enable Restrictions option. You are then be prompted to create a four-digit passcode for yourself, as well as a separate passcode for “visitors.”
You should keep secret the passcode you create for yourself. However, you should give the passcode you create for visitors to those people who are allowed to use your iPhone. When they access your iPhone using the visitor passcode, whatever restrictions you enact will be in effect, which limits their ability to use certain apps, features, or functions of your iPhone.
If you sign into your iPhone using your own passcode, however, you are automatically granted full access to all its features and functions.
If someone enters the wrong passcode repeatedly, the iPhone locks up for several minutes before giving the user the chance to enter the correct passcode. The amount of time the iPhone locks up then increases each time the incorrect passcode is entered.
After creating a separate passcode for yourself and your visitors, you can then tap the virtual switches associated with each app, feature, and function displayed on the Restrictions menu screen to pick and choose what your visitors will and won’t be able to do while they’re using your iPhone.
Using the Notification Center
One of the new apps that come pre-installed on all iPhones running iOS 5 is called Notification Center. Although no app icon for Notification Center is displayed on your Home screen, this app is always running in the background.
Notification Center automatically monitors your iPhone and compatible apps. It then displays the alerts, alarms, and notifications generated by your iPhone in one centralized location: the Notification Center window.
Regardless of what you’re doing on your iPhone or what app is currently active (as long as it’s not the Lock screen), to access the Notification Center window (shown in Figure 5.11), swipe your finger from the top of the iPhone’s display toward the bottom of the display. The Notification Center window slides down from the top of the screen.
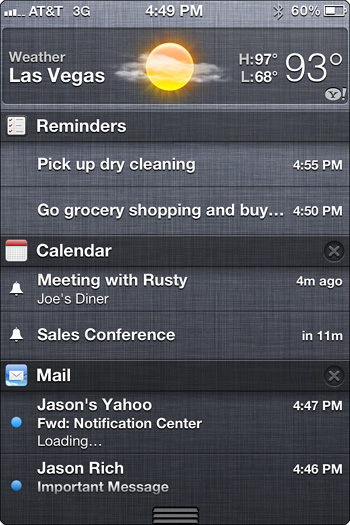
Figure 5.11 You can access the Notification Center window at any time. Near the top, the optional Weather widget is displayed.
To remove the Notification Center window from your iPhone’s screen, place your finger on the icon composed of three horizontal lines (the Close icon) displayed at the bottom center of the window and flick your finger upward.
Depending on how you customize the Notification Center window within the Settings app, at the top of the window you may see one or more graphic widgets, such as the Weather or Stocks widget, that are built into iOS 5. (Additional widgets are available from Apple and third-party developers.)
Below the widget(s) are all recent alerts, alarms, and notifications generated by your iPhone. These listings are displayed chronologically, based on when each was generated, or they are listed by the app that generated them. The order is determined by how you customize the settings for Notification Center within the Settings app.
Among the ways you can customize the Notification Center app is by determining which other apps Notification Center will constantly monitor. If there are apps that you don’t deem important, you can instruct Notification Center to ignore those app and all alerts, alarms, and notifications generated by them.
For the apps you do instruct Notification Center to continuously monitor, you can determine how many individual alerts, alarms, or notifications the Notification Center window will display related to that app at any given time. Your options include 1, 5, or 10 recent items.
In addition, you can sometimes determine how much detail about a specific alert, alarm, or notification you want to display. For example, you can set the Mail app to display between zero and five lines of the body of each new incoming email message (in addition to the mail’s date, subject, and sender) within the Notification Center window.
As you’re customizing the options available within Settings that relate to Notification Center, you can also decide whether you want a noninteractive Notification Center window to be displayed on your Lock screen. If you opt for this feature to be turned on, whenever you wake up or turn on your iPhone, you are notified of any alerts, alarms, or notifications you missed.
Likewise, for each type of alert, alarm, or notification that an individual app is capable of generating, from the Notifications menu option within the Settings app, you can set the app to also create a Banner or Alert window and/or Badge App icon.
A Banner appears at the top of the iPhone’s screen when an alert, alarm, or notification is generated by an app. It automatically disappears after several seconds. An Alert window, however, pops on your iPhone’s screen and then requires you to acknowledge the alert before it will disappear.
A Badge App icon appears as a tiny circular icon within a specific app icon on your Home screen. It can be a solid red circle, or it might contain a number. For example, if you receive five incoming emails, the Mail app icon on your Home screen would display a Badge App icon containing the number 5.
Customizing Notification Center
By default, Notification Center continuously monitors all apps that it’s compatible with. So, when you access the Notification Center window, you could easily be inundated by dozens of alert, alarm, and notification listings.
Thus, you’ll probably want to customize this app within the Settings app. This allows you to make the following decisions:
• Which apps Notification Center will monitor
• In what order the alerts, alarms, and notifications will be displayed (alphabetically by app name or by time each was received)
• The number of alerts, alarms, and notifications each app will display at once within the Notification Center window
• When applicable, how much content each alert, alarm, or notification will contain
![]() LET ME TRY IT
LET ME TRY IT
Customizing the Notification Center App
To customize the Notification Center app so it displays only alerts, alarms, and notifications you deem important or time sensitive, for example, follow these steps:
1. Launch the Settings app from the iPhone’s Home screen.
2. From the main Settings menu, tap the Notifications option (displayed near the top of the screen).
3. Under the Sort Apps heading displayed near the top of the Notifications menu screen within Settings, decide whether you want the alerts, alarms, and notifications to be displayed within the Notification Center window to be sorted by app or by the time each was received.
4. Under the In Notification Center option, you see listings for each app that the Notification Center app is continuously monitoring. One at a time, tap each app listing to decide whether or not it should be monitored by Notification Center and then what will appear within each listing. When you tap each listing, the customization options vary and are app-specific.
5. When you see a Widget displayed under the In Notification Center heading, when you tap that Widget option, you see a virtual on/off switch. When this switch is turned on, that Widget is displayed within the Notification Center window. When the switch is turned off, the Widget isn’t displayed.
6. When you tap an app listing displayed under the In Notification Center heading, at the top of that screen is a virtual on/off switch associated with the Notification Center option. This allows you to determine whether the Notification Center app will monitor a specific app. When the switch is turned on (shown in Figure 5.12 for the Reminders app), that app is monitored by Notification Center.
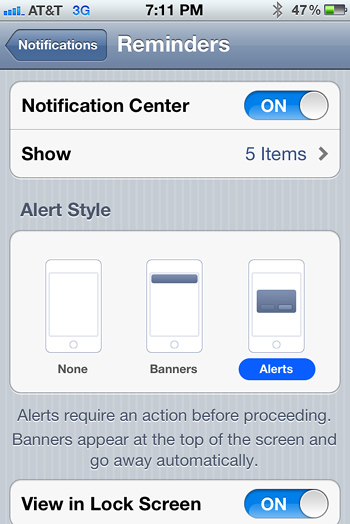
Figure 5.12 You can customize how each app is represented within the Notification Center Window. Shown here are the customization options (within Settings) for the Reminders app.
7. Immediately below the Notification Center option is the Show option. It determines how many alerts, alarms, or notifications related to that specific app will be displayed at any given time within the Notification Center window. Your options include 1, 5, or 10.
8. From the app-specific screen related to Notifications within the Settings app, you can also customize how non-Notification Center-related alerts, alarms, and notifications for that app will be displayed on your iPhone.
9. One at a time, you can customize how Notification Center will handle each app listed under the In Notification Center listing on the Notifications screen within Settings.
10. If you scroll down to the bottom of the Notifications menu screen, you see a heading called Not In Notification Center. This is a listing of Notification Center-compatible apps not currently being monitored by the Notification Center app. To change this, tap one listing at a time, and then at the top of the screen, tap the virtual on/off switch associated with the Notification Center option for that app.
11. To exit Settings, press the Home button to return to the Home screen. The customizations you made to the Notification Center app are automatically saved and immediately take effect. You can now access the Notification Center window to confirm this.
 TELL ME MORE Media 5.3—Customizing Notification Center
Access this audio file through your registered Web edition at my.safaribooksonline.com/9780132954310/media.
In situations in which you can determine how many lines of content are displayed within each listing of the Notification Center window, you can set the number within Settings, by accessing the listing for that specific app.
For example, for the Mail app, to decide how much of an email’s body you want to display in addition to the date, subject, and sender, launch Settings, and from the main Settings menu, tap the Mail, Contacts, Calendars option. Scroll down to the Mail heading and tap the Preview option. This allows you to choose between zero and five lines that will be displayed within the Mail app, as well as within the Notification Center window.
Getting the Most out of the Notification Center
The Notification Center app is always running, so you don’t have to remember to turn it on and off as it’s needed. At any time, however, you can access the Notification Center window by swiping your finger in a downward direction from the top of the screen.
When the Notification Center window appears, each alert, alarm, or notification listing is interactive. By tapping an individual listing, you can automatically launch the relevant app and display whatever information is pertinent.
For example, if Notification Center is alerting you of a pending appointment stored within the Calendar app, you can tap that listing to launch the Calendar app, and then view the details pertaining to that particular appointment.
Likewise, if you tap an alert from the Mail app that’s announcing the arrival of new incoming email, tap that listing to launch the Mail app, and automatically display the entire incoming email message on your iPhone’s screen.
As you’re viewing the Notification Center window, you’ll discover that the alerts, alarms, and notifications are sorted by app. You can temporarily remove all listings from the window related to that app by tapping on the small “X” icon displayed to the right of the app’s name and logo.
The blue dot that appears to the left of each listing within the Notification Center window means that it’s a new alert, alarm, or notification that has not yet been viewed or acknowledged by you.
Customizing Your iPhone’s Sounds
Also within the Settings app, you can fully customize the ringtones the Phone app uses for incoming calls, as well as all other audible alerts and alarms the iPhone generates.
![]() LET ME TRY IT
LET ME TRY IT
Customizing Your iPhone’s Sound-Related Features
Follow these steps to customize the sounds, including the ringtones, your iPhone generates:
1. Launch the Settings app from the Home Screen.
2. From the main Settings menu, tap the Sounds option.
3. At the top of the Sounds menu screen within Settings (shown in Figure 5.13), the first option allows you to turn on or off the phone’s Vibrate mode by tapping on the virtual on/off switch. When it is turned on, in addition to (or instead of) generating an audible ringtone, alert, or alarm, the phone vibrates. This feature is useful when you need to put your iPhone on Mute or if you’re in a loud area and won’t otherwise hear the sounds generated by the phone.
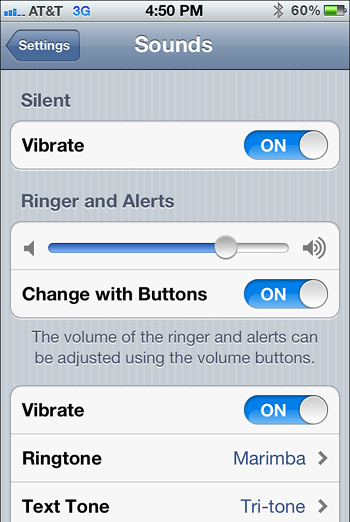
Figure 5.13 From this menu screen within Settings, you can customize all the sounds your iPhone generates for ringtones, alerts, and alarms.
4. Below the Vibrate option is the Ringer and Alerts volume slider. Use your finger to manually adjust the default volume. The more you move the slider to the right, the louder the sounds and alerts generated by your iPhone will be.
5. By tapping the virtual switch associated with the Change with Buttons option and switching it from the default on position to off, you can deactivate the Volume Up (+) and Volume Down (-) buttons located on the side of your iPhone.
6. Scroll down on the Sounds menu screen. Each type of alert and alarm your iPhone is capable of generating is listed separately, starting with Ringtone.One at a time, you can customize these settings.
The Ringtone option refers to the default ringtone heard for every incoming call your iPhone receives (assuming the phone’s Mute button is not turned on). Within the Contacts app, you can customize the ringtone for specific callers.
To change the default ringtone, tap the Ringtone option and then select from one of the ringtones installed on your iPhone. This includes the ringtones that come pre-installed within iOS 5 as well as any additional ringtones you’ve purchased from the iTunes Store.
To purchase and install new ringtones from the iTunes Store, tap on the Buy More Ringtones option displayed at the top center of the Ringtones menu screen within Settings. It’s also possible to create your own ringtones. To learn more about how to do this using music purchased from iTunes, visit http://support.apple.com/kb/ht1693.
TELL ME MORE Media 5.4—Use Custom Ringtones
Access this audio file through your registered Web edition at my.safaribooksonline.com/9780132954310/media.
After setting the default ringtone for your iPhone (for all incoming calls, unless you add a custom ringtone to an entry within the Contacts app for a specific caller), you can adjust the sound generated for each type of alert or alarm the iPhone can generate.
Starting with Text Tone (the sound you hear when an incoming text message is received), and continuing with each Alarm or Alert option listed within the Sounds menu, tap each option and choose which sound you want the iPhone to generate in conjunction with that specific type of alarm or alert.
When you tap any of these options, a menu of the different Alert Tones (sounds) currently stored on your iPhone is displayed, including sounds that come pre-installed with iOS 5 and sounds you’ve purchased and downloaded from the iTunes Store, for example.
Pick and choose which Alert Tone you want to associate with each type of alert or alarm. You also have the option of leaving the default sounds in place. The various types of alerts and alarms you can customize include Text Tone, New Voicemail, New Mail, Sent Mail, Tweet, and Calendar Alerts.
Keep in mind that you also have the option to select None for any Alert Tone selection. When None is selected, no audible sound is heard when an app or a feature on your iPhone would otherwise generate an audible sound.