Learning iPhone Basics
Now that you understand the basic layout and design of your iPhone, in terms of what the various buttons and ports on the phone itself are used for, this chapter delves more into navigating the iPhone using the touch screen; launching apps from the Home screen; switching between apps using Multitasking mode; using the iOS 5 Select, Select All, Copy, Cut, and Paste features; and connecting your iPhone to the wireless web using a 3G or Wi-Fi connection.
Operating the Touch Screen
You’ve probably figured out by now that in addition to displaying crystal clear, vibrant, and colorful text, photos, and graphics, your iPhone’s screen is a fully interactive touch screen.
Using a series of finger gestures and taps (which you’re about to learn), you can navigate your way around your iPhone’s various apps.
When interacting with your iPhone’s touch screen, be gentle. It’s precise but somewhat delicate. You don’t need to press down too firmly on the screen at any time.
If you need to clean fingerprint smudges or other dirt from the screen, use a micro fiber cleaning cloth, as opposed to a tissue, paper towel, or your shirt sleeve. Also, refrain from using cleaning chemicals on your iPhone screen.
To protect your screen from dirt and scratches, you can attach an optional, ultra-thin and transparent protection film directly over the screen.
From the moment you turn on your iPhone (or take it out of Sleep mode), aside from pressing the Home button to return to the Home screen at any time, virtually all your interaction with the iPhone is done through the following finger movements and taps on the device’s touch screen:
• Tap—Tapping an icon or a link that’s displayed on your device’s screen serves the same purpose as clicking the mouse when you use your main computer. And just as when you use a computer, you can single-tap or double-tap, which is equivalent to a single- or double-click of the mouse.
• Hold—Instead of a quick tap, in some cases, you need to press and hold your finger on an icon or onscreen command option. When a hold action is required, place your finger on the appropriate icon or command option and hold it there. There’s never a need to press down hard on the iPhone’s screen.
• Swipe—A swipe refers to quickly moving a finger along the screen from right to left, left to right, top to bottom, or bottom to top, to scroll to the left, right, down, or up, respectively, depending on which app you’re using.
• Pinch—Using your thumb and index finger (the finger next to your thumb), perform a pinch motion on the touch screen to zoom out when using certain apps. Or “unpinch” (by moving your fingers apart quickly) to zoom in on what you’re looking at on the screen when using most apps.
• Pull-down—Using your index finger, swipe it from the top of the iPhone quickly downward onto the screen. This causes the new Notification Center window to appear, alerting you of incoming email messages, text messages, alarms, or other time-sensitive actions that need to be dealt with. You can hold the phone in portrait or landscape mode for this to work. To make this window disappear, flick upward on the icon that looks like three horizontal gray lines at the bottom of the window.
Another way to quickly zoom in or out on an area of the iPhone screen (when using many apps) is to quickly double-tap the area of the screen where you want to zoom in and then double-tap again to zoom back out.
Here’s What Else You Need to Know About Your iPhone’s Virtual Keyboard
Whenever necessary, the iPhone’s virtual keyboard automatically appears, allowing you to manually input text or numbers. The layout of the virtual keyboard adapts based on the app you’re using, whether you’re holding your iPhone horizontally or vertically, and the type of data you’re entering.
To make the onscreen virtual keyboard keys larger, which makes it easier to type, you can often hold your iPhone sideways, in landscape mode (as shown in Figure 3.1). As you’re typing, by default, you hear a key click sound effect each time you tap a keyboard key. Your iPhone also automatically capitalizes letters when it deems appropriate, checks your spelling, and autocorrects typos.
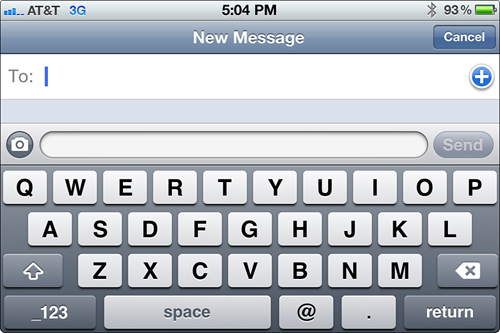
Figure 3.1 When you hold your iPhone in landscape mode (sideways), the virtual keyboard is larger, making it easier to type. This can be done when using most but not all apps. Shown here is the Messages app being used with the iPhone 4 held in landscape mode.
To modify the keyboard-related functions of your iPhone and turn off the key click sound effect, autocapitalization, autocorrect, spell check, and/or Caps Lock features, launch the Settings app. Tap the General option from the main Settings menu and then select the Keyboard option.
From the Keyboard menu screen within Settings, you can tap on the virtual on/off switches associated with each keyboard feature to turn it on or off. You can also create keyboard shortcuts (which are explained shortly).
To make the virtual keyboard disappear from the iPhone’s screen when it’s no longer needed (if it doesn’t disappear automatically), tap anywhere on the screen except for the keyboard.
If, however, you need to make the virtual keyboard manually appear so that you can fill in a data field when using a particular app, for example, simply tap the blank onscreen field where you need to enter data, and the appropriately formatted virtual keyboard appears.
While typing with the virtual keyboard, you can enter numbers and punctuation by first tapping on the “123” key that’s displayed in the lower-left corner of the keyboard. The letters on the keyboard will be replaced by numbers, punctuation marks and commonly used symbols.
After tapping on the “123” key, the Caps Lock key (which looks like an upward-pointing arrow) transforms into a “#+=” key. Tap on it to change the virtual keyboard yet again, so it displays an additional assortment of commonly used symbols.
Creating and Using Keyboard Shortcuts
To help save you time when manually typing commonly used phrases or sentences, you can create keyboard shortcuts and then type a custom abbreviation for each shortcut to make the full text appear.
For example, if you commonly use the phrase “I am out of the office right now,” you can create a custom keyboard shortcut for this phrase, called “OOO” (for Out Of Office). Then, as you’re typing, to add the phrase “I am out of the office right now” into a compatible app, simply type OOO.
![]() LET ME TRY IT
LET ME TRY IT
Creating a Keyboard Shortcut
To create as many keyboard shortcuts as you’d like on your iPhone, follow these steps:
1. Launch the Settings app from the Home screen.
2. From the main Settings menu, tap the General option.
3. When the General menu appears within Settings, tap the Keyboard option.
4. Scroll down on the Keyboard menu screen to the Shortcuts heading and tap the Add New Shortcut option.
5. When the Shortcut creation screen appears (shown in Figure 3.2), you see two blank fields, labeled Phrase and Shortcut. In the top Phrase field, enter the complete phrase for which you want to create a shortcut. Make sure the spelling and punctuation you use are correct. For example, in this field, type I am out of the office right now.
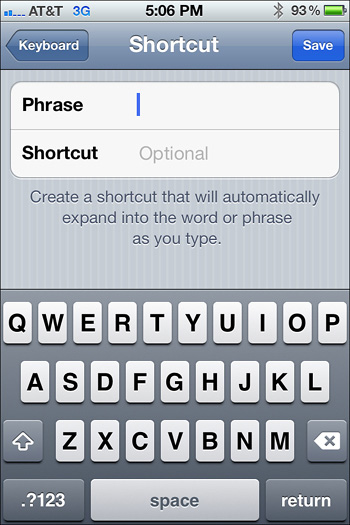
Figure 3.2 You can create keyboard shortcuts within the Settings app but use them in conjunction with almost any other iPhone app to make typing frequently used phrases or sentences much faster.
6. Tap the Shortcut field and then enter a custom abbreviation for the Keyboard Shortcut that you will remember. For this example, enter OOO (for Out of Office).
7. Tap the Save icon that’s displayed in the upper-right corner of the screen.
8. Now, as you’re using other compatible apps, when you type OOO, the phrase “I am out of the office right now” automatically appears. From the Keyboard screen within settings, however, make sure the Shortcut feature is turned on.
9. You can repeat these steps and create as many separate keyboard shortcuts as you’d like, each with a different abbreviation.
Navigating the Home Screen
When you turn on your iPhone or wake it up from Sleep mode, one of the first things you see is the Lock screen. When you use your finger to swipe from left to right on the Slide To Unlock slider, the iPhone’s Home screen is displayed.
Later, as you’re using any app, you can instantly switch back to the Home screen by pressing the Home button on the iPhone.
The Home screen is a central hub, just like the desktop screen of your primary computer. Here, you see separate app icons representing each app installed on your iPhone.
![]() To learn how to customize the look of your Home screen, reorganize the app icons, delete apps from your iPhone, and change the background image (Wallpaper), see “Customizing Your iPhone’s Home Screen,” (Chapter 5).
To learn how to customize the look of your Home screen, reorganize the app icons, delete apps from your iPhone, and change the background image (Wallpaper), see “Customizing Your iPhone’s Home Screen,” (Chapter 5).
To launch any app from the Home screen, simply tap once on its corresponding app icon. Initially, when you turn on a new iPhone the first time, the app icons displayed on your Home screen represent all the pre-installed apps, such as Contacts, Calendar, Photos, Camera, Clock, Calculator, App Store, Settings, Phone, Mail, Safari, Messages, Game Center, Maps, YouTube, Notes, Stocks, Newsstand, iTunes, Music, Compass, Videos, and Reminders.
As you begin installing additional iPhone apps acquired from the App Store, they too automatically appear on the Home screen, as do Safari Web Page icons you create using the Safari app and any app folders you create.
Displayed on a single Home screen are 16 app icons, plus 4 additional app icons at the bottom of the screen. To view the rest of the apps currently installed on your iPhone, use your finger to swipe from right to left across the screen. This action reveals additional Home screen pages that display the additional apps.
As you scroll between Home screen pages, the four apps displayed in the bottom row always remain constant. Thus, when you customize the location of the app icons, place the icons for your four most frequently used apps in these spots.
From the Home screen, if you scroll between screens by swiping your finger from left to right, you can access the Spotlight Search screen, which was described in Chapter 2, “Getting to Know Your iPhone.”
While looking at any Home Screen, press the Home Button once to return to the main Home Screen. Or while viewing the main Home Screen, tap on the Home button once to reveal the Spotlight Search screen.
 SHOW ME Media 3.1—Using the iPhone’s Spotlight Search Feature
Access this video file through your registered Web edition at my.safaribooksonline.com/9780132954310/media.
At the top center of the iPhone’s screen (shown in Figure 3.3), the current time is always displayed. To the left of the time is a series of icons representing the strength of your cellular service signal, as well as the name of your wireless service provider.
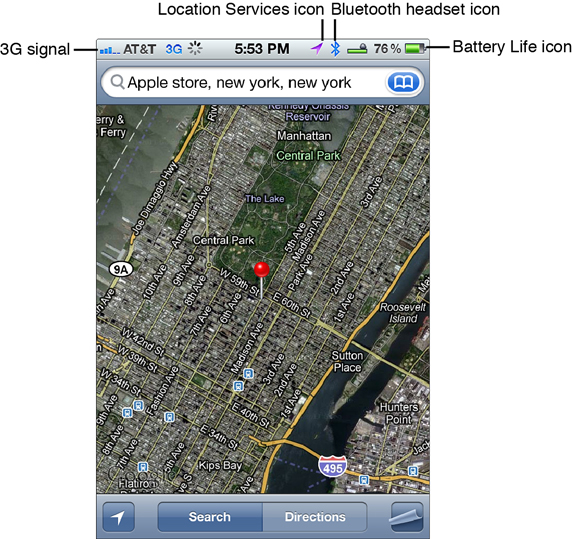
Figure 3.3 Constantly displayed along the top of the iPhone’s screen are a series of icons that keep you informed about the strength of the 3G or Wi-Fi signal that’s available, as well as whether specific features, such as Bluetooth or Location Services, are active. The iPhone’s battery life indicator also is displayed here.
The more signal bars you see in the upper-left corner of the screen, the stronger your cellular signal for making and receiving calls, as well as surfing the Web using a 3G connection will be.
When your iPhone is transmitting (sending or receiving data using a 3G connection), near the upper-left corner of the screen, a rotating circular icon is displayed. This icon is also shown in Figure 3.3 (near the upper-left corner.)
If your iPhone is connected to a Wi-Fi Internet connection, a Wi-Fi signal indicator is displayed next to the cellular service signal strength indicator icon, also near the top-left corner of the screen (shown in Figure 3.4).

Figure 3.4 If you’re connected to the Internet via Wi-Fi, the Wi-Fi signal indicator is displayed near the upper-left corner of the screen. A Wi-Fi connection has no limitations as to how much data you can send or receive.
When you put your iPhone into Airplane mode, the signal strength indicator icon is replaced by an airplane-shaped icon. This means your iPhone cannot connect to the cellular network to make or receive calls or access the Internet via a 3G connection. You can, however, turn on a Wi-Fi connection while your iPhone is in Airplane mode.
Near the top-right corner of the iPhone screen, a series of icons is displayed, based on which features and functions are being utilized. In the extreme upper-right corner of the screen is the battery life indicator. To the left of this, you may also see the Bluetooth icon or Location Services icon, for example, if these features are active.
Creating App Folders on the Home Screen
To help you organize your apps on the Home screen, you have the ability to group apps together into folders and then display those folders on your Home screen. Folders can also be used to reduce app-related clutter on your Home screen. Figure 3.5 shows a folder called Games, which was created to store five game apps.
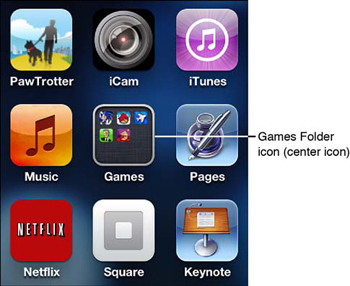
Figure 3.5 Using folders, you can group together apps that fit into the same category, such as Games, Work, Photography, News, and so on.
![]() LET ME TRY IT
LET ME TRY IT
Creating an Onscreen App Folder on Your Home Screen
To create an app folder that contains two or more app icons which will be displayed on your Home screen, follow these steps:
1. From the Home screen, decide which apps you want to group together into a folder.
2. Place and hold your finger on one of the apps you want to add into a folder for two to three seconds.
3. When all the Home screen app icons start to shake, drag the app icon your finger is pressing on directly on top of another app that you want to add to a folder.
4. A new folder that contains the original app you selected is automatically created, along with the app you dragged the original app on top of (shown in Figure 3.6). Your iPhone suggests a name for this folder. However, you can tap this name field and use the virtual keyboard to create whatever custom folder name you desire. Tap the Done icon on the virtual keyboard to save your changes, or if you’re sticking with the default folder name that your iPhone created, tap anywhere on the iPhone’s screen outside the folder.

Figure 3.6 After you drag one app icon on top of another, a new folder is created, and the iPhone suggests a name for the folder. You can then rename it if you want.
5. On your Home screen, the newly created folder is displayed. It looks like an app icon, but the graphic for the folder is a solid gray box with tiny thumbnail images representing the apps stored within the folder. At this point, you can save your change by pressing the Home button, or you can use your finger to drag additional app icons, one at a time, into this newly created folder.
6. After a folder is created and is displayed on your Home screen, you can treat it like any other app icon. For example, you can move it around on your Home screen.
7. To launch an app within a folder, first tap the folder icon displayed on the Home screen. The icons associated with each app stored within that folder are displayed. Next, tap the app icon of your choice to launch that app.
To remove an app from within a folder, press and hold down your finger on the folder icon until all of the icons on the Home Screen start to shake. Then, tap on the folder icon to open it. Using your finger, drag one app icon at a time out of the folder and move it anywhere on the Home Screen.
Switching Between Apps Using Multitasking Mode
As you’re using any app or from the Home screen, to enter into Multitasking mode, double-press the Home button. The Multitasking toolbar is displayed along the bottom of the screen (see Figure 3.7).

Figure 3.7 The Multitasking bar shows all apps currently running on your iPhone and allows you to quickly switch between apps.
Displayed on the Multitasking toolbar are all the apps currently running in the background on your iPhone. You can scroll left or right along this toolbar and then tap whichever app you want to access. The previously active app continues running in the background, and the newly selected app becomes the active app.
Using Multitasking mode, you can quickly switch between apps. This capability is useful in many situations. For example, you’re talking on the phone and need to look up information pertaining to an upcoming appointment within the Calendar app. Or you’re typing a document using the optional Pages app but want to quickly select, copy, and paste text from another app into the document you’re composing.
When the Multitasking bar is visible, you can close any currently running app by holding down any of the app icons displayed on the Multitasking bar until they start to shake and a red-and-white Negative Sign icon appears in the upper-left corner of each icon. Tap this Negative Sign icon for each app you want to shut down. Tap anywhere on the screen to exit this mode and return to the Home screen. Or press the Home button to return to the Home screen and exit Multitasking mode.
Using the Select, Select All, Copy, Cut, and Paste Commands
Built into the iOS 5 operating system are the Select, Select All, Copy, Cut, and Paste commands which you can use within almost every app. These commands work exactly the same ways as they do on a Mac or PC.
You can select text, photos, or graphics using the Select (or Select All) command; place it temporarily into a virtual Clipboard using the Copy command; and then paste that content in another location within the same app or within another app altogether using the Paste command.
The Select, Select All, Copy, Cut, and Paste commands work with almost all pre-installed and third-party iPhone apps, but not all of them.
To use these commands, you first need to select specific text, photos, or graphics (that is, content). To do this, use the Select command to select something specific, such as a word, phrase, or paragraph of text; a specific photo; or a graphic image (see Figure 3.8). To access the Select command, place and hold your finger down on a word, graphic, or photo that’s displayed on your screen. After a second or two, the Select command tab will appear.
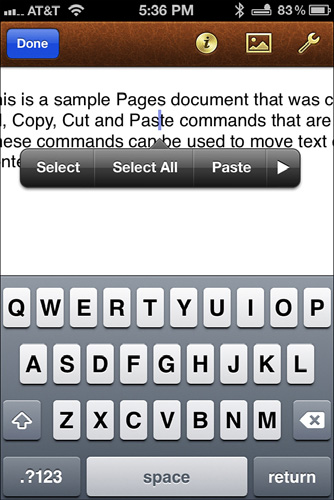
Figure 3.8 Use the Select or Select All command and then highlight content that you want to copy, cut, and paste.
To make the Select, Copy, and Paste commands appear as tabs on your iPhone’s screen, press and hold your finger on any word, graphic, or photo that you can view within an app that is compatible with these features.
The Select All command highlights all content on the page or screen. You don’t need to move the blue dots around like you would if you use the Select command.
When you tap the Select command tab, the word or content that you selected is highlighted in blue, and you are able to move around a blue dot to the right and left of what’s selected to increase or decrease the amount of selected content (as shown in Figure 3.9).
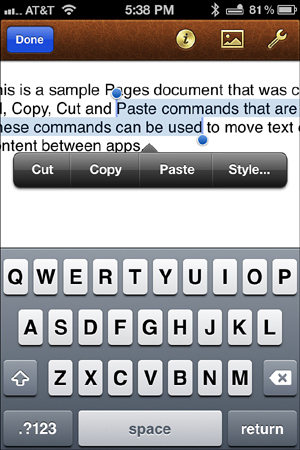
Figure 3.9 Move the blue dots that appear when the Select command is active to highlight more or less content that you want to select, copy, cut, and then paste.
When the content you want to cut or copy and then paste is highlighted, tap the Cut command to delete that content from the document or file you’re working on. Alternatively, tap the Copy command to save it to the iPhone’s virtual Clipboard.
After copying content to the iPhone’s virtual keyboard, move to the location where you want to paste that content. To make the Paste command tab reappear, hold your finger down on the location where you want to paste the content. This can be within the same or in another app altogether.
SHOW ME Media 3.2—Demonstration of the Select, Copy, and Paste Commands
Access this video file through your registered Web edition at my.safaribooksonline.com/9780132954310/media.
Connecting to the Internet with Your iPhone
Your iPhone has the capability to connect to the Internet using one of two methods. First, it can use the 3G wireless data network offered by your wireless service provider.
Unless your wireless service provider offers an unlimited data plan, you have a predetermined monthly allocation pertaining to how much data you can send or receive via its network. When an unlimited data plan is not offered, the monthly data allocation is typically 2GB per month, but this amount may vary based on the terms of your service plan.
If you go beyond the monthly 3G wireless data allocation provided by your wireless service provider, you are billed extra for every additional megabyte (not gigabyte) of data you utilize. Paying for the extra data transmission can get extremely costly if you’re not careful.
The alternative way you can use your iPhone to connect to the Internet is with Wi-Fi. To use this method, you must be within a Wi-Fi hotspot and, while connected to the Web, stay within the hotspot’s signal radius. A Wi-Fi hotspot typically extends between 100 and 150 feet from the wireless Internet router generating the Wi-Fi signal.
You can set up a wireless home network that includes a Wi-Fi hotspot by adding a wireless Internet router to your home or office Internet connection. You can also find Wi-Fi hotspots in hotels, airports, Internet cafes, coffee shops, libraries, and schools.
When you use Wi-Fi to connect to the Internet with your iPhone, the connection is typically much faster, and there is no limit to how much data you can send and receive.
 TELL ME MORE Media 3.3—iPhone Internet Connection Options
Access this audio file through your registered Web edition at my.safaribooksonline.com/9780132954310/media.
To utilize some of web-related apps and features of your iPhone, including FaceTime, iCloud Backup, iCloud Photo Stream, and to download files from the iTunes Store or App Store that are more than 20MB in size, you must use a Wi-Fi connection. A 3G connection does not work.
Likewise, if you want to stream content from the Internet, such as movies, videos, or TV shows, depending on the app you’re using, a Wi-Fi connection may be required.
Turning On or Off Your iPhone’s 3G Internet Connection
As long as your iPhone is not manually placed into Airplane mode, if you’re within the coverage area of your wireless service provider, you see signal bars for making and receiving calls from your iPhone, and see a corresponding 3G icon indicating that wireless data service is available.
If this is the case, you can use your iPhone to access the Internet using the Safari web browser app, the Mail app to manage your email accounts, the Messages app to send/receive text messages, or any of the other apps that utilize the Web.
The iTunes app, for example, is used to access the iTunes Store to purchase and download music and other content, while the YouTube app is used to stream YouTube videos from the Web to your iPhone’s screen. Any app that needs to utilize the Internet is able to do so, as long as a 3G wireless data signal is available.
![]() To learn more about making and receiving calls using your iPhone, see “Placing and Receiving Calls,” (Chapter 6).
To learn more about making and receiving calls using your iPhone, see “Placing and Receiving Calls,” (Chapter 6).
There are several situations in which it becomes necessary or desirable to turn on your iPhone’s Airplane mode—for example, when you’re flying on an airplane. This feature also is useful when you’re traveling overseas and don’t want to utilize the phone in ways that will generate hefty international roaming fees, yet you still want to be able to connect to the Web using a Wi-Fi connection and take advantage of your iPhone’s other functionality.
![]() LET ME TRY IT
LET ME TRY IT
Turning the Airplane Mode On and Off
To turn on or off Airplane mode on your iPhone, follow these steps:
1. From the Home screen, launch the Settings app.
2. When the main Settings menu is displayed, the first option is Airplane mode. It is accompanied by a virtual on/off switch.
3. Turn Airplane mode off (the default setting) to allow your iPhone to connect to the Internet via a 3G wireless data connection and/or to make and receive phone calls. Turn the virtual switch associated with Airplane mode to the on position to prevent your iPhone from transmitting, thus preventing the phone from making or receiving calls, accessing the Web, or sending and receiving text messages or emails, for example.
There are some areas you may travel to within the United States (or the country your iPhone is registered in) where 3G wireless data service is not available. In some cases, your phone may connect to a slower 2G network or may not be able to connect to the Internet at all.
Virtually every major city in the United States, however, offers 3G connectivity through all the various wireless service providers.
Establishing a Wi-Fi Internet Connection from Your iPhone
Whether a 3G connection can be established between your iPhone and your wireless service provider, if you have the Wi-Fi function of your iPhone turned on, you have the ability to connect to a Wi-Fi home network or hotspot, assuming a Wi-Fi signal is present.
To turn on or off the iPhone’s Wi-Fi feature, launch the Settings app. From the main Settings menu, tap the Wi-Fi option, which is listed just below the Airplane mode option.
When you tap the Wi-Fi option within Settings, the Wi-Fi screen reveals a virtual on/off switch that’s associated with the Wi-Fi option. When this setting is turned on, your iPhone automatically looks for a Wi-Fi network to connect to.
During this process, under the Choose a Network heading, any available Wi-Fi networks are displayed (see Figure 3.10). If the Wi-Fi network is public, tap that network’s listing to connect to the Internet via that Wi-Fi hotspot.

Figure 3.10 When the Wi-Fi feature is turned on, your iPhone seeks out and displays all available Wi-Fi networks (hotspots) you can connect to.
If, however, a Lock icon appears next to a Wi-Fi network’s listing, this means the Wi-Fi network is password protected. If you tap a locked Wi-Fi networking listing, you are prompted to enter a password to be able to connect to that network.
After a Wi-Fi connection is established, when your iPhone needs to access the Web, it uses the Wi-Fi network instead of a 3G network, which often provides you with a significantly faster web surfing experience.
You can tell that you’re connected to a Wi-Fi network because a Wi-Fi signal strength indicator icon is displayed near the top-left corner of the screen. (Refer to Figure 3.4.)
If no Wi-Fi signal is available wherever you happen to be, your iPhone defaults to using a 3G connection, if available. However, if you leave the Wi-Fi option on your iPhone turned on, the phone continuously searches for an available Wi-Fi signal, and this depletes your iPhone’s battery much faster.
So, if you’re not using your iPhone’s Wi-Fi capabilities, turn off this feature within the Settings app.
TELL ME MORE Media 3.4—Pros and Cons of Using a Wi-Fi Internet Connection
Access this audio file through your registered Web edition at my.safaribooksonline.com/9780132954310/media.