Placing and Receiving Calls
By now, you probably realize that your iPhone (if it’s running iOS 5) is capable of handling many types of tasks that were never before possible on a mobile device. This is in part due to its Internet connectivity and its newfound capability to utilize Apple’s iCloud service for data synchronization and file sharing.
First and foremost, however, your iPhone is a cell phone that’s designed to make and receive calls. However, the Phone app that comes pre-installed on your iPhone offers integration with other apps, including FaceTime, Contacts, and Voice Control (or Siri on the iPhone 4S).
The Phone app’s features enable you to do the following:
• Access FaceTime to participate in a real-time video conference with another FaceTime user. (A Wi-Fi Internet connection is required.)
• Use iOS 5’s Voice Control feature to issue voice commands and control the Phone app without using the touch screen. If you’re an iPhone 4S user, use Siri for this purpose.
• Initiate a three-way conference call.
• Maintain a detailed history of all incoming and outgoing calls.
• Maintain a list of your most frequently called contacts, with support for one-tap dialing of those phone numbers.
• Manage your voicemail.
• Mute the microphone during a conversation.
• Use a Bluetooth headset (or hands-free car kit) so you can safely engage in calls while driving or utilize the iPhone’s Multitasking mode to use other apps, features, and functions (as long as you’re not driving).
• Utilize Call Forwarding to automatically forward incoming calls to another phone number (such as your home or office).
This chapter gets you up to speed making and receiving calls using the Phone app on your iPhone and teaches you how to use its other call-related features.
Understanding Your Calling Plan
When you activated your iPhone, you signed up for a specific calling plan with your wireless service provider. This plan probably includes a predetermined number of “peak” calling minutes that can be used on weekdays. The hours wireless service providers consider “peak” time vary. For example, this time may be between 7:00 a.m. and 7:00 p.m. Each time you make or receive a call during peak time, your monthly minute allocation diminishes. When you use up your monthly minutes, you are charged a hefty per-minute rate thereafter.
With most wireless service providers, unlimited calling is permitted during “off-peak” times, which include nights and weekends. You are not charged extra for long-distance calls, as long as calls are made to and within your home country. International calling fees apply if you make calls from your home country to another country. International roaming rates apply if you travel abroad and use your iPhone outside your home country.
Depending on your calling plan, calls between your iPhone and another cell phone may also be unlimited and never count against your peak minute allocation, or your unused peak minutes may roll over to the next month.
Some wireless service providers offer a monthly, flat-rate service plan, which includes unlimited calling, text messaging, and wireless data usage. If you subscribed to this type of plan, you don’t need to monitor your usage. However, international calling and international roaming fees still apply.
Depending on your wireless service provider, you can typically travel overseas and then make and receive calls while abroad. However, when you do this, you are charged hefty International Roaming fees (ranging from $1.99 to $4.99 per minute).
If you want to make calls while overseas or to qualify for discounted International Roaming rates, some service providers require that you activate a special international calling plan before leaving your home country.
An alternative is to use the Skype app (in conjunction with a Wi-Fi Internet connection) to be able to place and receive international calls for just pennies per minute. This app uses Voice-Over-IP technology, as opposed to a wireless cellular network, yet typically offers crystal-clear call clarity.
Before you start using your iPhone to make and receive calls, understand what your wireless service plan includes so that you can avoid unexpected charges on your monthly bill. Most wireless service providers offer a free app for monitoring your usage, managing your wireless service account, and paying the monthly bill directly from your iPhone.
Deciding How You’ll Interact with Callers
Before you start making and receiving calls, determine how you’ll interact with your callers. You can hold the iPhone up to your ear and treat it like a normal phone after you initiate or answer a call. The drawback to this technique is that you cannot simultaneously surf the Web or use any of the iPhone’s other apps or functions. In some states, it is illegal to hold a cell phone up to your ear while driving.
One alternative is to use the iPhone’s built-in Speakerphone feature. When a call is in progress, tap the Speaker icon. Although this technique offers hands-free operation, it does not allow you to engage in a private conversation, and using the Speakerphone feature detracts from the call’s clarity because your iPhone’s built-in microphone picks up all ancillary background noise in the area.
Another, more practical alternative, which offers hands-free phone operation and call clarity, is to use a Bluetooth wireless headset (or wired headset) in conjunction with the Phone app. Most headsets, such as those available from Jawbone (www.jawbone.com), offer state-of-the-art noise-reduction technology, provide high-definition sound quality, and fit comfortably in one ear.
 TELL ME MORE Media 6.1—Reasons to Invest in a Good-Quality Wireless Bluetooth Headset
Access this audio file through your registered Web edition at my.safaribooksonline.com/9780132954310/media.
If you spend a lot of time in your car, you can install a wireless (Bluetooth) hands-free car kit within it. This kit allows your iPhone to tap into your car’s stereo system, plus use a separate microphone, so you can enjoy hands-free phone operation while you’re driving without using a headset.
Placing Calls from Your iPhone
The Phone app offers several ways to initiate a call; you can do the following:
• Tap the Favorites icon and then tap one contact within your Favorites list to initiate a call to that person. This technique requires you to first populate the Favorites list.
• Tap the Recents icon displayed at the bottom of the Phone app to view a detailed call history of calls made and received. By tapping on any call listing, you can initiate a new call to that person.
• Tap the Contacts icon, also displayed at the bottom of the Phone app, to see a complete listing of all contacts stored within your personal Contacts database (associated with the Contacts app). Find a contact from the All Contacts screen and then tap one of the phone numbers listed within that contact’s entry.
• Tap the Keypad option to manually dial a phone number. When dialing domestically within the United States, use the 1+Area Code+Phone Number (1+###+###+####) format.
Creating a Favorites List and Initiating Calls Using It
When you launch the Phone app, the same five command icons are almost always displayed at the bottom of the screen. In the lower-right corner of the screen is the Favorites icon.
Tap Favorites to reveal a manually created list of the contacts you call the most. These contacts are displayed on the Favorites screen (shown in Figure 6.1). After you populate this list, simply tap a contact’s listing, and an outgoing call is immediately initiated.
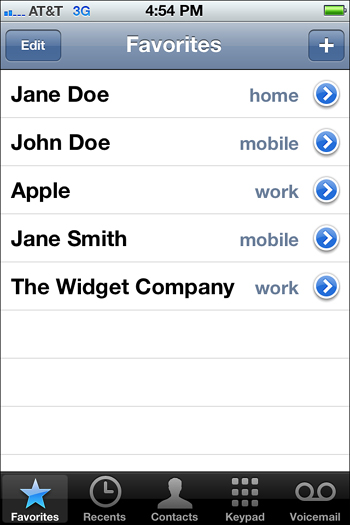
Figure 6.1 The Favorites screen allows for one-tap dialing to the contacts you designate as Favorites.
![]() LET ME TRY IT
LET ME TRY IT
Adding Contacts to Your Favorites List and Initiating Calls From It
To populate and personalize the Phone app’s Favorites list, follow these steps:
1. Launch the Phone app and tap the Favorites command icon.
2. Tap the plus-sign icon displayed in the upper-right corner of the screen.
3. The All Contacts screen appears. This listing contains all the entries stored within your personal Contacts database associated with the Contacts app. Either use the Search field at the top of the listing or scroll downward until you find the entry for the person or company you want to add to your Favorites list. Tap the entry to view it.
4. When viewing the Contacts entry, tap the phone number you want to add to your Favorites list. Each Favorites listing can have one name and one phone number associated with it. However, you can create multiple listings within Favorites for someone’s Home, Work and/or Mobile phone number for example.
5. When the Add Phone Number screen appears, associate the phone number as being either a Voice Call number or a FaceTime number, and tap the appropriate icon.
6. The Favorites screen reappears, and at the bottom of your Favorites list is the contact you just added, along with one of this person’s phone numbers that you selected. Tap the blue-and-white > icon to reveal that contact’s complete Contacts entry within the Phone app, or tap the name to dial the number and initiate a call.
One at a time, add as many individual contact names and phone numbers to your Favorites list as you desire. To reorganize the order of the list, tap the Edit icon displayed in the upper-left corner of the Favorites screen.
While in Edit mode, tap the red-and-white negative sign icon to delete a listing from your Favorites list. Place your finger on the icon that’s displayed to the extreme right of each listing (it looks like three horizontal lines) and drag it up or down to reorganize your list. Tap the Done icon (displayed in the upper-left corner of the screen) to save your changes.
Utilizing the Phone App’s Recents List
The Phone app automatically maintains a detailed call history of all incoming and outgoing calls made from your iPhone (shown in Figure 6.2). To access this listing, tap the Recents icon displayed near the bottom of the Phone app’s screen.
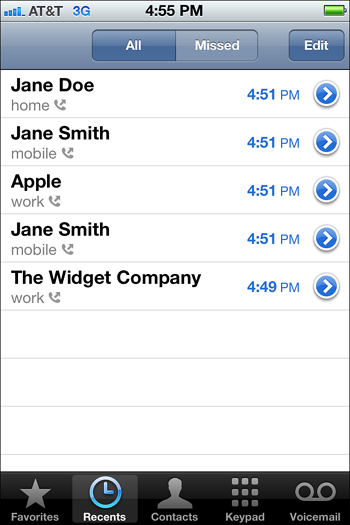
Figure 6.2 View all incoming and outgoing calls made from your iPhone from the Recents list. Tap any listing to dial that number.
As you’re looking at the Recents screen, all missed calls are displayed in red, whereas all other calls are displayed in black. You can sort the calls by tapping the All or Missed tab displayed near the top center of the Recents screen.
Assuming their details are stored within the Contacts app, each call listing displayed on the Recents screen includes the contact’s name on the left side of the screen. Below the contact’s name, if applicable, you can see whether the call was to or from that person’s Home, Work, Mobile, or iPhone number. Otherwise, just the phone number or Caller ID information is listed on the Recents screen.
On the right side of the screen, the time of each call is displayed, along with a blue-and-white > icon. Tap this icon to reveal the Info screen pertaining to that call, which includes details about the contact (if the entry is stored in your
Contacts database), as well as more information about the call itself, including its duration.
Scroll to the bottom of the Info screen to reveal four command icons, labeled Send Message (to send that person a Text Message), FaceTime (to initiate a FaceTime call with that person), Share Contact (to email the contact info to someone else), or Add To Favorites (to include this contact within your Favorites list).
As you’re looking at the Recents list, if you tap the Edit icon displayed in the upper-right corner of the screen, you are able to delete individual listings by tapping the red-and-white negative sign icon associated with a listing. Alternatively, you can clear your entire Recents list by tapping the Clear icon (displayed in the upper-left corner of the screen).
The Recents list is handy for using one-tap dialing to reach people or companies you’ve recently conversed with but who are not stored in your Favorites list.
Finding and Dialing Phone Numbers from Your Contacts Database
Contacts is a powerful app for maintaining a personal database of the people you know or are in contact with. Entries can be for family members, friends, coworkers, employees, customers, clients, vendors, or anyone else you deal with in your personal or professional life.
The Contacts app nicely integrates with the Phone app. To access entries from your Contacts database, tap the Contacts icon displayed within Phone app.
At the top of the All Contacts list that’s then displayed, use the Search field to quickly find a contact by performing a keyword search. Alternatively, use your finger to scroll up or down through the listing. To jump to a specific letter in the alphabetized list, tap any letter displayed on the right side of the screen.
While viewing the All Contacts list, tap the plus-sign icon (displayed in the upper-right corner of the screen) to add a new contact to your Contacts database. Or tap on the Groups icon (displayed in the upper-left corner of the screen) to display your Contacts listings by group.
![]() To learn about the Contacts app and how to create Contacts entries, see “Managing Contacts on Your iPhone,” (Chapter 10).
To learn about the Contacts app and how to create Contacts entries, see “Managing Contacts on Your iPhone,” (Chapter 10).
When you find a Contacts entry that contains a person and phone number you want to call, tap it to view that entry. Then tap any phone number listed within that entry to initiate a call to that number.
Manually Dialing a Phone Number to Initiate a Call
If details about the person, company, or organization you want to call are not stored within your iPhone, but you know the phone number you want to dial, tap the Keypad option (shown in Figure 6.3) to manually dial a phone number.

Figure 6.3 Use the Keypad to manually dial a phone number; then press the Call button to initiate the call.
The Keypad within the Phone app resembles a traditional telephone keypad. Using your finger, tap one digit at a time to enter the phone number you want to dial and then tap the green-and-white Call button to initiate the call.
As you’re entering a phone number manually using the Keypad, if you make a mistake, tap the left-pointing arrow icon (located to the right of the Call icon). This deletes the last digit you entered in the phone number.
After you initiate a call, you might need to tap the Keypad option again to navigate your way through a voicemail system during a call.
 SHOW ME Media 6.2—Manually Dial a Phone Number, Initiate, and Then End a Call
Access this video file through your registered Web edition at my.safaribooksonline.com/9780132954310/media.
Participating in a Phone Conversation
As soon as you initiate a call or receive one, the screen on your iPhone changes. Displayed on the Call-In-Progress screen (shown in Figure 6.4) is the name or phone number of the person you’re speaking with. This is determined based on whether information about the person you’re conversing with is stored in the Contacts app as well as what information was provided by Caller ID (for an incoming call).
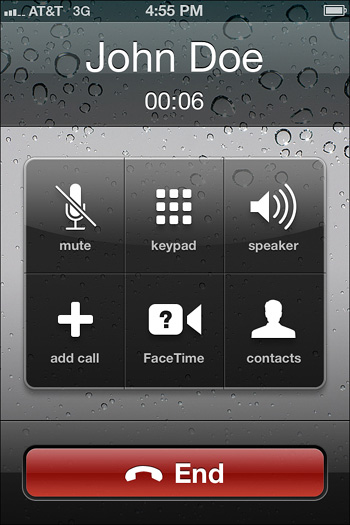
Figure 6.4 You have access to a handful of calling features from this Call-In-Progress screen within the Phone app.
At the bottom of the screen, while a call is in progress, a large red-and-white End icon is displayed. Tap this at any time to end the call. Tapping this icon is equivalent to hanging up a traditional phone (after you say good-bye).
Displayed in the middle of the screen during a call are six command icons that give you added functionality while you’re on the phone. Based on options you choose, these icons may change during a call. Likewise, if details about the person you’re on the phone with are stored in Contacts, and a photo is linked to that Contacts entry, the photo of the person you are speaking with also is displayed on the Call-In-Progress screen.
Turn Off the iPhone’s Mic Using the Mute Button
During a phone conversation, tap the Mute button to turn off your iPhone’s microphone (or the microphone associated with a headset). You still can hear the person you’re on the phone with, but that person isn’t able to hear you.
Manually Enter Phone Numbers Using Keypad
To navigate your way around a voicemail system during a call, tap the Keypad icon. This reveals the telephone keypad and allows you to interact with a computerized voicemail system by pressing individual numbers. If the voicemail operator says, “Press 0 to speak with a representative,” for example, tap the Keypad option, followed by the zero key.
Transform Your iPhone into a Speakerphone Using Speaker
Tap the Speaker icon to active the Speakerphone option of the iPhone. You then hear the person you’re on the phone through the phone’s primary speaker, as opposed to the phone speaker used when holding the phone up to your ear.
If you have a wireless Bluetooth headset connected to your iPhone, the Speaker icon is replaced by the Audio Source icon. Tap it to choose between the headset, speaker, or iPhone option (which refers to holding the phone up to your ear). During a call, you can freely switch between these options by tapping the Speaker or Audio Source icon.
Create a Conference Call Using Add Call
The Add Call option allows you to initiate a three-way conference call while you’re on the phone with someone. To use this feature, first begin conversing with the first party you want to bring into the conference call. When that person is on the line, tap the Add Call icon.
Now use any of the command icons displayed at the bottom of the Phone app’s screen (Favorites, Recents, Contacts, or Keypad) to find or manually enter the phone number for the second party you want to add to the call.
Initiate that second call. Then tap the Merge Calls icon, which replaces the Add Call icon displayed within the Call-In-Progress screen, to create a three-way conference call. Alternatively, you can tap the Swap calls icon (which replaces the FaceTime icon) to switch between calls and keep them separate.
This technique also works if you’re on the phone with one person and someone else calls you and activates Call Waiting. You then have the option to ignore the incoming call, switch between calls, or create a conference call, based on the onscreen icons you tap.
SHOW ME Media 6.3—Initiate a Three-Way Conference Call
Access this video file through your registered Web edition at my.safaribooksonline.com/9780132954310/media.
Participate in a Video Conference with FaceTime
FaceTime is a separate app that works seamlessly with the Phone app; it allows you to participate in real-time video conference calls with other FaceTime users. This feature works with all iPhone models that have both a front- and rear-facing camera (but not with older iPhone models).
For FaceTime to work, you need to be connected to a Wi-Fi Internet connection. This feature does not work with a 3G Internet connection. Also, the person you plan to engage in a FaceTime video conference must also be a FaceTime user.
FaceTime software is also available for Macs, and it comes free on all iPhones, iPads, and iPod touch models that have a front- and rear-facing camera. When you use FaceTime with your iPhone, your iPhone’s phone number automatically becomes your FaceTime username.
If you’re trying to initiate a FaceTime video conference with another iPhone user, you need to know that user’s iPhone’s phone number. That person also needs to be within a Wi-Fi hotspot.
To initiate a FaceTime call with an Mac, iPad, or iPod touch user, you need to know that person’s FaceTime username (which is often his Apple ID or another email address).
Before you begin using FaceTime, launch the Settings app. From the main Settings menu, tap the FaceTime option. From the FaceTime menu screen within Settings, make sure the FaceTime feature is turned on. To do this, tap the virtual on/off switch displayed at the top of the screen (next to the FaceTime option) and make sure the virtual switch is set to the on position.
If you want to use your Apple ID as your FaceTime username (instead of your iPhone’s phone number), tap the Use Your Apple ID For FaceTime icon displayed in the center of the screen.
Alternatively, you can add an email address that will be linked to your FaceTime account so that people can initiate FaceTime calls with you using the linked email address as your FaceTime identifier (which is like your unique phone number). To do this, tap the Add An Email option displayed at the bottom of the FaceTime menu screen within Settings.
When FaceTime is set up, whenever your iPhone is connected to the Internet via a Wi-Fi connection, any other FaceTime users who are stored in your iPhone within Favorites, Recents, or Contacts, and who are also actively connected to FaceTime can be reached within the Phone app.
To initiate a FaceTime call from your iPhone, find the person you’re calling using the Contacts app, scroll down within that person’s entry, and tap the FaceTime icon. Next, tap the FaceTime phone number or email address for that person, based on where the FaceTime icon appears. A FaceTime connection (or “call”) is initiated. You can also store a name and someone’s FaceTime account information within your Favorites list and then initiate a video conference call with that person from your Favorites list.
The trickiest part of using FaceTime is figuring out the FaceTime phone number, Apple ID, or email address associated with someone else’s FaceTime account and then making that initial connection. After that, you are able to connect with a single tap on the screen.
When using FaceTime on an iPad 2 or Mac, you need to launch the FaceTime app and sign in before you are able to initiate or receive FaceTime calls. As long as you’re within a Wi-Fi hotspot, this step is not necessary using an iPhone.
As soon as you initiate a FaceTime connection, the message “FaceTime with” and the person’s name are displayed on the screen. You also see a Call End icon, which you can tap at any time to close the connection and end the FaceTime call.
If the person you’re calling with FaceTime answers, your own video image shrinks on your iPhone’s display and becomes a smaller thumbnail image. At the same time, an image of the person you’re connecting with appears, utilizing almost the entire screen of your phone.
When a FaceTime call is underway, you see three command icons on the screen, including a Mute button, the Call End icon, and a Switch Camera icon.
During a conversation, tap the Mute button to shut down the microphone of your iPhone, allowing the person you’re video conferencing with to see you but not hear you.
At any time, tap the Call End icon to close the FaceTime connection. Or, during a FaceTime call, tap the Switch Camera icon on your iPhone to switch between the front- and rear-facing camera. During a call, you can hold your iPhone either horizontally or vertically.
When you’re using FaceTime, the image you transmit is more stable if you hold the iPhone steady. The best way to accomplish this is to use an optional stand and place your phone on a flat surface, propped up at an angle suitable for capturing you on-camera as you talk. There are a handful of optional iPhone stands that work well for this purpose.
TELL ME MORE Media 6.4—Using FaceTime and the Contacts App Together
Access this audio file through your registered Web edition at my.safaribooksonline.com/9780132954310/media.
Access Your Contacts Database Using Contacts
While you’re on the phone, you can look up any entry stored within your Contacts database. As you’re accessing the Contacts app, continue speaking with the person you’re on the line with, assuming you’re using the iPhone’s Speakerphone option, a headset, or a hands-free car kit, and not holding the phone up to your ear.
Multitasking During a Call
In addition to accessing the Contacts app within the Phone app during a phone call, at any time, you can double-press the Home button to enter into Multitasking mode and switch between apps. Alternatively, tap the Home button once to return to the iPhone’s Home screen (with a call still in progress) and launch any other app.
Whenever you access the Home screen or another app while a call is in progress, a green banner (shown in Figure 6.5) appears along the top of the screen. At any time, tap this banner to return to the Phone app to terminate a call or use another call-related feature.
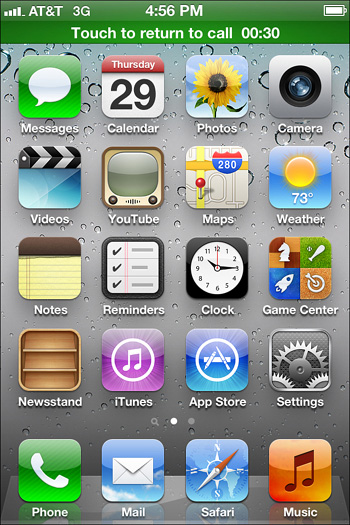
Figure 6.5 To return to the Phone app when you’re on a call but using another app, tap the green banner that says Touch To Return To Call. It’s displayed at the top of the screen.
Use the Other Apps Also Integrated with the Phone App
You’ll discover that many other apps also integrate seamlessly with the Phone app, allowing you to initiate a call from almost any app that displays a phone number. For example, if you’re surfing the Web using Safari, and you encounter a phone number you want to call, tap that number to initiate the call.
Within the Maps app, you can use the Search field to enter the name of any company or business (along with its city and/or state) and then find the location and contact details associated with it. Within Maps, as you’re looking at a business’s phone number, tap it to dial the number and initiate a call. You can also tap the Save As Contact icon to store that business and its contact information within your Contacts database (which is then readily accessible from the Phone app).
Even if the Phone app isn’t active, if you launch and use the Contacts app, tap any phone number included within any Contacts entry. The Phone app automatically launches and a call to that phone number is initiated.
Receiving Calls
As long as your iPhone is not turned off or in Airplane mode (and you’re within your wireless service provider’s coverage area or roaming), it is able to receive calls. Anytime you receive an incoming call, the Phone app overrides whatever you’re doing on your iPhone and displays the incoming call screen (shown in Figure 6.6).
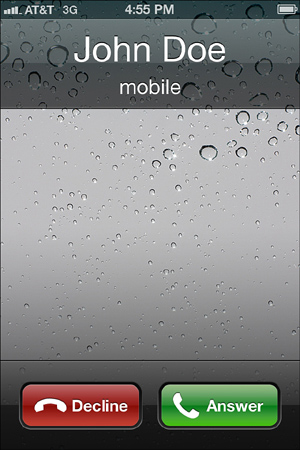
Figure 6.6 When you receive an incoming call, whatever you are doing is overridden by the incoming call screen, which allows you to decline or accept an incoming call.
Within the Contacts app, you can link a custom ringtone to any contact entry. So, when that person calls you, you hear a custom ringtone, as opposed to the iPhone’s default ringtone (which can be set within the Settings app).
You can purchase and download custom ringtones from the App Store for $1.29 each. Custom ringtones can include clips from popular songs, for example.
To purchase, download, and install custom ringtones, launch Settings and select the Sounds option from the main Settings menu. Scroll down the Sounds screen and tap the Ringtone option. At the top of the Ringtone screen within Settings, tap the Buy More Tones option. You are directed to a special area within the iTunes Store that sells ringtones.
The incoming call screen, which displays Caller ID information, also displays the caller’s name and photo, if the call is coming from someone whose contact information (and photo) is already stored within the Contacts app (as shown in Figure 6.7).

Figure 6.7 When you link a photo with a contact entry within the Contacts app, that contact’s photo is displayed on the incoming call screen whenever that person calls your iPhone.
If the iPhone is in Sleep mode, it wakes up the device and displays a slightly different incoming call screen (shown in Figure 6.8). You need to slide your finger along the Slide to Answer slider to first unlock the phone and launch the Phone app.

Figure 6.8 When the iPhone is in Sleep mode, you need to use the Slide to Answer slider to simultaneously unlock the phone and answer an incoming call.
If, however, you’re using a wireless Bluetooth headset, you can tap the Answer button on your headset to unlock the phone, launch the Phone app, and answer the incoming call.
Whenever the incoming call screen is displayed (and you hear the incoming ringtone), you have the option to ignore (decline) the call and send it directly to voicemail. To do this, tap once on the Sleep/Wake button located on the top of the iPhone.
If you’re working on your iPhone when an incoming call arrives, a slightly different incoming call screen appears. This one displays the incoming call’s Caller ID information (combined with any content, such as the caller’s photo) stored within your Contacts app. At the bottom of the incoming call screen is a red-and-white Decline icon and a green-and-white Answer icon.
Tap the Decline icon to send the call directly to voicemail without answering it. Alternatively, tap the Answer icon to answer the call. The call-in-progress screen of the Phone app is then displayed (refer to Figure 6.4).
Using iOS 5’s Voice Controls Feature to Control the Phone App
iOS 5’s Voice Control feature works on the iPhone 3Gs and iPhone 4. If you’re an iPhone 4S user, skip this section and plan to take advantage of Siri to control your iPhone using voice commands.
![]() To learn using Siri on the iPhone 4S, see “iPhone 4S Users: Get to Know Siri, Your New Personal Assistant,” (Chapter 14).
To learn using Siri on the iPhone 4S, see “iPhone 4S Users: Get to Know Siri, Your New Personal Assistant,” (Chapter 14).
Voice Controls allows you to control many of the features built into the Phone app using your voice. To use this feature anytime (while any app is active), press and hold down the Home button until the blue-and-white Voice Command screen (shown in Figure 6.9) appears. At the same time, your iPhone emits a beep.

Figure 6.9 Use your voice to initiate calls from your iPhone.
The Voice Control feature works with the Phone app as well as the Music app. You can also use it to tell you what time it is by activating the Voice Control feature and saying “What time is it?”
Now, either into the iPhone’s microphone (or into your wireless Bluetooth headset), say the command “Call” or “Dial,” followed by the person’s full name. The person you’re verbally trying to call must have a listing within your Contacts database.
If, however, that person has multiple phone numbers within the listing, you need to say “Call” or “Dial”; the person’s full name; and the word “Home,” “Work,” or “Mobile,” for example. Be sure to pause briefly between each command, and when speaking a name, use the person’s first and last names.
To dial a phone number for someone not listed within your Contacts database, launch the Voice Control feature and then say “Call” or “Dial,” followed by a phone number. Speak each digit of the phone number slowly and clearly.
If you accidently activate the Voice Control option, to exit it, say the word “Cancel” or “Stop,” or manually press the Home button on your iPhone.
Working with Visual Voicemail
Built into the Phone app is what Apple calls Visual Voicemail. This feature allows you to record your outgoing voicemail message and listen to and manage incoming voicemail messages within the Phone app.
To manage voicemail on your iPhone, launch the Phone app and then tap the Voicemail icon displayed in the lower-right corner of the screen. The Phone app’s Voicemail screen appears (shown in Figure 6.10).
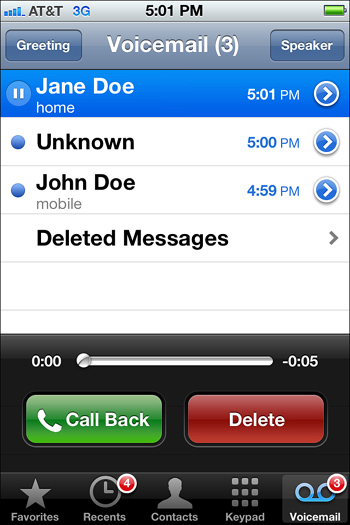
Figure 6.10 Manage your iPhone’s voicemail account and listen to incoming voicemails from this screen. Tap the Voicemails icon within the Phone app to access it.
Tap the Greeting icon (displayed in the upper-left corner of the screen) to record or rerecord your outgoing voicemail message. For example, you might want to record, “Hello, you’ve reached the cellular voicemail for [insert your name]. I can’t answer the phone right now, but please leave your name and phone number, along with a brief message, and I will return your call as soon as possible. Thank you for calling.”
Because managing Visual Voicemail requires you to use the iPhone’s touch screen and listen to voicemails simultaneously, either have your wireless Bluetooth headset (or a wired headset) connected to your iPhone or tap the Speaker icon displayed in the upper-right corner of the Voicemail screen to activate the iPhone’s built-in speaker.
In the main area of the Voicemail screen is a list of incoming voicemail messages. Based on Caller ID information and data from your Contacts database, the incoming caller’s name and/or phone number is displayed. (However, if the person has Caller ID blocked, the call could be displayed as Unknown or Private.)
To the right of each voicemail listing is the time or date it was received. Tap the blue-and-white > icon related to any voicemail listing to reveal a detailed Info screen related to that incoming call and message.
![]() LET ME TRY IT
LET ME TRY IT
Listening to and Managing Incoming Voicemail Messages
To listen to and then save or delete an incoming voicemail message, follow these steps:
1. Launch the Phone app on your iPhone.
2. Tap the Voicemail icon displayed in the lower-right corner of the screen.
3. If you’re not using a headset, tap the Speaker icon displayed in the upper-right corner of the screen.
4. From the listing of incoming voicemails, tap the name or phone number associated with a listing. A blue-and-white Play icon appears to the left of the listing. Tap this Play icon to begin playing the recorded message.
5. While a voicemail message is playing, the Play icon transforms into a Pause icon. Use it to temporarily pause the message’s playback.
6. Below the voicemail listings is a time slider for the message. Use your finger to slide the dot within this slider to the right to fast-forward within a message. Or move the dot to the left to rewind the message.
7. Near the bottom of the Voicemail screen are two icons that become active after a voicemail message is selected. They’re labeled Call Back and Delete. Tap the Call Back option to initiate a call to the person who left the voicemail message and call her back. Tap the Delete icon to delete the voicemail message. Do nothing, and the voicemail message remains saved and accessible from your iPhone.
If you accidently delete a voicemail message that you wanted to save, scroll down to the bottom of the voicemail message listing on the Voicemail screen. Tap the Deleted Messages icon. A listing of deleted messages is displayed. Tap a deleted message’s listing and then tap the Undelete icon to restore the message and replay it.
Accessing Your iPhone’s Voicemails from Another Phone
In addition to using this Voicemail screen to listen to your messages, from any other phone, you can manually call your iPhone’s phone number or your wireless service provider’s remote access phone number. When you do this, you need to enter a numeric password that you create within the Settings app.
For example, if you’re at home or work and want to call your iPhone’s voicemail system and listen to your messages or rerecord your outgoing message, dial your iPhone phone number. When you hear your own outgoing message, press the star (*) key on the phone’s keypad. When prompted, enter your numeric password, followed by the pound (#) key, and follow the voice prompts you hear. (This process may be slightly different, based on your wireless service provider.)
![]() LET ME TRY IT
LET ME TRY IT
Setting or Changing Your Voicemail Password
If you want to listen to your voicemails by calling your voicemail account from any other phone besides your iPhone, you need to enter a password. To create or change a voicemail password, follow these steps:
1. Launch the Settings app from the Home screen.
2. Select the Phone option from the main Settings menu.
3. From the Phone menu screen within Settings, scroll down to the Change Voicemail Password feature and tap it.
4. Enter your existing passcode (if applicable). If you have not yet created one, it may be the last four digits of your iPhone’s phone number, or it will be provided by your wireless service provider.
5. When prompted, enter the new numeric password of your choice. Tap the Done icon when you’re finished.
Customizing the Phone App
Like many apps on your iPhone, the Phone app has a handful of customizable settings associated with it. You can access them from the Settings app. To do this, launch Settings and tap the Phone option from the main Settings menu.
From the Phone menu screen that appears within Settings (shown in Figure 6.11), under the Calls heading are various options that allow you to control the Call Forwarding, Call Waiting, Caller ID, and TTY features built into the Phone app.
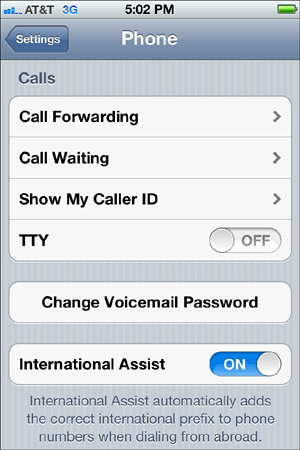
Figure 6.11 Customize a handful of Phone app-related settings within the Settings app.
Call Forwarding allows you to transfer all incoming calls to your iPhone to another phone number that you pre-select. The Call Waiting option allows you to turn on or off the Call Waiting feature. The Show My Caller ID option allows you to decide whether or not your phone number will be revealed on someone else’s Caller ID display when you initiate a call to them.