Managing Contacts on Your iPhone
The Contacts app that comes pre-installed on your iPhone is extremely useful for creating and managing a personal database of the people you know and the companies you do business with.
Contacts is a powerful standalone app, but what makes it really useful is that the data stored within your Contacts database is readily accessible from a variety of other iPhone apps. Plus, it’s easier than ever to sync your Contacts database with your primary computer and other iOS devices.
As you create each contact’s entry, one for each person or company, dozens of information fields are available, so you can store all sorts of useful details about each contact, in addition to name, address, phone number(s) and email address(es). In fact, the more information you include within each contact’s entry, the more useful the database will be when it’s used in conjunction with other apps.
If you’re using an iPhone 4S, the Siri feature utilizes the Related People field within your own contact entry of the Contacts app to associate actual names with titles like “Mom,” “Dad,” “Grandma,” or “Grandpa.” For example, if you associate the Father label to him in the Related People field, when using Siri, you can say a command like, “Call Dad at home,” and Siri will know exactly who you’re talking about.
Creating Your Contacts Database
When you begin using the Contacts app, it contains no data, unless you’ve restored your Contacts database from a previous iPhone, or synced it with the Address Book or Outlook database on your Mac or PC computer. However, after you begin creating and storing contact entries, the app makes it easy to retrieve and utilize that data later.
From your iPhone, you can create one contact at a time or use the iTunes Sync process or iCloud to sync contacts between your primary computer and your iPhone. By default, the Contacts app is fully compatible with Address Book on the Mac, as well as Outlook on a PC. So, if you already maintain a Contacts database on your primary computer, chances are you can easily import it to your iPhone and then keep your Contacts data synchronized.
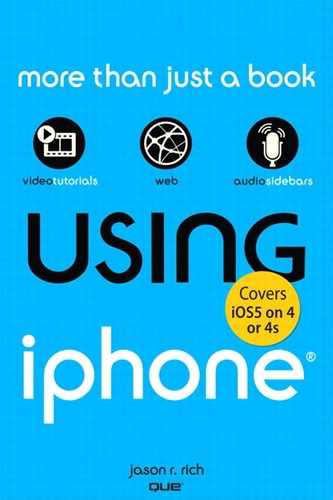
When you launch the Contacts app, the All Contacts screen is displayed (shown in Figure 10.1). Here, listings for each contact entry stored in your Contacts database are displayed alphabetically. At the top of the All Contacts screen is a Search field. Use it to quickly find and then open any contact entry.
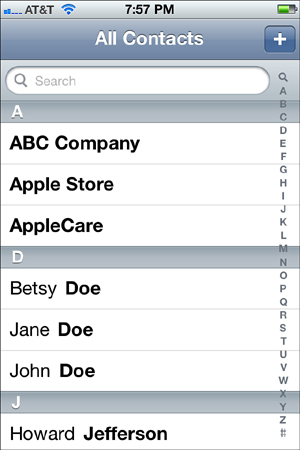
Figure 10.1 The All Contacts screen displays listings for all the contacts stored within your iPhone, in alphabetical order.
As you’re looking at the All Contacts screen, use your finger to swipe upward or downward to manually scroll through your contacts listing, or tap one of the letters displayed along the right margin of the screen to jump to entries that begin with the letter you tap.
To open and view any contact entry from the All Contacts screen, tap its listing. The Info screen pertaining to that entry is displayed.
Creating a New Contact Entry
To create a new contact entry from scratch, launch the Contacts app from your iPhone’s Home screen. Then, when the All Contacts screen appears, tap the plus sign icon displayed near the top-right corner of the screen.
The New Contact screen (shown in Figure 10.2) is displayed. Using your finger, tap one blank field at a time to enter data pertaining to that entry into the appropriate fields. The iPhone’s virtual keyboard automatically appears when you tap a blank field.

Figure 10.2 To create a new contact entry, fill in the various fields displayed on the New Contact screen.
The default fields within a contact entry that you can fill in for each contact include First Name, Last Name, Company, Mobile Phone Number, Email Address, Ringtone, Text Tone, Home Page URL, and Address.
Begin by entering the contact’s first and last names (in two separate fields). If the contact is associated with a company, input that company name in the Company field. Or if you want to list a company only (with no specific contact), leave the First and Last Name fields blank and fill in only the Company field. Likewise, if the contact is not affiliated with a company, leave the Company field empty.
After entering the appropriate data into each specific field, tap the Return key on the virtual keyboard to jump to the next field. Alternatively, tap your finger on the next blank field that you want to fill in.
You are free to include as much or as little information about each contact as you desire. At any time, you can edit a contact entry and include additional information later. In other words, feel free to leave unimportant or irrelevant fields empty.
Several fields, including Mobile Phone Number, Email Address, and Address, allow you to enter multiple entries. For example, you can enter multiple phone numbers for a specific contact and label each phone number separately. First, tap the Phone field to enter a phone number.
Be sure to include the area code and seven-digit phone number for U.S. phone numbers. Or add the country code and the full phone number for international phone numbers.
You do not need to include parentheses around the area code or a dash between the three-digit exchange and phone number. The Contacts app adds them automatically.
To the left of the Phone Number field is the field’s label heading. Tap this label to change it to one of nine other options, such as iPhone, Home, Work, Mail, or Main. At the bottom of this Label list is the Add Custom Field label option. Tap it to create your own label for a phone number field.
After you add one phone number to the Info screen, a second blank Phone field appears. You can add as many separate phone numbers per contact as you’d like.
When you’re entering phone numbers into the Phone field, it’s important to associate the appropriate label to that field, such as Home, Work, Mobile, or iPhone. It’s particularly important to differentiate between iPhone and Mobile phone numbers because this data is accessed by other apps, like Messages and FaceTime, which look specifically for other iPhone listings.
By tapping the Ringtone field, you can assign a custom ringtone to that specific contact. So, when that person calls you and her name appears in the Caller ID window, instead of hearing your iPhone’s default ringtone, you hear the custom ringtone you selected for that contact.
When you tap the Ringtone option, the Ringtone screen appears. Tap the Buy More Tones option to access a special section of the iTunes Store (shown in Figure 10.3) that sells ringtones (priced at $1.29 each), or scroll down on the Ringtone screen and choose from one of the 25 ringtones built into iOS 5. It’s also possible to create your own ringtones using iTunes or GarageBand on a Mac, for example.

Figure 10.3 Use custom ringtones to audibly differentiate between incoming calls. From the iTunes Store, you can buy ringtones created from hit songs, for example.
To discover the top-10 most popular ringtones available for purchase from iTunes, tap the Ringtones field of the Info screen for a contact. Then tap the Buy More Ringtones icon at the top of the Ringtones screen.
When the Tones screen of the iTunes Store appears, tap the Top Ten tab near the top of the screen. Choose a ringtone category, such as All Ringtones, Blues, Comedy, Country, Dance, Pop, or Rock. The top-10 ringtones in that genre are displayed.
All purchased ringtones become part of the ringtone listing that appears within your iPhone’s Ringtone screen, under the Ringtone heading, when you’re associating a ringtone with a contact. (Refer again to Figure 10.3.)
Tap the Text Tone field to associate a custom alert tone that you’ll hear when a contact sends you a text message. You can choose from more than 25 alert tones on your iPhone, or you can tap the Buy More Tones icon to shop for additional alert tones from iTunes.
As you scroll down and continue entering data into the Info screen for a new contact entry, you can include one or more website URLs. You don’t need to include the http:// prefix when entering a website address. After you enter one website URL, an additional field appears within the Info screen, allowing you to associate additional websites with the contact entry.
To enter someone’s mailing address, tap the Add New Address field. Separate Street, City, State, Zip, and Country fields automatically appear (shown in Figure 10.4). To the left of the Street field, the default Home label is displayed. Tap this label to change it, if you desire, from Home to Work or Other. (You also can create your own field labels by selecting the Add Custom Label option.)
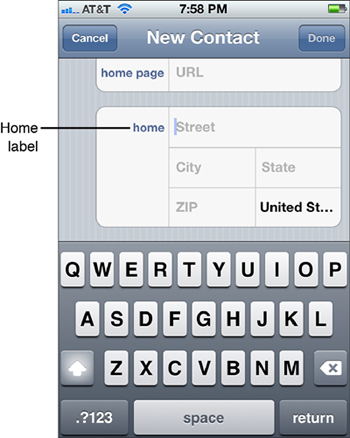
Figure 10.4 When entering a contact’s mailing address, use the separate Street, City, State, Zip, and Country fields and associate a label (such as Home or Work) with that address.
Enter the contact’s address by filling in each of these Address fields separately. After you enter text into the Street field, for example, a second (optional) Street field appears. Here, you can include someone’s Apartment or Suite number, for example.
Within any contact entry, you are able to include multiple addresses. To add another address, tap the Add New Address field within the Info screen. When adding multiple addresses, be sure to differentiate them by changing the label associated with each address.
The Contacts app now works seamlessly with other iPhone apps. To take full advantage of this cross-app integration, tap the Add Field field found on the Info screen and include additional information about each contact that’s relevant to your needs.
The Add Field option allows you to add a name prefix (Mr., Mrs., Dr., and so on). There are also optional Phonetic First Name and Phonetic Last Name fields, which allow you to spell out the person’s name how it sounds. You can also add someone’s middle name, a suffix, or a nickname by tapping the appropriate fields.
Other details about a contact you can add by tapping the Add Field option include Job Title, Department, Twitter username, Instant Message username, Birthday, Date, Related People, and Notes.
If you use the official Twitter app to manage a Twitter account from your iPhone, the Twitter app accesses the Contacts database and pulls a contact’s Twitter username from it, if this information is included in the Contacts entry. (Use the @Username format when filling in the Twitter field.)
Within the Related People field, add the name(s) of your contact’s secretary, assistant, spouse, parents, or children, for example. When you tap the label associated with this field, a dozen label options are displayed, or you can create your own by selecting the Add Custom Label option.
By entering someone’s birthday using the Add Field option, you are able to automatically display that person’s birthday within Calendars to remind you to send birthday wishes or a card. Likewise, you can add another Date that corresponds to an anniversary. When you add a Date (as opposed to a Birthday) it will not automatically show up in your Calendar app.
![]() To learn more about Apple’s Cards app, which allows you to create and mail custom greeting cards from your iPhone, see “The App Store, iBookstore, and Newsstand,” (Chapter 15).
To learn more about Apple’s Cards app, which allows you to create and mail custom greeting cards from your iPhone, see “The App Store, iBookstore, and Newsstand,” (Chapter 15).
By tapping the Add Field option within the Info screen as you’re creating or editing a contact, you can select Notes. Here, it’s possible to enter as much information about a contact as you desire using the iPhone’s virtual keyboard. This can include driving directions, notes about your last meeting, or any other information that doesn’t fit into another field.
Like all the fields within the Contacts database, the Notes field is fully searchable.
Near the bottom of the Info screen as you’re creating a new contact, you’ll find the Link Contact field. Use this feature to link together separate contacts, such as people who work for the same company (but who have separate listings in your database) or family members who have separate listings in your database. You can also link contacts for the same person, but who appear in multiple entries, for example.
Linking a Photo to a Contact Entry
As you’re creating or editing a contact, you have the option to link a photo to each contact entry. Use one of the iPhone’s built-in cameras to snap a photo, or associate a photo with a contact that’s already stored within your iPhone.
Not only is the contact’s photo displayed when you later look at his entry when using the Contacts app, but also when that person calls you, his photo is displayed as part of the Caller ID window that appears when your iPhone receives an incoming call. You’ll discover that other apps also take advantage of photos stored in the Contacts app.
When you first install and launch the official Facebook app, you can request that Facebook link with your Contacts app and automatically show the profile photos of your Facebook friends within the appropriate entries of your Contacts database.
Any anytime, you can turn on this feature from within the Facebook app by accessing the menu and selecting the Friends option. As you’re looking at your listing of friends, tap the Share icon that’s displayed in the upper-right corner of the screen, and then choose the Sync Contacts option. Turn on the virtual switches associated with the Syncing and Replace Photos options. Tap the Sync Contacts icon to proceed.
![]() LET ME TRY IT
LET ME TRY IT
Linking a Photo to a Contact Entry
To link a photo to a contact entry, follow these steps:
1. Launch the Contacts app.
2. From the All Contacts screen, select the contact you want to add a photo to. Tap that entry and then tap the Edit icon displayed in the upper-right corner of the screen. Tap the Add Photo icon. Or while you’re creating an entry from scratch, tap the Add Photo icon.
3. After tapping the Add Photo icon, tap the Take Photo option to snap a photo using one of the iPhone’s built-in cameras. Alternatively, tap the Choose Photo icon to select a photo already stored in an Album on your iPhone.
4. If you selected the Take Photo option, the Take Photo screen appears, and the Camera app is activated. Point the iPhone’s camera lens toward your subject and snap a photo by tapping the green-and-white Camera icon (shutter button).
5. After you snap the photo, the Move and Scale screen appears. You can zoom in on the photo using a reverse-pinch finger motion or use one finger to reposition the image. Tap the Use Photo icon to save the image and link it to a Contact’s entry.
6. If you selected Choose Photo, from the Photos screen that appears, select the Album that contains the photo you want to use by tapping the Album listing. Then tap the thumbnail that represents the photo. When the Move and Scale screen appears, zoom in on the photo using a reverse-pinch finger motion or use one finger to recenter the image. Tap the Choose icon to save the image and link it to the contact entry.
 SHOW ME Media 10.1—Linking a Photo to a Contact
![]() Access this video file through your registered Web edition at my.safaribooksonline.com/9780132954310/media.
Access this video file through your registered Web edition at my.safaribooksonline.com/9780132954310/media.
Differentiating Between Phone Number Fields: Why This Is Important
FaceTime and iMessage are two services that allow you to communicate with other iOS device users, either via real-time video conferencing or through text messaging. You also have the option to send and receive text messages using your iPhone through the text messaging service operated by your wireless service provider (which is also done using the Messages app).
These and other apps can automatically access your Contacts database to find other FaceTime or iMessage users, for example, by looking for phone numbers associated with the iPhone field label. Likewise, the Messages app allows you to send text messages to people in your Contacts database who have a phone number associated with an iPhone or Mobile label.
Meanwhile, when you create a Favorites list within the Phone app, for example, or look at the Recents list generated by the Phone app, it details all incoming and outgoing calls and differentiates between someone’s home, work, mobile, and/or iPhone number if this information is included in your Contacts database.
So, for each phone number you enter into a contact entry (shown in Figure 10.5), be sure to associate the appropriate label with it. It’s also important to properly label all email addresses and mailing address fields, with labels such as Home, Work, or Other.
Figure 10.5 For each phone number added to an entry, be sure to associate the appropriate label to it, such as Home, Work, Mobile, or iPhone.
To associate a telephone extension with a phone number, enter the main number in one phone number field and add a label, such as Work, to it. Then, when given the opportunity, use another phone number field to enter the Extension number and create a custom label called Extension for it.
Alternatively, as you’re entering a phone number in a phone number field, after entering the 10 digits of the number, tap the +*# icon (displayed to the left of the “0”), tap the Wait or Pause icon, and then enter the numeric extension within that same field.
SHOW ME Media 10.2—Adding Special Fields to a Contact
Access this video file through your registered Web edition at my.safaribooksonline.com/9780132954310/media.
Editing a Contact Entry
When a contact entry is created and saved, it becomes part of your personal Contacts database. At any time, you can launch the Contacts app and then modify, edit, or delete a contact entry.
If your Contacts database is synced to a computer or another mobile device, when you make a change to an entry, add an entry, or delete one while using that computer or device, it is reflected automatically on your iPhone (or vice versa). This is also true if you have your iPhone set up to sync Contacts data with iCloud.
![]() LET ME TRY IT
LET ME TRY IT
Editing a Contact Entry
To edit or modify an existing contact entry, follow these steps:
1. Launch the Contacts app, and from the All Contacts screen, tap the contact entry you want to edit.
2. When the Info screen for that specific entry appears, tap the Edit icon displayed in the upper-right corner of the screen.
3. You can now add, delete, or change one field at a time by tapping it. You can delete some fields that have a red-and-white negative sign next to it by tapping that icon. To change the data within a field, use the virtual keyboard to overwrite or add text.
4. To add new information, tap a bank field and add content, or tap the green-and-white plus sign icon associated with that field to add a new one.
5. After editing the entry, tap the Done icon displayed in the upper-right corner of the screen to save your changes.
 TELL ME MORE Media 10.3—Linking Contacts
Access this audio file through your registered Web edition at my.safaribooksonline.com/9780132954310/media.
Deleting a Contact Entry
In addition to adding or editing a contact entry, from the Contacts app you can also delete individual entries one at a time.
![]() LET ME TRY IT
LET ME TRY IT
Deleting a Contact Entry
To delete an existing contact entry, follow these steps:
1. Launch the Contacts app.
2. From the All Contacts screen, select the contact entry you want to delete and tap it.
3. When the Contact’s Info screen appears, tap the Edit icon displayed in the upper-right corner of the screen.
4. Scroll down to the bottom of the Info screen while in Edit mode.
5. Tap the red-and-white Delete Contact icon.
6. To confirm your deletion request, tap the Delete Contact icon again when it reappears or tap Cancel to keep the contact information stored in your Contacts database.
Using the Information Stored in Contacts
By scrolling to the bottom of any contact’s Info screen, you’ll discover four command icons, labeled Send Message, FaceTime, Share Contact, and Add To Favorites. Here’s a quick summary of what these command icons do:
• Send Message—Launch the Messages app to send that contact a text message via your wireless service provider’s text messaging service (if the contact has a mobile phone number) or use Apple’s iMessage text messaging service (if the contact is also an iMessage user).
• FaceTime—Tap this icon to initiate a FaceTime call if the contact is a FaceTime user and can connect to the FaceTime videoconferencing service. The person you’re calling can be using an iPhone or iPad (within a Wi-Fi hotspot) or using FaceTime on a Mac. Within your contact entry, the person’s FaceTime phone number or username needs to be stored.
• Share Contact—Send someone an email or text message containing the entire contents of that contact’s contact entry. After tapping the Share Contact icon, you are prompted to choose Email or Message to determine how the information will be sent.
• Add to Favorites—Quickly add a contact’s name and one of her phone numbers to the Phone app’s Favorites list. If you want to list the person’s home, work, and mobile number within your Favorites list, you need to create three separate Favorites entries. Within your Favorites list, you can also include someone’s FaceTime number or username.
TELL ME MORE Media 10.4—Sharing Contacts
Access this audio file through your registered Web edition at my.safaribooksonline.com/9780132954310/media.
Accessing Contact Information Using the Contacts App
When your Contacts database is populated with entries, you can search and access it in a variety of ways, within the Contacts app itself, as well as from a variety of other apps.
From the Contacts app’s All Contacts screen, you can
• Scroll through the entry listings and then tap the listing whose entry you want to view in detail.
• Use the Search field at the top of the All Contacts screen to quickly find a contact using a keyword or search phrase.
• Find a contact by tapping a letter displayed along the right margin of the All Contacts screen to view contact listings alphabetically by a specific letter.
The Info screen associated with each Contact entry is interactive. Tap any phone number to initiate a call to that person within the Contacts app. Alternatively, tap any email address to compose and send that contact an email within the Contacts app.
Likewise, you can tap a contact’s Website URL to launch Safari and access that website, or tap the contact’s Twitter or Instant Message field to send him a tweet or instant message using the appropriate app.
If you tap an address listed on the Info screen, the Maps app launches, allowing you to view that address displayed on a map and then obtain directions to or from that address.
Accessing Contacts Data from Other Apps
Other apps that link to the Contacts app allow you to pull information from your Contacts database.
For example, as you’re composing a new email using the Mail app, tap the plus sign icon to the right of the To field to access the All Contacts list and pull someone’s email address from your database. This technique also works within the Messages app, for example.
Alternatively, while filling in the To field of an email (within Mail) or a text message (within Messages), simply begin typing the name of the person you want to send the message to (or her email address or phone number, as appropriate), and if the information is stored within Contacts, it automatically pops up within the To field of the app you’re using.
Likewise, within the Search field of the Maps app, begin typing the name of a person or company stored within your Contacts database to find that entry and use it.
![]() To learn more about composing email messages using the Mail app, see “Composing an Email,” (Chapter 8).
To learn more about composing email messages using the Mail app, see “Composing an Email,” (Chapter 8).
Finding Contacts Using Your iPhone’s Spotlight Search Feature
When you want to quickly find any information stored within your iPhone, including data that is part of a Contact’s entry, the Spotlight Search feature built into iOS 5 is ideal. From the main Home screen, swipe your finger from left to right to access the Spotlight Search screen.
When the blank search field appears at the top of the screen, use the iPhone’s virtual keyboard to enter a name, company, or any information associated with a contact’s entry. The related entries are displayed. Tap one of the search results that displays the Contacts app’s icon to the left of it to launch the Contacts app and quickly access that specific entry’s Info screen.
Find Contact Information Using Siri on Your iPhone 4S
If you’re an iPhone 4S user, the fastest and most efficient way to find an entry within contacts and then use that information to initiate a call, send an email, compose a text message, or schedule an appointment with that person (using the Calendars app) is to use Siri.
To activate Siri, press and hold down the Home button on the iPhone 4S for two to three seconds until the Siri icon appears. Then speak directly into your iPhone (or a Bluetooth wireless headset) and state what you want.
For example, you can say “Call John Doe at home” to initiate a call to John Doe’s home phone number, assuming John Doe (and his home phone number) are already stored within your Contacts database. Or you can say, “Compose a text message to John Doe,” and then follow the directions Siri gives you.
Another option is to use Siri and ask for directions to John Doe’s home or work address from your current location, for example, if the contact’s address information is already stored within your Contacts database.
![]() To learn more about Siri with your iPhone 4S, see “An Introduction to Siri,” (Chapter 14).
To learn more about Siri with your iPhone 4S, see “An Introduction to Siri,” (Chapter 14).
Syncing Contacts Data with iCloud
When you turn on iCloud functionality on your iPhone, you can set it up so your iPhone automatically syncs Contacts data with iCloud. From there, that data is synced automatically to any other computers or iOS devices linked to that same iCloud account.
To set up your iPhone to sync Contacts data with your iCloud account, launch the Settings app. From the main Settings menu, select the iCloud option. When the iCloud menu screen appears within Settings, tap the virtual switch associated with Contacts and turn it to the on position (shown in Figure 10.6).

Figure 10.6 After you activate iCloud on your iPhone, you still need to turn on the Contacts synchronization feature so it works with iCloud.
You need to do this with each computer or iOS device you want to sync your Contacts database with. When this is done, Contacts automatically updates your Contacts database whenever you make a change, whether that change is made on your iPhone, your computer, or when using another iOS device (such as an iPad) that’s also linked to the same iCloud account.
![]() To learn more about using iCloud with your iPhone, see “An Introduction to iCloud,” (Chapter 4).
To learn more about using iCloud with your iPhone, see “An Introduction to iCloud,” (Chapter 4).
Syncing Contacts Data with Your Mac or PC Using iTunes
If you don’t use iCloud, you can still sync your Contacts database with your primary computer using the iTunes Sync process. To do this, you need to be running the latest version of iTunes on your primary computer and then link your iPhone to that computer using the supplied USB cable or by connecting your computer and iPhone to the same home wireless network.
When iTunes is running on your primary computer and your iPhone is connected to it, click the iPhone listing displayed under the Devices heading on the left side of the iTunes screen.
Near the top center of the iTunes screen, tap the Info icon. Then, using the mouse, place a check mark next to the Sync Address Book Contacts option. You can then decide whether to sync all your contacts or just contacts within specific groups you specify.
Tap the Sync icon (displayed in the lower-right corner of the iTunes screen) to perform an iTunes Sync and synchronize your Contacts database between your computer and iPhone.
Using iTunes Sync, you also can synchronize your Contacts database with Yahoo! Address Book or Google Contacts if you use one of these online-based services to manage your personal contacts database.
![]() To learn more about syncing data between your primary computer and iPhone, see “Connecting an iPhone to Your Computer,” (Chapter 2).
To learn more about syncing data between your primary computer and iPhone, see “Connecting an iPhone to Your Computer,” (Chapter 2).
Syncing Contacts Data with Other Devices
Beyond synchronizing the Contacts database on your iPhone with the Address Book on your Mac or Outlook on your PC using the iTunes Sync process or iCloud, you also can use iCloud to keep your Contacts database synchronized with other iOS devices, such as your iPad or iPod touch. (See “Syncing Contacts Data with iCloud” earlier in this chapter.)
Using third-party software or apps, you also are able to synchronize your Contacts database on your iPhone with a Blackberry smartphone, another mobile device, or specialized contact management software on your PC or Mac. Use the Search feature when visiting the App Store to find the third-party app needed, based on what software or mobile device you want to synchronize your Contacts data with.
Switching from a Blackberry smartphone to an iPhone? You’re not alone, and who could blame you? The BerryMover app ($9.99), available from the App Store, makes it possible to easily copy Contacts data from your Blackberry smartphone to an iPhone.
Using this app, upload your most current and complete Blackberry backup file to your iPhone. The app then grabs every contact, reformats it as needed, and stores the contacts within your Contacts database on your iPhone. This app works with other types of Blackberry data as well, including calendar data, tasks, notes, and text messages.