
10. Packaging and Deploying
When your application is complete, you must find a way to get it out to your potential customers. There are a number of options to do this, including a technique called side-loading that is explained later in this chapter. Many developers will want to leverage the partnership they can create with Microsoft through the Windows Store. The store is available both through a set of online pages that are created for your application and a local Windows 8 app called “Store” that is pre-installed on the Windows 8 machine.
The concept of an application store has been around for several years and was popularized through various smartphone platforms. The store provides a centralized location for managing, purchasing, downloading, and deploying applications. The concept of the centralized store ensures there is a single focal point for users to discover applications and provides enhanced security to the end user because the applications that are presented by the store have been screened and tested. You learn more about the screening process for applications submitted to the Windows Store later in this chapter.
The Windows Store
The Windows Store provides services for developers and companies to publish their applications (including Windows 8 apps as well as traditional desktop style applications) and users to discover, purchase, and install them. The store supplies the infrastructure for discovery of applications both through Windows 8 and online. It features significant reach, which means more potential profit for developers considering selling applications through the Windows Store. There are a variety of business models you can follow to monetize your application, including integration of ads through either Microsoft’s owner advertising network or third-party services such as AdDuplex (www.adduplex.com).
Discovery
It is important to make it easy for potential customers to not only discover your application, but also be able to purchase and install it on their systems. Windows 8 and Internet Explorer 10 work together to provide the necessary features to create a seamless transition between the online experience and the locally installed Windows Store application. When you submit your application to the Windows Store, it will automatically be promoted both through the Windows Marketplace that you can view with a web browser and through the Windows Store application itself.
To see an example of how integration works, open Internet Explorer 10 from the Start screen (launch the Windows 8 version, not the desktop version). Navigate to the online Cut the Rope application at http://cuttherope.ie.
Swipe open the Application Bar and you’ll notice the wrench icon has a plus (+) sign next to it indicating enhanced features. When you tap the wrench, you’ll see a number of options including the ability to install the app for the website, as shown in Figure 10.1.
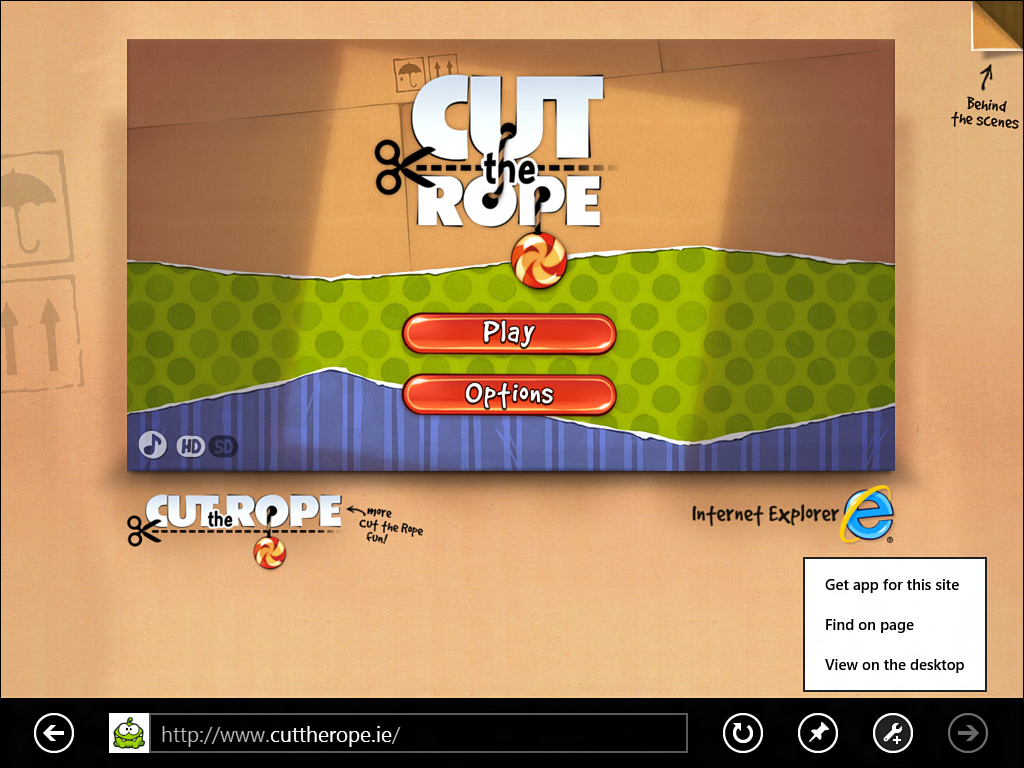
© 2012 ZeptoLab UK Limited. All Rights Reserved.
Figure 10.1. Example of integration between a website and the Windows Store
When you tap the option “Get app for this site,” you are taken to the corresponding page in the Windows Store where you can easily download the application. When the application is installed, the enhanced menu in Internet Explorer will update to present you with the option to launch the local version of the application. Wondering how the site is able to integrate this way? Use the wrench to view the site on the desktop and view the source (right-click anywhere on the page and choose View Source). You’ll find several HTML meta-tags, as shown in Listing 10.1.
Listing 10.1. HTML to Integrate the Cut the Rope Website with the Windows Store
<meta name="application-name" content="Cut the Rope" />
<meta name="msapplication-tooltip" content="Play Cut the Rope! A mysterious package has arrived, and the little monster inside Has only one request... CANDY!" />
<meta name="msapplication-navbutton-color" content="#659729" />
<meta name="msApplication-ID" content="App"/>
<meta name="msApplication-PackageFamilyName"
content="ZeptoLabUKLimited.CutTheRope_sq9zxnwrk84pj"/>
<link rel="shortcut icon" href="/favicon.ico" type="image/x-icon" />
The tags provide context that Internet Explorer 10 can use to provide a link to the end user. The key tag is the msApplication-PackageFamilyName that can be found in the manifest for your application. Providing the name will allow Internet Explorer 10 to determine whether or not the application is currently installed and if not, pass the identifier to the Windows Store for you to download.
For another example of integration, open Bing from the Windows 8 Internet Explorer 10 and search for Rowi, the name of my favorite Twitter application. Scroll down. The listing for Rowi includes the store icon, overall reviews, and a link to download it, as you can see in Figure 10.2.
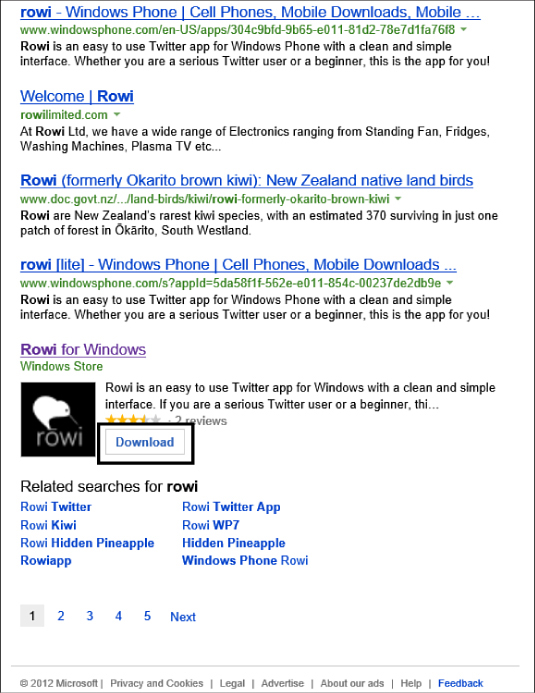
Source: Hidden Pineapple, LLC. Used with permission.
Figure 10.2. The Bing listing for the Rowi Windows 8 Twitter application
Clicking the link takes you right to the local Windows Store entry on your Windows 8 device. This is because the URL starts with ms-windows-store and provides a unique identifier that can be passed to the Windows Store application to show the entry. That makes it easy to browse information about the application and tap the Install button to install it locally. The Windows Store page is shown in Figure 10.3.
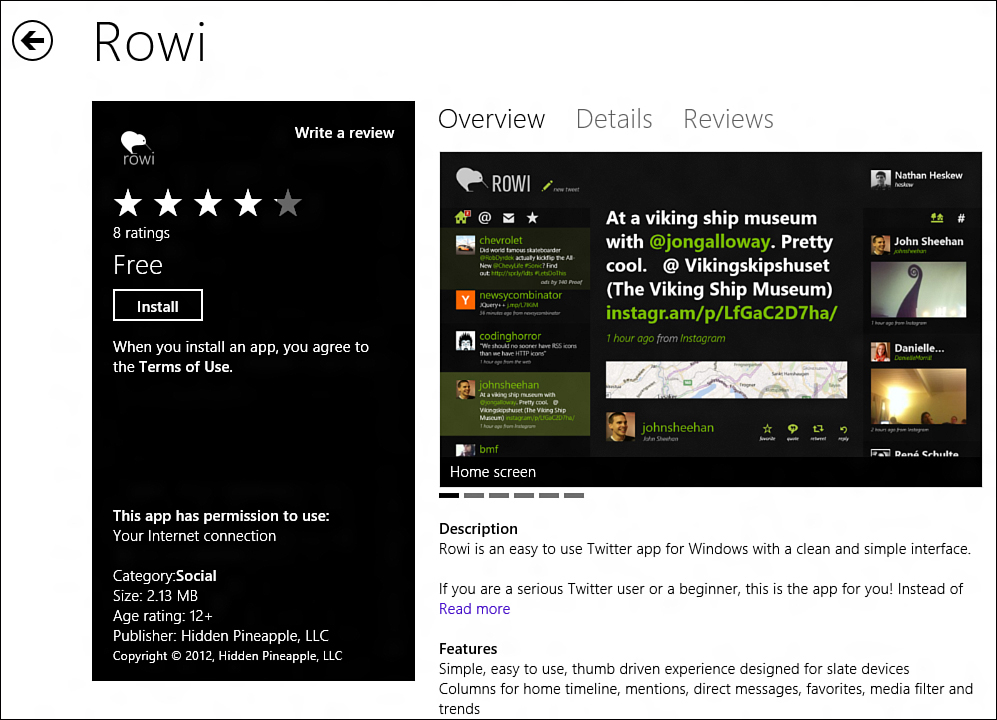
Source: Hidden Pineapple, LLC. Used with permission.
Figure 10.3. Windows Store page for Rowi
Of course, the easiest way to discover applications is to launch the Windows Store itself. The main page provides featured applications and allows you to browse various categories from highly rated applications to recently added ones. The Windows Store also uses semantic zoom to give you quick access to various categories, as shown in Figure 10.4.
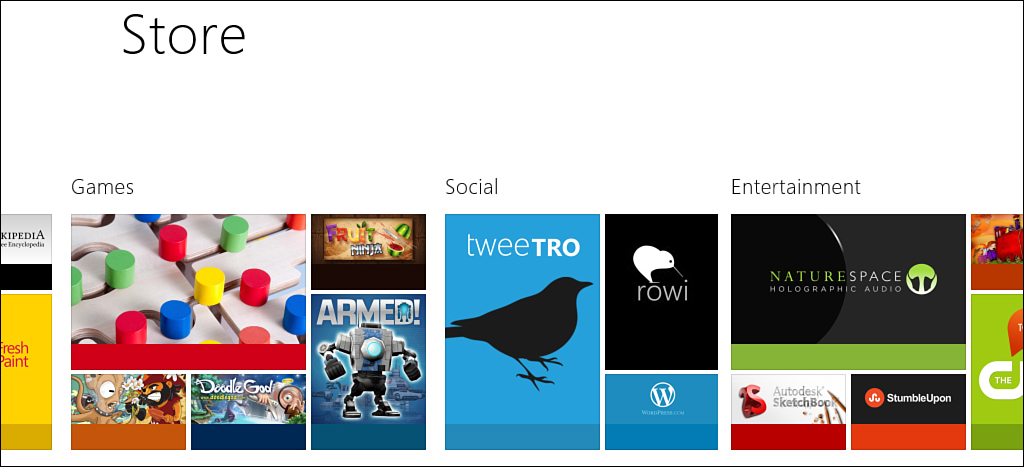
Figure 10.4. Semantic zoom in the Windows Store
You learn how to list your application in the Windows Store later in this chapter. First, you may be asking yourself, “Why would I want to list it through the store?” To answer that question, you should first learn more about the reach of the Windows Store and the cost to get involved.
Reach
According to Microsoft, the Windows Store enables developers to sell their apps in more than 200 markets, with currency support for 70 different markets, and localization options to 100 different markets. That’s quite a reach—you can read the details of the announcement here at http://blogs.msdn.com/b/windowsstore/archive/2012/01/05/global-reach.aspx.
According to Apple, 365 million iOS devices were sold through March 2012.1 Compare that to over 600 million Windows 7 licenses sold through June 2012.2 This is a significant number of devices. Windows 8 will retain backwards compatibility with Windows 7 devices on all but the Windows RT (ARM) versions, so the potential market is extremely large for developers. A Windows 7 application targeting just 0.1% of the entire market would still reach 600,000 installs.
The Windows Store allows you to price your application anywhere between $1.49 to $999.99 for the application and any in-app purchases for specific features. You’ll learn more about these options in the next section of this chapter. The revenue share model starts at 30% to Microsoft and 70% to the developer. When the developer reaches the $25,000 mark, the revenue to Microsoft decreases to 20%, and the developer keeps 80% of subsequent sales. Using the previous example of 600,000 installs, if you sold at the lowest tier ($1.49 per sale), you would generate over $700,000 in revenue after the split.
To earn money from your applications, you must invest in a developer account with Microsoft. This enables you to submit your applications to the Windows Store. There are currently two pricing models for submission: $49 for an individual developer registration and $99 for a business registration. Both allow you to submit multiple application entries to the Windows Store.
Business Models
There are a variety of business models you can choose from to sell your application. The first step is to determine the overall cost of the application. You can set a price for your application and specify whether or not a trial period exists. The trial can either be time limited (that is, the user receives full functionality but then must purchase after a period of time) or feature differentiated (certain features are disabled until the user makes a full purchase). An example selection is shown in Figure 10.5.
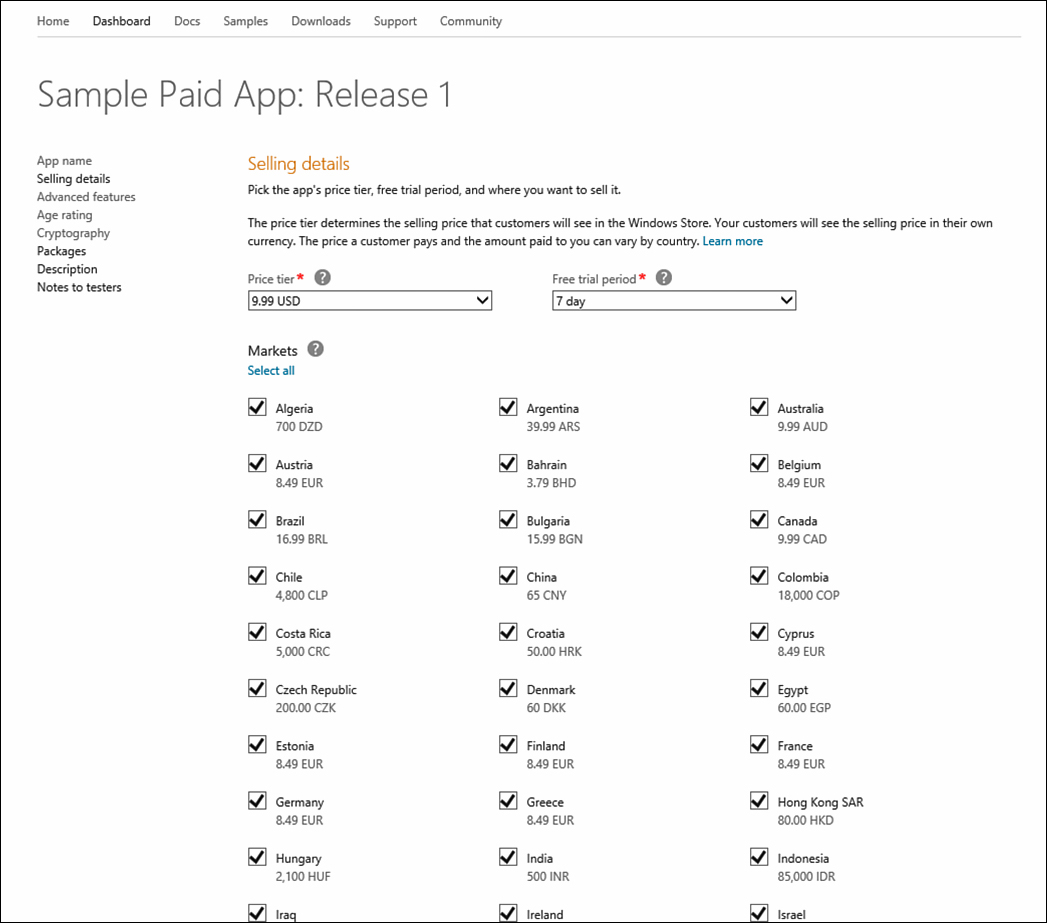
Figure 10.5. Choosing the initial pricing and trial model for your application
The API to convert from a trial to a full paid model is straightforward. First, visit the following link to download the SDK sample for trial conversions and in-app purchases—http://code.msdn.microsoft.com/windowsapps/Licensing-API-Sample-19712f1a.
In the sample, the user is in trial mode and can click a button to purchase the full product. The first step is to get the licensing information for the current application:
var licenseInformation = CurrentApp.LicenseInformation;
If the application is in trial mode, request the full application purchase. The Windows 8 store will take over and manage the rest of the transaction for you:
if (licenseInformation.IsTrial)
{
await CurrentApp.RequestAppPurchaseAsync(false);
}
You will be unable to interact with the licensing server until your application is successfully submitted to the Windows Store. To test things like trial conversions and other in-app purchases, you can take advantage of a built-in simulator and replace all references to CurrentApp with CurrentAppSimulator (you’ll see this in the downloaded example). The simulator allows you to load a special XML document to simulate the license state and purchase options for the application. Listing 10.2 shows the sample file for a trial-mode application that can be converted to a fully licensed version through a $4.99 purchase.
Listing 10.2. Sample XML Document to Simulate Licensing Options
<?xml version="1.0" encoding="utf-16" ?>
<CurrentApp>
<ListingInformation>
<App>
<AppId>2B14D306-D8F8-4066-A45B-0FB3464C67F2</AppId>
<LinkUri>http://apps.microsoft.com/app/2B14D306-D8F8-4066-A45B-0FB3464C67F2</LinkUri>
<CurrentMarket>en-US</CurrentMarket>
<AgeRating>3</AgeRating>
<MarketData xml:lang="en-us">
<Name>Trial management full license</Name>
<Description>Sample app for demonstrating trial license management</Description>
<Price>4.99</Price>
<CurrencySymbol>$</CurrencySymbol>
</MarketData>
</App>
</ListingInformation>
<LicenseInformation>
<App>
<IsActive>true</IsActive>
<IsTrial>true</IsTrial>
<ExpirationDate>2013-01-01T00:00:00.00Z</ExpirationDate>
</App>
</LicenseInformation>
</CurrentApp>
The file is loaded to the application simulator as shown in the TrialMode.xaml.cs file:
StorageFolder proxyDataFolder = await
Package.Current.InstalledLocation.GetFolderAsync("data");
StorageFile proxyFile = await proxyDataFolder
.GetFileAsync("trial-mode.xml");
await CurrentAppSimulator.ReloadSimulatorAsync(proxyFile);
You can reload the simulator as often as you like to test out different scenarios.
The simulator is an in-memory simulator. When you load a proxy file, you can make changes such as simulating in-app purchases. These changes are reflected in memory and do not change the licensing file itself. Anytime you restart the application, it will reset to the original state as indicated by the XML you provide. If you wish to test different scenarios, you can provide multiple files as shown in the SDK sample. The SDK sample loads the appropriate file for the scenario being tested and can reset the file by reloading the original. Be sure that when you are ready to make your final submission, you remove the test files and rename all references to the simulator.
The code also sets up an event handler to trigger any time the licensing information changes, such as through a simulated purchase (or real purchase when the application is in production):
licenseChangeHandler = new
LicenseChangedEventHandler(TrialModeRefreshScenario);
CurrentAppSimulator.LicenseInformation.LicenseChanged +=
licenseChangeHandler;
The simulator allows you to choose what the simulated result of a purchase is. For example, you can ask the simulator to indicate the purchase was not successful to test that your application appropriately manages the failure. Figure 10.6 shows the simulator. When the button is clicked to make a purchase, the Windows Store dialog pops up and provides a drop-down to choose the simulated result of the purchase.
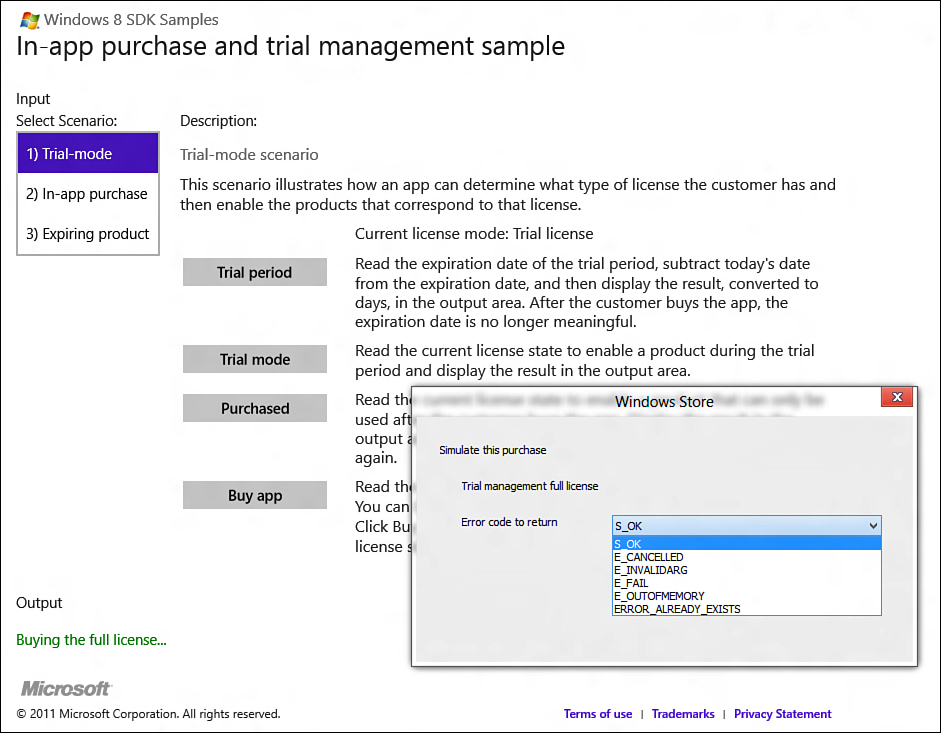
Figure 10.6. The Windows Store simulator
The use of trial mode is very important. According to Microsoft’s statistics, using the Windows Phone as an example, applications that provide a trial mode were downloaded 70 times more often than other applications. These trial downloads resulted in a 10% conversion rate and earned 10 times more revenue than applications that did not offer a trail mode. You can read the full blog post online at http://bit.ly/ekk9s5.
Your application can provide special “products” or features that are activated through separate purchases. This allows the user to customize his experience and purchase the features that make sense for his use of the application. For example, an image editor might provide a set of default formats out of the box but require an additional purchase to support more advanced formats more likely to be used by professional designers than hobbyists who are just “kicking the tires” of the tool. The products are set up online through your developer account but can be simulated with some simple XML using the proxy file:
<Product ProductId="product1">
<MarketData xml:lang="en-us">
<Name>Product 1</Name>
<Price>1.99</Price>
<CurrencySymbol>$</CurrencySymbol>
</MarketData>
</Product>
Listing 10.3 demonstrates how to query the licensing information for production information to display to the user.
Listing 10.3. Querying for Product Information
ListingInformation listing = await
CurrentAppSimulator.LoadListingInformationAsync();
var product1 = listing.ProductListings["product1"];
var product2 = listing.ProductListings["product2"];
Product1SellMessage.Text = "You can buy " + product1.Name +
" for: " + product1.FormattedPrice + ".";
Product2SellMessage.Text = "You can buy " + product2.Name +
" for: " + product2.FormattedPrice + ".";
The product provides an IsActive property to inform you whether or not it has been purchased/activated. You can query that property and disable the functionality until the user purchases it. You request a product purchase the same way you requested the application purchase; the only difference is an added parameter indicating the specific product to buy:
await CurrentAppSimulator.RequestProductPurchaseAsync(
"product1", false);
You may also provide an expiration date for products. This allows you to create recurring revenue by providing features that expire after a certain timeframe and require the user to make an additional purchase in order to continue using the feature. The product has an ExpirationDate property you can query to provide the user with information about when it will expire and which will prompt renewal.
Advertising
One option available to your applications is advertising. It is a common model to either support the application through ad revenue or provide a free version with advertising that can convert to a paid version that has no ads. Microsoft gives you two options for advertising in your Windows 8 applications. The first is through a third-party of your choice, and the second is with Microsoft’s own service available online at www.windows-advertising.com.
To get started using Microsoft’s advertising platform, first visit the link just listed and download the SDK. This provides you with the tools necessary to integrate advertising into your application. When you have the SDK, you can review the documentation for using it online at http://msdn.microsoft.com/en-us/library/hh506371(MSADS.10).aspx.
A full walkthrough for integrating an advertisement using XAML and C# can be found at http://msdn.microsoft.com/en-us/library/hh506359(v=msads.10).aspx.
You also must sign up for an account to specify how to receive your revenue and track the success of your advertisements. If you choose to go with a third-party advertising provider such as AdDuplex, you will likely need to download their own SDK and follow their specific instructions for integrating advertisements into your applications. The Windows Store is flexible and allows applications that contain advertising from any provider as long as it meets the guidelines for store inclusion, which you learn about later in this chapter. The information about the application can be provided to the advertising provider to help tailor the ads shown, which will likely increase click-through rates and revenue.
Preparing Your App for the Store
There are several steps you must take to prepare your application for submission to the Windows Store. First, familiarize yourself with the app certification requirements that are listed online at http://msdn.microsoft.com/en-us/library/windows/apps/hh694083.aspx.
As of this writing, there are seven key things your application must do to be listed in the Windows Store. Six of them apply to Windows 8 apps and are summarized next.
Provide Value
The application should provide full value to the end user. There should not be any areas that are “under construction” or appear incomplete. If you offer a trial mode, that mode must reasonably resemble the full functionality either by providing full functionality for a limited time or by limiting certain features.
Offer More Than Just Ads or Websites
The application can contain advertising but must provide more value beyond the advertising—no application will be accepted that is nothing but a set of advertisements. You also cannot use the tiles, application title, description, notifications, or Application Bar to provide additional advertising. The experience for the application should take place within the application and not redirect the user to another location such as a website.
Behave Predictably
The application should adhere to the Windows 8 guidelines you’ve learned about throughout this book. This includes supporting the various orientations and modes (including snap). Your application should handle suspension and termination appropriately and not be coded in a way it is likely to freeze or stop responding if issues occur such as a loss of network connectivity. Application updates should increase or stabilize the application and never limit functionality in any way. It is important you only use WinRT APIs available to Windows 8 apps in your application.
Keep the Customer in Control
The application should adhere to all of the guidelines for notifying the user about use of features such as the Location API and enable them to disable notifications. If you collect personal information, you must provide a privacy policy that clearly states your intentions and complies with all relevant laws. If you intend to share personal information, you must allow the user to opt-in and provide explicit consent. Your application should not be malicious and should not instruct the user to perform actions that could harm his or her devices.
Cater to a Global Audience
Your application must not contain adult content. Metadata associated with the application should be appropriate to all age groups. The highest rating any content or metadata could potentially receive is Windows Store 12+ or content appropriate to consumers who are 12 years of age or older. Your application should also not contain content that advocates discrimination, hatred, or violence. It should not glamorize illegal activities nor contain content that would be considered obscene. You can read the full list of restrictions online at the URL provided earlier.
Be Easy to Identify and Understand
Your application should have a clear, unique title and an appropriate rating. You must provide technical support for your application. You also must be listed in at least one of the Windows Store’s geographical markets and localize your application for all languages that it supports. Furthermore, when you provide updates to your application, you must fully describe the changes you are presenting. You must also provide at least one screen shot when submitting your application. You learn how in the next section.
The Process
The full process for application submission is outlined at http://msdn.microsoft.com/en-us/library/windows/apps/hh454036(v=vs.110).aspx.
The steps involved include the following:
1. Open a developer account. Remember you can purchase an individual account for $49 and a company account for $99.
2. Reserve the name for your app. You can reserve an app name for up to a year before you must submit the application. You can learn more about the guidelines for naming your app at http://msdn.microsoft.com/en-us/library/windows/apps/hh694077.aspx.
3. Acquire your developer license.
4. Edit the app manifest as appropriate.
5. Associate the app with the Windows Store. To do this, right-click the project in the Solution Explorer and then select Store![]() Associate App with the Store, as shown in Figure 10.7.
Associate App with the Store, as shown in Figure 10.7.
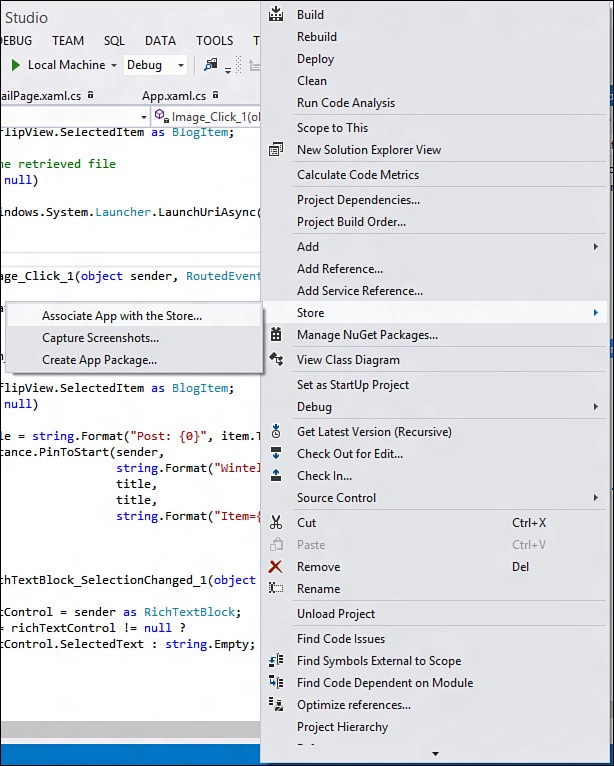
Figure 10.7. Associating your app with the Windows Store
6. Copy screenshots. Simply right-click the project in the Solution Explorer and then select Store![]() Capture Screenshots. This will launch the simulator and allow you to take screenshots by clicking the camera icon in the toolbar on the right.
Capture Screenshots. This will launch the simulator and allow you to take screenshots by clicking the camera icon in the toolbar on the right.
7. Create your App package. Right-click the project in the Solution Explorer and then select Store![]() Create App Package. You will be prompted to log into your developer account.
Create App Package. You will be prompted to log into your developer account.
8. Upload your App package to the Windows Store online through your developer account.
The App Certification Kit
To help verify that your application is ready for submission to the Windows Store, you can run the Windows App Certification Kit. The Windows App Certification Kit will analyze your application and determine the following:
• Your manifest, including capabilities and declarations, is set up correctly.
• Your resources are all present and valid.
• Your app runs without crashing or hanging.
• Your app is built in Release and not Debug configuration.
• The files in your app use the correct encoding.
• Your app launches and suspends in the appropriate amount of time.
• Your app calls the appropriate WinRT APIs and doesn’t attempt to call any unauthorized or non-Windows 8 APIs.
• Your app uses appropriate Windows security features.
To run the test, use the application search to find and launch “Windows App Cert Kit” or “appcertui.” Choose the option to Validate Windows Store App, as shown in Figure 10.8 (you can also use this to validate other application types including desktop-style applications).
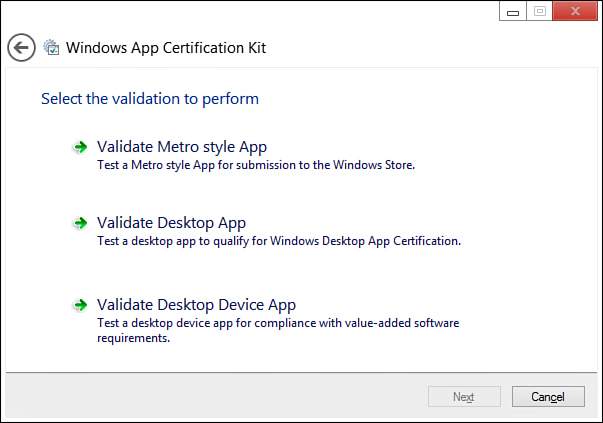
Figure 10.8. Associating your app with the Windows Store
When you select the option, the dialog will spin for a few minutes while it gathers system information and compiles a list of installed Windows 8 apps. You can select one or more applications to test. Figure 10.9 shows selection of the Wintellog MVVM application from Chapter 9.
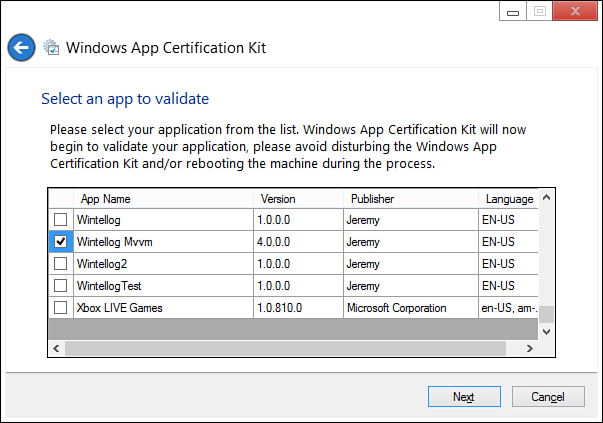
Figure 10.9. Choosing the application to test
Click the Next button, and the test will begin. It will take several minutes to run depending on your application and the device you are running it on. It is important that you allow it to run and not attempt to interact with the application. You will see it start and restart your app several times during testing. Simply allow it to run and wait for the final results.
When the test completes, you will be prompted for a location to save the results as an XML file. The test will also generate a local HTML file with the results. You can click a link at the end to view the results. If any tests did not pass, the results will provide the steps you need to take to fix the problem. You should ensure all checks pass before attempting to submit your application to the store. Figure 10.10 shows the results of running the test against the Wintellog MVVM application from Chapter 9.
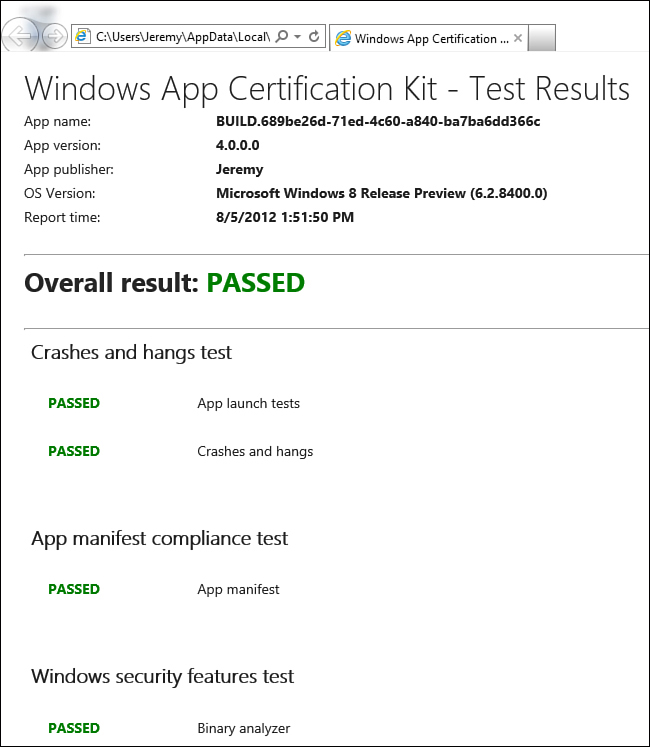
Figure 10.10. The Windows App Certification Kit test results
You can learn more about the Windows App Certification Kit online at http://msdn.microsoft.com/en-us/library/windows/apps/hh694081.aspx.
The article includes links to the individual tests that are run. The articles for each test explain what is tested and provide guidance for addressing tests that fail.
What to Expect
The developer center will provide you with an overview of the full submission process, along with an estimated time to receive a decision. You will be informed of every step within the process. Figure 10.11 shows an example dashboard that indicates where the app is in the certification process and what steps remain.
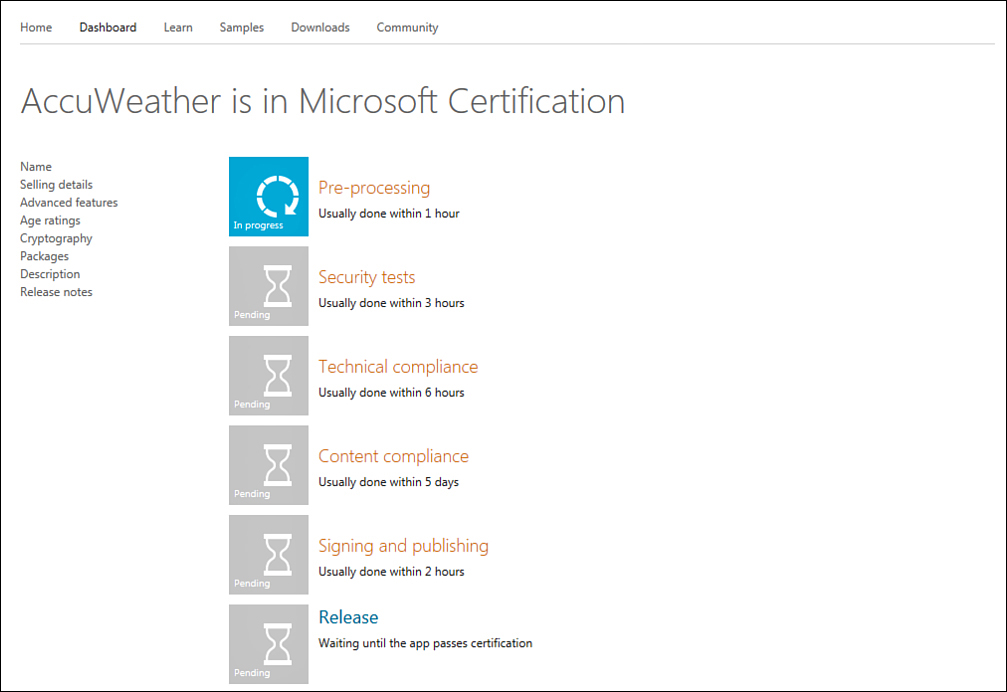
Figure 10.11. The submission process
When your application is approved, you will have access to additional dashboards that provide information about purchases and installations. You will be able to slice-and-dice information by region, age group, and other demographics to gain insights into how your app is being adopted. You will also be able to see your ratings and of course track revenue that is generated. Figure 10.12 shows an example dashboard.
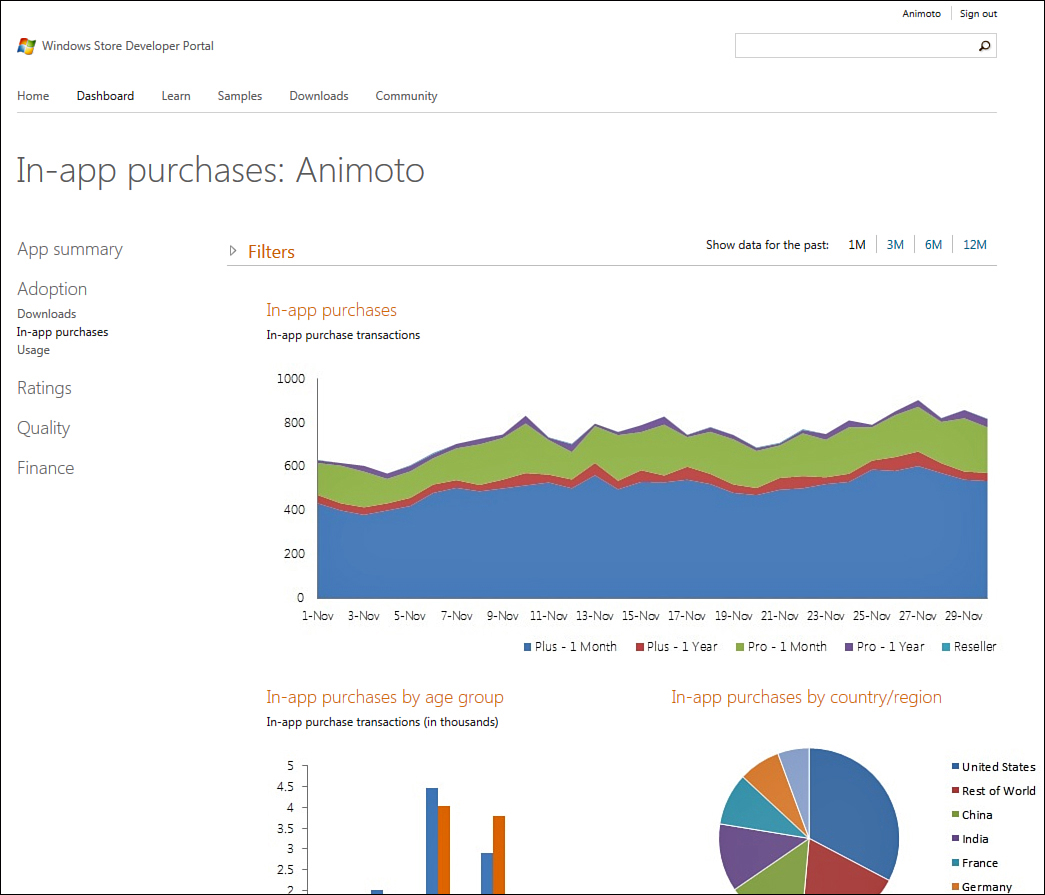
Figure 10.12. Windows Store dashboard for active apps
Sometimes you may need to distribute your application without going through the Windows Store. This can happen when you have an early version of the application that you want to share with others for testing or beta use or when you are developing a Line of Business application for use within the company intranet. Fortunately there is a solution for this scenario called side-loading that allows you to create a package that you can distribute to other devices to install your package.
Side-Loading
You can add applications using Windows PowerShell. Although applications distributed in this fashion do not have to be installed or certified from within the Windows Store, they must be signed with a trusted certificate. They can only be installed on machines that trust the signing certificate.
You can learn more about managing certificates here:
http://msdn.microsoft.com/en-us/library/aa376553(v=vs.85).aspx
Learn about signing Windows 8 apps here:
http://msdn.microsoft.com/en-us/library/aa387764(v=vs.85).aspx
Finally, learn more about general side-loading guidelines here:
http://technet.microsoft.com/en-us/library/hh852635.aspx
The first step to side-loading your application is to generate a package that you can distribute. This is done by right-clicking the project in Solution Explorer and choosing the Store![]() Create App Package option. When the initial dialog appears to ask whether you wish to build a package to upload to the Windows Store, select the option No and click the Next button.
Create App Package option. When the initial dialog appears to ask whether you wish to build a package to upload to the Windows Store, select the option No and click the Next button.
The next dialog shown in Figure 10.13 asks you to specify the location for the install, the version of the package, and how you wish to build the package (the default Neutral build will target all platforms). You can choose whether or not to include public symbol files. Including these will help users analyze any app crashes that may occur, but they can also expose proprietary information about your application that you may not want to include.
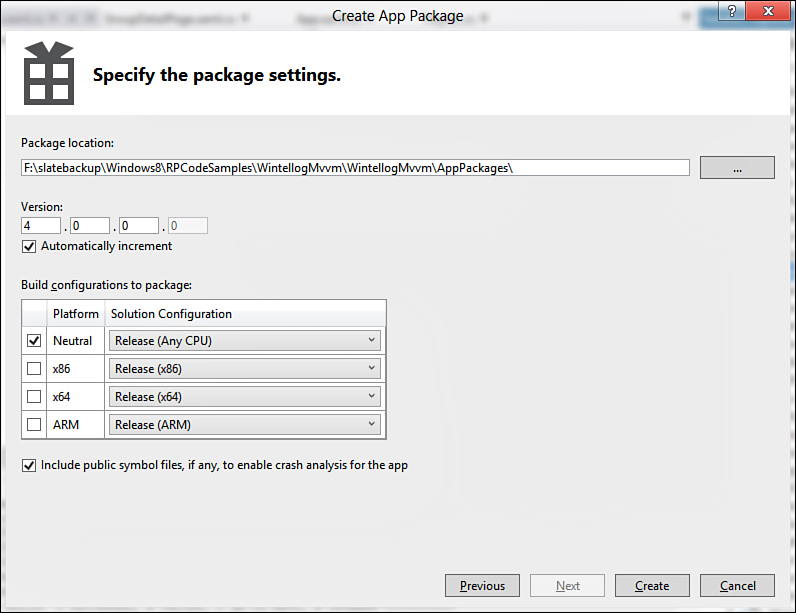
Figure 10.13. Packaging options for side-loading
Finally, click the Create button to create the package. The final dialog will give you a link to the location of the package and the option to launch the Windows App Certification Kit. Click or tap the file location and you will see a file and a folder. The easiest way to package these for distribution is to highlight both and choose Send To![]() Compressed (zipped) folder. That will provide you with a single file you can distribute. The target user will unzip the package on her machine.
Compressed (zipped) folder. That will provide you with a single file you can distribute. The target user will unzip the package on her machine.
To install the package on the target device, you must navigate into the folder and right-click the PowerShell script named Add-AppDevPackage.ps1. Chose the option Run with PowerShell (PowerShell is automatically distributed on every Windows 8 machine). The script will walk you through all necessary steps including updating any policies on the machine and installing the appropriate certificates. When these steps are complete, the application will be installed. You can see the results of an example installation session in Figure 10.14.
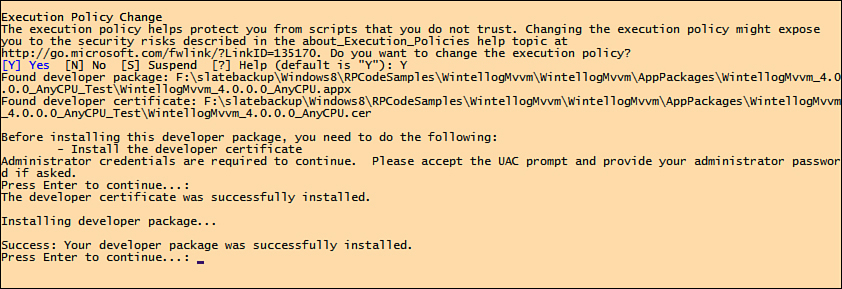
Figure 10.14. The result of running the installation PowerShell script
Using this method, you can deploy the package to multiple target machines without having to involve the Windows Store.
Summary
In this chapter, you learned about the Windows Store and various features it provides, including various models for selling your application and enabling in-app purchases for specific features. I shared the process for submitting an application to the Windows Store, including how to use the Windows App Certification Kit to test your application prior to submission. You also learned how to create a special package to side-load your application on target devices without going through the Windows Store.
I hope you have enjoyed this book! My intention was to provide you with all of the tools and information needed for you to build your application and submit it for sale in the Windows Store. Of course, the easy part is knowing the various parts that make up the app. The difficult part will be coming up with the idea for your application. I wish you every success with whatever you decide to build for the Windows 8 platform.
I welcome your comments and feedback. If you liked this book, I would ask that you please take some time to visit the Amazon.com website and leave your comments at http://bit.ly/win8design.
This will be a tremendous help when other developers are searching online for a solution because they can read honest reviews from their peers to help decide which book they are willing to invest in. Feel free to write about this on your blog as well! If you’d like to discuss the content of the book with me or other developers, you can visit the book forums online at http://windows8applications.codeplex.com/discussions.
This is the same site where I host the source code. There is also a link to contact me directly. Feel free to follow me (and drop me a line) on Twitter; my handle there is @JeremyLikness. You can also continue to follow my technical articles and blog posts at http://csharperimage.jeremylikness.com/ where I will keep you up to date with the latest additions and updates as well as any future book projects.
Thank you!