8. Common Controllers
The iOS software development kit (SDK) provides a wealth of system-supplied controllers that you can use in your day-to-day development tasks. This chapter introduces some of the most popular ones. You read about selecting images from your device library, snapping photos, and recording and editing videos. You discover how to allow users to compose e-mails and text messages, and how to post updates to social services like Twitter and Facebook. Each controller offers a way to leverage prepackaged iOS system functionality. Here’s the know-how you need to get started using them.
Image Picker Controller
The UIImagePickerController class enables users to select images from a device’s media library and to snap pictures with its camera. It is somewhat of a living fossil; its system-supplied interface was created back in the early days of iPhone OS. Over time, as Apple rolled out devices with video recording (iOS 3.1) and front and rear cameras (iOS 4), the class evolved. It introduced photo and video editing, customizable camera view overlays, and more.
Image Sources
The image picker works with the following three sources. As much as one might want more nuanced access to iCloud and to shared and individual photo streams, for now you can access your entire library, just the camera roll, or just the camera. Submit your enhancement suggestions to http://bugreport.apple.com:
• UIImagePickerControllerSourceTypePhotoLibrary—This source contains all images synced to iOS. Material in this source includes images snapped by the user (Camera Roll), photo streams, albums synced from computers, copied via the camera connection kit, and so on.
• UIImagePickerControllerSourceTypeSavedPhotosAlbum—This source refers only to the Camera Roll, which consists of pictures and videos captured by the user on units with cameras or to the Saved Photos album for noncamera units. Photo stream items captured on other devices also sync into this roll.
• UIImagePickerControllerSourceTypeCamera—This source enables users to shoot pictures with a built-in iPhone camera. The source provides support for front and back camera selection, and both still and video capture.
Presenting the Picker on iPhone and iPad
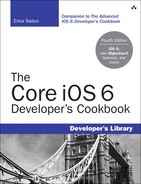
Figure 8-1 shows the image picker presented on an iPhone and iPad using a library source. The UIImagePickerController class was designed to operate in a modal presentation on iPhone-like devices (left) or a popover on tablets (right).
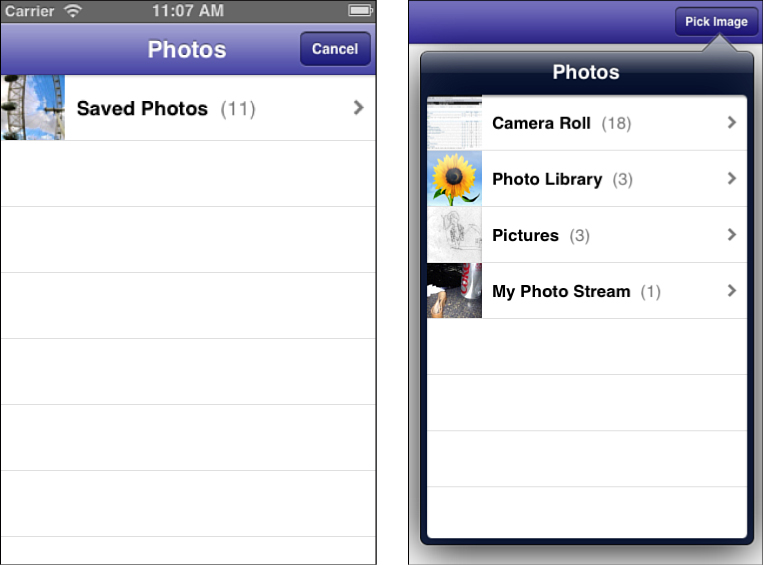
Figure 8-1. The core image picker allows users to select images from pictures stored in the media library.
On iPhone-like devices, present the picker modally. On the iPad, you can embed pickers into popovers instead. Never push image pickers onto an existing navigation stack. On older versions of iOS, this would create a second navigation bar under the primary. On modern versions of iOS, it throws a nasty exception: “Pushing a navigation controller is not supported by the image picker.”
Recipe: Selecting Images
In its simplest role, the image picker enables users to browse their library and select a stored photo. Recipe 8-1 demonstrates how to create and present a picker and retrieve an image selected by the user. Before proceeding with general how-to, let me introduce two key how-to’s for this section.
How To: Adding Photos to the Simulator
Before running this recipe on a Mac, you may want to populate the simulator’s photo collection. You can do this in two ways. First, you can drop images onto the simulator from Finder. Each image opens in Mobile Safari, where you can then tap-and-hold and choose Save Image to copy the image to your photo library.
Once you set up your test photo collection as you like, navigate to the Application Support folder in your home library on your Mac. Open the iPhone Simulator folder, and then the folder for the iOS version you’re currently using (for example, 6.0). Inside, you’ll find a Media folder. The path to the Media folder will look something like this: /Users/(Your Account)/Library/Application Support/iPhone Simulator/(OS Version)/Media.
Back up this newly populated Media folder to a convenient location. Creating a backup enables you to restore it in the future without having to re-add each photo individually. Each time you reset the simulator’s contents and settings, this material gets deleted. Having a folder on hand that’s ready to drop in and test with can be a huge time saver.
Alternatively, purchase a copy of Ecamm’s PhoneView (http://ecamm.com). PhoneView offers access to a device’s Media folder through the Apple File Connection (AFC) service. Connect an iPhone, launch the application, and then you can drag and drop folders from PhoneView to your Mac. Make sure you check Show Entire Disk in PhoneView preferences to see all the relevant folders.
Using PhoneView, copy the DCIM, PhotoData, and Photos folders from a device to a folder on your Macintosh. Once copied, quit the simulator and add the copied folders into the ~/Library/Application Support/iPhone Simulator/(OS Version)/Media destination. When you next launch the simulator, your new media will be waiting for you in the Photos app.
The Assets Library Framework
This recipe uses the assets library framework. To add frameworks, use the Targets > Build Phases > Link Binary with Libraries settings. Click + and select the framework to add. In the Project Navigator, drag the newly added framework down to the Frameworks group.
Using the assets library may sound complicating, but there are strong underlying reasons why this is a best practice for working with image pickers. In iOS 6, an image picker may return an asset URL without providing a direct image to use. Recipe 8-1 assumes that’s a possibility and offers a method to load an image from the assets library (loadImageFromAssetURL:into:). A typical URL looks something like this:
assets-library://asset/asset.JPG?id=553F6592-43C9-45A0-B851-28A726727436&ext=JPG
That URL provides direct access to media.
Fortunately, Apple has now moved past an extremely annoying assets library issue. Historically, iOS queried the user for permission to use his or her location—permissions that users would normally deny. Apps would get stuck because you couldn’t force the system to ask again. Instead, iOS 6 now properly states that the app would like to access a user’s photos rather than location, hopefully with better user success. Determine your authorization situation by querying the class’s authorizationStatus. You can reset these granted privileges by opening Settings > Privacy and update service-based permissions (like location and photo access) on an app-by-app basis.
The procedural how-to matters now having been addressed, the next section introduces the image picker itself.
Presenting a Picker
Create an image picker by allocating and initializing it. Next, set its source type to the library (all images) or Camera Roll (captured images). Recipe 8-1 selects the photo library source, allowing users to browse through all library images.
UIImagePickerController *picker = [[UIImagePickerController alloc] init];
picker.sourceType = UIImagePickerControllerSourceTypePhotoLibrary;
An optional editing property (allowsEditing) adds a step to the interactive selection process. When enabled, it allows users to scale and frame the image they picked before finishing their selection. When disabled, any media selection immediately redirects control to the next phase of the picker’s life cycle.
Be sure to set the picker’s delegate property. The delegate conforms to the UINavigationControllerDelegate and UIImagePickerControllerDelegate protocols; it receives callbacks after a user has selected an image or has cancelled selection. When using an image picker controller with popovers, declare the UIPopoverControllerDelegate protocol as well.
When working on iPhone-like devices, always present the picker modally; check for the active device at runtime. The following test (iOS 3.2 and later) returns true when run on an iPhone, false on an iPad:
#define IS_IPHONE (UI_USER_INTERFACE_IDIOM() == UIUserInterfaceIdiomPhone)
The following snippet shows the typical presentation patterns for image pickers:
if (IS_IPHONE)
{
[self presentViewController:picker animated:YES completion:nil];
}
else
{
if (popover) [popover dismissPopoverAnimated:NO];
popover = [[UIPopoverController alloc] initWithContentViewController:picker];
popover.delegate = self;
[popover presentPopoverFromBarButtonItem:
self.navigationItem.rightBarButtonItem
permittedArrowDirections:UIPopoverArrowDirectionAny
animated:YES];
}
Handling Delegate Callbacks
Recipe 8-1 considers the following three possible image picker callback scenarios:
• The user has successfully selected an image.
• The user has tapped Cancel (only available on modal presentations).
• The user dismissed the popover that embeds the picker by tapping outside of it.
The last two cases are simple. For a modal presentation, dismiss the controller. For a popover, remove any local references holding onto the instance. Processing a selection takes a little more work.
Pickers finish their lives by returning a custom information dictionary to their assigned delegate. This info dictionary contains key-value pairs related to the user’s selection. Depending on way the image picker has been set up and on the kind of media selected by the user, the dictionary may contain few or many of these keys.
For example, when working with images on the simulator dropped in via Safari, expect to see nothing more than a media type and a reference URL. Images shot on a device and then edited through the picker may contain all six keys listed here:
• UIImagePickerControllerMediaType—Defines the kind of media selected by the user—normally public.image for images or public.movie for movies. Media types are defined in the Mobile Core Services framework. Media types are primarily used in this context for adding items to the system pasteboard.
• UIImagePickerControllerCropRect—Returns the portion of the image selected by the user as an NSValue that stores a CGRect.
• UIImagePickerControllerOriginalImage—Offers a UIImage instance with the original (nonedited) image contents.
• UIImagePickerControllerEditedImage—Provides the edited version of the image, containing the portion of the picture selected by the user. The UIImage returned is small, sized to fit the iPhone screen.
• UIImagePickerControllerReferenceURL—Specifies a file system URL for the selected asset. This URL always points to the original version of an item, regardless of whether a user has cropped or trimmed an asset.
• UIImagePickerControllerMediaMetadata—Offers metadata for a newly captured photograph.
Recipe 8-1 uses several steps to move from the initial info dictionary contents to produce a recovered image. First, it checks whether the dictionary contains an edited version. If it does not find this, it accesses the original image. Should that fail, it retrieves the reference URL and tries to load it through the assets library. Normally, at the end of these steps, the application has a valid image instance to work with. If it does not, it logs an error and returns.
Finally, don’t forget to dismiss modally presented controllers before wrapping up work in the delegate callback.
When it comes to user interaction zoology, the UIImagePickerController is a cow. It is slow to load. It eagerly consumes application memory and spends extra time chewing its cud. Be aware of these limitations when designing your apps and do not tip your image picker.
#define IS_IPHONE (UI_USER_INTERFACE_IDIOM() == UIUserInterfaceIdiomPhone)
// Dismiss the picker
- (void) performDismiss
{
if (IS_IPHONE)
[self dismissViewControllerAnimated:YES completion:nil];
else
[popover dismissPopoverAnimated:YES];
}
// Present the picker
- (void) presentViewController:(UIViewController *)viewControllerToPresent
{
if (IS_IPHONE)
{
[self presentViewController:viewControllerToPresent
animated:YES completion:nil];
}
else
{
popover = [[UIPopoverController alloc]
initWithContentViewController:viewControllerToPresent];
popover.delegate = self;
[popover presentPopoverFromBarButtonItem:
self.navigationItem.rightBarButtonItem
permittedArrowDirections:UIPopoverArrowDirectionAny
animated:YES];
}
}
// Popover was dismissed
- (void)popoverControllerDidDismissPopover:
(UIPopoverController *)aPopoverController
{
popover = nil;
}
// Retrieve an image from an asset URL
- (void) imageFromAssetURL: (NSURL *) assetURL
into: (UIImage **) image
{
ALAssetsLibrary *library = [[ALAssetsLibrary alloc] init];
ALAssetsLibraryAssetForURLResultBlock resultsBlock = ^(ALAsset *asset)
{
ALAssetRepresentation *assetRepresentation =
[asset defaultRepresentation];
CGImageRef cgImage = [assetRepresentation CGImageWithOptions:nil];
CFRetain(cgImage); // Thanks Oliver Drobnik
if (image) *image = [UIImage imageWithCGImage:cgImage];
CFRelease(cgImage);
};
ALAssetsLibraryAccessFailureBlock failure = ^(NSError *__strong error)
{
NSLog(@"Error retrieving asset from url: %@",
error.localizedFailureReason);
};
[library assetForURL:assetURL
resultBlock:resultsBlock failureBlock:failure];
}
// Update image and for iPhone, dismiss the controller
- (void)imagePickerController:(UIImagePickerController *)picker
didFinishPickingMediaWithInfo:(NSDictionary *)info
{
// Use the edited image if available
UIImage __autoreleasing *image =
info[UIImagePickerControllerEditedImage];
// If not, grab the original image
if (!image) image = info[UIImagePickerControllerOriginalImage];
// If still no luck, check for an asset URL
NSURL *assetURL = info[UIImagePickerControllerReferenceURL];
if (!image && !assetURL)
{
NSLog(@"Cannot retrieve an image from the selected item. Giving up.");
}
else if (!image)
{
// Retrieve the image from the asset library
[self imageFromAssetURL:assetURL into:&image];
}
// Display the image
if (image)
imageView.image = image;
if (IS_IPHONE)
[self performDismiss];
}
// iPhone-like devices only: dismiss the picker with cancel button
- (void) imagePickerControllerDidCancel: (UIImagePickerController *)picker
{
[self performDismiss];
}
- (void) pickImage
{
if (popover) return;
// Create and initialize the picker
UIImagePickerController *picker = [[UIImagePickerController alloc] init];
picker.sourceType = UIImagePickerControllerSourceTypePhotoLibrary;
picker.allowsEditing = editSwitch.isOn;
picker.delegate = self;
[self presentViewController:picker];
}
To find this recipe’s full sample project, point your browser to https://github.com/erica/iOS-6-Cookbook and go to the folder for Chapter 8.
Recipe: Snapping Photos
In addition to selecting pictures, the image picker controller enables you to snap photos with a device’s built-in camera. Because cameras are not available on all iOS units (specifically, older iPod touch and iPad devices), begin by checking whether the system running the application supports camera usage:
if ([UIImagePickerController isSourceTypeAvailable:
UIImagePickerControllerSourceTypeCamera]) ...
The rule is this: Never offer camera-based features for devices without cameras. Although iOS 6 was deployed only to camera-ready devices, Apple has not committed to this as policy. As unlikely as it sounds, they could introduce new models without cameras. Until Apple says otherwise, assume the possibility exists for a noncamera system, even under modern iOS releases. Further, assume this method will accurately report state for camera-enabled devices whose source has been disabled through some future system setting.
Setting Up the Picker
You instantiate a camera version of the image picker the way you create a picture selection one. Just change the source type from library or Camera Roll to camera:
picker.sourceType = UIImagePickerControllerSourceTypeCamera;
As with other modes, you can allow or disallow image editing as part of the photo-capture process by setting the allowsEditing property.
Although the setup is the same, the user experience differs slightly (see Figure 8-2). The camera picker offers a preview that displays after the user taps the camera icon to snap a photo. This preview lets users Retake the photo or Use the photo as is. Once they tap Use, control passes to the next phase. If you’ve enabled image editing, the user does so next. If not, control moves to the standard “did finish picking” method in the delegate.

Figure 8-2. The camera version of the image picker controller offers a distinct user experience for snapping photos.
Most modern devices offer more than one camera. The iPhone 3GS, the last remaining iOS 6 dinosaur, does not. Assign the cameraDevice property to select which camera you want to use. The rear camera is always the default.
The isCameraDeviceAvailable: class method queries whether a camera device is available. This snippet checks to see whether the front camera is available, and if so selects it:
if ([UIImagePickerController isCameraDeviceAvailable:
UIImagePickerControllerCameraDeviceFront])
picker.cameraDevice = UIImagePickerControllerCameraDeviceFront;
Here are a few more points about the camera or cameras that you can access through the UIImagePickerController class:
• You can query the device’s ability to use flash using the isFlashAvailableForCameraDevice: class method. Supply either the front or back device constant. This method returns YES for available flash, or otherwise NO.
• When a camera supports flash, you can set the cameraFlashMode property directly to auto (UIImagePickerControllerCameraFlashModeAuto, which is the default), to always used (UIImagePickerControllerCameraFlashModeOn), or always off (UIImagePickerControllerCameraFlashModeOff). Selecting off disables the flash regardless of ambient light conditions.
• Choose between photo and video capture by setting the cameraCaptureMode property. The picker defaults to photo-capture mode. You can test what modes are available for a device using availableCaptureModesForCameraDevice:. This returns an array of NSNumber objects, each of which encodes a valid capture mode, either photo (UIImagePickerControllerCameraCaptureModePhoto) or video (UIImagePickerControllerCameraCaptureModeVideo).
Displaying Images
When working with photos, keep image size in mind. Snapped pictures, especially those from high-resolution cameras, can be quite large, even in the age of Retina displays. Those captured from front-facing video cameras use lower-quality sensors and are much smaller.
Content modes provide an in-app solution to displaying large images. They allow image views to scale their embedded images to available screen space. Consider using one of the following modes:
• The UIViewContentModeScaleAspectFit mode ensures that the entire image is shown with the aspect ratio retained. The image may be padded with empty rectangles on the sides or the top and bottom to preserve that aspect.
• The UIViewContentModeScaleAspectFill mode displays as much of the image as possible, while filling the entire view. Some content may be clipped so that the entire view’s bounds are filled.
Saving Images to the Photo Album
Save a snapped image (or any UIImage instance, actually) to the photo album by calling UIImageWriteToSavedPhotosAlbum(). This function takes four arguments. The first is the image to save. The second and third arguments specify a callback target and selector, typically your primary view controller and image:didFinishSavingWithError:contextInfo:. The fourth argument is an optional context pointer. Whatever selector you use, it must take three arguments: an image, an error, and a pointer to the passed context information.
Recipe 8-2 uses this function to demonstrate how to snap a new image, allow user edits, and then save it to the photo album.
// "Finished saving" callback method
- (void)image:(UIImage *)image
didFinishSavingWithError: (NSError *)error
contextInfo:(void *)contextInfo;
{
// Handle the end of the image write process
if (!error)
NSLog(@"Image written to photo album");
else
NSLog(@"Error writing to photo album: %@", error.localizedFailureReason);
}
// Save the returned image
- (void)imagePickerController:(UIImagePickerController *)picker
didFinishPickingMediaWithInfo:(NSDictionary *)info
{
// Use the edited image if available
UIImage __autoreleasing *image =
info[UIImagePickerControllerEditedImage];
// If not, grab the original image
if (!image) image = info[UIImagePickerControllerOriginalImage];
NSURL *assetURL = info[UIImagePickerControllerReferenceURL];
if (!image && !assetURL)
{
NSLog(@"Cannot retrieve an image from selected item. Giving up.");
}
else if (!image)
{
NSLog(@"Retrieving from Assets Library");
[self loadImageFromAssetURL:assetURL into:&image];
}
if (image)
{
// Save the image
UIImageWriteToSavedPhotosAlbum(image, self,
@selector(image:didFinishSavingWithError:contextInfo:), NULL);
imageView.image = image;
}
[self performDismiss];
}
- (void) loadView
{
[super loadView];
// Only present the "Snap" option for camera-ready devices
if ([UIImagePickerController isSourceTypeAvailable:
UIImagePickerControllerSourceTypeCamera])
self.navigationItem.rightBarButtonItem =
SYSBARBUTTON(UIBarButtonSystemItemCamera,
@selector(snapImage)));
}
To find this recipe’s full sample project, point your browser to https://github.com/erica/iOS-6-Cookbook and go to the folder for Chapter 8.
Recipe: Recording Video
Even in the age of ubiquitous cameras on iOS 6, exercise caution regarding not just the availability but also the kinds of cameras provided by each device. When recording video, allow your application to detect whether a device supports camera-based video recording.
This is a two-step process. It isn’t sufficient to only check for a camera, such as those in the first-generation and 3G iPhones (in contrast to early iPad and iPod touch models, which shipped without). Only the 3GS and newer units provided video-recording capabilities and, however unlikely, future models could ship without cameras or with still cameras.
That means you perform two checks: first, that a camera is available; and second, that the available capture types includes video. This method returns a Boolean value indicating whether the device running the application is video ready:
- (BOOL) videoRecordingAvailable
{
// The source type must be available
if (![UIImagePickerController isSourceTypeAvailable:
UIImagePickerControllerSourceTypeCamera])
return NO;
// And the media type must include the movie type
NSArray *mediaTypes = [UIImagePickerController
availableMediaTypesForSourceType:
UIImagePickerControllerSourceTypeCamera]
return [mediaTypes containsObject:(NSString *)kUTTypeMovie];
}
This method searches for a movie type (kUTTypeMovie, a.k.a. public.movie) in the results for the available media types query. Uniform type identifiers (UTIs) are strings that identify abstract types for common file formats such as images, movies, and data. These types are defined in the Mobile Core Services framework. Be sure to include the framework in your project:
#import <MobileCoreServices/MobileCoreServices.h>
Creating the Video Recording Picker
Recording video is almost identical to capturing still images with the camera. You allocate and initialize a new image picker, set its delegate, and present it:
UIImagePickerController *picker =
[[UIImagePickerController alloc] init];
picker.sourceType = UIImagePickerControllerSourceTypeCamera;
picker.videoQuality = UIImagePickerControllerQualityTypeMedium;
picker.mediaTypes = @[(NSString *)kUTTypeMovie]; // public.movie
picker.delegate = self;
Choose the video quality you want to record. As you improve quality, the data stored per second increases. Select from high (UIImagePickerControllerQualityTypeHigh), medium (UIImagePickerControllerQualityTypeMedium), low (UIImagePickerControllerQualityTypeLow), or VGA (UIImagePickerControllerQualityType640x480).
As with image picking, the video version allows you to set an allowsEditing property, as discussed in Recipe 8-5.
Saving the Video
The info dictionary returned by the video picker contains a UIImagePickerControllerMediaURL key. This media URL points to the captured video, which is stored in a temporary folder within the sandbox. Use the UISaveVideoAtPathToSavedPhotosAlbum() method to store the video to your library.
This save method takes four arguments: the path to the video you want to add to the library, a callback target, a selector with three arguments (basically identical to the selector used during image save callbacks), and an optional context. The save method calls the target with that selector after it finishes its work, and there’s where you can check for success.
- (void)video:(NSString *)videoPath
didFinishSavingWithError:(NSError *)error
contextInfo:(void *)contextInfo
{
if (!error)
self.title = @"Saved!";
else
NSLog(@"Error saving video: %@", error.localizedFailureReason);
}
- (void) saveVideo: (NSURL *) mediaURL
{
// check if video is compatible with album
BOOL compatible = UIVideoAtPathIsCompatibleWithSavedPhotosAlbum(
mediaURL.path);
// save
if (compatible)
UISaveVideoAtPathToSavedPhotosAlbum(
mediaURL.path, self,
@selector(video:didFinishSavingWithError:contextInfo:),
NULL);
}
- (void)imagePickerController:(UIImagePickerController *)picker
didFinishPickingMediaWithInfo:(NSDictionary *)info
{
[self performDismiss];
// Save the video
NSURL *mediaURL = [info objectForKey:UIImagePickerControllerMediaURL];
[self saveVideo: mediaURL];
}
- (void) recordVideo
{
if (popover) return;
self.title = nil;
// Create and initialize the picker
UIImagePickerController *picker =
[[UIImagePickerController alloc] init];
picker.sourceType = UIImagePickerControllerSourceTypeCamera;
picker.videoQuality = UIImagePickerControllerQualityTypeMedium;
picker.mediaTypes = @[(NSString *)kUTTypeMovie];
picker.delegate = self;
[self presentViewController:picker];
}
To find this recipe’s full sample project, point your browser to https://github.com/erica/iOS-6-Cookbook and go to the folder for Chapter 8.
Recipe: Playing Video with Media Player
The MPMoviePlayerViewController and MPMoviePlayerController classes simplify video display in your applications. Part of the Media Player framework, these classes allow you to embed video into your views or to play movies back full screen. Offering the ready-built full-feature video player shown in Figure 8-3, you do little more than supply a content URL. The player provides the Done button, the time scrubber, the aspect control, and the playback controls, plus the underlying video presentation.

Figure 8-3. The Media Player framework simplifies adding video playback to your applications. This class allows off-device streaming video as well as fixed-size local assets. Supported video standards include H.264 Baseline Profile Level 3.0 video (up to 640x480 at 30fps) and MPEG-4 Part 2 video (Simple Profile). Most files with .mov, .mp4, .mpv, and .3gp extensions can be played. Audio support includes AAC-LC audio (up to 48KHz), MP3 (MPEG-1 Audio Layer 3, up to 48KHz) stereo.
Recipe 8-4 builds on the video recording introduced in Recipe 8-3. It adds playback after each recording by switching the Camera button in the navigation bar to a Play button. Once the video finishes playing, the button returns to the Camera. This recipe does not save any videos to the library, so you can record, play, and record, play, ad infinitum.
The image picker supplies a media URL, which is all you need to establish the player. Recipe 8-4 instantiates a new player and sets two properties. The first enables AirPlay, letting you stream the recorded video to an AirPlay-enabled receiver like Apple TV or a commercial application like Reflection (http://reflectionapp.com). The second sets the playback style to show the video full screen. It then presents the movie.
The two movie player classes consist of a presentable view controller and the actual player controller, which it owns as a property. That is why Recipe 8-4 makes so many mentions of player.moviePlayer. The view controller class is quite small and easy to launch. The real work takes place in the player controller.
Movie players use notifications rather than delegates to communicate with applications. You subscribe to these notifications to determine when the movie starts playing, when it finishes, and when it changes state (as in pause/play). Recipe 8-4 observes two notifications: when the movie becomes playable, and when it finishes.
After the movie loads and its state changes to playable, Recipe 8-4 starts playback. The movie appears full screen and continues playing until the user taps Done or the movie finishes. In either case, the player generates a finish notification. At that time, the app returns to recording mode, presenting its camera button to allow the user to record the next video sequence.
This recipe demonstrates the basics for playing video in iOS. You are not limited to video you record yourself. The movie player controller is agnostic about its video source. You can set the content URL to a file stored in your sandbox or even point it to a compliant resource out on the Internet.
If your movie player opens and immediately closes, always check your URLs to make sure that they are valid. Do not forget that local file URLs need fileURLWithPath:, whereas remote ones can use URLWithString:.
- (void) playMovie
{
// play
MPMoviePlayerViewController *player =
[[MPMoviePlayerViewController alloc] initWithContentURL:mediaURL];
player.moviePlayer.allowsAirPlay = YES;
player.moviePlayer.controlStyle = MPMovieControlStyleFullscreen;
[self.navigationController
presentMoviePlayerViewControllerAnimated:player];
// Handle the end of movie playback
[[NSNotificationCenter defaultCenter]
addObserverForName:MPMoviePlayerPlaybackDidFinishNotification
object:player.moviePlayer queue:[NSOperationQueue mainQueue]
usingBlock:^(NSNotification *notification){
// Return to recording mode
self.navigationItem.rightBarButtonItem =
SYSBARBUTTON(UIBarButtonSystemItemCamera,
@selector(recordVideo));
// Stop listening to movie notifications
[[NSNotificationCenter defaultCenter] removeObserver:self];
}];
// Wait for the movie to load and become playable
[[NSNotificationCenter defaultCenter]
addObserverForName:MPMoviePlayerLoadStateDidChangeNotification
object:player.moviePlayer queue:[NSOperationQueue mainQueue]
usingBlock:^(NSNotification *notification) {
// When the movie sets the playable flag, start playback
if ((player.moviePlayer.loadState &
MPMovieLoadStatePlayable) != 0)
[player.moviePlayer performSelector:@selector(play)
withObject:nil afterDelay:1.0f];
}];
}
// After recording any content, allow the user to play it
- (void)imagePickerController:(UIImagePickerController *)picker
didFinishPickingMediaWithInfo:(NSDictionary *)info
{
[self performDismiss];
// recover video URL
mediaURL = [info objectForKey:UIImagePickerControllerMediaURL];
self.navigationItem.rightBarButtonItem =
SYSBARBUTTON(UIBarButtonSystemItemPlay, @selector(playMovie));
}
To find this recipe’s full sample project, point your browser to https://github.com/erica/iOS-6-Cookbook and go to the folder for Chapter 8.
Recipe: Editing Video
Enabling an image picker’s allowsEditing property for a video source activates the yellow editing bars you’ve seen in the built-in photos app. (Drag the grips at either side to see them in action.) During the editing step of the capture process, users drag the ends of the scrubbing track to choose the video range they want to use.
Surprisingly, the picker does not trim the video itself. Instead, it returns four items in the info dictionary:
• UIImagePickerControllerMediaURL
• UIImagePickerControllerMediaType
• _UIImagePickerControllerVideoEditingStart
• _UIImagePickerControllerVideoEditingEnd
The media URL points to the untrimmed video, which is stored in a temporary folder within the sandbox. The video start and end points are NSNumbers, containing the offsets the user chose with those yellow edit bars. The media type is public.movie.
If you save the video to the library (as shown in Recipe 8-3), it stores the unedited version, which is not what your user expects or you want. The iOS SDK offers you two ways to edit video. Recipe 8-5 demonstrates how to use the AVFoundation framework to respond to the edit requests returned by the video image picker. Recipe 8-6 shows you how to pick videos from your library and use the UIVideoEditorController to edit.
AV Foundation and Core Media
This recipe requires access to two very specialized frameworks. The AV Foundation framework provides an Objective-C interface that supports media processing. Core Media uses a low-level C interface to describe media properties. Together these provide an iOS version of the Mac’s QuickTime media experience. Include both frameworks in your project’s build and add their headers to your source code for this recipe.
Recipe 8-5 begins by recovering the media URL from the image picker’s info dictionary. This URL points to the temporary file in the sandbox created by the image picker. The recipe creates a new AV asset URL from that.
Next it creates the export range, the times within the video that should be saved to the library. It does this using the Core Media CMTimeRange structure, building it from the info dictionary’s start and end times. The CMTimeMakeWithSeconds() function takes two arguments, a time and a scale factor. This recipe uses a factor of 1, preserving the exact times.
An export session allows your app to save data back out to the file system. This session does not save video to the library; that is a separate step. The session exports the trimmed video to a local file in the sandbox tmp folder, alongside the originally captured video. To create an export session, allocate it, and set its asset and quality.
Recipe 8-5 uses a new path to save to. This path is identical to the one it read from with “-trimmed” added to the core filename. The export session uses this path to set its output URL, the export range to specify what time range to include, and selects a QuickTime movie output file type. Now established, it’s ready to process the video. The export session asynchronously performs the file export using the properties you and the contents of the passed asset.
When complete, it’s time to save the trimmed movie to the central media library. Recipe 8-5 does so in the export session’s completion block.
Recipe 8-5. Trimming Video with AV Foundation
- (void) trimVideo: (NSDictionary *) info
{
// recover video URL
NSURL *mediaURL = [info objectForKey:UIImagePickerControllerMediaURL];
AVURLAsset *asset = [AVURLAsset URLAssetWithURL:mediaURL options:nil];
// Create the export range
CGFloat editingStart =
[info[@"_UIImagePickerControllerVideoEditingStart"] floatValue];
CGFloat editingEnd =
[info[@"_UIImagePickerControllerVideoEditingEnd"] floatValue];
CMTime startTime = CMTimeMakeWithSeconds(editingStart, 1);
CMTime endTime = CMTimeMakeWithSeconds(editingEnd, 1);
CMTimeRange exportRange = CMTimeRangeFromTimeToTime(startTime, endTime);
// Create a trimmed version URL: file:originalpath-trimmed.mov
NSString *urlPath = mediaURL.path;
NSString *extension = urlPath.pathExtension;
NSString *base = [urlPath stringByDeletingPathExtension];
NSString *newPath = [NSString stringWithFormat:
@"%@-trimmed.%@", base, extension];
NSURL *fileURL = [NSURL fileURLWithPath:newPath];
// Establish an export session
AVAssetExportSession *session = [AVAssetExportSession
exportSessionWithAsset:asset
presetName:AVAssetExportPresetMediumQuality];
session.outputURL = fileURL;
session.outputFileType = AVFileTypeQuickTimeMovie;
session.timeRange = exportRange;
// Perform the export
[session exportAsynchronouslyWithCompletionHandler:^(){
if (session.status == AVAssetExportSessionStatusCompleted)
[self saveVideo:fileURL];
else if (session.status == AVAssetExportSessionStatusFailed)
NSLog(@"AV export session failed");
else
NSLog(@"Export session status: %d", session.status);
}];
}}
To find this recipe’s full sample project, point your browser to https://github.com/erica/iOS-6-Cookbook and go to the folder for Chapter 8.
Recipe: Picking and Editing Video
You can use the Image Picker class to select videos as well as images, as demonstrated in Recipe 8-6. All it takes is a little editing of the media types property. Set the picker source type as normal, to either the photo library or the saved photos album, but restrict the media types property. The following snippet shows how to set the media types to request a picker that presents video assets only:
picker.sourceType = UIImagePickerControllerSourceTypePhotoLibrary;
picker.mediaTypes = @[(NSString *)kUTTypeMovie];
Once the user selects a video, Recipe 8-6 enters editing mode. Always check that the video asset can be modified. Call the UIVideoEditorController class method canEditVideoAtPath:. This returns a Boolean value that indicates whether the video is compatible with the editor controller:
if (![UIVideoEditorController canEditVideoAtPath:vpath]) ...
If it is compatible, allocate a new video editor. The UIVideoEditorController class uses a system-supplied interface that allows users to interactively trim videos. Set its delegate and videoPath properties and present it. (This class can also be used to reencode data to a lower quality via its videoQuality property.)
The editor uses a set of delegate callbacks that are similar to but not identical to the ones used by the UIImagePickerController class. Callbacks include methods for success, failure, and user cancellation:
• videoEditorController:didSaveEditedVideoToPath:
• videoEditorController:didFailWithError:
• videoEditorControllerDidCancel:
Cancellation only occurs when the user taps the Cancel button within the video editor. Tapping outside a popover dismisses the editor but won’t invoke the callback. For both cancellation and failure, Recipe 8-6 responds by resetting its interface, allowing users to pick another video.
A success callback occurs when a user has finished editing the video and taps Use. The controller saves the trimmed video to a temporary path and calls the did-save method. Do not confuse this “saving” with storing items to your photo library; this path resides in the application sandbox’s tmp folder. If you do nothing with the data, iOS deletes it the next time the device reboots. Once past this step, Recipe 8-6 offers a button to save the trimmed data into the shared iOS photo album, which is the save-to-library feature introduced in Recipe 8-3.
Recipe 8-6. Using the Video Editor Controller
// The edited video is now stored in the local tmp folder
- (void)videoEditorController:(UIVideoEditorController *)editor
didSaveEditedVideoToPath:(NSString *)editedVideoPath
{
[self performDismiss];
// Update the working URL and present the Save button
mediaURL = [NSURL URLWithString:editedVideoPath];
self.navigationItem.leftBarButtonItem =
BARBUTTON(@"Save", @selector(saveVideo));
self.navigationItem.rightBarButtonItem =
BARBUTTON(@"Pick", @selector(pickVideo));
}
// Handle failed edit
- (void)videoEditorController:(UIVideoEditorController *)editor
didFailWithError:(NSError *)error
{
[self performDismiss];
mediaURL = nil;
self.navigationItem.rightBarButtonItem =
BARBUTTON(@"Pick", @selector(pickVideo));
self.navigationItem.leftBarButtonItem = nil;
NSLog(@"Video edit failed: %@", error.localizedFailureReason);
}
// Handle cancel by returning to Pick state
- (void)videoEditorControllerDidCancel:
(UIVideoEditorController *)editor
{
[self performDismiss];
mediaURL = nil;
self.navigationItem.rightBarButtonItem =
BARBUTTON(@"Pick", @selector(pickVideo));
self.navigationItem.leftBarButtonItem = nil;
}
// Allow the user to edit the media with a video editor
- (void) editMedia
{
if (![UIVideoEditorController canEditVideoAtPath:mediaURL.path])
{
self.title = @"Cannot Edit Video";
self.navigationItem.rightBarButtonItem =
BARBUTTON(@"Pick", @selector(pickVideo));
return;
}
UIVideoEditorController *editor =
[[UIVideoEditorController alloc] init];
editor.videoPath = mediaURL.path;
editor.delegate = self;
[self presentViewController:editor];
}
// The user has selected a video. Offer an edit button
- (void)imagePickerController:(UIImagePickerController *)picker
didFinishPickingMediaWithInfo:(NSDictionary *)info
{
[self performDismiss];
// Store the video URL and present an Edit button
mediaURL = [info objectForKey:UIImagePickerControllerMediaURL];
self.navigationItem.rightBarButtonItem =
BARBUTTON(@"Edit", @selector(editMedia));
}
To find this recipe’s full sample project, point your browser to https://github.com/erica/iOS-6-Cookbook and go to the folder for Chapter 8.
Recipe: E-Mailing Pictures
The Message UI framework allows users to compose e-mail and text messages within applications. As with camera access and the image picker, check whether a user’s device has been enabled for these services. A simple test allows you to determine when mail is available:
[MFMailComposeViewController canSendMail]
When mail capabilities are enabled, users can send their photographs via instances of MFMailComposeViewController. Texts are sent through MFMessageComposeViewController instances.
Recipe 8-7 uses this composition class to create a new mail item populated with the user-snapped photograph. The mail composition controller works best as a modally presented client on both the iPhone family and tablets. Your primary view controller presents it and waits for results via a delegate callback.
Creating Message Contents
The composition controller’s properties allow you to programmatically build a message including to/cc/bcc recipients and attachments. Recipe 8-7 demonstrates the creation of a simple HTML message with an attachment. Properties are almost universally optional. Define the subject and body contents via setSubject: and setMessageBody:. Each method takes a string as its argument.
Leave the To Recipients unassigned to greet the user with an unaddressed message. The times you’ll want to prefill this field include adding call-home features such as Report a Bug or Send Feedback to the Developer or when you allow the user to choose a favorite recipient in your settings.
Creating the attachment requires slightly more work. To add an attachment, you need to provide all the file components expected by the mail client. You supply data (via an NSData object), a MIME type (a string), and a filename (another string). Retrieve the image data using the UIImageJPEGRepresentation() function. This function can take time to work. So, expect slight delays before the message view appears.
This recipe uses a hard-coded MIME type of image/jpeg. If you want to send other data types, you can query iOS for MIME types via typical file extensions. Use UTTypeCopyPreferredTagWithClass(), as shown in the following method, which is defined in the MobileCoreServices framework:
#import <MobileCoreServices/UTType.h>
- (NSString *) mimeTypeForExtension: (NSString *) ext
{
// Request the UTI via the file extension
CFStringRef UTI = UTTypeCreatePreferredIdentifierForTag(
kUTTagClassFilenameExtension,
(__bridge CFStringRef) ext, NULL);
if (!UTI) return nil;
// Request the MIME file type via the UTI,
// may return nil for unrecognized MIME types
NSString *mimeType = (__bridge_transfer NSString *)
UTTypeCopyPreferredTagWithClass(UTI, kUTTagClassMIMEType);
return mimeType;
}
This method returns a standard MIME type based on the file extension passed to it, such as .jpg, .png, .txt, .html, and so on. Always test to see whether this method returns nil, because the iOS’s built-in knowledge base of extension-MIME type matches is limited. Alternatively, search on the Internet for the proper MIME representations, adding them to your project by hand.
The e-mail uses a filename you specify to transmit the data you send. Use any name you like. Here, the name is set to pickerimage.jpg. Because you’re just sending data, there’s no true connection between the content you send and the name you assign:
[mcvc addAttachmentData:UIImageJPEGRepresentation(image, 1.0f)
mimeType:@"image/jpeg" fileName:@"pickerimage.jpg"];
When using the iOS mail composer, attachments appear at the end of sent mail. Apple does not provide a way to embed images inside the flow of HTML text. This is due to differences between Apple and Microsoft representations.
Recipe 8-7. Sending Images by E-Mail
- (void)mailComposeController:(MFMailComposeViewController*)controller
didFinishWithResult:(MFMailComposeResult)result
error:(NSError*)error
{
// Wrap up the composer details
[self performDismiss];
switch (result)
{
case MFMailComposeResultCancelled:
NSLog(@"Mail was cancelled");
break;
case MFMailComposeResultFailed:
NSLog(@"Mail failed");
break;
case MFMailComposeResultSaved:
NSLog(@"Mail was saved");
break;
case MFMailComposeResultSent:
NSLog(@"Mail was sent");
break;
default:
break;
}
}
- (void) sendImage
{
UIImage *image = imageView.image;
if (!image) return;
// Customize the e-mail
MFMailComposeViewController *mcvc =
MFMailComposeViewController alloc] init];
mcvc.mailComposeDelegate = self;
// Set the subject
[mcvc setSubject:@"Here's a great photo!"];
// Create a prefilled body
NSString *body = @"<h1>Check this out</h1>
<p>I snapped this image from the
<code><b>UIImagePickerController</b></code>.</p>";
[mcvc setMessageBody:body isHTML:YES];
// Add the attachment
[mcvc addAttachmentData:UIImageJPEGRepresentation(image, 1.0f)
mimeType:@"image/jpeg" fileName:@"pickerimage.jpg"];
// Present the e-mail composition controller
[self presentViewController:mcvc];
}
To find this recipe’s full sample project, point your browser to https://github.com/erica/iOS-6-Cookbook and go to the folder for Chapter 8.
Recipe: Sending a Text Message
It’s even easier to send a text from your applications than e-mail. This particular controller is shown in Figure 8-4. As with mail, first ensure that the capability exists on your iOS device and declare the MFMessageComposeViewControllerDelegate protocol:
[MFMessageComposeViewController canSendText]

Figure 8-4. The message compose view controller.
Monitor the availability of text support, which may change over time, by listening for the MFMessageComposeViewControllerTextMessageAvailabilityDidChangeNotification notification.
Recipe 8-8 creates the new controller and sets its messageComposeDelegate and its body. If you know the intended recipients, you can prepopulate that field by passing an array of phone number strings. Present the controller however you like and wait for the delegate callback, where you dismiss it.
- (void)messageComposeViewController:
(MFMessageComposeViewController *)controller
didFinishWithResult:(MessageComposeResult)result
{
[self performDismiss];
switch (result)
{
case MessageComposeResultCancelled:
NSLog(@"Message was cancelled");
break;
case MessageComposeResultFailed:
NSLog(@"Message failed");
break;
case MessageComposeResultSent:
NSLog(@"Message was sent");
break;
default:
break;
}
}
- (void) sendMessage
{
MFMessageComposeViewController *mcvc =
[[MFMessageComposeViewController alloc] init];
mcvc.messageComposeDelegate = self;
mcvc.body = @"I'm reading the iOS Developer's Cookbook";
[self presentViewController:mcvc];
}
- (void) loadView
{
[super loadView];
self.view.backgroundColor = [UIColor whiteColor];
if ([MFMessageComposeViewController canSendText])
self.navigationItem.rightBarButtonItem =
BARBUTTON(@"Send", @selector(sendMessage));
else
self.title = @"Cannot send texts";
}
To find this recipe’s full sample project, point your browser to https://github.com/erica/iOS-6-Cookbook and go to the folder for Chapter 8.
Recipe: Posting Social Updates
The Social framework offers a unified API for integrating applications with social networking services. The framework currently supports Facebook, Twitter, and the China-based Sina Weibo. As with mail and messaging, start off by testing whether the service type you want to support is supported:
[SLComposeViewController isAvailableForServiceType:SLServiceTypeFacebook]
If it is, you can create a composition view controller for that service:
SLComposeViewController *fbController = [SLComposeViewController
composeViewControllerForServiceType:SLServiceTypeFacebook];
You customize a controller with images, URLs, and initial text. Recipe 8-9 demonstrates the steps to create the interface shown in Figure 8-5.

Figure 8-5. Composing Twitter messages
Originally introduced in iOS 5, the TWTweetComposeViewController provided the same interface as the iOS 6 Social version. It cannot, however, be presented in a popover. Further, you cannot generalize its use to other social services. Wherever possible for iOS 6 deployment, replace your use of the TW classes with the Social framework versions. The API is essentially identical.
Recipe 8-9. Posting Social Updates
- (void) postSocial: (NSString *) serviceType
{
// Establish the controller
SLComposeViewController *controller = [SLComposeViewController
composeViewControllerForServiceType:serviceType];
// Add text and an image
[controller addImage:[UIImage imageNamed:@"Icon.png"]];
[controller setInitialText:
@"I'm reading the iOS Developer's Coookbook"];
// Define the completion handler
controller.completionHandler =
^(SLComposeViewControllerResult result){
switch (result)
{
case SLComposeViewControllerResultCancelled:
NSLog(@"Cancelled");
break;
case SLComposeViewControllerResultDone:
NSLog(@"Posted");
break;
default:
break;
}
};
// Present the controller
[self presentViewController:controller];
}
- (void) postToFacebook
{
[self postSocial:SLServiceTypeFacebook];
}
- (void) postToTwitter
{
[self postSocial:SLServiceTypeTwitter];
}
- (void) loadView
{
[super loadView];
self.view.backgroundColor = [UIColor whiteColor];
if ([SLComposeViewController
isAvailableForServiceType:SLServiceTypeFacebook])
self.navigationItem.leftBarButtonItem =
BARBUTTON(@"Facebook", @selector(postToFacebook));
if ([SLComposeViewController
isAvailableForServiceType:SLServiceTypeTwitter])
self.navigationItem.rightBarButtonItem =
BARBUTTON(@"Twitter", @selector(postToTwitter));
}
To find this recipe’s full sample project, point your browser to https://github.com/erica/iOS-6-Cookbook and go to the folder for Chapter 8.
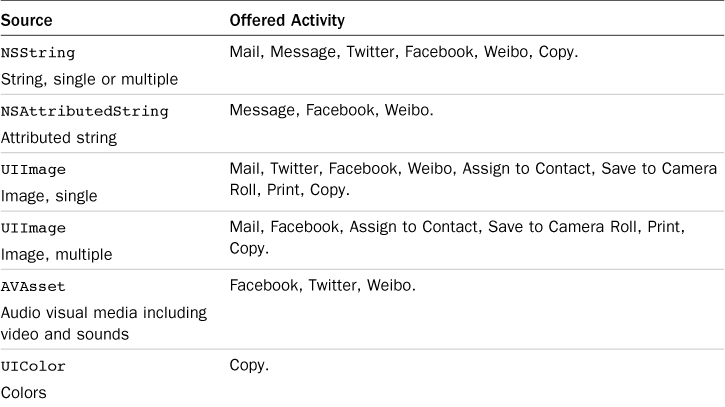
Recipe: Activity View Controller
Newly introduced, iOS 6’s activity view controller integrates data activities into the interface shown in Figure 8-6. With minimal development cost on your part, this new controller enables your users to copy items to the pasteboard, post to social media, share via e-mail and texting, and more. Built-in activities include Facebook, Twitter, Weibo, SMS, mail, printing, copying to pasteboard, and assigning data to a contact. Apps can define their own custom services, as well, which you’ll read about later in this section:
• UIActivityTypePostToFacebook
• UIActivityTypePostToTwitter
• UIActivityTypePostToWeibo
• UIActivityTypeMessage
• UIActivityTypeMail
• UIActivityTypePrint
• UIActivityTypeCopyToPasteboard
• UIActivityTypeAssignToContact

Figure 8-6. The UIActivityViewController class offers system and custom services.
How you present the controller varies by device. Show it modally on members of the iPhone family and in a popover on tablets. The UIBarButtonSystemItemAction icon provides the perfect way to populate bar buttons linking to this controller.
Best of all, almost no work is required on your end. After users select an activity, the controller handles all further interaction such as presenting a mail or Twitter compose sheet, adding a picture to the onboard library, or assigning it to a contact. This class offers a one-stop utility for many techniques already covered in this chapter.
Creating and Presenting the Controller
Create and present the view controller from your code, as demonstrated in Recipe 8-10. This implementation lets its main class adopt the UIActivityItemSource protocol, passing self in the items array passed to the controller. This represents the first of two ways to create and present the controller.
The protocol’s two mandatory methods supply the item to process and a placeholder for that item. The item corresponds to an appropriate item for a given activity type. The placeholder for that item is typically the same item, unless you are working with objects that you must process or create. In that case, you can create a placeholder object without real data. Both callbacks run on the main thread so keep your data small. If you need to process your data, consider using a provider instead.
The controller passed back to the item method is actually the composition controller for the type of item being processed. For an email activity, it’s an MFMailComposeViewController, for Twitter, it’s the TWTweetComposeViewController, and so forth. You can cast the controller accordingly and perform any further updates like adding a subject line. At the time this book was being written, Apple had not fully documented this behavior, and it may change in the future. However, you can easily check (and it makes logical sense) that the first parameter in the item-for-activity-type callback is properly the activity’s composition controller and not the initial UIActivityViewController you presented.
The UIActivityItemProvider class enables you to delay passing data. It’s a type of operation (NSOperation) that offers you the flexibility to process data before being shared. For example, you might need to process a large video file before it can be uploaded to a social sharing site, or subsample some audio.
Subclass the provider class and implement the item method. This takes the place of the main method you normally use with operations. Generate the processed data, safe in the knowledge that it will run asynchronously without blocking your user’s interactive experience.
Recipe 8-10 passes self to the controller as part of its items array. self adopts the source protocol (<UIActivityItemSource>), so the controller understands to use callbacks when retrieving data items. The callbacks methods allow you to vary your data based on each one’s intended use. Use the activity types (such as Facebook or Add to Contacts; they’re listed earlier in this section) to choose the exact data you want to provide. This is especially important when selecting from resolutions for various uses. When printing, you’ll want to keep your data quality high. When tweeting, a low-res image may do the job instead.
If your data is invariant (that is, you’ll be passing the same data to e-mail as you would to Facebook), you can directly supply an array of data items (typically strings, images, and URLs). For example, you could create the controller like this. This uses a single image:
UIActivityViewController *activity = [[UIActivityViewController alloc]
initWithActivityItems:@[imageView.image]
applicationActivities:nil];
This direct approach is much simpler. Your primary class need not declare the item source protocol; you do not need to implement the extra methods. It’s a quick and easy way to manage activities for uncomplex items.
You’re not limited to passing single items, either. Include additional elements in the activity items array as needed. The following controller might add its two images to an e-mail or save both to the system Camera Roll, depending on the user’s selection. Broadening activities to use multiple items enables users to be more efficient while using your app:
UIImage *secondImage = [UIImage imageNamed:@"Default.png"];
UIActivityViewController *activity = [[UIActivityViewController alloc]
initWithActivityItems:@[imageView.image, secondImage]
applicationActivities:nil];
Recipe 8-10. The Activity View Controller
- (void) presentViewController:
(UIViewController *)viewControllerToPresent
{
if (IS_IPHONE)
{
[self presentViewController:viewControllerToPresent
animated:YES completion:nil];
}
else
{
popover = [[UIPopoverController alloc]
initWithContentViewController:viewControllerToPresent];
popover.delegate = self;
[popover presentPopoverFromBarButtonItem:
self.navigationItem.leftBarButtonItem
permittedArrowDirections:UIPopoverArrowDirectionAny
animated:YES];
}
}
// Return the item to process
- (id)activityViewController:
(UIActivityViewController *)activityViewController
itemForActivityType:(NSString *)activityType
{
return imageView.image;
}
// Return a thumbnail version of that item
- (id)activityViewControllerPlaceholderItem:
(UIActivityViewController *)activityViewController
{
return imageView.image;
}
// Create and present the view controller
- (void) action
{
UIActivityViewController *activity =
[[UIActivityViewController alloc]
initWithActivityItems:@[self] applicationActivities:nil];
[self presentViewController:activity];
}
To find this recipe’s full sample project, point your browser to https://github.com/erica/iOS-6-Cookbook and go to the folder for Chapter 8.
Adding Services
Each app can provide application-specific services by subclassing the UIActivity class and presenting a custom view controller. The view controller allows the user to process the passed data in some way. Listing 8-1 introduces a skeletal activity that presents a simple text view. This view lists the items passed to it by the activity controller. It displays each item’s class and description.
This listing includes details for two distinct classes. The first class implements a simple text controller and is intended for use within a navigation hierarchy. It includes a view for presenting text and a handler that updates the calling UIActivity instance by sending activityDidFinish: when the user taps Done.
Adding a way for your activity to complete is important, especially when your controller doesn’t have a natural endpoint. When your action uploads data to an FTP server, you know when it completes. If it tweets, you know when the status posts. In this example, it’s up to the user to determine when this activity finishes. Make sure your view controller contains a weak property pointing back to the activity so that you can send the did-finish method after your work concludes.
The activity class contains a number of mandatory and optional items. I recommend you implement all the methods shown in this listing. The methods to support a custom activity include the following:
• activityType—Returns a unique string describing the type of activity. One of this string’s counterparts in the system-supplied activities is UIActivityTypePostToFacebook. Use a similar naming scheme. This string identifies a particular activity type, and what it does. In this listing, I return @"CustomActivityTypeListItemsAndTypes", which describes the activity.
• activityTitle—Supply the text you want to show in the activity controller. The custom text in Figure 8-7 was returned by this method. Use active descriptions when describing your custom action. Follow Apple’s lead; for example, Save to Camera Roll, Print, Copy. Your title should finish the phrase “I want to...” For example, “I want to Print,” “I want to Copy,” or, in this example, “I want to list items.” Use header case and capitalize each word except for minor ones like to or and.

Figure 8-7. Add your own custom application activities.
• activityImage—Return an image for the controller to use. The controller adds a backsplash and converts your image to a one-value bitmap, layering it on top. Use simple art on a transparent background to build the contents of your icon image.
• canPerformWithActivityItems:—Scan the passed items and decide whether your controller can process them. If so, return YES.
• prepareWithActivityItems:—Stores the passed items for later use (here, they’re assigned to a local instance variable) and performs any necessary pre-processing.
• activityViewController—Return a fully initialized presentable view controller using the activity items passed to you earlier. This controller is automatically presented to the user, where he or she can customize options before performing the promised action.
Adding custom activities allows your app to expand its data-handling possibilities while integrating features into a consistent system-supplied interface. It’s a powerful iOS feature. The strongest activity choices will integrate with system services (such as copying to the pasteboard or saving to the photo album) or provide a connection to off-device APIs, like Facebook, Twitter, Dropbox, and FTP.
This example, which simply lists items, represents a weak use-case. There’s no reason the same feature couldn’t be provided as a normal in-app screen. When you think actions, try to project outside the app. Connect your user’s data with sharing and processing features that expand beyond the normal GUI.
Listing 8-1. Application Activities
// All activities present a view controller. This custom controller
// provides a full-sized text view.
@interface TextViewController : UIViewController
@property (nonatomic, readonly) UITextView *textView;
@property (nonatomic, weak) UIActivity *activity;
@end
@implementation TextViewController
// Make sure you provide a done handler of some kind, such as this
// or an integrated button that finishes and wraps up
- (void) done
{
[_activity activityDidFinish:YES];
}
// Just a super-basic text view controller
- (id) init
{
if (!(self = [super init])) return nil;
_textView = [[UITextView alloc] init];
_textView.font = [UIFont fontWithName:@"Futura" size:16.0f];
_textView.editable = NO;
[self.view addSubview:_textView];
PREPCONSTRAINTS(_textView);
STRETCH_VIEW(self.view, _textView);
// Prepare a Done button
self.navigationItem.rightBarButtonItem =
BARBUTTON(@"Done", @selector(done));
return self;
}
@end
@interface MyActivity : UIActivity
@end
@implementation MyActivity
{
NSArray *items;
}
// A unique type name
- (NSString *)activityType
{
return @"CustomActivityTypeListItemsAndTypes";
}
// The title listed on the controller
- (NSString *) activityTitle
{
return @"Cookbook";
}
// A custom image, displayed as a bitmap over a textured background
// This one says "iOS" in a rounded rect edge
- (UIImage *) activityImage
{
CGRect rect = CGRectMake(0.0f, 0.0f, 75.0f, 75.0f);
UIGraphicsBeginImageContext(rect.size);
rect = CGRectInset(rect, 15.0f, 15.0f);
UIBezierPath *path = [UIBezierPath
bezierPathWithRoundedRect:rect cornerRadius:4.0f];
[path stroke];
rect = CGRectInset(rect, 0.0f, 10.0f);
[@"iOS" drawInRect:rect
withFont:[UIFont fontWithName:@"Futura" size:18.0f]
lineBreakMode:NSLineBreakByWordWrapping
alignment:NSTextAlignmentCenter];
UIImage *image = UIGraphicsGetImageFromCurrentImageContext();
UIGraphicsEndImageContext();
return image;
}
// Specify if you can respond to these items
- (BOOL)canPerformWithActivityItems:(NSArray *)activityItems
{
return YES;
}
// Store the items locally for later use
- (void)prepareWithActivityItems:(NSArray *)activityItems
{
items = activityItems;
}
// Return a view controller, in this case one that lists
// its items and their classes
- (UIViewController *) activityViewController
{
TextViewController *tvc = [[TextViewController alloc] init];
tvc.activity = self;
UITextView *textView = tvc.textView;
NSMutableString *string = [NSMutableString string];
for (id item in items)
[string appendFormat:
@"%@: %@
", [item class], [item description]];
textView.text = string;
// Make sure to provide some kind of done: handler in
// your main controller.
UINavigationController *nav = [[UINavigationController alloc]
initWithRootViewController:tvc];
return nav;
}
@end
Items and Services
The services presented for each item vary by the kind of data you pass. Table 8-1 lists offered activities by source data type. As you’ll see in the recipe that follows, preview controller support expands beyond these foundation types. iOS’s Quick Look framework integrates activity controllers into its file previews. The Quick Look-provided activity controller can print and e-mail many kinds of documents. Some document types support other activities as well.
Table 8-1. Activity Types for Data Types

Recipe: The Quick Look Preview Controller
The Quick Look preview controller class enables users to preview many document types. This controller supports text, images, PDF, RTF, iWork files, Microsoft Office documents (Office 97 and later, including DOC, PPT, XLS, and so on), and comma-separated value (CSV) files. You supply a supported file type, and the Quick Look controller displays it for the user. An integrated system-supplied activity view controller helps share the previewed document, as you can see in Figure 8-8.

Figure 8-8. This Quick Look controller was presented modally and shows the screen after the user has tapped the action button. Quick Look handles a wide range of document types, enabling users to see the file contents before deciding on an action to apply to them. Most Quick Look types support Mail and Print. Many support Copy, and image files offer even more options.
Either push or present your preview controllers. The controller adapts to both situations, working with navigation stacks and with modal presentation. Recipe 8-11 demonstrates both approaches.
Implementing Quick Look
Quick Look support requires just a few simple steps:
1. Declare the QLPreviewControllerDataSource protocol in your primary controller class.
2. Implement the numberOfPreviewItemsInPreviewController: and previewController:previewItemAtIndex: data source methods. The first of these methods returns a count of items to preview. The second returns the preview item referred to by the index.
3. Preview items must conform to the QLPreviewItem protocol. This protocol consists of two required properties: a preview title and an item URL. Recipe 8-11 creates a conforming QuickItem class. This class implements an absolutely minimal approach to support the data source.
Once these requirements are met, your code is ready to create a new preview controller, set its data source, and present or push it.
@interface QuickItem : NSObject <QLPreviewItem>
@property (nonatomic, strong) NSString *path;
@property (readonly) NSString *previewItemTitle;
@property (readonly) NSURL *previewItemURL;
@end
@implementation QuickItem
// Title for preview item
- (NSString *) previewItemTitle
{
return @"Generated PDF";
}
// URL for preview item
- (NSURL *) previewItemURL
{
return [NSURL fileURLWithPath:_path];
}
@end
#define FILE_PATH [NSHomeDirectory()
stringByAppendingPathComponent:@"Documents/PDFSample.pdf"]
@interface TestBedViewController : UIViewController
<QLPreviewControllerDataSource>
@end
@implementation TestBedViewController
- (NSInteger) numberOfPreviewItemsInPreviewController:
(QLPreviewController *) controller
{
return 1;
}
- (id <QLPreviewItem>) previewController:
(QLPreviewController *) controller
previewItemAtIndex: (NSInteger) index;
{
QuickItem *item = [[QuickItem alloc] init];
item.path = FILE_PATH;
return item;
}
// Push onto navigation stack
- (void) push
{
QLPreviewController *controller =
[[QLPreviewController alloc] init];
controller.dataSource = self;
[self.navigationController
pushViewController:controller animated:YES];
}
// Use modal presentation
- (void) present
{
QLPreviewController *controller =
[[QLPreviewController alloc] init];
controller.dataSource = self;
[self presentViewController:controller
animated:YES completion:nil];
}
- (void) loadView
{
[super loadView];
self.view.backgroundColor = [UIColor whiteColor];
self.navigationItem.rightBarButtonItem =
BARBUTTON(@"Push", @selector(push));
self.navigationItem.leftBarButtonItem =
BARBUTTON(@"Present", @selector(present));
}
@end
To find this recipe’s full sample project, point your browser to https://github.com/erica/iOS-6-Cookbook and go to the folder for Chapter 8.
Summary
This chapter introduced a number of ready-to-use controllers that you can prepare and present to good effect. System-supplied controllers simplify programming for common tasks like tweeting and sending e-mail. Here are a few parting thoughts about the recipes you just encountered:
• Although you can roll your own versions of a few of these controllers, why bother? System-supplied controllers represent the rare cases where enforcing your own design takes a back seat to a consistency of user experience across applications. When a user sends an e-mail, he or she expects that e-mail compose screen to look basically the same regardless of application. Go ahead and leverage Apple system services to mail, tweet, and interact with the system media library.
• The image picker controller has grown to be a bit of a Frankenclass. It has long deserved a proper refresh and redesign. From controlling sources at a fine grain to reducing its memory overhead, the class deserves some loving attention from Apple. Now that so many great media processing classes have made the jump to iOS, I’d love to see better integration with AV Foundation, Core Media, and other key technologies—and not just through a visual controller. Although preserving user privacy is critical, it would be nice if the library opened up a more flexible range of APIs (with user-directed permissions, of course).
• The Social framework can do a lot more than post Facebook updates and tweets. The class lets you submit authenticated and unauthenticated service requests using appropriate security. Use the Accounts framework along with Social to retrieve login information for placing credentialed requests.
• When you’re looking for one-stop shopping for data file sharing, you’ll be hard-pressed to find a superior solution than activity view controllers. Easy to use, and simple to present, this single controller does the work of an army, integrating your app with iOS’s system-supplied services.