
9. Taking and Editing Photos
In this chapter, we use the Camera app to take photos, the Photos app to view your pictures and create slideshows, and the iPhoto app to edit photos and create journals.
• Turning Your iPad into a Picture Frame
• Using Brushed Effects with Photos in iPhoto
• Applying Special Effects to Photos in iPhoto
• Creating Online Journals with iPhoto
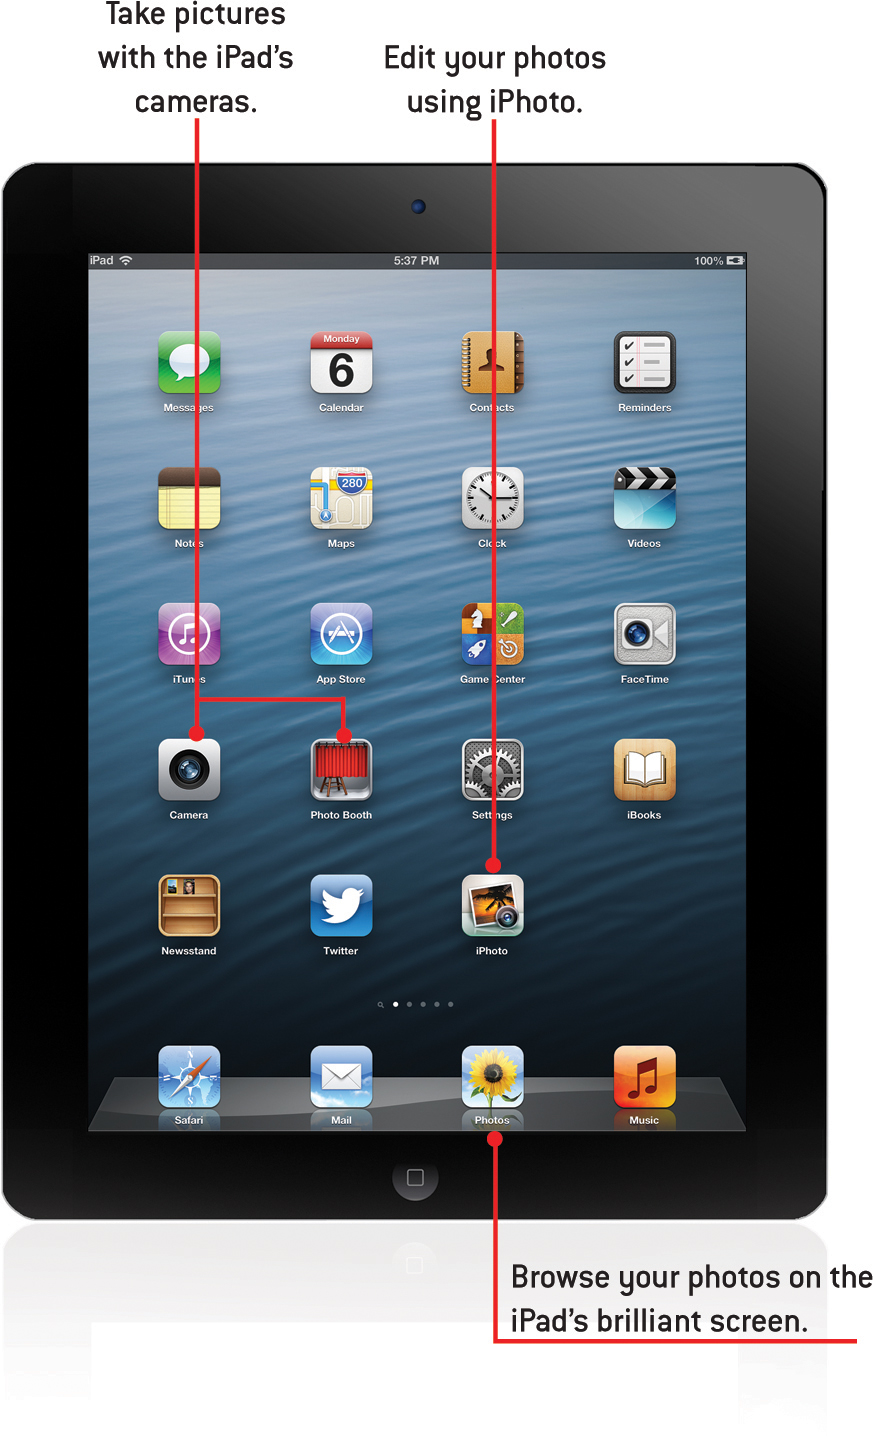
In addition to replacing books, the iPad replaces photo albums. You can literally carry thousands of photos with you on your iPad. Plus, your iPad’s screen is a beautiful way to display these photos.
To access photos on your iPad, you first must sync them from your computer. Then you can use the Photos app to browse and view your photos.
With the iPad’s cameras, you can also take photos with your iPad. You can view those in the Photos app as well.
Taking Photos
The 2nd and 3rd generation iPads include two cameras that you can use to take photos. The primary app for doing this is the Camera app.
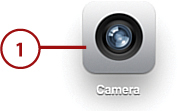
1. Launch the Camera app from the home page. This brings up the Camera app, and you should immediately see the image from the camera.
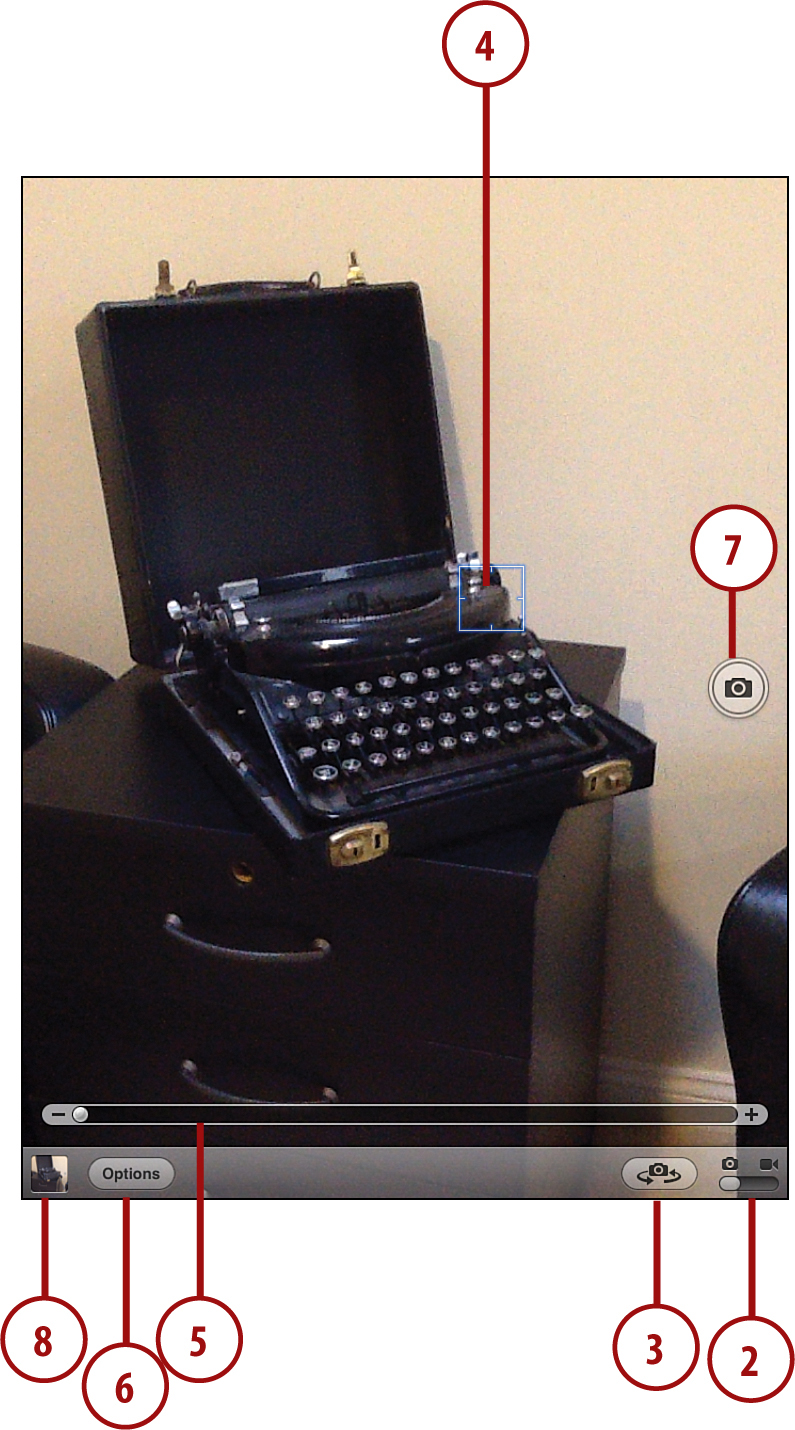
2. First, locate the switch at the bottom-right corner of the screen. Make sure it’s switched to camera (left) instead of video (right).
3. Tap the button to the left of it to switch between front and rear cameras.
4. Tap anywhere on the image to specify that you want to use that portion of the image to determine the exposure for the photo.
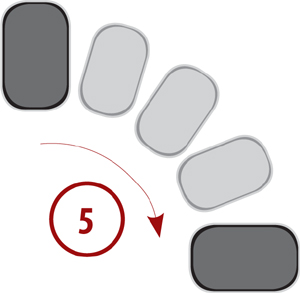
5. After you have tapped on the image, and if you are using the rear-facing camera, you can zoom in. To do that, use your fingers to pinch apart. After you do so, you will see a zoom slider at the bottom of the screen.
6. Tap the Options button at the bottom of the screen to enable a transparent grid over image.
7. Tap the large camera button at the right side of the screen to take the picture.
8. Tap the button at the lower left to go to the Camera Roll and see the pictures you have taken.
9. Tap the middle of the image from the Camera Roll to bring up controls on the top and bottom of the screen.
10. Use the slider at the bottom to flip through images you have taken that are in your Camera Roll. Or just swipe left and right to flip through your photos.
11. Tap Camera Roll to exit viewing this one image and jump to an icon view of all of your Camera Roll photos.
12. Tap to start a slideshow of Camera Roll pictures.
13. Tap to email, print, or copy the photo. You can also send your photo via Twitter, Facebook, a text or email message, or to your iCloud Photo Stream.
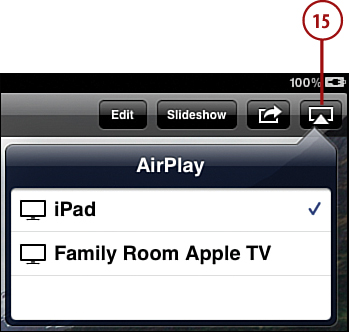
14. Tap to send the photo to an Apple TV or other device using AirPlay.
15. Tap to delete the photo.
16. Tap Done to return to the Camera app to take another photo.

Using Photo Booth
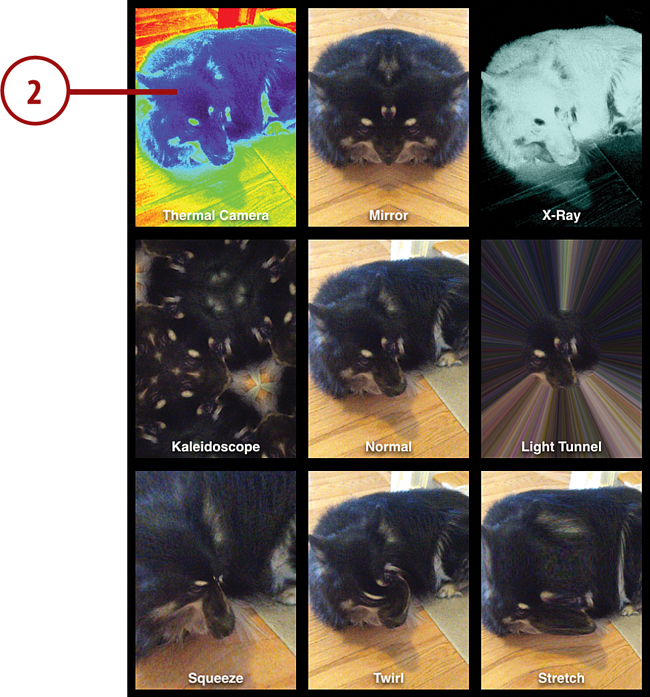
In addition to the basic picture-taking functionality of the Camera app, you can also use the included Photo Booth app to take more creative shots using one of eight special filters.
1. Launch the Photo Booth app.
2. You’ll start by seeing all the filters you can choose from. Tap one of the filters to select it.
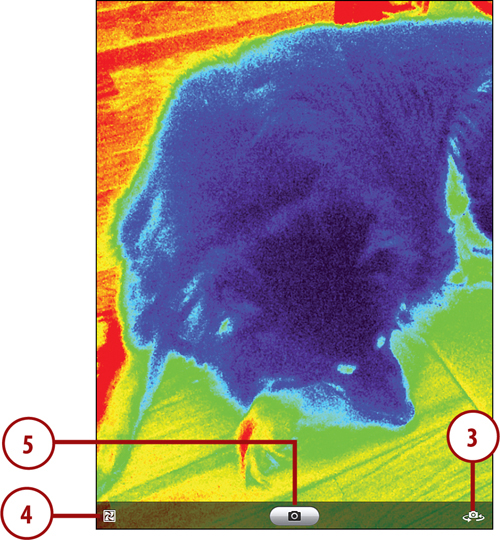
3. Now you’ll see just that one filter. In addition, you have some buttons. Tap on the button at the bottom right to switch between the front and rear cameras.
4. Tap the button at the bottom left to return to the 9-filter preview.
5. Tap the camera button at the bottom to take a picture.
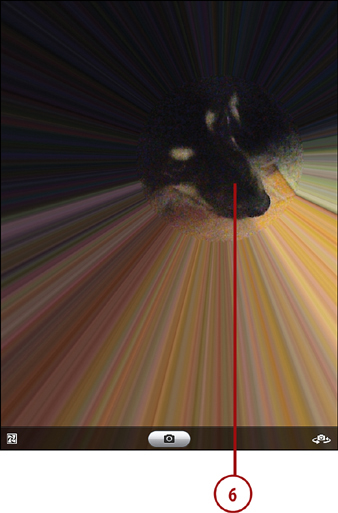
6. Some filters also allow you to tap the live video image to adjust the filter. For instance, the Light Tunnel filter enables you to set the position of the center of the tunnel.
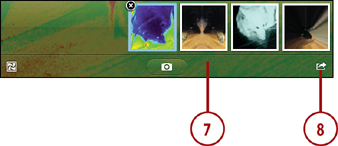
7. As you take photos, they drop down to the bottom of the screen in a list. Select one and you’ll get an X button to delete it.
8. Tap the button at the lower right to select photos to copy or email. All the pictures are placed in your Camera Roll as you take them, so you can also access them from the Photos app.
When you take a picture with the camera on the front of the iPad, you get a kind of flash effect from the screen. It simply turns all white for a second. This helps in low light situations.
Browsing Your Photos
After you have synced to your Mac or PC, you should have some photos on your iPad, provided you have set some to sync in either iPhoto or iTunes. Then you can browse them with the Photos app.
1. Tap on the Photos app icon to launch it.

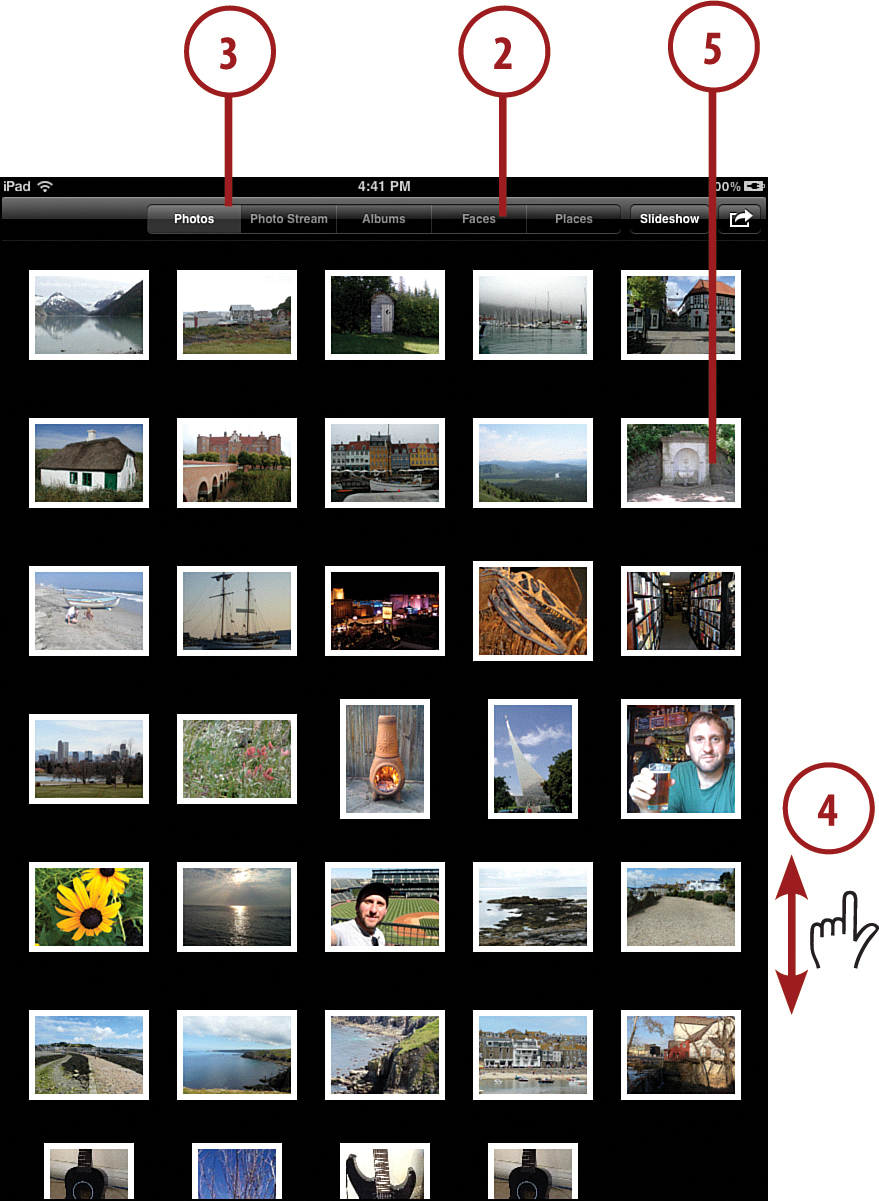
2. Tap one of the viewing options. You should have two to five choices, depending on how you synced your iPad.
3. Tap Photos to make sure you are in photo viewing mode.
4. Drag and scroll vertically or flick vertically to move through all the photos on your iPad.
5. Tap a photo to view that one. For most photos, you might want to rotate the iPad to its horizontal orientation for wide-screen viewing.
Notice the Photo Stream select at the top of the screen? If you are using Apple’s iCloud service, when you take pictures with an iOS device, they will show up in your Photo Stream. So taking a picture with an iPhone will put the picture in both the Photo Stream on your iPhone and on your iPad. They will also show up in iPhoto if you have a Mac. Apple TV also has the capability to show your Photo Stream. You don’t have to do anything once iCloud has been configured on both; Photo Stream is just one of the many things that iCloud keeps in sync between devices.
6. To move to the next or previous photo, drag left or right.
7. To bring up controls at the top and bottom of a photo, tap in the center of the screen.
8. You can tap and run your finger over the small thumbnails at the bottom of the screen to move through photos.
9. Tap the All Photos button at the top of the screen to return to the list of photos.

Editing Photos
You can edit the photos on your iPad by cropping them, rotating them, and enhancing the image quality.
1. Tap on the Photos app icon to launch it.

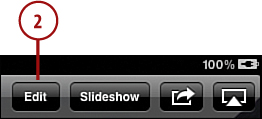
2. While viewing a photo, tap the Edit button to start editing.
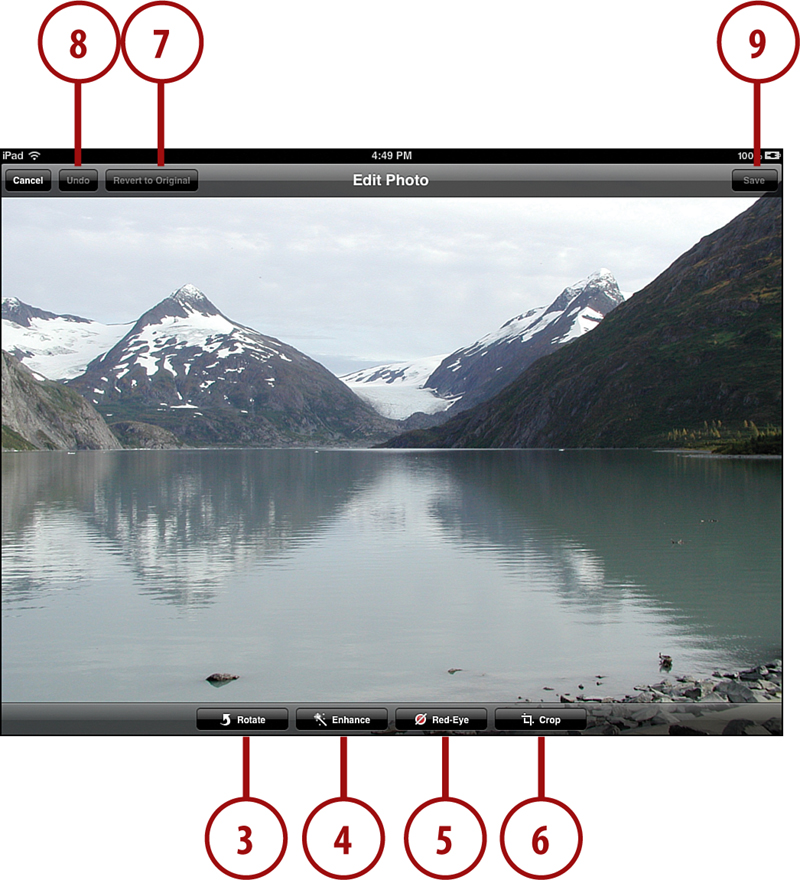
3. Tapping the Rotate button rotates the image 90 degrees counterclockwise.
4. Tapping the Enhance button automatically adjusts the brightness, contrast, and other quality settings. There is no way to manually adjust the image; you simply tap this button and hope the result is something better than what you had before.
5. Tap the Red-Eye button to indicate the position of the eyes in the image and remove the red-eye effect that may have been caused by the flash.
6. Tap the Crop button to select a portion of the image. You can also slightly rotate the image to straighten it in this mode.
7. At any time, you can tap the Revert to Original button to remove all changes and start again.
8. After you have applied the first change, you can use the Undo button to undo the change. You can use it multiple times to undo a series of changes.
9. When you have made some changes and wish to save the image, tap the Save button. This creates a new copy of the image in your photo library with all the changes you have made.
Sharing Photos
There are many ways you can share photos from the Photos app.
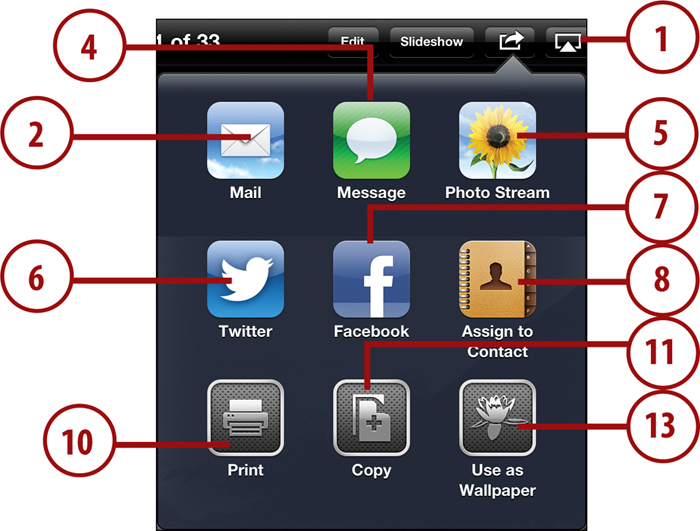
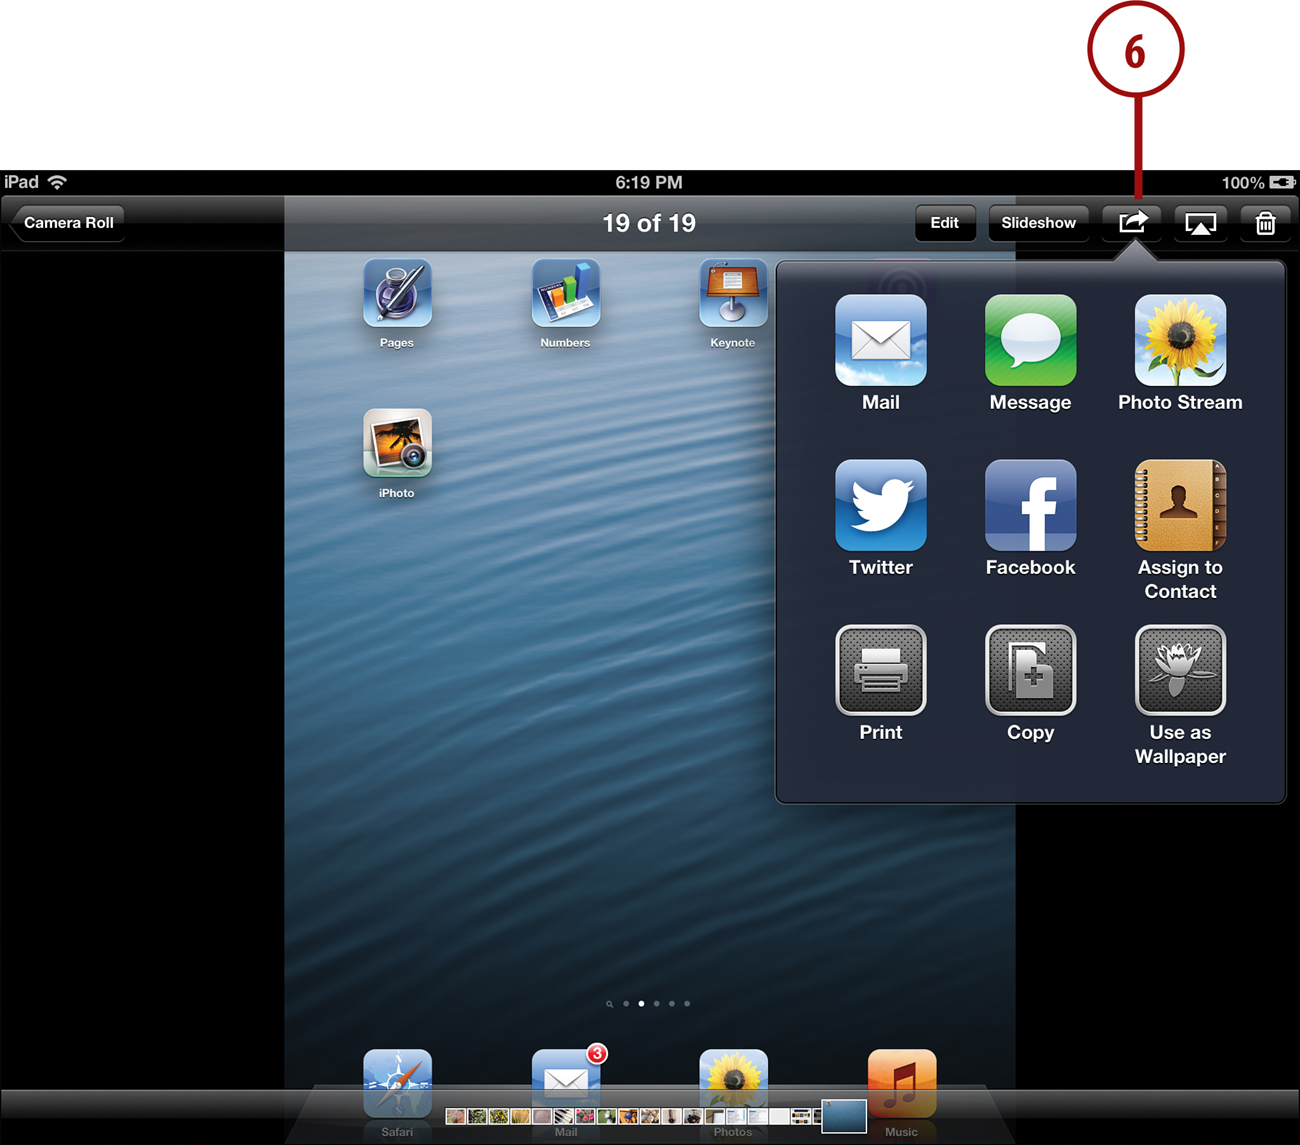
1. While viewing a single image in the Photos app, tap the boxed arrow button in the upper-right corner.
2. Tap Mail to send the current photo in an email message.
3. After you tap Mail, a message composition screen appears and starts a new message. The photo is attached to the message.
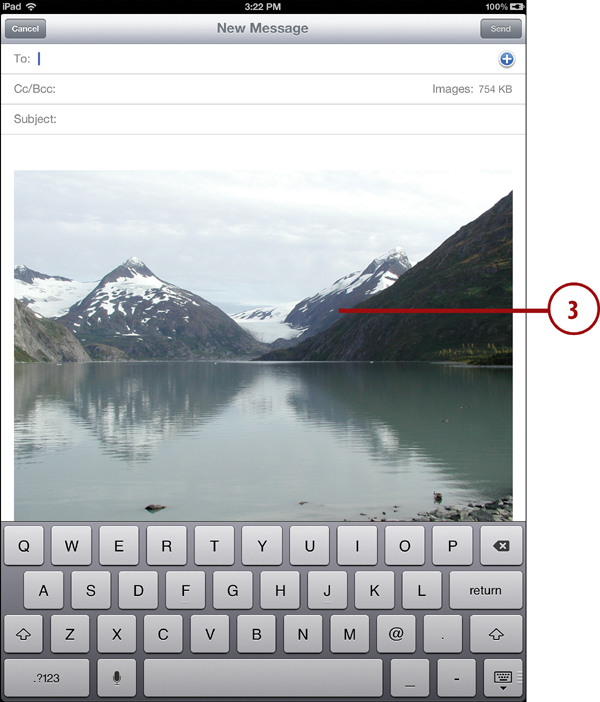
If you sync a photo from your computer to your iPad, and then email it to people, they actually receive a reduced image, not the original. iPad albums contain reduced images to save space. If you want to send the original, email it from your computer.
4. You can also send the photo to someone else using the iMessage system. See “Setting Up Messaging” in Chapter 8.
5. If you are using iCloud’s Photo Stream feature, you can send the photo to Photo Stream—even if it is not a photo you have taken with the iPad’s camera, such as a photo taken with your iPhone.
6. You can also send the photo to your Twitter account. Tap here and a small Twitter composition dialog will appear, which allows you to add a message to go along with the photo.
7. Likewise, you can also post the photo along with a message to your Facebook wall.
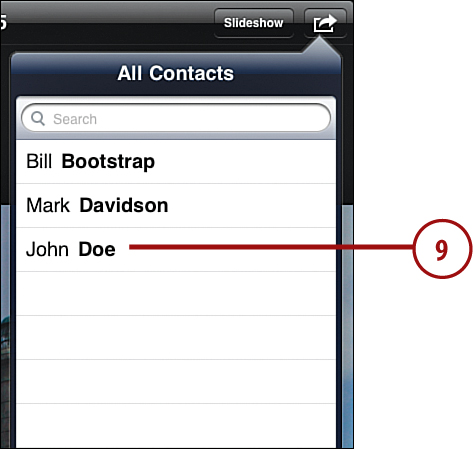
8. Tap Assign to Contact to display a list of all your contacts so that you can add the photo to the contact’s thumbnail image.
9. Tap a contact name to assign the image to that contact.
10. Tap Print to send to your networked printer. See “Printing from Your iPad” in Chapter 18.
11. Tap Copy to copy the photo to your clipboard. Putting the photo on the clipboard enables you to paste it into documents or email messages in other apps.
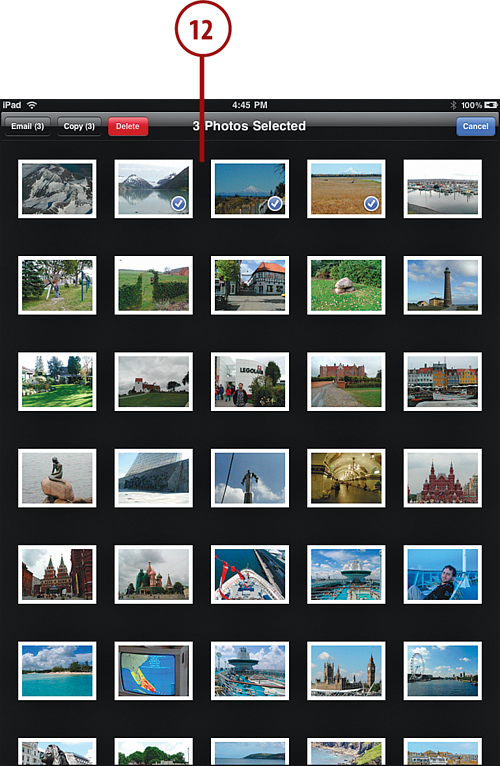
12. To copy more than one image, tap the boxed arrow button while viewing your photos, and then select one or more photos to email or copy.
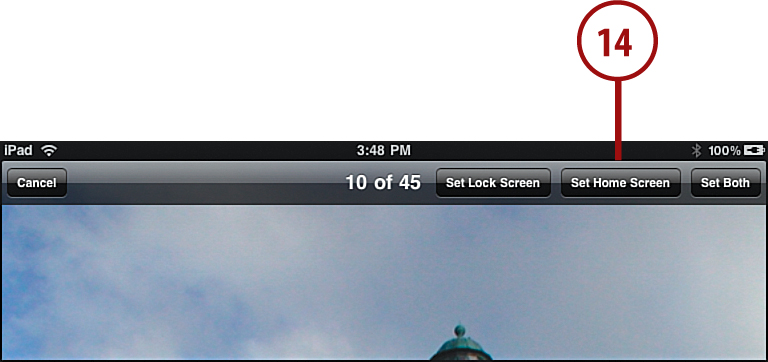
13. Tap Use as Wallpaper.
14. Assign the image to either the Lock Screen background or the Home Screen background, or both.
15. Tap the AirPlay button to show the photo on an Apple TV connected to the same network. This will only appear if you are using AirPlay on your network. Remember to have AirPlay turned on for that Apple TV.
You can share your photos in many ways, and it is likely that more will be added in the future. What you can use depends on what you have set up on your iPad. For instance, if you have Messaging and Twitter set up, you can use the Message and Tweet buttons to share using those services.
Viewing Albums
Looking at a huge list of photos is not the best way to view your collection. Using Albums is the simplest way to organize them.
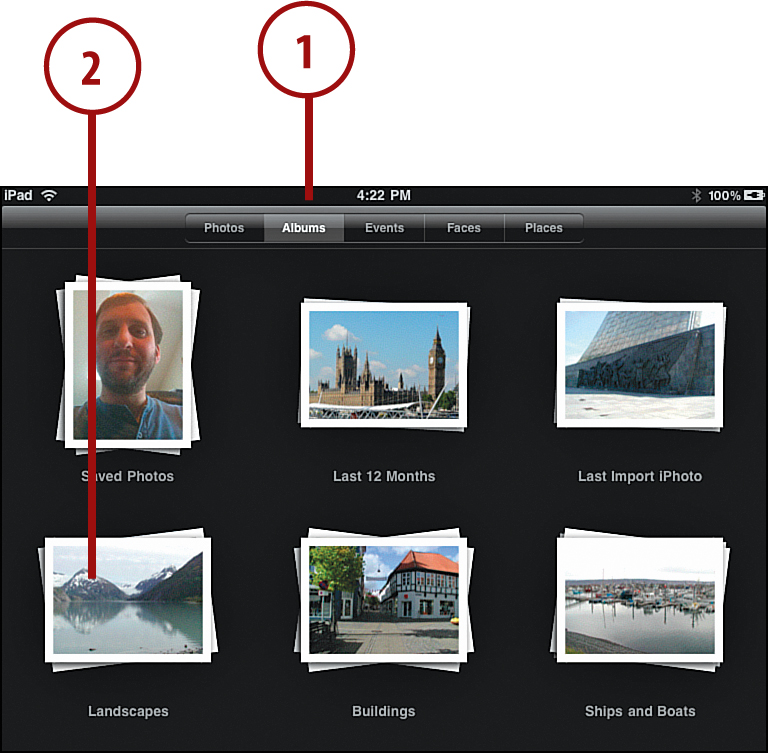
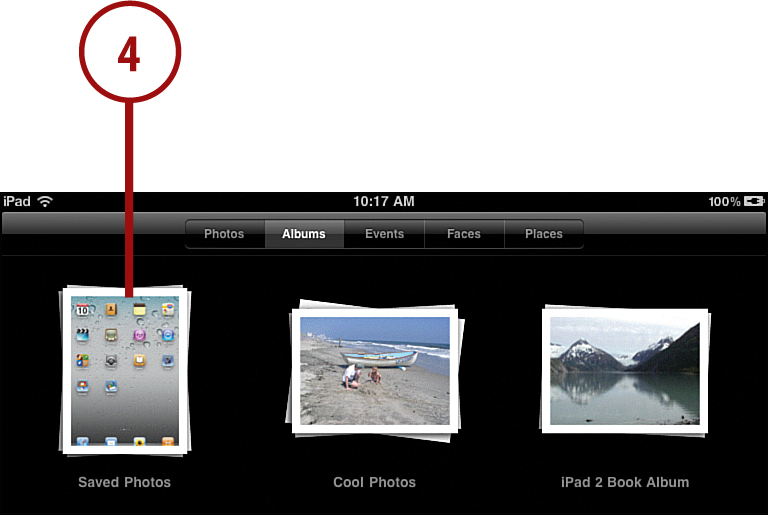
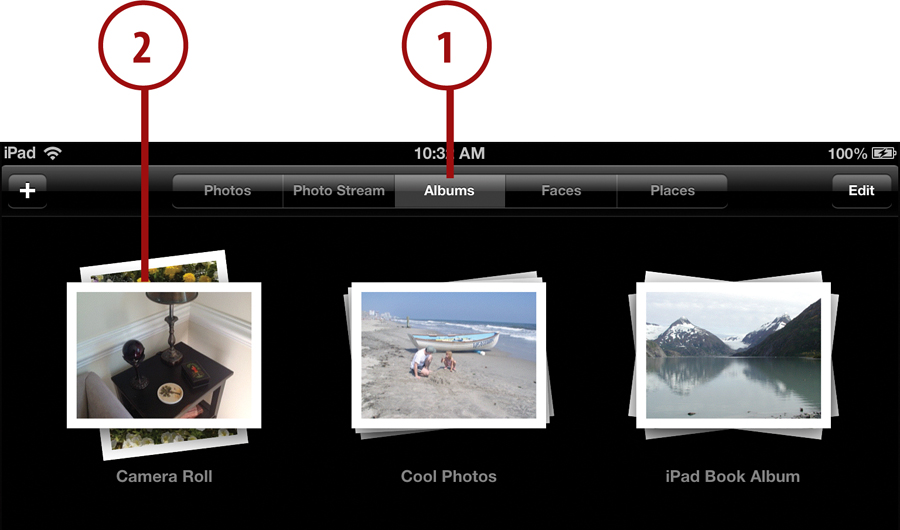
1. In the Photos app, tap the Albums button. Most of the albums will correspond to your iPhoto albums or your folders if you sync images from your computer’s file system.
2. Tap on an album to expand it to see all the photos.
3. Tap any photo to view it.
4. Tap the album name to return from viewing the photo, and then tap the Albums button on the next screen to return to the list of albums.

After you finish digging down into an album, you can go back to the list of albums by pressing the Albums button, or a similarly named button, at the top left. But you can also pinch in all photos to group them in the middle of the screen and then release to move back to the albums list.
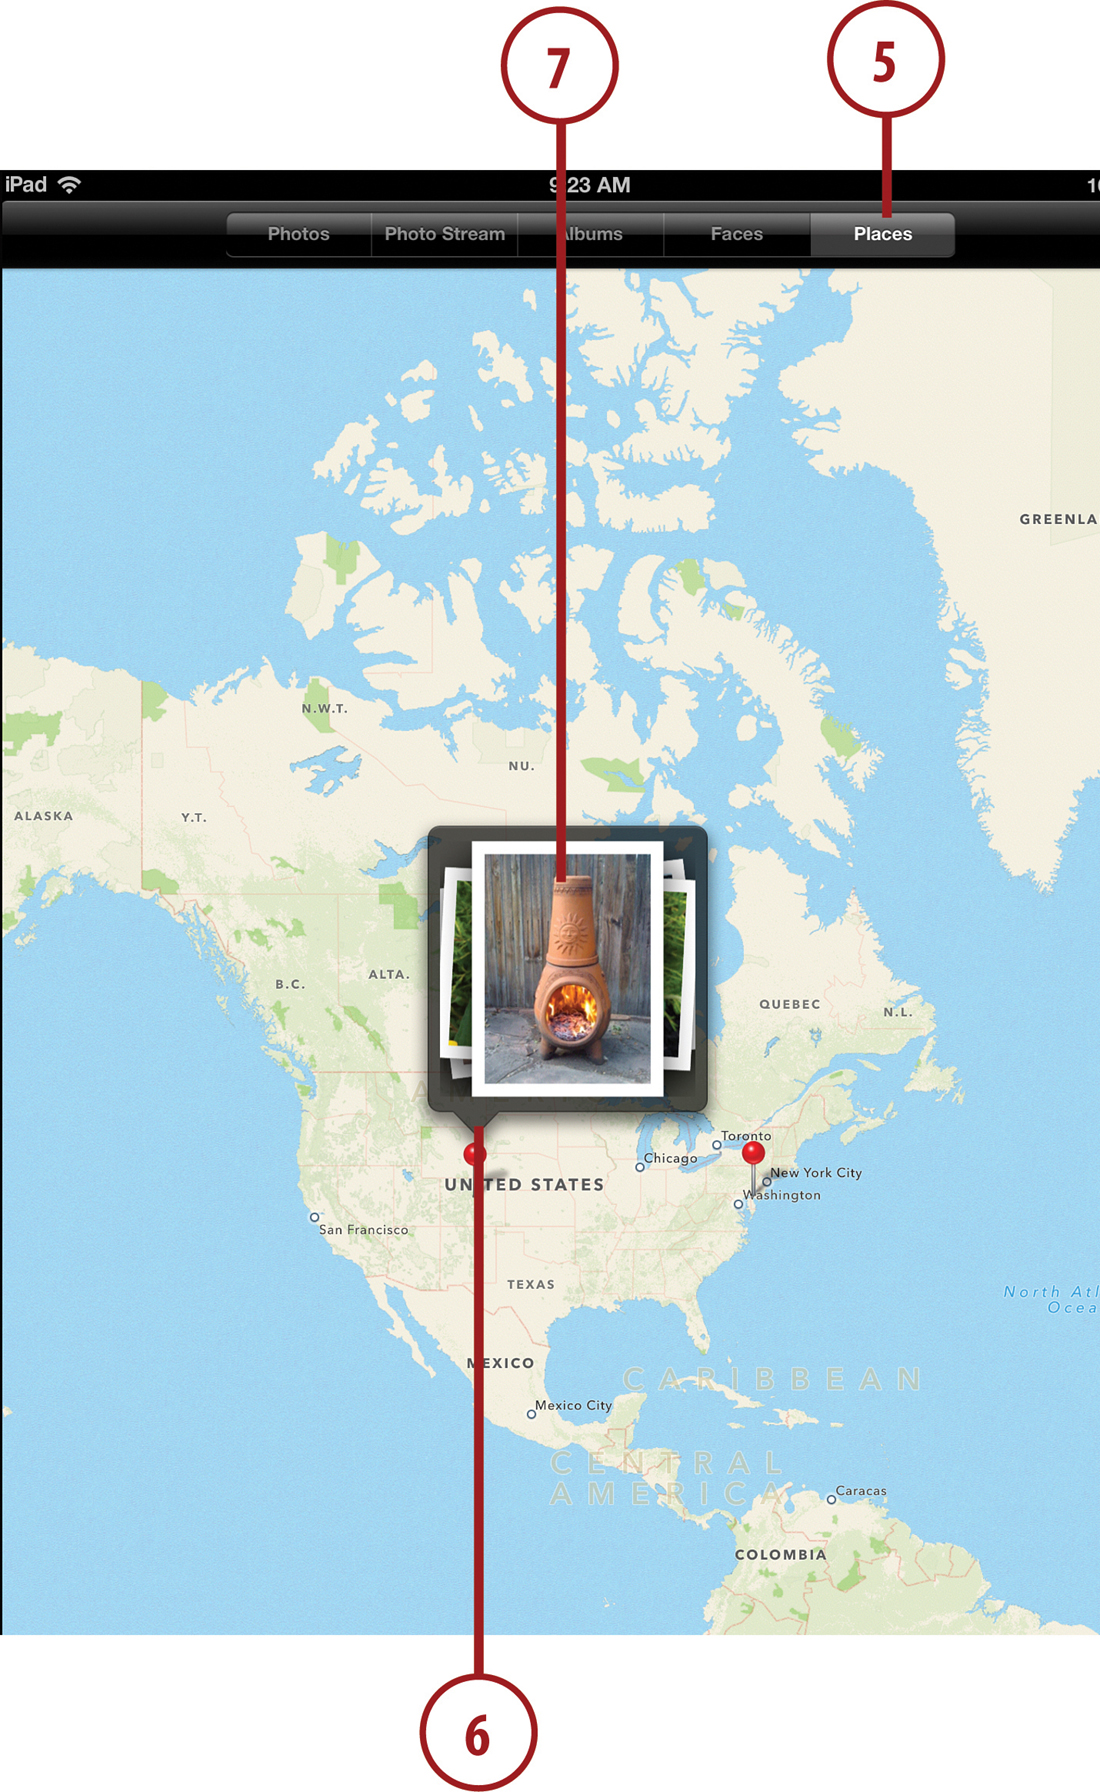
5. Tap Places to see your geo-tagged photos (those marked with GPS locations). You need to be using Places in iPhoto on your Mac for this to appear.
6. Tap a pin on the map and a set of photos appears above it.
7. Tap the set of photos to dig down into the pictures.
Creating Albums
You can create new albums right on your iPad. The process involves naming a new album and then selecting the photos to appear in the album.
1. Tap the Photos app icon to launch it.

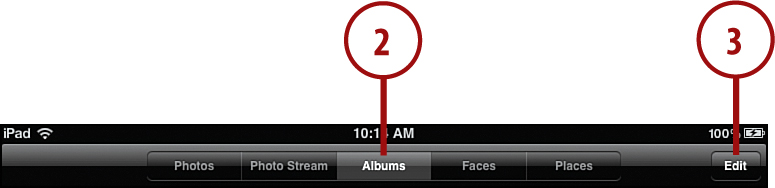
2. Tap Albums at the top to view your albums.
3. Tap the Edit button to go into Editing mode.
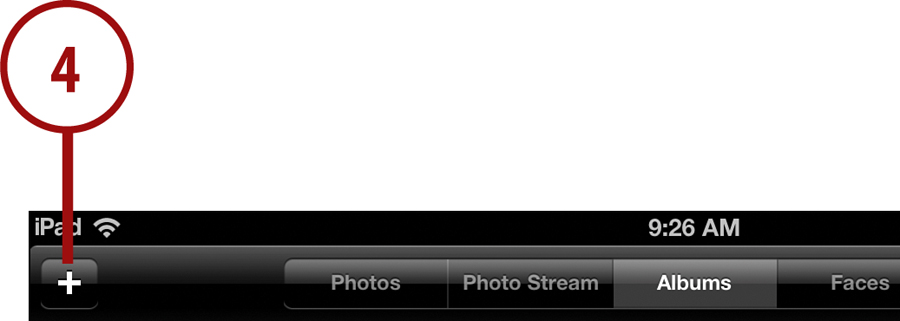
4. Tap New Album to start a new photo album.
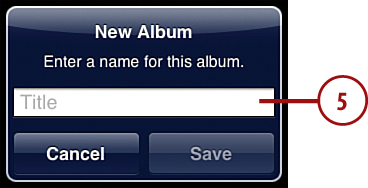
5. You will be prompted to enter a name for the new album.
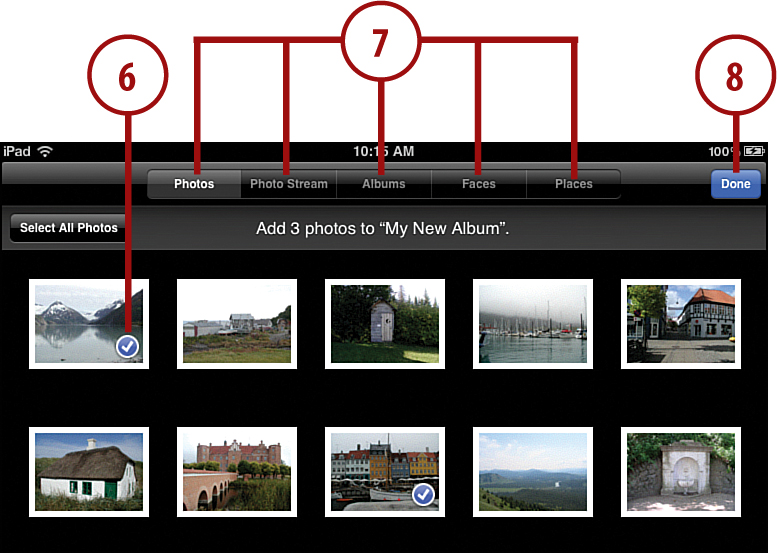
6. Tap the photos you want to appear in your new album. A checkmark appears on the ones you have selected.
7. You can use the Photo Stream, Albums, Faces, and Places buttons at the top of the screen to find photos.
8. Tap Done to complete the album.
You can edit any album you have created on your iPad, but not an album created on your computer and then synced to your iPad. Just go back to step 4, and select an iPad-created album instead of tapping the New Album button.
Creating a Slideshow
Another way to look at your photos is as a slideshow with music and transitions.
1. Tap on the Photos app icon to launch it.
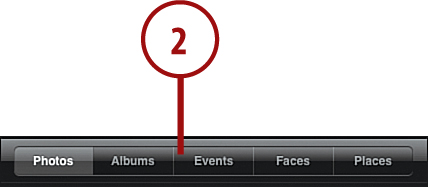
2. Go to your Photos list, or select Albums, Event, Faces, or Places.
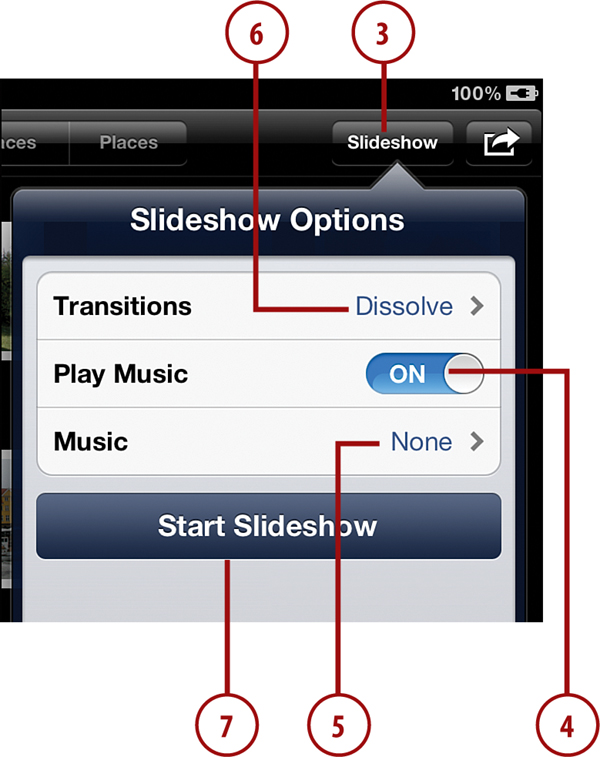
4. Switch the Play Music button on or off.
5. If you want to use music, tap to select a song from your iTunes collection.
6. Choose a transition.
7. Tap Start Slideshow.
Want to present a slideshow on a monitor or TV? Use one of the video adapters discussed in Chapter 18 to hook your iPad up to a projector or a TV. Or, you can use AirPlay to stream the slideshow from your iPad to an Apple TV or other AirPlay device. Just tap on the slideshow while it is running and look for the AirPlay button at the upper-right corner. See “Using AirPlay to Play Music and Video on Other Devices” in Chapter 4.
Turning Your iPad into a Picture Frame
You can also set your iPad to show a slideshow when you are not in the Photos app. The Picture Frame function is configured in Settings, and then you activate it from the Lock screen.
1. Go to the Settings app.
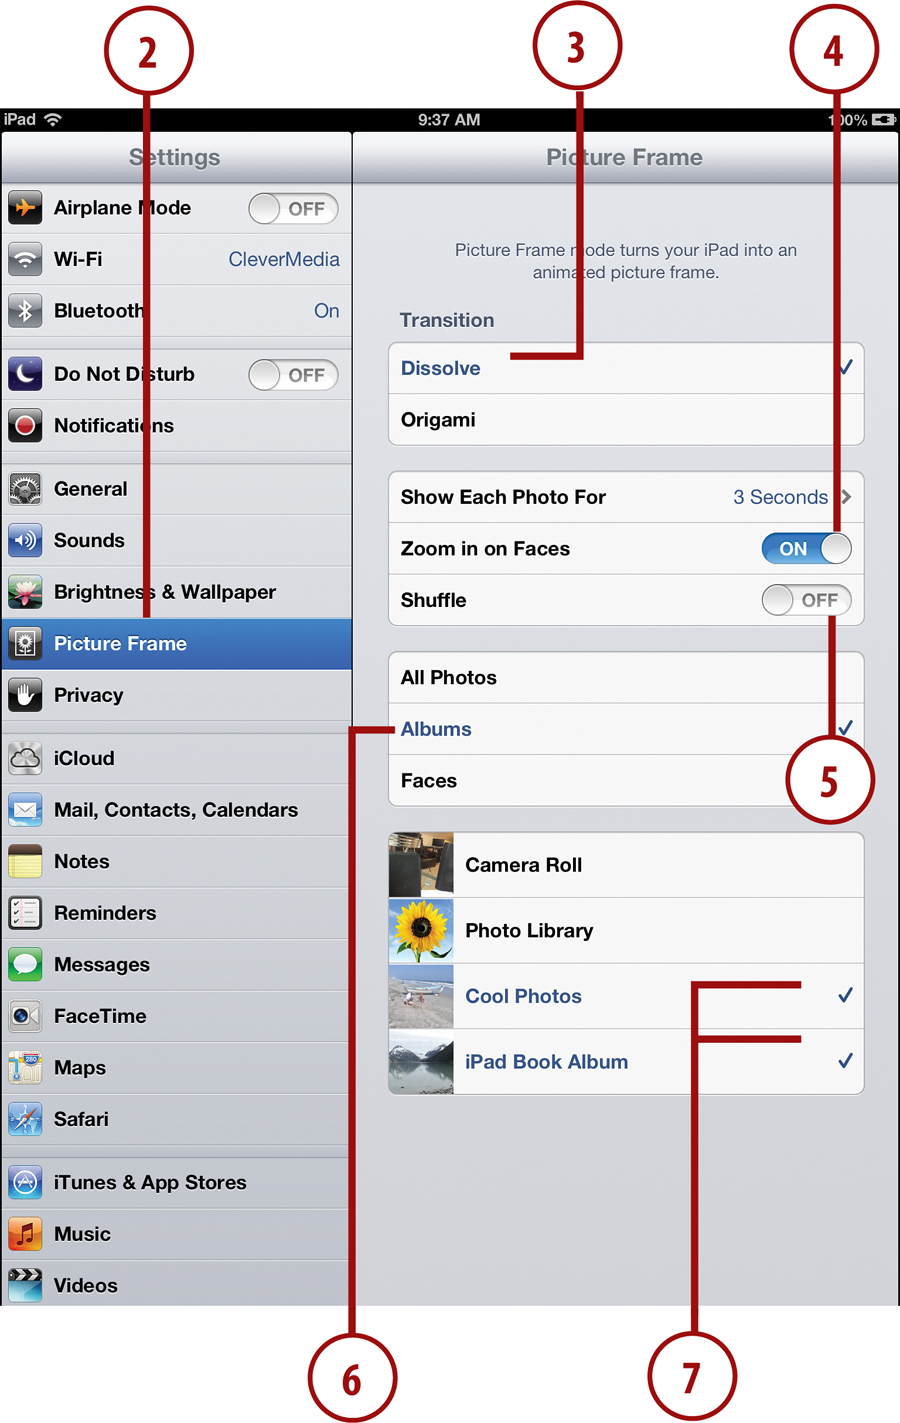
3. Choose either the Dissolve or Origami transition.
4. Turn Zoom in on Faces on or off. When it is on, pictures with faces in them are zoomed and cropped to show the faces close up.
5. Turn Shuffle on to show photos in random order.
6. Choose either All Photos, Albums, Faces, or Events.
7. Depending on your choice in step 6, you can check off one or more albums, faces, or events.
If you want ultimate control over your picture frame slideshow and you use a Mac, create a special album in the Photos apps called something like “iPad Picture Frame” and fill it with just the photos you want to use. Make sure you set iTunes to sync this photo album. Then set your Picture Frame settings to show only this one album.
8. Lock your iPad by pressing the Wake/Sleep button at the top of the device.
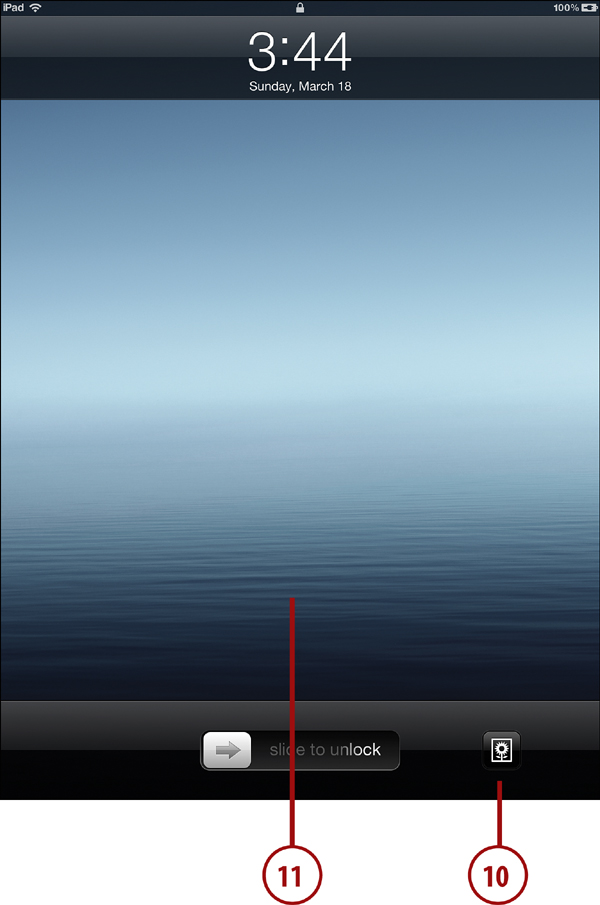
9. Press the Home button to bring up the Lock screen.
10. Without unlocking your iPad, tap the Picture Frame button to the right of the Slide to Unlock switch to put your iPad in Picture Frame mode.
11. Tap the screen at any time to bring back the Lock Screen controls so that you can unlock your iPad.
Capturing the Screen
You can capture the entire iPad screen and send it to your Photos app. This feature is useful if you want to save what you see to an image for later.
1. Make sure the screen shows what you want to capture. Try the Home screen, as an example.
2. Press and hold the Wake/Sleep button and Home button at the same time. The screen flashes and you hear a camera shutter sound, unless you have the volume turned down.
3. Go to the Photos app.
4. Tap on the Camera Roll album. The last image in this album should be your new screen capture. Tap it to open it.
5. The example is a vertical capture of the Home screen, so it might be confusing to look at. Turn your iPad horizontally.
6. Tap the boxed arrow icon to email the photo or copy it to use in another application. Or you can leave the photo in your Saved Photos album for future use.
Deleting Photos
You can only delete photos from the Camera Roll album (sometimes referred to as the “Saved Photos” album) and your Photo Stream.
1. In Photos, go to the Albums view.
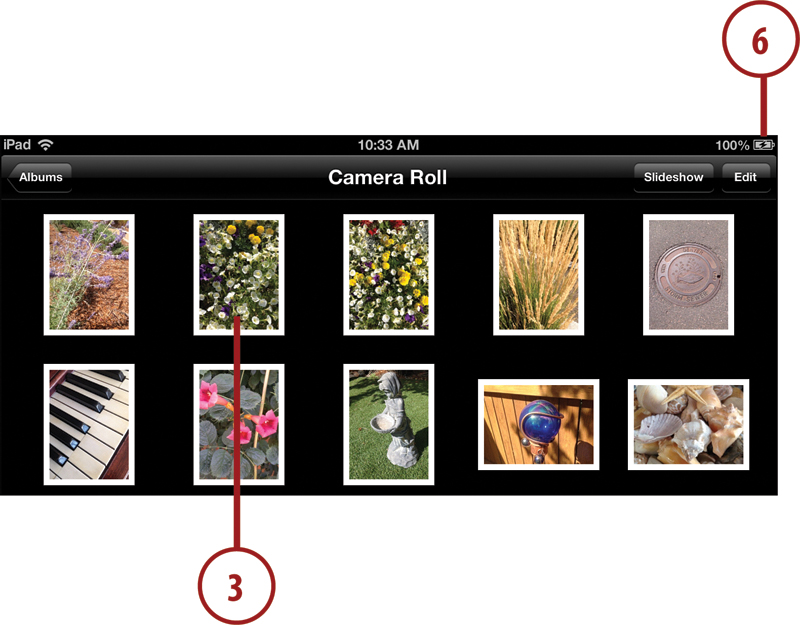
2. Tap on Camera Roll.
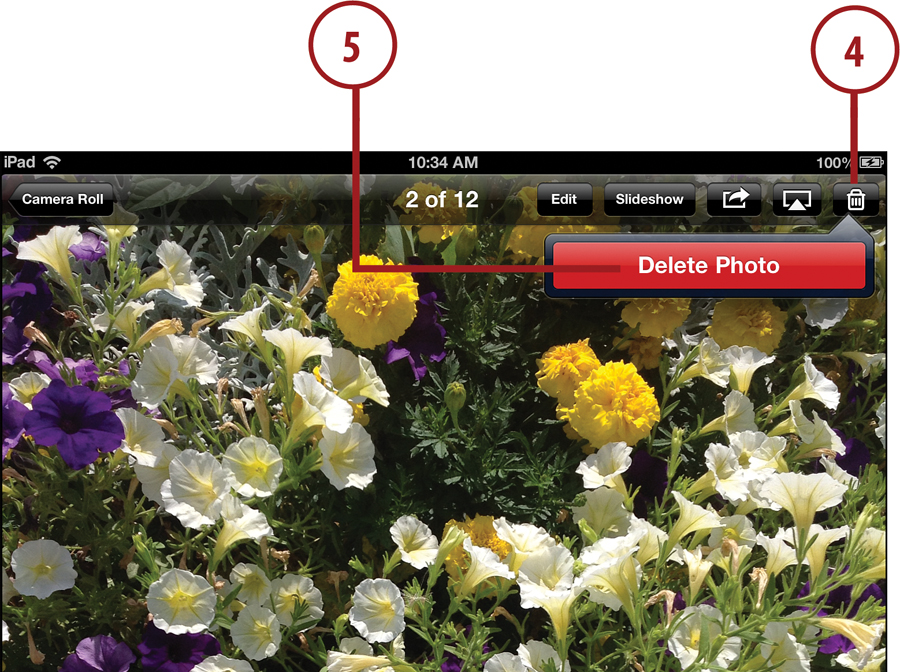
3. Tap a photo to view it.
5. Tap Delete Photo.
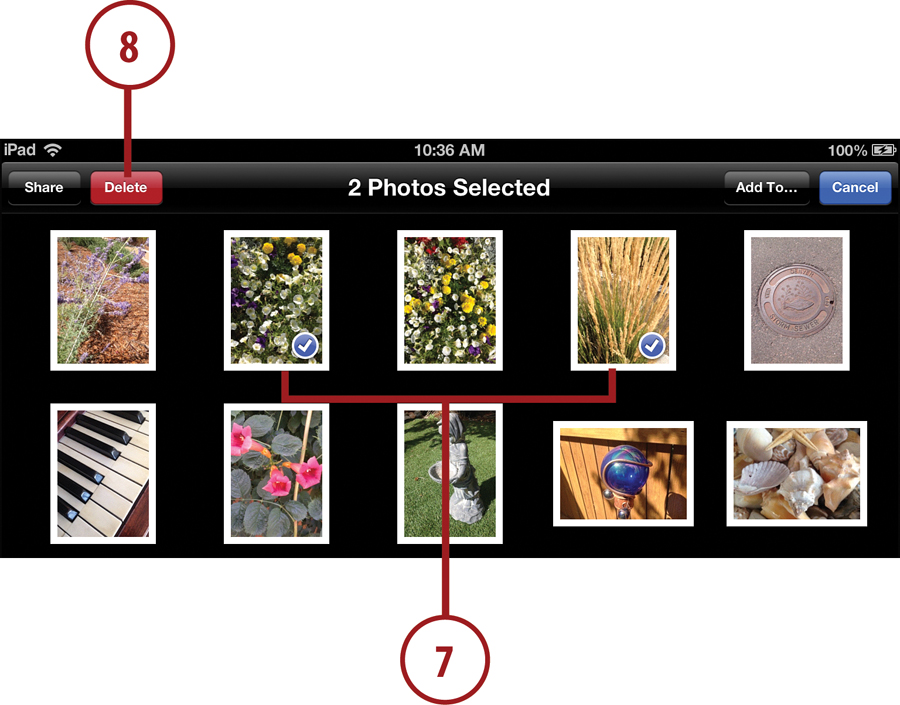
6. Alternatively, you can go back to step 2 and then tap the boxed arrow button.
7. Tap multiple photos to select them.
8. Tap Delete, and then tap Delete Selected Photos.
So How Can I Delete Other Photos?
The Camera Roll album is special; it contains photos created on your iPad. The rest of the albums are just copies of photos synced from your computer. You can’t delete them from your iPad any more than you can delete music synced to your iPad.
To delete these photos, go back to iPhoto on your computer, and remove them from any albums that you have set to sync to your iPad. Also, go into iTunes on your computer, and make sure the photo syncing options there—such as to sync Last 12 Months—won’t copy that photo.
If you think of your photos like you think of your music, understanding which photos are synced and why makes more sense.
Adjusting Photos in iPhoto
Although the Photos app gives you the ability to make basic adjustments to your pictures, the iPhoto app goes much further. You need to purchase it in the App Store. Then you can use the iPhoto app to apply a variety of filters, adjustments, and special effects to your photos.
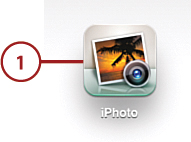
1. After you purchase and download iPhoto, tap its icon to run it.
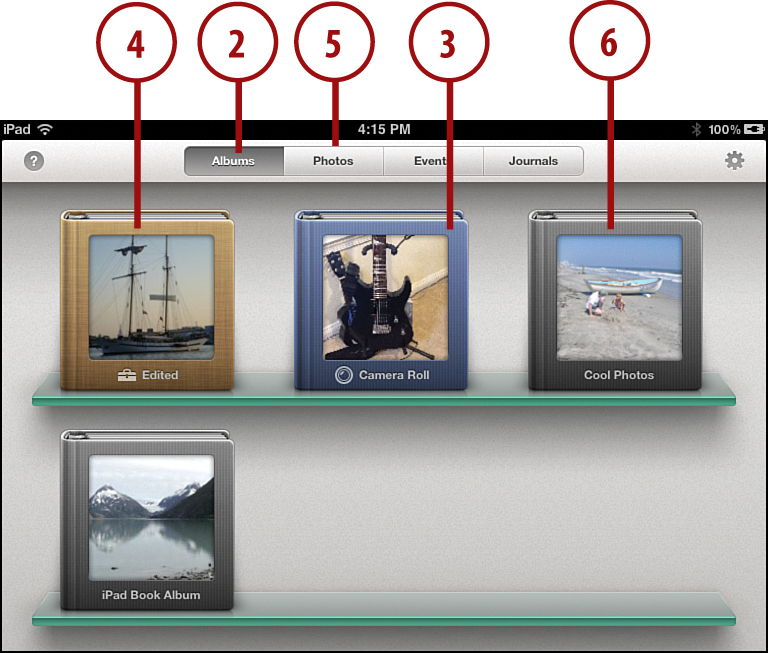
2. First, you need to select a photo to edit. Tap Albums to view your photos grouped into the same albums as in the Photos app.
3. You can view the photos you have taken with your iPad’s camera in the Camera Roll. You can also see photos you have created in other apps here.
4. If you have already edited a photo, you will see the Edited album. This contains a list of all altered photos. You can go here to continue to work on them.
5. Tap Photos to see one long list of all the photos on your iPad.
6. Tap an album to dig into that album’s photos.
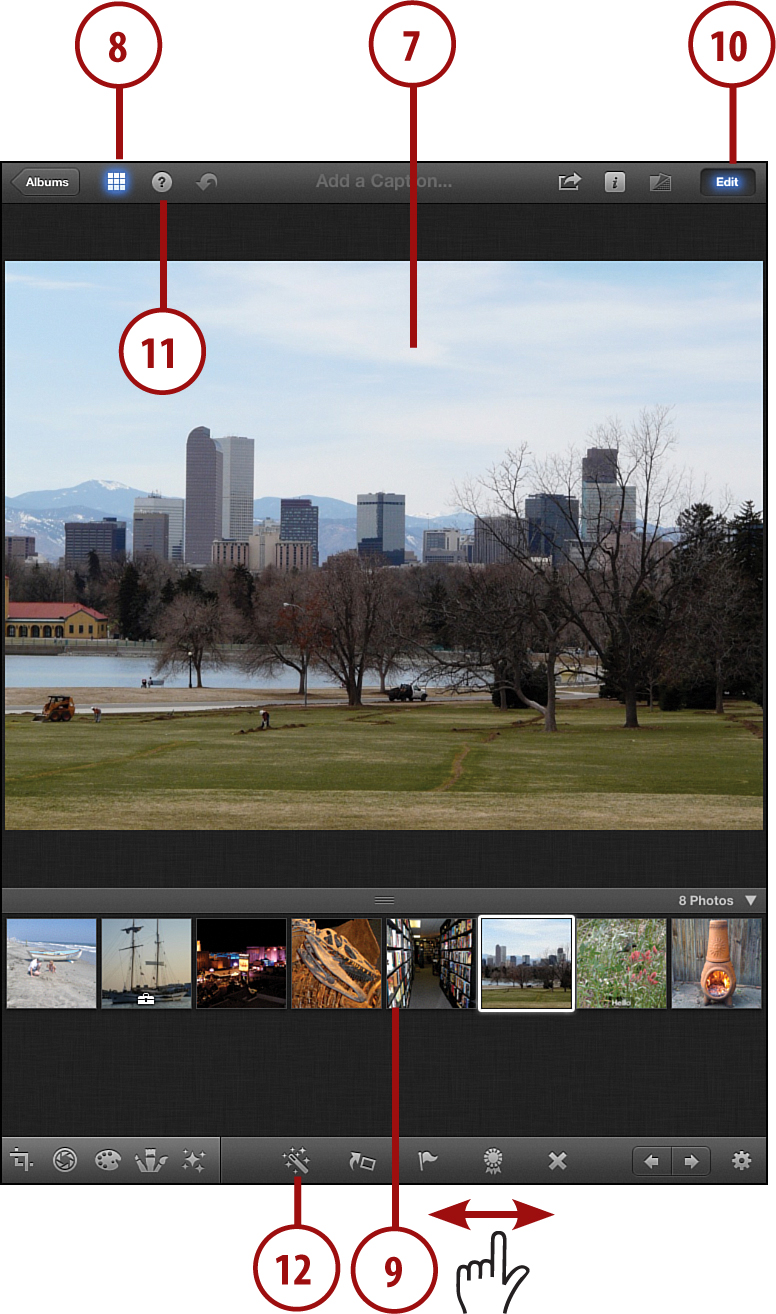
7. You will see one of the photos from the album in the center of the screen. This is the photo you are currently editing.
8. Tap the Thumbnail Grid button to see the rest of the photos in the album at the bottom so that you can switch between them.
9. Tap any photo to switch to it. Alternatively, you can swipe left or right to move between photos.
10. Tap the Edit button to bring up the photo editing controls at the bottom of the screen.
11. Tap the Help button to bring up labels for all of buttons and controls in iPhoto.
12. Try the Auto-enhance button if you want to let your iPad figure out how to adjust the brightness, contrast, and other alterations that should improve the look of the picture.
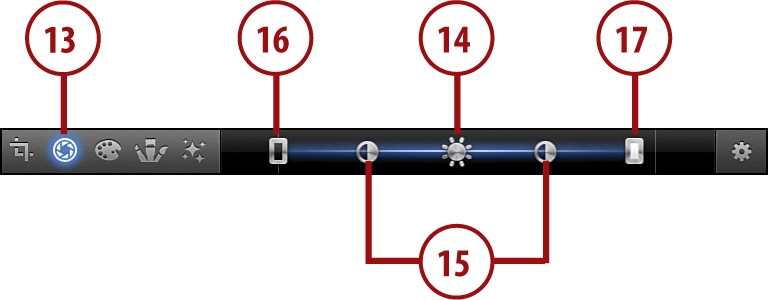
13. Tap the Exposure button to reveal the brightness and contrast controls.
14. Drag the brightness control left or right to adjust the general brightness of the photo.
15. Drag the contrast controls left or right to adjust the contrast.
16. Drag the shadows control to adjust the exposure for the dark areas of the photo.
17. Drag the highlights control to adjust the exposure for the light areas of the photo.
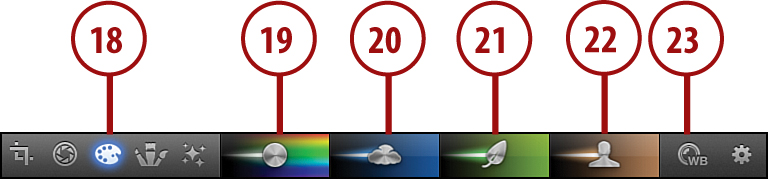
18. Tap the Color adjustments button.
19. Drag the Saturation control left and right to saturate or desaturate the image. The first enhances the color in your photo, and the second removes color, bringing it closer to black and white.
20. Adjust the blue tones in the picture.
21. Adjust the green tones in the picture.
22. Adjust the skin tones in the picture.
23. Bring up a set of white balance controls.
Cropping, Straightening, and Rotating
In addition to color effects and adjustments, you can also crop and rotate your pictures. The Crop & Straighten button is at the bottom-left corner and enables you to trim the edges down and rotate the image any amount. In addition, the Rotate 90 degrees button along the bottom of the screen (an arrow next to a rectangle) lets you quickly rotate an image that is oriented incorrectly.
Using Brushed Effects on Photos in iPhoto
There are also adjustments that you can make on parts of a photo rather than the entire image.
1. Tap the Brushes button.
2. Select a brush to use.
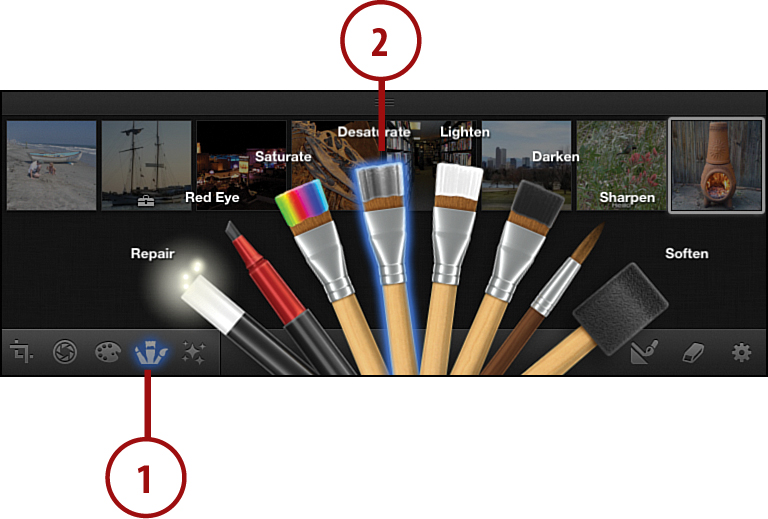
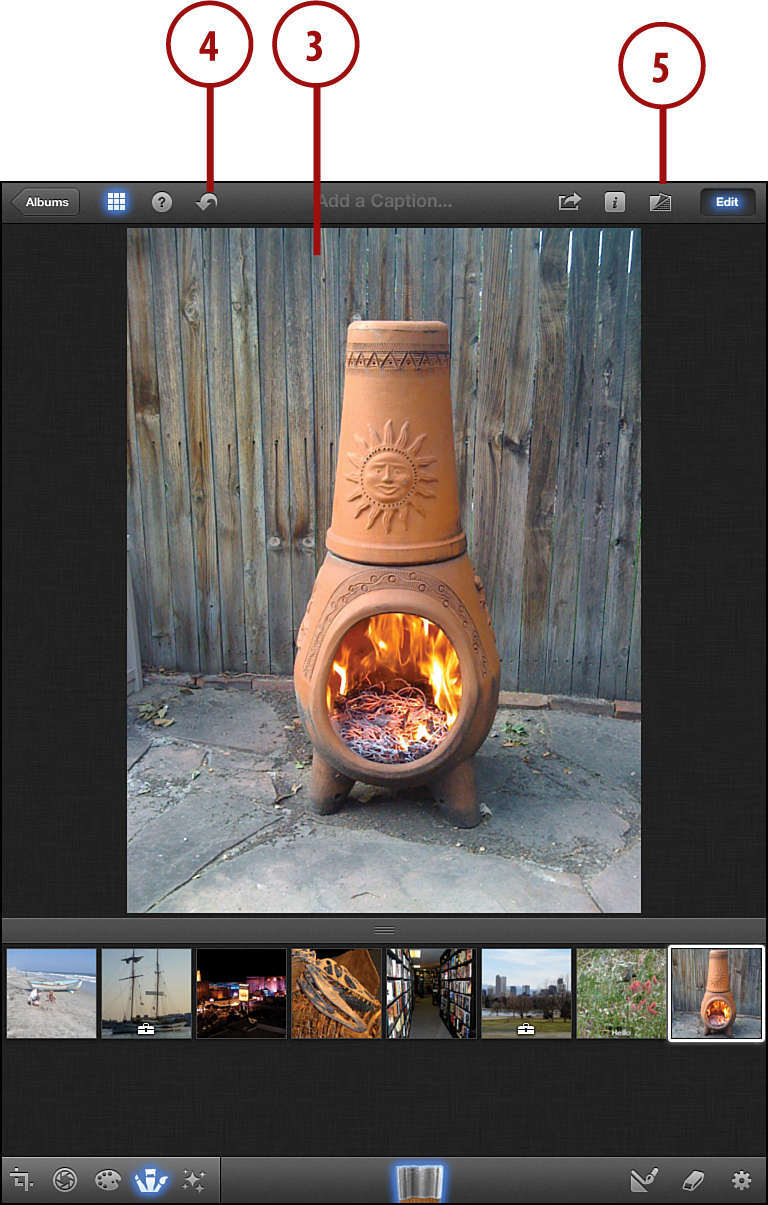
3. Use your finger to manually brush the area you want the effect applied to. For instance, you can desaturate everything in this photo except the fire.
4. Tap the undo button to revert to how the image was before you tried the brush. Using the undo button, you can try a variety of brushes and other effects knowing that you can undo the change easily.
5. Tap the Show Original button if you want to quickly compare your changes to the original photo without undoing the changes.
Applying Special Effects to Photos in iPhoto
You can also apply a variety of filters to your entire photo.
1. Tap the Effects button.
2. Select one of the effects sets.
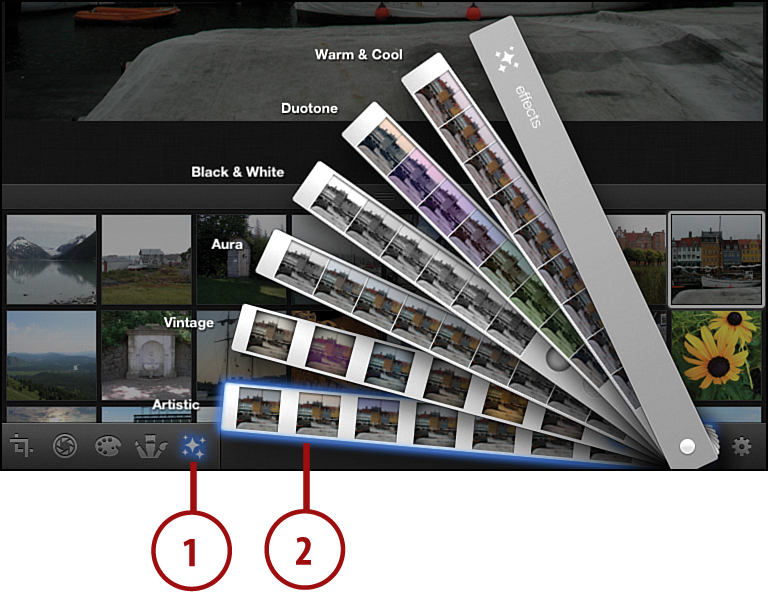
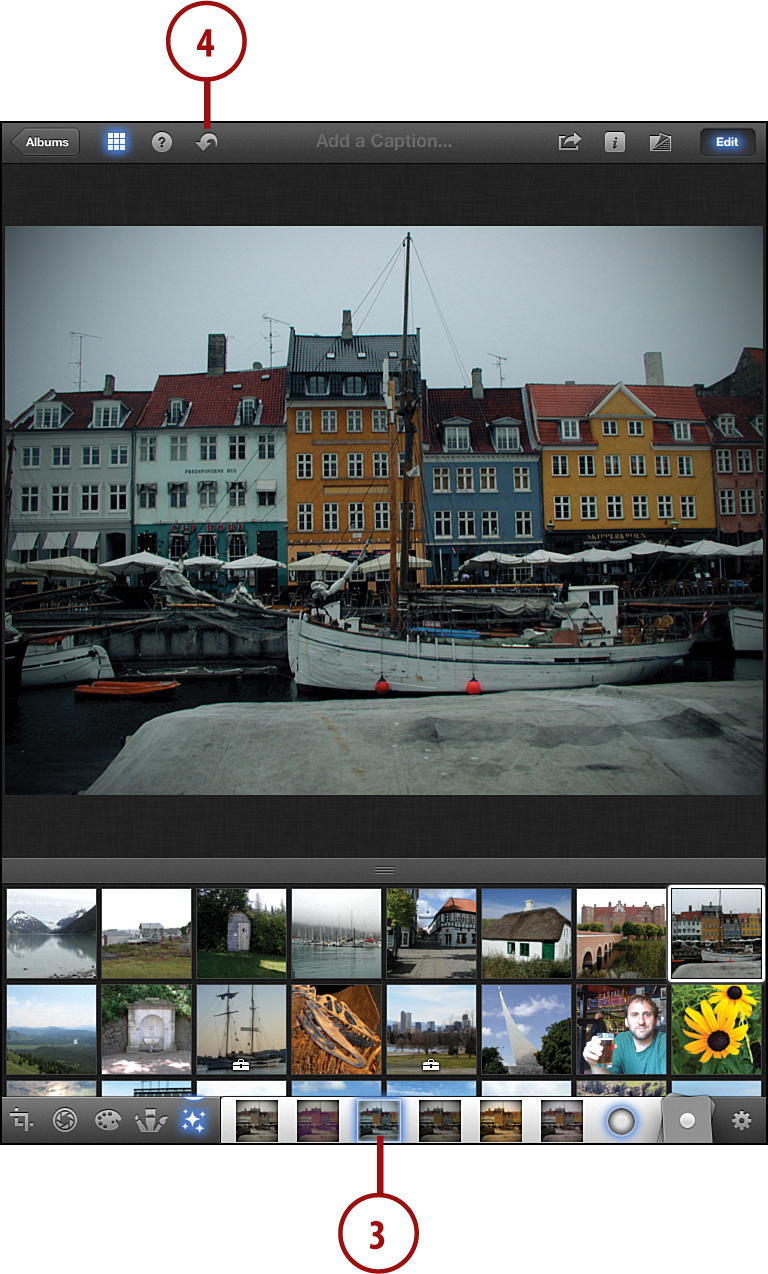
3. Tap a thumbnail to try that effect.
4. Use undo to revert back to the original image before trying another one.
Sharing Photos with iPhoto
Whether you edit the photo or not, you can still use iPhoto to share your photos in a variety of ways with different services and devices.
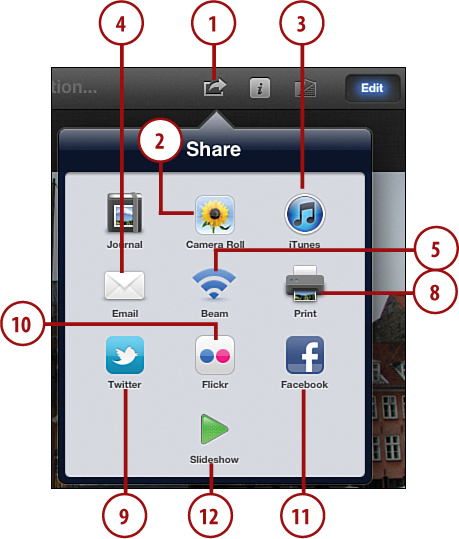
1. Tap the Share button to bring up the list of sharing methods.
2. Tap Camera Roll to send the photo to your iPad’s Camera Roll as a new image. Use this to allow other apps to access your edited photo and to send the photo to your computer the next time you sync your photos.
3. Tap iTunes to prepare the image to be shared with your computer via iTunes sync. See “Syncing Documents” in Chapter 3.
4. Tap Email to compose a message with the selected pictures.
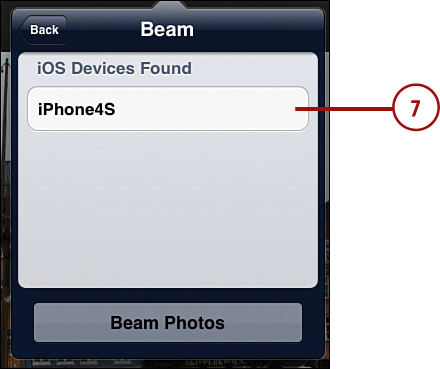
5. Tap Beam to send the picture wirelessly to another iOS device.
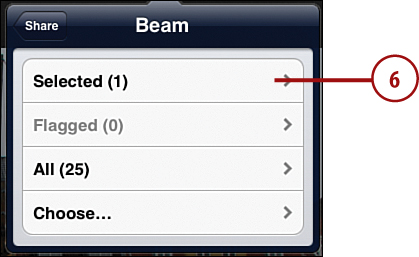
6. When you select Beam, or almost any other sharing option, the next step is to select which images to send.
7. When you Beam an image, you need to select the iOS device to send it to. The other device needs to be on the same Wi-Fi network and running the same iPhoto iOS app.
8. You can send a photo to an AirPrint printer. See “Printing from Your iPad” in Chapter 18.
9. You can post a photo online and send a tweet with a link to it.
10. You can add the photo to your Flickr account.
11. You can also post a photo to Facebook.
12. You can start a slideshow with photos you select.
Creating Online Journals with iPhoto
You can also post photos online using Apple’s free iCloud service. The Journals feature of iPhoto allows you to create web pages with one or more photos on them, plus additional information like text and maps.
To begin, it is best to select several photos. Then share and use the Journals function.
1. Tap the special tools button.
2. Tap Select Multiple.
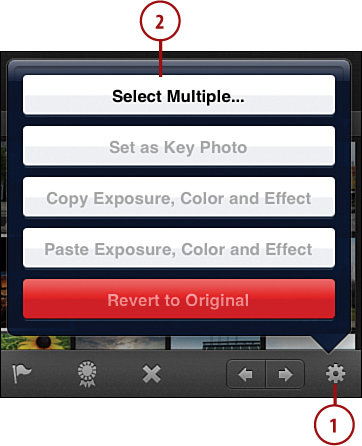
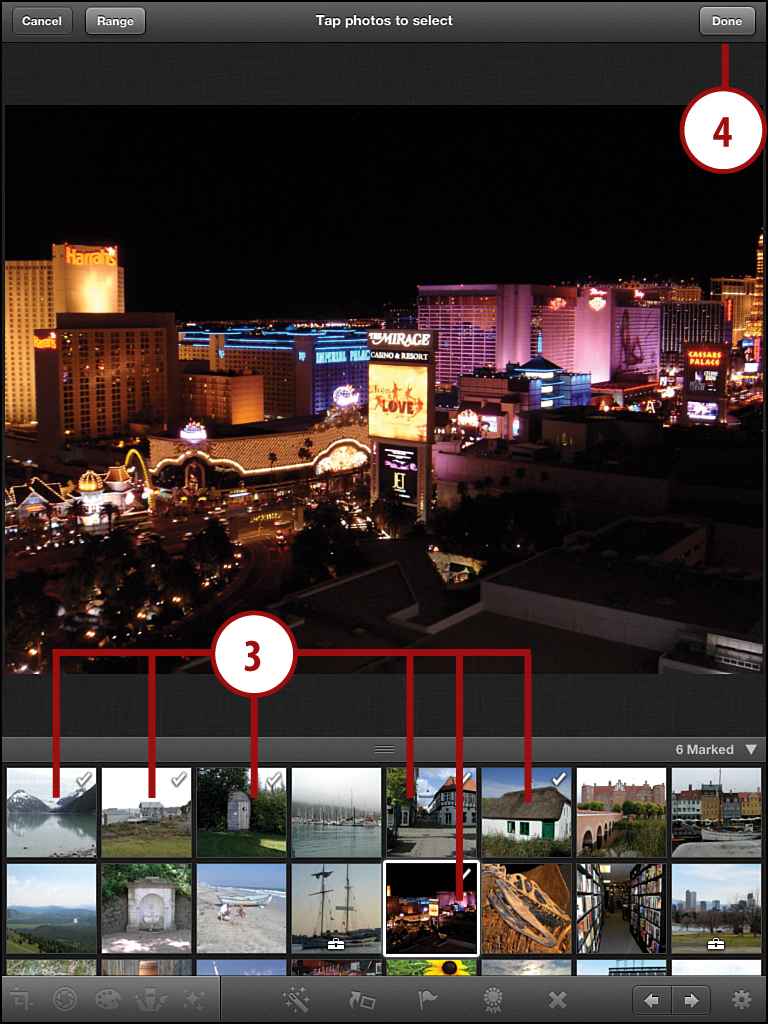
3. Select several photos.
4. Tap Done.
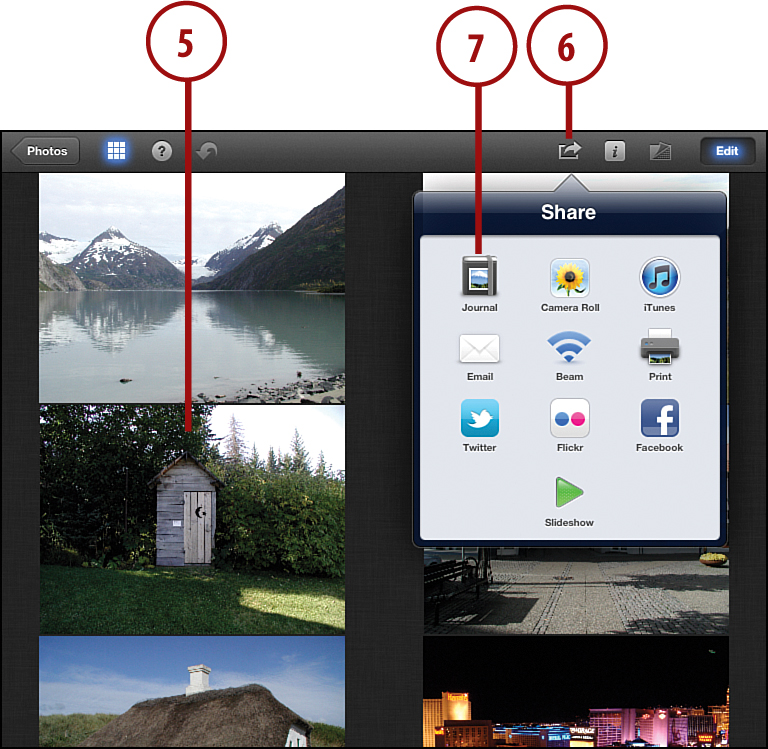
5. The selected photos now appear in the middle of the screen.
6. Tap the Share button
7. Tap Journal.
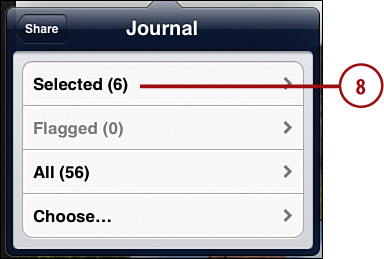
8. Tap Selected.
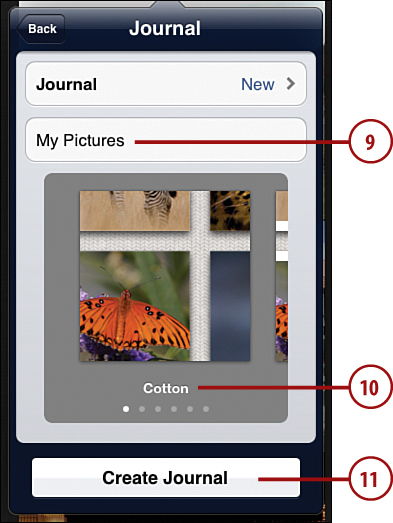
9. Enter a name for your new journal.
10. Swipe through the themes and select one.
11. Tap Create Journal.
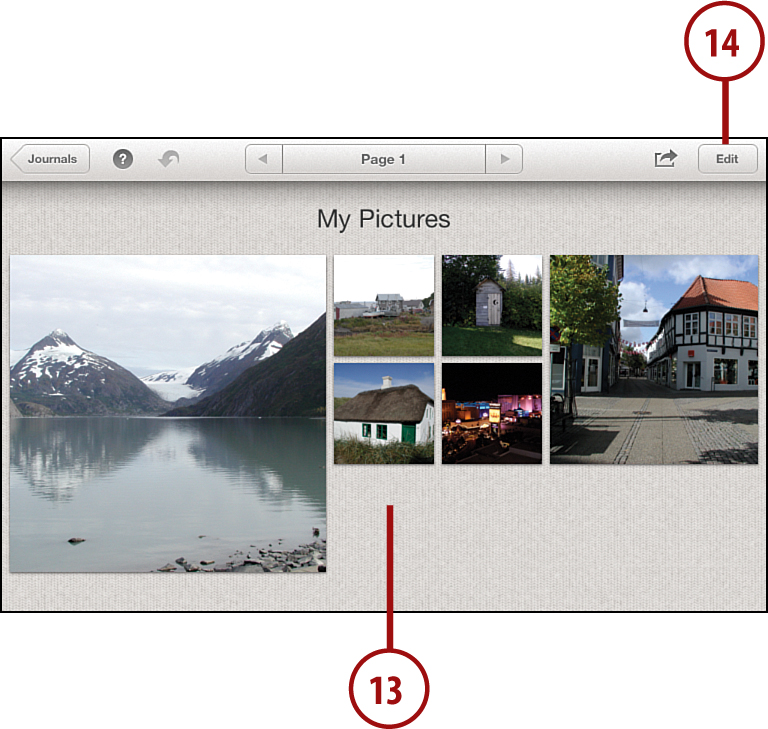
13. Photos are automatically placed on the page.
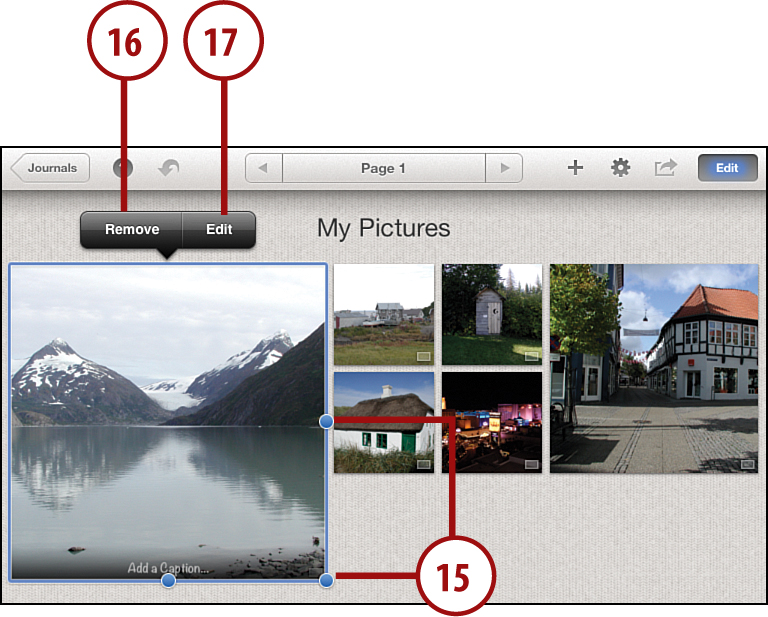
14. Tap Edit to move or resize photos and to add more content to the page.
15. You can drag a picture to move it by tapping and holding on the photo for a second, and then moving it around after it “detaches” from the page. You can also drag the blue dots around it to resize it. Other pictures automatically reflow to fit.
16. You can also remove a picture.
17. You can edit a picture using iPhoto’s effects and filters.
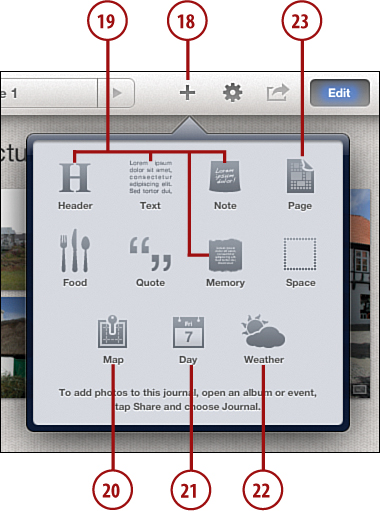
19. You can add text to your page in a variety of formats, such as a sticky note or torn strip of paper. Text objects can be resized and moved like pictures.
20. You can add a map to your page.
21. You can add a graphic with the date on it.
22. You can add a weather graphic.
23. Tap the Page button to create a second page. Journals can have just one, or many, pages.
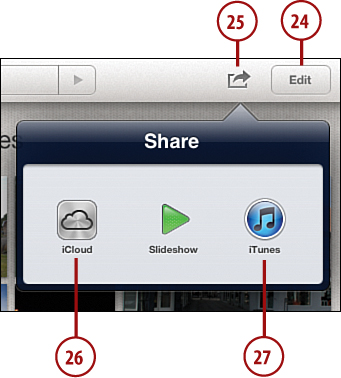
24. Tap the Edit button to leave Edit mode. Only then will the Share button become active.
25. Tap Share.
26. You can send the Journal to your iCloud account. This will create one or more web pages. You can then send your friends links to those pages and they can view your journal.
27. You can also save the files that make up the journal web pages. You would then transfer them to your Mac or PC using iTunes. See “Syncing Documents” in Chapter 3. This is for anyone with their own website who knows how to upload and manipulate files on the server.
That’s a basic overview of Journals to get you started. It is a very deep, creative tool. After you create your first journal, you will see a new album appear in iPhoto with your journals. You can go back to one you have created and edit it at any time. Sharing it again to iCloud will update that journal.
To make the most of the Journals feature of iPhoto, you will want to explore it on your own. Use some of your favorite photos and try different sizes and positions for each. Try adding each of the special elements like maps and notes. Once you get to know this tool, you will be able to quickly create fun and interesting web pages to show off your photos to friends.