11. Writing with Pages
In this chapter, we begin to get work done on the iPad by using Pages to create and format documents.
• Sharing and Printing Documents
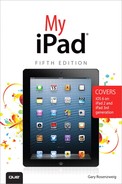
So far, we’ve mostly been looking at ways to consume media—music, video, books, photos, and so on. The next three chapters deal with the iWork suite of applications: Pages, Numbers, and Keynote.
We start with Pages, the word processor, which you can use for a fair amount of layout and design. Pages is not one of the iPad’s built-in apps. You need to purchase and download it from the App Store.
Creating a New Document
Let’s start off simple. The most basic use of Pages is to create a new document and enter some text.
1. Tap the Pages app icon on the Home screen.
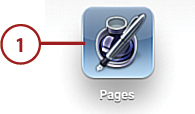
2. If this is the first time you have run Pages, you will go through a series of screens welcoming you to Pages and asking if you want to set up iCloud as the storage space for Pages documents. Finally, it will ask if you want to create a new document or learn more about using Pages.
Pages, Numbers, and Keynote can store their files on Apple’s iCloud service rather than on your iPad. This is the default behavior as long as you have iCloud configured on your iPad and have allowed these three apps to use it. Using just an iPad means you won’t notice much of a difference. You can take comfort, however, in knowing that they are being backed up on Apple servers as you work. And if you have a second iCloud device, like an iPhone or a Mac, you will see these documents there as well. For instance, Pages documents saved to iCloud from Pages on your iPad will appear in Pages for Mac. You can also access them at the iCloud website. See “Syncing Using iCloud” in Chapter 3.
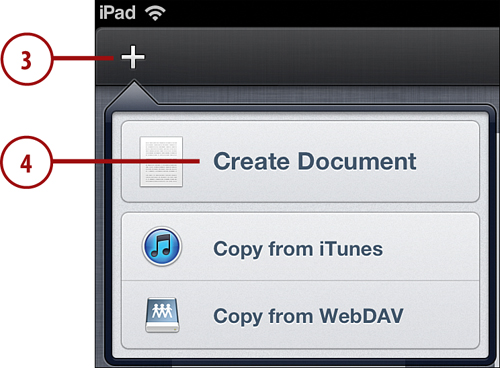
3. If this isn’t the first time you have run Pages, tap the + button at the top-left corner of the screen to start a new document.
4. Tap Create Document.
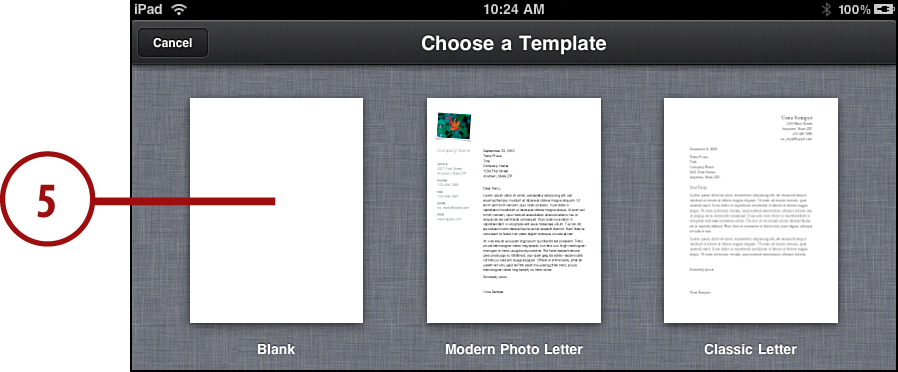
5. The template choices display. You can scroll vertically to see more. Tap the Blank template to go into the main editing view.
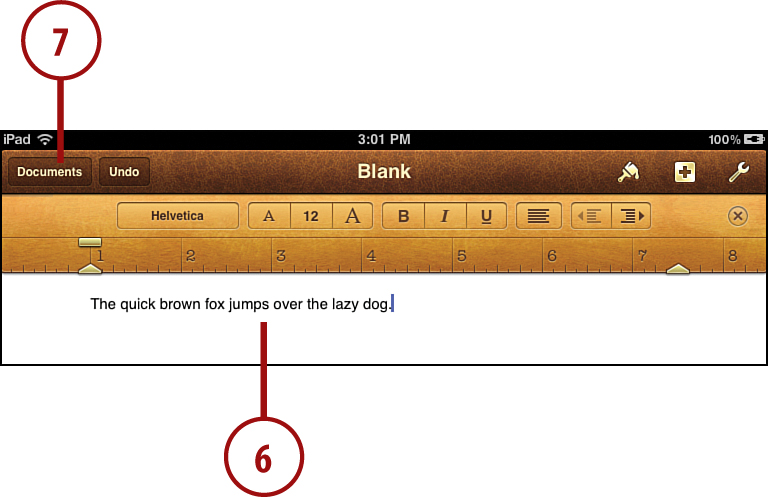
6. Type some sample text in the document just to get the feel for entering text.
7. Return to your documents list by tapping Documents.
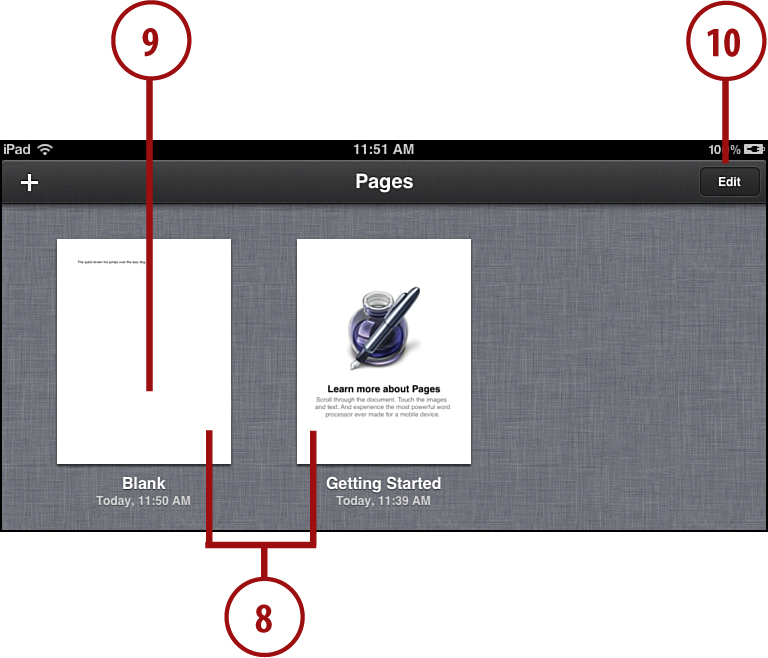
8. You can now see all your documents. If you have not created any other documents yet, you should have two documents now: the one you just created and the sample document.
9. Tap a document to open it.
10. Tap Edit to select and then delete documents.
If you plan on using Pages on your iPad often, you might want to invest in a physical keyboard for your iPad. You can use the Apple Wireless keyboard or almost any Bluetooth keyboard. Apple also has a version of the iPad dock that includes a keyboard. See Chapter 18, “iPad Accessories,” for details.
Styling Text
Now let’s learn how to style text. You can change the font, style, and size.
1. In an open document, double-tap a word to select it.
2. Pull on the blue dots to select the area you want to style.
3. Use the toolbar buttons to format your text as bold, italic, or underline.

At the top of the Pages screen, there is an Undo button. Use that to undo the last action you took—whether it is typing some text or changing styles. You can use Undo multiple times to go back several steps.
4. Tap the paintbrush button to bring up the Style/List/Layout menu.
5. Tap Style.
6. Tap the B, I, and U buttons to format text. Tap the buttons a second time if you want to change the style back to plain text. The fourth button, S, styles the text as strikethrough.
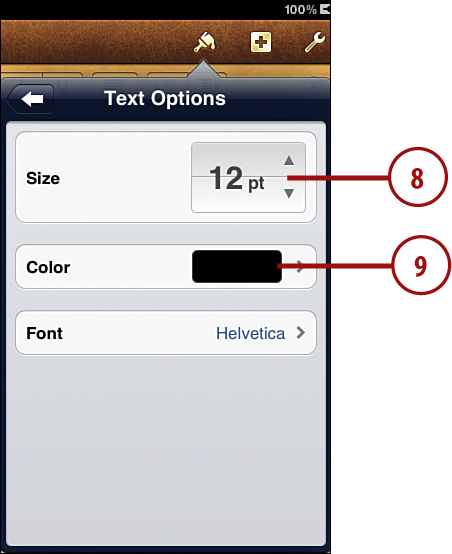
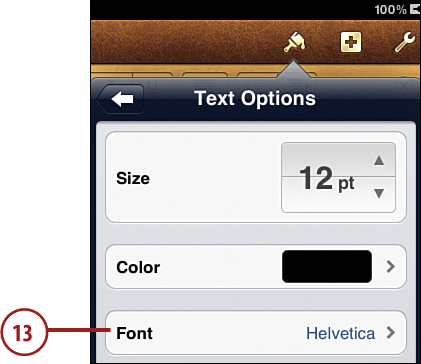
7. Tap the size and name of the font.
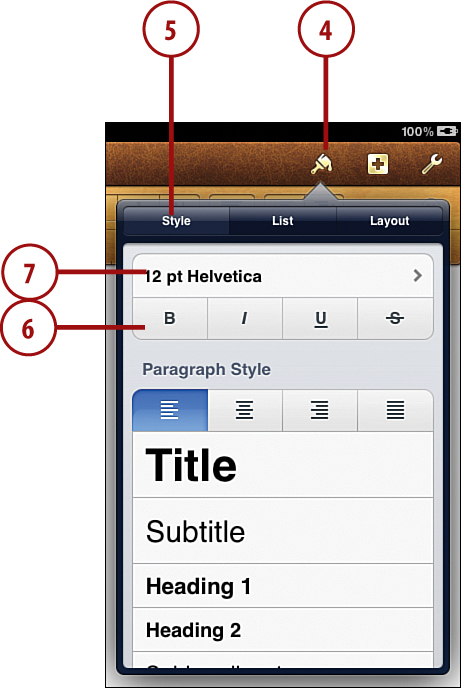
8. Set the font size, color, and type. Tap on the top and bottom halves of the font size indicator to increase and decrease the font size.
9. Tap the Color button to get a selection of colors.
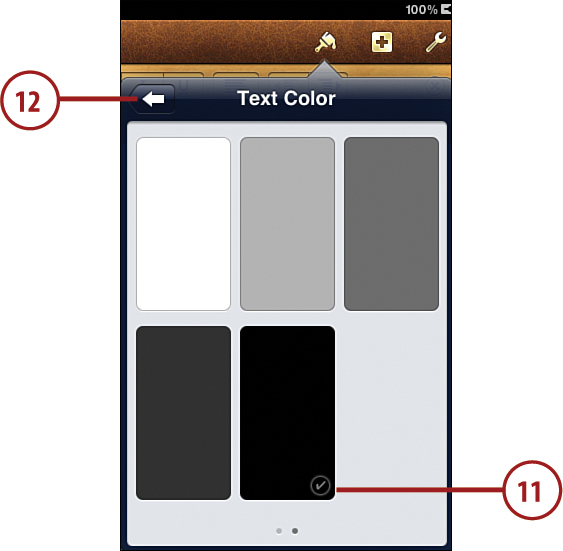
10. Tap a color or swipe to the left to look at the page containing gray-scale options.
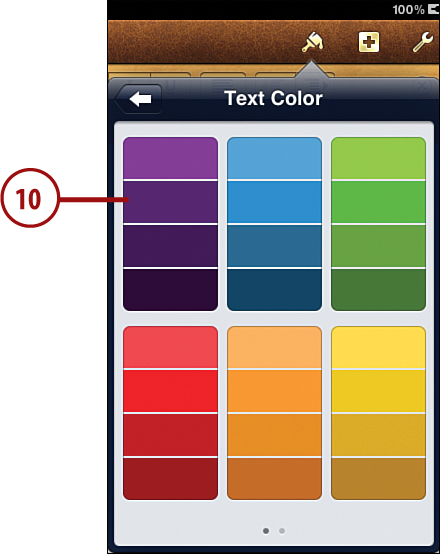
11. The black color tile has a check mark in it to indicate that it is the current color of the text. Swipe right to get back to the first page of colors and choose a different color, such as red.
12. Tap the left-facing arrow above the colors to return to the Text Options menu.
13. Tap Font.
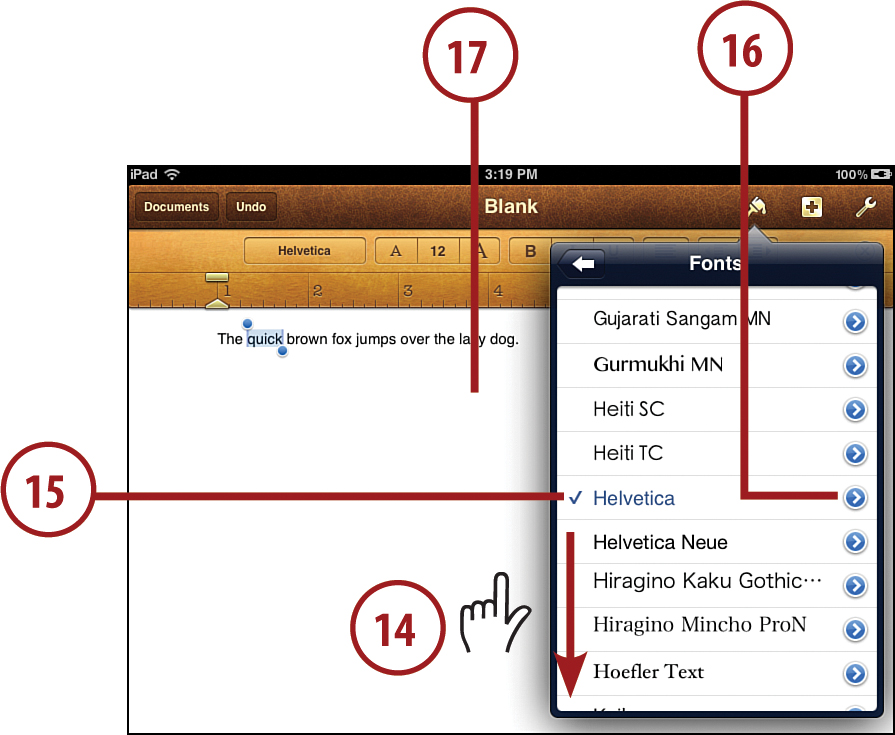
14. Drag up and down in the list of fonts to view them all.
15. Tap a font to change the selected text to it.
16. Tap the blue button if it appears to the right of a font to view variations for that font.
17. Tap outside of the menu to dismiss it and return to editing.
You can print a document from Pages, Numbers, or Keynote if you have one of the printers compatible with Apple’s AirPrint technology built into your iPad. Tap the tool button (it looks like a wrench in the upper-right corner) and then tap Print. You’ll be prompted to select a printer, page range, and number of copies. See “Printing from Your iPad” in Chapter 18.
There are many preset styles that apply to an entire paragraph, such as Title, Subtitle, Heading 1, Body, and so on. Select one of these to apply that preset style to the entire paragraph, not just the selected text.
Reusing Styles
So, what if you define the font, style, and size for something in Pages, and you want to use it again with another section of text? Just copy and paste the style from one piece of text to others.
1. Select some text.
2. Tap Style.
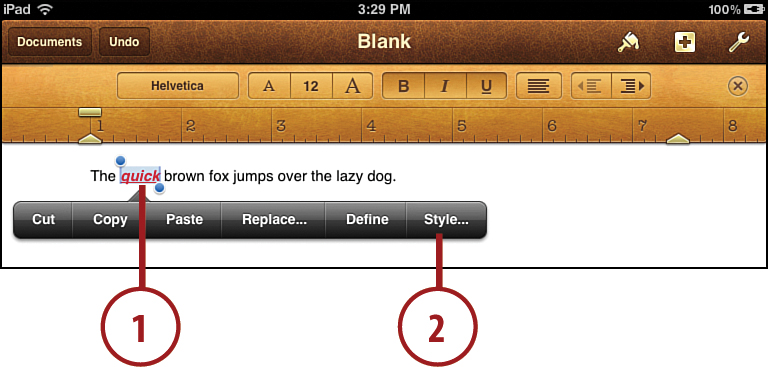
3. Tap Copy Style.

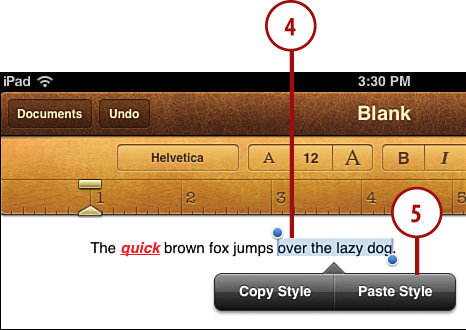
4. Select a piece of text to which you want to paste that style.
5. Repeat steps 2 and 3 to show the Copy Style and Paste Style button, and then tap Paste Style.
Formatting Text
The next step is to learn how to format and align text, which you do mostly through the toolbars at the top of the Pages screen in vertical mode.
1. Continue to work with the sample document, or start a new one and add some text.
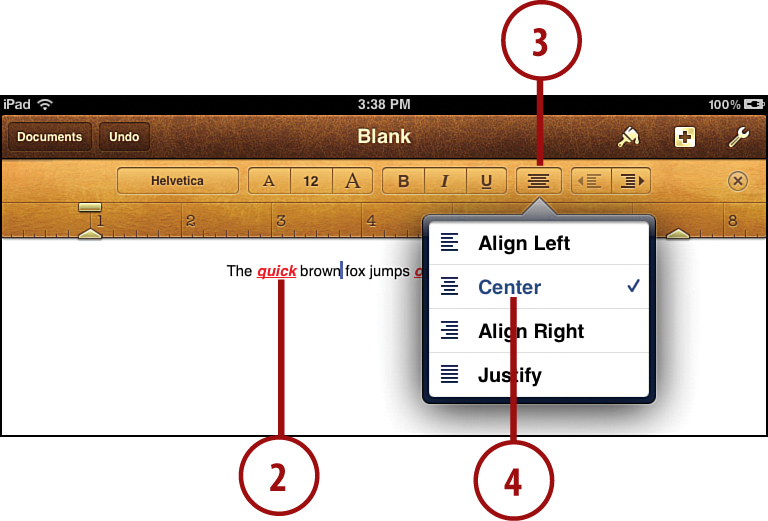
2. Tap in the text so that the cursor is somewhere in the paragraph you want to format.
3. Tap the alignment button at the top.
4. Tap the center alignment button in the menu. You can use the left, right, or justified buttons in the same set to align the text differently.
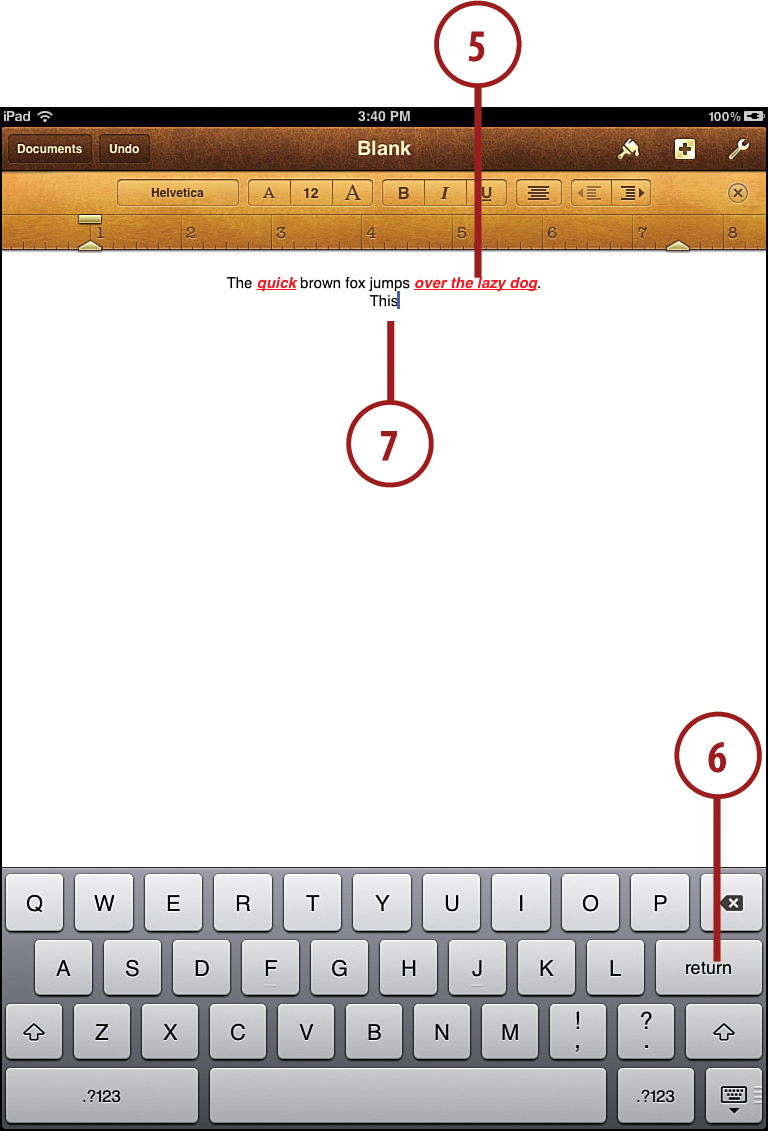
5. Tap at the end of the line to place the cursor there.
6. Tap the return key on the onscreen keyboard to go to the next line.
7. Type some sample text, just a word or two.
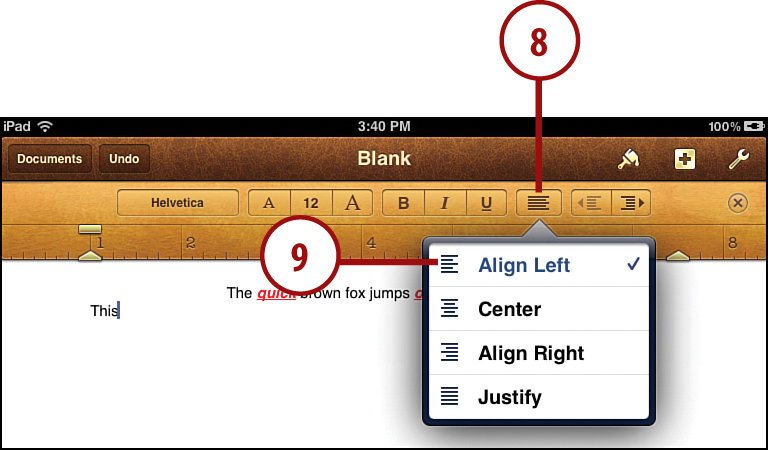
8. Tap the alignment button again.
9. Tap Align Left in the drop-down menu.
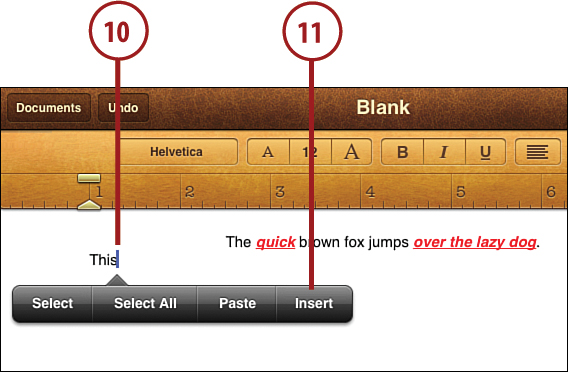
10. Double-tap next to the end of your text to bring up the Select, Select All, and Paste buttons.
11. Tap Insert to choose the element to insert.
12. Tap Tab to insert a tab.
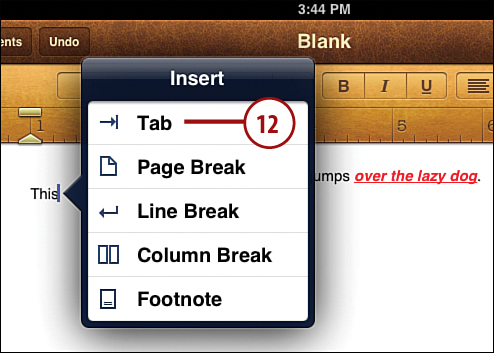
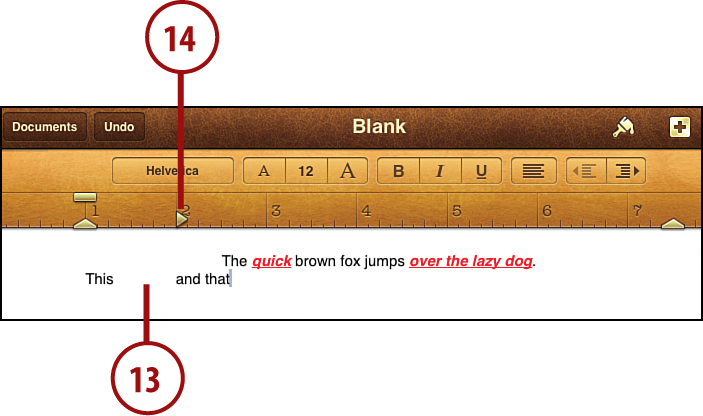
13. Type another sample word. Because the new line of text inherited the underline format of the previous line, we can clearly see the extra space inserted between the words by the tab. We haven’t added any tab stops to the document yet, so the position just defaults to the next inch.
14. Tap in the ruler around the 2-inch marker to insert a tab stop, which moves the second word over to match this tab stop’s horizontal position. You can tap and drag existing tab stops to reposition them.
If you like tabs, you’ll be happy to know you can make centered tabs, right tabs, and dotted tabs as you would on a desktop word processor. Just double-tap a tab in the ruler, and it changes to the next type. To remove a tab, just tap and drag it down and out of the ruler.
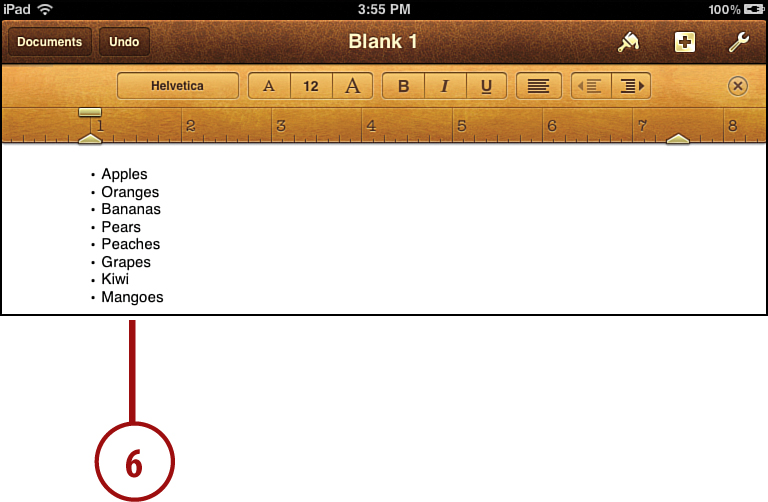
Creating Lists
You can easily create lists in Pages, just like in a normal word processor.
1. Create a new document in Pages using the Blank template.
2. Type a word that could be the first item in a list. Don’t tap return.
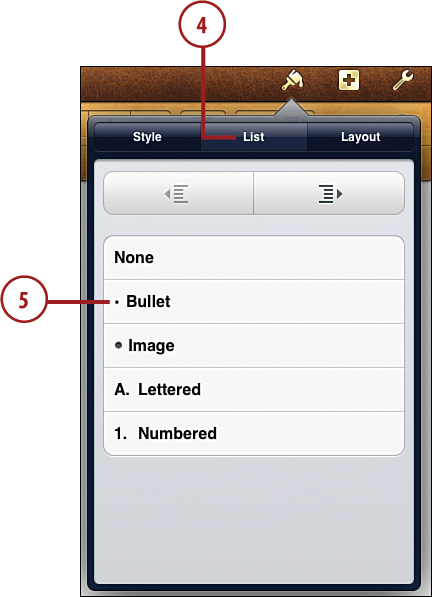
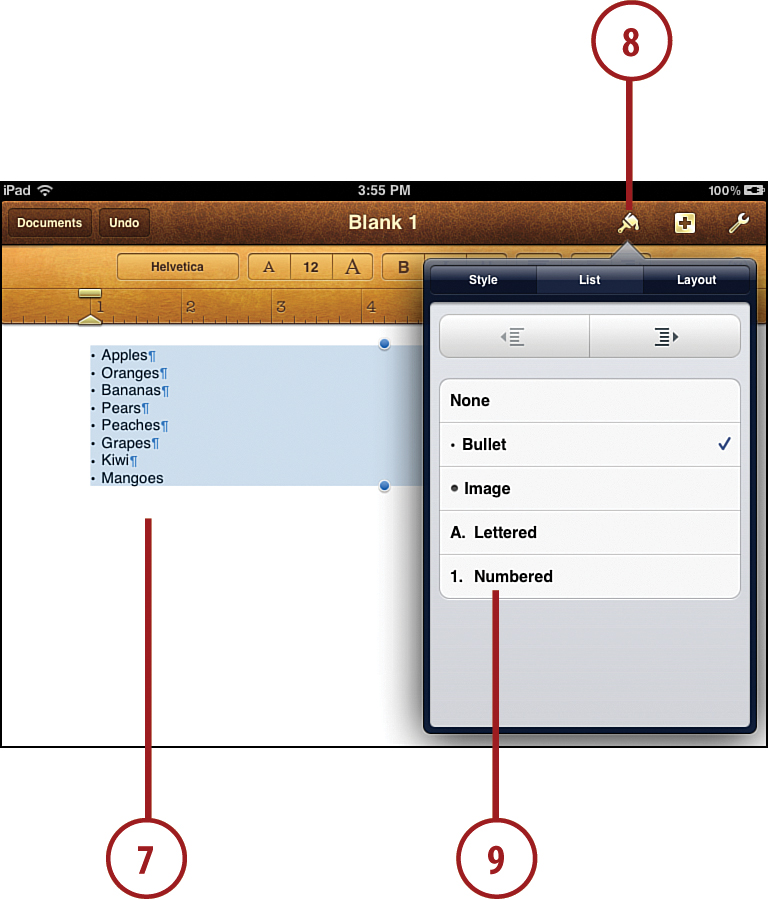
3. Tap the paintbrush button on the toolbar.
4. Tap List.
5. Tap the Bullet option to turn the text you just typed into the first item in a bulleted list.
6. Use the on-screen keyboard to tap return and type several more lines. Tapping return always creates a new line in the list. Tapping return a second time ends the list formatting.
8. Tap the paintbrush button.
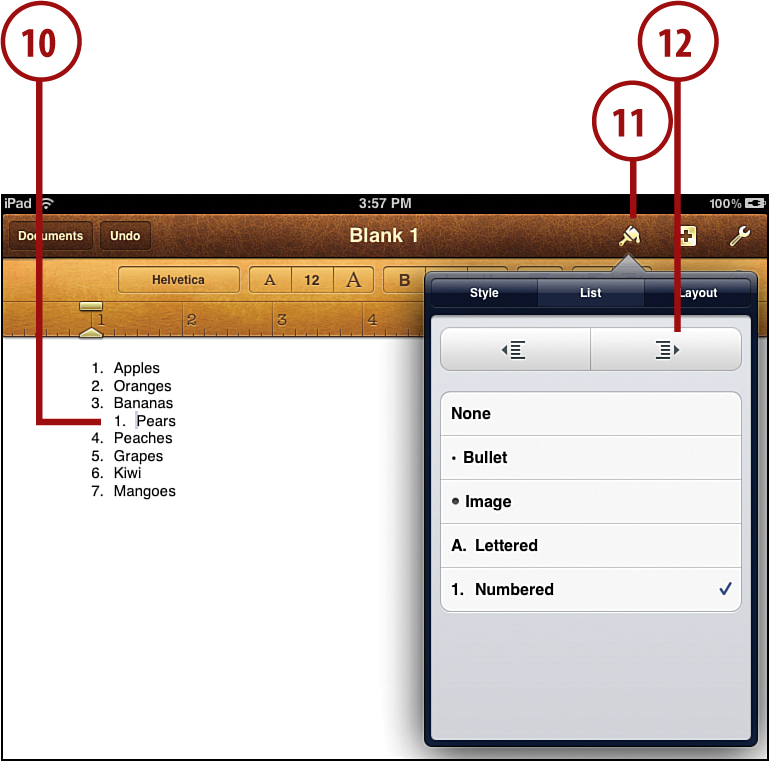
9. Tap Numbered to change the list to a numbered list.
10. Tap one line of the list.
11. Tap paintbrush again.
12. Tap the right arrow in the List menu to indent the line and create a sublist. You can create sublists as you type or by selecting lines and using the arrow buttons to format after you type.
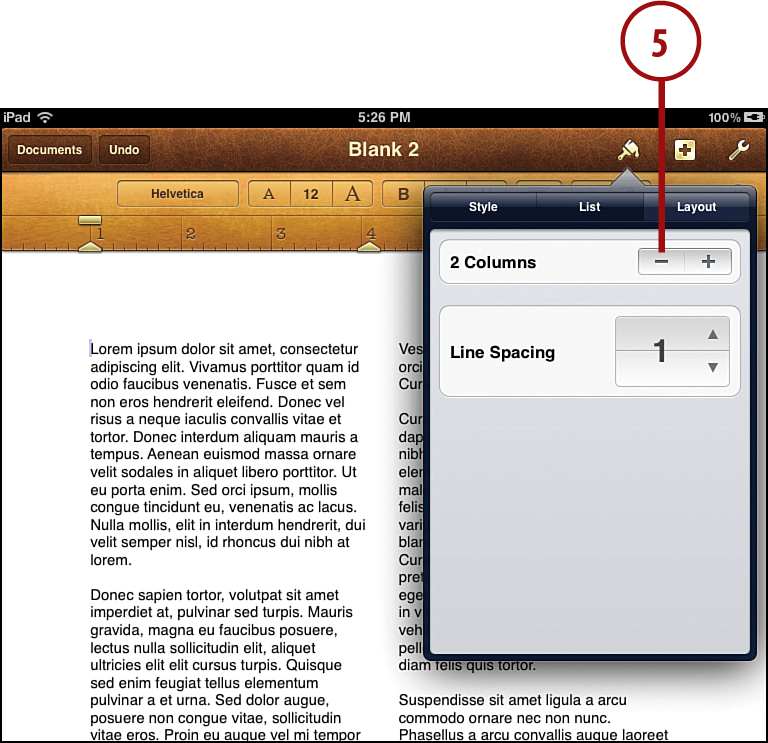
Column Layouts
Pages lets you go beyond boring one-column layouts. You can even change the number of columns for each paragraph.
1. Start a new document and fill it with text—perhaps copy and paste text from a website article. If you open a document, tap inside it so you are editing the document and you can see the keyboard at the bottom.
2. Tap the paintbrush button.
3. Tap Layout.
The Layout menu includes duplicates of the alignment buttons and a Line Spacing setting. You can change the line spacing in one-quarter line increments. A change affects the text in the paragraph where the cursor is located or the text in all selected paragraphs.
4. Tap + next to Columns. This adds a column and the entire document changes to a 2-column layout. Continue tapping the + button to add more columns.
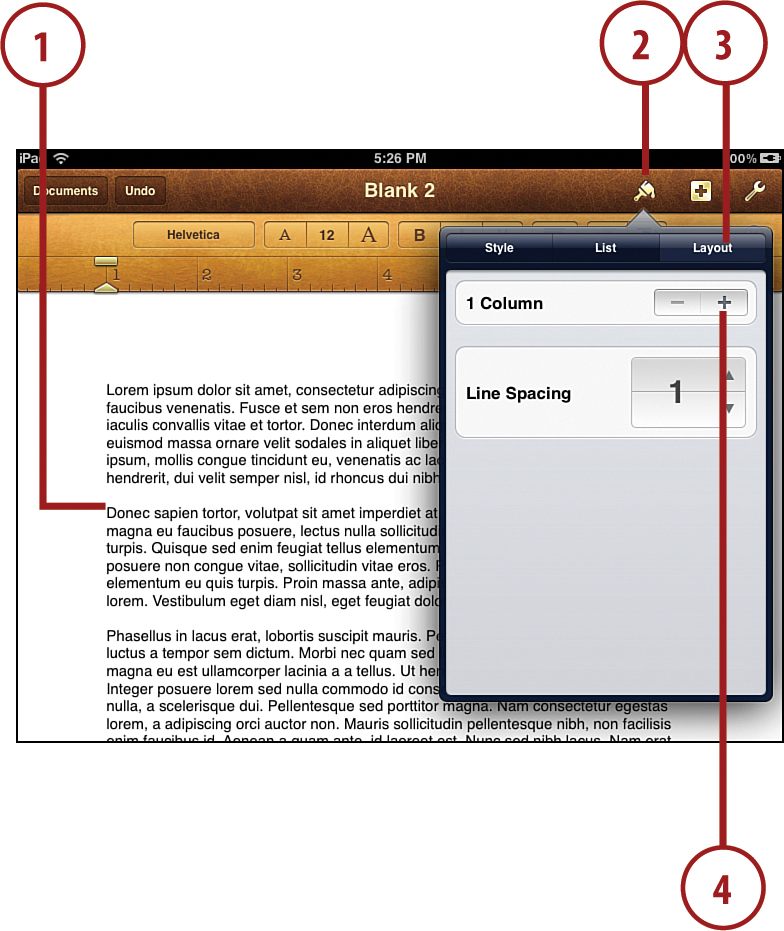
5. Tap – to reduce the number of columns until you are back to a 1-column layout.
Using Different Column Formats
You can select just one paragraph and apply a two-column layout to it while leaving the rest of your document in one-column layout. Be aware, though, that switching between one column and multiple columns in the same document can yield unpredictable results, so proceed with caution.
Inserting Images
You can place images into your Pages documents. You can even wrap text around the images.
1. Open a new document and fill it with text.
2. Place the cursor somewhere in the text, such as at the beginning of the second paragraph.
3. Tap the + button.

4. Tap Media.
5. Select a photo from a photo album.

6. The photo appears in the document at the location of the cursor. Tap it to close the menu.
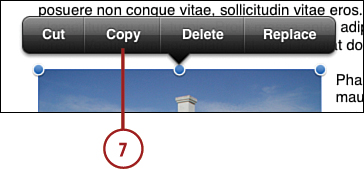
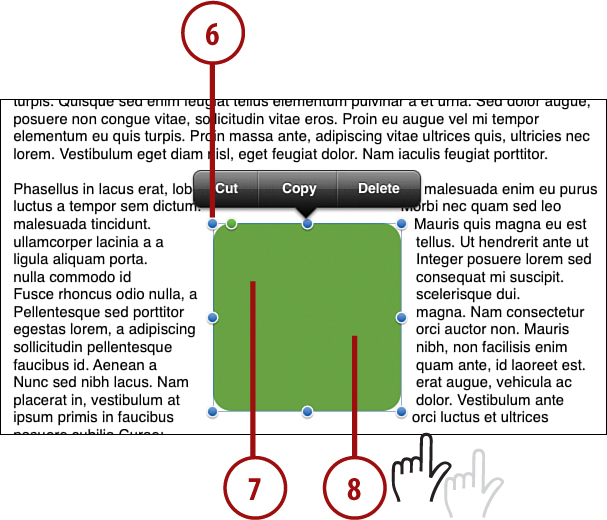
7. You can tap on the image and use Cut, Copy, Delete, and Replace on the photo when it is selected. The latter option brings the photos menu back for you to select another.
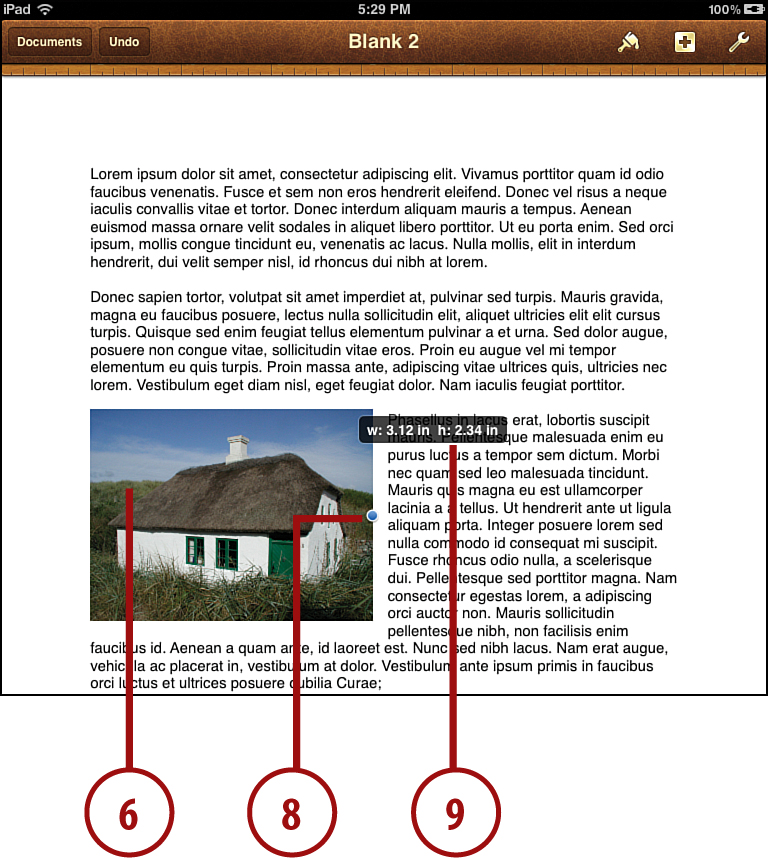
8. Drag the blue dots around the photo to resize it.
9. While resizing, measurements appear next to the photo.
10. Tap the paintbrush button to bring up the Style and Arrange menu.
11. Tap Arrange to see options for flipping a photo, moving it in front of or behind other items on the page, and editing the mask of the photo.
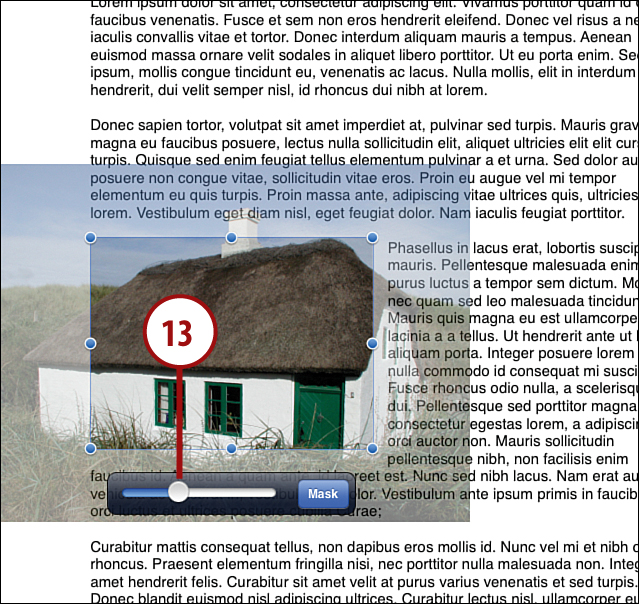
12. Tap Edit Mask.

13. Drag the slider to resize the photo. The photo changes size, but the size of the object remains the same, which enables you to put the focus on a particular portion of the photo by moving the photo around inside the space. Tap Mask to finish.
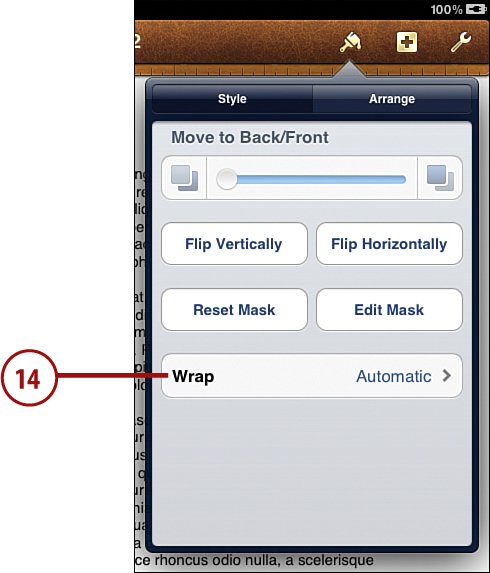
14. Tap the Paintbrush icon to open the Style and Arrange menu again. Tap Wrap. Use the Wrap menu to designate how the text wraps around the photo and whether the photo should stay put on the page or move along as you insert text before it.
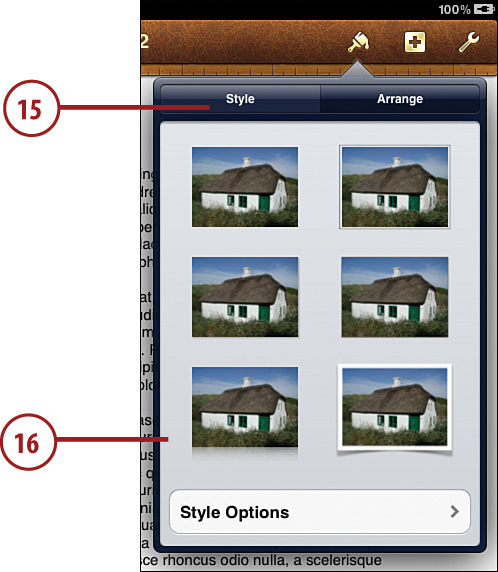
15. Tap Style.
16. Choose the type of border that you want to appear around the photo. There are six basic styles to choose from. In addition, you can tap Style Options and choose your own border and effects.
After you place an image in your document, you can drag it around and resize it as much as you want. Pages automatically snaps the edges of the image to the margins and center lines of the page as you drag it around.
I’ve found that the best way to get clip art onto your iPad and into Pages is to drag it into iPhoto. Then, I create a ClipArt event to store the files in. I then sync my iPad, making sure that the ClipArt event is set to sync. You can also do this with a folder if you aren’t using iPhoto or are on Windows.
Using Shapes in Documents
In addition to using clip art, you can also use some basic shapes in Pages. Inserting shapes works in the same basic manner.
1. Create a new document and add some text.
2. Tap the + button to bring up the Media/Tables/Charts/Shapes menu.
3. Tap the Shapes button.
4. Tap a shape, such as the rounded rectangle. It is placed in the middle of the text.
5. Tap the shape in the text to dismiss the menu.

6. Use the blue dots to resize the shape.
7. Tap and drag in the middle of the shape to move it around in the document.
8. Double-tap in the shape to enter text into the shape.
Creating Tables
Tables are a step up from using lists or tabs to format data in your documents. You can choose from several different types of tables, and entering data into them is relatively easy.
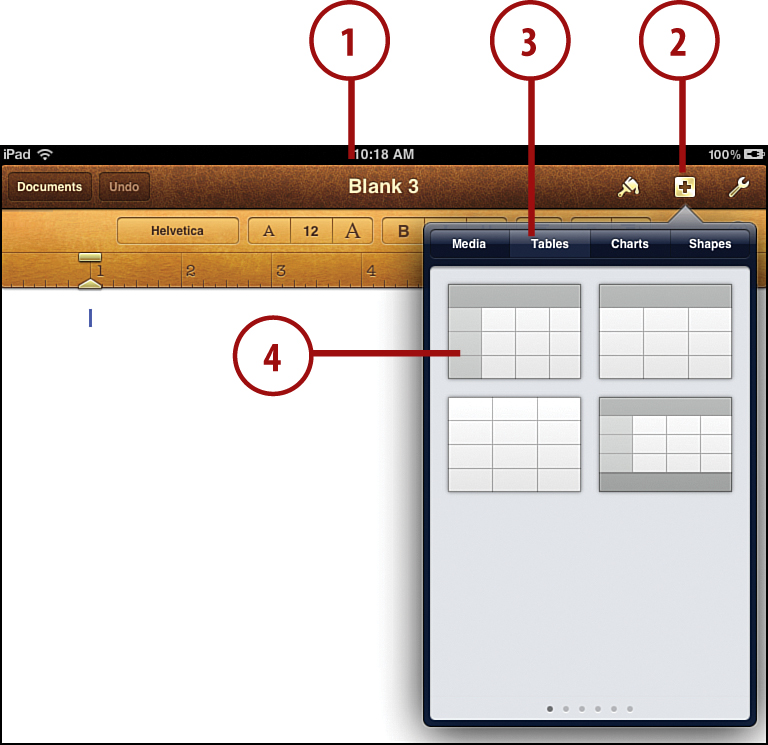
1. Start a new document.
2. Tap the + button.
3. Tap Tables. There are four different table options. In addition, you can swipe left and right in the menu to reveal six color variations.
4. Tap the first table to insert it.
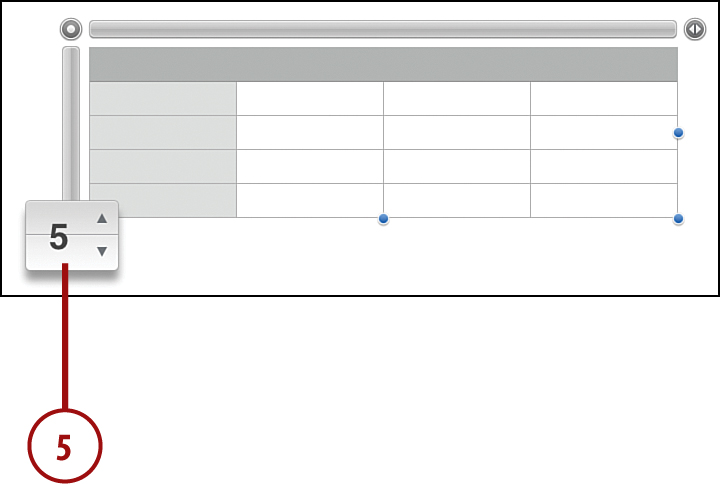
5. Tap the double arrow button to the right of the table or below the table to adjust the number of columns and rows.
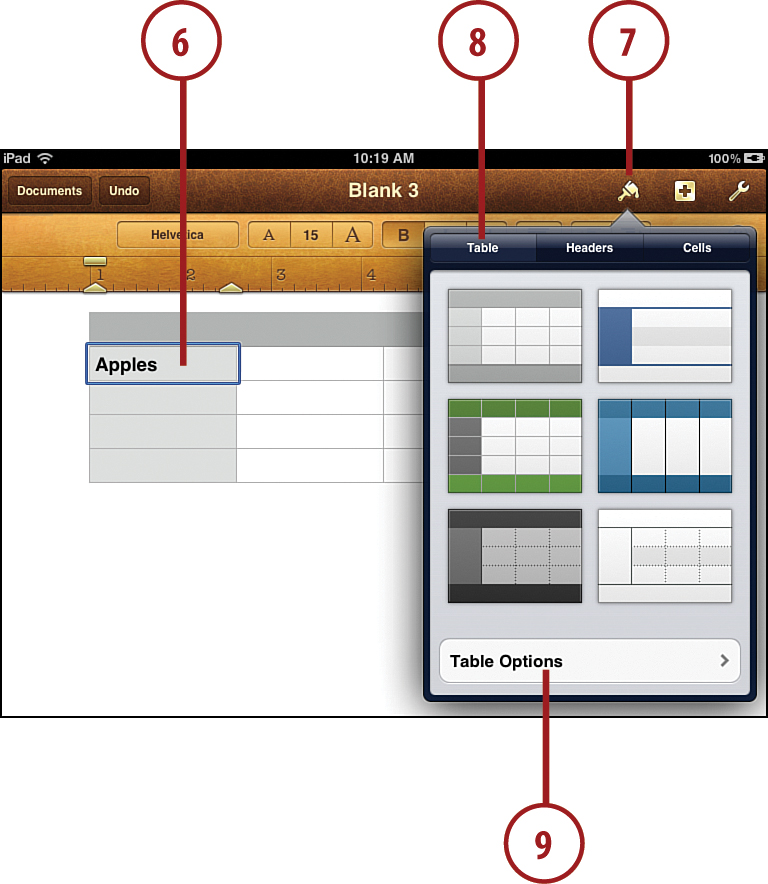
6. Double-tap in a cell to enter text.
7. Tap the paintbrush button to bring up the Table/Headers/Cells menu.
8. Tap Table to choose from six table styles.
9. Tap Table Options to go to a menu that gives you even more control over the borders and background colors of the table. Tap the back arrow when done.
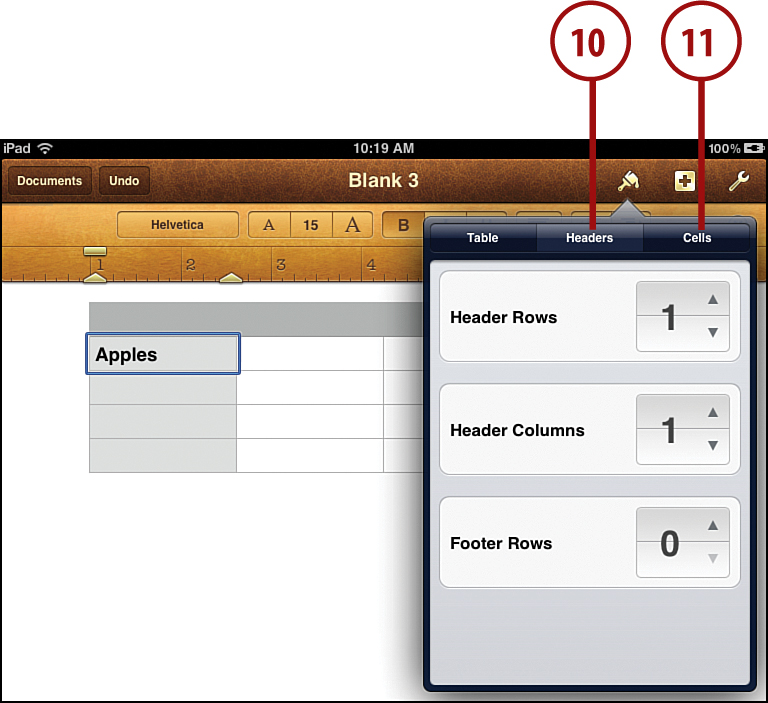
10. Tap Headers to change the number of rows used as a header and the number of columns as well. You can even add footer rows. These all show up as different colors according to the style of table.
11. Tap Arrange to bring up text wrapping options and to send the table behind or in front of other objects.
When the table is selected and you see bars at the top and left and a circle at the top-left corner, you can drag the table around the document by grabbing it at any location and dragging.
Creating Charts
Charts are another way to express numbers visually. Pages supports nine different kinds of charts.
1. Create a blank document.
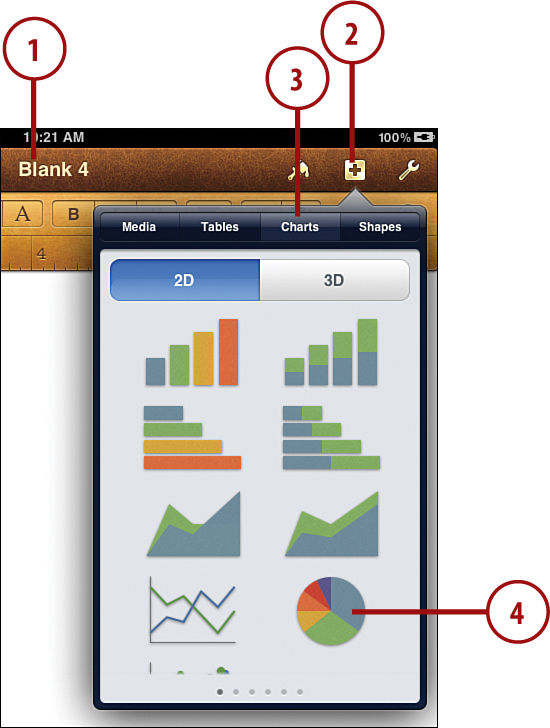
2. Tap the + button.
3. Tap Charts. You can look through six pages of chart styles, but the basics of each set of charts is the same.
4. Tap a chart to select it and insert that type of chart in the middle of your document.
5. After selecting the chart, tap the Edit Data button.
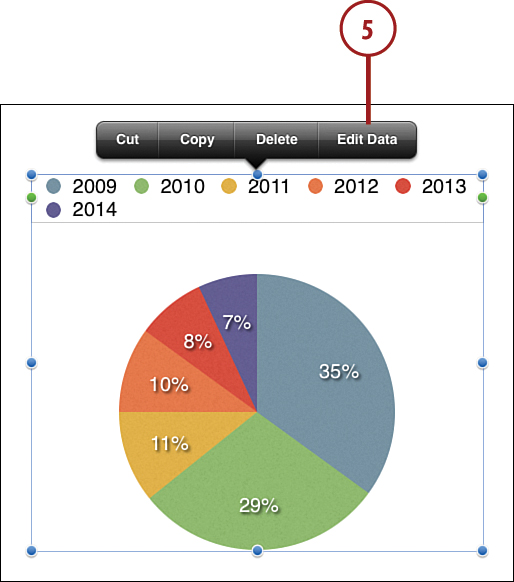
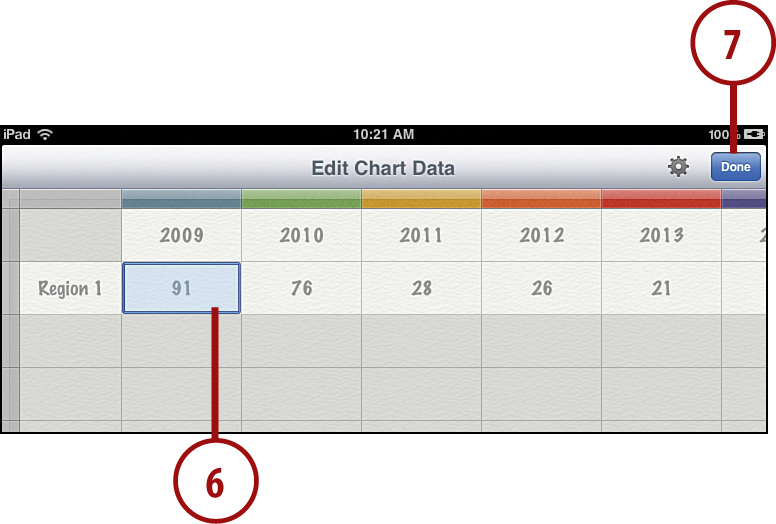
6. Alter the existing data to create your own chart by tapping the field and typing.
7. When you finish entering data, tap Done.
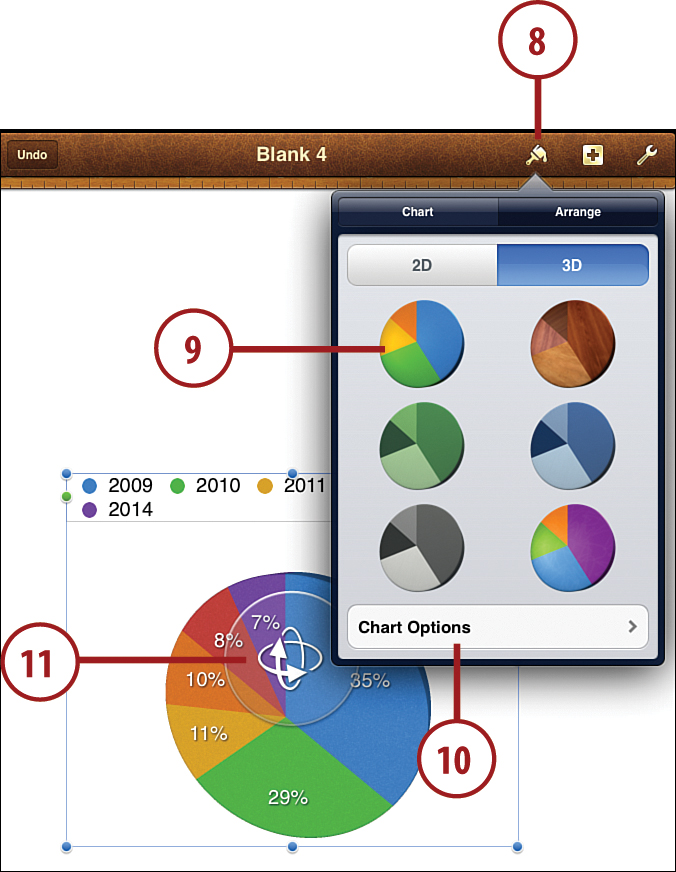
8. When you return to the main document view, select the chart and tap the paintbrush button.
9. From the Chart menu, select a color scheme for the chart. You can also switch between 2D and 3D versions of each style.
10. Tap Chart Options. Use the Chart Options menu to change a variety of properties of the chart.
11. For 3D charts, you can tap and drag in the middle of a chart to adjust its 3D angle.
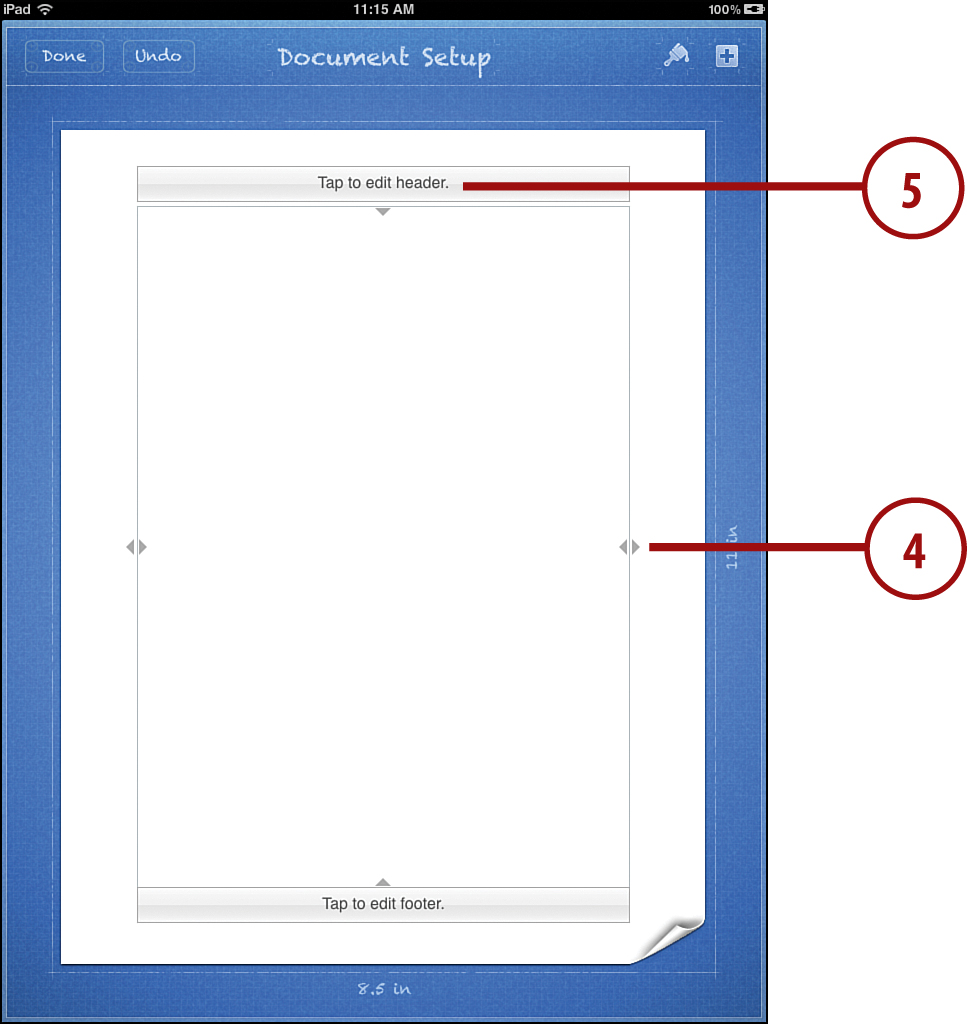
Document Setup
You can change a variety of your document’s properties in Pages.
1. Open a document or create a new one.
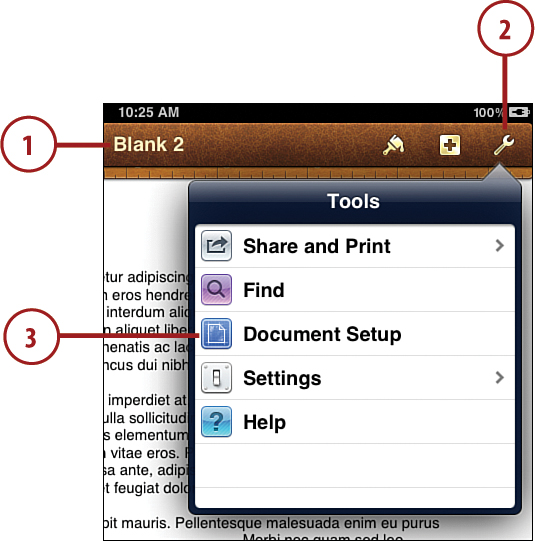
2. Tap the Wrench button.
3. Choose Document Setup.
4. Drag the arrows at the four edges of the page to adjust the width and height of the page.
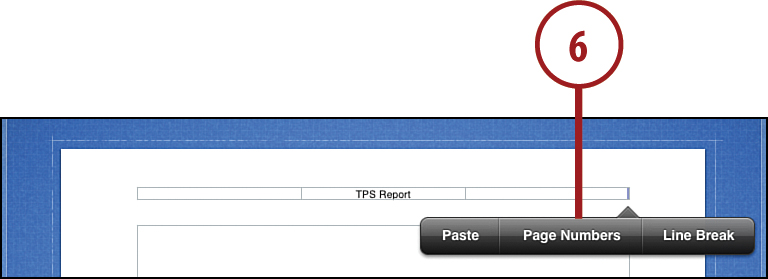
5. Tap in the header to add text to the header.
6. While typing in the header, tap in one of the three spaces (left, center, right) and you’ll see a toolbar where you can select Page Numbers to have the page number automatically placed in that part of the header.
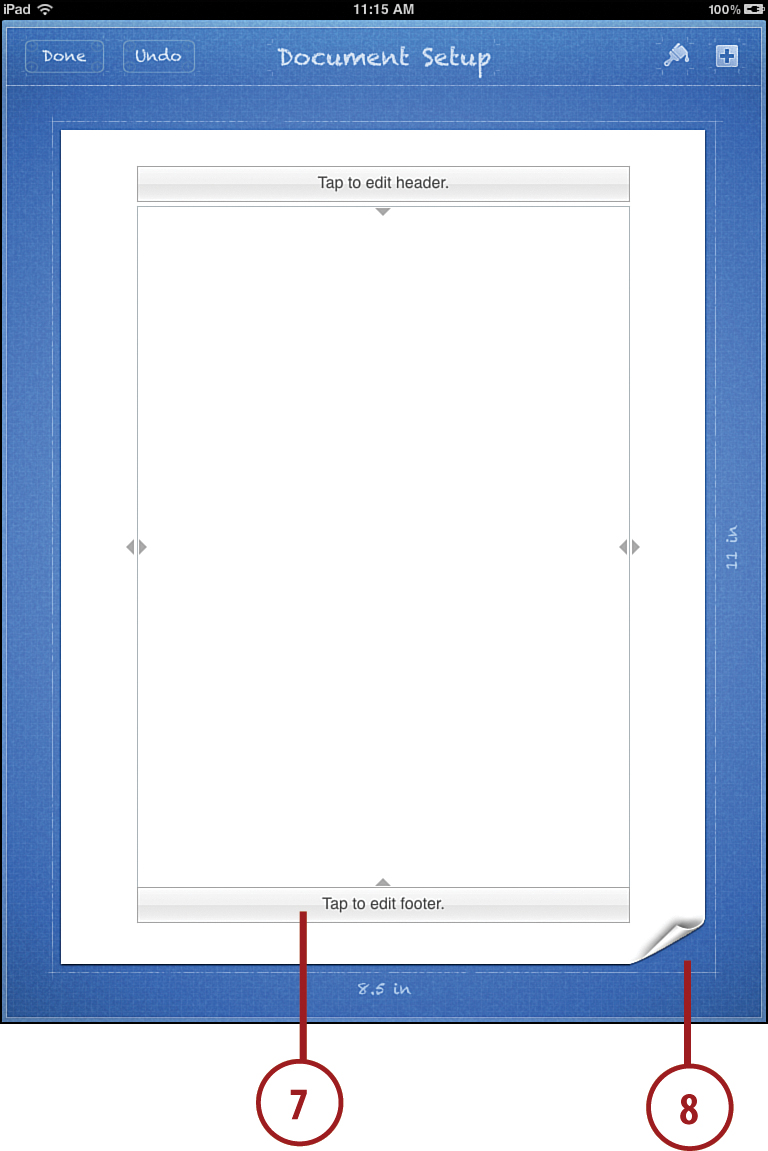
One thing you can do with Document Setup that is not obvious is to add background objects that appear under every page. You can tap the + button and add photos, tables, charts, and shapes to the main page area. The image you add appears behind the text. You can even add text that appears on every page by just inserting a borderless, empty text box shape and adding text to it.
7. Tap the footer to add text to the footer.
8. Tap the page curl to change the paper size.
You can color the entire background by creating a square box and stretching it to fill the page. Then add a shaded or textured background to it as a color in the shape’s Style Options. You can also place a picture over the entire background.
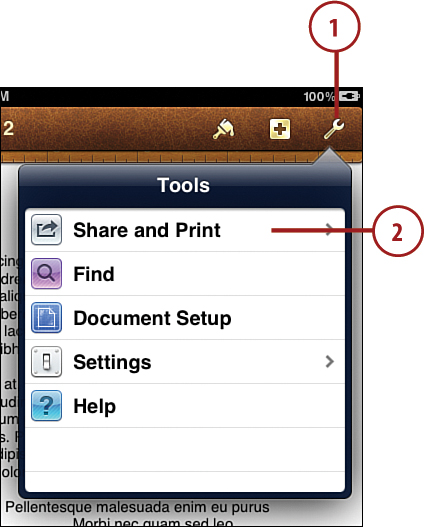
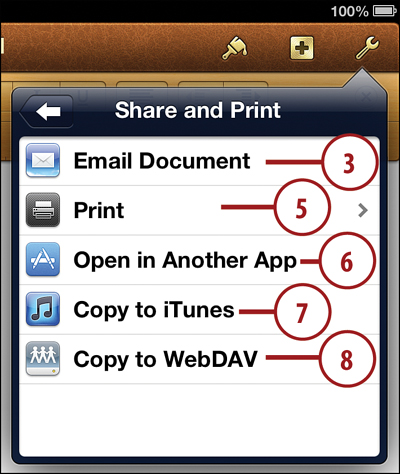
Sharing and Printing Documents
Thanks to iCloud, sharing documents with Pages, Numbers, and Keynote among your own devices is very easy. Any document you create on any device will simply be available to the others. But you can also share your document with another person by emailing it, printing it, or sending it to a network server.
1. While viewing a document, tap the tools button at the upper right.
2. Tap Share and Print.
3. Choose Email Document to send the document via email.
4. Choose the format in which to send the document. You can send it as a Pages document, a PDF, or a Microsoft Word document.
5. Choose Print to send the document to a network AirPrint printer.
6. You can export from Pages to a PDF or Word file and open it in other apps that can handle these file types. Numbers and Keynote can use this function to export into formats like Excel and PowerPoint.
7. Choose Copy to iTunes to place a copy of the document in a location of your iPad where you can see and transfer it using iTunes the next time you sync with your computer.
8. Choose this to send the document to an Internet file transfer service.

You can put more than just Pages documents into the iTunes list to import. Pages can also take Microsoft Word .doc and even .docx files.