
10. Recording Video
In this chapter, we use the Camera, Photo Booth, and iMovie apps to shoot and edit video with your iPad. We’ll also use the FaceTime app to make a video call.
• Editing Transitions in iMovie
• Adding Photos to Your Video in iMovie
• Adding Video Titles in iMovie
• Placing Video Calls with FaceTime
• Receiving Video Calls with FaceTime
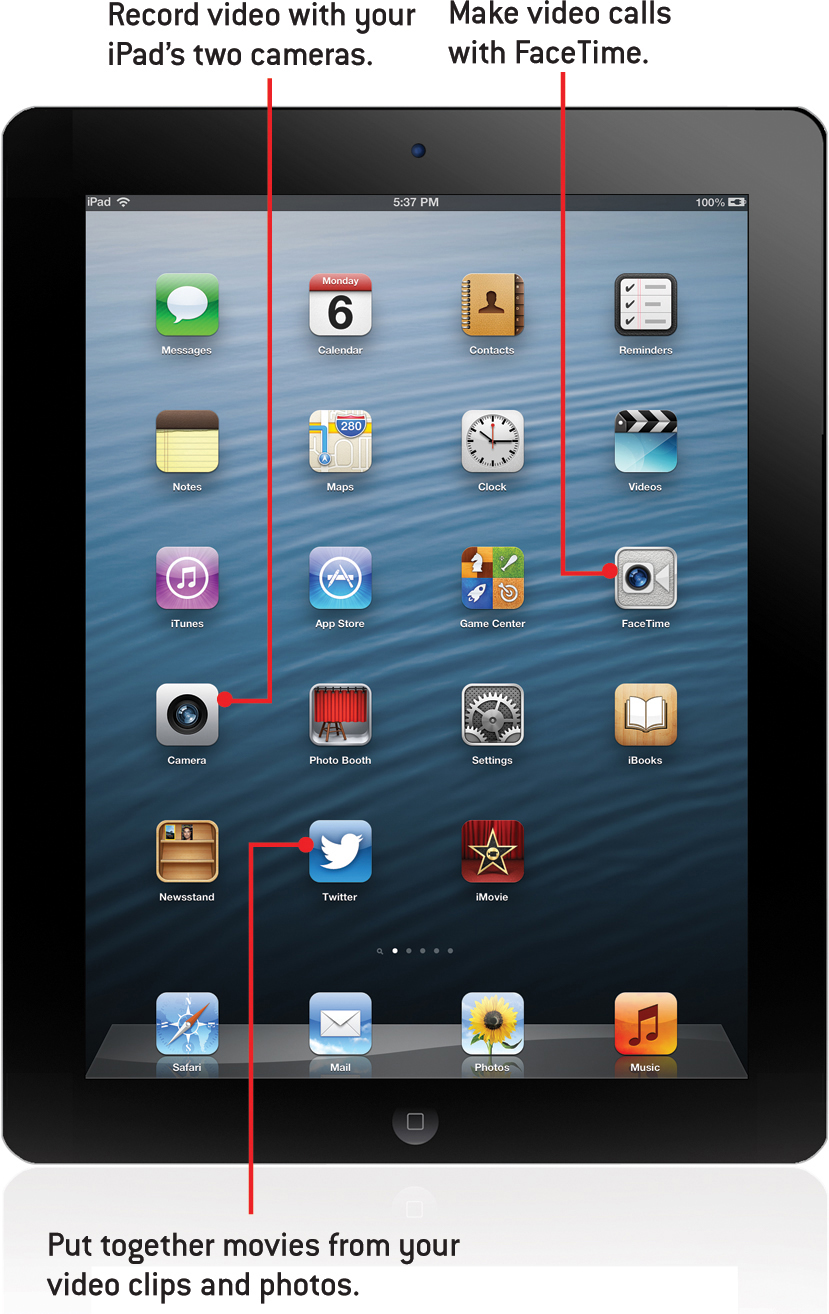
You can record video using either of the two cameras on your iPad. The primary app for doing this is the Camera app.
In addition, you can edit video with the iMovie app. This app, which you can purchase from Apple in the App Store, lets you combine clips and add transitions, titles, and audio.
The cameras on your iPad can also be used to video chat with someone on another iPad, an iPhone, iPod Touch, or a Mac using the FaceTime app.
Shooting Video
If you simply want to record something that is happening using the cameras, you can do it with the Camera app.
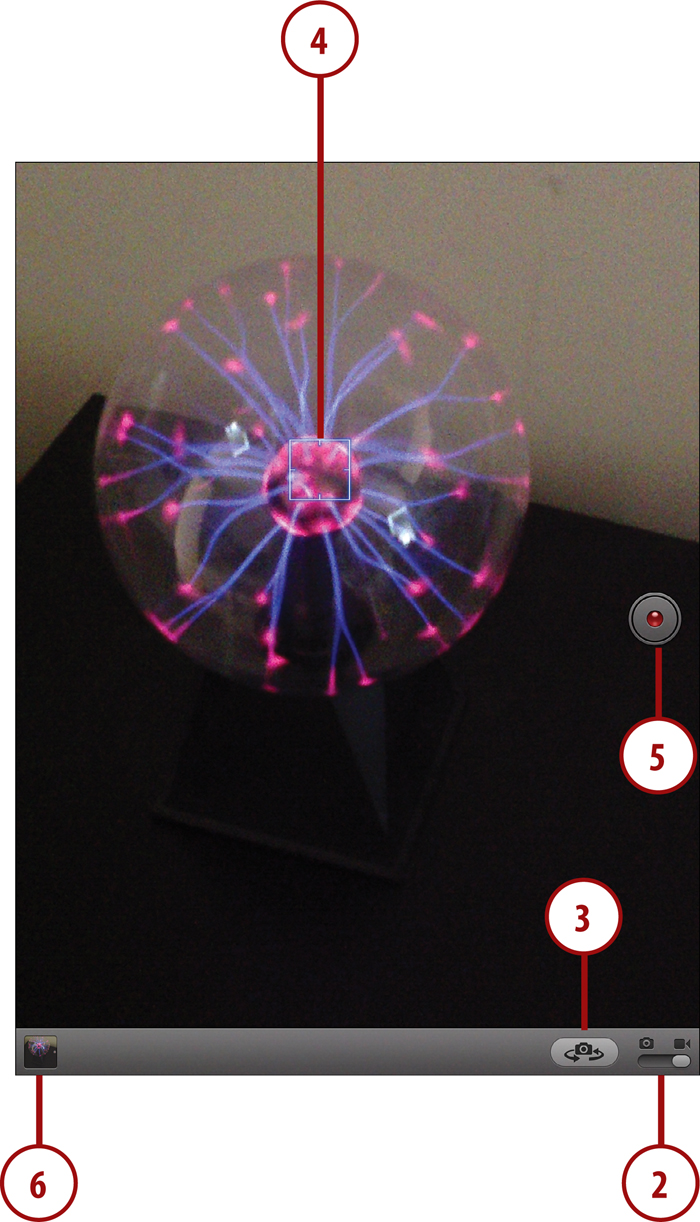
1. Launch the Camera app.

2. Switch the camera mode to video.
3. Toggle between the rear and front cameras.
4. Optionally, tap in the image to set the best point for the exposure setting.
5. Start recording. While you are recording, the red dot will flash and the length of the recording will show in the upper-right corner. Tap the same button to stop recording.
6. Tap the image in the lower-left corner to view your video when you are done.
7. You are now in the Camera Roll, the same place as you were in “Taking Photos,” in Chapter 9. But the interface looks different when you have a video instead of a still photo. Tap the play button to watch the video.
8. Tap the boxed arrow button to email the video, or send it to your YouTube account or via a text message.
9. Tap the AirPlay button to stream the video over Apple TV or another AirPlay device.
10. Tap the trashcan to delete the video.
11. When you are done viewing your video, tap Done to shoot another.

Trimming Video Clips
While viewing a video in the Camera Roll, you can also trim it to cut some unneeded footage from the start and end of the video.
1. You can get to the Camera Roll by either using the Photos app or the Camera app. For instance, launch the Camera app and immediately tap the image in the lower left on the screen.
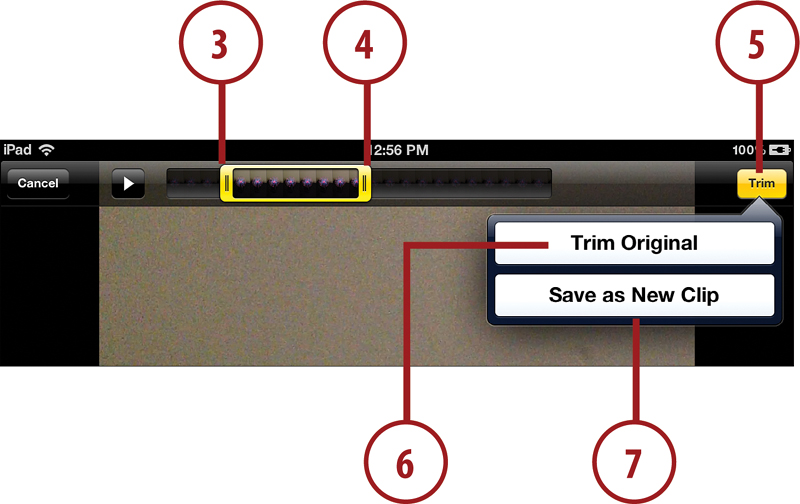
2. If you are viewing a video, you will see a timeline of sorts at the top of the screen.

3. Drag the left side of the timeline to the left to trim from the start of the video.
4. Drag the right side of the timeline to the right to trim from the end of the video.
5. Tap the Trim button.
6. Tap Trim Original to replace the video with the trimmed version.
7. Tap Save as New Clip to keep the original, and also save your trimmed version as a separate clip.
Combining Clips in iMovie
The trimming functionality of the Camera and Photos apps gives you the basic ability to edit a video clip, but you can go a lot further if you purchase the iMovie app from Apple. Although not a full-featured editor like you might have on your computer, you can combine clips, add titles and transitions, and produce a short video from your clips.
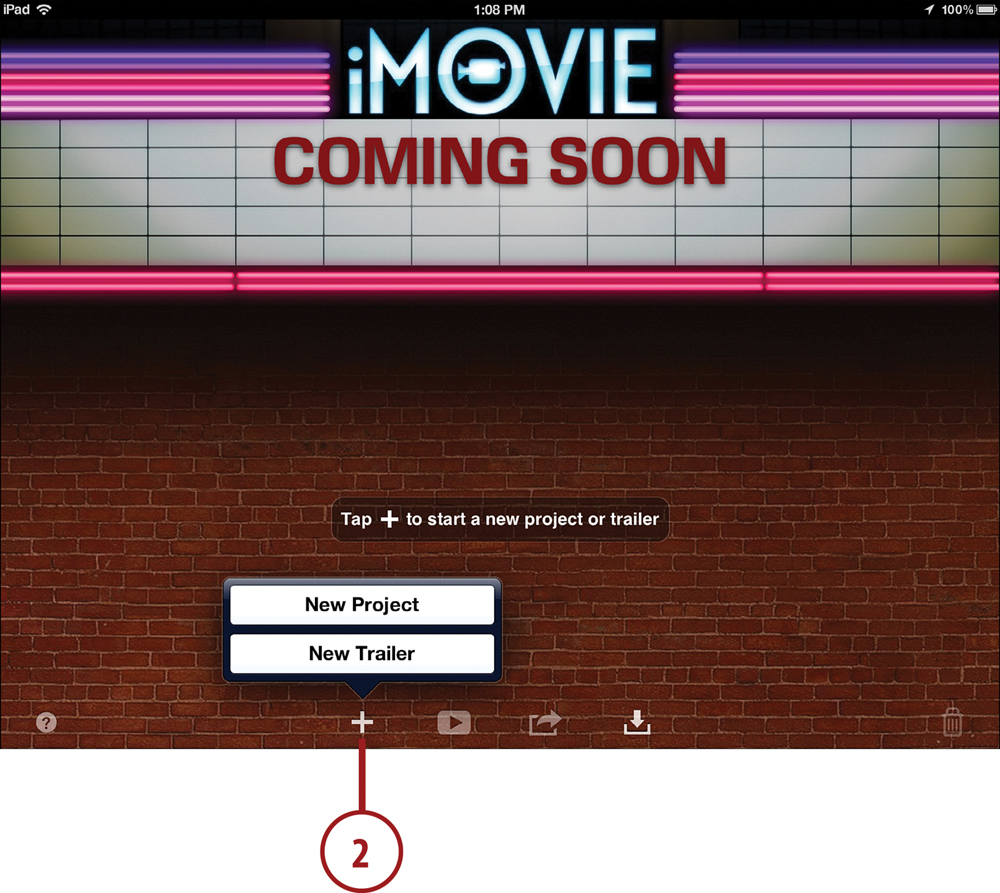
1. Launch the iMovie app. Turn your iPad to look at the screen horizontally. iMovie is a little easier to use in that orientation.

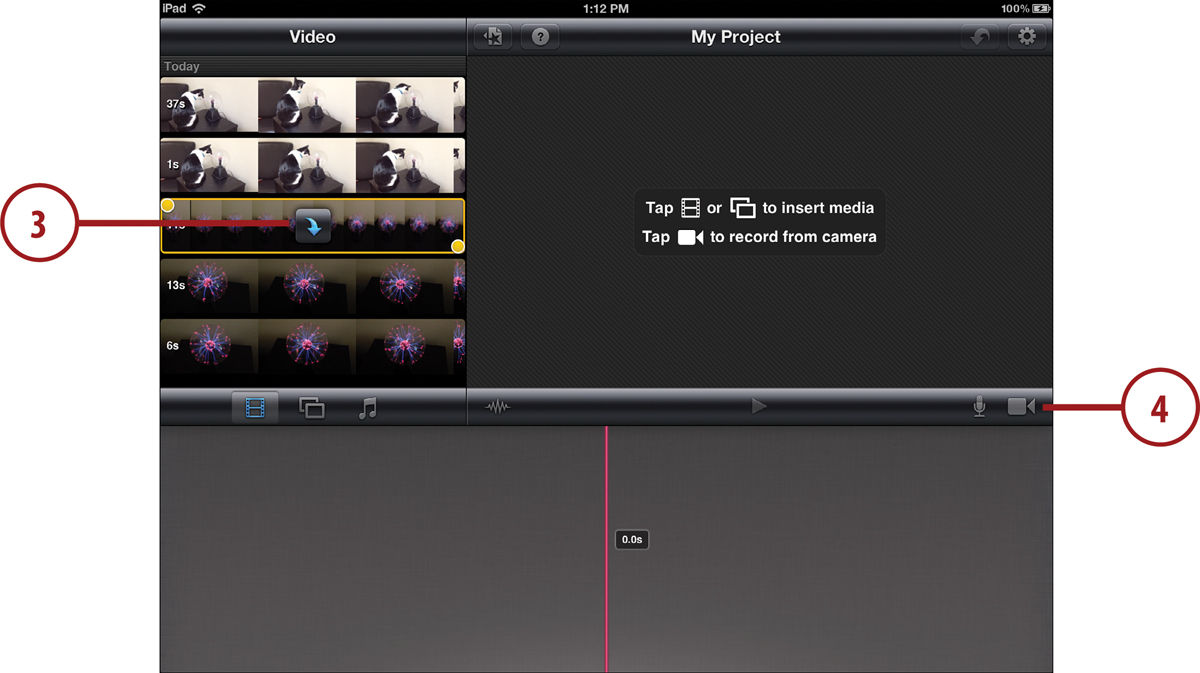
2. Tap the + button, and then New Project, to create a new project.
3. You can add a video to your project by tapping on a clip on the left, and then tapping the blue down arrow to place it in the timeline at the bottom.
4. You can also record new video clips using the camera button at the right.
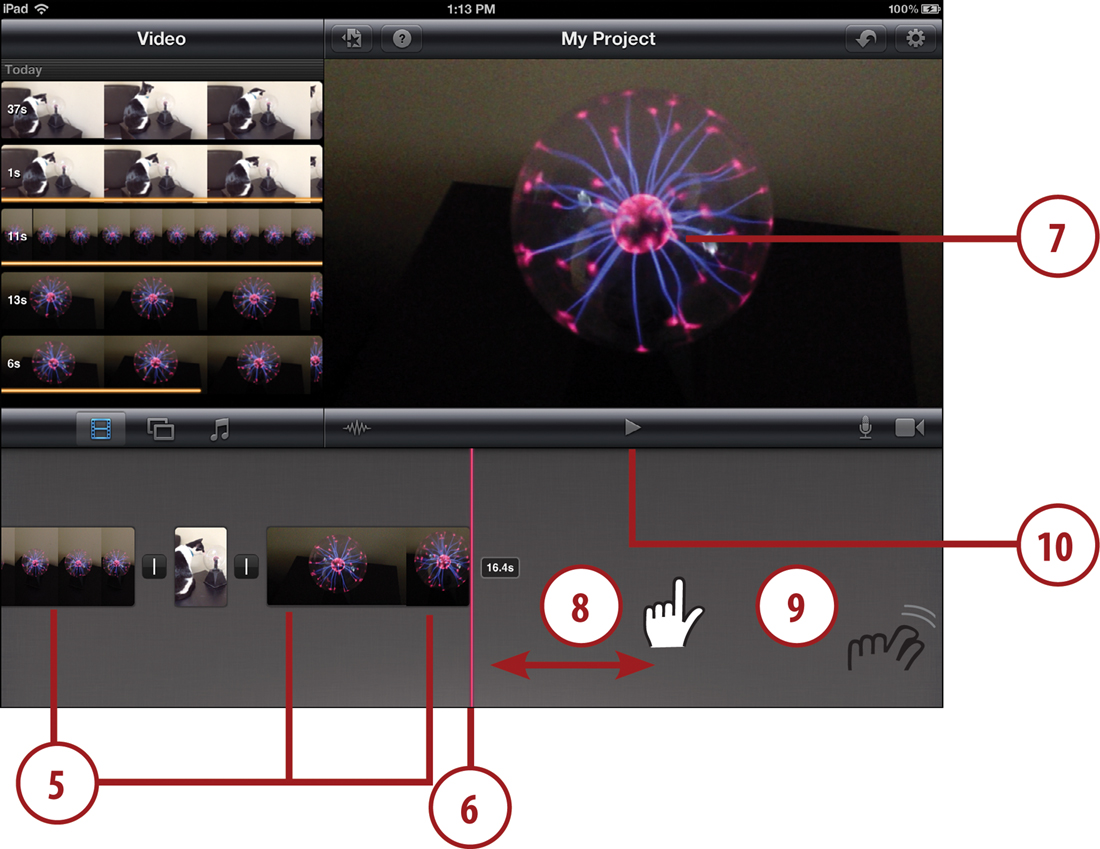
5. Continue to add more clips. Each one will be appended to the end of the project.
6. The red line indicates the current position of the video.
7. The preview area shows you the image at the current position.
8. You can drag the project timeline left and right to scroll through it.
9. You can pinch in and out to shrink or enlarge the timeline.
10. Press play to play the video in the preview area. If the red line is at the end of the video, it will jump back to the start of the video first.
11. Tap and hold a clip, and you can drag it to a different part of the project timeline.
12. Tap the My Projects button when you are done editing. There is no need to “save” your project—the current state of the project is always saved.
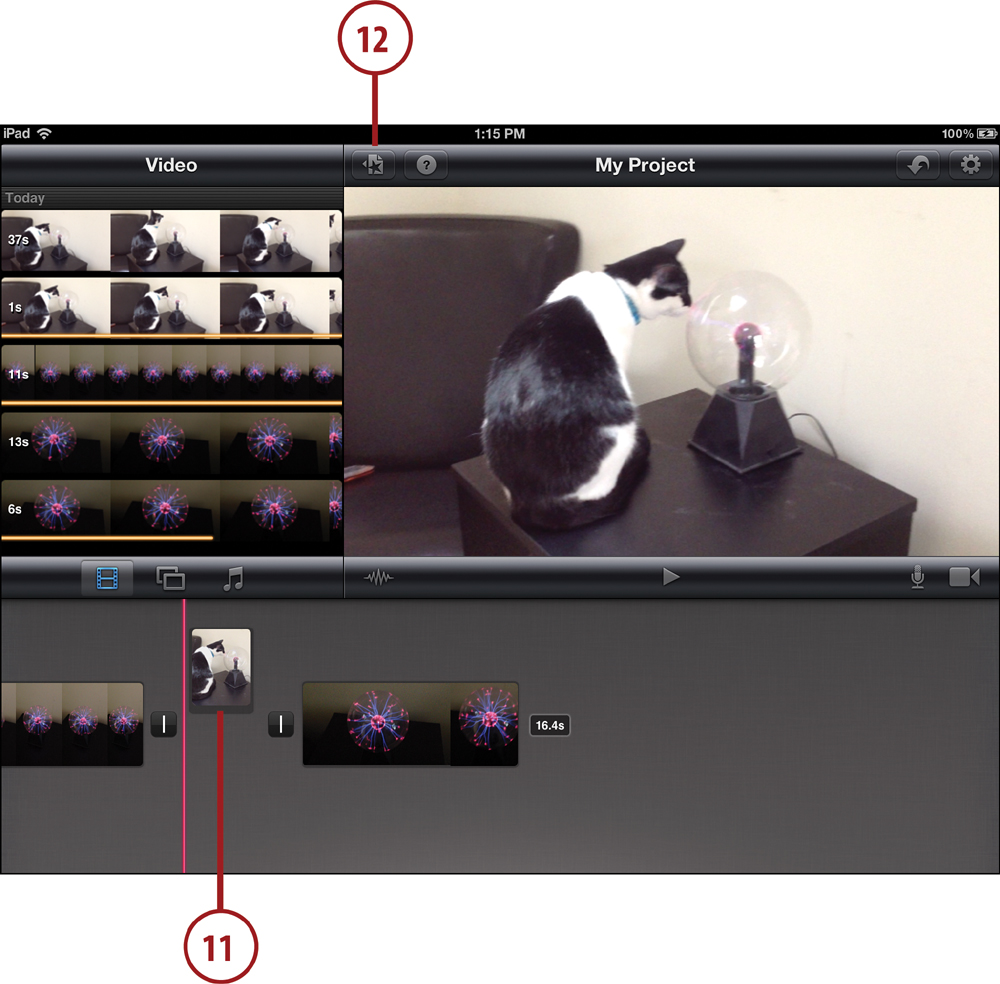
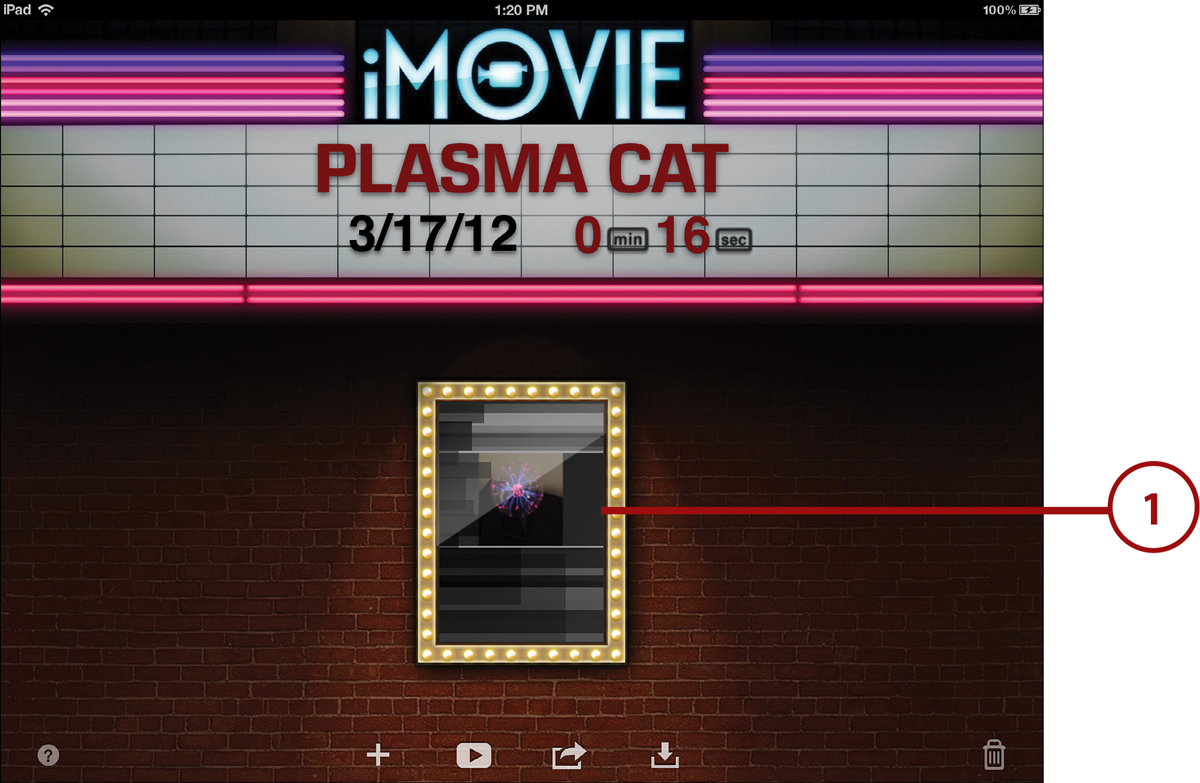
13. Tap the name of the project in the theater marquee to edit the name.

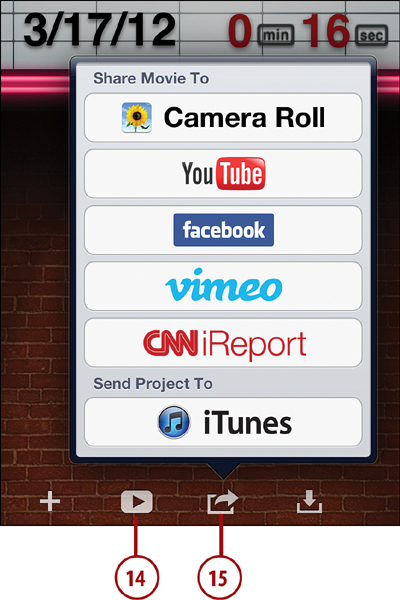
14. Tap the play button to view the finished project.
15. Tap the export button to send the video to your Camera Roll, export it to iTunes the next time you sync, or upload to one of the listed Internet video sites.
Best Way to Share with Friends?
While it may seem to be a good idea to simply email a video to your friends, remember that video files are usually very large. Even if you have the bandwidth to upload them, your friends need the bandwidth to download them. Some may have restrictions on how large email attachments can be.
So, the video sharing options in iMovie are better for all concerned. You can upload to your Facebook or YouTube account and even set the video to “private” or “unlisted.” Then just let a few friends know about it with the link in an email instead of a huge file attachment.
Editing Transitions in iMovie
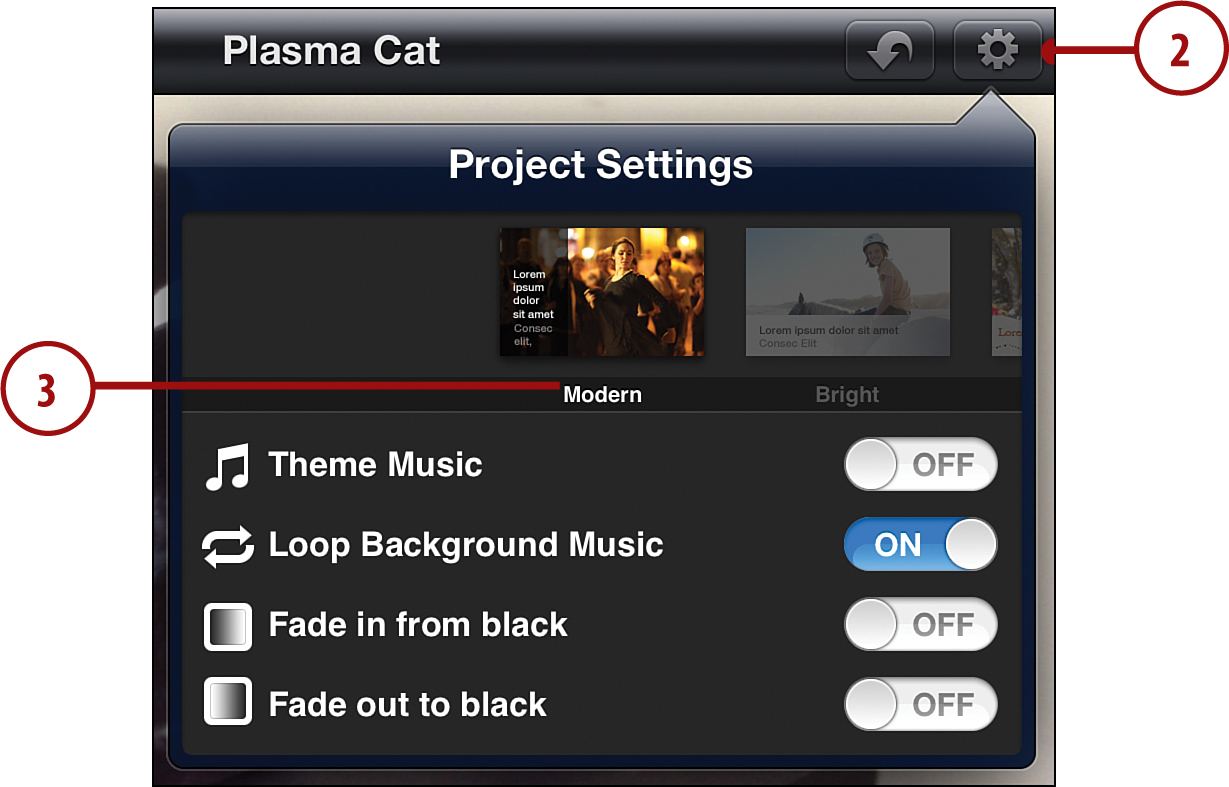
Between each clip in your iMovie project is a transition. You can choose between a direct cut (no transition), a cross-dissolve transition, or a special theme transition. But first, you must select a theme.
1. Open up the project you created in the previous example.
2. Tap the settings button at the upper right to select a theme.
3. Flip through the themes and choose one.
4. Double-tap one of the transition buttons that appear between each clip. This should bring up the Transition Settings menu.
5. Choose None if you want one clip to start right after the other.
6. Choose Cross Dissolve if you want one clip to fade into the other.
7. Choose Theme to use the special theme transition. These vary depending on which theme you choose.
8. Choose a duration for the transition.
9. Tap the triangles below the transition button to expand into a precision editor.
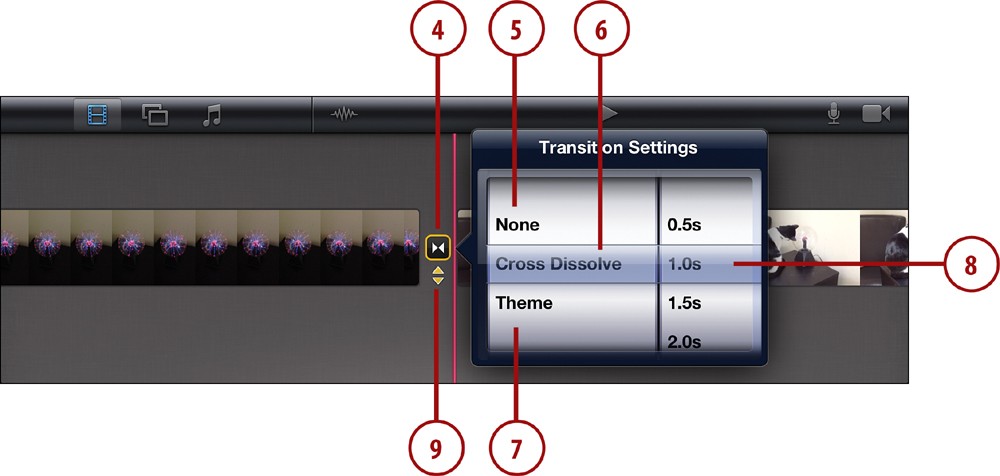
10. Move the transition area to select how you want the two clips to overlap during the transition.
11. Tap the triangles to leave the precision edit mode.
Unfortunately, you can’t really preview the transitions in iMovie for iPad. You just have to apply a theme and then see what the transitions look like. Plus, the theme applies to the entire project, so you can’t mix and match transitions. iMovie for iPad doesn’t give you much control over the details. It is more for people who want to create a quick, nice-looking video without playing around with the details.
Adding Photos to Your Video in iMovie
You can also add photos from your Camera Roll or any album on your iPad. You can just use a series of photos in a video, or mix photos and video clips.
1. Continuing with the previous example, scroll the timeline all the way to the left.
2. Tap the photos button.
3. Tap the name of the album that contains your photo.
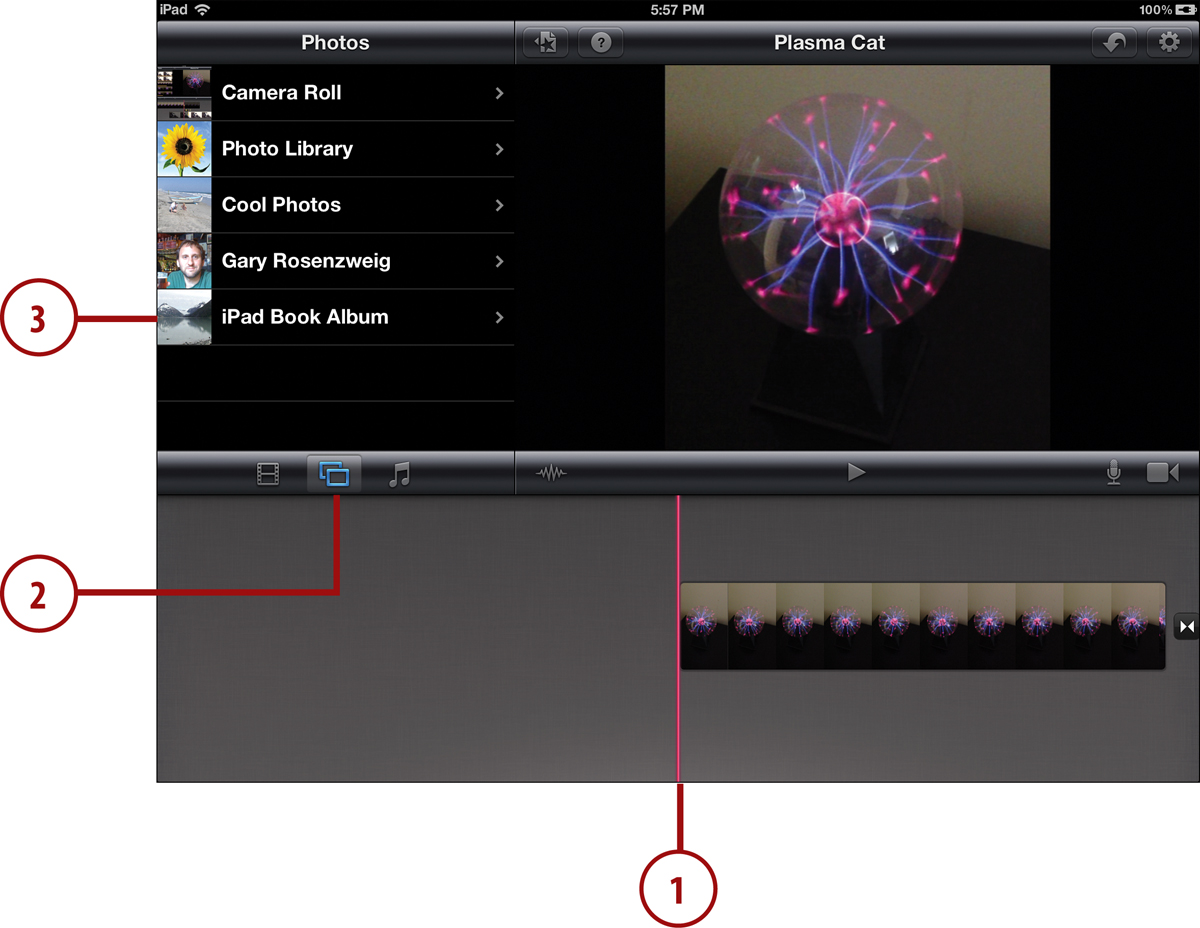
4. Tap the photo you want to use.
5. It now appears in the timeline at the current position. Tap it to select it.
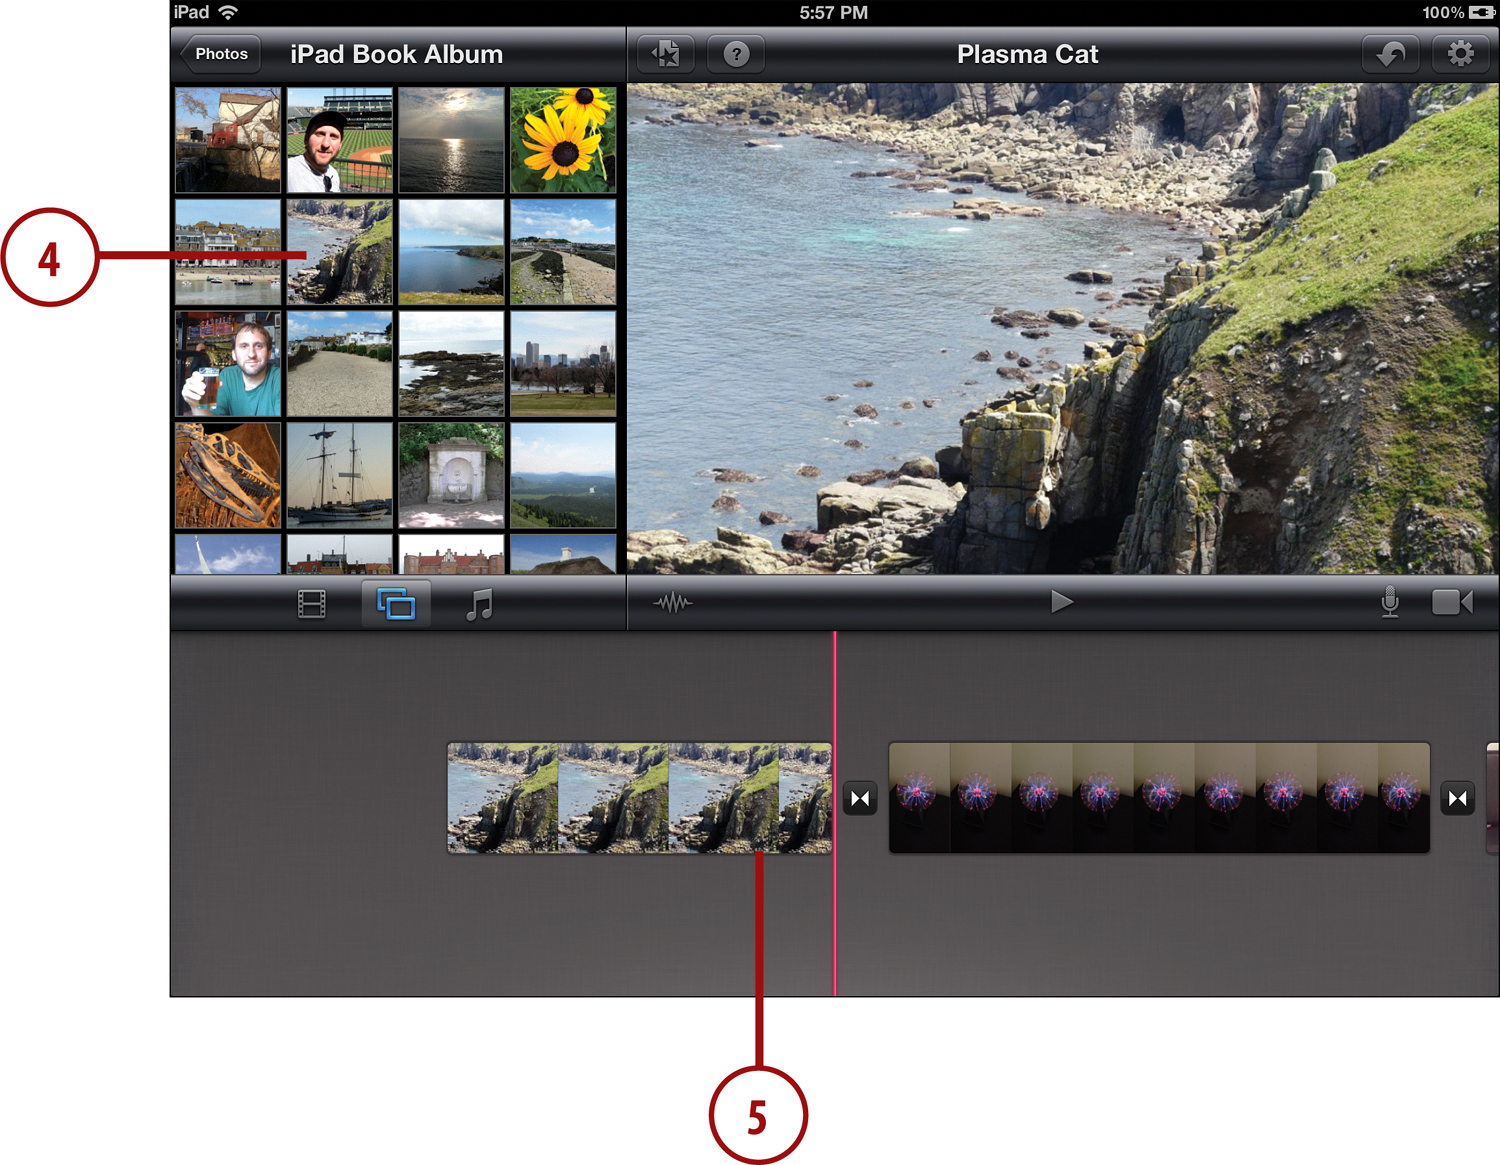
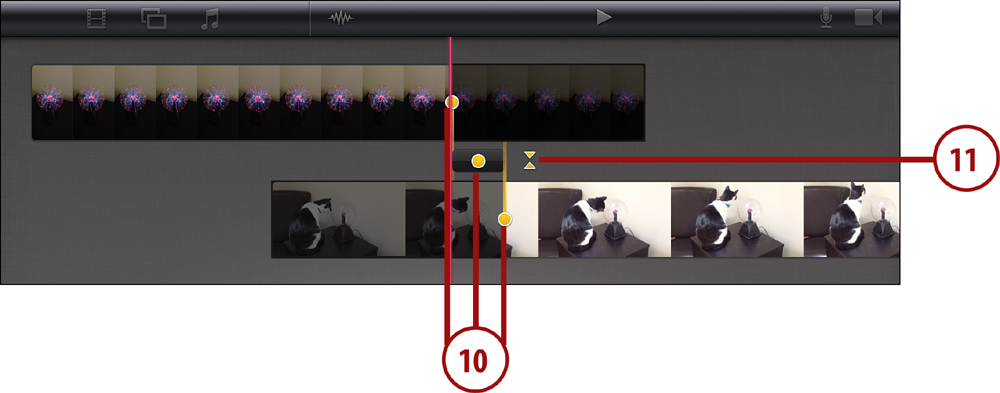
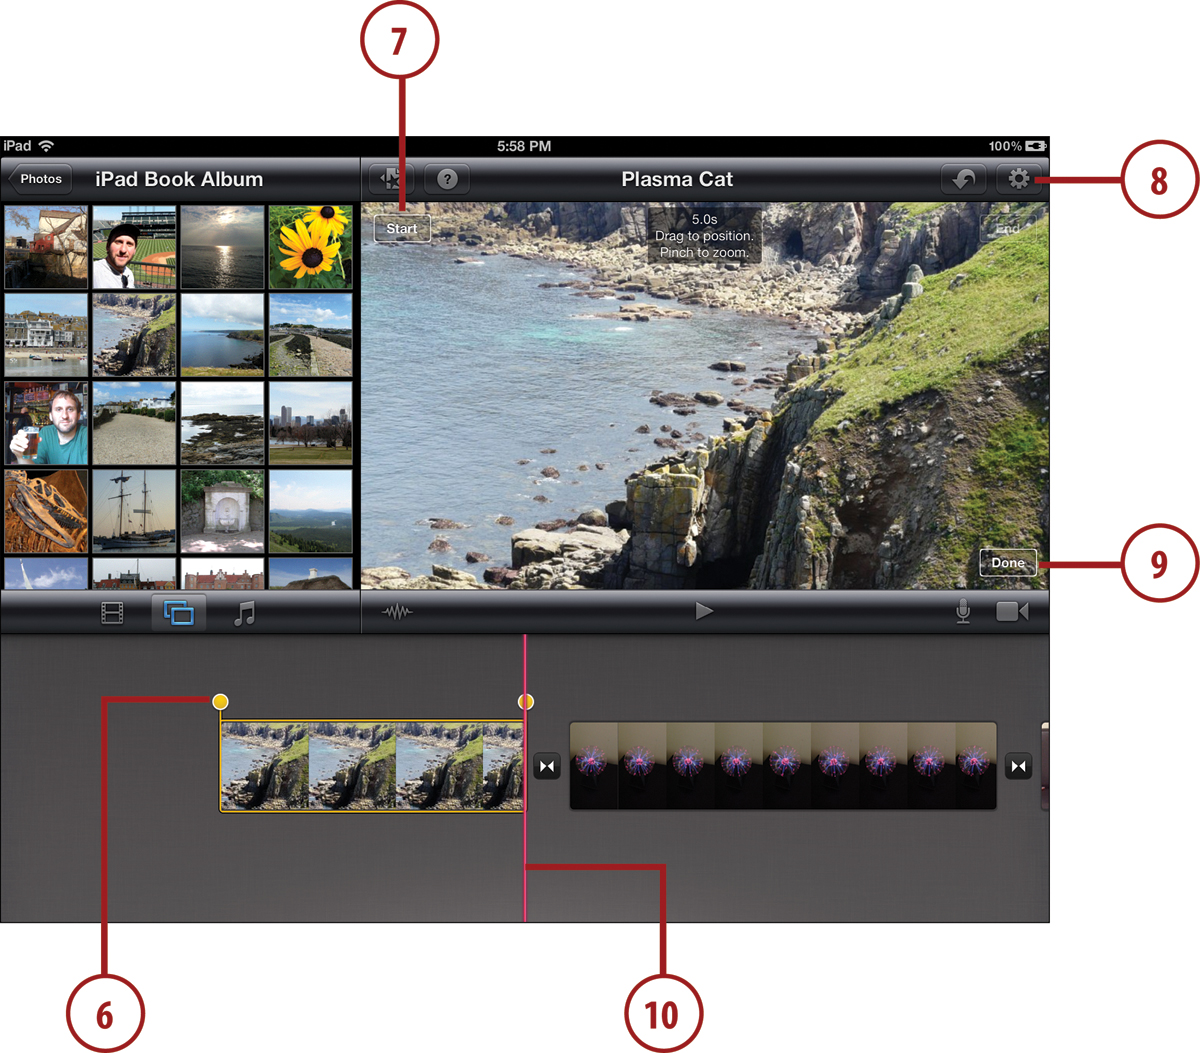
Pictures in iMovie projects don’t just sit there; they move. For instance, the picture may start out fitting in the screen, and then slowly zoom in on a specific spot. Or, it may start showing the upper left and pan down to the lower right. You can control where the movement starts and ends.
6. Tap and drag the yellow dots to change the duration of the photo in the timeline. It starts with a default of 5 seconds. But, for example, you could increase it to 10 seconds.
7. Tap the Start button that appears in the preview area. Then adjust the photo by pinching zooming and dragging to get it just as you like. For instance, pinch in so the photo fits into the frame.
8. Tap the End button at the upper right to set the end position for the picture. For instance, unpinch to zoom in on a specific area.
9. Tap Done when you finish adjusting both the start and end positions.
10. Slide the timeline back and forth to preview how the movement in the picture will work.
You can continue to add pictures just as you would add video clips. Add as many as you like. You can even create a slideshow of just photos without ever shooting a single second of video footage.
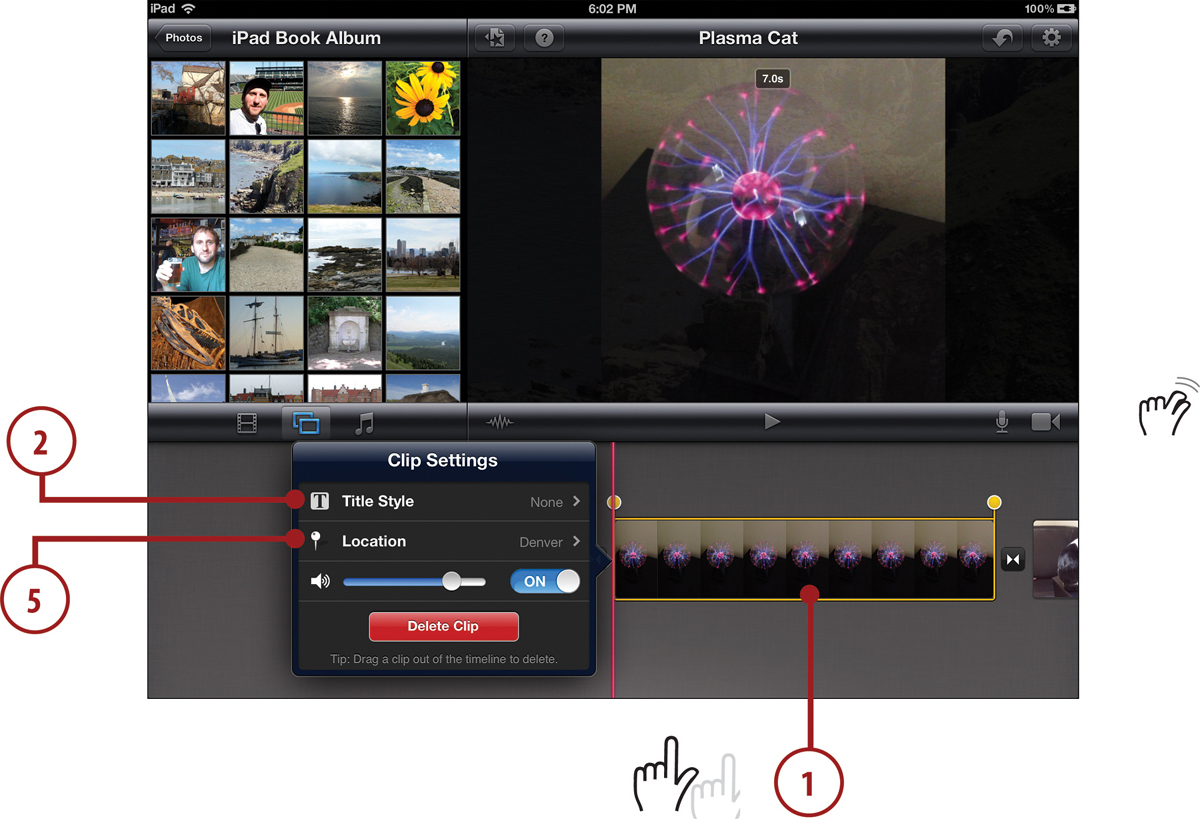
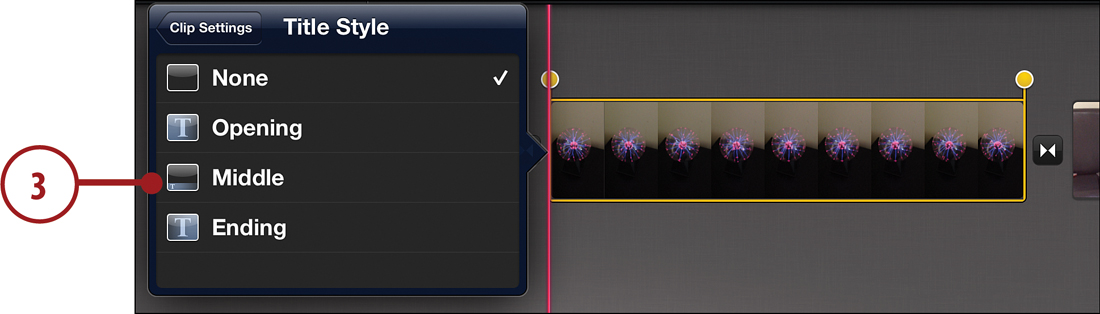
Adding Video Titles in iMovie
You can also add titles that overlay clips or photos in iMovie. Like the transitions, the style of the titles depends on the theme you are using.
1. Continue with the example we have been building. Double-tap on a clip to select it and bring up the Clip Settings menu.
2. Tap Title Style.
3. Select a title style. As you do so, a preview appears in the preview area.
4. Tap in the text field area in the preview to bring up the keyboard, and enter text.
5. Some title types show a map or have a space where the location is displayed. Tap Location to enter a name for the location.

Setting Up FaceTime
Another major use of the video cameras is FaceTime. This is Apple’s video calling service. You can make video phone calls between any devices that have FaceTime, including recent iPhones, iPod touches, iPads, and Macs. As the number of people with FaceTime increases, this app will become more useful.
All that’s required to make a FaceTime call is a free account. You can use your existing Apple ID or create a new one. You can also assign alternate email addresses to be used as FaceTime “phone numbers” that people can use to contact you via FaceTime.
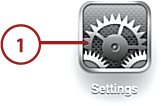
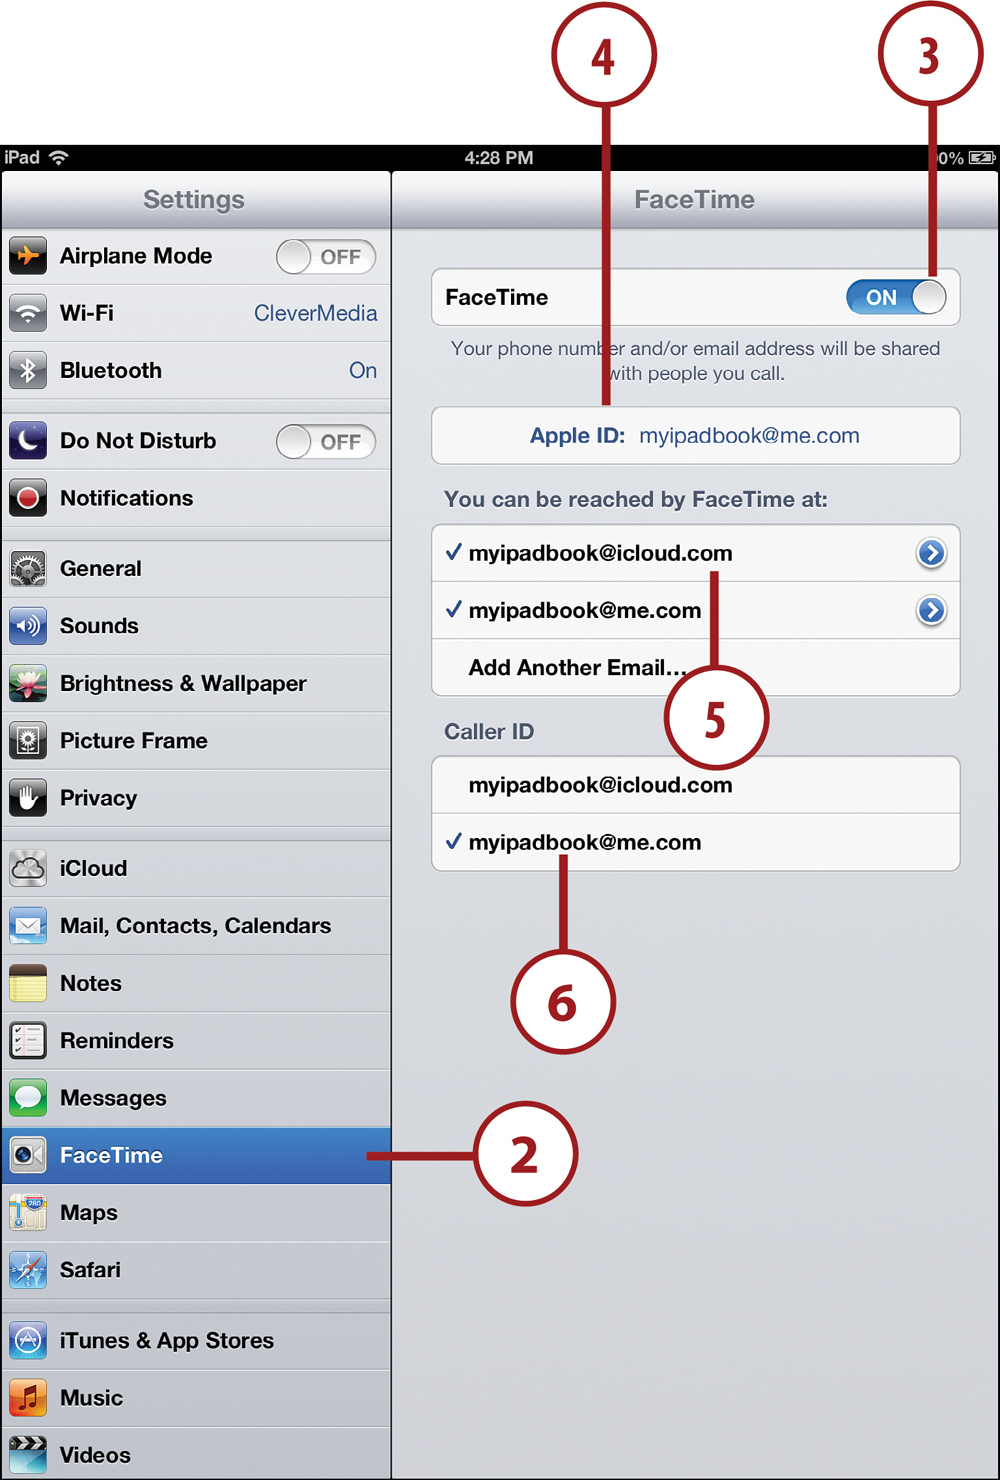
1. Launch the Settings app.
2. Tap FaceTime on the left.
3. Turn on FaceTime if it isn’t already.
4. An Apple ID is needed for FaceTime even if you don’t plan to use that same email address with FaceTime calls. If you haven’t used FaceTime before, you will be prompted to enter your Apple ID and password.
5. This list contains email addresses others can use to reach you via a FaceTime call. By default, your Apple ID email address will be here. But you can add another one and even remove your Apple ID email address if you never want to use that for FaceTime.
6. The Caller ID represents your default email address used to place FaceTime calls. It is what others will see when you call them.
By using different email addresses for different iOS devices, you can more easily specify which device you are calling. For instance, if you and your spouse both have iPhones, and you share an iPad, you can give the iPad a different email address (maybe a free email account). That way you can specify which device you want to call.
Remember that you still need to be connected to the Internet with a Wi-Fi connection. At this time, mobile carriers do not support FaceTime over their 3G or 4G networks, although there are rumors they might in the near future, possibly for an extra charge.
Placing Video Calls with FaceTime
After you have your account set up in FaceTime, you can place and receive calls.
1. Launch the FaceTime app.

2. Select a contact from your list. If your contact list isn’t showing, tap the Contacts button at the bottom right of the screen.
3. Alternatively, you can add a new contact. You need to know either their iPhone 4 phone number or the email address they used when creating their FaceTime account.
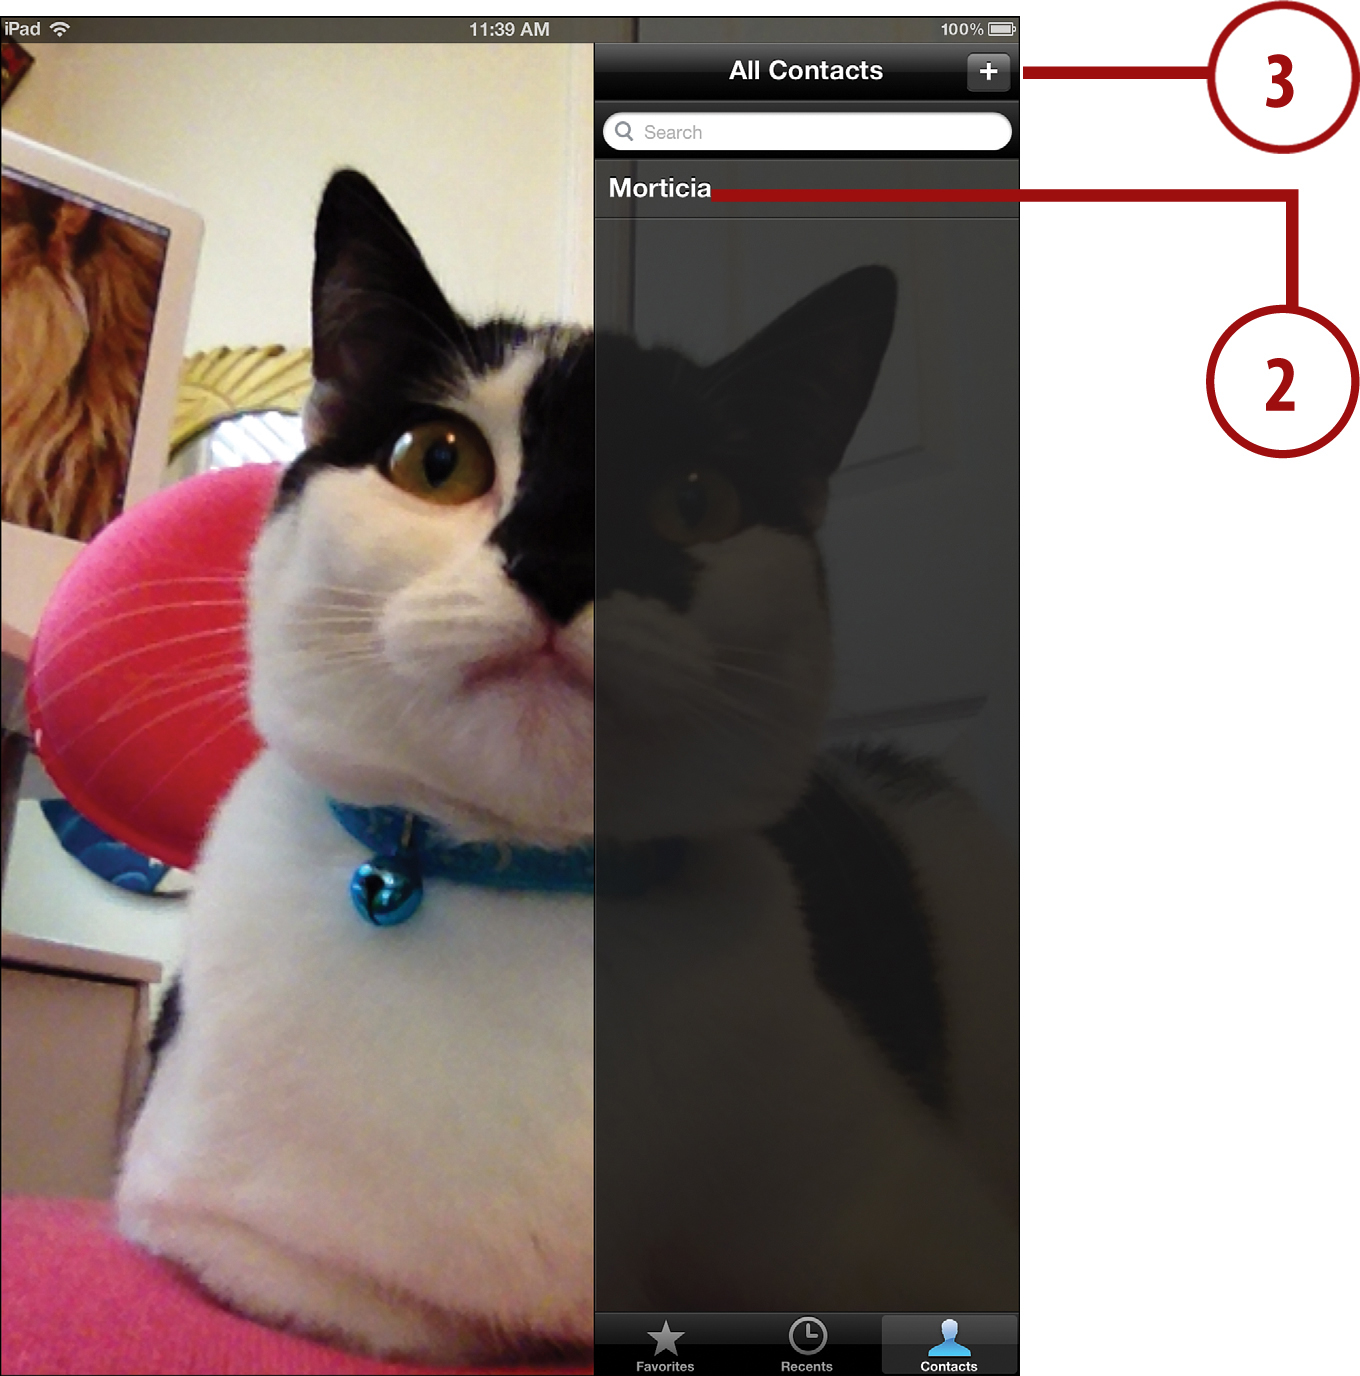
4. Tap the phone number or email address for the contact to initiate a FaceTime call.
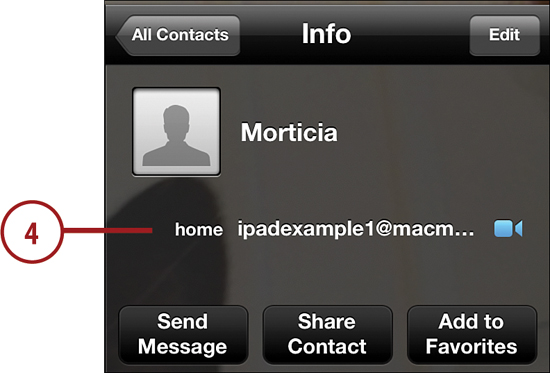
5. Wait while the call is placed. You’ll hear a ringing. You can tap the End button to cancel the call.

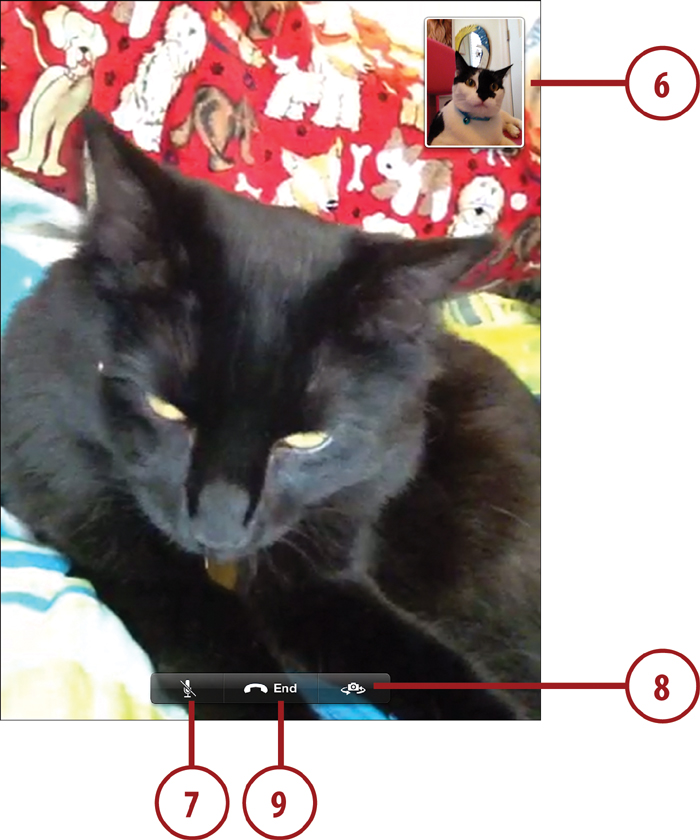
6. After the other party has answered the call, you can see both her image filling the whole screen and your image in the upper right. You can drag your image to any of the four corners.
7. Tap the mute button to mute your microphone.
8. Tap the switch cameras button to show the view from the rear camera.
9. Tap End to finish the call.
In order for you to place a FaceTime call, of course, the recipient also needs to have FaceTime set up. You can tell in step 4 that this has been done because of the blue camera icon next to the phone number. Otherwise, if she has a FaceTime-compatible device, you need to get her to set up an account before trying to initiate a FaceTime connection.
Receiving Video Calls with FaceTime
After you have a FaceTime account, you can receive calls as well. Make sure you have set up FaceTime by following the steps in the “Setting Up FaceTime” task earlier in this chapter. Then it is a matter of just waiting to receive a call from a friend.
1. If you aren’t currently using your iPad, it will ring using the ringtone you choose in Settings, General, Sounds. When you pick up your iPad, you’ll see something similar to the lock screen, but with a live feed from your camera (so you can see if you look good enough to video chat) and the caller’s name at the top.
2. Slide the Slide to Answer button to the right to wake up your iPad and go immediately into the call. If you are using your iPad at the time the call comes in, FaceTime launches and you get a screen with two buttons. The screen will still show your camera’s image and the name of the caller.
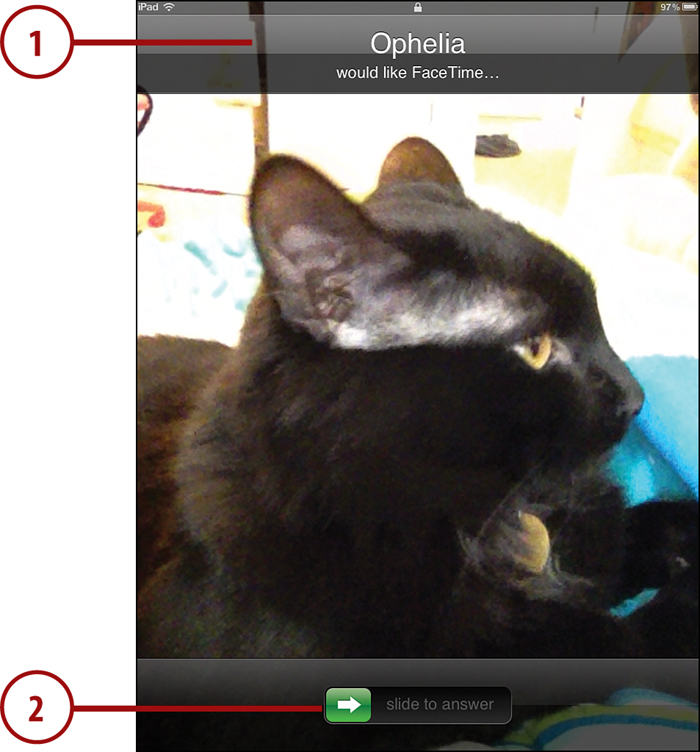
3. After the conversation starts, you can mute your microphone.
4. You can switch to the rear camera.
5. Tap End to end the call.