16. Using Popular and Critical Apps

In this chapter, we take a look at various apps that you should add to your iPad to make it even more useful.
• Putting Notes on Your Home/Lock Screen
• Creating Multimedia Cloud Notes with Evernote
Ask almost anyone what the best feature of the iPad is and you’ll get the same answer: all the apps! The App Store is not only a source of hundreds of thousands of useful, interesting, and fun apps, but it grows each day as third-party developers and Apple add more. Here’s a look at how to use some of the most popular apps for the iPad to perform various useful tasks.
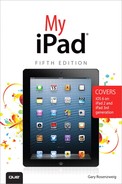
Using Facebook
Many people now spend more time on Facebook than the rest of the Internet combined. If you are one of those people, the official Facebook app is probably the first third-party app you should put on your iPad.
With it you can browse your wall, post status updates, send messages, post photos, and do most things that you can do on the Facebook website, but inside an environment designed for iPad users.
1. Search the App Store for the Facebook app and install it.
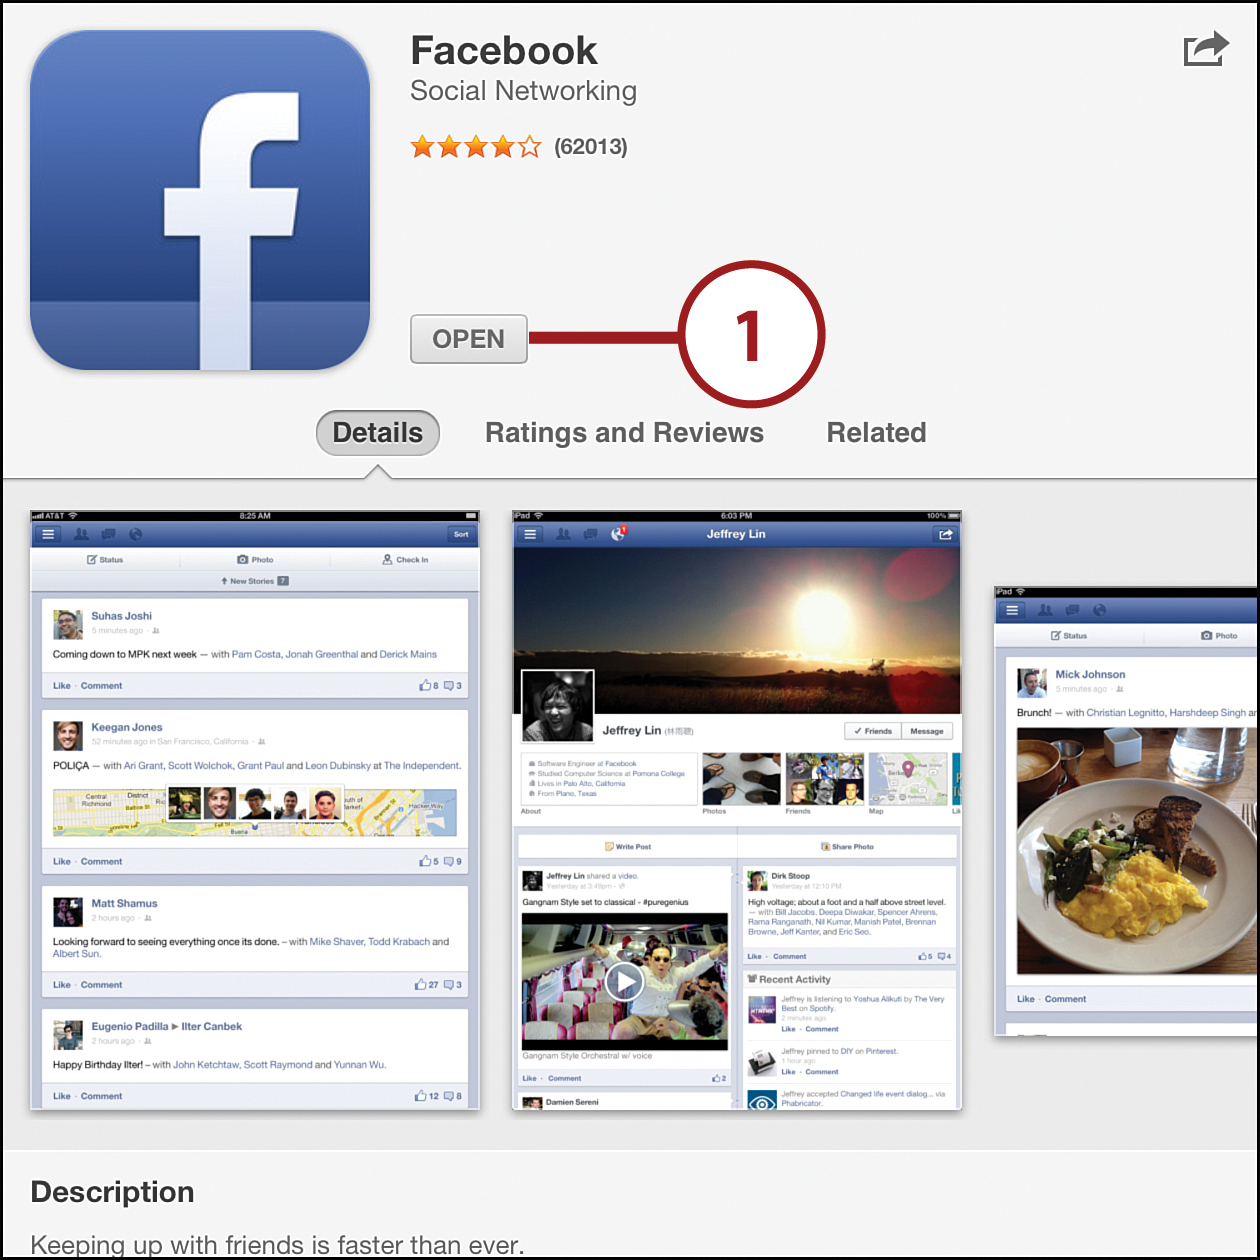
2. Enter the email address you use to log into Facebook, and your password.
3. Tap Log In.
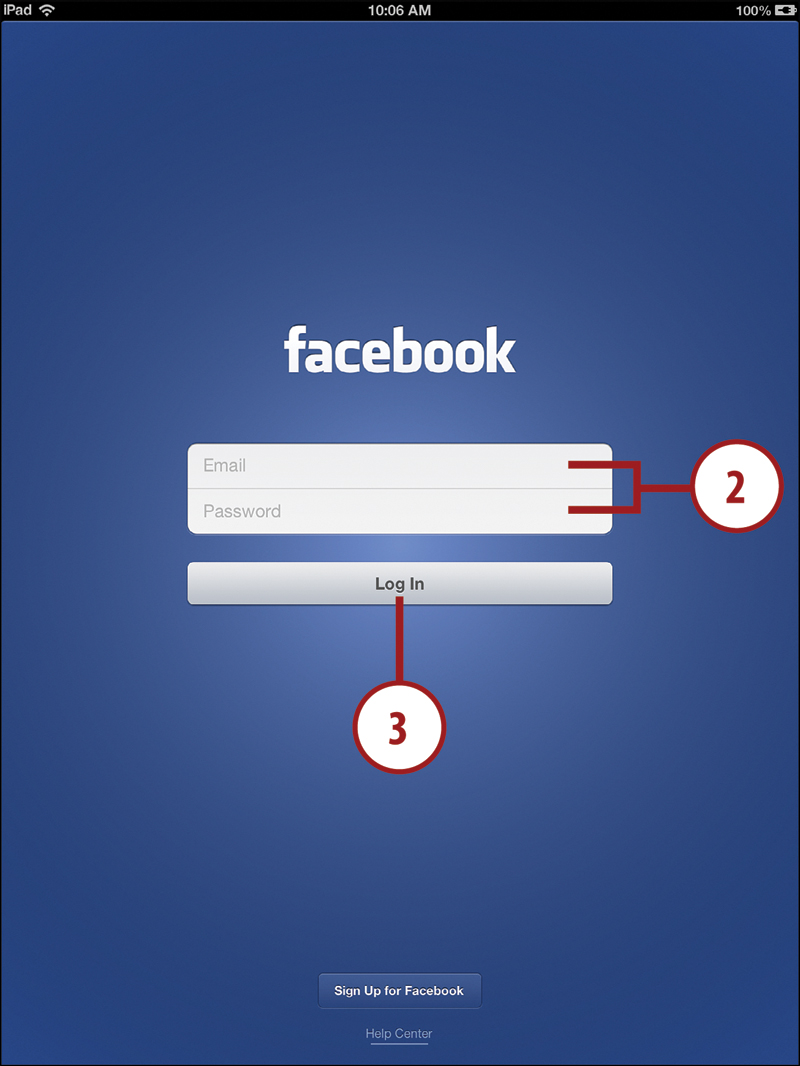
4. Scroll up and down to view your news feed.
5. Sort your feed by Top Stories or Most Recent.
6. You can Like posts just as you would on the Facebook web site.
7. You can also tap here to add a comment.
8. View and handle friend requests.
9. View direct messages and send messages to friends.
10. See your list of Facebook notifications.
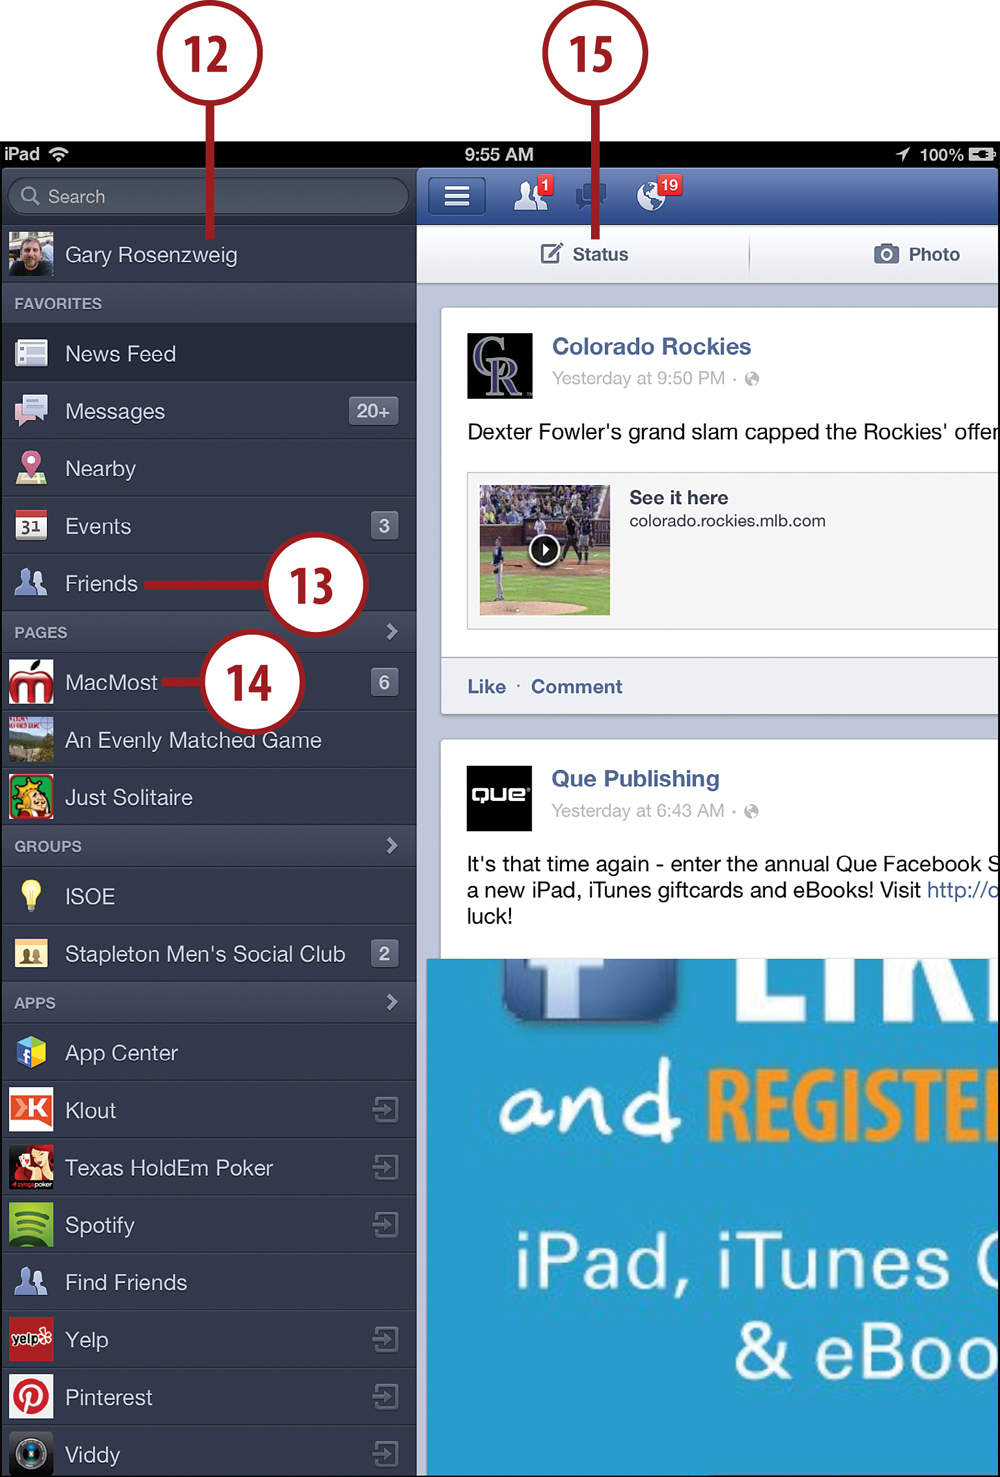
11. Tap this button or swipe left to right to bring up the sidebar.
12. You can examine your own wall and edit your profile.
13. See a list of your friends and view their information and their wall.
14. You can also post to walls of Facebook pages that you manage.
15. Tap Status to update your Facebook status, adding a post to your wall.
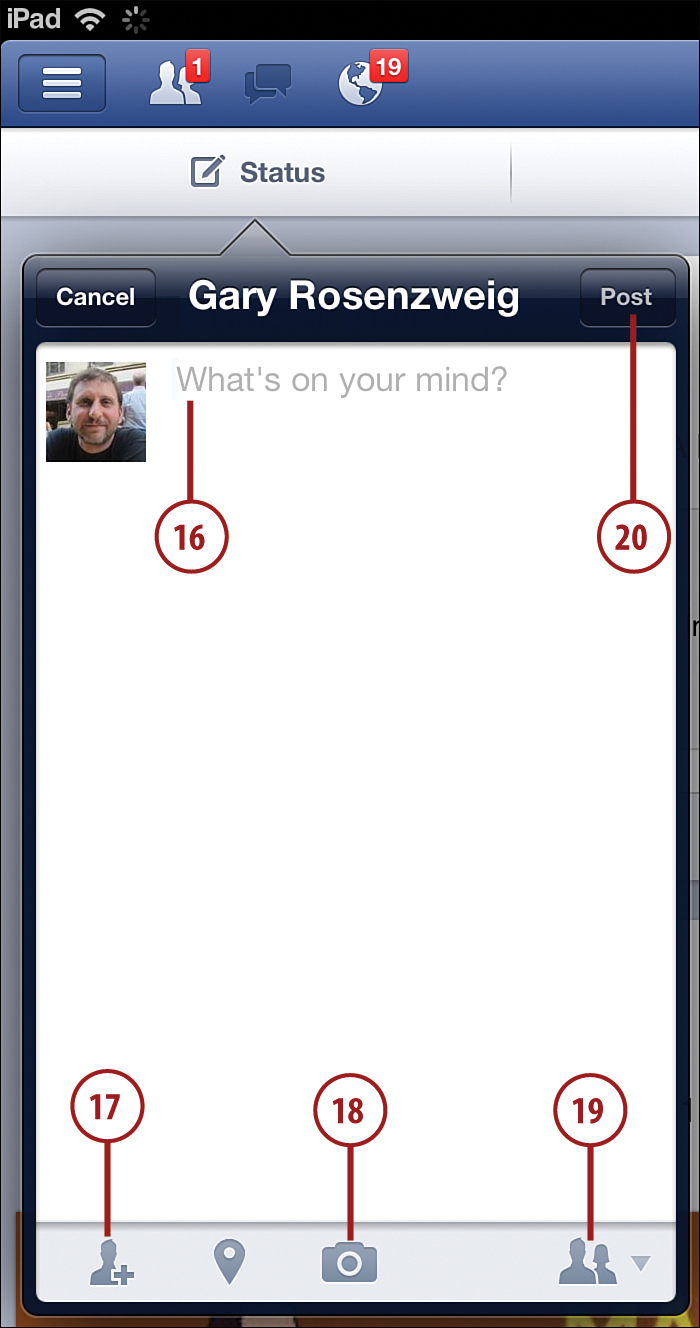
16. Type the text of your update.
17. Add friends who you are with to the update.
18. Add a photo from your Photos library, or take a new photo using your iPad’s cameras.
19. Choose groups you want to see your update.
20. Post the update to Facebook.
If there is one consistent thing about Facebook, it is change. Facebook loves to change how its website and apps look. So if the Facebook app looks different than what you see here, it could simply be that Facebook has, once again, decided to redesign the interface.
With iOS 6, you don’t need to use the Facebook app to post pictures. You can do it right from the Photos app and other image-handling apps. But you first need to go to the Settings app, then the Facebook section, and enter your email and password again. This gives iOS permission to use your Facebook account for posting. Then you can do things like post pictures from the Photos app, post links from Safari, and ask Siri to “update my Facebook status.”
Using iTap VNC
Your iPad can be a window to your Mac or PC. By using Virtual Network Computing (VNC) technology, you can control your computer just like it was sitting in front of you (except you can’t hear the sound output).
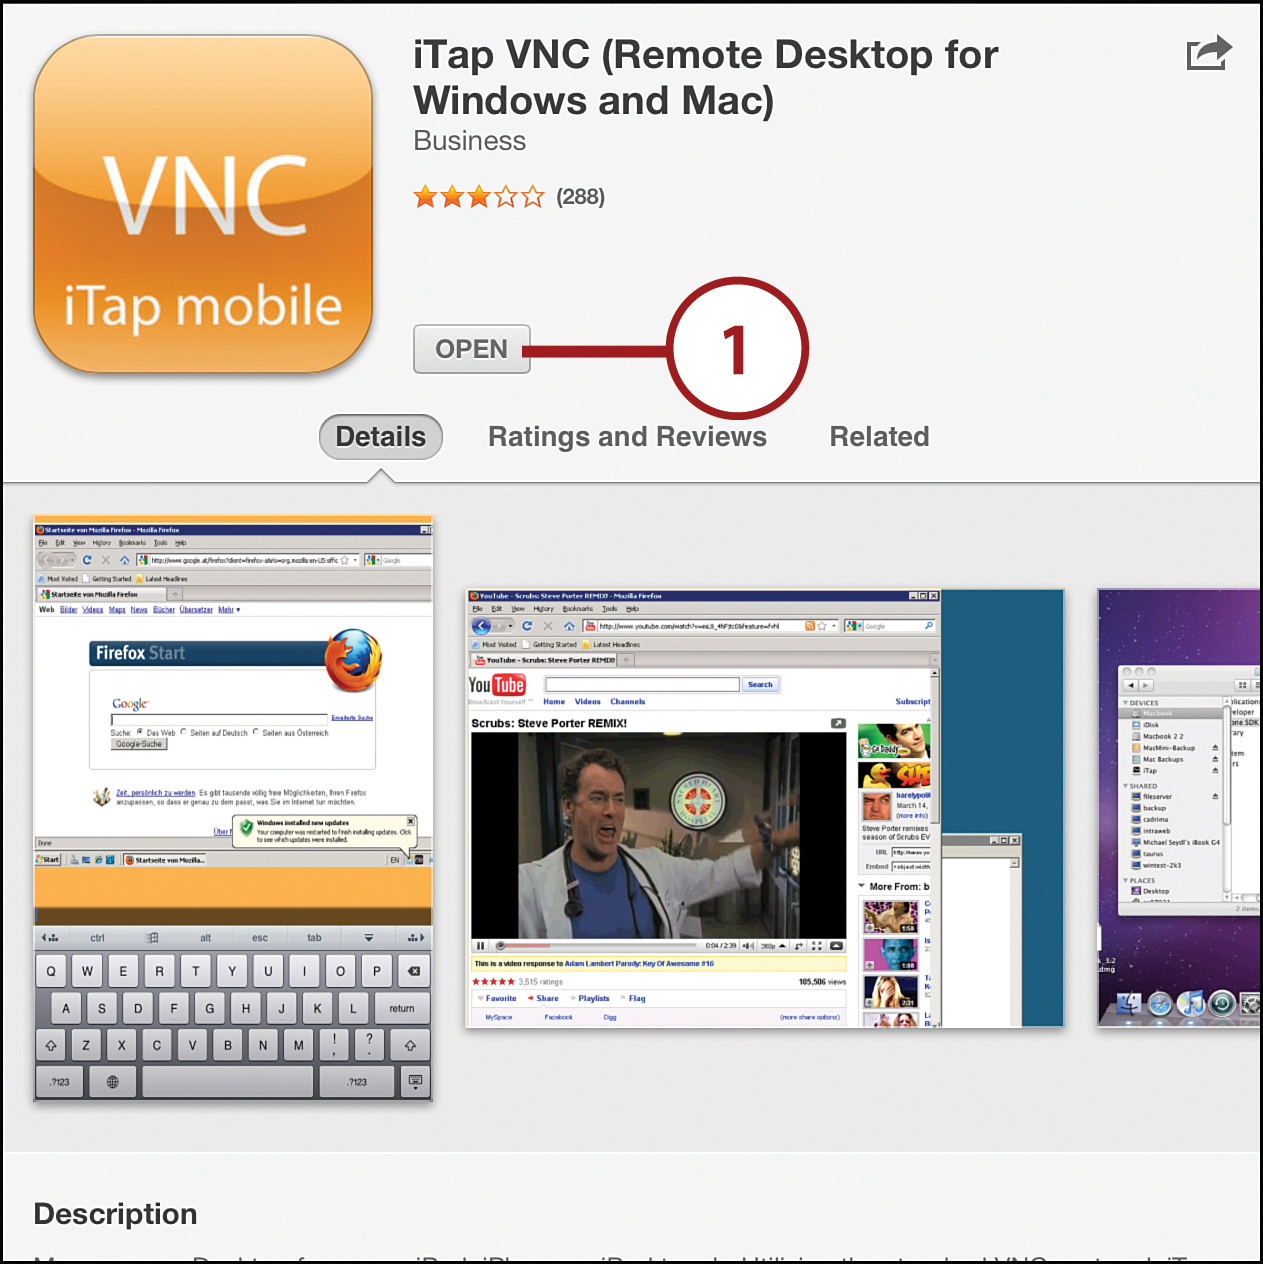
1. Search in the App Store for iTap VNC and download it. Tap the icon to launch the app.
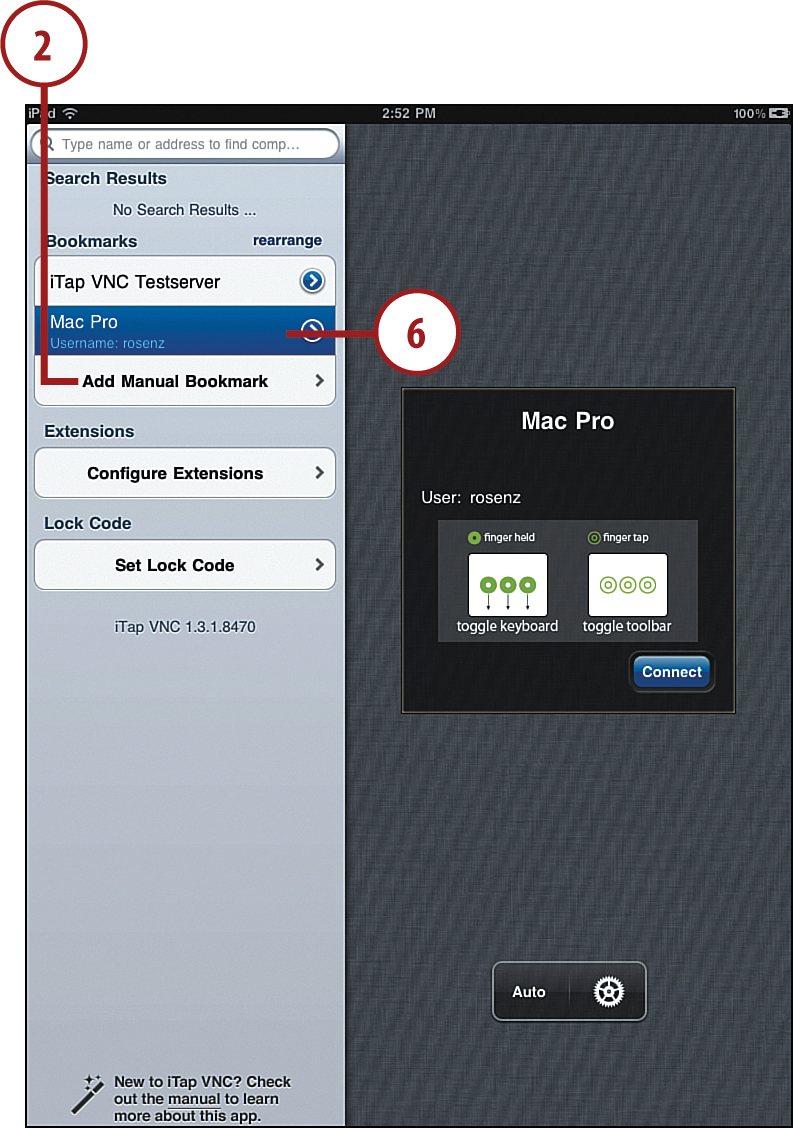
2. On the screen that shows your current bookmarks, tap Add Manual Bookmark.
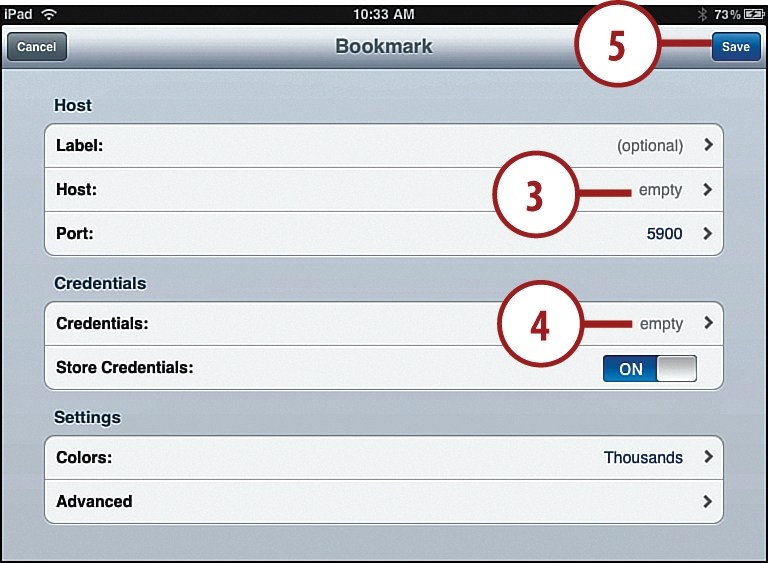
3. Enter the IP address of your computer under Host.
4. Tap Credentials and enter your ID and password for VNC access to that computer.
5. Tap Save.
Setting Up VNC on Your Computer
It takes two to VNC. You need to set up your Mac or Windows computer to accept the connection and allow your iPad to take over the screen. On a Mac, you can do this by turning on Screen Sharing in the Sharing pane of System Preferences. On Windows, it is called Remote Desktop, or you can install a third-party VNC server.
There are many other VNC apps like iTap VNC. Also check out iTeleport for iPad, Desktop Connect, and LogMeIn Ignition. A slightly different app to look at is Air Display. It lets you use your iPad as an extra screen with your Mac or Windows PC. If you use Windows and Remote Desktop Protocol instead of VNC, there is also an iTap RDP app available.
6. After initial setup, the next time you use iTap VNC, you are prompted to select the computer from a bookmark list. Tap the name of the bookmark to establish a connection.
7. After you are connected, you will see a portion of your computer’s screen.
Getting VNC connections to work can be frustrating. It has nothing to do with the iPad. Getting them to work between a laptop and a desktop has the same difficulties. If your network router or Internet modem isn’t set up just right, it won’t connect and you have little indication as to why. Most of the time, VNC connections work right away, but if you are one of the unlucky few, you might need to tinker around with your network equipment settings or even call in an expert to get it to work.
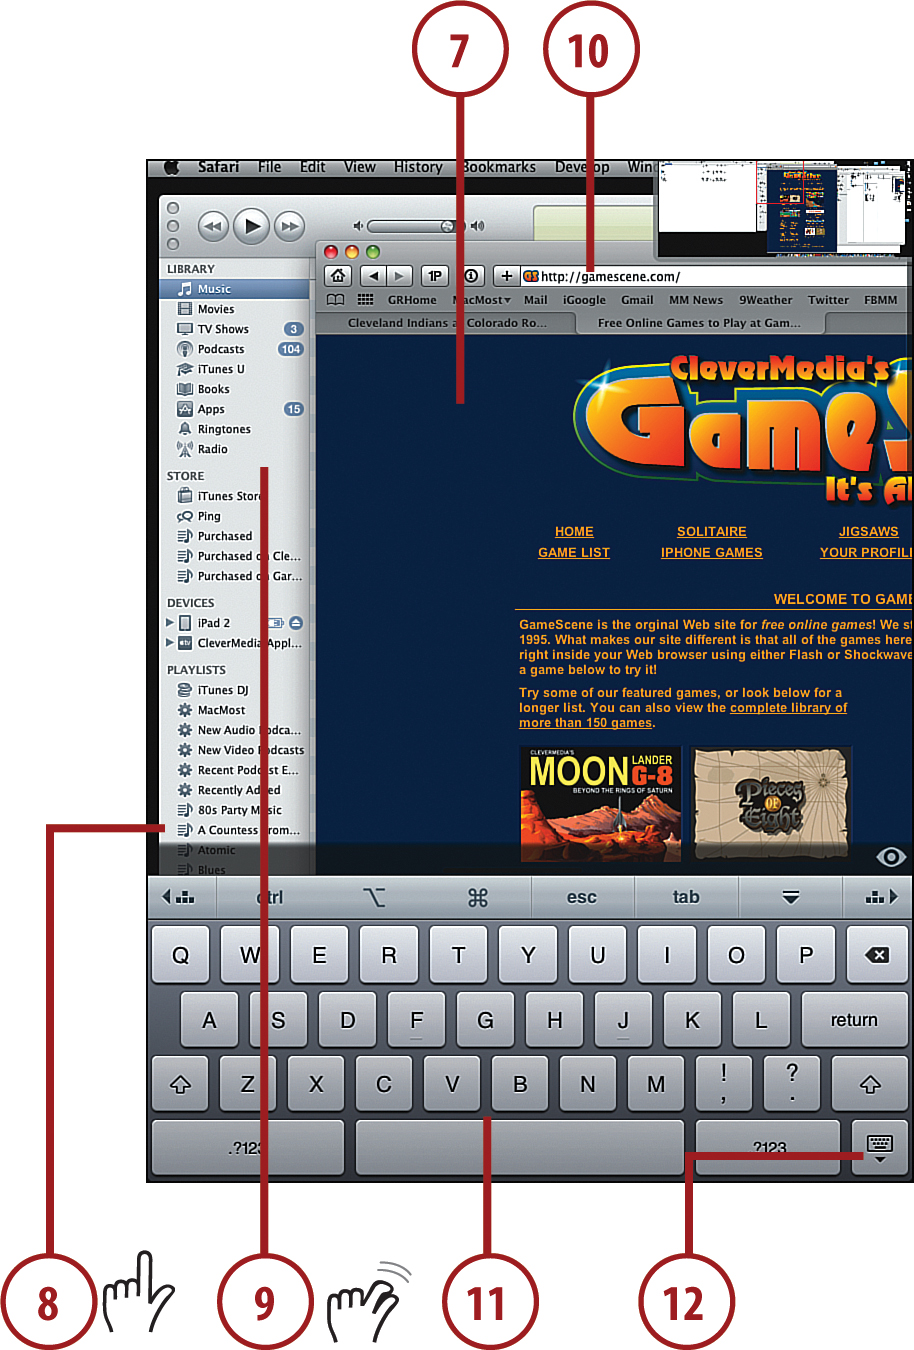
8. Tap and drag to move around to see your whole screen.
9. Pinch to zoom in and out.
10. To type into an application from a keyboard, first select the application to type in by tapping, as you would click it on your computer.
11. Swipe down with three fingers on your iPad screen to open the keyboard.
12. Dismiss the keyboard with the button at the lower-right corner.
Using GoodReader
Although åiBooks is great for basic document viewing, those more serious about collecting documents to read on their iPad have looked to apps that have even more features. Apps such as GoodReader enable you to create a library of viewable files such as PDFs, Word, images, text, and so on. You can then access these documents any time.
1. Search the App Store for GoodReader and add it to your apps.
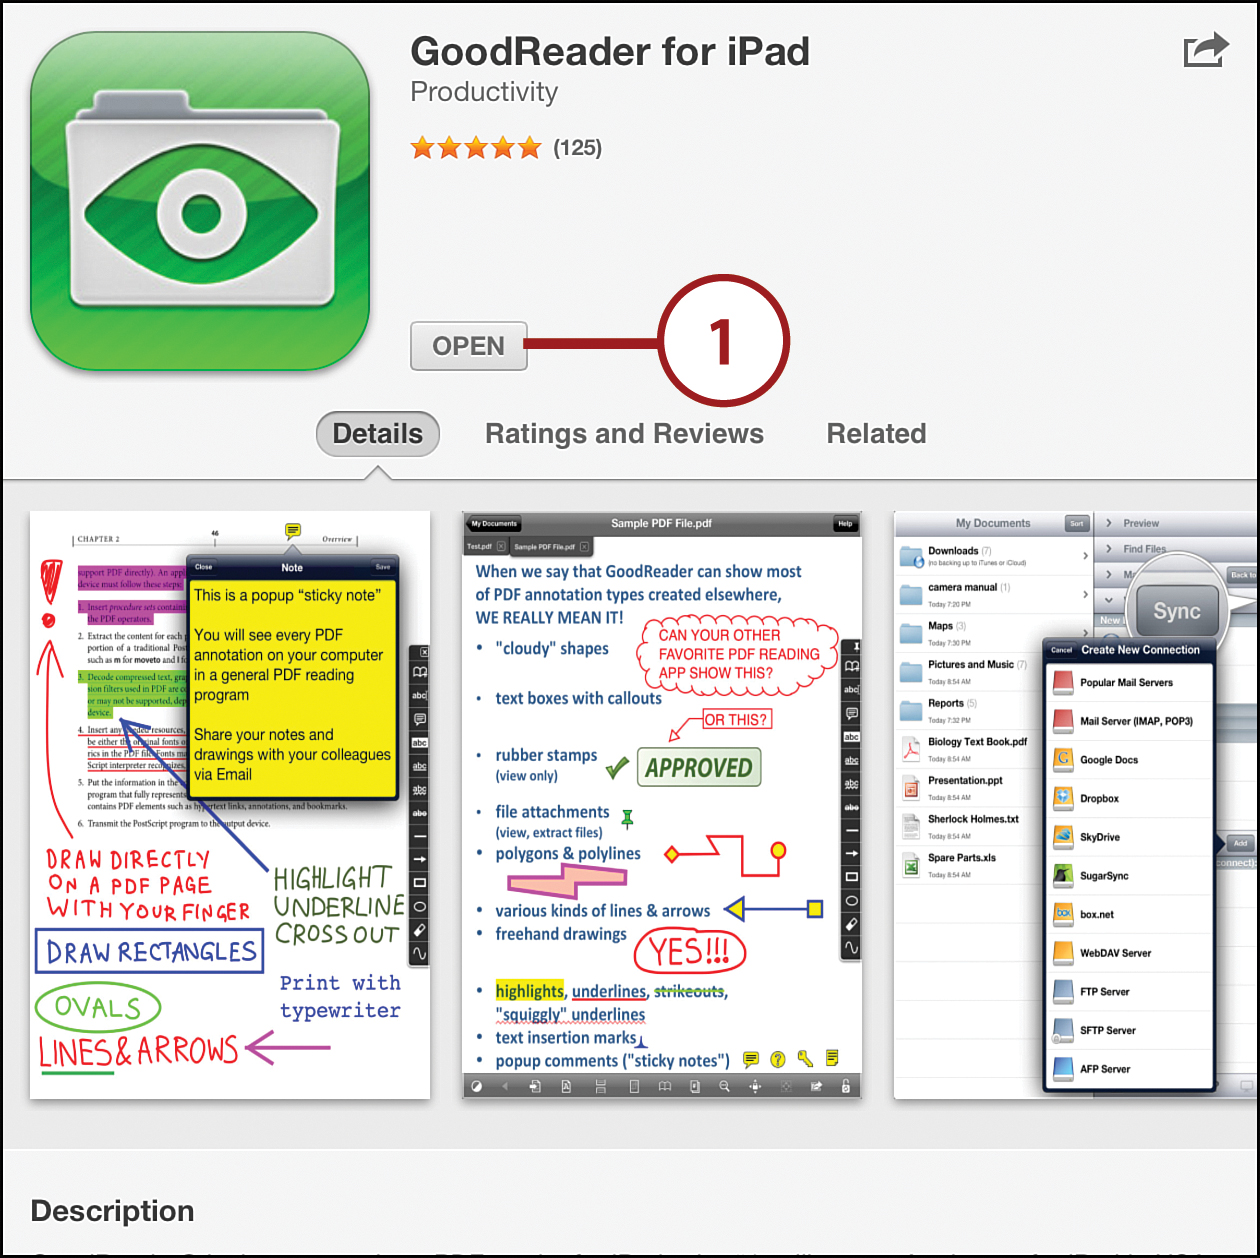
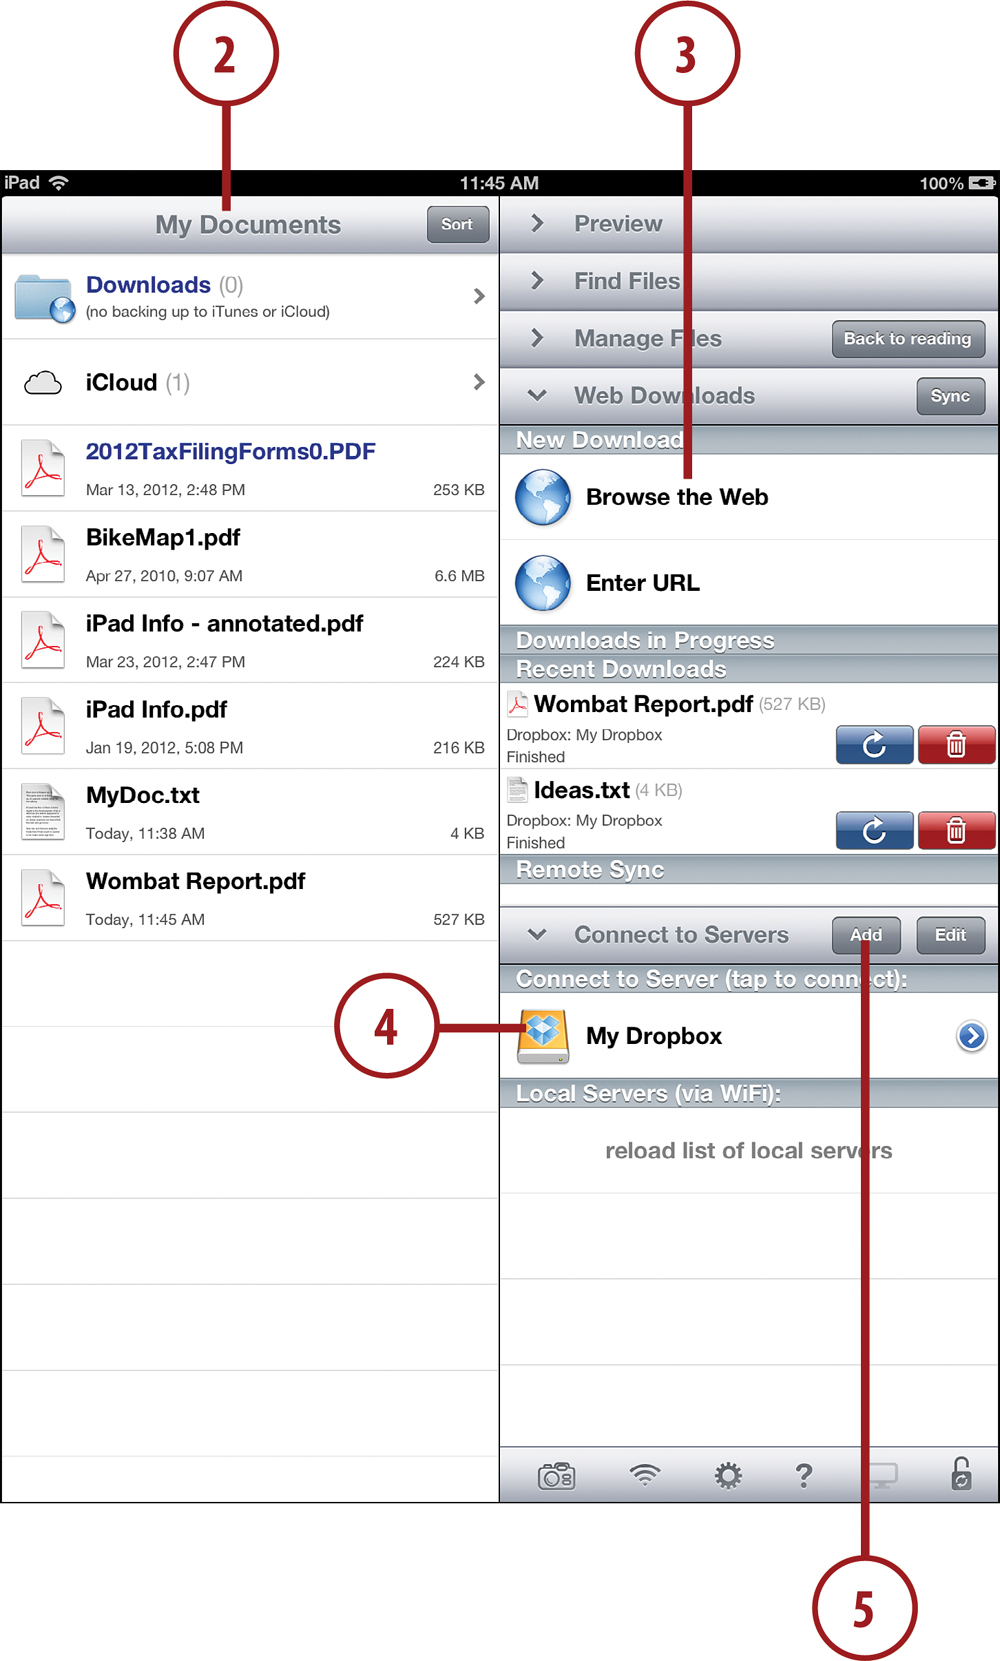
2. On the left side of GoodReader’s main screen, you see the documents you have on your iPad.
3. On the right side are various controls. For instance, you can browse the web or enter a URL to download a document from the web.
4. You can also see Internet locations you have set up access to, such as your Dropbox account.
5. Tap Add to add more Internet services.
6. You can access your documents stored in Google Docs.
7. You can use Dropbox or one of the other major cloud file storage services.
8. You can use a standard Internet sharing service, such as FTP.
9. You can also access Macs using standard file sharing.
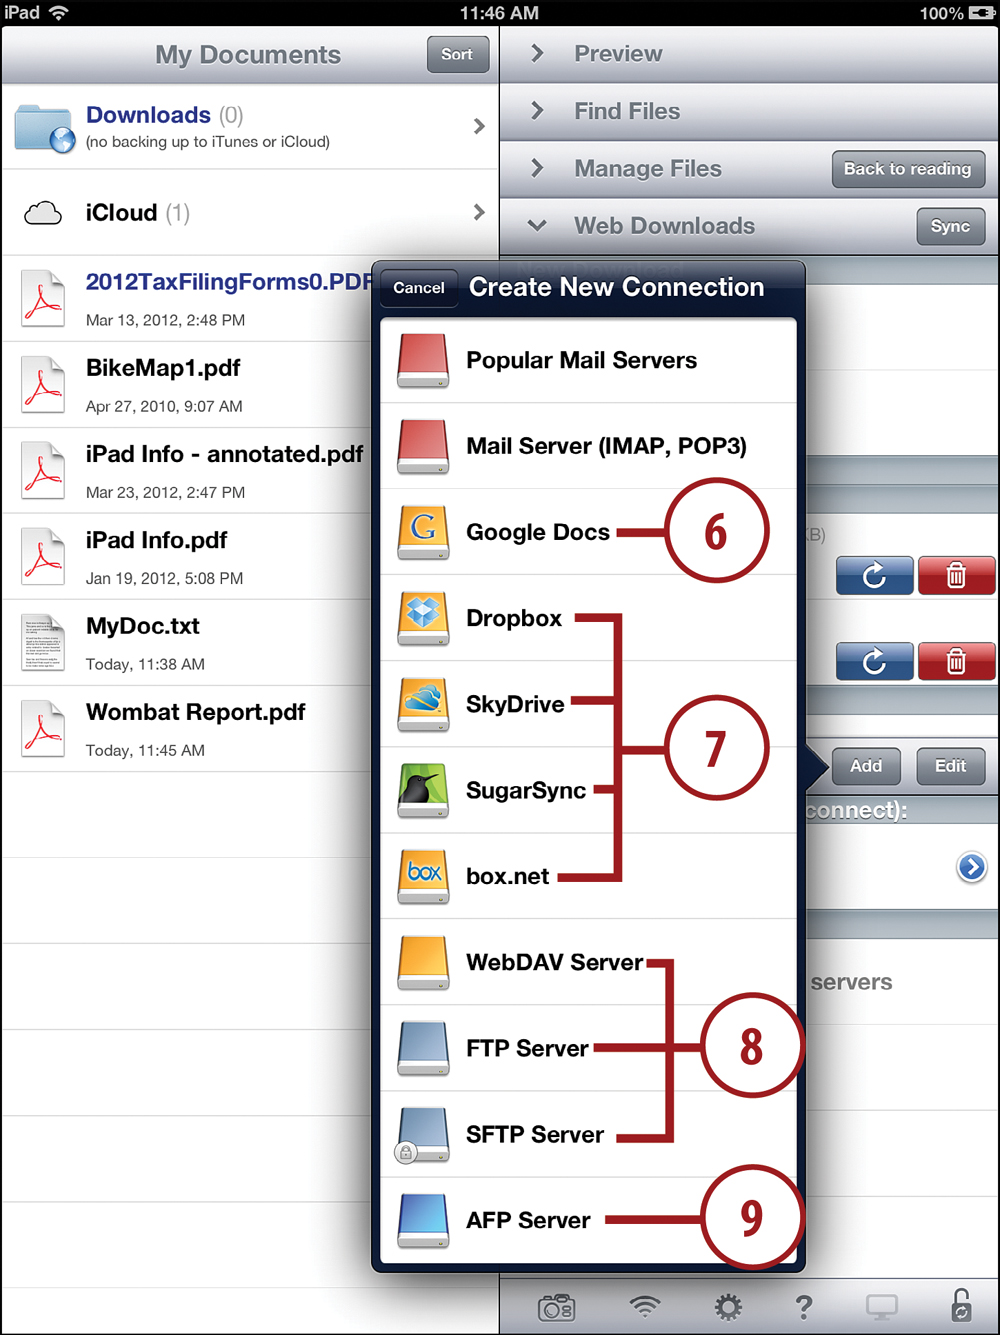
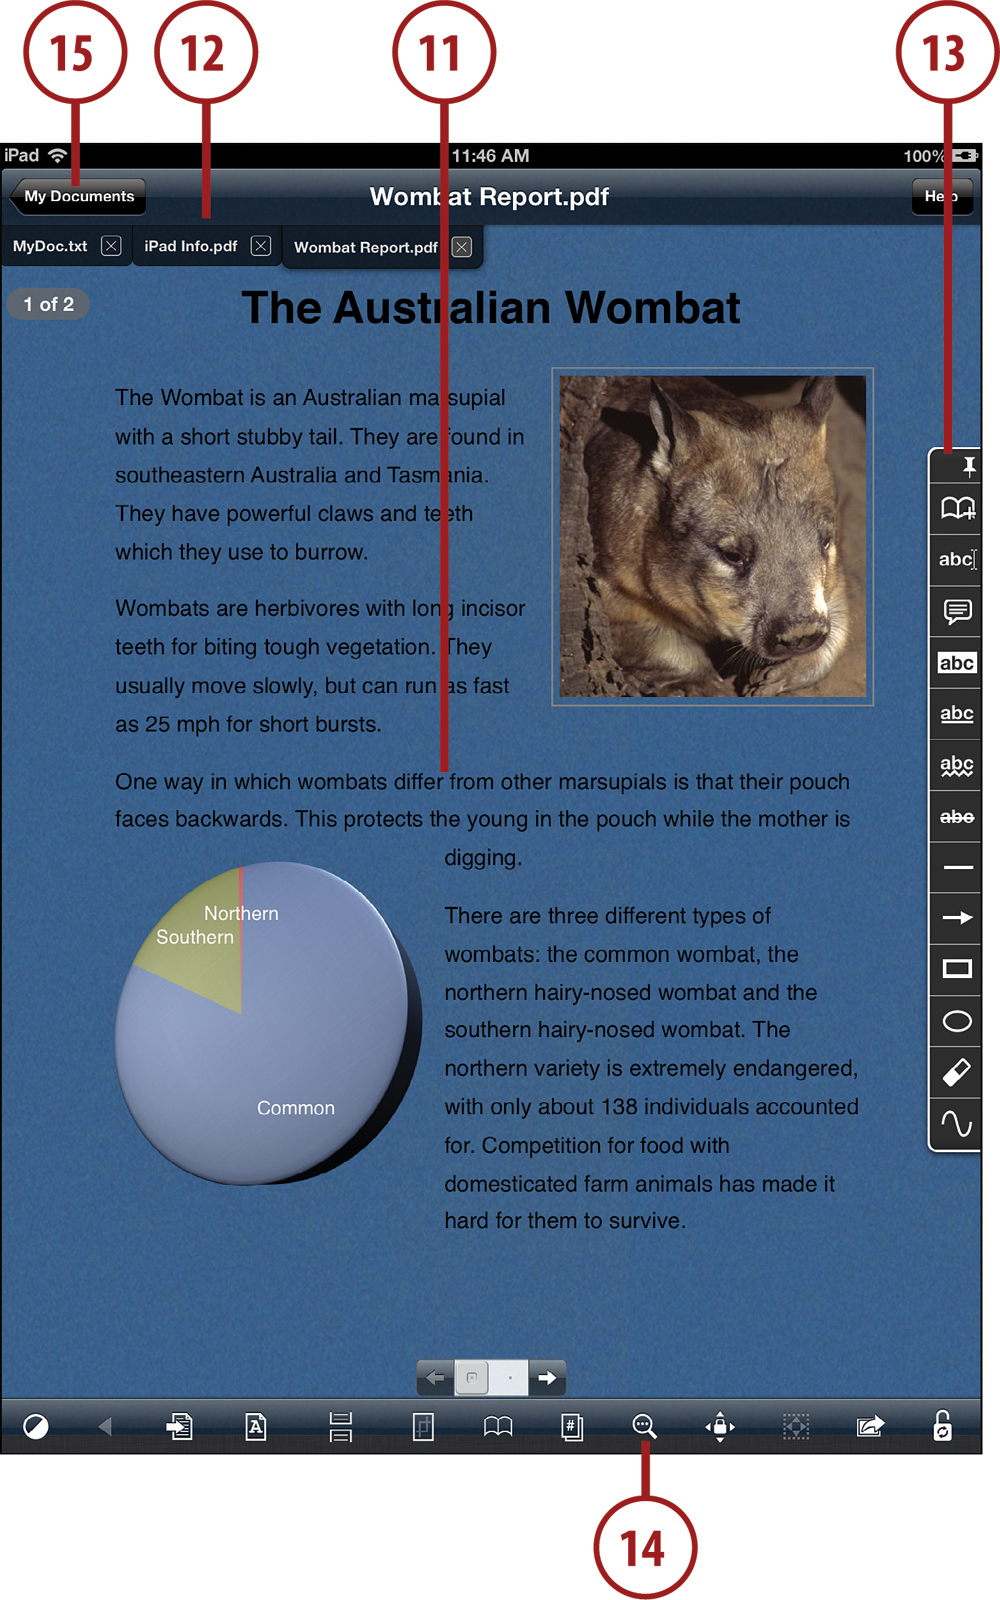
10. Tap a document to open it.
11. Documents of all different types, such as PDF, Pages, Word, text, images, and audio files can be viewed.
12. Documents open in tabs, allowing you to switch easily between several documents.
13. You can use annotation tools to mark up the document.
14. You can search the document and use various reading tools. If the document is editable, such as a text document, then you can also use editing tools here.
15. Tap to return to your list of documents and services.
You can also transfer files between your Mac or PC and your iPad into GoodReader when you sync, without using any special Internet services or setting up file sharing. See “Syncing Documents” in Chapter 3.
Using NewsRack
If you read a lot of online news and blogs, you probably use RSS from time to time to view these sources as feeds, rather than visiting the website. NewsRack is one RSS feed reader for the iPad.
1. Search the App Store for NewsRack and add it to your apps. After it has been installed, launch NewsRack.
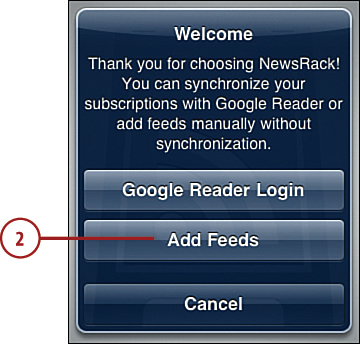
2. Tap Add Feeds. (Or use Sync Settings to sync your Google Reader settings.)
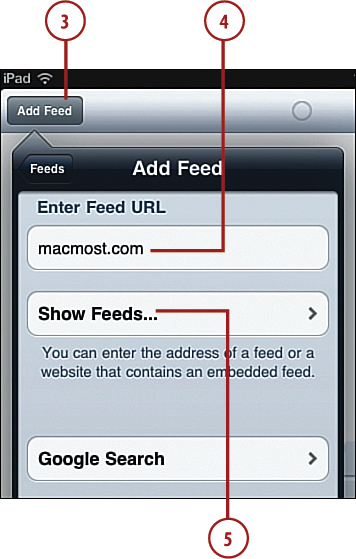
3. Tap the Add Feed button. This will look very different in horizontal screen orientation, so keep it vertical for now.
4. In the Enter Feed URL field, enter the domain name for a website.
5. Tap Show Feeds. A list of RSS feeds from the site will appear.
RSS feeds are everywhere. Chances are your local newspaper and your favorite blogs and online magazines all have RSS feeds. Try the URL for any website in NewsRack and see what feeds are available.
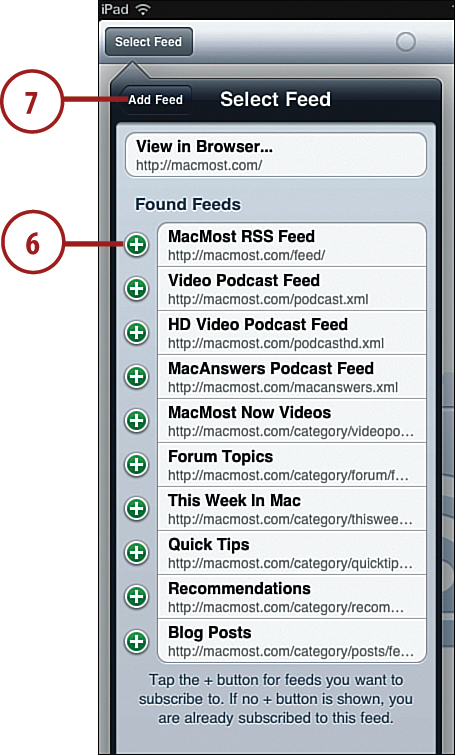
6. Tap the + button to the left of any feed you want to subscribe to.
7. Tap the back menu button (labeled Add Feed on this example) until you get a Done button, so you can complete the action of adding feeds.
Since the iPad is an ideal device for reading the news, many RSS reader apps have appeared. Other popular ones include Pulse News Reader, NetNewsWire, GoReader Pro, and Reeder for iPad. Search in the App Store for “rss reader,” and you will come up with even more.
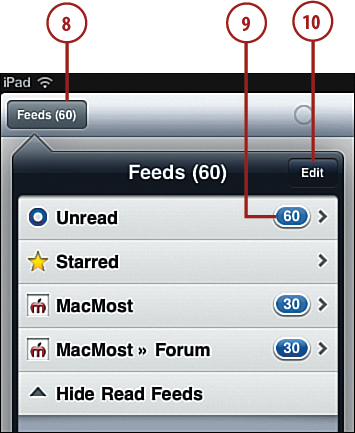
8. Tap Feeds at the top to look at a list of all your RSS feeds.
9. Tap Unread to view all the unread items in all your feeds.
Alternatively, tap a single feed to just see that feed.
10. Tap the Edit button to add more feeds or delete existing feeds.
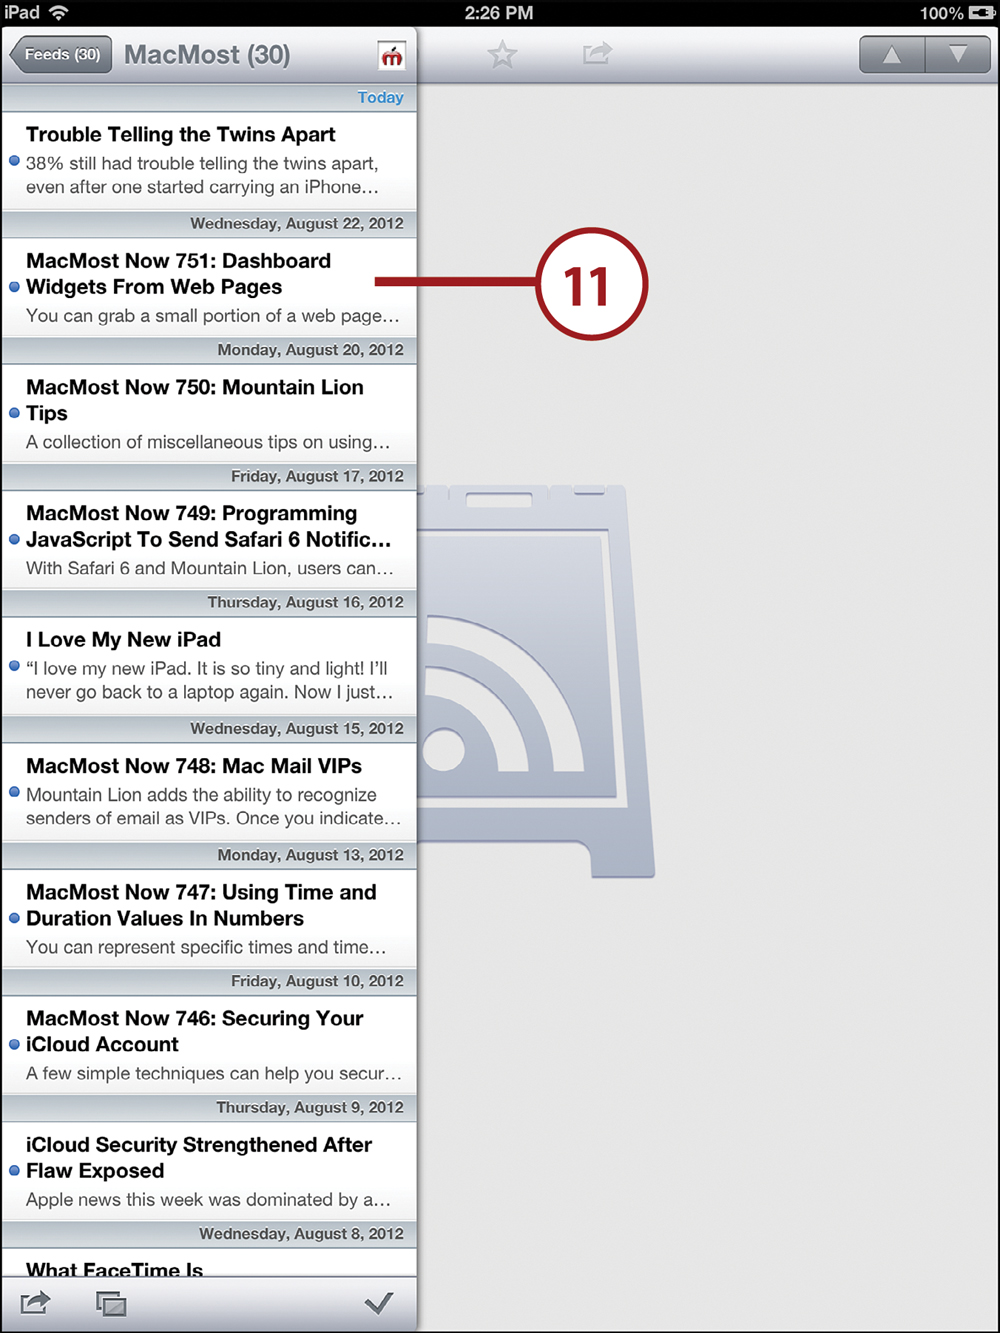
11. You see a mix of all the unread items in all your feeds. Tap any one to read it.
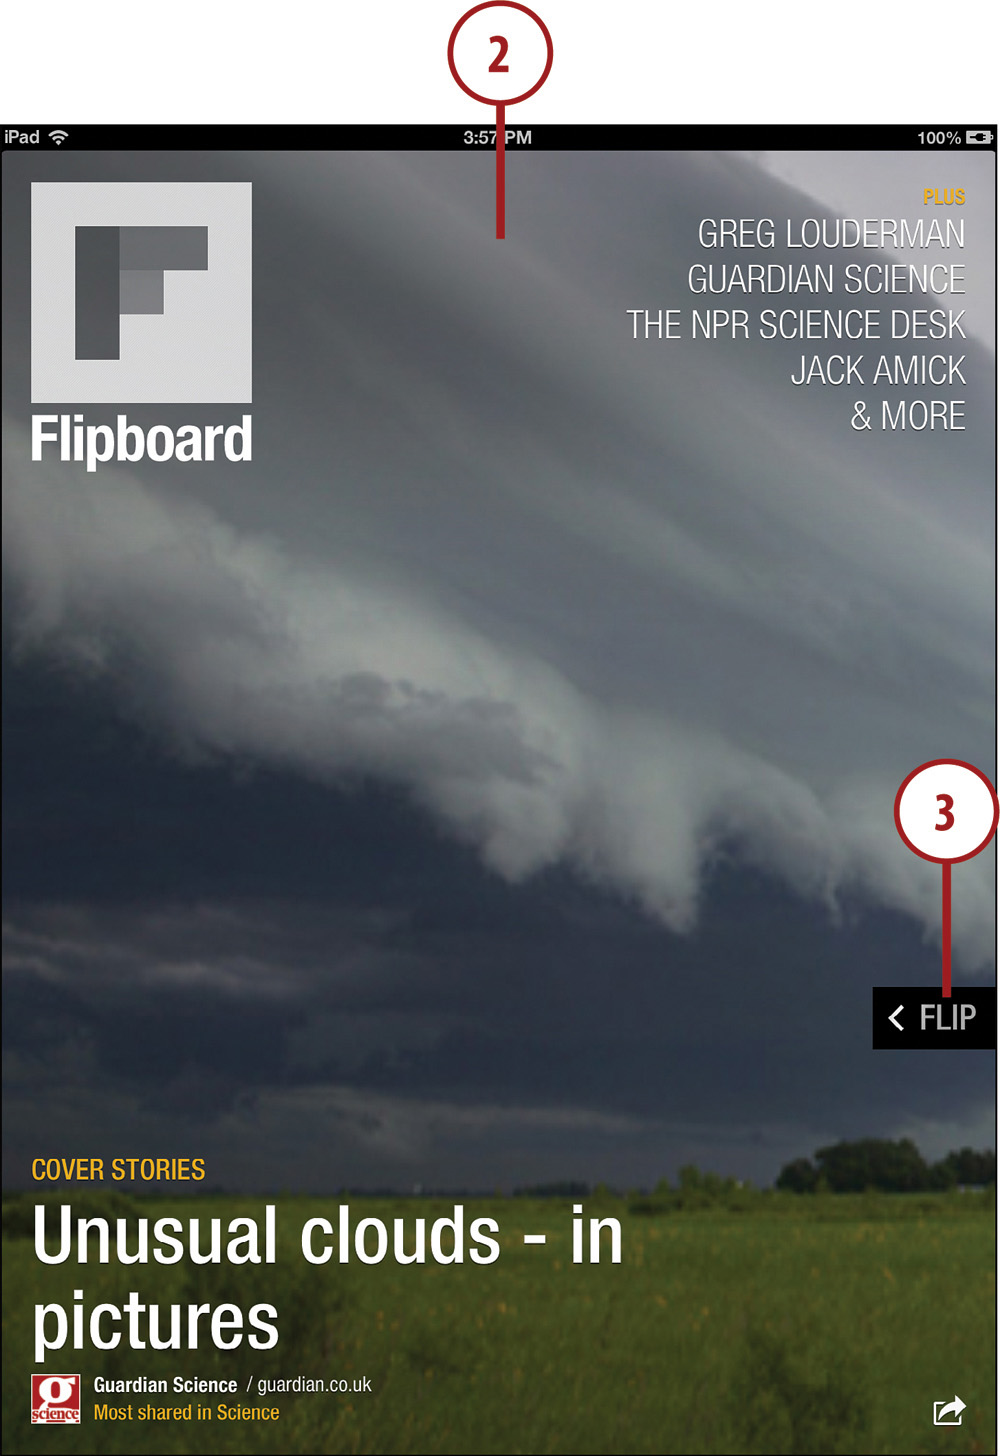
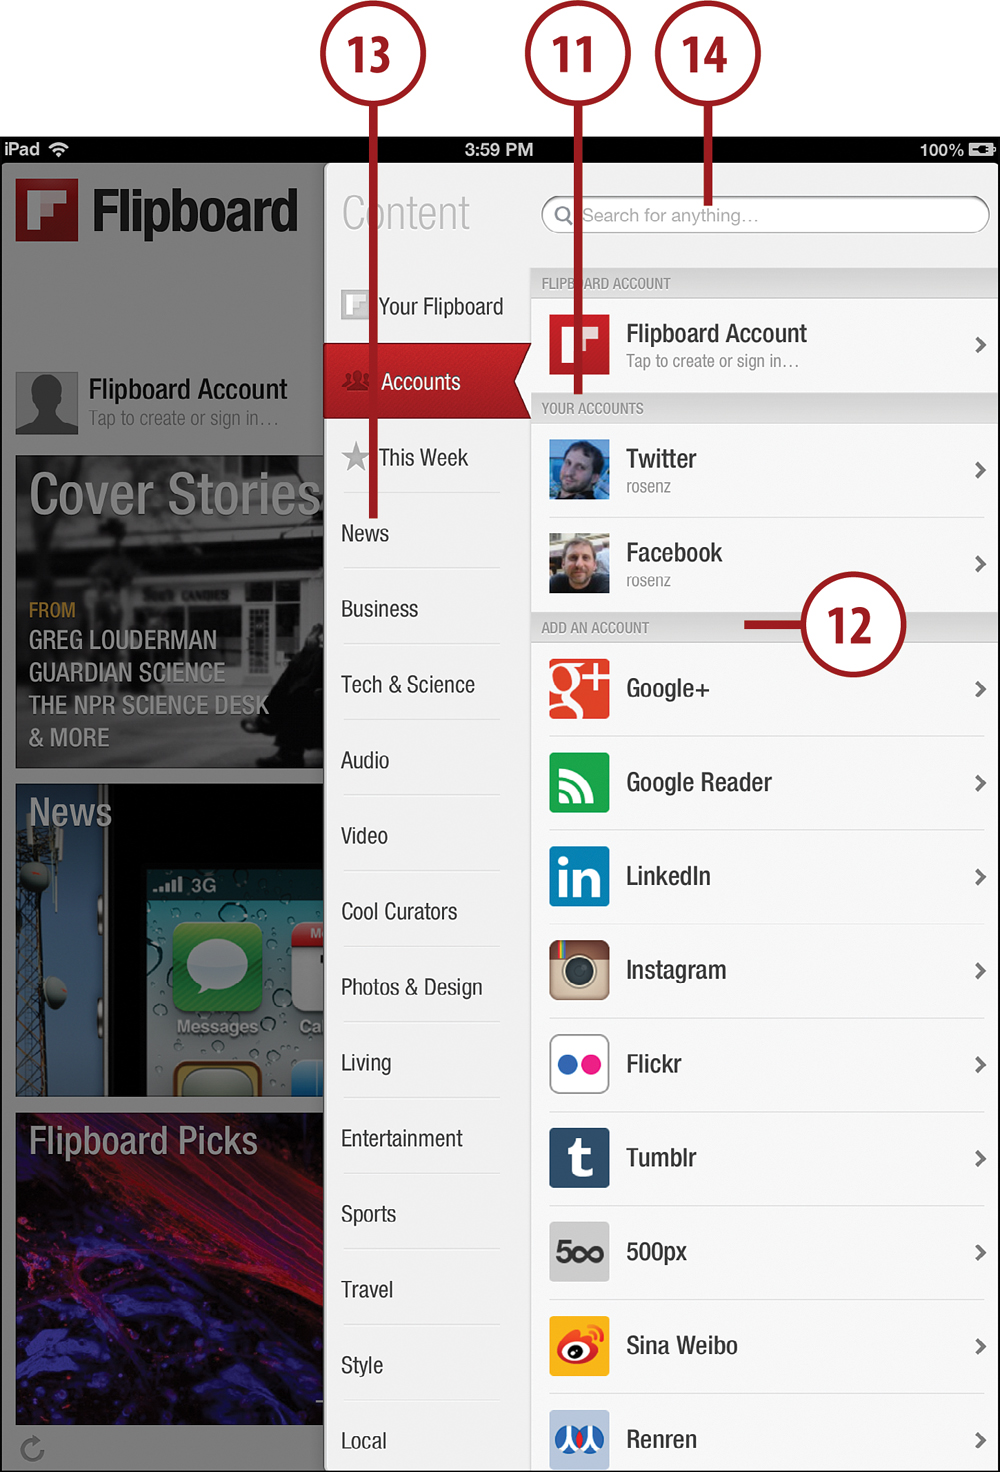
Using Flipboard
How about a magazine that is all about you? Well, at least about your friends and things that you like. Such a thing exists, called Flipboard. It uses information from your Facebook, Twitter, and other social media accounts to show news stories, pictures, and posts from your friends. It also uses your RSS feeds to show you news you are interested in. To see page after page of things that should interest you, just keep flipping.
1. Search for Flipboard in the App Store. Then install it and launch it.
2. The front page contains featured Flipboard stories that change every few seconds. Tap on the image to read more.
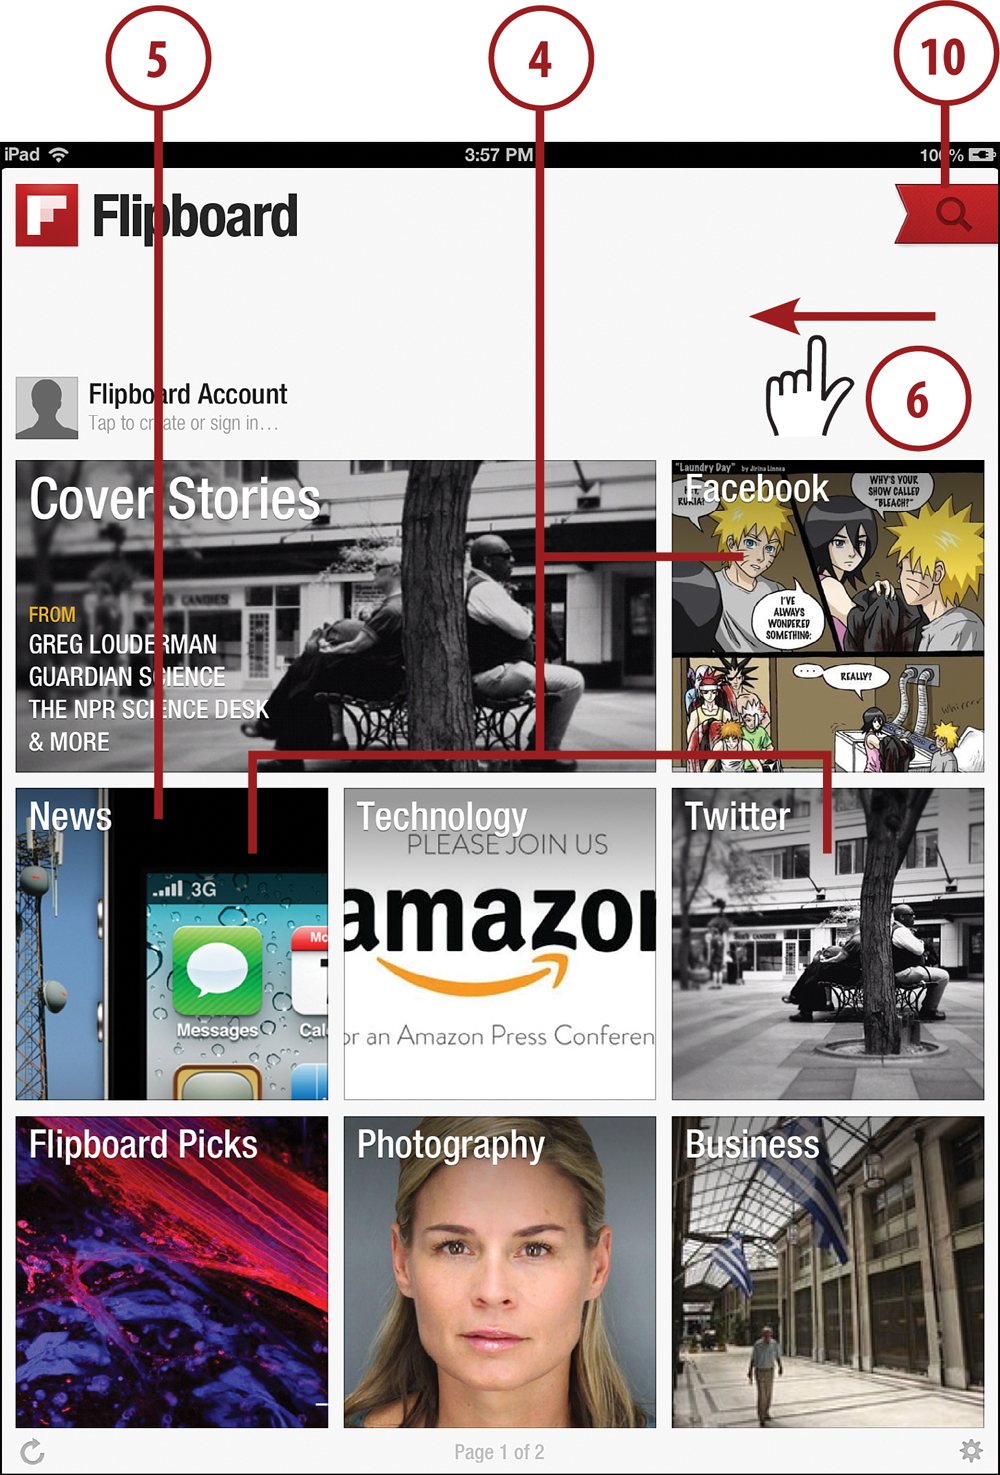
3. Swipe the Flip button to the left to continue to your main Flipboard page.
4. Sections match either a subject or a social network that you have added to your Flipboard.
5. Tap a section to view stories in it.
6. Swipe to move to the next page of sections.
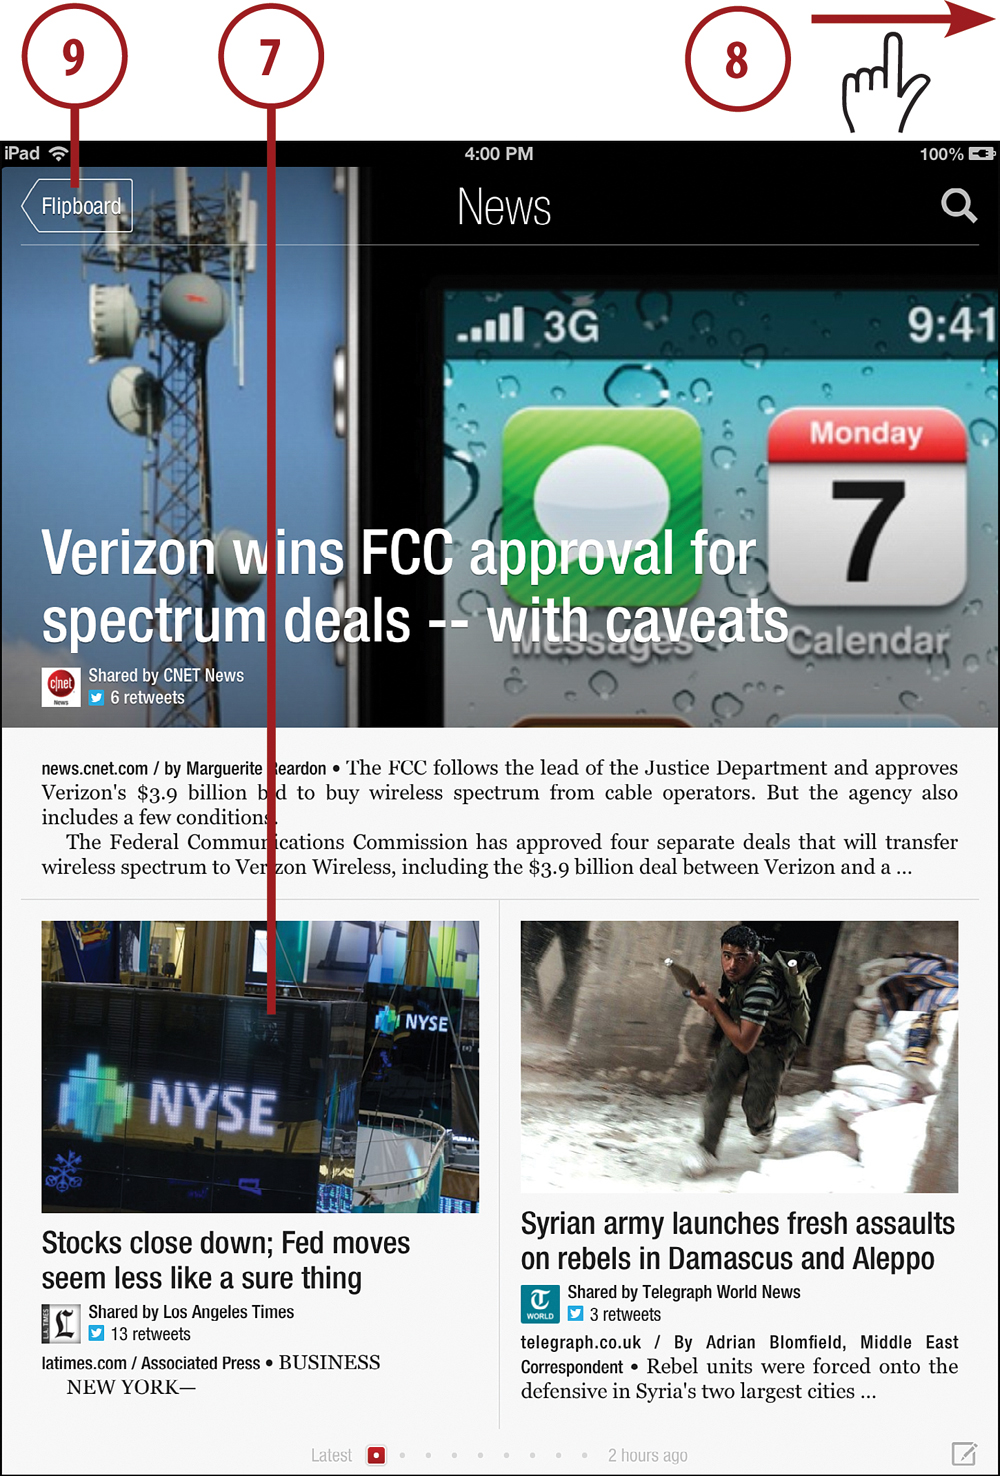
7. Tap a story to view the original text and images.
8. Flip to the next page to view more stories.
9. Return to the sections page.
10. Tap the red tag to view which social networks and sites make up your Flipboard content.
11. These are the sources you have set up so far.
12. Add more social networks and sources.
13. Add some popular news sources by category.
14. Search for news sources using keywords.
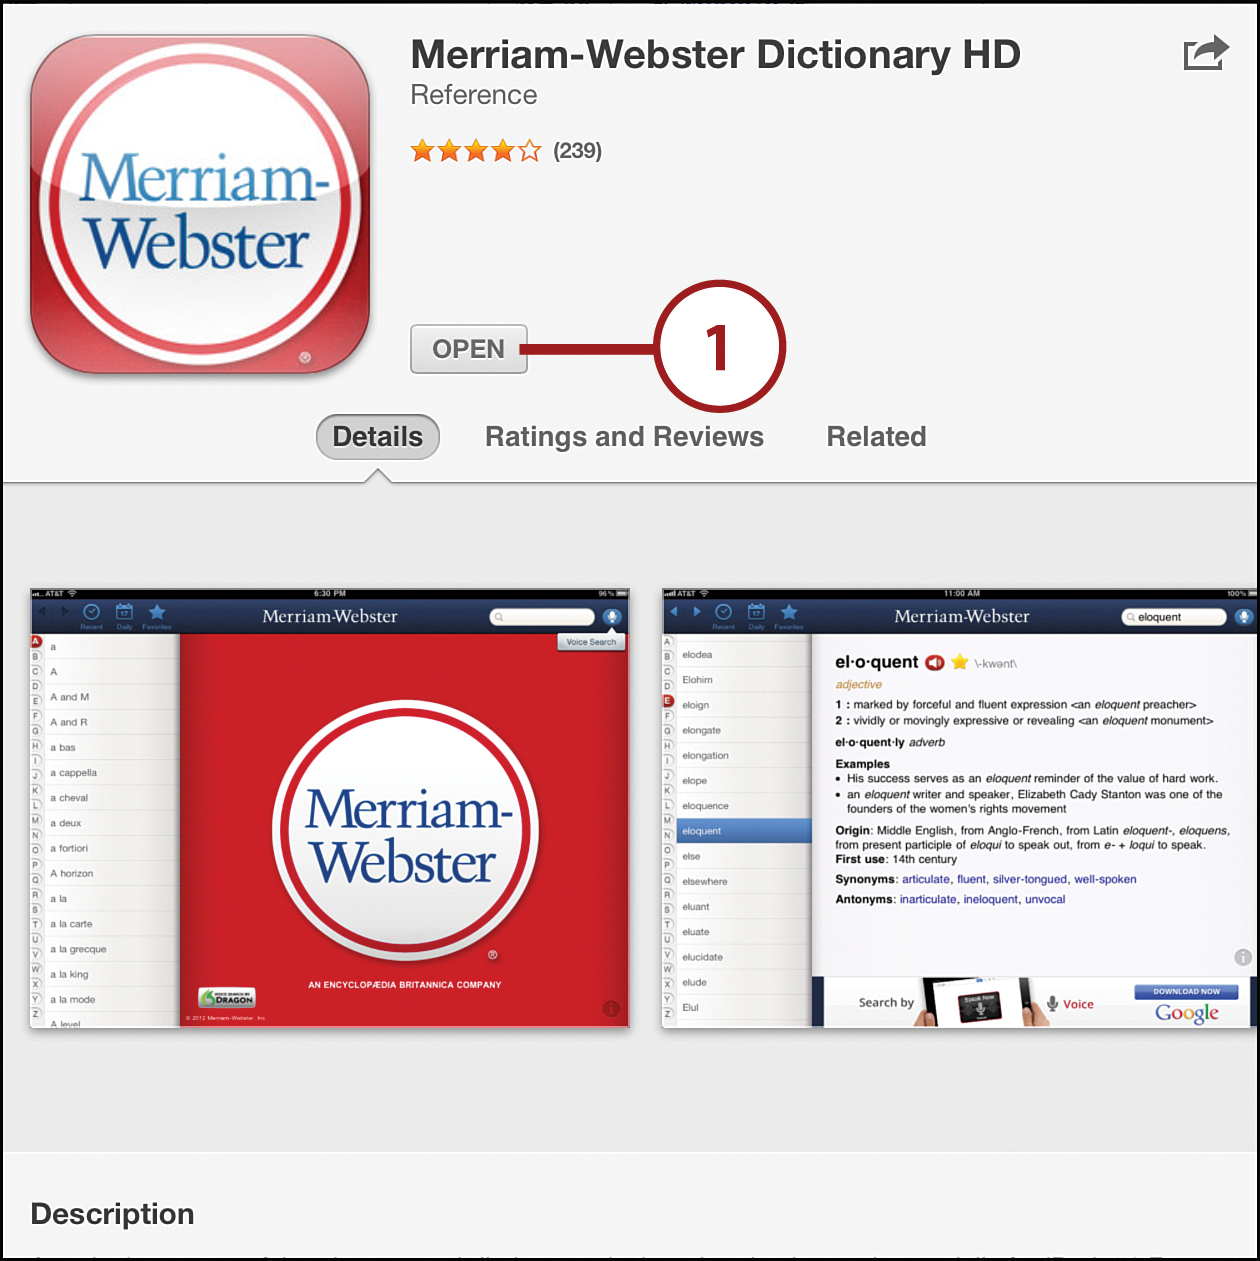
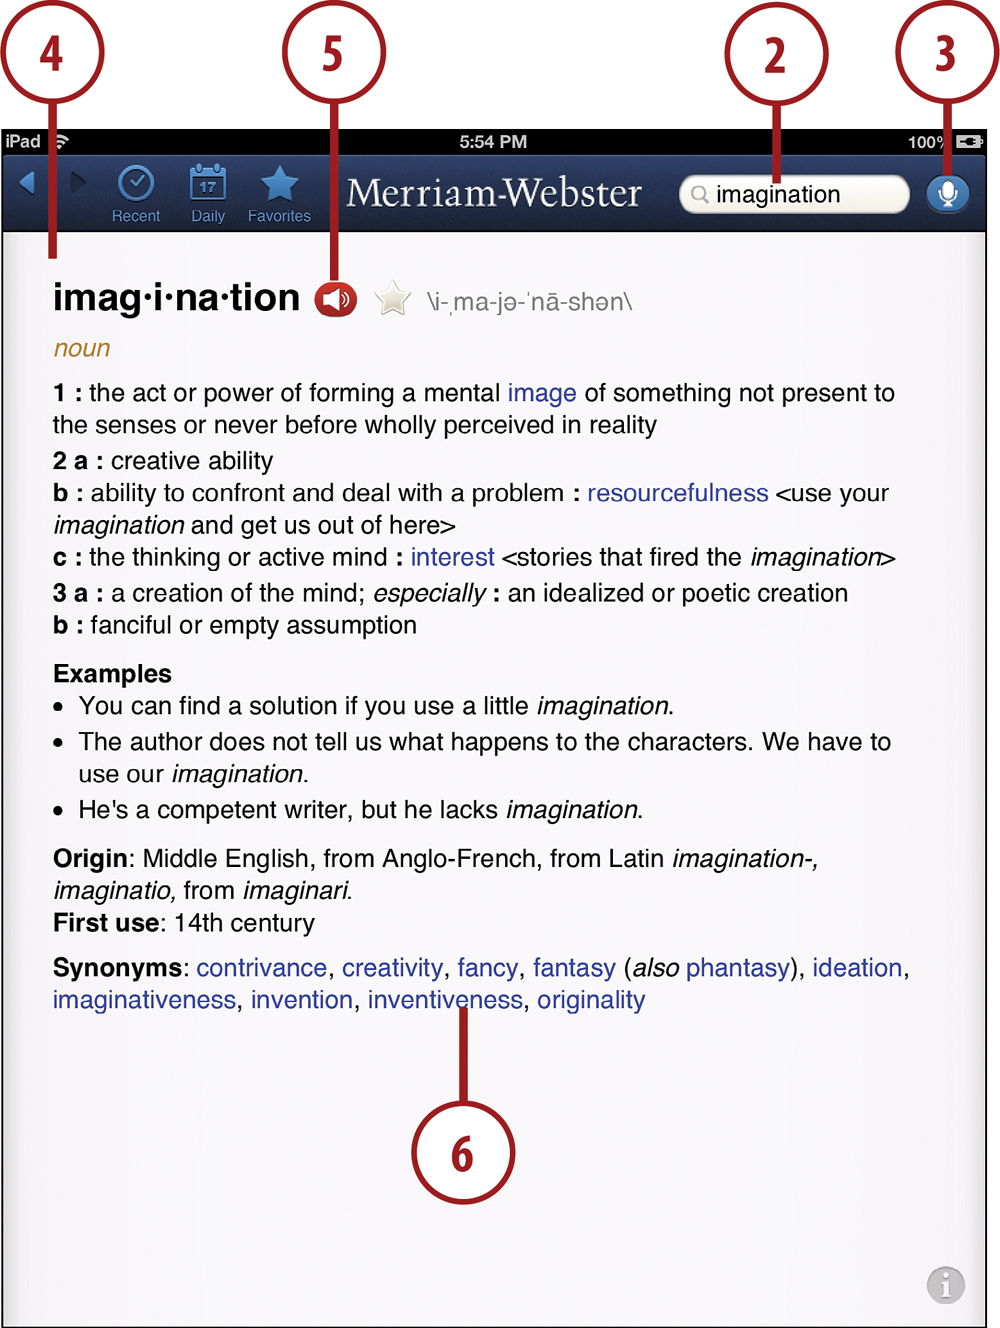
Adding a Dictionary
It would be a crime to have to carry a dictionary with you in addition to your iPad. Of course, the solution is to get a dictionary app for your iPad. The Merriam-Webster Dictionary HD app is a free download from the App Store. There is also a premium version that removes the ads and adds illustrations and other features for a few dollars.
1. Find the Merriam-Webster Dictionary HD app in the App Store, install it, and then launch it.
Of course, if you prefer another dictionary that doesn’t have an iPad app, you can always just bookmark that site in Safari. You can also create a Home screen bookmark as we did in Chapter 7.
2. Tap in the search box and enter a word to look up.
3. You can also tap the microphone button and speak the word to look it up. Handy if you don’t know how to spell the word.
4. The word and definition appears.
5. You can tap here to have the word spoken so you can hear its pronunciation.
6. The app can also be used as a thesaurus. A list of synonyms appears at the bottom. Tap any one to jump to that word. In fact, any blue word in the definition can also be tapped to jump to that word for further clarification.
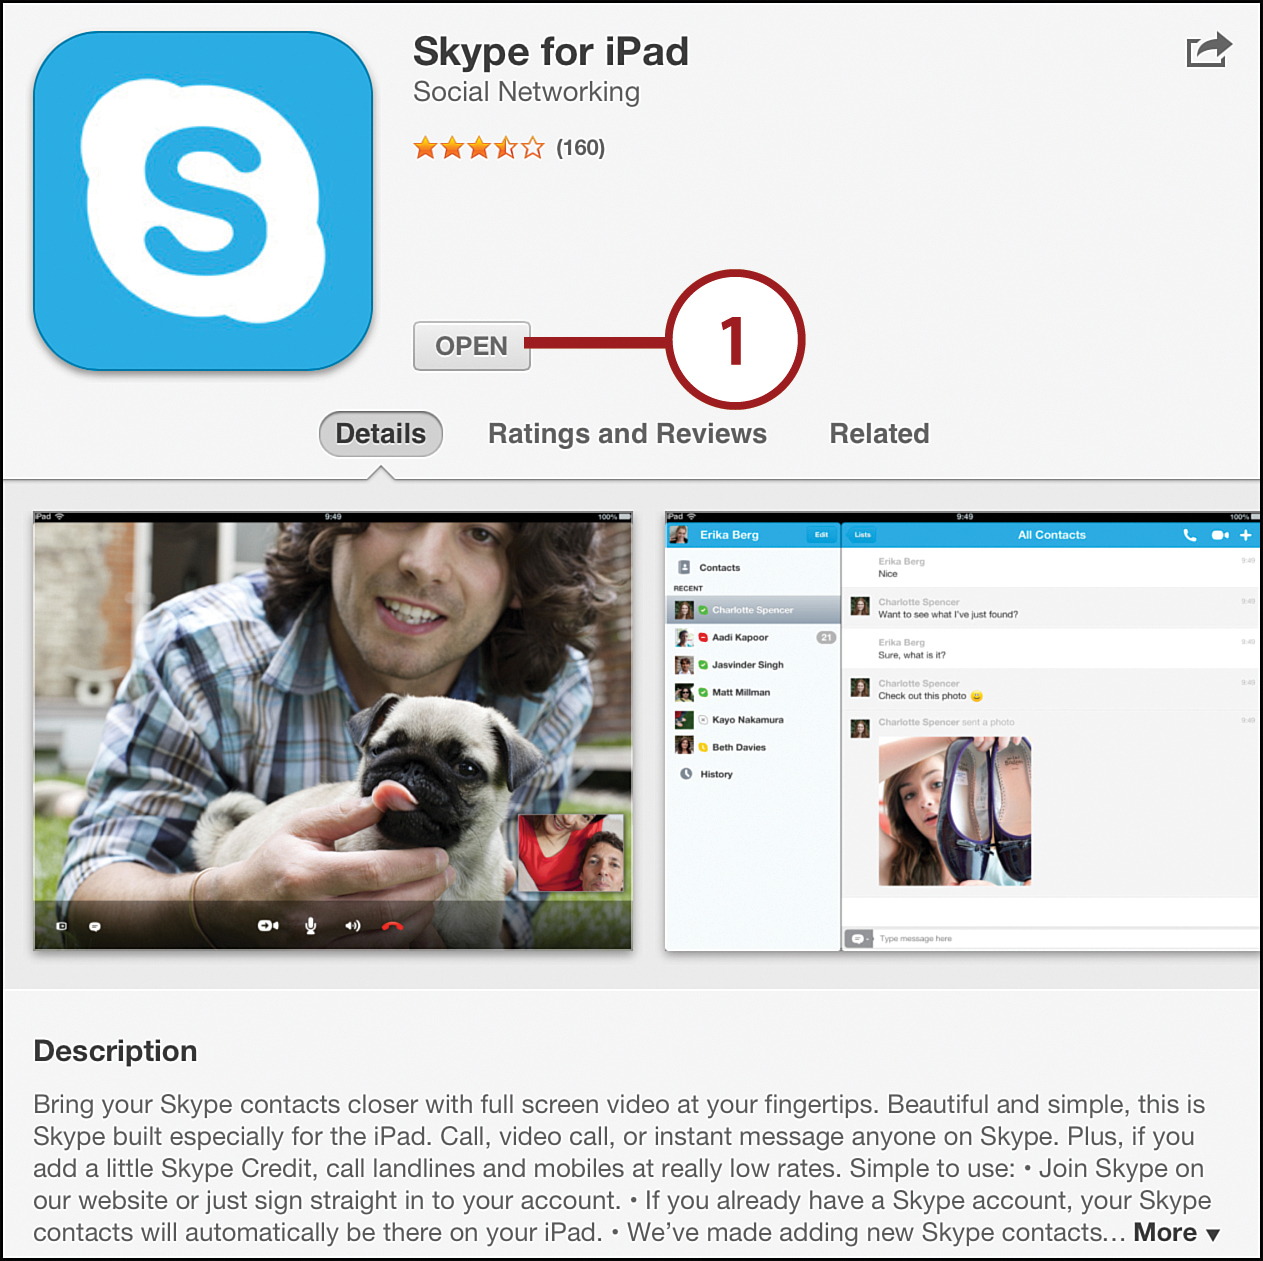
Using Skype for iPad
Your iPad works quite well as a phone when you use a VoIP (voice over IP) app. Skype is probably the most well known. Make sure you get Skype for iPad and not the small-screen iPhone Skype app.
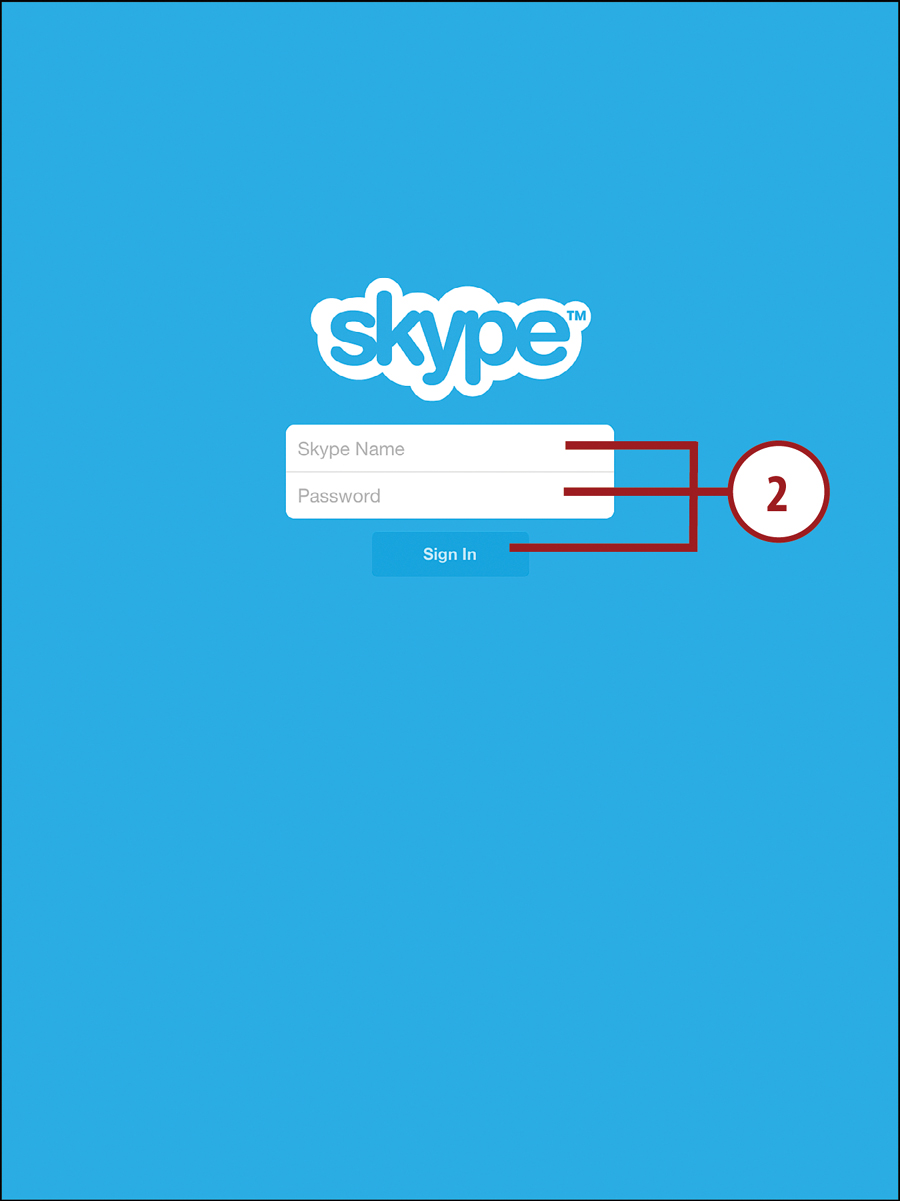
1. Search for Skype in the App Store. Make sure you look for the iPad app, not the iPhone/iPod touch app of the same name. Install it and then launch it.
2. When you run the Skype app, you need to enter your ID and password and then sign in. After you do this the first time, you can skip this screen.
You need a Skype account to use the Skype app. You can get a free one at http://www.skype.com/. If you find the service useful, you might want to upgrade to a paid account, which lets you call land lines and other phones. The free account lets you call only other Skype users.
3. Use the on-screen keypad to enter a phone number. You need a country code, too, which means using a 1 for U.S. calls. It should be there by default.
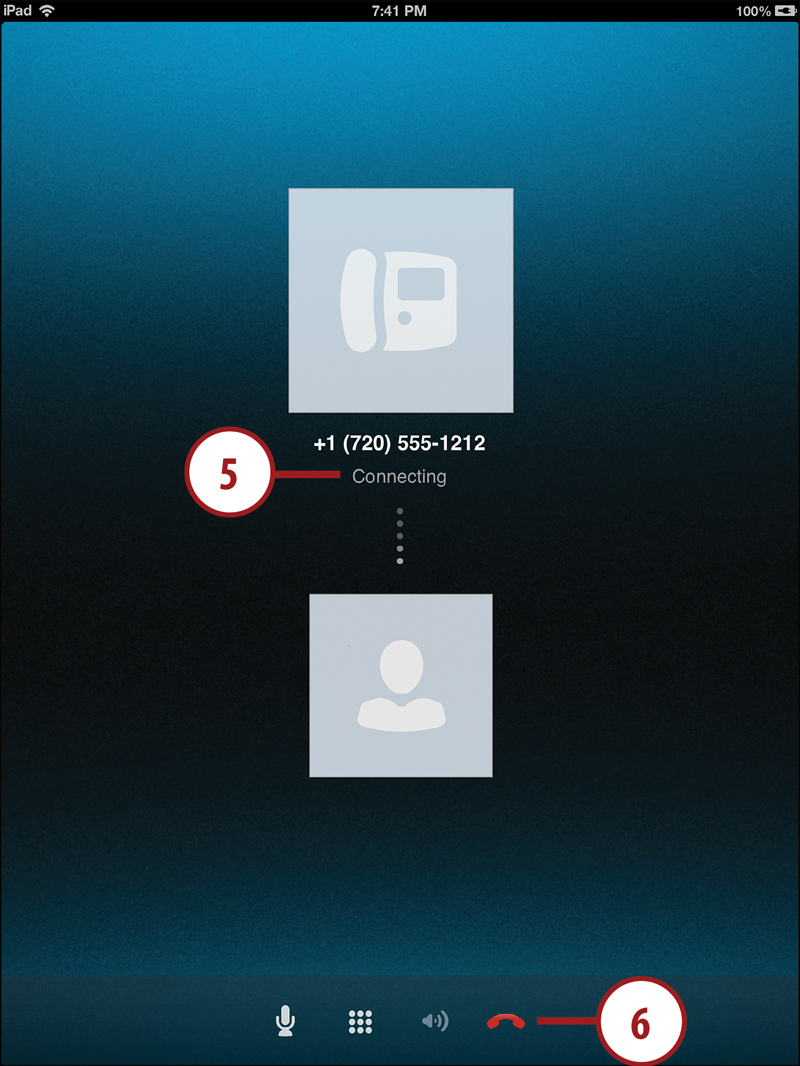
4. Tap Call.

5. While placing a call, you see the status, and eventually the elapsed time, and Mute and Hold buttons.
6. Tap the hang up button to hang up.
How Do You Hold Your iPad to Talk?
The microphone is at the top of your iPad. The speaker is at the bottom on the back. The best way may be to just put the iPad in front of you and ignore the locations of both. Or, you can get a set of iPhone earbuds.
You can also make video calls with Skype using your iPad’s cameras. But you must be connecting to another Skype user who also has a video camera connected to their computer, or perhaps they are using an iPad as well.
Putting Notes on Your Home/Lock Screen
Your Lock screen and Home screen backgrounds look pretty. But can they be functional? One app attempts to make them more useful by enabling you to put sticky notes on them. Search in the App Store for Stick It and add it to your collection of apps.
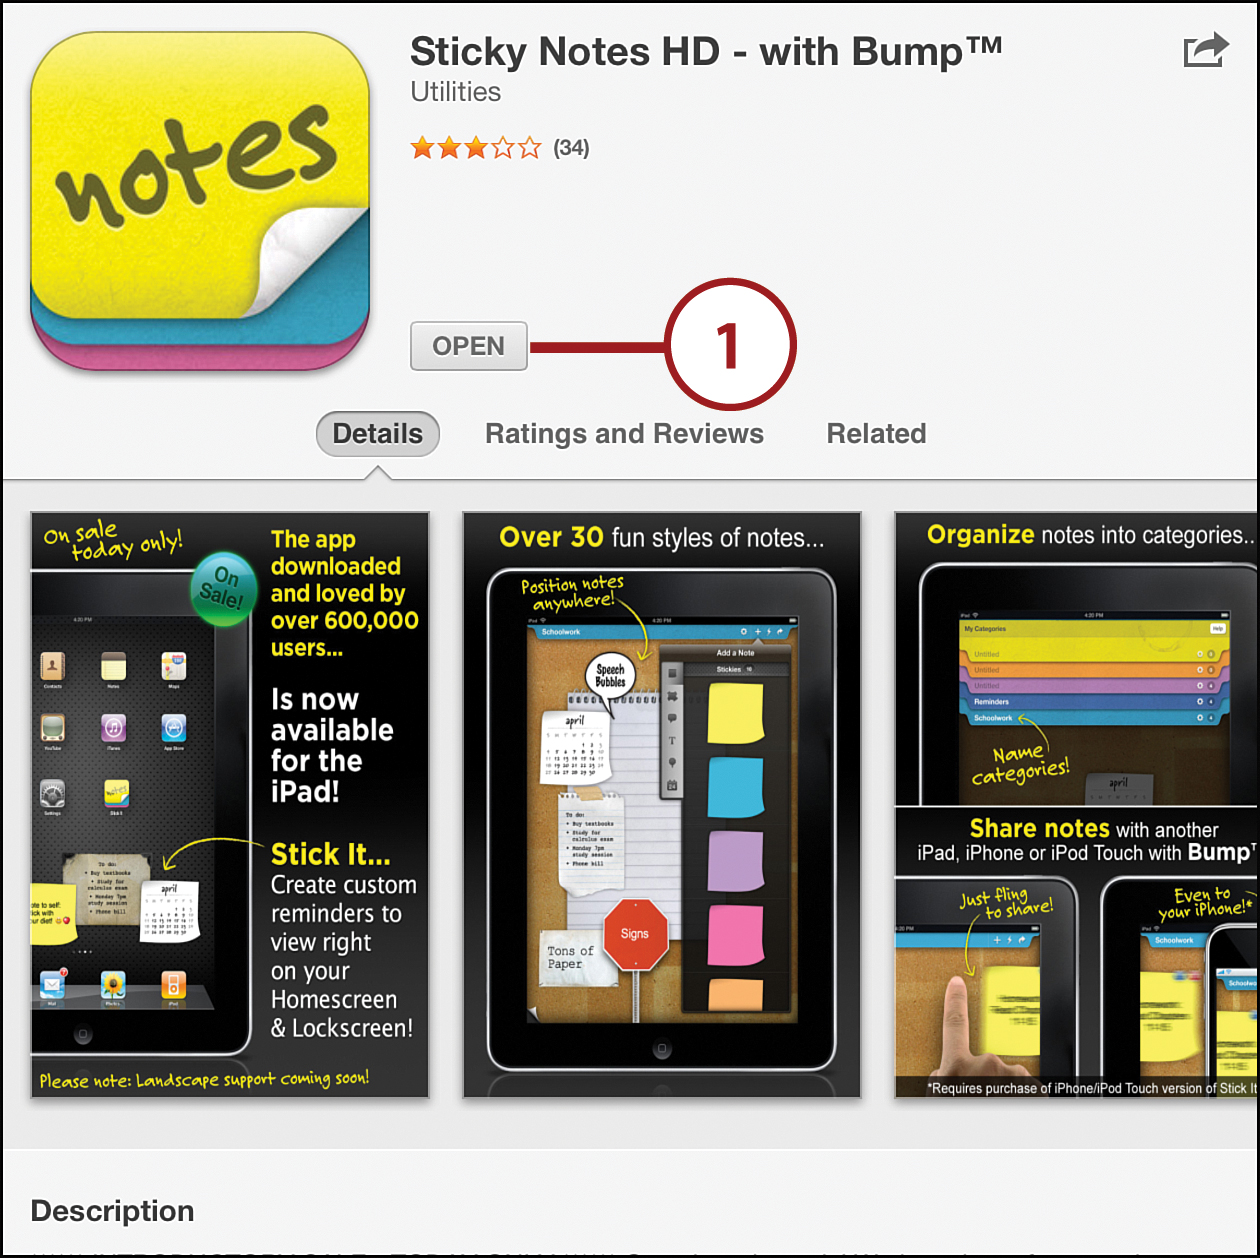
1. Search for Sticky Notes HD in the App Store. Install it and then launch it.
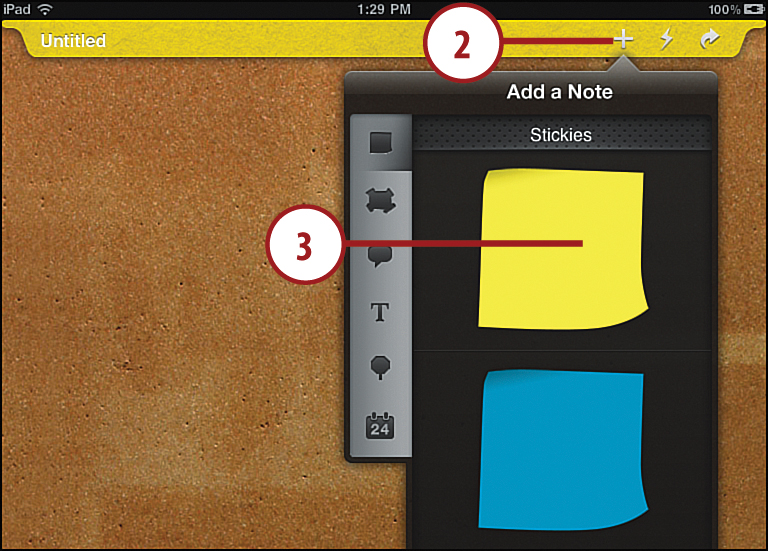
2. Tap + to create a new note. You may be asked to choose Small or Large. Choose Large.
3. Select a color from the list. You can also select different note types, such as talk bubbles, pieces of paper, or even just plain text boxes.
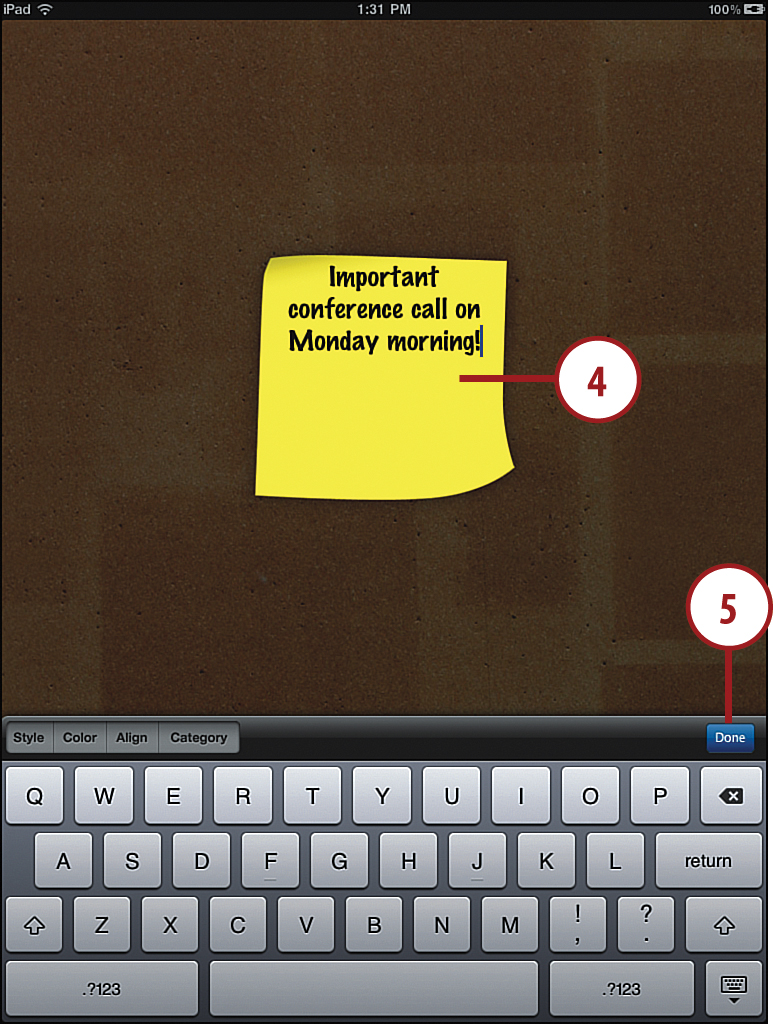
4. Type a note using the on-screen keyboard.
5. Tap Done.
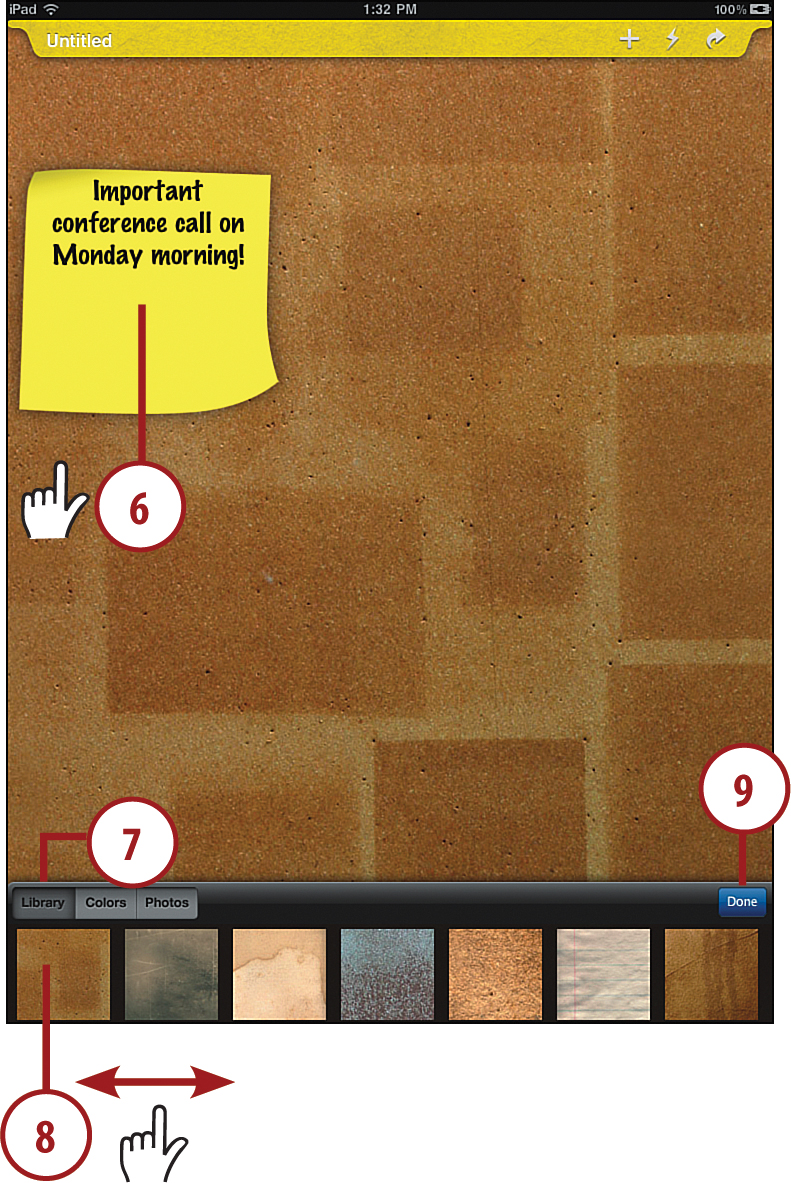
6. Drag the note into a better position.
7. Tap the bottom-left corner to pick a background image.
8. Choose a background from the Library, Colors, or Photos buttons. Tap a new background.
9. Tap Done.
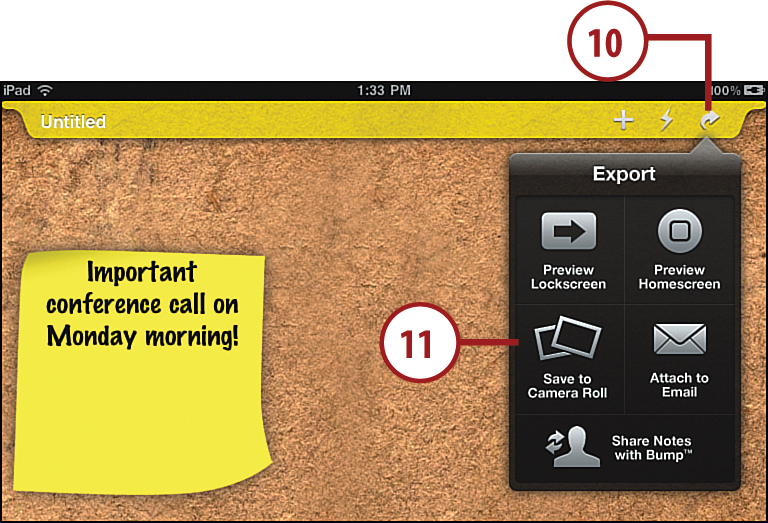
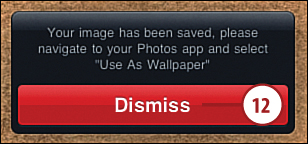
11. Tap Save to Camera Roll.
12. Tap Dismiss.
Although the Stick It app is great for making backgrounds with notes on them, it can’t make these backgrounds your Lock or Home screen. You have to do that yourself using the Photos app or the Brightness & Wallpaper settings in the Settings app.
13. Press your Home button to return to the Home screen and then tap the Photos icon.
14. Find the photo you just took and tap it.
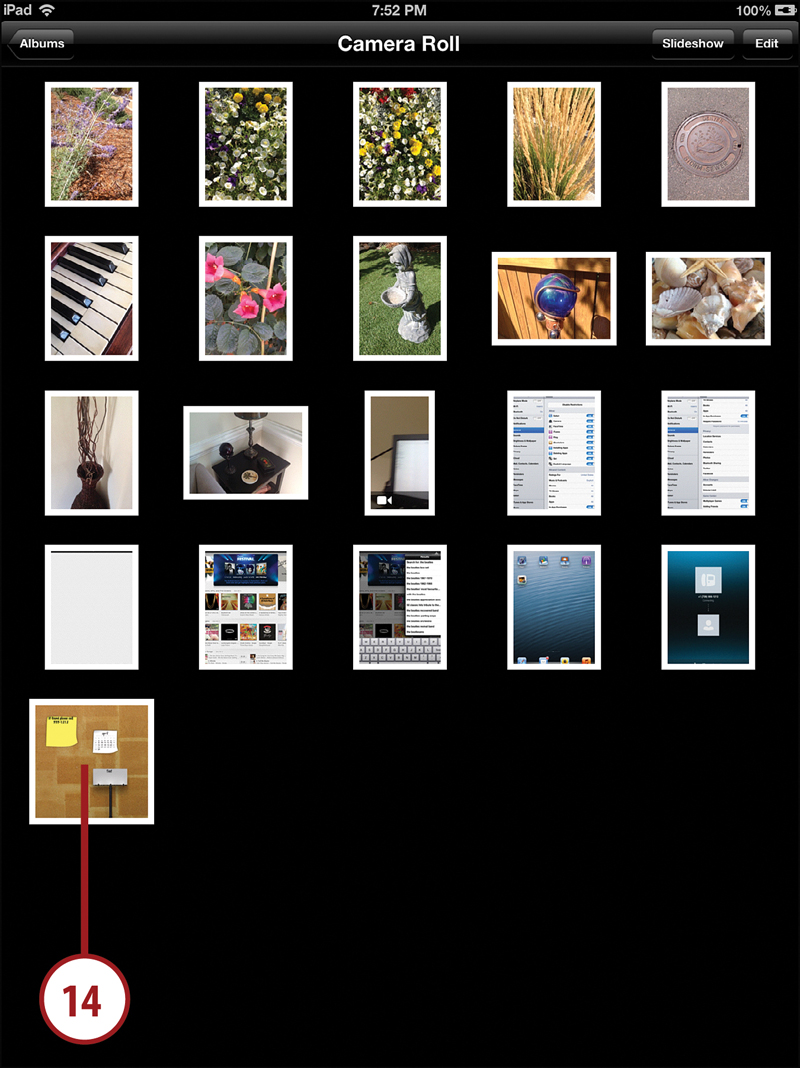
15. Tap the Boxed Arrow button.
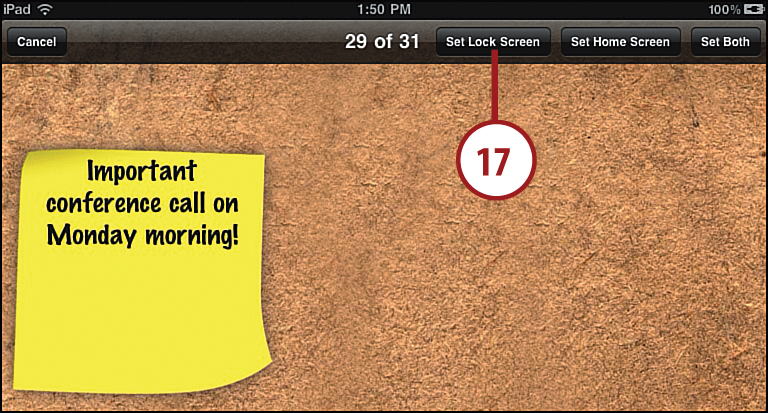
16. Tap Use as Wallpaper.

17. Tap Set Lock Screen.
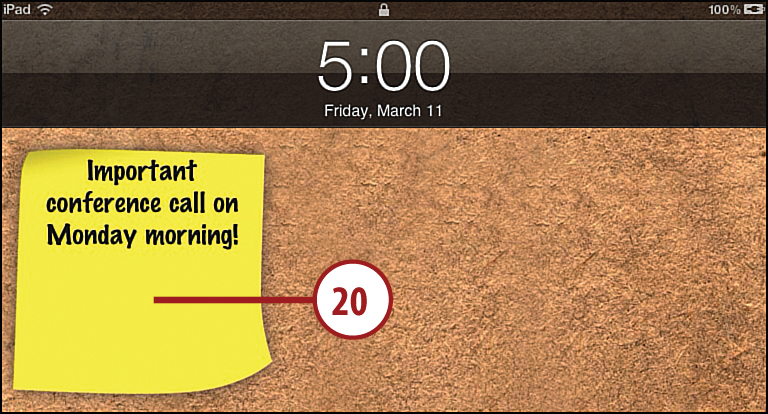
18. Press the Wake/Sleep Button at the top of your iPad.
19. Press the Home button.
20. The background, complete with the sticky note, now appears on your Lock screen.
Another use for this app is to quickly and easily put your emergency contact information on the Lock screen. You can just put a “In case of emergency” phone number and instructions on the screen, or “If found, please call:” phone number.
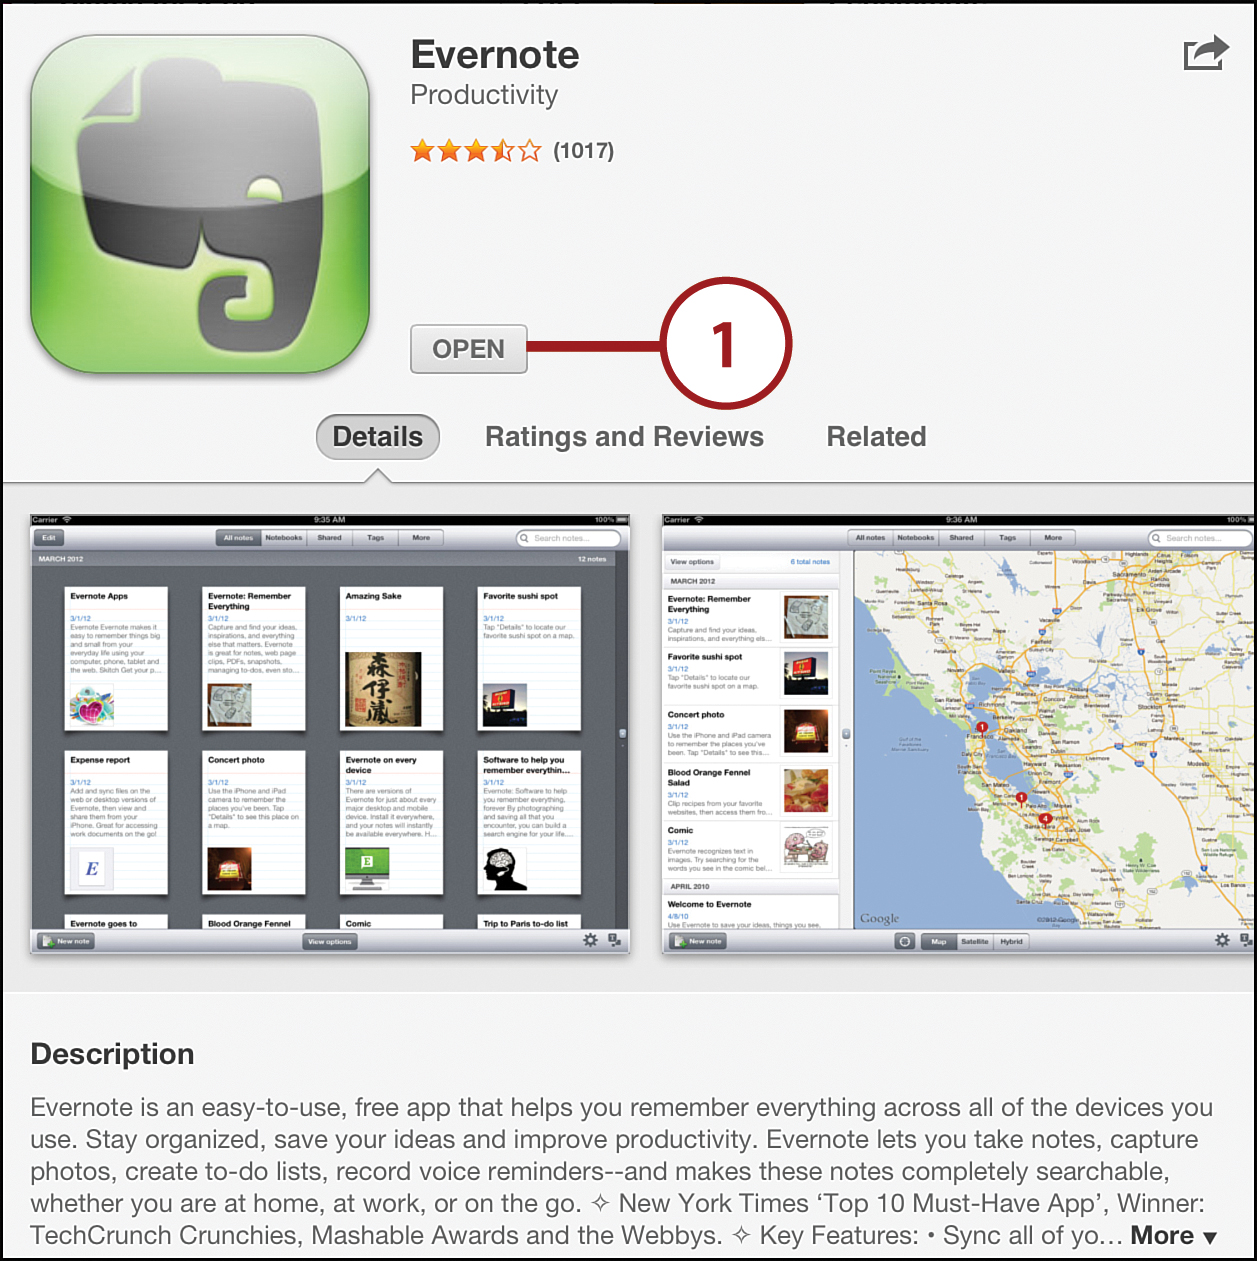
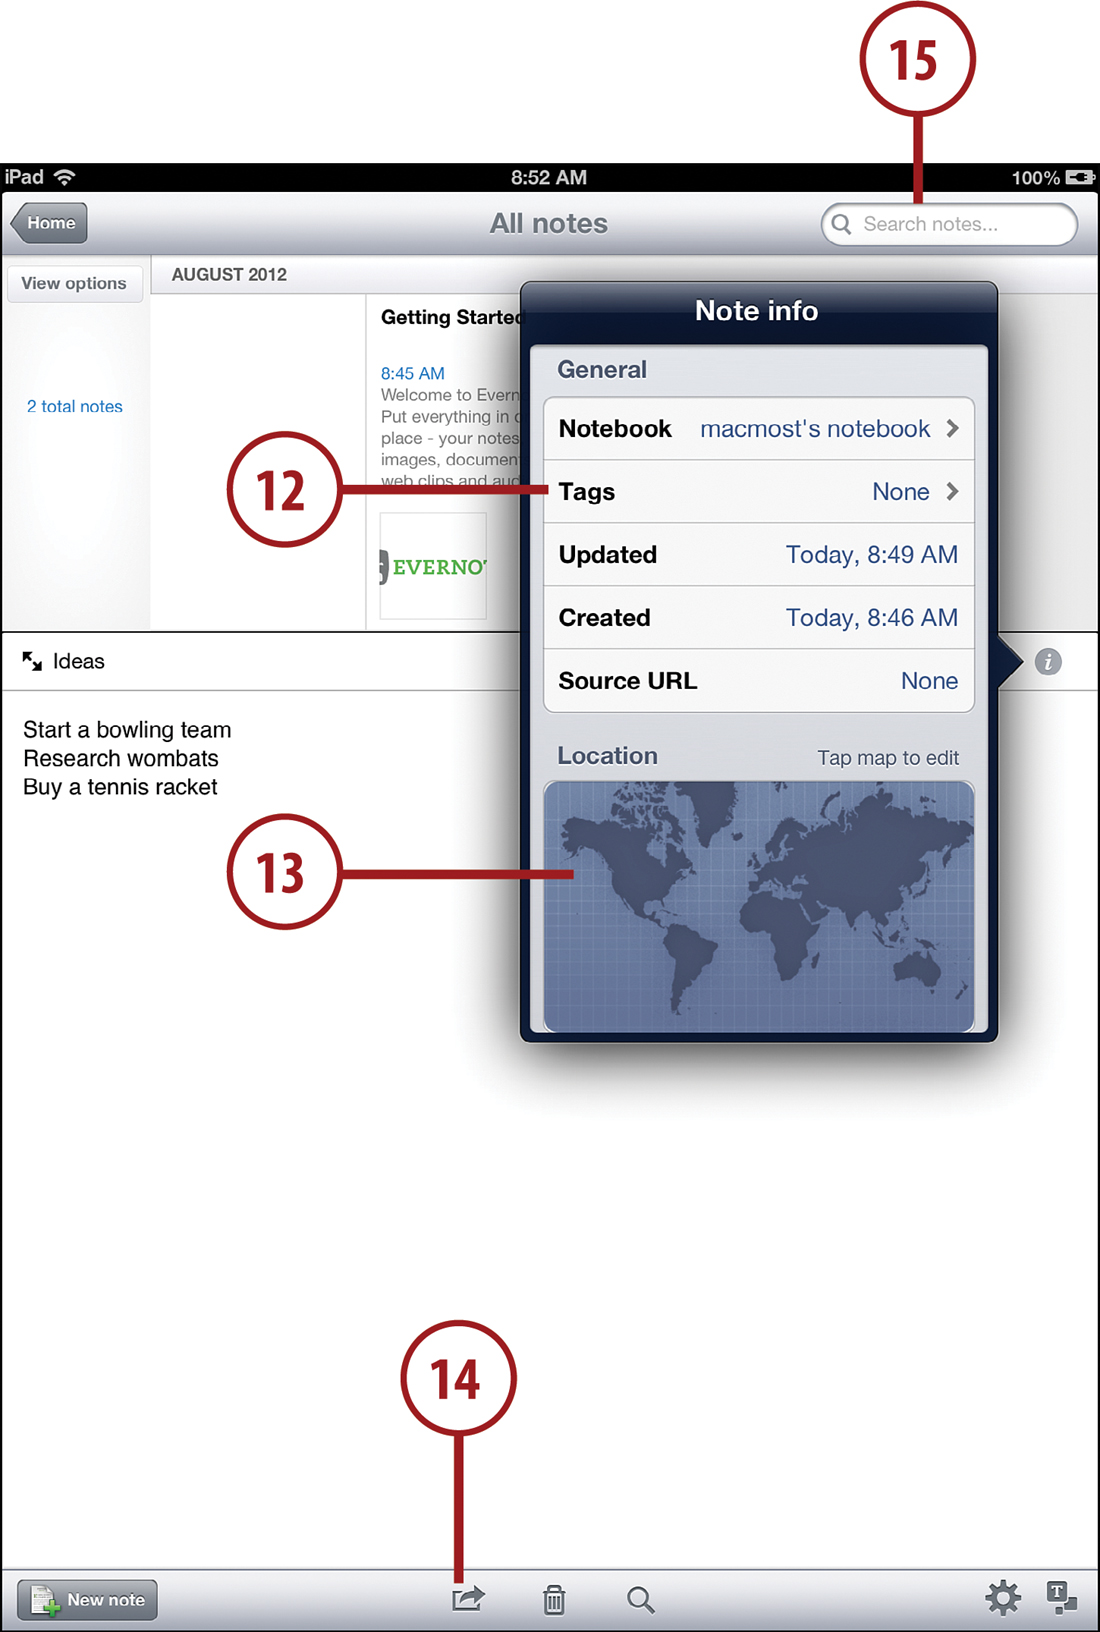
Creating Multimedia Cloud Notes with Evernote
One of the most popular productivity apps on the iPad and iPhone, as well as Macs and PCs, is Evernote. At its heart, it is like the built-in Notes app on your iPad. You can create text notes, and they will sync across your devices.
But Evernote has several advanced features that endear it to users. First, you can easily record audio and take photos and add them to your notes. Second, it is independent of an email service like iCloud or Gmail. Third, there are Evernote clients for almost every computer and device. You can even view your notes in a web-based interface if you need to.
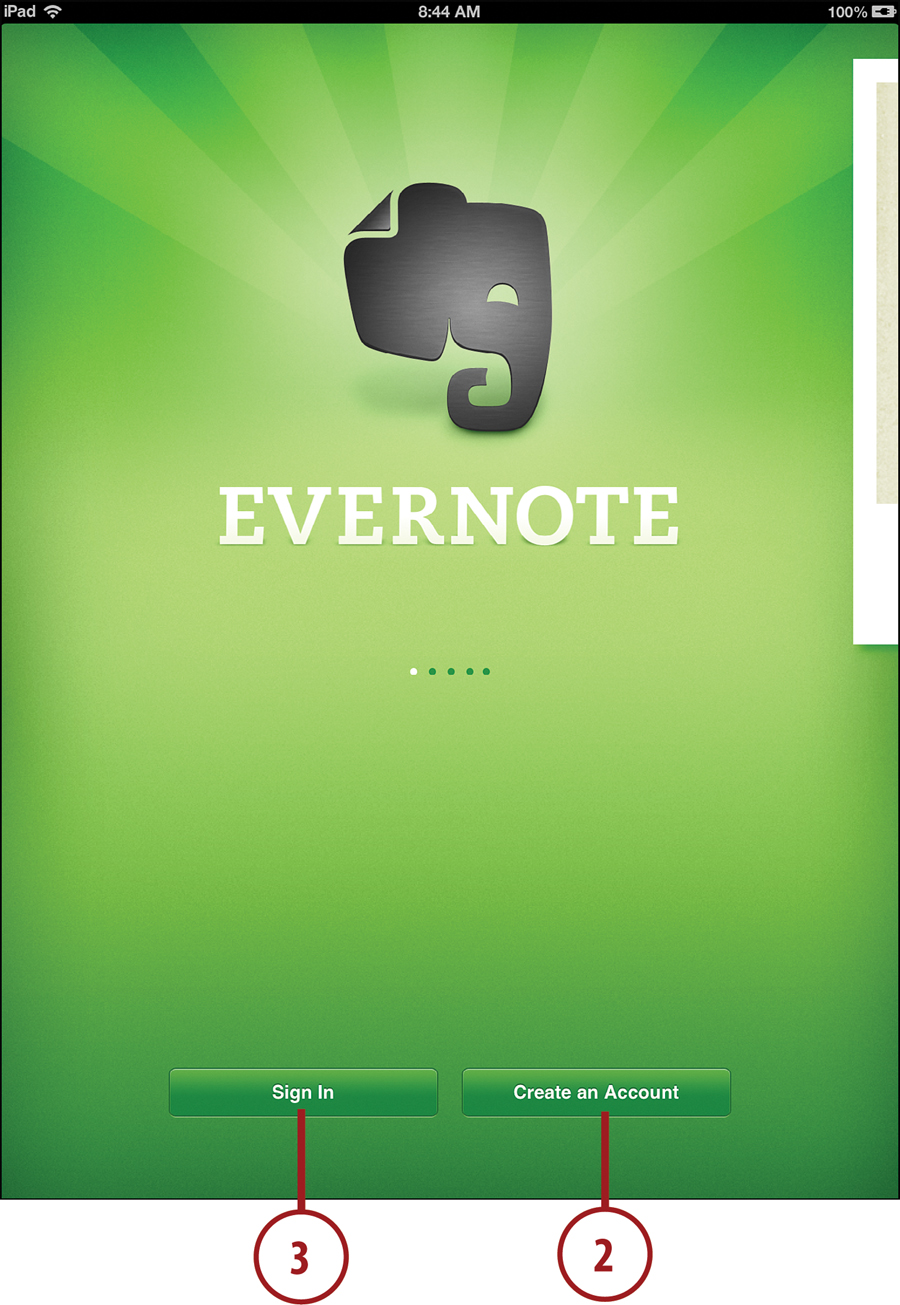
1. Search for Evernote in the App Store and install it.
2. If you have never used Evernote, you can create a new account on your iPad. Basic accounts are free.
3. If you already have an Evernote account, just enter your ID and password to log on.
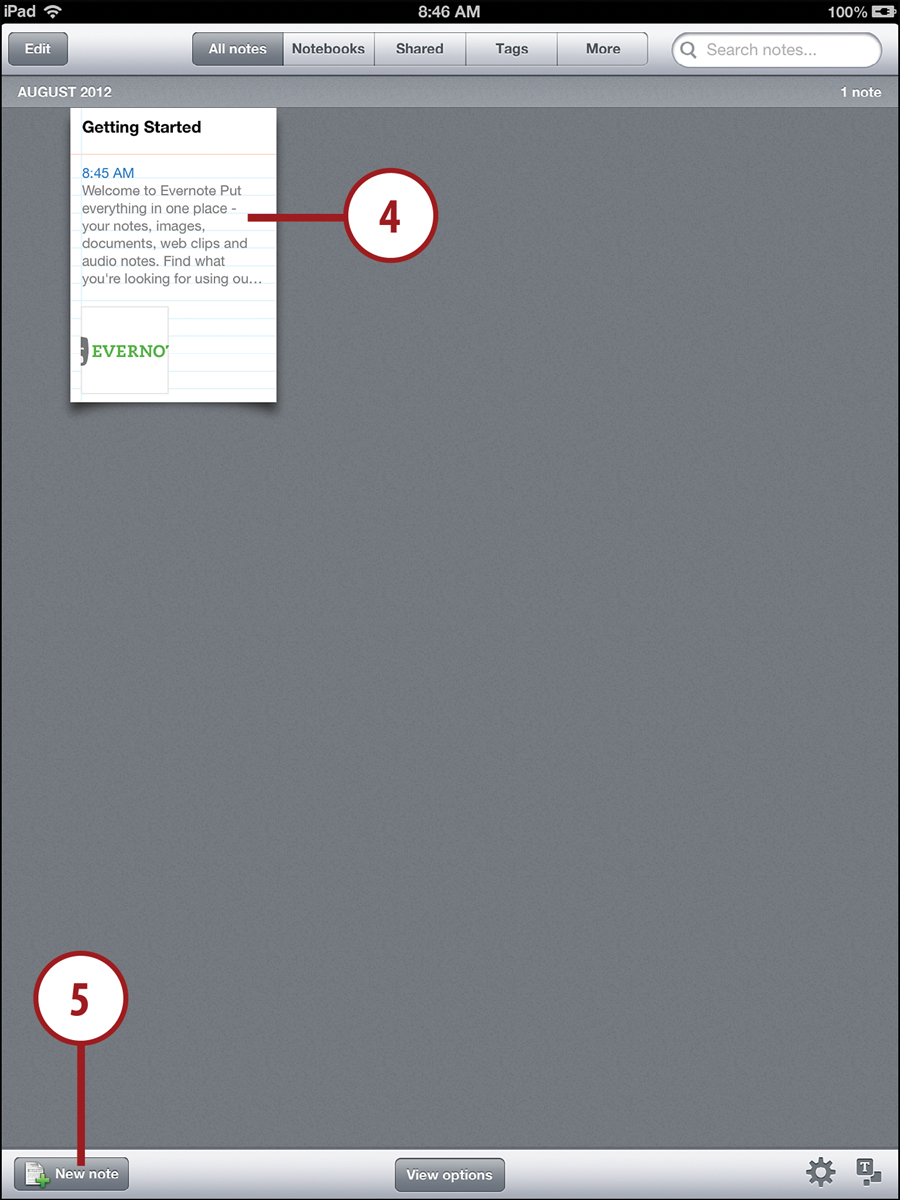
4. The main screen will show your notes. Tap a note to view it.
5. To create a new note, tap here.
6. Tap in the title area to type a name for the note.
7. Tap in the body area to type text into the note.
8. At any time you can tap the photo button to take a picture with your iPad and add it to the note at the current cursor location. The button next to it allows you to select a photo from your photo library.
9. Tap Evernote’s microphone button to record a voice memo or simply record the sound around you.
10. You can format text with a variety of controls, even creating checkboxes and lists.
11. Tap the info button to get info on a note.
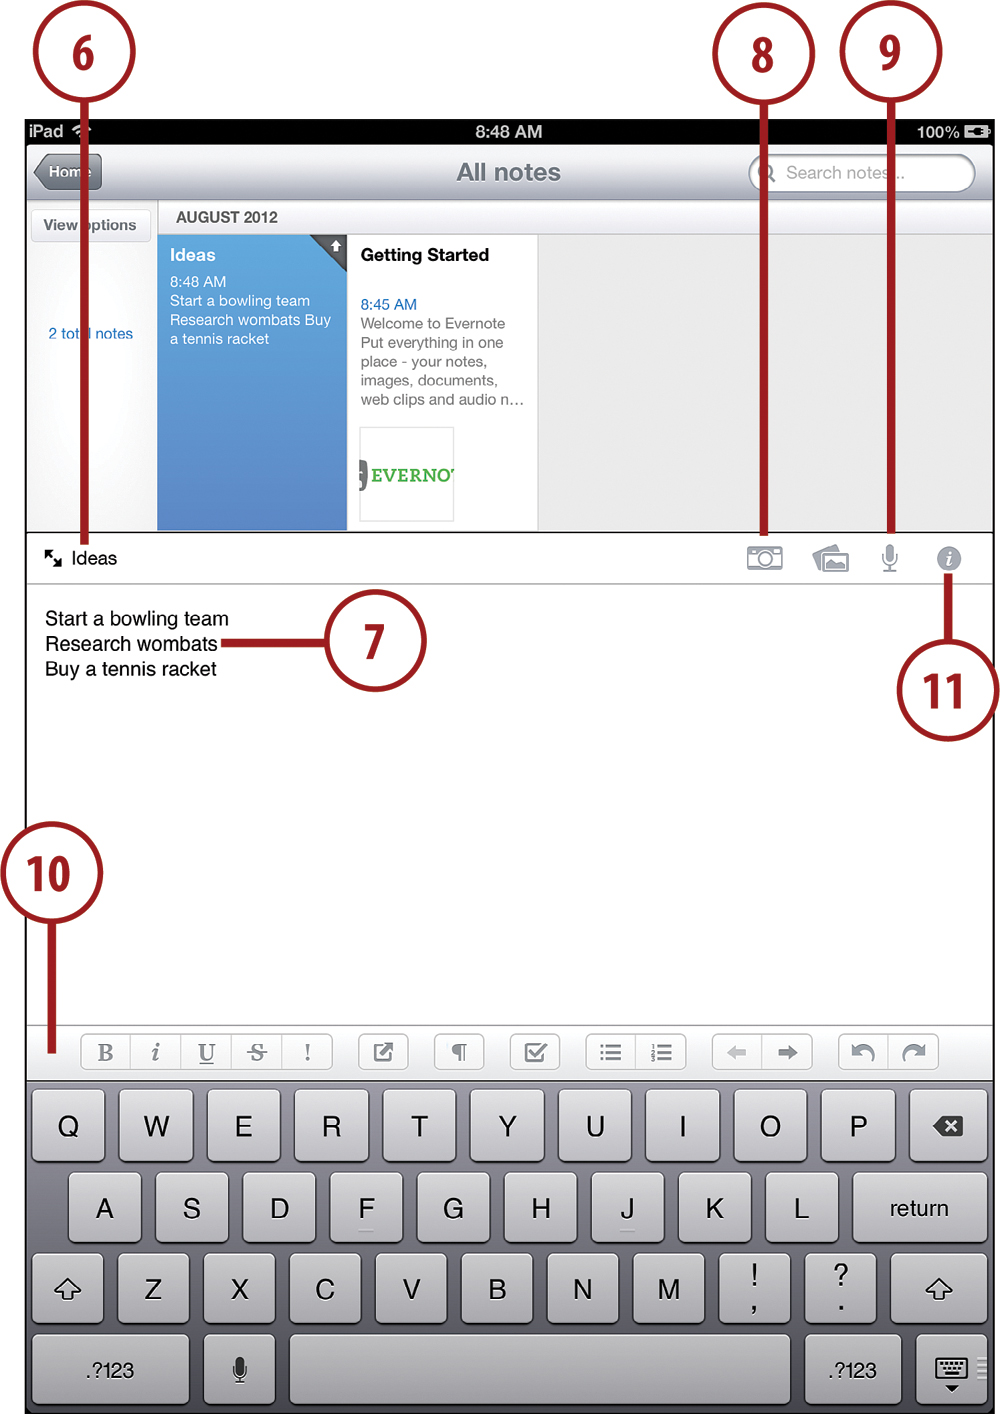
12. You can add tags to notes as one way to organize them.
13. If you allow it, notes will include location information about where you were when you created the note.
14. You can share the note on Face-book, Twitter, via Email, or print it.
15. You can search the content of notes.
The real power of Evernote involves how it syncs quickly and wirelessly over the Internet. For instance, you can use it to write notes, record audio, and take pictures with your iPad while out of the office, and then find them all on your Mac or PC when you get back to your desk. Often, the picture-taking ability is used to grab snapshots of sketches on napkins or product information on the back of a box.
You Want Audio While Taking Notes?
If you want to record audio and take notes at the same time, try the app SoundNote. You can tap out text with the keyboard and draw with your finger all while audio is being recorded. Then it remembers where the audio stream was for each word. So tap a word to hear the audio at that moment.
Another app that does this is Circus Ponies NoteBook. You can type text, draw, take photos, and so on. You can turn on audio recording, and then each line in your note will match up with a portion of a recording. So you can sit in a lecture or meeting and take notes, and then refer back to the audio that matches each portion of your note. Wish I had these back in college!
Handwriting Notes
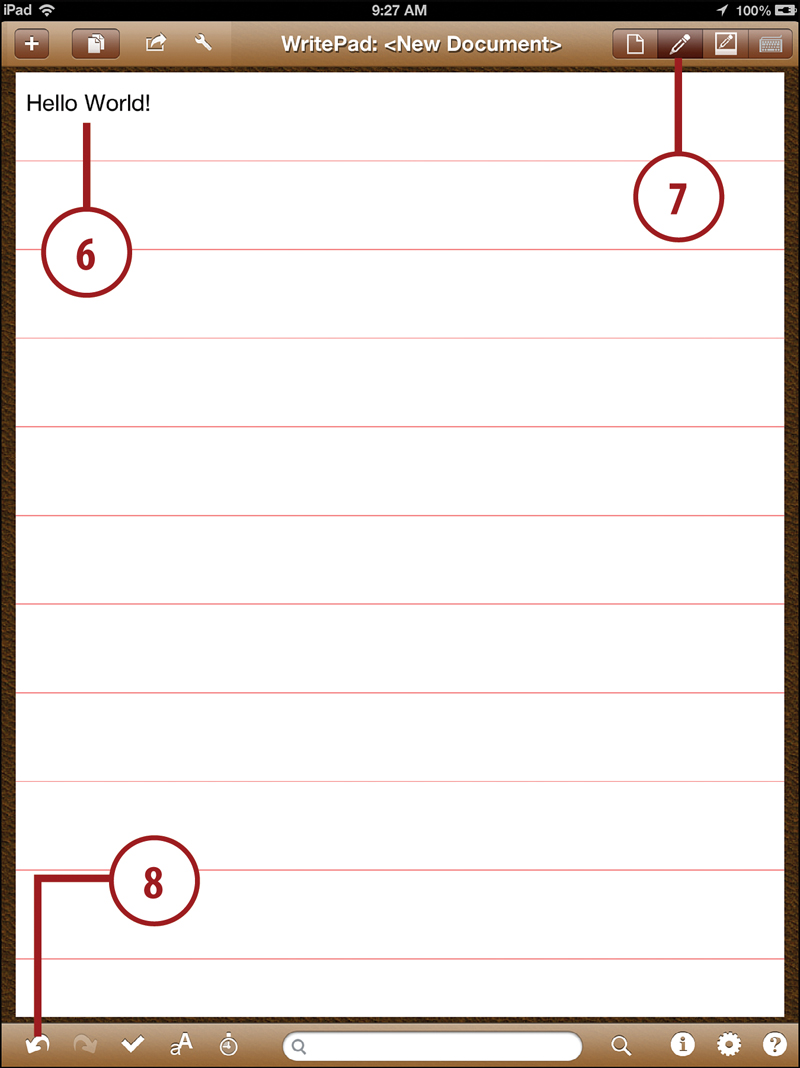
You’d think with a touch screen that the iPad could recognize your handwriting instead of making you type on an on-screen keyboard. The WritePad app enables you to take notes by typing or by using the touch screen to write with your finger.
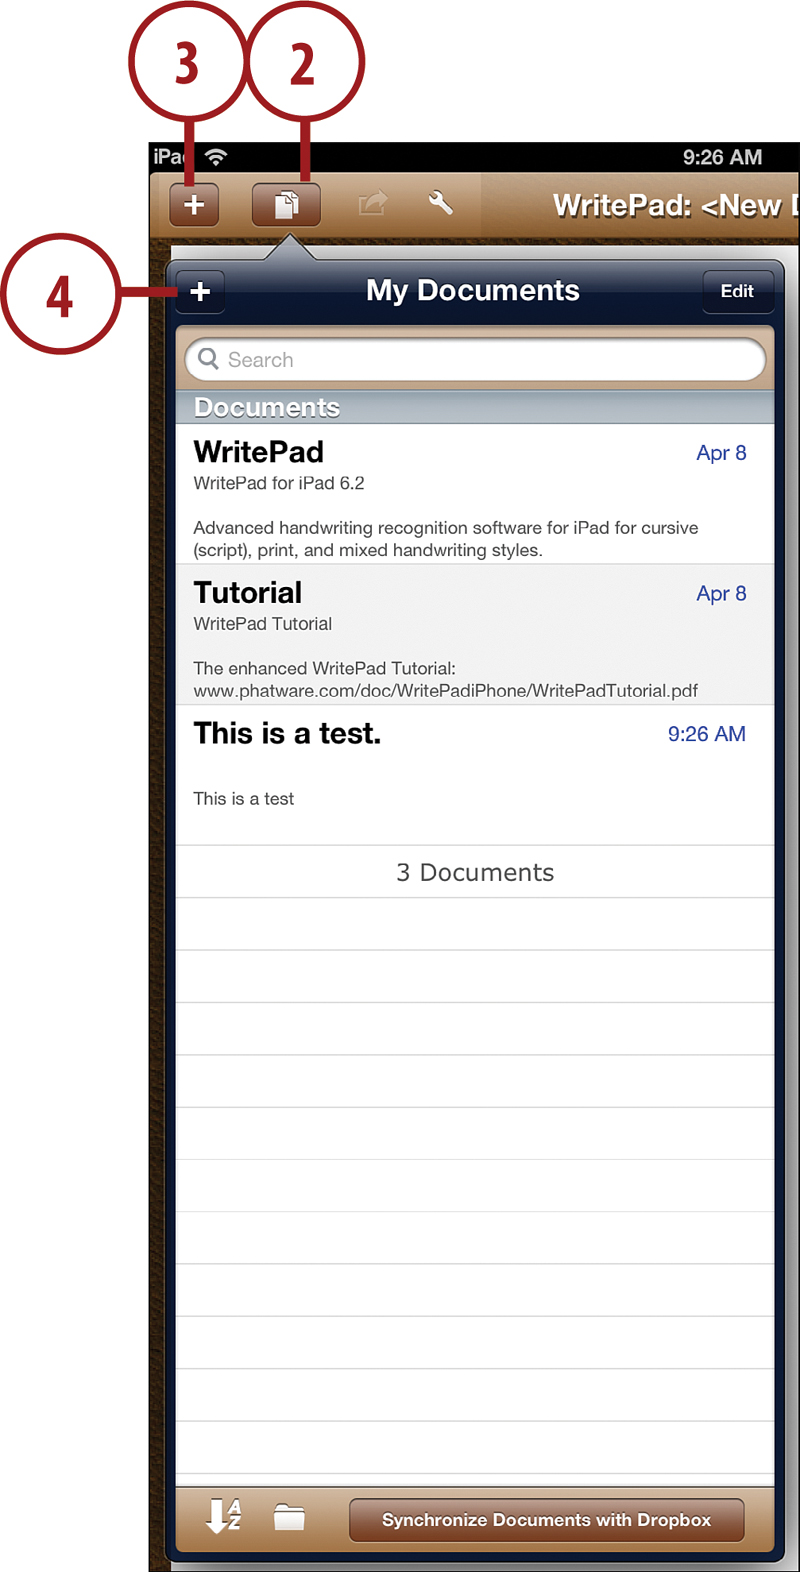
1. Find WritePad in the App Store. Install it and launch it.
2. Tap the My Documents button to view your current documents.
3. Tap + to start a new document.
4. You can create folders to organize your documents if you want.
5. Tap and drag around the screen using the tip of your finger like a pen or pencil. Start in the upper-left corner. You can use printed letters, cursive, or a mixture.
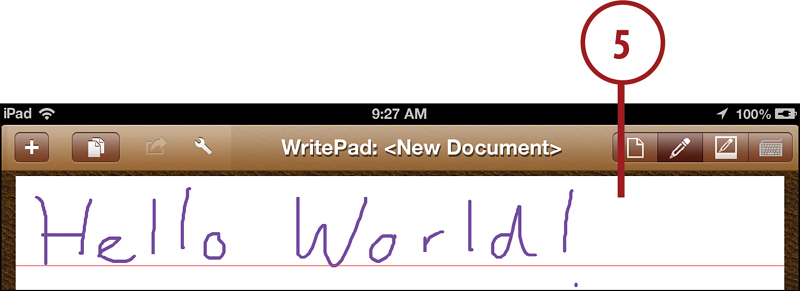
6. Stop writing and wait for the text to process. When it does, the text appears at the cursor location.
7. Tap the buttons at the top-right corner to switch between Reading mode, Writing mode, and Keyboard mode.
8. Tap the Undo button to undo the last text processed.
Looking for a Different Handwriting App?
If you’d rather have an excellent app that just lets you write and draw on the screen, try Penultimate. You create notebooks and write in them by drawing with your finger. You can also mark up PDF documents and enter text using the on-screen keyboard.
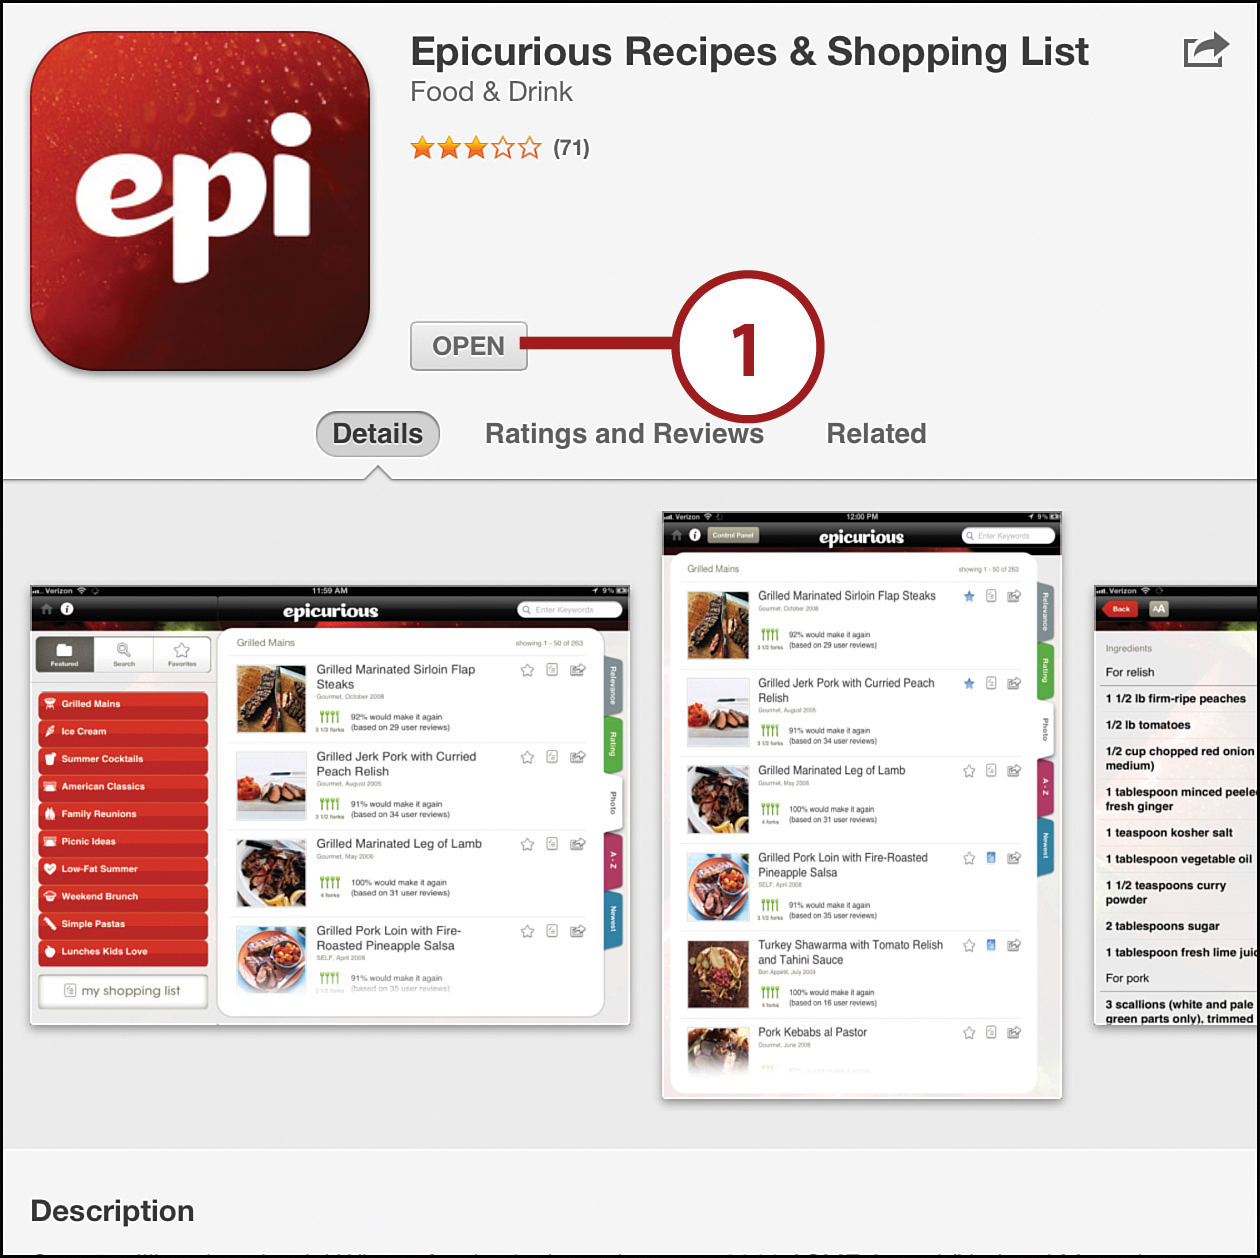
Using Epicurious
One application for early personal computers was to store and recall recipes. With the Internet, we can also share those recipes. And now with the iPad, there is finally a way to easily have these recipes with you in the kitchen while cooking. The Epicurious app is a favorite for such tasks.
1. Search for Epicurious in the App Store. Download and launch.
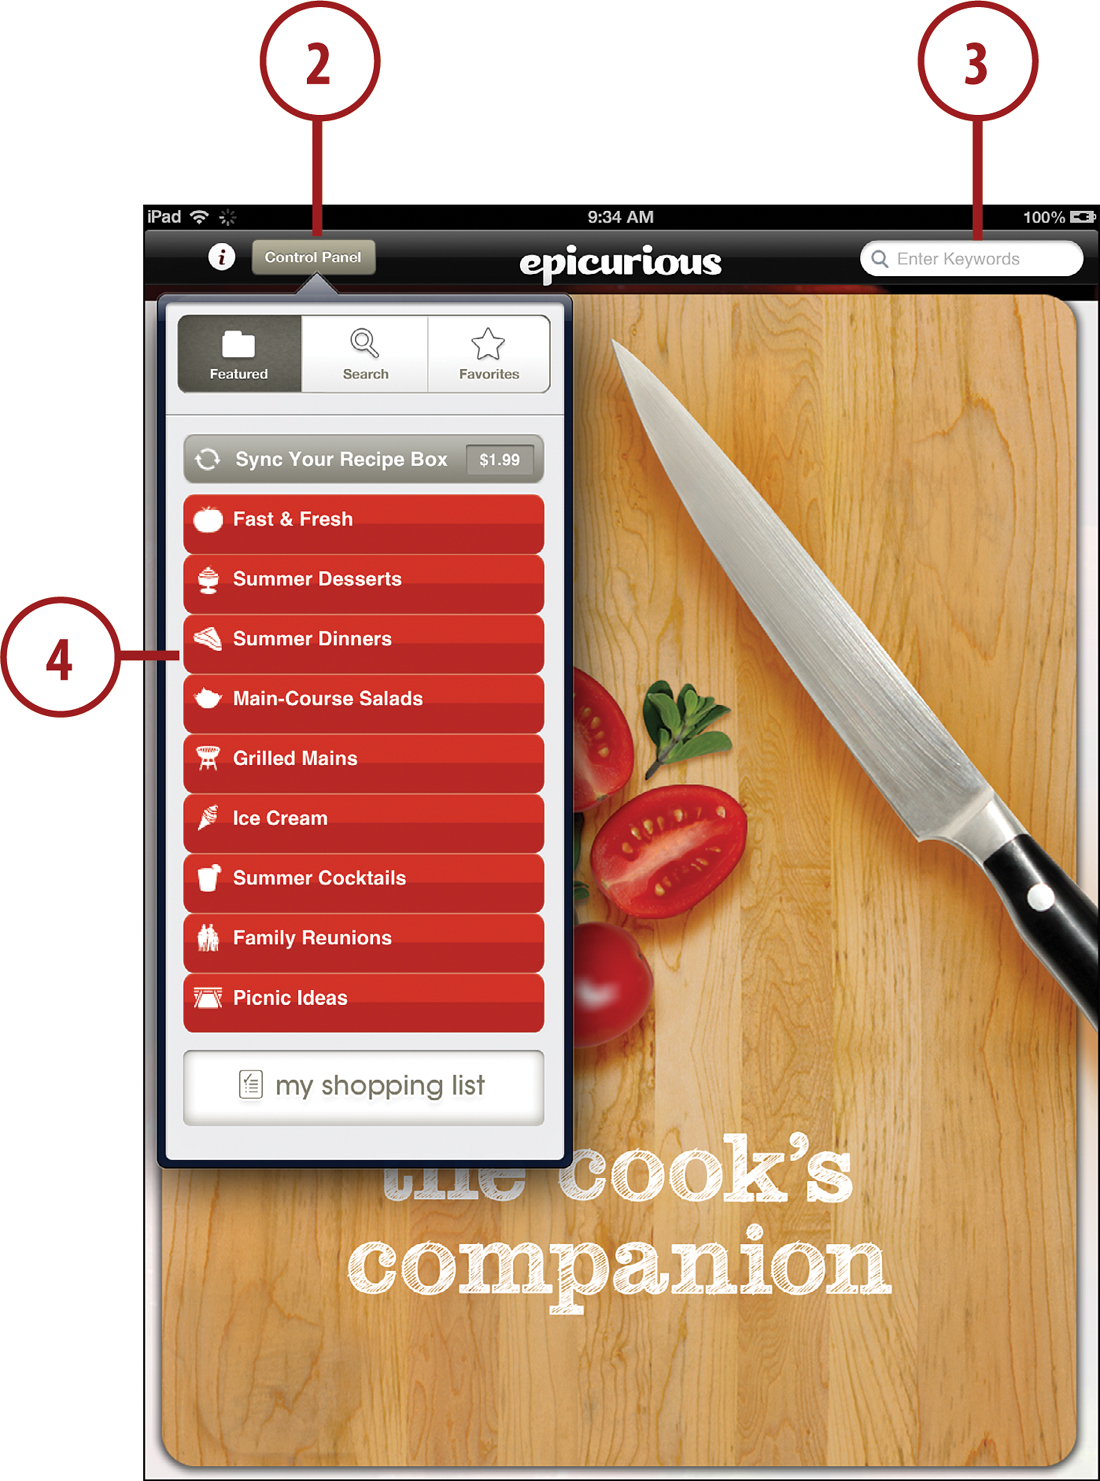
2. Tap the Control Panel to see a list of featured sections.
3. Use the search box to search for a recipe.
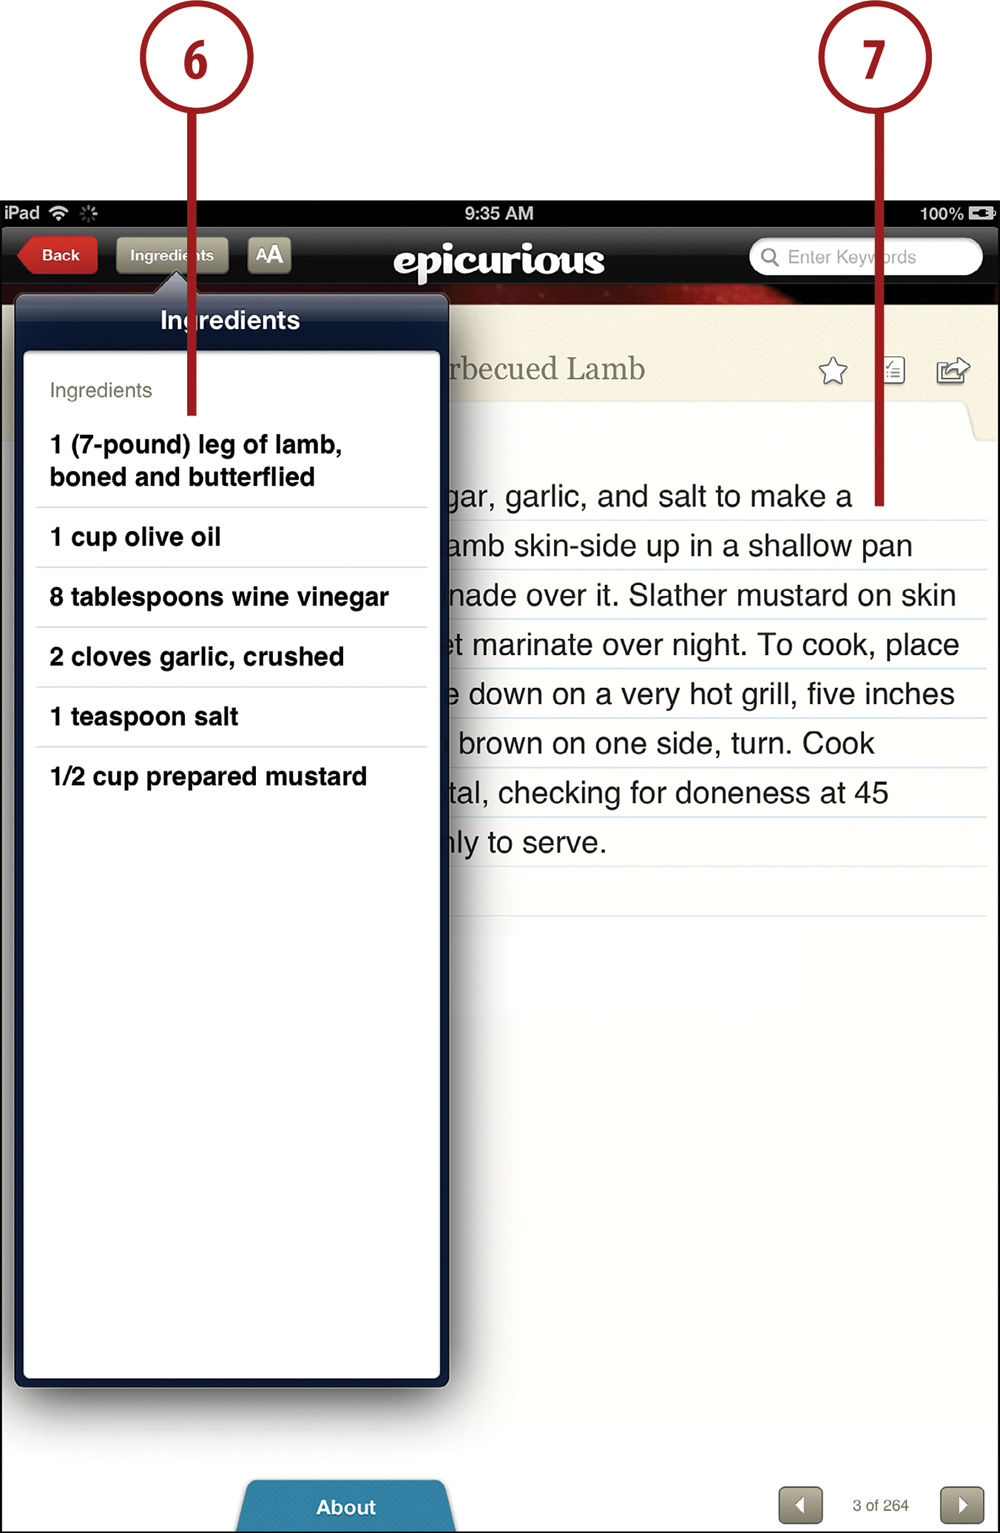
4. Tap a section.
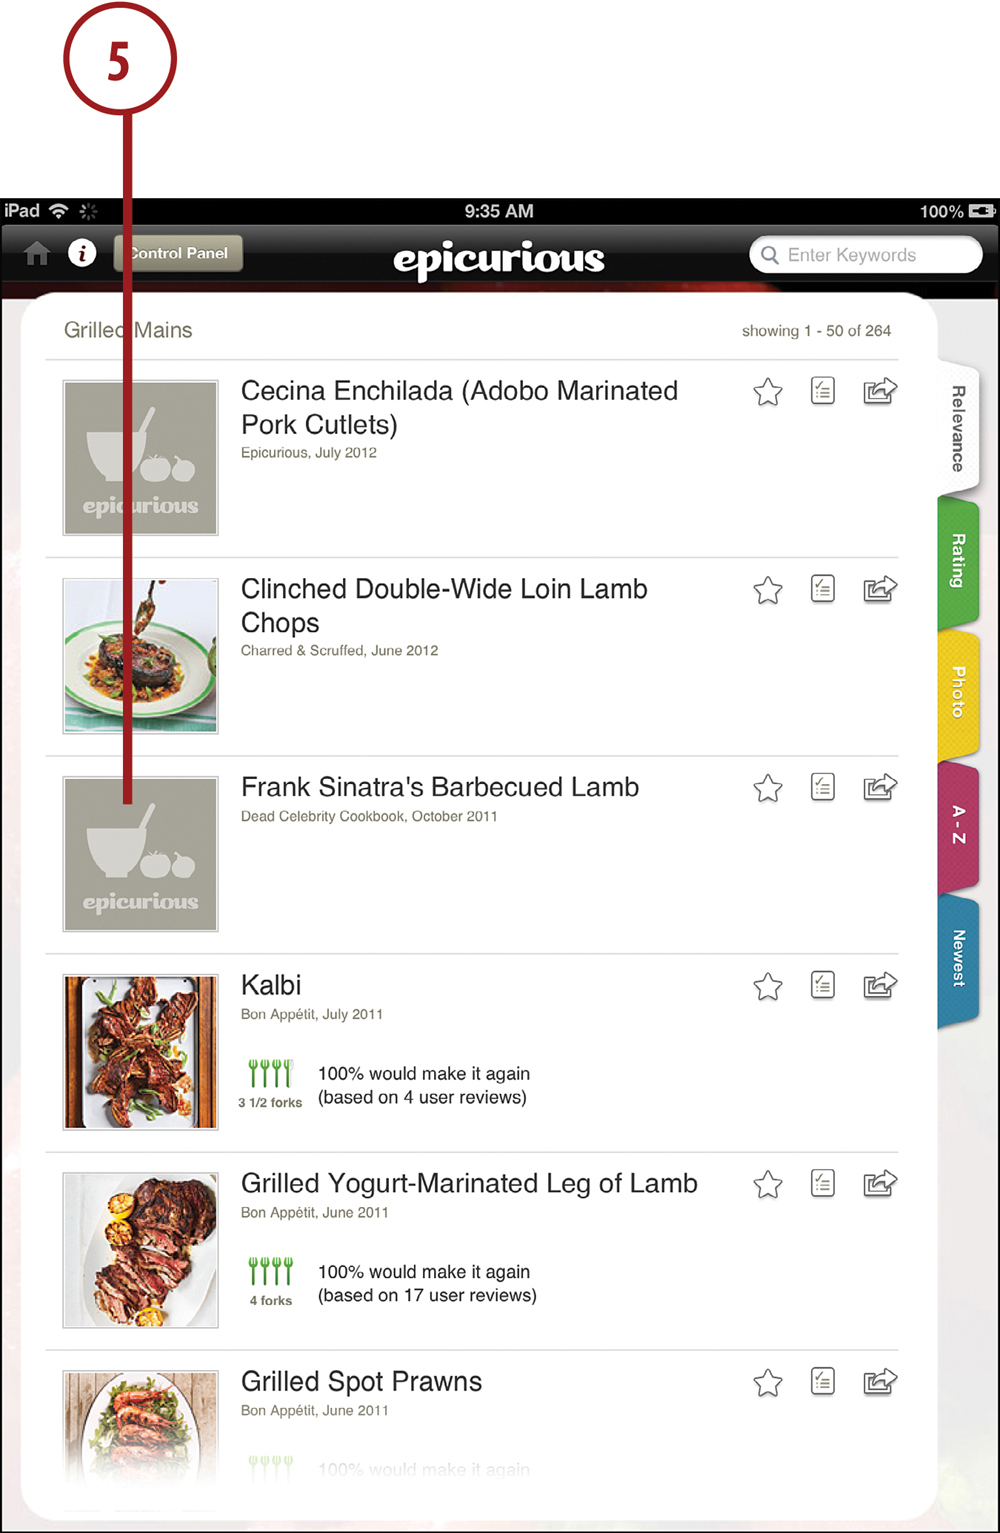
6. You’ll get a list of ingredients needed.
7. You can then follow the recipe. If only cooking were that easy! Bon Appetit!
Other Useful Apps
So many useful apps are in the store that it is impossible to cover them all in a book. Here are some quick mentions of others you can check out. Some are free, others you have to pay for.
• SketchBook Pro: This drawing app lets you paint with your fingers. Professional artists have used it to create some amazing pieces. There is even a Flickr gallery of SketchBook pro art. You should also check out Brushes, ArtStudio, and the free Adobe Ideas app.
• 1Password: Mac users already know about the popular 1Password for Mac. The iPad version doesn’t integrate with Safari, but it does give you a place to securely store passwords and other important information.
• Things: If you are into productivity apps and to-do lists, check out Things. It is the king of to-do list apps on the iPad. Also check out Wunderlist.
• Bento 4 for iPad: If you need to create databases, check out Bento. It is a powerful database tool that you can use for serious business purposes, or just to keep track of the DVDs you own.
• MindNode: If you use mind mapping software to organize your ideas and plan projects, then you’ll be happy to know there is a pretty advanced tool that lets you do this on the iPad.
• OmniGraffle: If you need to create organizational charts, or like to use graphics to plan out projects, check out the iPad version of this popular graphics tool.
• WordPress: The official WordPress app lets you write, edit, and maintain your blog posts. It works for the WordPress.com blogging service and for WordPress blogs set up on independent sites.
• StarWalk: This is a must-have app for anyone even vaguely interested in astronomy. Even if you aren’t, the beautiful, up-to-the-minute renderings of the night sky on your iPad will impress your friends. You can see what the sky looks like right now, right where you are, and use it as a guide to identifying what you see. Also check out The Elements: A Visual Exploration for more cool science learning.
• Wolfram Alpha: Want to compare two stocks, see the molecular structure of sulfuric acid, or calculate the amount of sodium in your breakfast?
Would you believe that one app does all three and has hundreds of other interesting answers to all sorts of questions? It is also the answer engine behind a lot of what the iPhone’s Siri feature does, so you get a little bit of Siri on your iPad.
• USA Today: While other national newspapers are playing around with pay-to-read models, USA Today is sticking with free. It provides a great summary of what is going on around the country. If you are looking for a more European perspective, the BBC News app also provides news, plus a lot of video.
• The Weather Channel Max+: If you get your news on your iPad, you might as well get the weather, too. This free app covers it all, with maps, forecasts, current conditions, and even video. But there are plenty of other weather apps in the store, too. Check out Weather HD in particular.