3. Setting Up Accounts and Services
Microsoft Word 2013—and all the other applications in the Microsoft Office 2013 suite—offers better and faster ways than ever before to access your files and share them with others. Connecting with services, such as LinkedIn or Flickr, and sharing documents, pictures, and more, is also easier than ever. To use these new features, you need to set up a Microsoft account online. Chances are, if you’ve already installed Word, you’ve already taken steps to set up an initial account. In this chapter, you’ll learn more about the connectivity options available and how to put them to use. I’ll also explain this “cloud” stuff (which, strangely, has nothing to do with weather), help you find your way to additional services and apps, and show you how to customize your account.
Introducing Web and Cloud Connectivity
Everybody keeps talking about this “cloud” thing, but what exactly is it? Basically, it’s really just the Internet. I know that’s kind of a letdown and you were probably hoping it was a magical hard drive in the sky or something. Nope, it’s just the Internet, but to be more specific, it’s the ability to store and process computer data online rather than on your own computer. Cloud connectivity is really twofold—one part is cloud storage, taking your files, whether they are documents or pictures, and saving them to dedicated web servers. The other part is cloud computing, which is being able to run a computer program hosted on a web server. Both parts offer many advantages.
You’re already using cloud storage if you have an email account someplace such as Google or Yahoo! (they store your email messages), or if you share photos on Flickr or Facebook (they store your photos). However, the real meat and potatoes of cloud storage are services dedicated to letting you store all of your data with them (sometimes for a fee, other times for free).
When you think about it, it’s a brilliant idea. You don’t have to worry anymore about where to store your files, how much storage space your hard drive has left, keeping up with what’s on what flash drive or CD/DVD, or running out of storage space and needing to delete data to make room for more. Having someone else store your files safely is a pretty sweet deal. The final selling point is this—you can access your cloud storage from any computing device. Yes, any computing device! You don’t have to use your home or office computer, you can use your smartphone, tablet, other computers, and so on. Plus, with cloud storage, you have a backup of all your files in case your hard drive crashes.
Cloud storage is a relatively new concept and many cloud-based services are popping up all the time. They work by offering you space on their servers to store all types of files. (Web servers are computers that host websites, storage, and applications.) Large companies, such as Microsoft or Amazon, have server “farms,” or data centers, filled with thousands of servers. Most of the services charge a small monthly fee, and others are free, but limit the amount of storage. Examples of cloud storage services include Amazon’s Cloud Drive, Dropbox, SugarSync, and Microsoft’s very own SkyDrive.
![]() Note
Note
Why do they call it the cloud? The term comes from the way in which network engineers had to describe networks outside their own, such as the Internet, which they connected to but didn’t necessarily control or know what was going on in the other networks. Real clouds are opaque, and network clouds are rather like this, too, because you can’t really see how all the data moves across the Internet, but it does end up somewhere out the other side via all the connections. When the engineers would diagram the various devices and connections on their networks, they would draw the Internet portion of the network as a cloud.
Cloud computing—the other prong in cloud technology—uses the Web as a platform for applications. Rather than rely on installing programs on your computer to handle word processing or spreadsheet tasks, for example, you can use web-based applications to create and work with files. In other words, you’re opening the program from the Web instead of on your own computer. When running applications on other computers on the cloud, less computing power is required from your own system. Microsoft Office is one such package available as a subscription service for both home and office users, called Office 365. You can access Office 365 from any computer, sort of like renting the software instead of buying it. The nice part of this sort of scenario is you no longer need to worry about upgrading versions of the software—updates and new features are available right away with cloud applications.
In light of the excitement over cloud storage and cloud computing, you need to be mindful of some things—bandwidth and costs. Sending email and viewing photos on the cloud doesn’t require a great deal of bandwidth, but utilizing web-based applications, such as streaming movies or games, eats up your monthly bandwidth allocation fast. Make sure you are aware of the costs for going over the limit if you have a limit as part of your cloud services subscription or monthly fee.
Microsoft products, such as Word 2013, tap into the power of cloud storage, too. For example, with a Microsoft account and an online connection, you can access Help files from Microsoft’s online resources to learn more about a feature, or you can search through collections of clip art illustrations and stock photography to add visuals to your documents. You can also create a SkyDrive account (www.SkyDrive.com) and store your documents online. SkyDrive offers 7 GB of free storage; you can up that amount for additional fees.
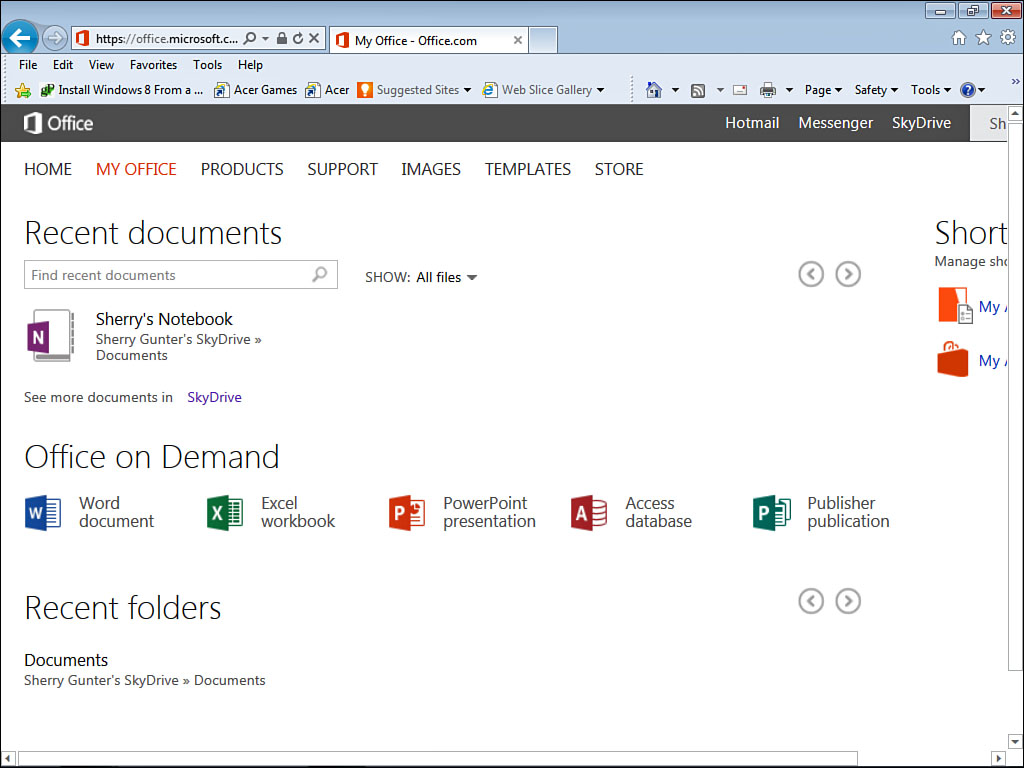
Wait, there’s more! Microsoft has cloud computing services to offer you, too! Office Web Apps offers browser-based versions of Microsoft programs, including Word (see Figure 3.1). Office Web Apps let you view and work with any of your Microsoft Office files. Office Web Apps are a free, online version of the Office suite and you can use them through the SkyDrive site, too. All it takes to use the apps is a Microsoft account (which used to be called a Windows Live Account). Mind you, the apps are not fully featured like a regular Word program window on your computer, or through a paid subscription with Office 365, but they’re extremely useful nonetheless. The great thing about this feature is that your friends and colleagues who do not have Office installed can use SkyDrive and Office Web Apps to work on the files, too. This is a great way for you to share your documents with each other.
FIGURE 3.1 Using your web browser, log on to your My Office account to access SkyDrive, Office Web Apps, and more.
Using a Microsoft Account
When you create an account to start using Word, you enter user information about yourself, such as your name and email address. Let’s talk about what you’re getting into with such an account. A Microsoft account is a free, cloud-based account that lets you use SkyDrive (cloud storage), Hotmail (free email service), Skype (online video conferencing), and more. In fact, a Microsoft account gives you access to a wide range of services and tools, including productivity tools to help you manage files, and social tools that help you communicate and share with others. If you use a Microsoft service such as Hotmail or Messenger, you already have a Microsoft account, but if not, you can create a free one.
Your Microsoft account offers the following online services:
• Email Outlook is the official email service, and you can use it with a Hotmail or Outlook email address, or use an email address you already have.
• Messenger/Skype Use this service to send instant messages to your friends and contacts.
• Calendar Keep track of important events and appointments, and share this data with others.
• Office Web Apps Web-based versions of the popular Office suite, including Word, PowerPoint, Excel, and OneNote.
• SkyDrive Not only is SkyDrive an online file storage space, but it’s completely integrated with Office Web Apps.
• Profile Create a public information page about yourself for viewing by other users who instant message you or contact you using email.
• Windows Essentials Apps Includes Photo Gallery (photo viewer and editor app), Movie Maker (a simple video editing app), and Writer (blog editor).
You can learn more about these services on the Microsoft Office website (office. microsoft.com) and start your My Office account. Learn more about using Office Web Apps at http://www.quepublishing.com/title/9780789750907.
Signing In
Signing into your Microsoft account is pretty simple. If you sign out, for instance, you’ll need to sign back in. As with a lot of online accounts, you need your email address and password to sign in. Follow these steps:
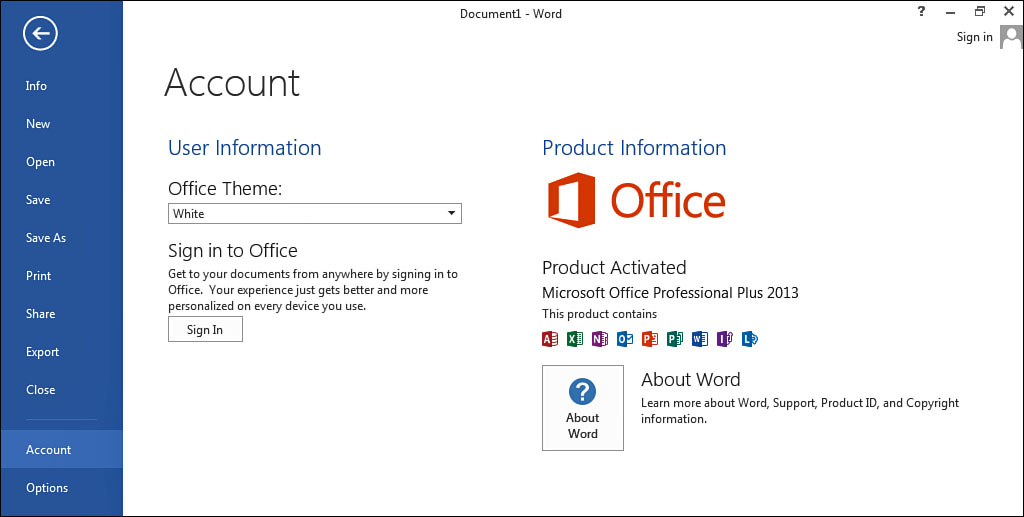
1. Click the Sign In button (see Figure 3.2).
FIGURE 3.2 Look for the Sign In button to get started.
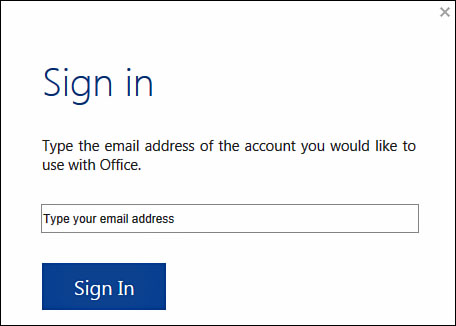
2. Type in your email address (see Figure 3.3).
FIGURE 3.3 Click the box and type in your email address.
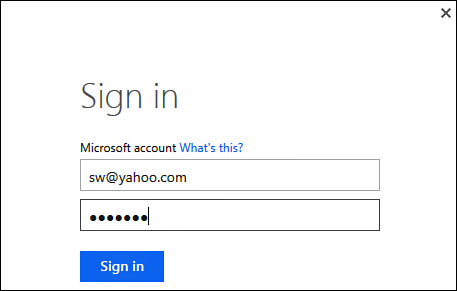
3. Type in your password (see Figure 3.4).
FIGURE 3.4 Next, type in your password.
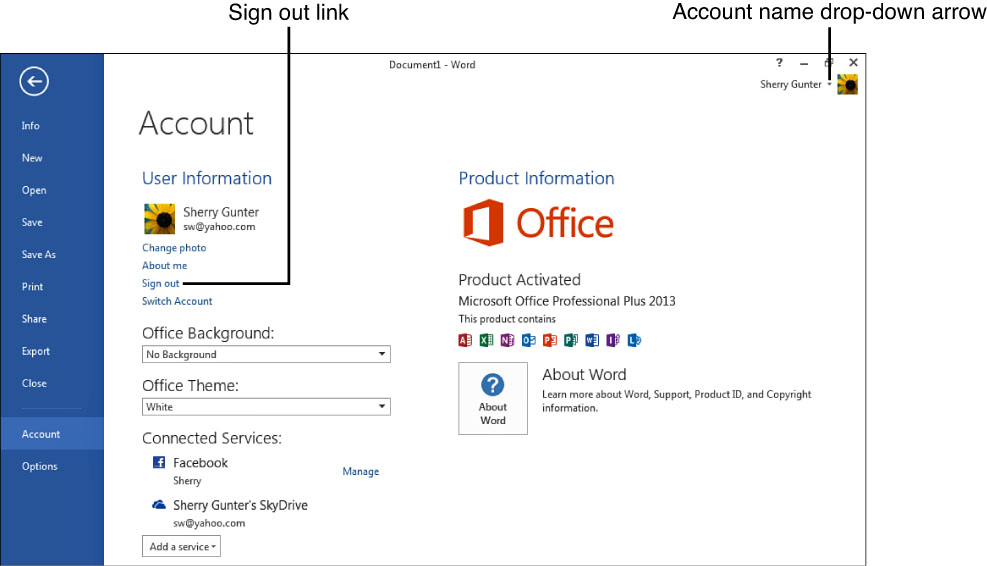
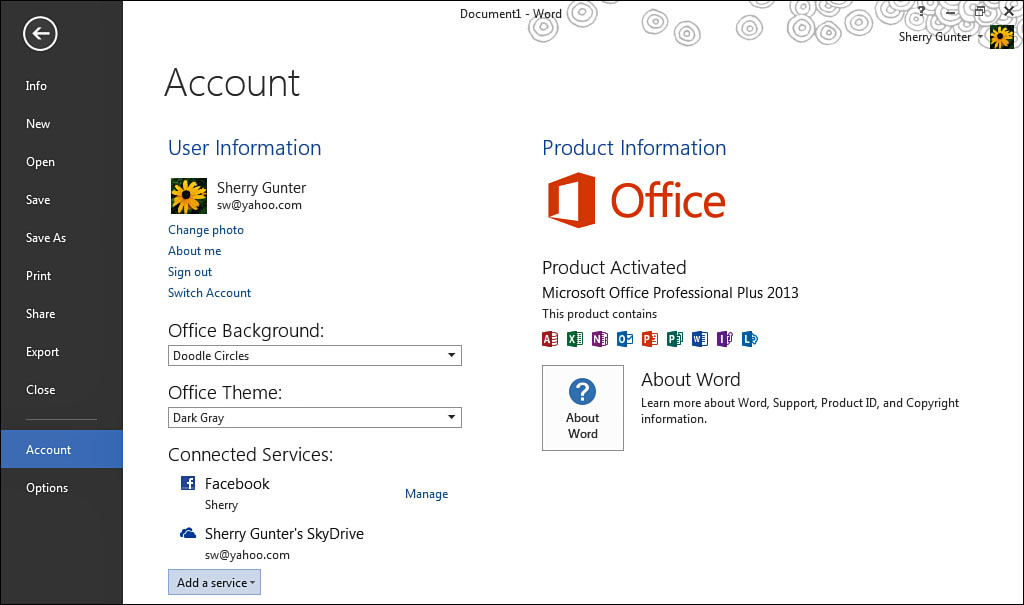
Word logs onto your account and displays your user information, services you’re using, and various account settings in a screen similar to the one in Figure 3.5.
FIGURE 3.5 Account information and settings include your name, photo, and any customizing settings you have applied.
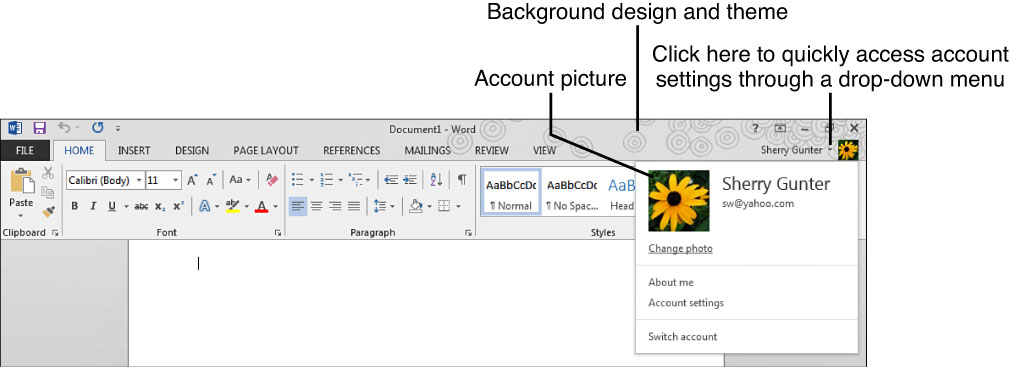
If you need to sign out again later, click the File tab and click Account, then click the Sign out link (see Figure 3.5). You can also click your account name drop-down arrow up in the right-corner of the program window and then click Account settings to open the same screen.
Adding and Switching Accounts
You can add multiple accounts and switch between them. This is helpful if you are sharing Word with other users in your household, for example. You can create an account for each one and they can customize their accounts the way they like.
To add an account, start by displaying the Account page again (see Figure 3.5). Click the Switch Account link to get things rolling. If you already know the other person’s email and password, you set up an account for him, or he can take over your keyboard and do it himself. The same Sign In box appears that you encountered in Figure 3.3, and you have to enter the email address and the password. After the new account is created, it’s automatically added to Word, too.
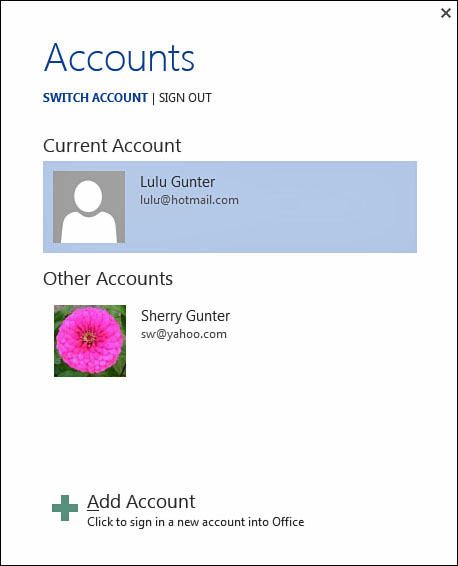
To switch between multiple accounts, click the Switch Account button on the Account page to display the Accounts box shown in Figure 3.6. Click the account you want to use in Word and you’re ready to go. To add more accounts, you can click the Add Account button at the bottom of the Accounts box.
FIGURE 3.6 You can switch between accounts using the Accounts box.
You can also switch between accounts by clicking the account name drop-down arrow in the program window and choosing Switch account. This also opens the Accounts box.
Customizing Your Account
You can do a little customizing to make Word your own, such as assigning an account picture and applying some design tweaks to the program window. The customizing settings you add apply only to your account. Other users who share your program can customize their own accounts. Figure 3.7 points out the customizable areas on Word.
FIGURE 3.7 You can use your Microsoft account’s Profile page to change your account picture.
Customizing Your Account Picture
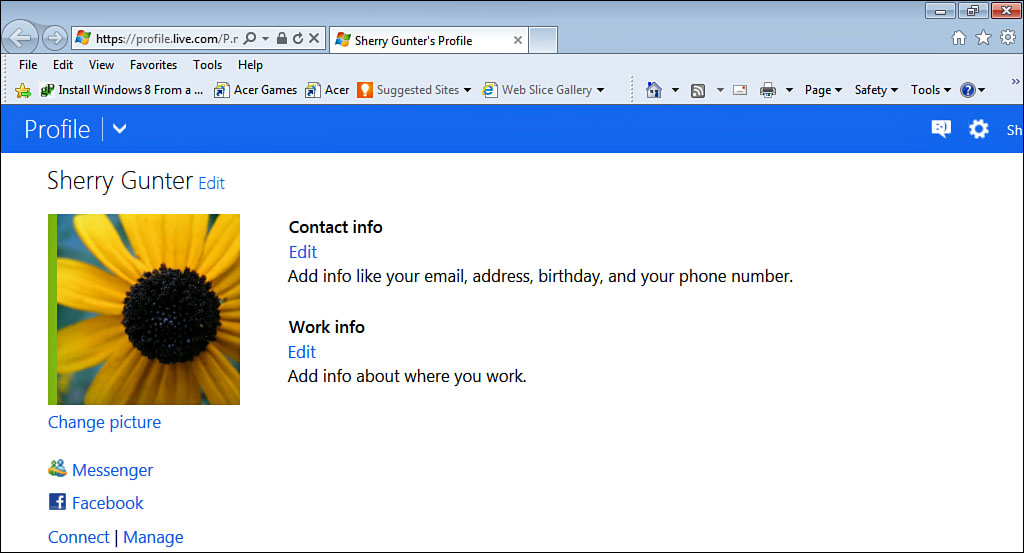
The account picture is shown with all of your Microsoft account activities online as well as in all the Microsoft Office programs you use, such as Word. An account picture can be any graphic file found on your computer, including a photograph or an illustration. To assign a picture, click the Change photo link on the Account page (refer to Figure 3.5). This opens your Microsoft account Profile page, shown in Figure 3.8. Click the Change picture link.
FIGURE 3.8 You can use your Microsoft account’s Profile page to change your account picture.
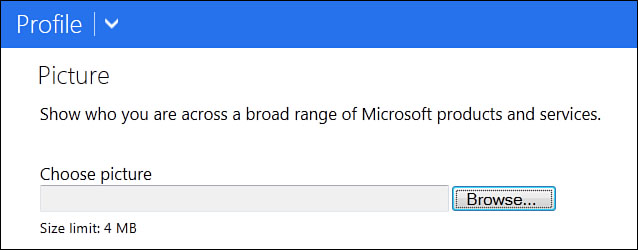
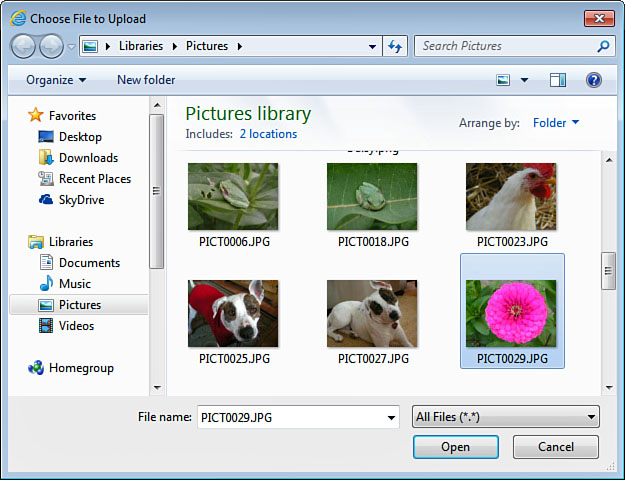
From the Picture page, shown in Figure 3.9, click the Browse button. This opens the Choose File to Upload dialog box, as shown in Figure 3.10.
FIGURE 3.9 First you need to find the picture you want to upload, so click the Browse button.
FIGURE 3.10 Next, select the image you want to use.
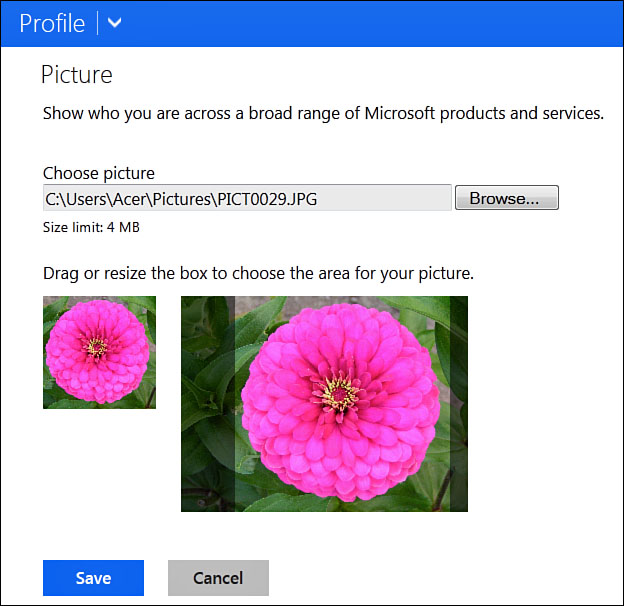
Navigate to the folder or drive containing the image you want to use, and select the image. Click Open to return to the Picture page (see Figure 3.11). Per the instructions there, you can drag or resize the picture box to get the best part of your picture to display as the account photo. When you have everything just right, click the Save button.
FIGURE 3.11 Position your picture the way you want it.
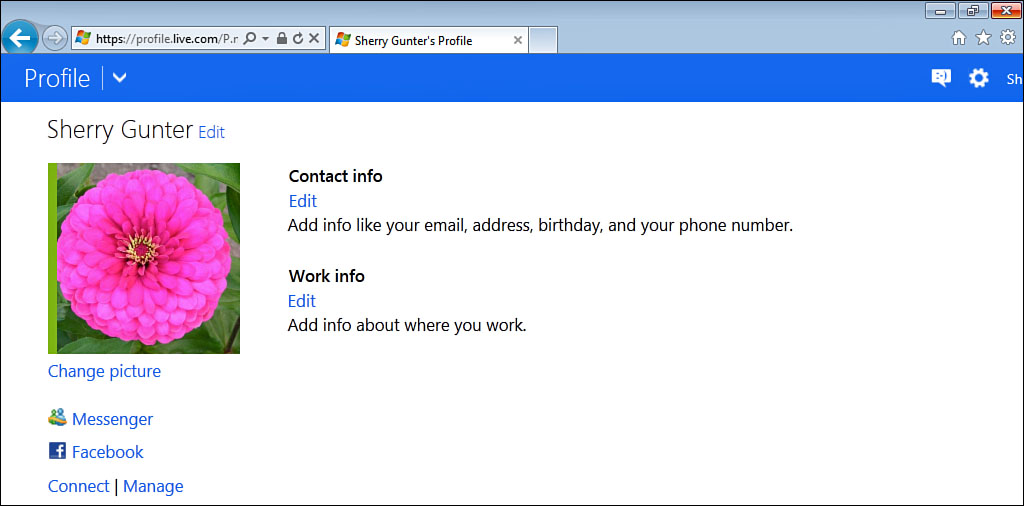
The Profile page now displays the new account picture, as shown in Figure 3.12. You can close out the browser window. The Word window should now sport the new picture. (If not, close the program and open it again.)
FIGURE 3.12 The new account picture now appears with your account name.
Changing the Background and Theme
New to Word 2013 and the other programs in the Microsoft Office suite is the ability to customize the program window background and theme. Changing the background only affects the very top of the program window (title bar and Ribbon tab names), but it does make you feel good choosing a design pattern that suits you. The design you choose doesn’t spill over onto your document page, so it’s really more of a little extra visual element for personalizing Word.
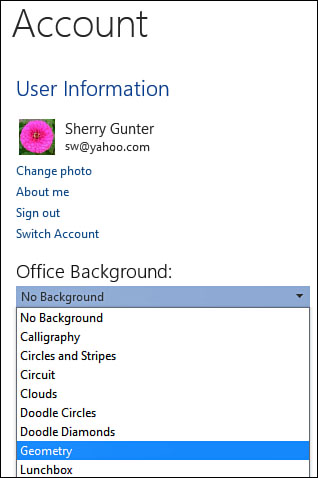
To change the background, click the Office Background drop-down arrow on the Account page, as shown in Figure 3.13. Move your mouse pointer over the different selections to preview what each one looks like. Click the one you like, and it’s immediately applied. To remove a background, just choose the No Background selection.
FIGURE 3.13 Choose a background design from this menu.
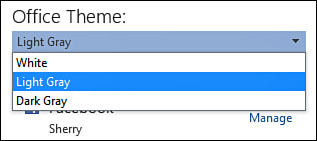
The Office theme is a choice between White, Light Gray, or Dark Gray, as shown in Figure 3.14. This color affects the top of the program window, too, including the Ribbon.
FIGURE 3.14 Choose from three theme colors.
To fully appreciate your new customizing options, click the Back navigation arrow (top-left corner) and return to the document window. Now sit back and admire your tweaks.
Adding Services
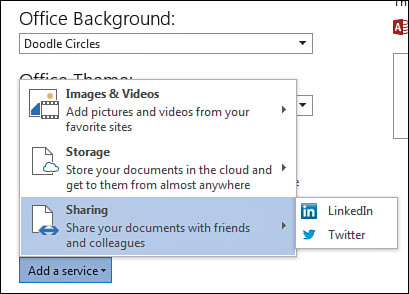
You can add online services to your Microsoft account to enhance your computing experience and manage them from the Account page (see Figure 3.15). You can find services listed under the Add a service drop-down menu on the Account page. The categories displayed might vary based on whether you are signed in under a personal, organization, or school account.
FIGURE 3.15 Add services such as Facebook or YouTube to access pictures, videos, and more.
The following categories are available with a personal account:
• Images & Videos You can nab images from your favorite sites, including Facebook, Flickr, and YouTube.
• Storage You can store documents on SkyDrive or Office 365 SharePoint.
• Sharing Share documents with other users you know on LinkedIn or Twitter.
To add a service, follow these steps.
1. Open the Account page; click the File tab and click Account or click the user name drop-down arrow and select Account settings.
2. Click the Add a service button, as shown in Figure 13.16.
FIGURE 3.16 Click the Add a service button to get started.
3. Click a category.
4. Click a service to add.
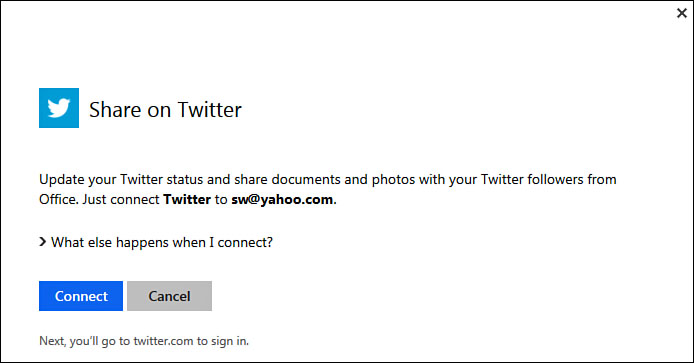
5. Depending on which service you add, additional boxes appear and you must log in with the account or give your approval to any apps Microsoft must add; click Connect to continue. In this example, shown in Figure 3.17, I’m connecting my Twitter account.
FIGURE 3.17 You’ll see a screen like this when you add your Twitter account.
6. Click Done when you finish, if applicable.
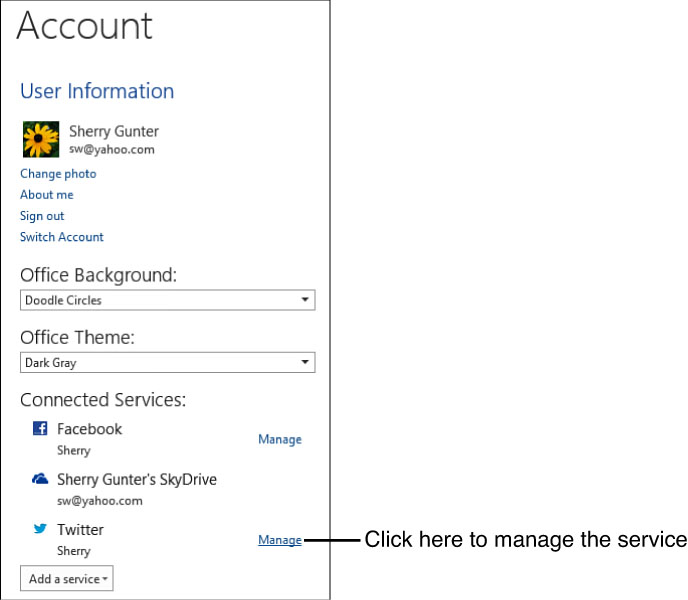
The new service is listed under the Connected Services heading on the Account page, similar to what’s shown in Figure 3.18. To make changes to the connection, click the Manage link and you can change the settings or remove the connection if you no longer want it.
FIGURE 3.18 Manage your connected services through the Account page.
You can also add services through other areas in Word, such as the Online Pictures dialog box (you can add Flickr to the mix of picture sources) or the Online Video dialog box (you can add YouTube to your selection for video sources).
Adding Apps
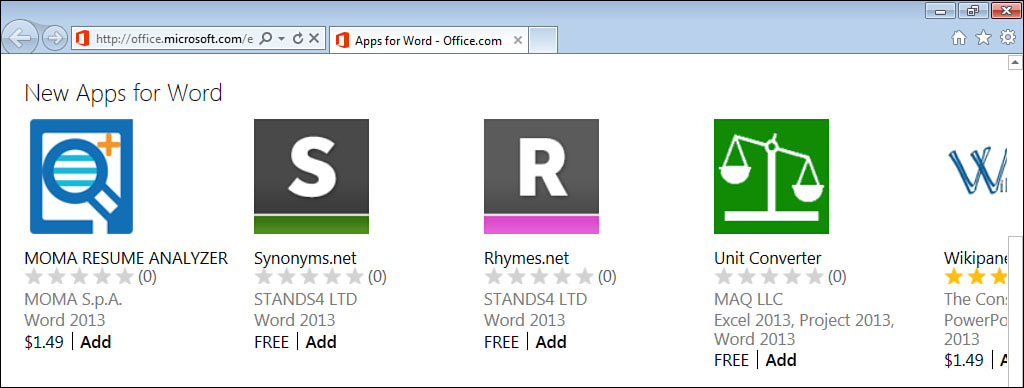
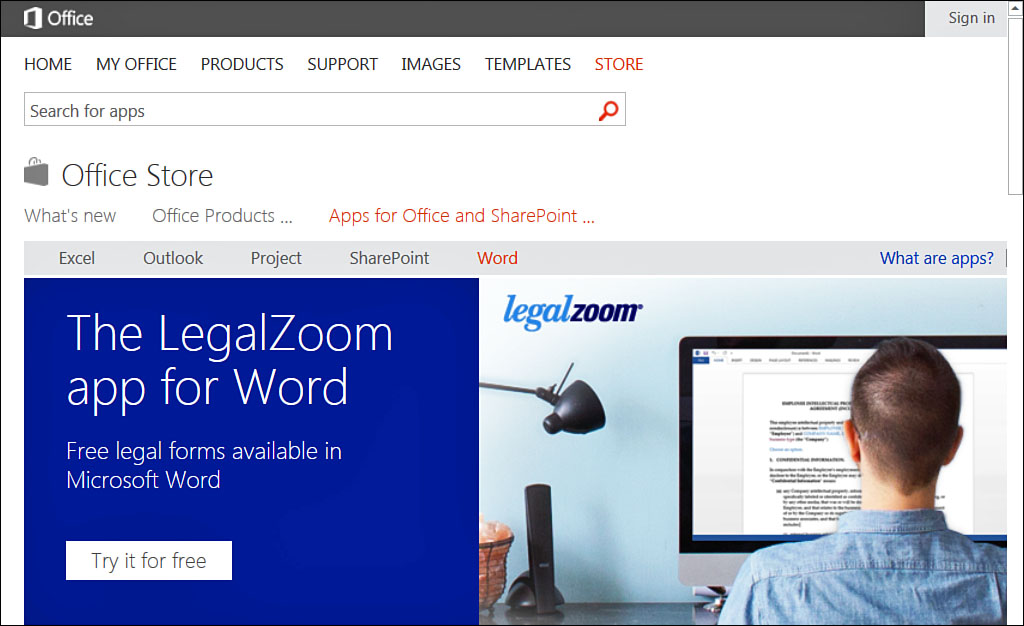
Feel up for a little shopping? You can go online and shop for more apps to add to Word and customize the program some more. Apps are small programs that you can add to Word to further enhance your experience, such as adding a dictionary, an additional library of stock photos, or templates for printing labels. The online Office Store, shown in Figure 3.19, is adding apps all the time—some are free and some sell for a small cost—and you can peruse from a variety of apps made specifically for Word. After you find one you like, you can download it and install it into Word.
FIGURE 3.19 Visit the Office Store to find apps you can add to Word.
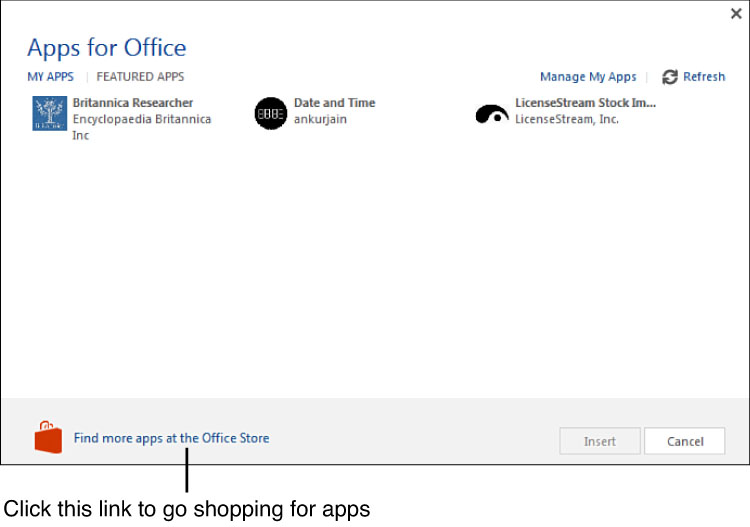
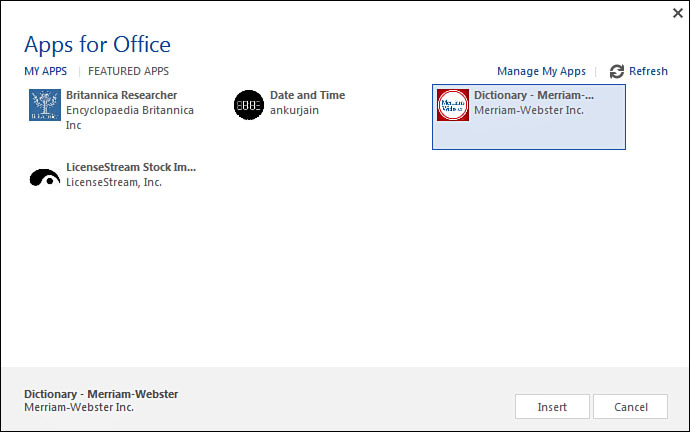
To add apps, begin by clicking the Insert tab and clicking the Apps for Office button, as shown in Figure 13.20. Click See All at the bottom of the menu that appears. This opens the Apps for Office dialog box, shown in Figure 13.21. A list of all of your installed apps appears under the My Apps tab in the dialog box. But you’re looking for new ones, so click the Find more apps at the Office Store link at the bottom of the dialog box.
FIGURE 3.20 Find the Apps for Office button to see what’s already installed and to look for more apps.
FIGURE 3.21 The Apps for Office dialog box keeps track of all of your apps.
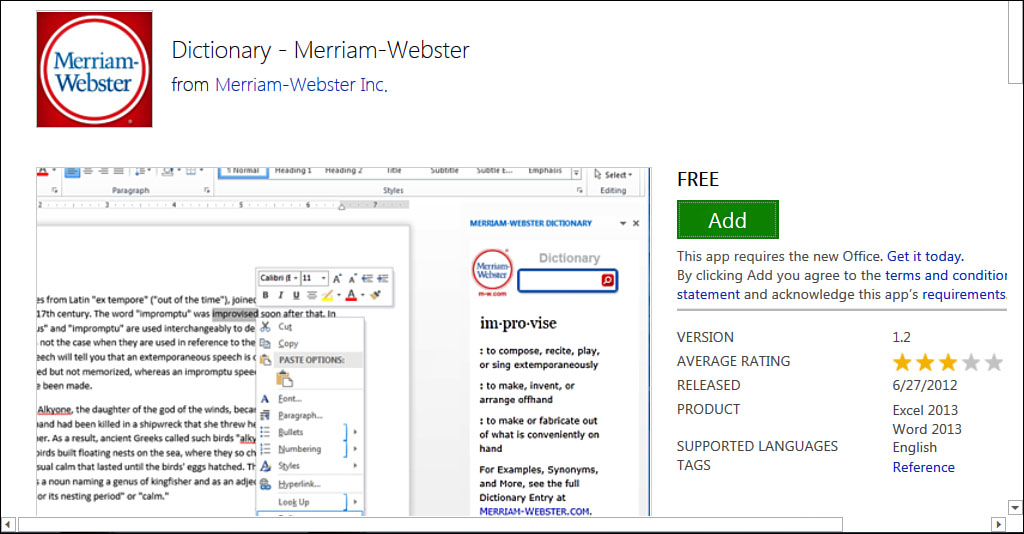
Your web browser opens to the Office Store and displays the Word apps, as shown in Figure 13.22. Start scrolling around the page to see what’s available and what you might like or need. When you find something interesting, click it to open another page with additional details, similar to Figure 3.23, and screenshots showing what the app does in Word. If you decide you want the app, click the Add button. The website asks you to confirm your purchase; click Continue and your app downloads.
FIGURE 3.22 Visit the Office Store to find apps you can add to Word.
FIGURE 3.23 You can read more about an app before deciding whether you want it.
![]() Tip
Tip
To help you decide whether an app is worth your time or not, check out the user reviews to see what others are saying about the app. Scroll around the app’s page and click the Reviews link to read more.
Lastly, you need to go and find your app and install it. Reopen the Apps for Office dialog box you worked with earlier (refer to Figure 3.21). If it’s closed, click the Insert tab, click the Apps for Office button, and click See All. Click My Apps and look for the icon for the newly downloaded app (see Figure 3.24). Click the app and click Insert.
FIGURE 3.24 Ah, look—now there’s a new app added to my list.
Word loads the app, which in this case is a dictionary that opens in its own pane off to the side of my document page, as shown in Figure 3.25. Goody—now I can look up words.
FIGURE 3.25 The new app installs and opens, in this case, a dictionary.
You can revisit the Apps for Office dialog box at any time to manage your installed apps, removing ones you don’t want or shopping for more.

