6. Adding Text
We can’t really call Microsoft Word a word processing program without actually processing words, so it’s about time you learned how to start adding text to your documents. Whether you’re adding text to a blank document, replacing placeholder text in a template, or editing text someone else entered—working with text is fairly straightforward and easy. It’s just you and your keyboard and the wide open space that is your document.
Typing and Editing Text
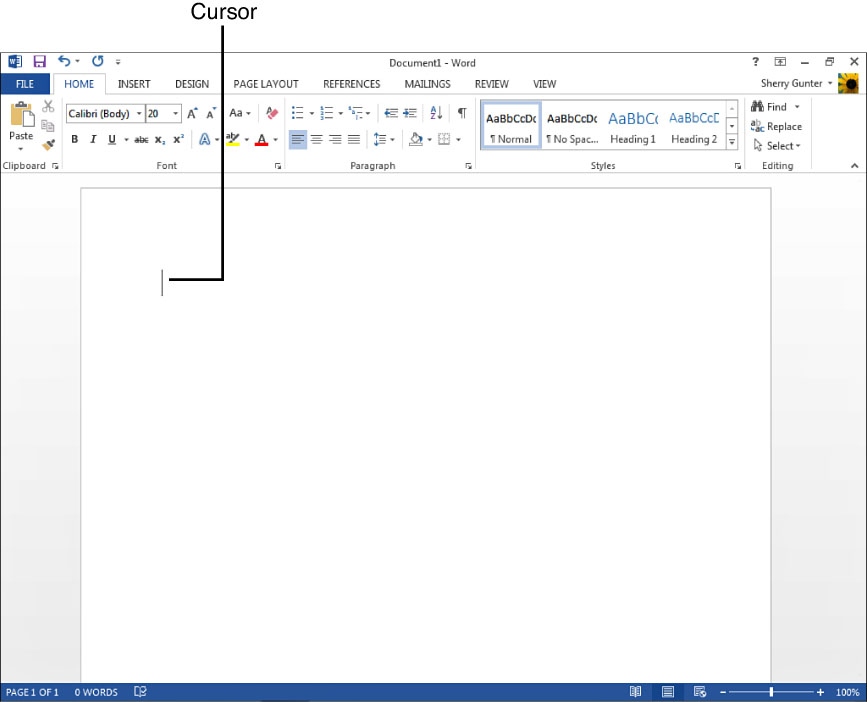
When you first open a blank Word document, the cursor awaits you at the top of the page. The cursor is the blinking vertical line that marks your spot in the document, as pointed out in Figure 6.1. It’s also sometimes referred to as the insertion point, but that’s not nearly as clever sounding as cursor. Wherever the cursor sits, that’s where your text will appear when you start typing. As you type, the cursor moves along to mark the end of your text, as shown in Figure 6.2. You can double-click anywhere on a page and start typing to add text.
FIGURE 6.1 The cursor marks the spot where you’re working.
FIGURE 6.2 When you start typing, the cursor moves along to mark the end spot.
As you’re typing along, here are a few tips you might find useful:
• You can use the Backspace key to back up a character, which is handy to delete the text to the left of the cursor and fix a mistake.
• You can use the Delete key to delete a character to the right of the cursor’s current location.
• When you reach the end of a line of text, Word automatically wraps it to the next line for you so you can keep typing.
• To start a new paragraph, press Enter.
• If you want some extra space between paragraphs, press Enter twice.
• If you want an instant indent, press the Tab key when you start a new paragraph or line.
• To move the cursor to the end of a line of text, press the keyboard’s End button.
• To move the cursor to the front of a line of text, press the Home button.
• Use the keyboard’s PageUp and PageDown (or PgUp and PgDn, depending on how they’re labeled) buttons to navigate longer documents.
• The scroll bars let you move up and down pages as well as side to side (depending on the page widths and depths). You can click and drag the middle bar, called the scroll box, or you can click arrow buttons to move around.
![]() Note
Note
You can switch between two modes of text entry when working on a document: Insert and Overtype. Insert mode is the default mode; anywhere you click the cursor you can start typing, and any existing text moves over to make room for the new text. When Overtype mode is turned on, existing text is replaced by whatever you type. For many computers, the Insert key on the keyboard toggles Insert and Overtype modes on and off. You can also control this through the Word Options dialog box: Click File, Options, Advanced, and then click the Use the Insert key to control overtype mode check box.
You can learn how to make your text look attractive in Part III, “Making Documents Look Impressive.”
![]() Tip
Tip
If you see red wavy lines under a word you typed, Word’s spell checker tool is trying to tell you the word might be misspelled. If you see a green wavy line, that’s the grammar checker alerting you to a possible grammar issue. You can learn more about Word’s proofing tools in Chapter 18, “Using Proofreading Tools.”
Selecting Text
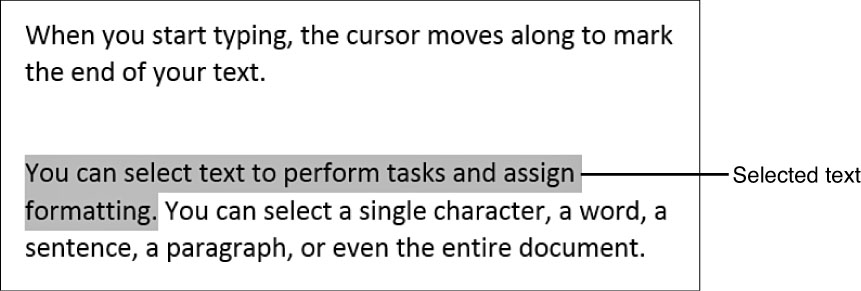
To perform edits on your text, whether it’s a single word, a paragraph, or an entire page, you’ll need to learn how to select text. When you select text, it’s highlighted on the page, as shown in Figure 6.3, and you can apply all kinds of commands and features, such as changing the font, moving the text, or applying an indent.
FIGURE 6.3 Selected text appears highlighted in the document.
As with most things computer-related, you have a myriad of ways to tackle the same task. The technique you use might just be a matter of preference or just what’s easiest at the moment. Here’s a variety of selection techniques you can apply:
• Double-click the word you want to select.
• Triple-click to select the entire sentence.
• Press and hold the Ctrl key while clicking anywhere in a sentence to select it.
• You can also drag across text to select it. Press and hold the left mouse button and drag across a character to select a single character, or click and drag across a group of words to select them.
• To select text that’s not adjacent, select the first bit of text (such as a word or sentence), then click and hold the Ctrl key while selecting the next bit of text.
• To select a large chunk of text, click at the beginning of the selection, then press and hold the Shift key and click the end of the selection.
• The left-hand margin area is a great place to click and select sentences, paragraphs, and even the entire page. Click to the left of a line of text to select the whole line. Double-click to the left of a paragraph to select the entire paragraph. Triple-click to the left of the text to select the entire page.
• To select everything in a document, click the Home tab, click the Select drop-down arrow in the Editing tool group, and then click Select All.
To deselect selected text, click anywhere outside of the selection.
![]() Tip
Tip
The mini toolbar often pops up next to your selected text. It’s there to offer you quick access to formatting commands and other tools pertinent to the task at hand. You can ignore the toolbar and it goes away if you move the mouse. If you find it bothersome, turn it off. Click the Ribbon’s File tab, click Options to open the Word Options dialog box, click the General category, and then deselect the Show Mini Toolbar on selection check box. It will still show up with other tasks, but not when you select text anymore.
![]() Note
Note
Here’s a sneaky fact. Word is set up to automatically select an entire word for you when it thinks you’re in the process of selecting. If this annoys you, you can make it stop. Click File and click Options to open the Word Options dialog box. Click the Advanced category, and under the Editing Options group of tools, deselect the When selecting, automatically select entire word check box. Click OK to exit the dialog box and apply your change.
Moving and Copying Text
You can easily move and copy text in a document. Moving text simply takes it from its current location and puts it where you want it to go. Copying does essentially the same thing, but places a copy of the original text in the new location instead of displacing the original. For example, you might want to move a paragraph from the top of the document to the bottom, or copy a heading from one area to another to reuse the text. You can employ the Cut, Copy, and Paste commands to move and copy text in Word.
Any text you move or copy is temporarily placed on the Windows Clipboard where it waits for pasting. The Clipboard acts as a holding area for cut or copied items. When you paste text, you have the option of pasting it without any formatting previously assigned, merging the formatting with that of the new spot in the document, or pasting the text along with any applied formatting.
![]() Tip
Tip
Cutting, copying, and pasting isn’t just for text. You can move and copy other elements on a page, including artwork, pictures, text boxes (which are special containers for text elements), tables, graphs, and so on, using the same techniques outlined here.
Cutting and Pasting Text
To move text, use one of these techniques on the selected text you want to move:
• Click and drag the selected text and drop it where you want it to go. Try it, it’s fun! Figures 6.4 and 6.5 demonstrate how this technique works.
FIGURE 6.4 Moving text is as simple as dragging it where you want it to go.
FIGURE 6.5 Drop your moved text, and it’s immediately pasted.
• Click the Home tab, click Cut. Click where you want to insert the moved text and click Paste.
• Prefer a keyboard shortcut? Press Ctrl+X to cut text, then when you’re ready to paste it press Ctrl+V.
Copying and Pasting Text
To copy and paste text, try one of these methods:
• Press and hold the Ctrl key, and then drag the selected text and drop it where you want it to go. This little movement is nearly as fun as cutting text.
• Click the Home tab, click Copy. Click where you want to insert the copied text and click Paste.
• For a keyboard shortcut, press Ctrl+C to copy text, then when you’re ready to paste it press Ctrl+V.
Using the Mini Toolbar
As you are cutting, copying, and pasting text, you might encounter the mini toolbar popping up onscreen, as shown in Figure 6.6. You can use this toolbar to quickly access commands related to the task at hand, which in this case is pasting text. Presenting commands so close to what you’re doing can save time, so take advantage of them if they help. For example, you might find clicking the Paste option on the mini toolbar to be quicker than moving the mouse up to the Home tab to access the same commands.
FIGURE 6.6 The mini toolbar is there to help you access the Paste command—fast.
Working with the Clipboard Pane
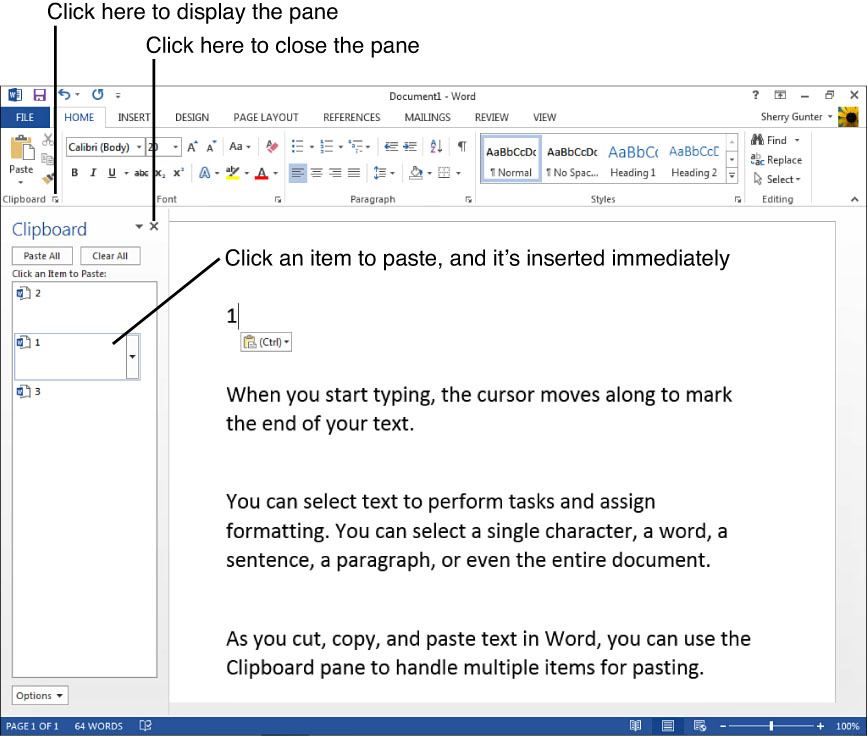
Let’s talk a little more about this Clipboard thing. The Cut, Copy, and Paste commands are conveniently located on the Ribbon’s Home tab. As you cut and copy data, you can actually view it in the Clipboard pane and choose which items to paste. To view the pane, click the Clipboard icon in the corner of the Clipboard group of commands on the Home tab, as shown in Figure 6.7. This opens the Clipboard pane, which lists any items you recently cut or copied.
FIGURE 6.7 Display the Clipboard pane when you’re juggling a lot of items you want to paste.
Here’s what you can do with the Clipboard pane:
• To paste an item from the list, first click in the document where you want the item to go, and then click the item from the list. Word immediately inserts it.
• To paste everything listed, you can click the Paste All button at the top of the pane.
• To clear out the pane and start with a clean slate, click the Clear All button.
• To exit the pane, click its Close button or click the Clipboard icon on the Home tab.
Adding Text with Quick Parts
To help you build better documents faster, Microsoft Word offers a library of pre-made content you can insert, called Quick Parts or building blocks (because you can use them to build onto your document). These building blocks include all kinds of elements, such as headers and footers for the tops and bottoms of your pages, salutations for letters, page numbers, special formatting for quote inserts, tables, cover pages, and more. In fact, you can turn any piece of text you use over and over again into a building block and keep it in the Quick Part library ready to use at a moment’s notice.
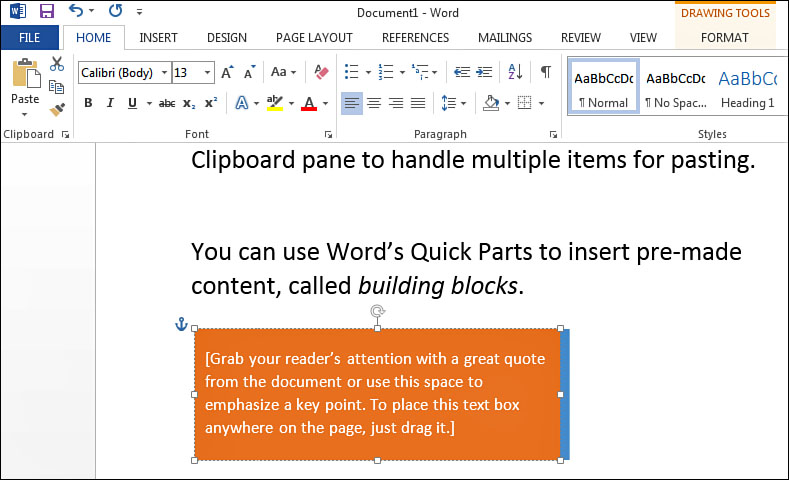
Acting just like parts of a template, Quick Parts offer preformatted text and designs, which often include more than placeholder text. You can customize the placeholder text with your own text. For example, a quote box (shown in Figure 6.8) includes placeholder text for a quote. Just type in your own quote text and it’s good to go.
FIGURE 6.8 Here’s an example of a quote box, a premade building block you can insert and use, substituting your own text in place of the placeholder text.
![]() Tip
Tip
Quick Parts are perfect for smaller bits of preformatted text elements, but if you’re looking to create a whole document, then templates are the thing to use. See Chapter 5, “Template Basics,” to learn more about using Word’s versatile templates—premade documents.
Inserting a Quick Part
To use any of Word’s premade building blocks, follow these steps:
1. Click the Insert tab.
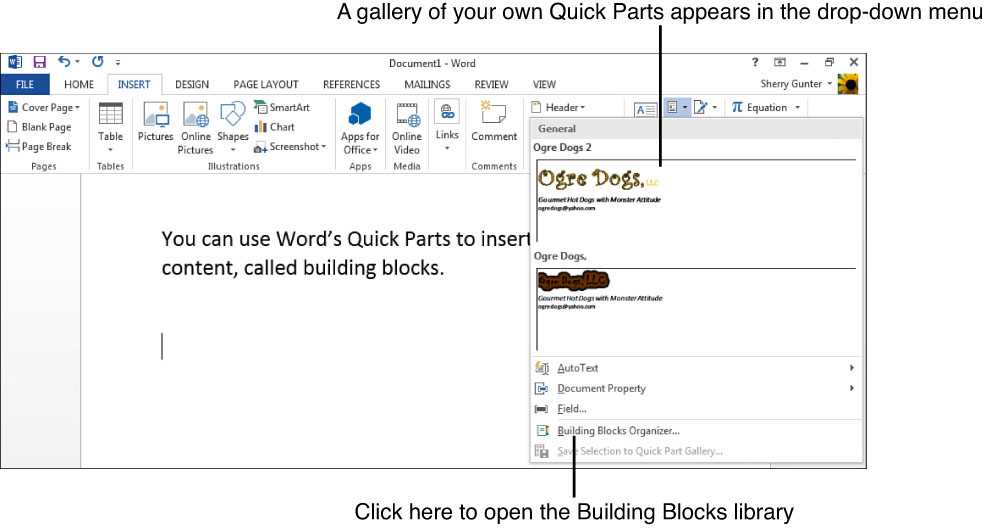
2. Click the Quick Parts drop-down arrow (see Figure 6.9).
FIGURE 6.9 Use the Quick Parts drop-down menu to access your own Quick Parts as well as the building blocks library.
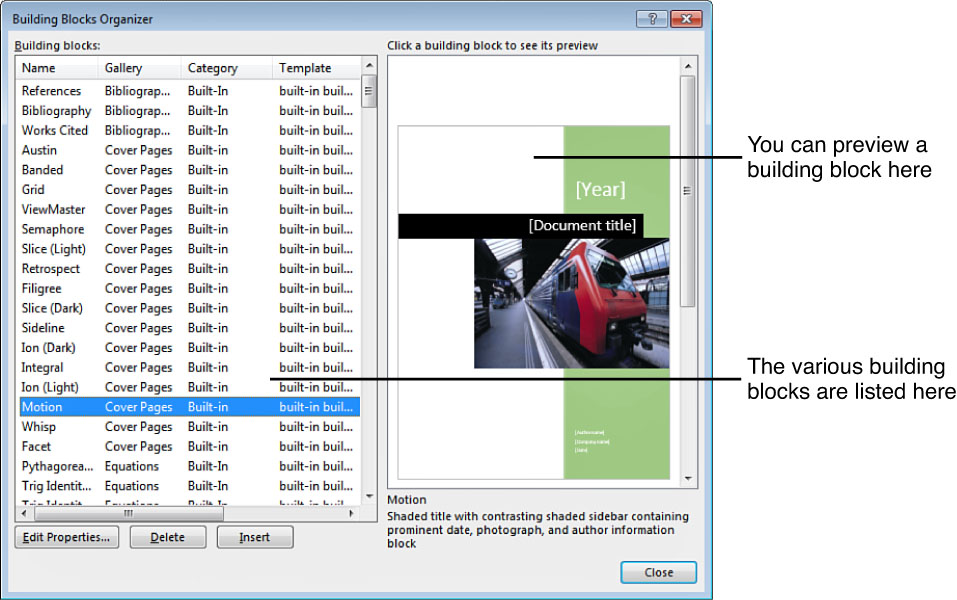
3. Click Building Blocks Organizer to open the Building Blocks Organizer dialog box (see Figure 6.10).
FIGURE 6.10 The Building Blocks Organizer.
4. Click the building block you want to preview.
5. When you find one you want to use, click Insert and Word adds it to the document.
Creating Your Own Quick Parts
As you might already suspect, creating building blocks for text elements you use a lot in your documents can be a real time saver. For example, if you use a company logo, motto, and contact information at the bottom of every letter document you create in Word, you can turn the information into a building block and reuse it again and again. Saving an item as a building block automatically adds it to the Quick Part Gallery for easy access.
To turn text into a building block, follow these steps:
1. Select the text you want to turn into a Quick Part.
2. Click the Insert tab.
3. Click the Quick Parts drop-down arrow.
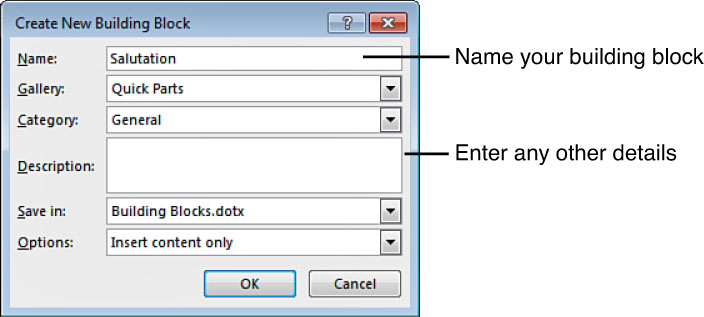
4. Click Save Selection to Quick Part Gallery. This opens the Create New Building Block dialog box, as shown in Figure 6.11.
FIGURE 6.11 Create your own Quick Parts using this dialog box.
5. Type a name for your building block.
6. Fill out any additional details you want to save along with the text element.
7. Click OK to save the building block.
Any time you want to add your building block to a document, click the Quick Parts drop-down menu on the Insert tab and choose your item from the Gallery.
Inserting Symbols
Although the typical computer keyboard is jam-packed with plenty of characters, numbers, and symbols, some special symbols cannot be found on a keyboard. These include symbols such as a copyright or registered trademark. You can use Word’s Symbol dialog box to find special characters and other symbols to insert into your documents, including mathematical symbols, special quote marks, and wingdings (tiny graphics).
To insert a symbol or special character, use these steps:
1. Click the Insert tab on the Ribbon.
2. Click Symbol.
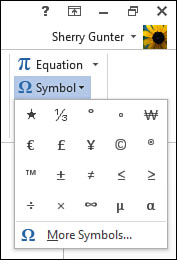
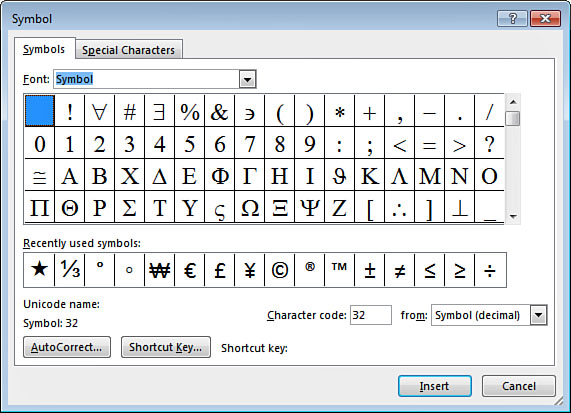
3. If the list already shows your symbol (see Figure 6.12), you can click it. If not, click More Symbols to open the Symbols dialog box (see Figure 6.13).
FIGURE 6.12 The drop-down menu displays recently used or common symbols you can insert.
FIGURE 6.13 Use the Symbols dialog box to insert special characters and symbols. The Symbols tab lets you choose from a variety of fonts and subsets.
4. Click the Symbols tab to view available symbols.
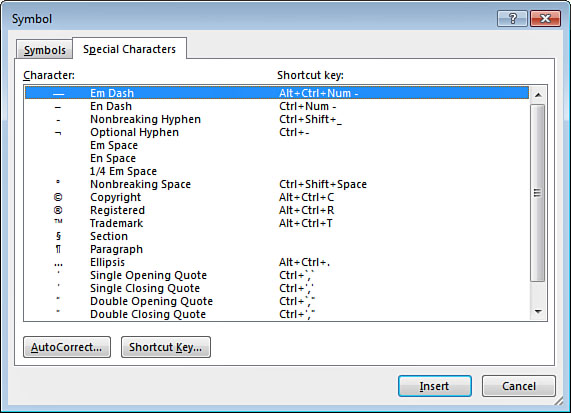
5. Click the Special Characters tab (see Figure 6.14) to view characters.
FIGURE 6.14 The Special Characters tab lists special characters, such as dashes and quotes.
6. Click the symbol or character you want to use.
7. Click Insert to insert it into your document.
8. The dialog box remains open in case you want to insert more symbols. Click Close when you’re finished.
Special characters and symbols are actually part of font sets, styles of type you can use to change the appearance of your text. If you don’t find the symbol or character you are looking for, try searching another font set or symbol subset in the Symbol dialog box.
![]() Tip
Tip
If you look over on the Special Characters tab of the Symbol dialog box, you’ll notice some characters offer shortcut keys you can use to insert the symbol. For example, if you press Alt+Ctrl+C you can quickly insert a copyright symbol. You can memorize the shortcut key combination for your favorite character.

