Chapter 16. Introduction to Forensics
Chapter Objectives
After reading this chapter and completing the exercises, you will be able to do the following:
![]() Understand basic forensics principles.
Understand basic forensics principles.
![]() Make a forensic copy of a drive.
Make a forensic copy of a drive.
![]() Use basic forensics tools.
Use basic forensics tools.
Introduction
Throughout this book we have explored network security. We have examined threats and countermeasures, firewalls, anti-virus, IDS, cyberterrorism, policies, and more. However, your network security knowledge is incomplete without at least a basic understanding of computer forensics. The reason for this is simple: The first responders to computer crimes are usually the network administrators and tech support personnel. If you fail to handle the basic forensic containment of the crime scene appropriately, you might render any evidence found to be in admissible.
However, remember that the steps outlined in this chapter are general guidelines. You should definitely consult whatever forensics standards are used in your jurisdiction. If you are not a law enforcement officer, you will still want to familiarize yourself with the procedures used by local law enforcement and to follow the same steps. If for some reason you cannot acquire the procedures used by your local law enforcement agency, then you can find federal guidelines. Here are some sources:
![]() United States Secret Service: www.secretservice.gov/ectf.shtml
United States Secret Service: www.secretservice.gov/ectf.shtml
![]() FBI Computer Forensics: www.fbi.gov/news/stories/2009/august/rcfls_081809
FBI Computer Forensics: www.fbi.gov/news/stories/2009/august/rcfls_081809
Also keep in mind that a few jurisdictions have passed laws requiring that in order to extract the evidence the investigator must be either a law enforcement officer or a licensed private investigator. This law is controversial, given that private investigator training and licensing normally does not include computer forensics training. You should check with specifics in your state. However, many of those states will allow you to forensically examine a computer if you have the permission of the owner. So this would not prohibit you from forensically examining computers in your company.
General Forensics Guidelines
You should always follow some general guidelines in any forensic examination. You want to have as little impact on the evidence as possible, which means you want to examine it and not alter it. You want to have a clear document trail for everything that is done. Of course, you also want to secure your evidence.
Don’t Touch the Suspect Drive
The first, and perhaps most important guideline, is to touch the system as little as possible. You do not want to make changes to the system in the process of examining it. Let’s look at one possible way to make a forensically valid copy of a drive. You can make a forensic copy with most major forensics tools such as Access Data’s Forensic Tool Kit, or Guidance Software’s Encase. However, you can also do it with free tools using Linux.
You need two bootable copies of Linux: one on the suspect machine and one on the target machine. Some books recommend Knoppix, but I have found BackTrack to be more consistently reliable. Whichever version of Linux you use, the steps will be the same:
1. Completely wipe the target drive:
dd if=/dev/zero of=/dev/hdb1 bs=2048
2. Set up the target forensics server to receive the copy of the suspected drive you want to examine. The Netcat command helps with that. The specific syntax is as follows:
nc –l –p 8888 > evidence.dd
This tells the machine to listen on port 8888 and put whatever it receives into evidence.dd.
3. On the suspect machine you have to start sending the drives information to the forensics server:
dd if=/dev/hda1 | nc 192.168.0.2 8888 –w 3
Of course, this assumes that the suspect drive is hda1. If it’s not, then replace that part of the command with the partition you are using. This also assumes the server has an IP address of 192.168.0.2. If it’s not, replace it with whatever your forensics server IP address is.
4. You also want to create a hash of the suspect drive. Later you can hash the drive you have been working with and compare that to the hash of the original drive and confirm that nothing has been altered. You can make a hash using Linux shell commands:
md5sum /dev/hda1 | nc 192.168.0.2 8888 –w 3
After completing the steps, you have a copy of the drive. Making two copies is often a good idea: one you will work with, and another will simply be stored. Under no circumstances should you do your forensic analysis on the suspect drive.
Leave a Document Trail
Beyond not touching the actual drive, the next concern is documentation. If you have never worked in any investigative capacity, the level of documentation might seem onerous to you. However, the rule is simple: Document everything.
When you first discover a computer crime, you must document exactly what events occurred. Who was present and what where they doing? What devices were attached to the computer, and what connections did it have over the network/Internet? What hardware and operating system were being used?
When you begin your actual forensic investigation, you must document every step. Start with documenting the process you use to make a forensic copy. Document every tool you use and every test you perform. You must be able to show in your documentation everything that was done.
Secure the Evidence
First and foremost, the computer must be taken offline to prevent further tampering. In some limited circumstances a machine might be left online to trace down an active, ongoing attack, but the general rule is take it offline immediately.
The next step is to limit access to the machine. No one who does not absolutely need access to the evidence should have it. Hard drives should be locked in a safe or secure cabinet. Analysis should be done in a room with limited access.
You must also be able to document every person who had access to the evidence, how they interacted with it, and where the evidence was stored. There must be no period of time that you cannot account for the evidence. This is called chain of custody.
FBI Forensics Guidelines
Beyond the general guidelines just discussed, the FBI gives some specific guidelines. In most cases, they will overlap with the earlier discussion, but covering the FBI recommendations is still useful to do.
If an incident occurs, the FBI recommends that the first responder preserve the state of the computer at the time of the incident by making a backup copy of any logs, damaged or altered files, and, of course, any files left by the intruder. This last part is critical. Hackers frequently use various tools and might leave traces of their presence. Furthermore, the FBI warns that if the incident is in progress, activate any auditing or recording software you might have available. Collect as much data about the incident as you can. In other words, this might be a case where you do not take the machine offline, but rather analyze the attack in progress.
Another important step is to document the specific losses suffered due to the attack. Losses typically include the following:
![]() Labor cost spent in response and recovery. (Multiply the number of participating staff by their hourly rates.)
Labor cost spent in response and recovery. (Multiply the number of participating staff by their hourly rates.)
![]() If equipment was damaged, the cost of that equipment.
If equipment was damaged, the cost of that equipment.
![]() If data was lost or stolen, what was the value of that data? How much did it cost to obtain that data and how much will it cost to reconstruct it?
If data was lost or stolen, what was the value of that data? How much did it cost to obtain that data and how much will it cost to reconstruct it?
![]() Any lost revenue, including losses due to downtime, having to give customers credit due to inconvenience, or any other way in which revenue was lost.
Any lost revenue, including losses due to downtime, having to give customers credit due to inconvenience, or any other way in which revenue was lost.
Documenting the exact damages due to the attack is just as important as documenting the attack itself.
The FBI computer forensic guidelines stress the importance of securing any evidence. The FBI also stresses that you should not limit your concept of computer evidence to PCs and laptops. Computer evidence can include the following:
![]() Logs (system, router, chat room, IDS, firewall, and so on)
Logs (system, router, chat room, IDS, firewall, and so on)
![]() Portable storage devices (USB drives, external drives, and so on)
Portable storage devices (USB drives, external drives, and so on)
![]() E-mails
E-mails
![]() Devices capable of storing data such as iPod, iPad, tablets
Devices capable of storing data such as iPod, iPad, tablets
![]() Cell phones
Cell phones
The FBI guidelines also stress making a forensic copy of the suspect drive/partition to work with and creating a hash of that drive.
Finding Evidence on the PC
After you have secured the evidence and made a forensic copy, it is time to start looking for evidence. That evidence can come in many forms.
In the Browser
The browser can be a source of both direct evidence and circumstantial or supporting evidence. Obviously in cases of child pornography, the browser might contain direct evidence of the specific crime. You might also find direct evidence in the case of cyberstalking. However, if you suspect someone of creating a virus that infected a network, you would probably only find indirect evidence such as the person having searched virus creation/programming-related topics.
Even if the person erases his browsing history, retrieving it is still possible. Windows stores a lot of information in a file called index.dat (information such as web addresses, search queries, and recently opened files). You can download a number of tools from the Internet that enable you to retrieve and review the index.dat file. Here are a few:
![]() www.eusing.com/Window_Washer/Index_dat.htm
www.eusing.com/Window_Washer/Index_dat.htm
![]() www.acesoft.net/index.dat%20viewer/index.dat_viewer.htm
www.acesoft.net/index.dat%20viewer/index.dat_viewer.htm
![]() http://download.cnet.com/Index-dat-Analyzer/3000-2144_4-10564321.html
http://download.cnet.com/Index-dat-Analyzer/3000-2144_4-10564321.html
In System Logs
Regardless of what operating system you are using, the operating system has logs. Those logs can be critical in any forensic investigation and you should retrieve them.
Windows Logs
Let’s start with Windows XP/Vista/7. With all of these versions of Windows, you find the logs by clicking on the Start button in the lower-left corner of the desktop and then clicking the Control Panel. You then click on Administrative Tools and the Event Viewer. Here are the logs you would check for. (Note that not all appear in every version of Windows.)
FYI: Logging
![]() Security log: This is probably the most important log from a forensics point of view. It has both successful and unsuccessful login events.
Security log: This is probably the most important log from a forensics point of view. It has both successful and unsuccessful login events.
![]() Application log: This log contains various events logged by applications or programs. Many applications record their errors in the application log.
Application log: This log contains various events logged by applications or programs. Many applications record their errors in the application log.
![]() System log: This log contains events logged by Windows system components. This includes events such as driver failures. This particular log is not as interesting from a forensics perspective as the other logs are.
System log: This log contains events logged by Windows system components. This includes events such as driver failures. This particular log is not as interesting from a forensics perspective as the other logs are.
![]() Forwarded Events log: This log is used to store events collected from remote computers. This will only have data in it if event forwarding has been configured.
Forwarded Events log: This log is used to store events collected from remote computers. This will only have data in it if event forwarding has been configured.
![]() Applications and Services logs: This log is used to store events from a single application or component rather than events that might have systemwide impact.
Applications and Services logs: This log is used to store events from a single application or component rather than events that might have systemwide impact.
Windows servers have similar logs. However, with Windows systems you have an additional possible concern. The possibility exists that the attacker cleared the logs before leaving the system. Tools are available that will allow one to wipe out a log, such as auditpol.exe. Using auditpol_\ipaddress_/disable turns off logging. Then when the criminal exits he can use auditpol_\ipaddress_/enable to turn it back on. Tools such as WinZapper also allow one to selectively remove certain items from event logs in Windows. Simply turning off logging before an attack and turning it back on afterward is also possible.
Linux Logs
Obviously, Linux also has logs you can check. Depending on your Linux distribution and what services you have running on it (such as MySQL), some of these logs might not be present on a particular machine:
![]() /var/log/faillog: This log file contains failed user logins. This can be very important when tracking attempts to crack into the system.
/var/log/faillog: This log file contains failed user logins. This can be very important when tracking attempts to crack into the system.
![]() /var/log/kern.log: This log file is used for messages from the operating system’s kernel. This is not likely to be pertinent to most computer crime investigations.
/var/log/kern.log: This log file is used for messages from the operating system’s kernel. This is not likely to be pertinent to most computer crime investigations.
![]() /var/log/lpr.log: This is the printer log and can give you a record of any items that have been printed from this machine. That can be useful in corporate espionage cases.
/var/log/lpr.log: This is the printer log and can give you a record of any items that have been printed from this machine. That can be useful in corporate espionage cases.
![]() /var/log/mail.*: This is the mail server log and can be very useful in any computer crime investigation. E-mails can be a component in any computer crime, and even in some noncomputer crimes such as fraud.
/var/log/mail.*: This is the mail server log and can be very useful in any computer crime investigation. E-mails can be a component in any computer crime, and even in some noncomputer crimes such as fraud.
![]() /var/log/mysql.*: This log records activities related to the MySQL database server and will usually be of less interest to a computer crime investigation.
/var/log/mysql.*: This log records activities related to the MySQL database server and will usually be of less interest to a computer crime investigation.
![]() /var/log/apache2/*: If this machine is running the Apache web server, then this log will show related activity. This can be very useful in tracking attempts to hack into the web server.
/var/log/apache2/*: If this machine is running the Apache web server, then this log will show related activity. This can be very useful in tracking attempts to hack into the web server.
![]() /var/log/lighttpd/*: If this machine is running the Lighttpd web server, then this log will show related activity. This can be very useful in tracking attempts to hack into the web server.
/var/log/lighttpd/*: If this machine is running the Lighttpd web server, then this log will show related activity. This can be very useful in tracking attempts to hack into the web server.
![]() /var/log/apport.log: This records application crashes. Sometimes these can reveal attempts to compromise the system or the presence of a virus or spyware.
/var/log/apport.log: This records application crashes. Sometimes these can reveal attempts to compromise the system or the presence of a virus or spyware.
![]() /var/log/user.log: These contain user activity logs and can be very important to a criminal investigation.
/var/log/user.log: These contain user activity logs and can be very important to a criminal investigation.
Getting Back Deleted Files
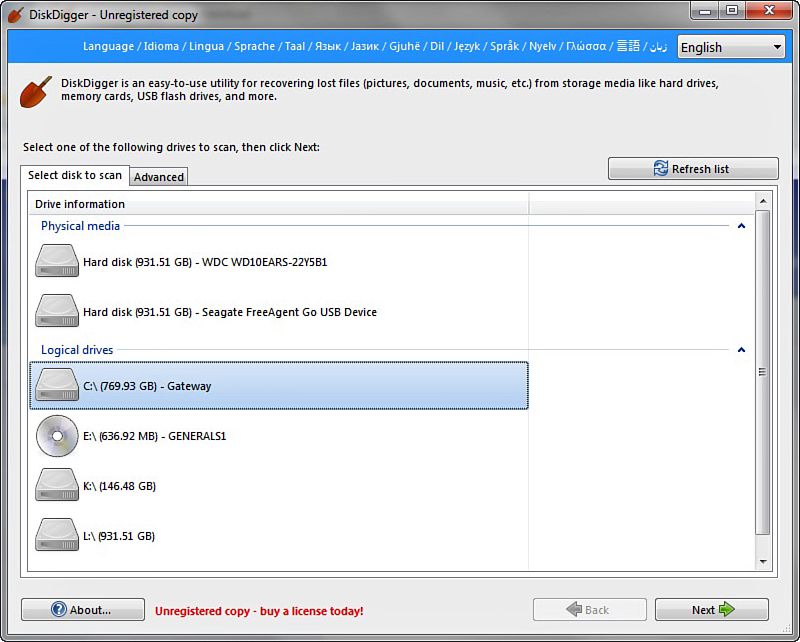
Criminals frequently attempt to destroy evidence, and this is also true with computer crimes. The criminals might delete files. However, you can use a variety of tools to recover such files, particularly in Windows. Disk Digger is a free tool that can be used to recover Windows files. This tool is very easy to use. More robust tools are available, but the fact that this is free and easy to use makes it perfect for students learning forensics. Let’s walk through its basic operation.
On its first screen, shown in Figure 16.1, you simply select the drive/partition you want to recover files from.
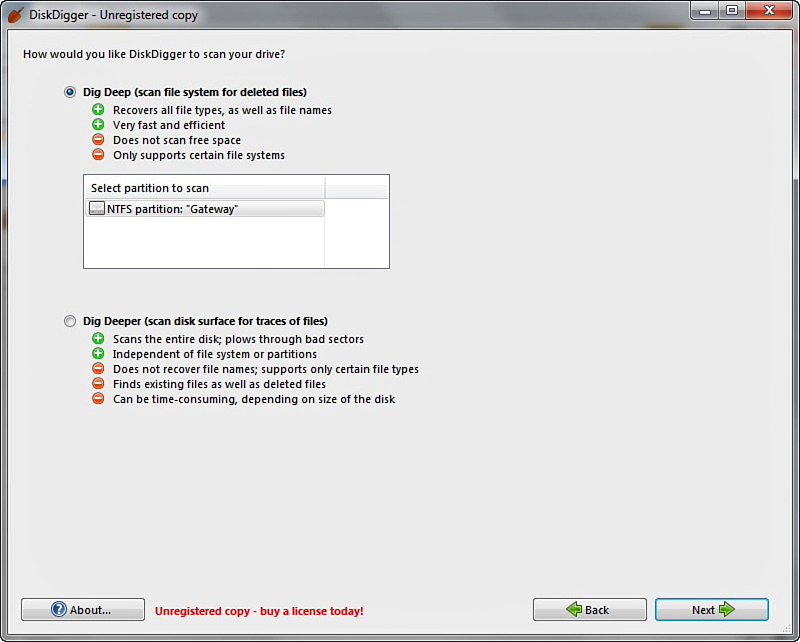
On the next screen you select the level of scan you want to do, as shown in Figure 16.2. Obviously the deeper the scan the longer it can take.
You then get a list of the files that were recovered, as shown in Figure 16.3.
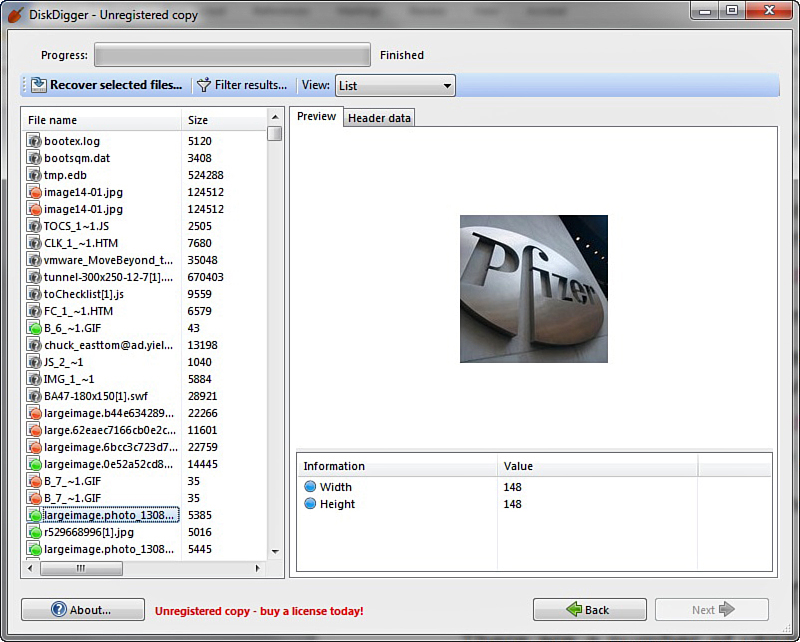
You can see the file and the file header. You can also choose to recover the file if you want. The possibility exists that Disk Digger will only recover a file fragment, but that can be enough for forensics.
Operating System Utilities
A number of utilities are built into the operating system that can be useful in gathering some forensic data. Given that Windows is the most commonly used operating system, we will focus on those utilities that work from the Windows command line. However, one of the key requirements when conducting forensics work is to be very familiar with the target operating system. You should also note that many of these commands are most useful on a live running system to catch attacks in progress.
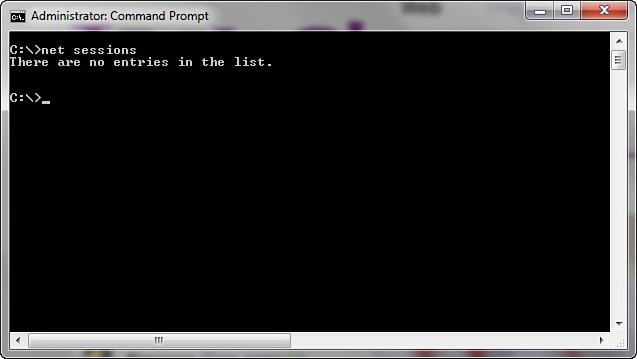
Net Sessions
The net sessions command lists any active sessions connected to the computer you run it on. This can be very important if you think an attack is live and ongoing. If there are no active sessions, the utility will report that, as shown in Figure 16.4.
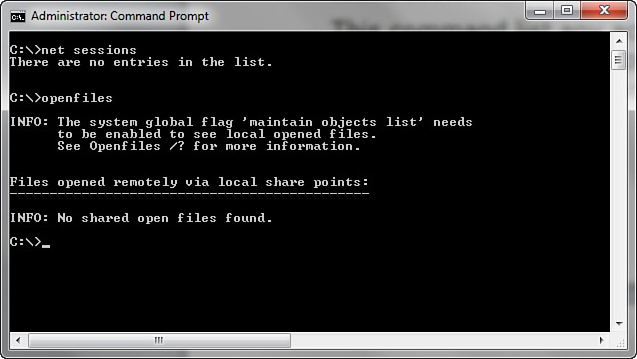
Openfiles
Openfiles is another command useful for finding live attacks ongoing. This command lists any shared files that are currently open. You can see this utility in Figure 16.5.
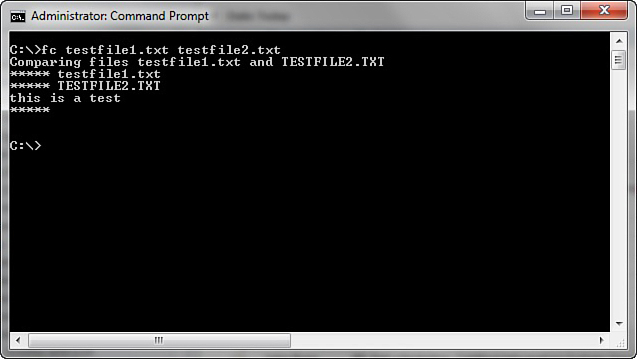
Fc
Fc is a command you can use with a forensic copy of a machine. It compares two files and shows the differences. If you think a configuration file has been altered you can compare it to a known good backup. You can see this utility in Figure 16.6.
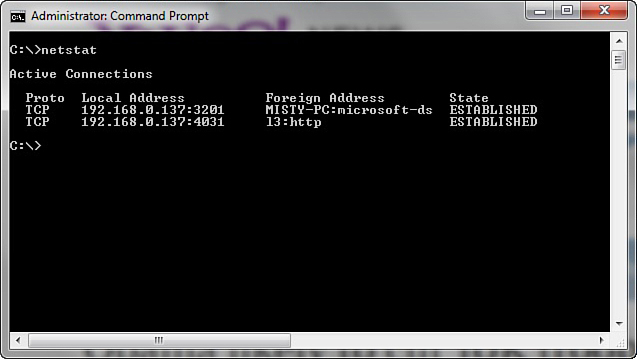
Netstat
The netstat command is also used to detect ongoing attacks. It lists all current network connections, not just inbound, but outbound as well. You can see this utility in Figure 16.7.
The Windows Registry
The Windows Registry is an incredible repository of potential valuable forensics information. It is the heart of the Windows machine. You can find a number of interesting pieces of data here. It is beyond the scope of this chapter to make you an expert in the Windows Registry, but it is hoped that you will continue on and learn more. One important thing you can find, from a forensics perspective, is any USB devices that have been connected to the machine.
The Registry key HKEY_LOCAL_MACHINESystemControlSetEnumUBSTOR lists USB devices that have been connected to the machine. It is often the case that a criminal will move evidence to an external device and take it with them. This could indicate that there are devices you need to find and examine.
Gathering Evidence from a Cell Phone
In our modern times, cell phones are ubiquitous. As common as they are, it should be no surprise that cell phones might play a role in some computer crimes. As discussed in previous chapters, there are even some crimes that are primarily executed via cell phones. Sending pornographic images via cell phone is one such crime. Securing data from a suspect’s cell phone in any criminal investigation is often a good idea. Some of the kinds of data that might be retrieved and examined during a cell phone forensic investigation, include:
![]() Photos
Photos
![]() Videos
Videos
![]() Text messages or SMS messages
Text messages or SMS messages
![]() Call times, dialed and received calls, and call durations
Call times, dialed and received calls, and call durations
![]() Contact names and phone numbers
Contact names and phone numbers
Obviously photos, videos, and text messages could contain evidence of a crime. However, contact information can be valuable as well. You learned in the first few chapters of this book that criminals frequently work in concert. A contact list can help you track down other perpetrators.
Although dealing with the details of every model of cell phone is beyond the scope of this book, you should be aware of a few general forensics rules:
![]() Always document the cell phone make, model, and any details regarding its condition.
Always document the cell phone make, model, and any details regarding its condition.
![]() Photograph the initial screen of the phone.
Photograph the initial screen of the phone.
![]() The SIM card will be the location of most of what you need to find.
The SIM card will be the location of most of what you need to find.
Many software packages are available for getting information from a SIM card. Most of the major forensics tools such as Access Data Forensics Tool Kit and Guidance Software Encase include phone forensics tools.
Forensic Tools to Use
There are many forensic tools to choose from, but some are more widely used than others. In this section we will discuss tools that are widely used.
Access Data Forensic ToolKit
AccessData1 introduced FTK (Forensic Tool Kit) is a very popular computer forensics tool. It is able to deliver analysis, decryption, and password cracking all within an intuitive, customizable, and user-friendly interface. Two very important features of this tool are its ability to analyze the Windows Registry and its ability to crack passwords. The Windows Registry is where Windows stores all information regarding any programs installed. This includes viruses, worms, Trojan horses, hidden programs, and spyware. The ability to effectively and efficiently scan the registry for evidence is critical. The ability to break passwords for common applications is important. Evidence might be stored in a password-protected Adobe PDF, Excel spreadsheet, or other application. The AccessData FTK can crack passwords from more than 100 commonly used applications.
Another feature about this toolkit is its distributed processing ability. Scanning an entire hard drive, searching the registry, and doing a complete forensic analysis of a computer can be a very time-intensive task. With AccessData’s Forensic Tool Kit that processing and analysis can be distributed on up to three computers. This lets all three computers process the analysis in tandem, thus significantly speeding up the forensics process.
FTK is also available for the Macintosh. Many commercial products are only available for Windows, and the open source community usually focuses on Unix and Linux, so the Macintosh compatibility is very important. In addition to that, FTK has an Explicit Image Detection add-on that automatically detects pornographic images, useful in cases involving allegations of child pornography.
The Sleuth Kit
The Sleuth Kit is a collection of command-line tools that are available as a free download. You can get them from this site, http://www.sleuthkit.org/sleuthkit/, as well as others. This toolset is not as feature rich nor as easy to use as Encase, but can be a good option for a budget-conscious agency. The most obvious of the utilities included is ffind.exe.
There are options to search for a given file or to search for only deleted versions of a file. This particular utility is best used when you know the specific file you are searching for. It is not a good option for a general search. A number of utilities available in Sleuth Kit; however, many readers might find using command-line utilities to be cumbersome. Fortunately, a GUI has been created for Sleuth Kit named Autopsy: http://www.sleuthkit.org/autopsy/download.php.
Disk Investigator
Disk Investigator is a free utility that comes as a graphic user interface for use with Windows operating systems. You can download it from http://www.theabsolute.net/sware/dskinv.html. It is not a full-featured product like Encase, but it is remarkably easy to use. When you first launch the utility it presents you with a cluster-by-cluster view of your hard drive in hexadecimal.
Under the View menu you can view directories or the root. The Tools menu allows you to search for a specific file or to recover deleted files.
One could write an entire book just about the various forensic utilities available on the Internet. Spending some time searching the Internet and experimenting with various utilities is a good idea for any investigator. Depending on your own skill set, technical background, and preferences, one utility might be more suitable than another. It is also recommended that after you select a tool to use, scan the Internet for articles about that tool. Make certain that it has widespread acceptance and no known issues exist with its use. Using more than one tool to search a hard drive can also sometimes be beneficial. If multiple tools yield the same result this can preempt any objections the opposing attorneys or their expert might attempt to present at trial. Remember as always to document every single step of your investigation process.
Summary
This chapter covered the basics of computer forensics. The most important things you have learned are to first make a forensics copy to work with, and second, to document everything. You simply cannot overdocument an incident. You have also learned how to retrieve browser information and recover deleted files, as well as some commands that might be useful forensically. Finally, you learned the forensics value of the Windows Registry.
Test Your Skills
Multiple Choice Questions
1. In a computer forensics investigation, what describes the route that evidence takes from the time you find it until the case is closed or goes to court?
A. Rules of evidence
B. Law of probability
C. Chain of custody
D. Policy of separation
2. Where does Linux store e-mail server logs?
A. /var/log/mail.*
B. /etc/log/mail.*
C. /mail/log/mail.*
D. /server/log/mail.*
3. Why should you note all cable connections for a computer you want to seize as evidence?
A. To know what outside connections existed
B. In case other devices were connected
C. To know what peripheral devices exist
D. To know what hardware existed
4. What is in the Index.dat file?
A. Internet Explorer information
B. General Internet history, file browsing history, and so on for a Windows machine
C. All web history for Firefox
D. General Internet history, file browsing history, and so on for a Linux machine
5. What is the name of the standard Linux command that is also available as Windows application that can be used to create bitstream images and make a forensic copy?
A. mcopy
B. image
C. MD5
D. dd
6. When cataloging digital evidence, the primary goal is to do what?
A. Make bitstream images of all hard drives
B. Preserve evidence integrity
C. Not remove the evidence from the scene
D. Not allow the computer to be turned off
7. The command openfiles shows what?
A. Any files that are opened
B. Any shared files that are opened
C. Any system files that are opened
D. Any files open with ADS
8. “Interesting data” is what?
A. Data relevant to your investigation
B. Pornography
C. Documents, spreadsheets, and databases
D. Schematics or other economic-based information
9. Which of the following are important to the investigator regarding logging?
A. The logging methods
B. Log retention
C. Location of stored logs
D. All of the above
Download Disk Digger and search your computer for deleted files. Attempt to recover one file of your choice.
Exercise 14.2: Making a Forensic Copy
This exercise requires two computers. You must also download either Backtrack or Knoppix (both are free), and then attempt to make a forensic copy of computer A by sending its data to computer B.