
Hour 15. Loaders, CursorLoaders, and CustomAdapters
What You’ll Learn in This Hour
![]() Learning how loaders work
Learning how loaders work
![]() Seeing what loader classes are available
Seeing what loader classes are available
![]() Initializing, creating, and resetting a loader
Initializing, creating, and resetting a loader
![]() Incorporating loaders into the Flickr photo app
Incorporating loaders into the Flickr photo app
![]() Creating a
Creating a CustomAdapter
In Hour 14, “Creating a Content Provider,” you created your own ContentProvider. FlickrPhotoProvider provides content about Flickr photos and returns an image file when requested. One reason to develop your own ContentProvider is to take advantage of how well ContentProviders work with CursorLoaders. In this hour, you change the app to take advantage of a CursorLoader(android.content.CursorLoader). CursorLoaders are an implementation of the Loader(android.content.Loader) class.
How Loaders Work
Loaders were introduced in Android 3.0. They are also available in the support library. Loaders help to asynchronously load data in a fragment or activity, something you have been working on since Hour 12. So far, the book has covered downloading data, writing to a SQLite database, and creating a content provider. You’ll use all that work to create and use a CursorLoader in your FlickrPhotoListFragment.
Loaders provide the functionality of a ContentObserver by monitoring the source of their data and providing updates when the data changes. Much of the work that is commonly done in a data-driven app is done in a streamlined way using loaders.
Loaders retain their data after being stopped. That means that if an activity or fragment that uses a loader is stopped, the data in the loader is retained. When the fragment starts again, the data is available and the fragment does not need to wait for the data to reload.
![]()
Loader—A Loader is an abstract class to asynchronously load data.
![]()
AsyncTaskLoader—An AsyncTaskLoader is an abstract class that is a subclass of Loader. It uses an AsyncTask to do the work of loading data.
![]()
CursorLoader—A CursorLoader is a subclass of AsyncTaskLoader. Typically, you’ll use a CursorLoader when implementing a Loader. A CursorLoader queries a ContentResolver and returns a cursor that can be used in the activity or fragment. CursorLoaders and ContentProviders work well together.
![]()
LoaderManager—A LoaderManager is associated with each activity or fragment. There is a single LoaderManager for each activity or fragment, but a LoaderManager can manage more than one loader.
![]()
LoaderManagerCallbacks—LoaderManagerCallbacks is an interface for an activity or fragment to interact with the LoaderManager. A fragment will implement a LoaderCallbacks interface:
public class ImageViewFragment extends Fragment implements
LoaderCallbacks<Cursor>
To implement LoaderManagerCallbacks, you must use the methods onCreateLoader(), onLoadFinished(), and onLoaderReset().
You will use a CursorLoader in your app. The CursorLoader is your loader.
To manage the connection between the loader and a fragment or activity, you use the LoaderManager class. A LoaderManager includes the interface LoaderManager.LoaderCallbacks to communicate between the LoaderManager and the fragment or activity.
Understanding Loader States
You can use loaders in an activity or in a fragment. Loaders must be initialized. In an activity, a loader is initialized in the onCreate() method. In a fragment, a loader is initialized in the onActivityCreated() method. For the rest of the examples, assume that a fragment is using the loader.
After initialization, a loader is created if it does not already exist. If it does exist, it is used immediately. When data is available from a loader, the fragment is notified via the LoaderManager.Callback method onLoadFinished(). If initLoader() is called and data is available, onLoadFinished() is called immediately.
Initializing a Loader
A loader is initialized with a call to the initLoader() method of the LoaderManager. It looks like this:
getLoaderManager().initLoader(LOADER_ID, null, this);
The getLoaderManager() method returns the LoaderManager for the current fragment. LOADER_ID is a unique id integer value that identifies the loader. That is important if more than one loader exists. The id is used to distinguish which loader is being used in the LoaderManager.Callback method onCreateLoader().
The second parameter is a Bundle for passing any optional parameters to the loader constructor. In this case, that parameter is null.
The last parameter is a class that implements LoaderManager.Callbacks. Because you will be implementing LoaderManager.Callbacks in your fragment, you use this to reference your fragment.
Creating a Loader
When the initLoader() method is called, if the loader does not exist, a call to the LoaderManager.Callback's on CreateLoader() method is called. The loader is created using this method.
When creating a CursorLoader, you use the parameters of a query on a ContentProvider. Specifically, as you saw in Hour 14, the query requires a uri, projection, selection, selectionArgs, and sortOrder. The CursorLoader is created using these parameters and is returned in onCreateLoader().
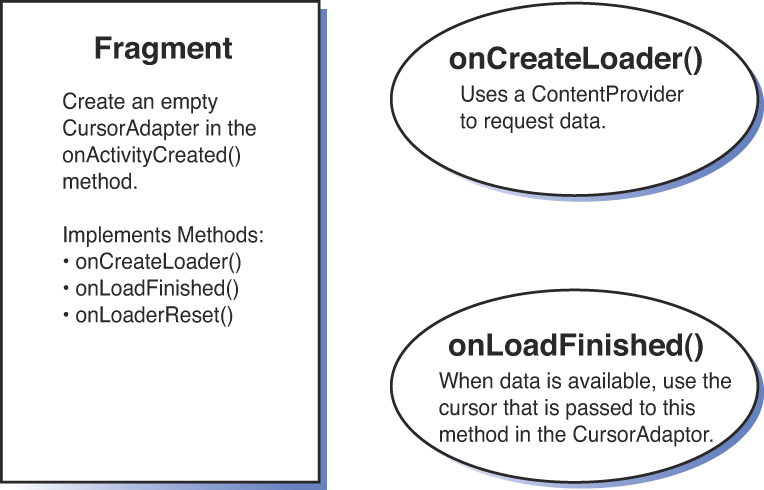
Taking Action When Data Is Available
The LoaderManager.Callback method onLoadFinished() is called when data is available. In the case of CursorLoader implementation, the onLoadFinished() method is passed a Cursor to use.
When working with a CursorAdapter, you use the onLoadFinished() method to swap in new data with a call to the adapter’s swapCursor() method.
Figure 15.1 shows a simplified version of these relationships.

Resetting a Loader
When the application determines that the loader no longer has any associated data, the onLoaderReset() method fires. This is an opportunity to remove any references to the data.
With a CursorLoader, this is the point where the cursor associated with the loader is about to be closed. If more than one cursor is associated with the loader, the onLoaderReset() method fires when the last cursor is about to be closed.
When you’re using a CursorAdapter with a CursorLoader, this is the opportunity to reset the cursor to null with a call to the adapter’s swapCursor() method:
MyAdapter.swapCursor(null);
Using a CursorLoader with a CursorAdapter
Using a CursorLoader with a CursorAdapter is powerful. The CursorAdapter uses the data from the loader to show the data. The CursorLoader keeps the data up to date. As the data changes, the display changes.
In Listings 15.1–15.5, examine the updated PhotoListFragment and learn how CursorLoaders are used.
Listing 15.1 lists the required import statements; the class is defined on lines 9 and 10. The PhotoListFragment extends Fragment and implements LoaderCallbacks.
Line 11 defines a SimpleCursorAdapter named mAdapter. You initialize this cursor adapter by setting the cursor value to null. When data is available in a new cursor, you update mAdapter.
LISTING 15.1 PhotoListFragment Definition
1: package com.bffmedia.hour15app;
2: import android.app.ListFragment;
3: import android.app.LoaderManager.LoaderCallbacks;
4: import android.content.CursorLoader;
5: import android.content.Loader;
6: import android.database.Cursor;
7: import android.os.Bundle;
8: import android.widget.SimpleCursorAdapter;
9: public class PhotoListFragment extends ListFragment implements
10: LoaderCallbacks<Cursor> {
11: SimpleCursorAdapter mAdapter;
Listing 15.2 shows the onActivityCreated() method. Line 4 shows the initLoader() method. The id of this loader is 0. The second parameter is null. That is where a bundle could be used to pass data when creating the loader.
Lines 5–9 define the SimpleCursorAdapter mAdapter. Note that on line 7, the cursor for the adapter is set to null. When data is available, this will be updated.
LISTING 15.2 PhotoListFragment onActivityCreated() Method
1: @Override
2: public void onActivityCreated(Bundle savedInstanceState) {
3: super.onActivityCreated(savedInstanceState);
4: getLoaderManager().initLoader(0, null, this);
5: mAdapter = new SimpleCursorAdapter(getActivity(),
6: android.R.layout.simple_list_item_1,
7: null, //cursor
8: new String[] {"title"},
9: new int[] { android.R.id.text1 }, 0);
10: setListAdapter(mAdapter);
11: }
Listing 15.3 shows the onCreateLoader() method. In line 2, the id of the loader is passed along with a bundle. These values were set with the call to initLoader() in Listing 15.2 on line 4. Because you use only one loader, the id is not important and a bundle is not passed. Lines 3 and 4 define a new CursorLoader based on querying the ContentProviderFlickrPhotoProvider. The new CursorLoader is returned.
LISTING 15.3 PhotoListFragment onCreateLoader() Method
1: @Override
2: public Loader<Cursor> onCreateLoader(int id, Bundle args) {
3: CursorLoader cursorLoader = new CursorLoader(getActivity(),
4: FlickrPhotoProvider.CONTENT_URI, null, null, null, null);
5: return cursorLoader;
6: }
Listing 15.4 shows the onLoadFinished() method. The cursor that is passed to this method is used to update the adapter with a call to swapCursor(). At this point, the data is available in the cursor and is available for display in by setting the adapter. Recall that the originally set value for cursor in the adapter was null. See line 7 of Listing 15.2.
LISTING 15.4 PhotoListFragment onLoadFinished() Method
1: @ @Override
2: public void onLoadFinished(Loader<Cursor> loader, Cursor cursor) {
3: mAdapter.swapCursor(cursor);
4: }
When the loader has no associated data, the onLoaderReset() method is called. Listing 15.5 shows this method. On line 3, a call is made to swapCursor() with null as the parameter.
LISTING 15.5 PhotoListFragment onLoaderReset() Method
1: @Override
2: public void onLoaderReset(Loader<Cursor> loader) {
3: mAdapter.swapCursor(null);
4: }
Listings 15.1–15.5 comprise all the code in the PhotoListFragment. The process to use a CursorLoader to provide data is as follows:
1. Initialize the loader.
2. Create the loader by querying the content provider.
3. Use the data on the fragment when the loader finished.
Figure 15.2 shows a simplified diagram of how a fragment uses a CursorLoader and CursorAdapter.
Using a similar technique as creating a PhotoListFragment, you can create a fragment that displays data in a GridView. By creating a GridView layout as you did in Hour 10, you can populate a new PhotoGridFragment with code that is nearly identical to the PhotoListFragment code.
To create the PhotoGridFragment, you must create a layout, implement the onCreateView() method in the fragment, and set the adapter on the new GridView.
Listing 15.6 shows the definition and onActivityCreated() method for the new class called PhotoGridFragment. Listing 15.6 is nearly identical to Listing 15.2 except a GridView is used.
LISTING 15.6 PhotoGridFragment onActivityCreated()
1: public class PhotoGridFragment extends Fragment implements
LoaderCallbacks<Cursor> {
2: GridView mGrid;
3: SimpleCursorAdapter mAdapter;
4: @Override
5: public void onActivityCreated(Bundle savedInstanceState) {
6: super.onActivityCreated(savedInstanceState);
7: getLoaderManager().initLoader(0, null, this);
8: mAdapter = new SimpleCursorAdapter(getActivity(),
9: android.R.layout.simple_list_item_1,
10: null,
11: new String[] {"title"},
12: new int[] { android.R.id.text1 }, 0);
13: mGrid.setAdapter(mAdapter);
14: }
Listing 15.7 shows the onCreateView() method for the PhotoGridFragment.
The CursorLoader methods onCreateLoader(), onLoadFinished(), and onLoaderReset() for the PhotoGridFragment are identical to those in the PhotoListFragment in Listings 15.3–15.5.
LISTING 15.7 PhotoGridFragment onCreateView()
1: public View onCreateView(LayoutInflater inflater, ViewGroup container,
2: Bundle savedInstanceState) {
3: mGrid = (GridView) inflater.inflate(R.layout.grid_fragment, container,
false);
4: return mGrid;
5: }
Using your knowledge of the action bar, you can use two tabs in the example app: one to show the PhotoListFragment and the other to show the PhotoGridFragment. Figure 15.3 shows the two views side by side.

Creating Custom Adapters
You have used SimpleCursorAdapters in this hour. In Hour 10, you used an ArrayAdapter to create fragments that displayed data in lists, grids, and galleries. To create robust apps, custom adapters are often used.
The following sections show you how to create a simple custom adapter, by extending the BaseAdapter to perform the same function as the ArrayAdapter. In the next hour, you will create a custom cursor adapter to use in the Flickr photo app.
Using BaseAdapter
To use a BaseAdapter(android.widget.BaseAdapter), you must implement four methods: getCount(), getItem(), getItemId(), and getView(). With a BaseAdapter, you work with a set of items. In the case of the simple PieAdapter, the set is a string array with the names of pies. The getCount() method provides the number of items. The other methods work with a single item to provide the item, the item id, and a view for the item. By creating the view you desire, you can customize how the item displays.
Listing 15.8 is a simple version of a BaseAdapter that illustrates these methods.
The Hour15AppCustomAdapter project contains the source code that accompanies this hour. The custom adapter work is done in SimpleListFragment.java.
LISTING 15.8 Extending BaseAdapter
1: public class PieAdapter extends BaseAdapter {
2: Context mContext;
3: String mPies[];
4: LayoutInflater mInflater;
5: public PieAdapter(Context c, String[] pies) {
6: mContext = c;
7: mPies = pies;
8: mInflater = (LayoutInflater) mContext.getSystemService
9: (Context.LAYOUT_INFLATER_SERVICE);
10: }
11: public int getCount() {
12: return mPies.length;
13: }
14: public Object getItem(int position) {
15: return mPies[position];
16: }
17: public long getItemId(int position) {
18: return position;
19: }
20: public View getView(int position, View convertView, ViewGroup parent) {
21: View view = mInflater.inflate(R.layout.list_item, null);
22: TextView textView = (TextView) view.findViewById(R.id.pieTextView);
23: textView.setText(mPies[position]);
24: return view;
25: }
26: }
The PieAdapter in Listing 16.1 uses a string array as the set of items. The getCount() method of line 11 uses the length of the array to determine the number of available items. The getItem() and getItemId() methods are both passed the position in the list that can be used. For getItem(), position is used to get the item in that position in the array. For getItemId(), position itself is used as the id.
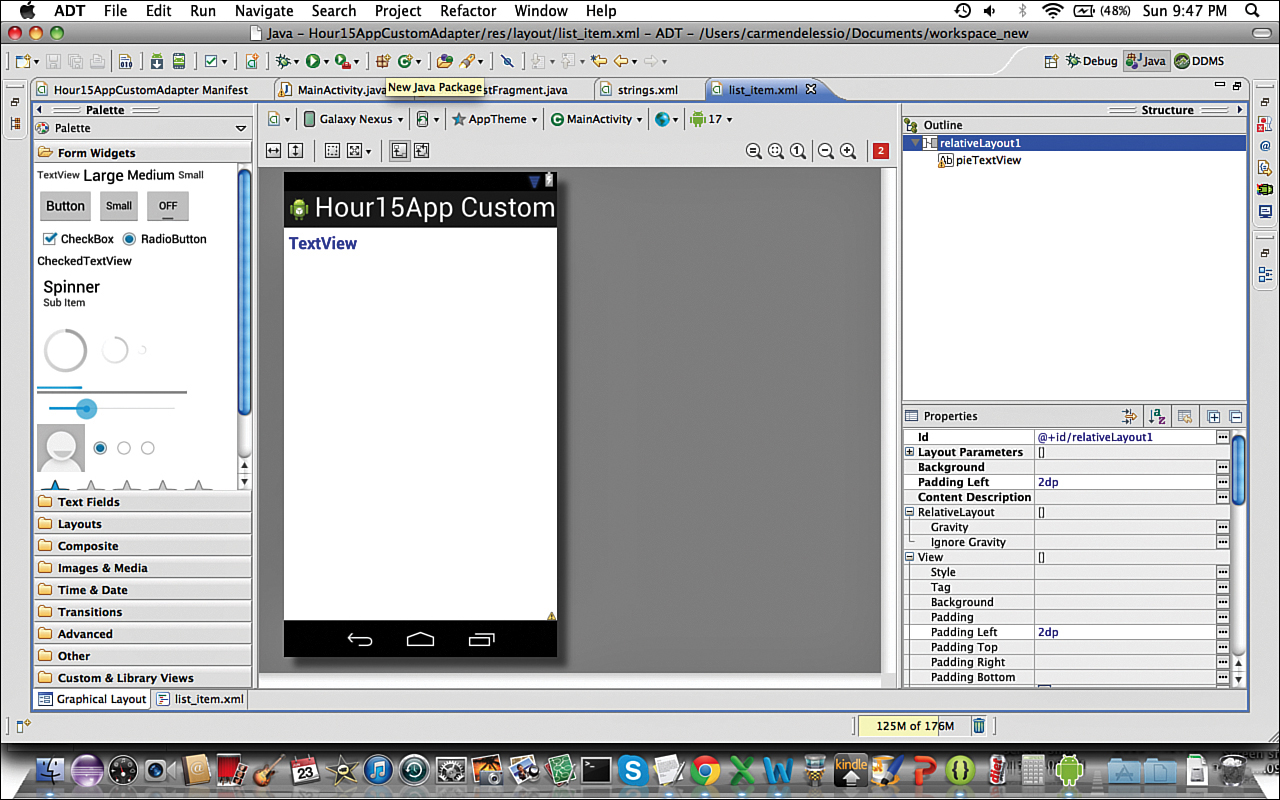
In the getView() method on lines 20 and 21, a View is inflated with the layout defined by R.id.list_item. That XML layout contains a RelativeLayout that holds a TextView with the id pieTextView. On line 22, you use findViewById() to get the TextView, and on line 23, you set the text of the TextView with the string value from the mPies array. The Viewview is returned.
To use the PieAdapter in the onActivityCreated() method in a ListFragment, you would instantiate the PieAdapter and set the list adapter as follows:
PieAdapter adapter = new PieAdapter(getActivity(), mPies);
setListAdapter(adapter);
Figure 15.4 shows the list_item.xml layout in the visual editor in Eclipse. The TextView uses large, bold, blue text. Figure 15.5 shows the resulting app with the names of the pies shown in a list.

Introducing the View Holder Pattern
Implementing a BaseAdapter like the PieAdapter of Listing 15.8 is fairly straightforward. You have a set of items and the BaseAdapter is the mechanism for tying the data in those items to a particular view.
There is a way to make a BaseAdapter more efficient. You can implement the view holder pattern with the PieAdapter. Doing so can also help you understand how Android deals with views when they are used in a list.
Android reuses views that have been shown in the list. In line 20 of Listing 15.8, the getView() method is passed a View named convertView. If convertView is not null, then it is being reused. You can use it directly. The expensive operations in Android are creating a new View and finding the view by id. Avoiding those operations can make your adapter more efficient. The pattern to implement this technique is known as the view holder pattern.
Listing 15.9 shows the changes to the getView() method to implement the view holder pattern.
Lines 15–17 define a new class called ViewHolder that contains a field of type TextView. To avoid inflating views, you can reuse the ViewHolder class.
The logic for reuse begins on line 3. Remember that convertView may be null or it may contain a View that can be reused. Line 3 checks to see whether it is null.
If convertView is null, you need to create a new View. Line 4 creates a new View by inflating the XML layout. The inflated View is assigned to convertView. On line 5, you create a new ViewHolder, and on line 6, you use findViewById() to assign the textView field within viewHolder.
Line 7 takes the View convertView and associates it to the viewHolder via the setTag() method. Using setTag() is powerful. It allows you to associate any object with a view. In this case, the View convertView uses setTag() to create a reference to viewHolder and hence the textView field with viewHolder.
Continuing this case where convertView is null, after setting the tag on line 7, the text value for textView is set on line 11 and the convertView is returned on line 12.
If the getView() method runs and convertView is not null, then the embedded ViewHolder object is retrieving using a call to getTag() on line 9. The retrieved viewHolder that was previously attached to the View with setTag(). Because you have a ViewHolder object, you have a TextView that you can use. Lines 11 and 12 perform the same functions whether the viewHolder was just created or retrieved from the convertView.
LISTING 15.9 Using the View Holder Pattern
1: public View getView(int position, View convertView, ViewGroup parent) {
2: ViewHolder viewHolder;
3: if (convertView == null) {
4: convertView = mInflater.inflate(R.layout.list_item, null);
5: viewHolder = new ViewHolder();
6: viewHolder.textView = (TextView) convertView.findViewById(R.
id.pieTextView);
7: convertView.setTag(viewHolder);
8: } else {
9: viewHolder = (ViewHolder) convertView.getTag();
10: }
11: viewHolder.textView.setText(mPies[position]);
12: return convertView;
13: }
14: }
15:
16: private static class ViewHolder {
17: public TextView textView;
18: }
Introducing Custom Cursor Adapters
A CursorAdapter uses data from a Cursor to populate a View. You have used a SimpleCursorAdapter to show data from a Cursor in both a grid and a list. See Listing 15.2 for an example.
To create a custom CursorAdapter, you must implement two methods: newView() and bindView(). In the newView() method, a new view is defined and returned. In the bindView() method, the data from cursor is used in the View.
Hour 16 covers this topic in detail.
GO TO ![]() HOUR 16, “DEVELOPING A COMPLETE APP,” to see how to create and use a custom cursor adapter.
HOUR 16, “DEVELOPING A COMPLETE APP,” to see how to create and use a custom cursor adapter.
Summary
This hour covered loaders at a conceptual level, and you implemented two examples using a CursorLoader. To accomplish this, you used the FlickrPhotoProvider content provider that you developed in Hour 14. You saw how a CursorLoader and CursorAdapter can work together in fragments that implemented LoaderManager.LoaderCallbacks. You also created a custom adapter by extending BaseAdapter.
Q&A
Q. How do onCreateLoader() and onLoadFinished() work together?
A. The onCreateLoader() method requests data using a content provider and returns a CursorLoader. The onLoadFinished() method fires when the data from the content provider is available, so the onCreateLoader() creates the CursorLoader and the onLoadFinished() uses the data.
Q. What is the advantage of using a CursorAdapter with loaders?
A. A CursorAdapter maps data from a cursor to the user interface. Because onLoadFinished() returns a cursor, you can use a CursorAdapter in the onLoadFinished() method to display the data that is available from the loader. The CursorAdapter is created in the onActivityCreated() method, and in the onLoadFinished() method, a new Cursor is swapped in.
Q. What is the relationship between an AsyncTaskLoader and a CursorLoader?
A. A CursorLoader is a subclass of AsyncTaskLoader. AsyncTaskLoader is a subclass of Loader.
Q. Can loaders be used on Android 2.x devices?
A. Loaders were introduced in Android 3.0 (HoneyComb), but they are available via the support library for older versions of Android.
Workshop
Quiz
1. What methods would typically call an adapter’s swapCursor() method?
2. What method fires when data is available?
3. What is the first parameter of the initLoader() method and why is it important?
Answers
1. The onLoadFinished() and onLoaderReset() methods use swapCursor.
2. onLoadFinished() fires when data is available.
3. The first parameter to initLoader() is an id. It is important because it identifies the loader if more than one loader exists in the fragment or activity. It is passed to the LoaderManager.Callbacks methods.
Exercise
Implement a gallery view to show titles. Base it on the PhotoGridFragment class. Review Hour 10 for the implementation of a fragment that displays data in a gallery view. The exercise requires implementing a CursorLoader with a fragment that uses a gallery.