
Hour 16. Developing a Complete App
What You’ll Learn in This Hour
![]() Creating a custom adapter
Creating a custom adapter
![]() Loading images in a list
Loading images in a list
This book covers many aspects of developing an Android app. In the past four hours, you learned about retrieving remote data, using ContentProviders, Cursors, and CursorLoaders. In this hour, you create a complete app that takes advantage of these features. You’ll continue to use the Flickr photo app in this hour. To create a full and robust app, you learn to create a custom CursorAdapter for displaying items in a list and grid. You also learn how to efficiently load remote images into a list or grid.
Determining App Functionality
One design concept in regard to creating an app is that it should do one thing and do it well.
For this hour, you must first decide what the app will do. Deciding what the app does and what features to keep in and which features to take out might be the most important decisions made in any app project.
Starting with Flickr Photos
You’ve worked with Flickr photos in an earlier hour, so that is a good place to start. You know how to get a set of recently posted photos and how to save and display these photos. You also know how to store and retrieve data about these photos. You can apply this knowledge to incorporating various features in a potential app.
For an app that shows lots of publicly available Flickr photos, enabling the user of the app to designate some photos as favorites seems like a reasonable idea. Favorite photos would be easy to retrieve and view.
At some point, users would probably want to get rid of photos that they don’t care about, so you need a way to delete all photos that are not favorites.
The goal is to make a simple, yet complete and functional app. The Hour16App project contains the source code that accompanies this hour.
An inventory of the proposed functionality for the app would include the following:
![]() Display recent photos from Flickr
Display recent photos from Flickr
![]() Pick some photos as favorites
Pick some photos as favorites
![]() View favorite photos
View favorite photos
![]() Delete non-favorites
Delete non-favorites
You know how to do most of these things. To make a complete app, you must address creating custom cursor adapters and consider how to display many images in a list.
Consider giving the user choices on how to display the data. You can offer a ListView and a GridView. You must decide on navigation. How will the user indicate that he or she wants to see favorite photos? How do you show an individual photo? Does a dialog window make sense? How should you indicate a favorite?
This chapter helps you consider your app’s functionality and shows how to create a simple wireframe for the app as well as discusses what decisions make can help keep the app simple. One of the goals is to make an application that you can use as a starting point for your own apps.
Creating a Wireframe for the App
Figures 16.1 and 16.2 show four simple wireframe diagrams used to describe the app. Wireframes help when considering the layout and data required for an app.
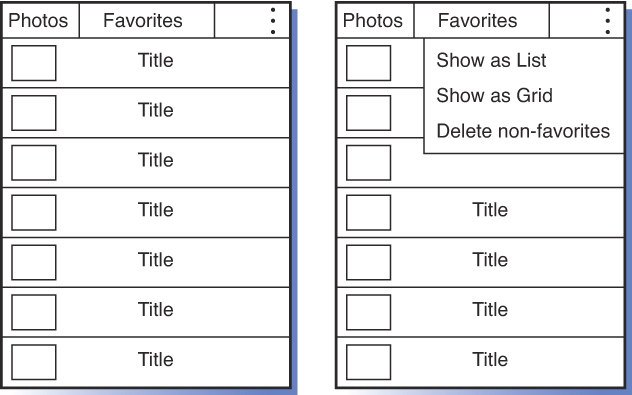
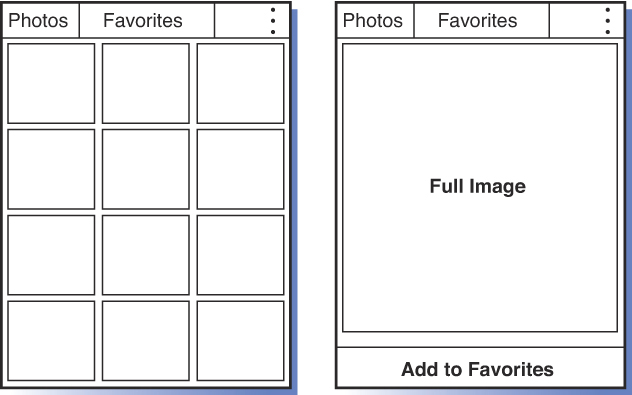
Figure 16.1 shows the app displaying a list of images and an action bar with two tabs and an overflow menu indicator. The second image in Figure 16.1 shows the overflow menu expanded with the choices to “Show as List,” “Show as Grid,” and “Delete non-favorites.”
Figure 16.2 shows the app with images displayed in a grid. The second image in Figure 16.2 shows a single image being displayed. It also shows an option to “Add to Favorites.”
These simple wireframes can help you plan the app and take inventory of what is required for implementation. You have already created a FlickrPhoto object and included a field to indicate that a photo was a favorite. You know how to retrieve and save FlickrPhoto data. As you begin to turn what you’ve learned into an app, the wireframe will help with planning.
The Android developer site includes a design section at http://developer.android.com/design/index.html. You can find an active professional Android designer group on Google+ at https://plus.google.com/communities/113499773637471211070. The blog for the company opoloo is amazing. In particular, check out the raw material and process for designing a complete app found in this post: http://blog.opoloo.com/articles/redesigning-the-topgear-app.
Planning the App: Taking Inventory
The wireframes are helpful in determining the visual and layout needs for the app. With them, you can see that you need to create the following:
![]() ActionBar with two tabs and an overflow menu
ActionBar with two tabs and an overflow menu
![]() Overflow menu on action bar with three choices
Overflow menu on action bar with three choices
![]() Activity, for swapping in fragments
Activity, for swapping in fragments
![]() List fragment to show photos and titles
List fragment to show photos and titles
![]() Grid fragment to show photos in a grid
Grid fragment to show photos in a grid
![]() Detail fragment to show a single photo
Detail fragment to show a single photo
You can leverage your work from previous hours by using a:
![]()
FlickrPhoto object to describe Flickr photo data
![]()
DatabaseAdapter, the database for Flickr photos
![]()
ContentProvider to provide the ability to get photo data and images for use in the app
You need several more things to create this app. So far in this book, you have used SimpleCursorAdapters to display data in lists or grids. For this app, you must develop two simple custom cursor adapters, one for the list and one for the grid. The list shows the title and the image. The grid shows just the image.
To create a custom cursor adapter, you tie the FlickrPhoto data from the app to a specific layout that you create; in this case, two layouts to go with the two adapters. So, to complete the app inventory, you need a:
![]() List adapter to tie the FlickrPhoto title and image to the layout
List adapter to tie the FlickrPhoto title and image to the layout
![]() List item layout for showing one FlickrPhoto in a list
List item layout for showing one FlickrPhoto in a list
![]() Grid adapter to tie the FlickrPhoto image to the layout
Grid adapter to tie the FlickrPhoto image to the layout
![]() Grid item layout for showing one FlickrPhoto in a grid
Grid item layout for showing one FlickrPhoto in a grid
Developing the App
A key part of the app is how the data for a FlickrPhoto object appears in the list, so you need to continue with the development of the ListCursorAdapter. For example, you must create the navigation including the action bar, handle showing all photos and just favorites, create a detail page to show one photo and make it a favorite, and delete all non-favorite photos.
Using a Custom CursorAdapter
To create a custom CursorAdapter, you implement the newView() and bindView() methods. The newView() method defines and returns a new View. In the bindView() method, the data from cursor is used in the View.
The app will display FlickrPhoto data, so you use the Cursors and CursorLoaders as you did in Hour 15.
Listing 16.1 shows the newView() method for the ListCursorAdapter class that you will create and use in this app. Line 3 creates a LayoutInflater. Line 5 uses the LayoutInflater to inflate a layout from the XML layout file R.layout.list_item. That layout file contains a RelativeLayout with an ImageView and a TextView. The view holder concept (see the next section) is in use here. Each time the newView() method is called, a ListViewHolder class is instantiated to hold the ImageView and TextView that the layout contains. You tie the ListViewHolder to the view using setTag().
LISTING 16.1 CursorAdapter newView()
1: @Override
2: public View newView(Context context, Cursor cursor, ViewGroup parent) {
3: LayoutInflater li = (LayoutInflater) mContext.getSystemService(
4: Context.LAYOUT_INFLATER_SERVICE);
5: View v = li.inflate(R.layout.list_item, parent, false);
6: ListViewHolder viewHolder = new ListViewHolder();
7: viewHolder.photoImageView = (ImageView) v.findViewById(R.
id.photoImageView);
8: viewHolder.titleTextView = (TextView) v.findViewById(R.id.titleTextView);
9: v.setTag(viewHolder);
10: return (v);
11: }
To complete this CursorAdapter, you must implement the bindView() method.
Implementing BindView for ListCursorAdapter
The basics of using the bindView() method are fairly straightforward—you tie the data from a cursor with a view to display.
Efficiently displaying images can be a challenge. In the ListCursorAdapter, you show an image for each FlickrPhoto. You must consider how to do it without hindering performance. A particular challenge when retrieving data in the background is tying the retrieved image to a particular ImageView in the list. This process is sometimes called lazy loading.
If a user flings the list, then updating individual list items does not make sense. Updating items that are not in view can be a painfully slow experience for the user. In the bindView(), you will not update items if the user flings the list. The occurrence of the fling is determined by a gesture that occurs on the ListView or GridView.
Basic Implementation of bindView()
The basic implementation of bindView() is simple. The bindView() method is passed a View, a Context, and a Cursor. You use data from the Cursor to populate the View:
public void bindView(View v, Context context, Cursor c) {
You can use the method getPhotoFromCursor() to get a FlickrPhoto object from the passed Cursor:
FlickrPhoto currentPhoto = FlickrPhotoDbAdapter.getPhotoFromCursor(c);
The View that is created in the newView() method is passed. In this case, the View is a RelativeLayout that includes a TextView and an ImageView. So, you could use that view to display the title for currentPhoto:
TextView titleTextView = (TextView) v.findViewById(R.id.titleTextView);
titleTextView.setText(currentPhoto.title);
Full Implementation of bindView()
The full implementation of bindView() contains references to flinging the list and to lazy-loading images. The bindView() method is the core functionality that ties cursor data to the View. After you see how that is done, you learn how to address performance and image loading.
Listing 16.2 shows the entire bindView() method. Because a ListViewHolder is added as a tag to the View in the newView() method, you know that you can retrieve that ListViewHolder using getTag(), which occurs in line 3.
LISTING 16.2 CursorAdapter bindView() BaseAdapter
1: @Override
2: public void bindView(View v, Context context, Cursor c) {
3: ListViewHolder vh = (ListViewHolder) v.getTag();
4: FlickrPhoto currentPhoto = FlickrPhotoDbAdapter.getPhotoFromCursor(c);
5: vh.titleTextView.setText(currentPhoto.title);
6: if (!flinging){
7: vh.photoImageView.setImageResource(R.drawable.imageholder);
8: vh.id = currentPhoto.id;
9: v.setTag(vh);
10: vh.photoImageView.setTag(currentPhoto.id);
11: LoadBitmapTask task = new LoadBitmapTask(mContext, mViewGroup, currentPhoto);
12: task.execute();
13: }else{
14: vh.photoImageView.setImageResource(R.drawable.imageholder);
15: }
16: }
A cursor is available, and it is used in line 4 to obtain a FlickrPhoto object that you can use in the View. On line 5, you set the title of the photo.
Line 6 makes a check to see whether the user is flinging the list where the data is being presented. You see how to detect that next, but for now you want to know what to do when the list is being flung and when it is not. If it is not, you populate the ImageView on the list page with a resource called R.drawable.imageholder, a placeholder image that contains a light gray square. When the user is flinging the list, you do not want to display anything and, more importantly, you do not want to grab a remote image for a view that is not in the current display. Getting images for views that are not displayed can be painfully slow for the user, who is looking at his or her phone waiting for image 250 to appear, and the app is downloading images 40 through 250. The better idea is to jump to image 250, retrieve it, and display it.
Lines 7–12 show what happens in the case where the list is not being flung: The ImageView is temporarily set to the placeholder image.
Lines 8–10 do several things. The ListViewHolder contains data as well as Views. On line 8, you set the id value of the ListViewHolder to the id of the currentPhoto, which enables you to associate a view in the list with a particular FlickrPhoto object. You can take advantage of the fact that you have the FlickrPhoto object when someone clicks on the view. The data from the object is immediately available to act on.
Line 10 associates the id of the photo with the ImageView. You use that information when lazy-loading to display an image in the ImageView.
Lines 11 and 12 kick off an AsyncTask that retrieves and displays the image.
Later, this hour looks at loading images in more detail. Images should be cached for efficiency. You’ll use the simple technique of caching to disk. More complex techniques can be used to improve efficiency.
Tip: Consider Picasso
Picasso is an open source library from the company Square. Picasso makes loading images easy. In Hour 23, you use Picasso to load images in an app that uses a number of open source projects. To learn more about Picasso, see http://square.github.io/picasso/.
Detecting Flinging
In Listing 16.2, a check of the variable flinging determines what to display. You set the variable with a getter and setter in the ListCursorAdapter class:
public Boolean getFlinging() {
return flinging;
}
public void setFlinging(Boolean flinging) {
this.flinging = flinging;
}
The state of flinging is detected in the ListFragment. Both ListView and a GridView have a method called setOnScrollListener(). By using an onScrollListener, you can detect the states of the ListView including whether flinging is occurring.
Listing 16.3 shows how to use the OnScrollListener within a ListFragment. Scrolling is associated with the ListView within the ListFragment, so on line 1, you get the ListView using getListView(). The method setOnScrollListener() is called.
When creating an OnScrollListener(), you must implement two methods. The OnScroll() method and onScrollStateChanged() methods are required. The work to detect flinging is contained in the onScrollStateChanged() method.
The parameter scrollState indicates the status of scrolling. The three possible states indicated by constants in the OnScrollListener class are the following:
![]()
SCROLL_STATE_IDLE: The view is not scrolling.
![]()
SCROLL_STATE_TOUCH_SCROLL: The user is touching the screen to scroll.
![]()
SCROLL_STATE_FLING: The user has performed a fling.
The logic for detecting flinging and setting the value for flinging in the ListCursorAdapter is to set flinging to true when the state is SCROLL_STATE_FLING. When the state is SCROLL_STATE_IDLE, you make a check to see whether flinging is true. If it is, then the View was flinging and has now come to a stop. That is when you set flinging to false. You also tell the adapter to update the ListView by calling notifyDataSetChanged().
Listing 16.3 shows the fling status set in lines 19–22. Lines 9–15 handle the idle status.
LISTING 16.3 Detecting Flinging in a ListFragment
1: getListView().setOnScrollListener(new OnScrollListener() {
2: @Override
3: public void onScroll(AbsListView view, int firstVisibleItem,
4: int visibleItemCount, int totalItemCount) {
5: }
6: @Override
7: public void onScrollStateChanged(AbsListView view, int scrollState) {
8: switch (scrollState) {
9: case OnScrollListener.SCROLL_STATE_IDLE:
10: if (mAdapter!=null){
11: if (mAdapter.getFlinging()){
12: mAdapter.setFlinging(false);
13: mAdapter.notifyDataSetChanged();
14: }
15: }
16: break;
17: case OnScrollListener.SCROLL_STATE_TOUCH_SCROLL:
18: break;
19: case OnScrollListener.SCROLL_STATE_FLING:
20: if (mAdapter!=null)
21: mAdapter.setFlinging(true);
22: break;
23: }
24: }
25: });
Loading Images
You have seen the bindView() method in action and seen how to detect flinging in a ListView. The bindView() method also handles associating images with the ImageView in the item layout. This is done with a call to the AsyncTask LoadBitmapTask:
LoadBitmapTask task = new LoadBitmapTask(mContext, mViewGroup, currentPhoto);
task.execute();
Recall that you add the id of the FlickrPhoto as a tag to the ImageView. See line 10 of Listing 16.2:
vh.photoImageView.setTag(currentPhoto.id);
You use that tag within the LoadBitmapTask to ensure that the proper ImageView is updated.
Three parameters are passed to the LoadBitmapTask. They are the current context, the current ViewGroup, and the current FlickrPhoto object. The ViewGroup, in the case of the ListCursorAdapter, is the ListView.
The constructor for ListCursorAdapter is passed a ViewGroup:
public ListCursorAdapter(Context context, Cursor c, int flags, ViewGroup viewGroup)
{
super(context, c, flags);
mContext = context;
mViewGroup = viewGroup;
}
The ListView associated with the ListFragment is passed to the ListCursorAdapter constructor as the ViewGroup:
mAdapter = new ListCursorAdapter(getActivity(), null,0, getListView());
So, you have the ListView as the ViewGroup and ImageViews within the ListView that are tagged with the id of the associated FlickrPhoto.
Using that information, you can find the ImageView within the ListView that is associated with a particular FlickrPhoto via the findViewWithTag() method:
ImageView imageViewByTag = (ImageView) mViewGroup.findViewWithTag(mPhoto.id);
Given the FlickrPhoto and the ViewGroup, the LoadBitmapTask:
![]() Retrieves the image for the photo in the
Retrieves the image for the photo in the doInBackground() method
![]() Displays the retrieved image in the
Displays the retrieved image in the ImageView in the on PostExecute() method
Listing 16.4 shows both the doInBackground() and onPostExecute() methods.
LISTING 16.4 Displaying a Retrieved Image in an ImageView
1: // Decode image in background.
2: @Override
3: protected Object doInBackground(Object... params) {
4: InputStream is;
5: try {
6: is = mContext.getContentResolver().openInputStream(Uri.withAppendedPath
7: (FlickrPhotoProvider.CONTENT_URI ,mPhoto.id));
8: Bitmap bitmap = BitmapFactory.decodeStream(is);
9: return(bitmap);
10: } catch (FileNotFoundException e) {
11: mContext.getContentResolver().registerContentObserver
12: (Uri.withAppendedPath(FlickrPhotoProvider.CONTENT_URI ,mPhoto.id),
13: false,
14: new PhotoContentObserver(mContext, mViewGroup, mHandler, mPhoto.id));
15: return null;
16: }
17: }
18: @Override
19: protected void onPostExecute(Object bitmap) {
20: if ( bitmap != null) {
21: ImageView imageViewByTag = (ImageView)
22: mViewGroup.findViewWithTag(mPhoto.id);
23: if (imageViewByTag != null) {
24: imageViewByTag.setImageBitmap((Bitmap) bitmap);
25: }
26: }
27: }
Handling onClick() for the ListFragment
Listing 16.2 shows the id of the FlickrPhoto tied to the current View by using the setTag() method. The variable vh.id is the ViewHolder id field and the variable v is the View to display within the list:
vh.id = currentPhoto.id;
v.setTag(vh);
By making this association in the bindView() method, you have access to the ViewHolder when someone clicks on an item in the ListView. You can retrieve the ViewHolder by using the getTag() method.
Listing 16.5 shows the onListItemClick() method. This method is passed the View that was clicked. That View contains a tag with a ViewHolder object. Using that ViewHolder object, you obtain the id of the FlickrPhoto associated with this View. That id is passed to the ImageViewFragment and is used to display the full image.
LISTING 16.5 Handling onListItemClick()
1: @Override
2: public void onListItemClick(ListView l, View v, int position, long id) {
3: ListViewHolder vh = (ListViewHolder) v.getTag();
4: ImageViewFragment flickrImageFragment = new ImageViewFragment();
5: Bundle args = new Bundle();
6: args.putString("PHOTO_ID", vh.id);
7: flickrImageFragment.setArguments(args);
8: FragmentTransaction ft = getActivity().getFragmentManager().
beginTransaction();
9: ft.replace(R.id.layout_container, flickrImageFragment);
10: ft.addToBackStack("Image");
11: ft.commit();
12: }
Summarizing bindView()
The bindView() method of a CursorAdapter ties data from a cursor to a specific View. Serving as the hub between data and display, this method is tied to several other areas within the app. In the primary function of tying data to display, data is populated into a View that was created by inflating an item layout file. The data from the passed cursor is displayed in that View.
In the bindView() method, you associate the id of a photo with both an ImageView and the entire item view that will displayed within a ListView. The data for the ImageView is used to support the lazy-loading of images. The data for the item view is used to handle a click on the View.
The state of the ListView indicates whether to handle flinging within the bindView() method.
Creating the Photo and Favorite Photo Fragments
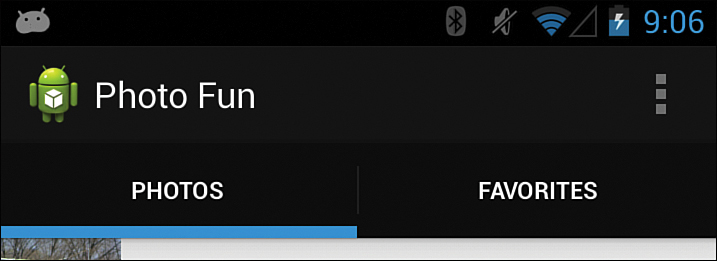
The wireframe diagram shown earlier in Figure 16.1 shows tabs for “Photos” and “Favorites” within the action bar for the app. You will create the action bar and add tabs in the onCreate() method of the activity. Listing 16.6 shows the tab definition. This creates the tabs in the action bar, as shown in Figure 16.3.
LISTING 16.6 ActionBar Tabs for Photos and Favorites
1: @ActionBar actionBar = getActionBar();
2: actionBar.setNavigationMode(ActionBar.NAVIGATION_MODE_TABS);
3: mPhotosTab= actionBar.newTab().setText("Photos").setTabListener(new
NavTabListener());
4: actionBar.addTab(mPhotosTab);
5: mFavoritesTab= actionBar.newTab().setText("Favorites")
6: .setTabListener(new NavTabListener());
7: actionBar.addTab(mFavoritesTab);
You set up the navigation in the NavTabListener class.
How you display FlickrPhotos is identical whether the user displays all photos or just favorites. The difference is in the data to display. That means you can create a single ListFragment that displays either all photos or favorite photos based on a value passed in arguments to the fragment.
In this case, you can use a Boolean called all to pass to the ListFragment. When all is true, all photos display, and when all is false, only favorites display. In the activity, you can use a method called showList() to show the ListFragment. If the user selects the Photos tab, the call to showList() will be showList(true) to indicate to display all photos. Listing 16.7 contains the showList() method.
LISTING 16.7 Method to Show ListFragment with Arguments
1: public void showList(Boolean all){
2: Bundle args = new Bundle();
3: if (all){
4: args.putBoolean("ALL", true);
5: }else{
6: args.putBoolean("ALL", false);
7: }
8: PhotoListFragment photoListFragment = new PhotoListFragment();
9: photoListFragment.setArguments(args);
10: FragmentTransaction ft = getFragmentManager().beginTransaction();
11: ft.replace(R.id.layout_container, photoListFragment);
12: ft.setTransition(FragmentTransaction.TRANSIT_FRAGMENT_FADE);
13: ft.commit();
14: }
As you can see from Listing 16.7, the PhotoListFragment will be passed a Bundle that contains a boolean variable indicating whether to show all photos or favorites.
The PhotoListFragment class implements LoaderCallbacks and uses Cursors and Loaders as you have done previously. Recall that both the initLoader() method and the onCreateLoader() method take a bundle as a parameter. In this case, you pass the bundle that was received by the fragment and that contains the boolean for whether to show all photos.
The initLoader() is passed the bundle:
Bundle b = this.getArguments();
getLoaderManager().initLoader(0, b, this);
Listing 16.8 shows the onCreateLoader() method that determines whether to show all photos or just favorites. Looking at lines 9–10 and lines 14–15, you can see that the only difference between showing all photos and favorites is how the cursorLoader is defined. By using the FlickrPhotoProvider ContentProvider in this way, you can display different data in an easy way. A clean separation exists between the data retrieval and the presentation. (This is a common concept of separating data access from the presentation of the data—Content Providers make that separation clear.)
LISTING 16.8 Showing All Photos or Favorites in onCreateLoader()
1: @Override
2: public Loader<Cursor> onCreateLoader(int id, Bundle args) {
3: boolean showAll = true;
4: CursorLoader cursorLoader;
5: if (args!=null){
6: showAll = args.getBoolean("ALL", true);
7: }
8: if (showAll){
9: cursorLoader = new CursorLoader(getActivity(),
10: FlickrPhotoProvider.CONTENT_URI,
11: null, null, null, null);
12: }else{
13: cursorLoader = new CursorLoader(getActivity(),
14: FlickrPhotoProvider.CONTENT_URI,
15: null, "isFavorite=1", null, null);
16: }
17: return cursorLoader;
19: }
Showing Data in a List or Grid
You now know how to display data in a ListFragment and how to implement bindView().
Per the wireframe diagrams in Figures 16.1 and 16.2, you should also implement a GridView. The options for whether to show a grid or a list appear in the overflow menu in the action bar. As you know, to create the menu, you must:
![]() Create the menu resource XML file
Create the menu resource XML file
![]() Implement the
Implement the onCreateOptionsMenu() method
![]() Implement the
Implement the onOptionsItemSelected() method
These actions result in the overflow menu shown in Figure 16.4.
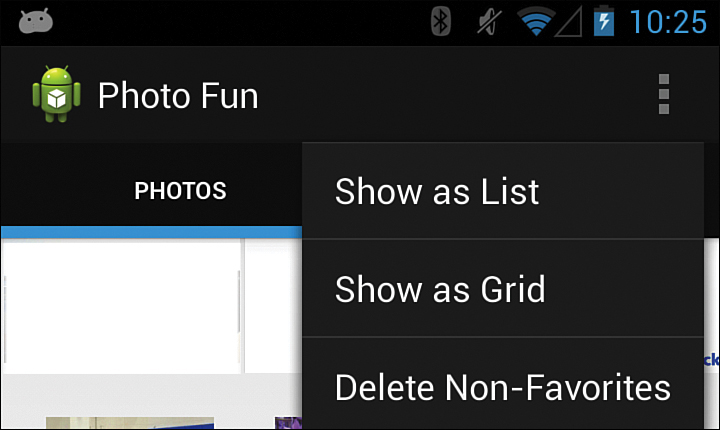
At a high level, when the user selects either Show as List or Show as Grid from the overflow menu, a check occurs on the selected tab on the action bar and either the list or grid is shown.
This code nipped shows the case to handle the list option being selected. The showList() method is called with true and false to indicate whether to display all photos or just favorites:
case R.id.menu_show_as_list:
showList=true;
if (getActionBar().getSelectedTab() == mPhotosTab){
showList(true);
}else{
showList(false);
}
You use showList() to show the ListFragment and a method called showGrid() to show a fragment called PhotoGridFragment. PhotoGridFragment uses the same logic as PhotoListFragment, but displays the data in a GridView instead of a ListView.
If you recall, to develop the PhotoListFragment, you:
![]() Create an XML layout for an item in the list called
Create an XML layout for an item in the list called list_item.xml
![]() Create a custom
Create a custom CursorAdapter called ListCursorAdapter
![]() Implement
Implement PhotoListFragment with a LoaderCallback
![]() Handle the
Handle the onScrollListener in PhotoListFragment
![]() Implement the
Implement the onListItemClick() method in PhotoListFragment
As you saw beginning in Hour 10, many similarities exist when creating a ListFragment and a fragment that implements a GridView. One difference is that the fragment that implements a GridView must implement an onCreateView() method. Another difference is that, rather than implementing the ListFragment’s onListItemClick() method, in a fragment with a GridView, you must implement the setOnItemClickListener() of the GridView. Though it may be challenging, the pieces are in place to implement the GridView fragment described in the following Try It Yourself.
Figure 16.5 shows the app showing the same data in both a list and a grid.

Displaying the Selected Image
When the user selects an image, whether from a list or a grid, you want to display that single image. To do that, you use a fragment called ImageViewFragment and pass a single photo id to the fragment.
Even though you are getting a single item, you can take advantage of your content provider and even the LoaderCallbacks to handle this case.
In the onCreateLoader() method, you use the single photo id that was passed to the fragment. The cursor loader is created with the FlickPhotoProvider content provider. The method Uri.withAppendedPath() is used to append the id of the selected photo to FlickrPhotoProvider.CONTENT_URI. That means that a single FlickrPhoto object will be returned:
@Override
public Loader<Cursor> onCreateLoader(int id, Bundle args) {
if (args!=null){
mPhotoId=args.getString("PHOTO_ID");
CursorLoader cursorLoader = new CursorLoader(getActivity(),
Uri.withAppendedPath(FlickrPhotoProvider.CONTENT_URI ,mPhotoId),
null, null, null, null);
return cursorLoader;
}
return null;
}
In the onLoadFinished() method, you can retrieve the single FlickrPhoto object from the cursor. At that point, you have the information that you need to display it. You can also determine whether it is a favorite or not.
Figure 16.6 shows the display of a single image.
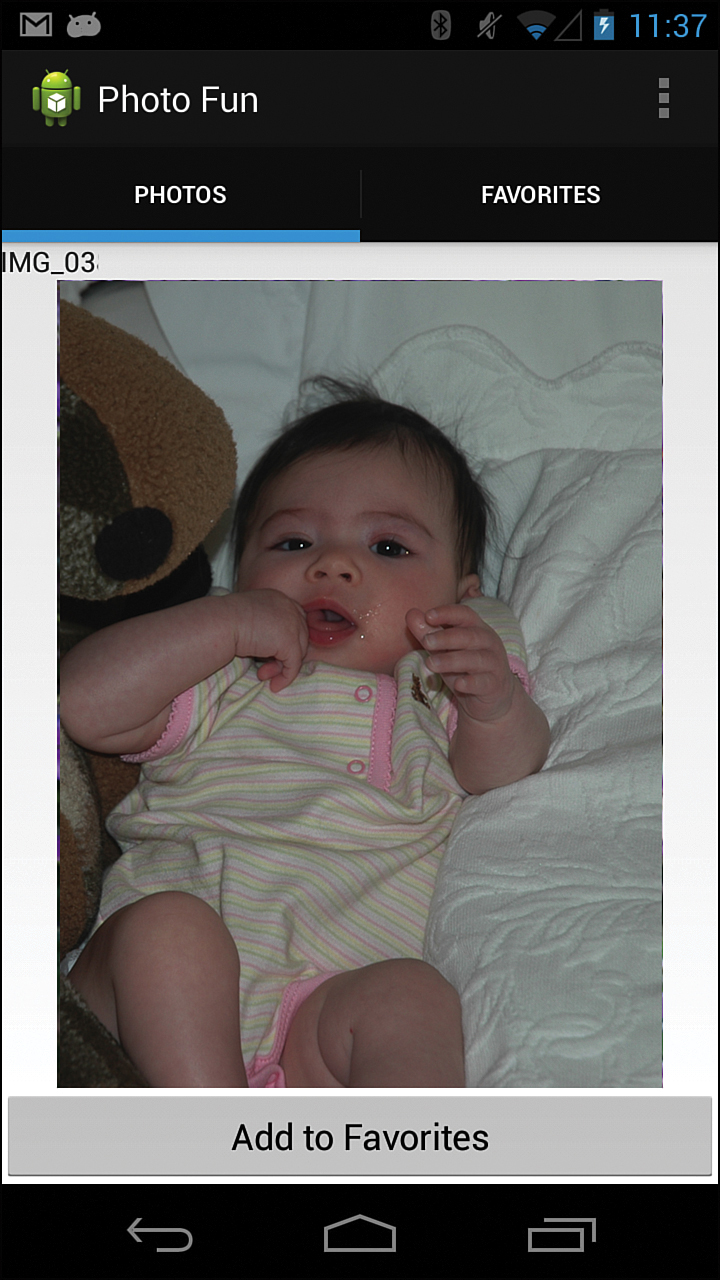
Handling Favorites
You’ve learned how to list favorite images, but not how to create them. Looking back at Figure 16.2, the wireframe indicates that you show a single image and have an option to make that image a favorite. Figure 16.5 shows this option implemented.
In the onLoadFinished() method in ImageViewFragment, you can obtain a FlickrPhoto object from the cursor. Using that, you check the isFavorite value to determine whether the photo is a favorite or not. The display updates to reflect that quality:
mCurrentPhoto = FlickrPhotoDbAdapter.getPhotoFromCursor(cursor);
if (mCurrentPhoto.isFavorite){
mFavoriteButton.setText("Remove from Favorites");
}else{
mFavoriteButton.setText("Add to Favorites");
}
When the favorite button is clicked, the values for the current FlickrPhoto object update in the database. Recall that you do this by setting ContentValues and calling the update method of the ContentProvider. Listing 16.9 shows a portion of the code to accomplish this. For a FlickrPhoto that is already a favorite, you set the value for isFavorite set to 0. To make a photo a favorite, you set the value of isFavorite to 1. The button label is also updated.
LISTING 16.9 Setting Favorites in ImageViewFragment
1: if (mCurrentPhoto.isFavorite){
2: newValues.put("isFavorite", 0);
3: mFavoriteButton.setText("Add to Favorites");
4: }else{
5: newValues.put("isFavorite", 1);
6: mFavoriteButton.setText("Remove from Favorites");
7: }
8: int id = getActivity().getContentResolver().update(
9: FlickrPhotoProvider.CONTENT_URI,
10: newValues, "flickr_id='"+mCurrentPhoto.id+"'", null);
The menu option to delete all non-favorites also uses the content provider. To select all non-favorites and delete them, you use the following:
getContentResolver().delete( FlickrPhotoProvider.CONTENT_URI, "isFavorite='0'",
null );
Final App Inventory
With the app complete, taking an inventory of what you created to support an app of this scope makes sense. Consolidating some functionality might have been possible, but this seems fairly typical. You used the following:
![]() 1 activity:
1 activity: MainActivity
![]() 3 fragments:
3 fragments: PhotoGridFragment, PhotoListFragment, and ImageFragment
![]() 2 adapters:
2 adapters: GridAdapter and ListAdapter to work with their respective fragments
![]() 2 layouts for items:
2 layouts for items: list_item.xml and grid_item.xml
![]() 1
1 AsyncTask to load images: BitmapLoadTask
![]() 1 data object:
1 data object: FlickrPhoto
![]() 1 database adapter:
1 database adapter: FlickrPhotoDbAdapter
![]() 1 content provider:
1 content provider: FlickrPhotoProvider
![]() 1 menu resource
1 menu resource
![]() 1 layout for the activity
1 layout for the activity
Summary
In this hour, you implemented a full app. In Hour 12, you began to work with data retrieved from the Flickr API. You learned how to retrieve that data, store it in a SQLite database, and use it through a content provider. You created the complete app using cursors and LoaderCallbacks. This hour introduced a custom CursorAdapter, showed how to handle flinging, and showed how to display images in a ListView and GridView. By using content providers, cursors, CursorLoaders, and CursorAdapters, you learned to show the same data in different views.
Q&A
Q. What is the purpose of a CursorAdapter?
A. A CursorAdapter populates a View from data provided in a cursor. It maps the data to specific UI components.
Q. Why are two layout XML files needed to show images in the GridFragment?
A. One defines the GridView for the GridFragment. Another defines the items displayed in the GridView. You can think of one view defining the container and another view defining the contents of the container. The GridView is used for the container. A CursorAdapter maps data from the cursor to the content items within the container.
Workshop
Quiz
1. What methods must a CursorAdapter implement?
2. When you’re implementing a BaseAdapter, how does the view holder pattern improve performance?
Answers
1. A CursorAdapter must implement the methods newView() and bindView().
2. Implementing the view holder pattern in a BaseAdapter avoids the costly methods associated with inflating new views.
Exercise
1. Change the layout for items in the GridView fragment to display include a TextView with the Title displayed.
2. Implement a gallery instead of a GridView to display the set of images. You saw in Hour 10 that you can switch between a gallery and GridView with minor changes to the fragments that are defined. The fragment’s onCreateView() method would need to return a gallery, and other changes would be required throughout the fragment definition.